Chapter 2. SharePoint development practices and techniques
Before you can start building a custom Microsoft SharePoint solution you will have to make sure you set up your development environment correctly. Because the hardware requirements for SharePoint 2013 are again a lot more demanding than they were for SharePoint 2010, setting up a new development environment might well mean that you have to acquire new hardware. There might be quite a bit of time between the moment that you order the hardware, whether from an external vendor or from an internal department, and when you can actually start using the hardware. This means that it’s important to start planning your SharePoint customizations early, so that waiting on the hardware will not interfere with your project planning.
When you have gotten the hardware, you will have to install your development environment. It is important to do this meticulously, to follow best practices and to make sure you document the entire configuration. Documentation is important if you have to create a second environment, or if you have to recreate your development environment.
When your SharePoint environment has been set up properly, you will need proper specifications so that you can start designing your solution. You will have to decide what type of solution will best suit your skills, the environment into which the solution will have to be deployed, and the functionality that you have to create. SharePoint 2013 introduces a new development approach, which means that you can now not only create farm solutions and sandboxes solution, but you can also create SharePoint apps. SharePoint 2013 also introduces a third application programming interface (API) by making Representational State Transfer (REST) APIs available that allow you to use simple HTTP requests and responses to perform CRUD (create, read, update, delete) operations on SharePoint data.
All these additions give you more options, but they also require you to make more choices, and it is important to make deliberate and well-informed choices to make sure that you end up with the best solution that you could possibly build for your specific situation and scenario. This chapter talks you through a lot of the choices and can help you make the right decisions.
Setting up a developer environment
Whenever you are looking at building a custom solution for any platform, one of the things you will have to determine is what environment you will use to build your custom solution. This is no different when you want to create a custom solution for SharePoint. Determining the best way to set up your development environment has always been difficult for SharePoint, and SharePoint 2013 adds even more complexity to it, with extended hardware requirements and two new types of servers.
Let’s start by looking at the different server roles that you can choose from.
Domain controller
Database server
SharePoint server
Web server
Application server
Office Web Apps server
Windows Azure workflow server
Although it is possible to build a development environment by using a standalone server installation of SharePoint on a single server without a domain controller or separate computer that is running Microsoft SQL Server, for practical reasons you will at least need a domain controller, a database server, and a SharePoint server. For certain types of SharePoint apps you might not need a SharePoint development environment, because these apps can be hosted on a generic web server that doesn’t have SharePoint installed on it. However, you should test what your app looks like in a SharePoint environment before you add the app to the production environment, so you should always use some sort of test or development environment.
If your development environment is installed in an existing domain, you don’t have to build your own domain controller; you can simply use an existing one. If you are creating your own domain, you will have to create a domain controller as well. You can create a single server and use that as the domain controller, the database server, and the SharePoint server. Be aware, though, that some things don’t work on a domain controller and some things have to be configured differently. It is important to keep this in mind while developing and testing custom solutions on your development server.
In SharePoint 2010, Microsoft Office Web Apps came in a separate installation that had to be installed on at least one of the SharePoint servers in the farm. After installation, they could be configured as service applications. In SharePoint 2013, this is no longer the case. Office Web Apps is now its own product. Office Web Apps has to be installed in its own separate farm, and it cannot be installed on a server that also has SharePoint installed on it, because Office Web Apps will completely take over the Internet Information Services (IIS) on the server. You can install Office Web Apps on one or more servers and connect the Office Web Apps farm to the SharePoint farm. Having Office Web Apps installed in its own farm on one or more servers means that it is now more scalable. The Office Web Apps farm can be connected to one or more SharePoint farms. This means that one Office Web Apps farm can support the SharePoint servers of several developers.
With SharePoint 2010, you automatically got the SharePoint 2010 workflow host, which was based on Windows Workflow Foundation 3. Windows Workflow Foundation was a native part of SharePoint, but the way in which it was implemented meant that customers who were serious about using workflow in SharePoint almost always ran into issues with scalability. SharePoint 2013 uses a new workflow service, which is built on the Windows Workflow Foundation components of the Microsoft .NET Framework 4.5. The new workflow service is called Workflow Manager and, like Office Web Apps, is a separate installation that should be installed on separate servers. After you have created a Workflow Manager farm consisting of one or more servers, you can connect this farm to your SharePoint 2013 farm. As with Office Web Apps, creating a separate workflow farm means that your environment will be a lot easier to scale out and a lot more suitable for use in a serious workflow solution or a large enterprise. Your old SharePoint 2010 workflows will still work, because SharePoint 2013 automatically installs the SharePoint 2010 workflow engine.
To summarize, if you want to have all SharePoint 2013 functionality available to you in your development environment, you will need at least three servers:
A domain controller/database server/SharePoint server
An Office Web Apps server
A Workflow Manager server
You can, of course, have many more: you could split out your domain controller, database server, and SharePoint server; you could have separate SharePoint web and application servers; and you can have as many Office Web Apps and Workflow Manager servers as you want. How many servers you use will mostly depend on the size of the solution that you are building, the type of functionality that you need, and—let’s face it—your budget.
Deciding between virtual and physical
An important decision that you have to make when you start to think about your development environment is whether you will be using virtual or physical servers. You could choose to install a supported server operating system (we’ll get into more detail on that soon) directly on your computer, either by connecting to an existing domain or turning the computer into a domain controller and installing SQL Server and SharePoint on it. You can no longer install SharePoint on a client operating system such as Windows 7 or Windows 8 as you could with SharePoint 2010. However, unlike Windows 7, Windows 8 does support Hyper-V, which means that you can create your virtual machines in Hyper-V on your Windows 8 computer. The Windows 8 version of Hyper-V is officially called Client Hyper-V.
As long as you only work on a single project, and you only need a single server (so you don’t need Workflow Manager or Office Web Apps), you can run your development environment directly on your computer. However, creating your development environment by using virtual servers is a far more flexible solution. You can either host the virtual servers on your own computer or on a server somewhere in the network, or even in the cloud. With today’s hardware requirements (especially the memory) and considering the fact that you might need more than one server, running your development environment on your computer won’t be a feasible solution for most people, so in a lot of cases development servers are hosted in a network somewhere. If you are using your development environment on a daily basis, it is recommended that you make sure that your servers are hosted somewhere relatively close to you to minimize latency issues and frustrations.
Running the development environment on a virtual server has a few advantages:
Using virtual servers as a development environment means that you can use a different virtual server for each project you’re working on. When a developer works on more than one project, it is better not to have the configuration and custom solutions from these projects in a single environment. Settings or solutions from one project might influence the behavior of the solutions from the second project, which means that you have no way of knowing what is causing problems and you can’t determine how the solution will behave in the production environment.
Another advantage of working with virtual servers is the fact that it’s easy to create snapshots and to go back to them. By using snapshots, the developer can run tests and, depending on the outcome of a test, decide to go back to a snapshot of a previous situation. He can then make some changes to the solution and run the same tests again.
Also, when project work goes on for a long time, environments sometimes get messy from testing different solutions and settings, and going back to a snapshot is a very easy way to clean that up. Using snapshots also means that you can go back to a previous state if a solution that you deployed or a script that you ran messed up your environment.
Using virtual servers to create development environments also makes it easier to set up a new development environment when a new developer is added to the project. Later on in this chapter we will talk in more detail about having a team of developers work on a single project.
In most cases, using virtual servers is also a lot cheaper than using physical servers. If you have a large physical server, you can run several virtual servers on it. This means you can save on hardware costs. Also, if you don’t need all your servers at the same time, they can share the resources, and if you need a new server, you can very quickly set it up, instead of having to order hardware and wait till it arrives.
Understanding hardware and software requirements
As with every SharePoint version, SharePoint 2013 has its own hardware requirements. Table 2-1 shows an overview of the hardware requirements for SharePoint 2013. As you can see, the amount of memory needed to run a SharePoint Server development environment has again increased significantly. There are a couple of things to note:
Single server means that both SharePoint and its databases are running on the same server.
A single server development installation of SharePoint Server 2013 is listed as requiring 24 gigabytes (GB) of RAM. However, the amount of RAM it really needs heavily depends on what services you are running in the environment. For instance, if you are actively using search, you probably need 24 GB, or at least something close to that. However, if you are only using web applications and some of the lighter service applications, you can get away with having a lot less memory.
The storage on the system drive has to be at least 80 GB. It is very important to note that this does not include the storage that is needed to store the databases that contain the content from your SharePoint environment, and it doesn’t include the storage that is needed to store, for instance, the SharePoint logs. Make sure that you have enough storage on your system; storage is cheap, and it’s very annoying to have to go into your development server every day to try and free up some storage so that at least your server will keep running.
Type of installation | RAM | Processor | Storage on system drive |
Single server development installation of SharePoint Foundation 2013 | 8 GB | 64-bit, 4 cores | 80 GB |
Single server development installation of SharePoint Server 2013 | 24 GB | 64-bit, 4 cores | 80 GB |
SharePoint server in a SharePoint Server 2013 development environment | 12 GB | 64-bit, 4 cores | 80 GB |
Database server in a SharePoint 2013 development environment | 8 GB | 64-bit, 4 cores | 80 GB |
SharePoint 2013 also comes with its own software requirements. For a SharePoint 2013 server, the following software is required:
The 64-bit edition of Windows Server 2008 R2 Service Pack 1 (SP1) Standard, Enterprise, or Datacenter or the 64-bit edition of Windows Server 2012 Standard or Datacenter
Hotfix: The SharePoint parsing process crashes in Windows Server 2008 R2 (KB 2554876)
Hotfix: FIX: IIS 7.5 configurations are not updated when you use the ServerManager class to commit configuration changes (KB 2708075)
Hotfix: WCF: process may crash with “System.Net.Sockets.SocketException: An invalid argument was supplied” when under high load (KB 2726478)
The prerequisites installed by the Microsoft SharePoint Products Preparation Tool
Hotfix: ASP.NET (SharePoint) race condition in .NET 4.5 RTM:
Windows Server 2008 R2 SP1 (KB 2759112)
Windows Server 2012 (KB 2765317)
For a database server in a SharePoint 2013 farm, the following software is required:
The 64-bit edition of Microsoft SQL Server 2012, or the 64-bit edition of SQL Server 2008 R2 Service Pack 1
The 64-bit edition of Windows Server 2008 R2 Service Pack 1 (SP1) Standard, Enterprise, or Datacenter or the 64-bit edition of Windows Server 2012 Standard or Datacenter
Hotfix: The SharePoint parsing process crashes in Windows Server 2008 R2 (KB 2554876)
Hotfix: FIX: IIS 7.5 configurations are not updated when you use the ServerManager class to commit configuration changes (KB 2708075)
Hotfix: ASP.NET (SharePoint) race condition in .NET 4.5 RTM:
Windows Server 2008 R2 SP1 (KB 2759112)
Windows Server 2012 (KB 2765317)
.NET Framework version 4.5
When setting up your development environment, you should always aim to make sure that it’s as much like the production environment as possible.
Delivering high-quality solutions
To deliver high-quality solutions it is best for the development environment to be as much like the production environment as possible. Theoretically this is true for all aspects of the environment: hardware, software, configuration, and data. In most cases, however, the hardware of a development environment cannot be the same as the hardware of a production environment. This is fine, as long as you are aware of the differences and what the impact of them might be on your test results.
So that accurate tests can be performed in a development environment, the software should be the same as the software in the production environment. You should use the same version of Windows Server and SharePoint and a similar version of SQL Server. If the production environment has SharePoint Server installed, make sure the development environment doesn’t have SharePoint Foundation installed. If the production server has a Windows service pack installed on it, make sure you install the same service pack in the development environment. It also works the other way around; if the service pack will not be installed in the production environment, do no install it in the development environment either. If one of the environments gets a SharePoint service pack or cumulative update installed on it, make sure all environments get that same service pack or cumulative update installed on them.
The way in which you configure your development server should also be as much like the production environment as possible. The best thing is to try and get access to the build guide for the production environment and use that to set up your development environment.
Examples of settings that are important when configuring your development environment are:
Using the default SQL instance or different instances
The authentication type:
NT LAN Manager (NTLM)
Kerberos
Windows claims
Security Assertion Markup Language (SAML) claims
Using host headers on your web application, or Host Header Site Collections
HTTP or HTTPS
The number of web applications
The way in which the farm, application pool, and services accounts are configured and the level of permissions they have. Make sure you have the same number of managed accounts in your development environment as in the production environment.
In order to get accurate test results, it is also very helpful to have representative sample data and test users. The data will help you perform the same type of actions that a user would. If you are able to load enough sample data into your development environment, it will also help you test the scalability of your solution, at least to a certain extent. Most custom solutions perform very well with only a couple of documents, users, or sites, but when there are tens of thousands it might be a completely different story. Even if you can’t test on the scale of your production environment, you should always keep in mind what numbers your solution will have to cope with after it’s in production. It is always a good idea to at least make sure that you test whether your application will keep working past the list view threshold. The list view threshold is a web application setting that can be adjusted in Central Administration that tells SharePoint how many items can be requested from the database in a single query. The default list view threshold is 5,000.
As a developer, you will usually log in with an account that has administrative permissions. It’s the only way in which you can properly develop custom full trust solutions. Do make sure that you are not logged on as the SharePoint farm account. When you are testing your solution, it is very important to not only test it using your administrative account, but also with accounts that have Read, Contribute, and Site Owner permissions. A lot of custom SharePoint solutions will work fine when run by an administrator, but need more work when a reader or contributor of a site should be able to work with them as well. For instance, the List view threshold (the throttling feature that specifies the maximum number of list or library items that a database operation, such as a query, can process at the same time) will not be applied if you are logging onto your SharePoint environment as a local administrator, which means that you cannot test the behavior of large lists properly.
Automating SharePoint administration by using Windows PowerShell scripts
Windows PowerShell scripts can be used to automate SharePoint installation and management. When you are using Windows PowerShell scripts to install SharePoint, it is easy to repeat the installation in exactly the same way. This is very useful when you have to create multiple development environments or multiple servers in a production environment, or when a farm has to be rebuilt after a system failure. Be aware that not all steps of the installation can be scripted by using Windows PowerShell, so you will still have to make sure that all steps are documented as well.
Using Windows PowerShell to manage SharePoint is very useful for repeatable tasks. When you use a saved script every time, the chances of human errors causing serious problems during maintenance decrease. Windows PowerShell can also be used to fully automate maintenance steps. It would, for example, be possible to create a Windows PowerShell script that creates a new site collection. The next step would be to add a couple of parameters and then automatically start the script. You could, for instance, start the script whenever a new project or customer is added to a Customer Relationship Management (CRM) system.
Though it is often convenient to use Windows PowerShell to install or configure SharePoint, in some cases you don’t have a choice because some functionality doesn’t show up in the user interface and can only be configured by using Windows PowerShell. Examples of this are the multitenancy features. The multitenancy features are a set of features that allow SharePoint to work as a hosting platform. They allow for operational service management of SharePoint for one or more divisions, organizations, or companies. Using the multitenancy features allows SharePoint to separate data, features, administration, customizations, and operations. In order to set up multitenancy in an environment, you have to set up site subscriptions, partitioned service applications, tenant administration sites, and (optionally) host header site collections and feature packs. All these features can only be configured by using Windows PowerShell.
If you need to install development environments on a regular basis—for instance, because you are working on different projects, or because you are working on a long-running project and developers are coming and going—it is worthwhile to create a Windows PowerShell script to install a development environment. Even if you would just use Windows PowerShell to configure SharePoint, this will save you a lot of time. It will also make sure that your development environments are always configured in exactly the same way. In addition to the fact that doing a scripted installation is often faster, this approach also allows you to do work on something else while the script is running.
There are two different tools in which you can write and run Windows PowerShell scripts: the Windows PowerShell console window or the Windows PowerShell Integrated Scripting Environment (ISE). To make the Windows PowerShell ISE available on your server, you need to install the Windows PowerShell Integrated Scripting Environment (ISE) Windows feature. You can do this by opening up the Server Manager, clicking Add Features, and selecting the ISE feature.
If you are using the console environment, you can either use the general console environment or the SharePoint 2013 Management Shell. You can access the general console environment by selecting it from the Windows Start menu. If it’s not on the first page, you can get to it from the Windows Start menu by simply starting to type PowerShell. This will give you the option to select one of the available Windows PowerShell tools and consoles.
Don’t pick the 32-bit version (x86); SharePoint is a 64-bit product. You can also go to the Windows Start menu to select the SharePoint 2013 Management Shell. You can find this in the same way as the general console; go to the Start menu, start typing PowerShell, and select the SharePoint 2013 Management Console.
These are effectively the same environment, except for the fact that in the SharePoint Management Shell the Microsoft.SharePoint.PowerShell snap-in has already been loaded. If you are using the standard console, you will have to load the snap-in yourself, by using the following command:
Add-PSSnapin Microsoft.SharePoint.PowerShell -ErrorAction "SilentlyContinue"
You add the -ErrorAction “SilentlyContinue” mainly because the console will throw an error if the snap-in has already been loaded. You can ignore this, so it will look nicer if you hide the error. You can also play it safe and check to see whether the snap-in is already loaded before attempting to load it, by using the following:
$snap = Get-PSSnapin | Where-Object {$_.Name -eq 'Microsoft.SharePoint.PowerShell'}
if ($snap -eq $null) {
  Add-PSSnapin Microsoft.SharePoint.PowerShell
}
If you are creating a larger script, it is probably easier to open up the Windows PowerShell ISE, because this provides a better editing environment. You will have to load the Microsoft.SharePoint.PowerShell snap-in into the ISE as well. You can do this by using exactly the same script used for the console. If you find yourself using the ISE a lot, you can also add the snap-in automatically when the ISE starts, by adding it to the Windows PowerShell profile. The profile is a Windows PowerShell script file that runs every time you start Windows PowerShell. It has a .ps1 extension like any normal Windows PowerShell file, and you can put any valid Windows PowerShell cmdlet in it. The only way in which the profile file differs from a normal script file is in its name and location.
If you want to use the profile, you will first have to figure out whether a profile already exists on the server. You can do this by using the Test-Path cmdlet:
Test-Path $profile
If the profile already exists, the Test-Path cmdlet will return True; if it doesn’t exist, it will return False. You can also just run the $profile cmdlet and use Windows Explorer to browse to the path that it returns. If the file isn’t there, the profile doesn’t exist:
$profile
You can use the New-Item cmdlet to create a profile if one doesn’t already exist. -path $profile passes in the full path, and -type file tells the cmdlet that you are trying to create a file:
New-Item -path $profile -type file
When you open the profile, you will notice that it is completely empty. You can add to it any script that you want to always be executed before you start working on your scripts. This could, for instance, be a command telling Windows PowerShell to always go to a default location:
Set-Location C:scripts
Or you can add the Microsoft.SharePoint.PowerShell snap-in:
Add-PSSnapin Microsoft.SharePoint.PowerShell -ErrorAction "SilentlyContinue"
Using Windows PowerShell to deploy a custom solution
As a developer, you may also find Windows PowerShell very useful for creating a deployment script that can be used to install your custom solution in a SharePoint environment. This will allow you to distribute your custom solution across test, user acceptance, and production environments a lot more easily. It will mean that administrators don’t have to perform a lot of manual steps and that you as a developer don’t have to describe all these steps in a deployment manual.
When using Windows PowerShell to write a deployment script, you will have to take into account that a previous version of your solution might already be installed in the environment that you are deploying to. This means that you first have to retract and remove the solution before you can install and deploy the solution. Retracting a solution forces SharePoint to delete most of the files it copied during deployment as well as to uninstall features and delete assemblies from the global assembly cache. After you’ve retracted a solution, you can then remove it, which deletes the solution package file from the configuration database.
One thing to be aware of is that SharePoint doesn’t clean up after itself very well when you retract a solution. For instance, SharePoint doesn’t explicitly deactivate features before it retracts the solution that they are deployed in. Because of this, it is a best practice to make sure that you deactivate all features in a solution before retracting the solution. Another thing to keep in mind is that SharePoint doesn’t always delete all files that were deployed using a solution when the solution is retracted. When it doesn’t, this often is for a good reason (for instance, because it could cause errors if the files were to be deleted), but it is something to keep in mind because it can cause quite a bit of cluttering, especially in a development or test environment where solutions are installed and retracted all the time.
You can retract a solution package by using the Uninstall-SPSolution cmdlet. When calling Uninstall-SPSolution, you should pass the -Identity parameter and the -Local parameter in the same manner as when calling Install-SPSolution. You should also pass the -Confirm parameter with a value of $false because failing to do so will cause the cmdlet to prompt the user, which can cause problems if the script is not monitored while it runs. After you’ve retracted the solution, you can then remove it by calling Remove-SPSolution, which instructs SharePoint Foundation to delete the solution package file from the configuration database:
Add-PSSnapin Microsoft.SharePoint.PowerShell -ErrorAction "SilentlyContinue"
$SolutionPackageName = "WingtipDevProject1.wsp"
Uninstall-SPSolution -Identity $SolutionPackageName -Local -Confirm:$false
Remove-SPSolution -Identity $SolutionPackageName -Confirm:$false
These calls to Uninstall-SPSolution and Remove-SPSolution will fail if the solution package isn’t currently installed and deployed. Therefore, it makes sense to add a call to Get-SPSolution and conditional logic to determine whether the solution package is currently installed and deployed before attempting to retract or remove it:
Add-PSSnapin Microsoft.SharePoint.PowerShell -ErrorAction "SilentlyContinue"
$SolutionPackageName = "WingtipDevProject1.wsp"
$solution = Get-SPSolution | where-object {$_.Name -eq $SolutionPackageName}
# check to see if solution package has been installed
if ($solution -ne $null) {
  # check to see if solution package is currently deployed
  if($solution.Deployed -eq $true){
    Uninstall-SPSolution -Identity $SolutionPackageName -Local -Confirm:$false
    Remove-SPSolution -Identity $SolutionPackageName -Confirm:$false
  }
}
Now that you’ve made sure that there’s no old version of your solution installed on the farm, you can add and deploy your solution. Example 2-1 shows the complete Windows PowerShell script. This script can be used to deploy a solution that cannot be scoped to a web application. Also, the DLL file in this solution will be deployed to the global assembly cache. If a solution can be scoped to a web application, the –AllWebApplications parameter can be used to deploy the solution to all web applications, or the –WebApplication parameter can be used to specify a specific web application that the solution should be deployed to.
Add-PSSnapin Microsoft.SharePoint.PowerShell -ErrorAction "SilentlyContinue"
$solution = Get-SPSolution | where-object {$_.Name -eq $SolutionPackageName}
if ($solution -ne $null) {
  if($solution.Deployed -eq $true){
    Uninstall-SPSolution -Identity $SolutionPackageName -Local -Confirm:$false
  }
  Remove-SPSolution -Identity $SolutionPackageName -Confirm:$false
}
Add-SPSolution -LiteralPath $SolutionPackagePath
Install-SPSolution -Identity $SolutionPackageName -Local -GACDeployment
Configuring SharePoint service applications
In SharePoint Server 2010 the concept of service applications was introduced. SharePoint contains several different service applications, and all of them provide a specific piece of functionality to your SharePoint farm if they are enabled. All service applications can be shared across web applications, and some service applications can even be shared across farms. Let’s establish the terminology first.
A service application itself is the logical container of the service. We use the term service application to describe the services architecture in SharePoint. It is also what is exposed in the Central Administration site through the Manage Service Applications page. For most service applications, there can be more than one instance of the service application in a single farm.
The service instance is the actual implementation of the service, the binaries. A service instance could include Windows Services, configuration, registry settings, timer jobs, and more. The bits that make up the service instance are deployed to every SharePoint server in the farm.
The service machine instance of a particular service application is the server or servers in the farm on which the service for that service application runs. You can check where a service is running and start or stop a service on a particular server by going to the Services On Server page in the Central Administration site. On this page, you can select a server and then start the services you want to run on that particular server. When a service runs on more than one server in the farm, software round-robin load balancing is provided by SharePoint. Not all service applications have an associated service machine instance. Most service applications can have more than one associated service machine instance, but some can only have one. Not all services you see on the Services On Server page are service machine instances of a service application.
The service application endpoint is created when you start a service. Starting the service and thus creating a service machine instance creates an Internet Information Services (IIS) virtual application in the SharePoint Web Services IIS website. The virtual application includes a Windows Communication Foundation (WCF) or .asmx web service. This web service is the service application endpoint. Each service application must have its own service application endpoint.
A service application proxy (also called service connection or service association) is a virtual link between a web application and a service application. The service application proxy also enables cross-farm services.
A proxy group is a group of service application proxies that are selected for one or more web applications. By default, all service application proxies are included in the default proxy group. When you create a web application, you can do one of the following:
Select the default proxy group.
Create a custom proxy group by selecting which service application proxies you want to link to the web application. These service application proxies will then be included in the proxy group.
The custom proxy group for one web application cannot be reused with a different web application.
There are three ways in which you can configure service applications:
By selecting services when you run the SharePoint Products Configuration Wizard
By adding services one by one on the Manage Service Applications page in SharePoint 2013 Central Administration
By using Windows PowerShell
It is not recommended that you use the SharePoint Product Configuration Wizard to configure service applications. Using the wizard will create the service applications with a set of default settings that might not be suitable for your environment. If you use the wizard it is also very easy (as easy as selecting a check box) to create too many service applications. You should always just create the service applications that you need in your farm. Every service application consumes a certain amount of resources, so creating a service application that you don’t need means that you are burning valuable resources on your server.
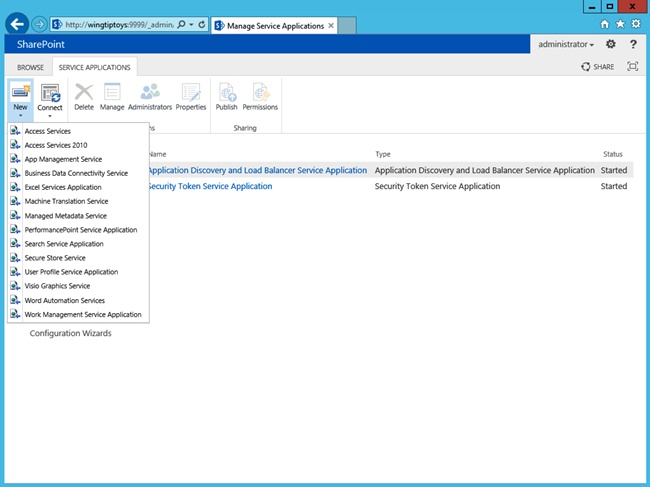
To create a service application from the Manage Service Applications page in Central Administration, you start by clicking the New button on the Manage Service Applications page, as shown in Figure 2-1. Click Managed Metadata Service to create a managed metadata service application.
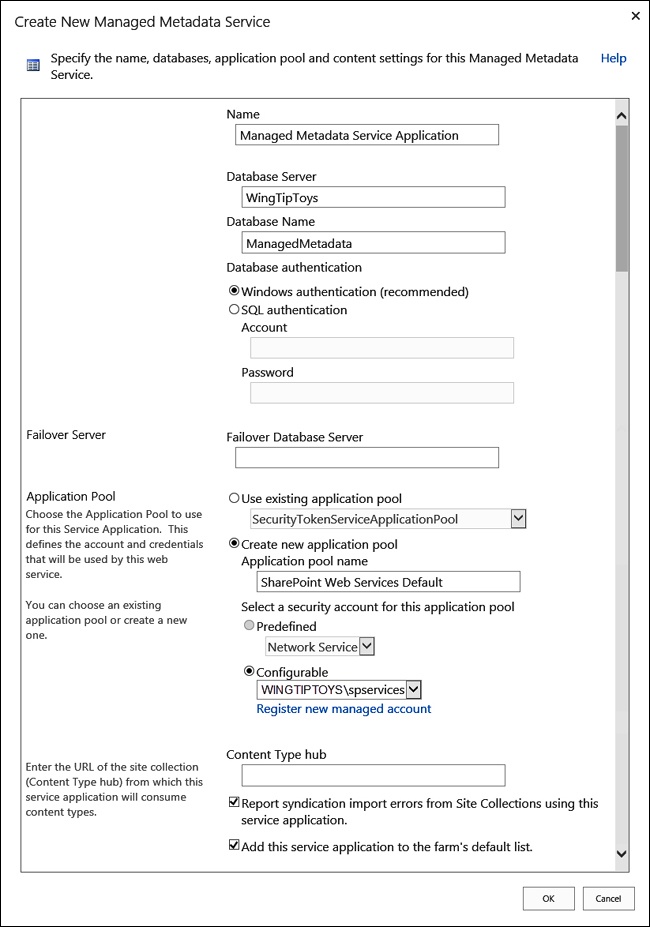
On the next page, you enter a name for the service application and for the database that will store the contents and configuration of the managed metadata service application that you are creating, as shown in Figure 2-2. In this example, the name of the service application is Managed Metadata Service Application. The name of the database is ManagedMetadata. If this is the first service application that you are creating, you will also have to create an application pool that it can use. The name of the application pool in this example is SharePoint Web Services Default. This is the same name that the wizard would have used for the application pool that it creates if you use it to create service applications. In most cases, this application pool can be used for most if not all of your service applications. The account that is used in this example is the WINGTIPTOYSspservices account. Be aware that the account that you use as the application pool account must be a managed account. Go to the Configure Managed Accounts page in Central Administration to create a new managed account. All managed accounts should be dedicated service accounts. Selecting Add This Service Application To The Farm’s Default List means that SharePoint will add the service application to the default proxy group after you click OK.
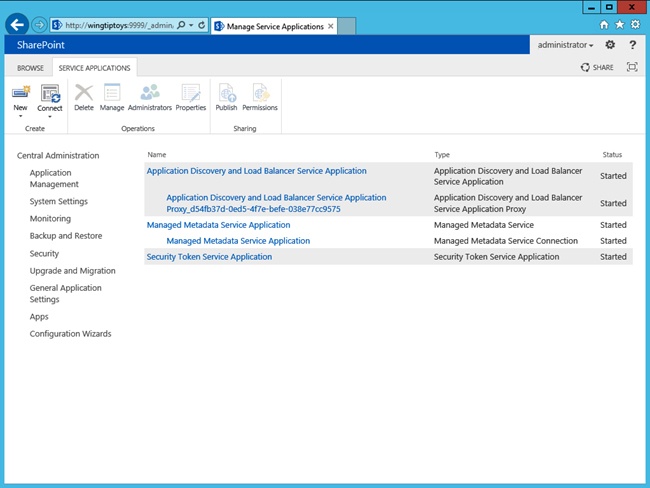
Figure 2-3 shows the Manage Service Applications page after the managed metadata service application has been created. Creating the managed metadata service application through the Manage Service Applications page also automatically creates the managed metadata service application proxy. Most service applications automatically create their proxy when they are created through the Central Administration user interface. When Windows PowerShell is used to create the service application, you will almost always have to create the service application proxy yourself.
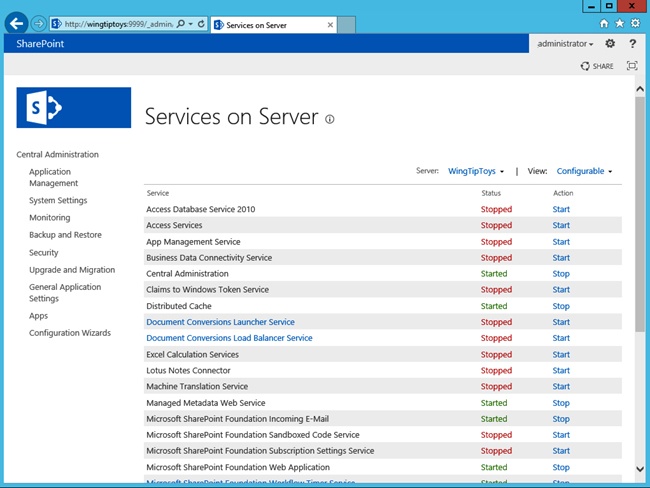
Some service applications start their service or services automatically, but for most service applications you will have to go into the Manage Services On Server page in Central Administration (shown in Figure 2-4). For the managed metadata service application, you will have to start the Managed Metadata Web Service on at least one server in the farm. In most development environments you will only have one SharePoint server, so you can start the service only on that server. Starting the service will also create a new IIS virtual application in the SharePoint Web Services IIS website. The name of the virtual application is a GUID, and the application will include the MetadataWebService.svc web service.
Example 2-2 shows the Windows PowerShell script that will create the service application, the application pool, and the service application proxy and that will start the managed metadata web service.
Add-PSSnapin Microsoft.SharePoint.PowerShell -ErrorAction "SilentlyContinue"

$saAppPoolName = "SharePoint Web Services Default"
$appPoolUserName = "WINGTIPTOYSspservices"

# Gets Application Pool, or creates one
$saAppPool = Get-SPServiceApplicationPool -Identity $saAppPoolName -EA 0
if($saAppPool -eq $null)
{

  Write-Host "Creating Application Pool"
  # Create Application Pool
  $saAppPoolAccount = Get-SPManagedAccount -Identity $appPoolUserName
  $saAppPool = New-SPServiceApplicationPool -Name $saAppPoolName '
    -Account $saAppPoolAccount
}

$mmsInstanceName = "MetadataWebServiceInstance"
$mmsName = "Managed Metadata Service Application"
$mmsDBName = "ManagedMetadata"

Write-Host "Creating Managed Metadata Service Application & proxy"
$mms = New-SPMetadataServiceApplication -Name $mmsName '
    -ApplicationPool $saAppPoolName -DatabaseName $mmsDBName
$proxy = New-SPMetadataServiceApplicationProxy -Name "$mmsName Proxy "'
    -ServiceApplication $mms -DefaultProxyGroup
Write-Host "Starting Managed Metadata Web Service"
Get-SPServiceInstance | where {$_.GetType().Name '
    -eq $mmsInstanceName} | Start-SPServiceInstance
Write-Host "Managed Metadata Service Application successful configured!"
Using debugging tools
While creating a custom solution, you can and probably will use Microsoft Visual Studio to debug your code in your development environment if you experience any issues or unexpected behavior. You might even use Visual Studio to do some debugging to simply get a better understanding of what’s happening behind the scenes in SharePoint. The Visual Studio Debugger is not the only way to understand and troubleshoot SharePoint and your custom components, though. Other tools that you can use include:
Unified Logging Service (ULS) and Windows event logs
The Developer Dashboard
Fiddler and other network monitoring tools
Working with ULS and Windows event logs
The ULS logs are SharePoint’s own dedicated log files. Whenever there is problem with a SharePoint environment, the first place a SharePoint developer or administrator should look for information is in the ULS logs. One of the advantages of the ULS logs is that they can be used for troubleshooting in all types of environments. Regardless of whether problems are occurring in a development environment, in a test or integration environment, or in a production environment, ULS logs should contain valuable pointers to what’s happening.
By default, the ULS logs are stored on the file system of every SharePoint server in the <Program Files Directory>Common FilesMicrosoft SharedWeb Server Extensions15LOGS folder, which is the LOGS folder under the SharePoint root folder. By going into Configure Diagnostic Logging on the Monitoring page in Central Administration, it is possible to specify the folder where the ULS logs are stored. Administrators can change the number of days logs are kept and the total amount of disk space that can be used by the logs. If you are troubleshooting a server that wasn’t configured by you and the logs are not in the LOGS folder in the SharePoint root folder, you can browse to the Configure Diagnostic Logging page to find out where the log files are stored on the server. The page can also be used to change the severity of the events that are logged both to the ULS logs and to the Windows event logs. Flood protection can be enabled to make sure that SharePoint events won’t flood the Windows event logs.
The ULS logs are text files that are quite difficult to read and that usually contain a lot of data. To more easily read events in the ULS logs and also to search, sort, and filter the ULS logs, the ULS Viewer is a must-have tool for everyone who has to troubleshoot SharePoint. The ULS Viewer can be downloaded from MSDN at http://archive.msdn.microsoft.com/ULSViewer and is an .exe file that has to be run on the SharePoint server. It will enable you to start and stop traces and to search through the logs by using a well-organized user interface instead of a text file.
Troubleshooting information for a SharePoint environment can also be found in the Windows event logs. On the server, the Windows event logs can be consulted by opening up the Event Viewer. There is some overlap in the information between the ULS logs and the Windows Event Viewer, but both also contain specific information that can be valuable for finding the source of the problem.
When an error occurs in SharePoint, an error message will be displayed in the user interface that contains what is referred to as a correlation ID. A correlation ID is a GUID that uniquely identifies a particular request. The correlation ID is generated by the SharePoint web server that receives the request. Every event that is part of the request is tagged with the same ID, and the ID even persists across different servers in the farm. For instance, if a request was sent to a SharePoint web server, it will be generated on that server and it will mark all entries in the ULS log that are part of the request with that particular correlation ID. If, as part of the request, some managed metadata has to be requested from the Managed Metadata service that runs on a dedicated application server, the same correlation ID can be found in the ULS logs on that application server. You can even use the correlation ID to trace the request on the server that is running SQL Server by using SQL Profiler to filter out requests related to the ID.
When an end user encounters an error in a SharePoint environment, that user will usually see an error message that contains a correlation ID. Even though the ID is of no use to the user himself, users can be asked to include the ID when they place a call to a helpdesk. Having the ID of the user’s faulty request can help administrators and developers find out what went wrong with the user’s request and help solve the issue.
Correlation IDs aren’t just generated for faulty requests; they are generated for all requests. To find the correlation ID for a successful request, you can use the Developer Dashboard.
Using the Developer Dashboard
The Developer Dashboard was introduced in SharePoint 2010 to show performance and tracing information for a SharePoint page in a control on the page itself. In SharePoint 2013, the Developer Dashboard has been dramatically improved. The dashboard is no longer a control on a page; it opens in a separate dedicated window. The dashboard also no longer just contains information about the latest request but contains information about several requests, so that you can compare them if you want to and more easily get an overview. The information on the Developer Dashboard is a lot more detailed than it was in SharePoint 2010. For instance, you can now easily see the SQL requests and the time it took to process them, the different scopes and execution times, service calls, and also all ULS log entries that are related to the selected request. All this can really help you to identify any potential problems related to a request, because you have all the information SharePoint collected about the requests in a single place.
By default, the Developer Dashboard is disabled. You can enable it by using Windows PowerShell. The Windows PowerShell cmdlet only supports On or Off; the OnDemand parameter has been deprecated, although On now pretty much acts the way OnDemand did in SharePoint 2010; it displays an icon in the upper-right corner that allows you to open up the Developer Dashboard. The Windows PowerShell cmdlet to turn on the Developer Dashboard is displayed in Example 2-3.
Add-PSSnapin Microsoft.SharePoint.PowerShell -ErrorAction "SilentlyContinue"
$DevDashboardSettings = [Microsoft.SharePoint.Administration.SPWebService]:: '
ContentService.DeveloperDashboardSettings
$DevDashboardSettings.DisplayLevel = 'On'
$DevDashboardsettings.Update()
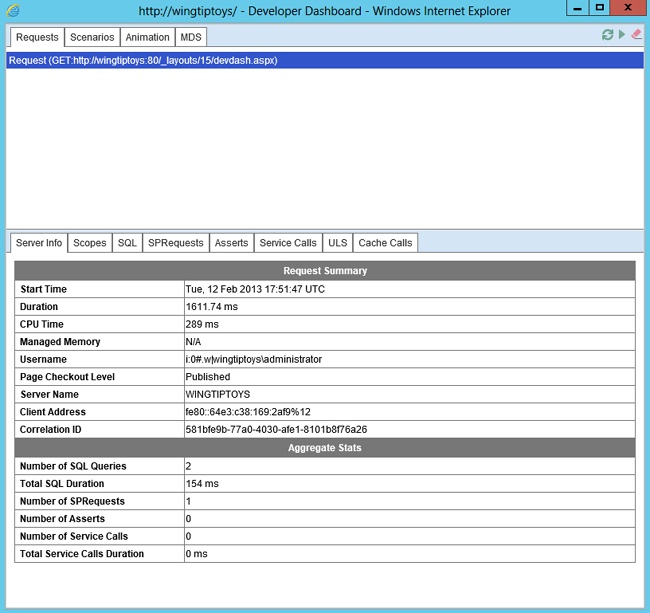
Figure 2-5 shows the Developer Dashboard after the welcome page of an out-of-the-box team site has been loaded. On the dashboard, you can see different tabs for server information, scopes, SQL info, ULS information, and a lot more. The Server Info tab contains the total execution time for the page, the current user, whether the page is published, and the correlation ID. The SQL tab also shows the execution time for all database queries and for all methods. By using the dashboard you can not only see how long a page took to load just the out-of-the-box functionality on it, but you can also see how long it takes your custom component to load. You can identify whether your code executes any expensive methods or database queries.
To write information from your own custom solution to the Developer Dashboard you can either execute your code in an OnInit or Render override, or you can wrap your code in an SPMonitoredScope block. Only code from farm solutions can send information to the Developer Dashboard; the contents of sandboxed solutions or apps cannot send information to the dashboard.
Using the SharePoint Developer Tools in Visual Studio 2012
The release of SharePoint 2007 was a significant milestone for SharePoint as a development platform because in this version, Microsoft introduced support for features and solution packages. Soon after SharePoint 2007 was released, however, it became clear within Microsoft and throughout the industry that more and better developer productivity tools were needed. With SharePoint 2010, Microsoft extended the developer platform by introducing the SharePoint Developer Tools in Visual Studio 2010. These new tools made developing for SharePoint 2010 much faster and easier because they automated grungy tasks and hid many of the low-level details that developers had to worry about when developing for SharePoint 2007. For example, every SharePoint project in Visual Studio 2010 is created with built-in support to generate its output as a solution package. The SharePoint Developer Tools also integrate commands into the Visual Studio 2010 environment that make it easy to deploy and retract the solution package for a SharePoint project during testing and debugging.
With the introduction of SharePoint 2013 and Visual Studio 2012, Microsoft has further improved the SharePoint Developer Tools. For the project types that were available for SharePoint 2010 there are now also SharePoint 2013 versions. There are also Office add-in project types that can be used to create add-ins for the Microsoft Office 2013 and Office 2010 applications. The biggest change, however, is that the SharePoint Developer Tools in Visual Studio 2012 contain two project types that allow you to create two different types of apps:
Apps for Office 2013
Apps for SharePoint 2013
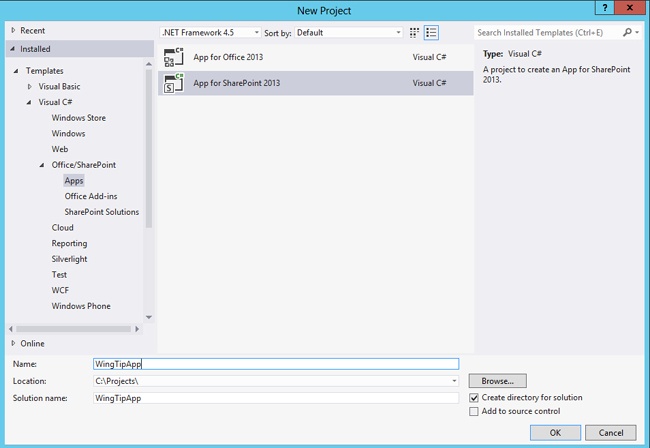
You can find the app for SharePoint 2013 C# in the New Project dialog box within Visual Studio 2012 by navigating to Visual C#Office/SharePointApps, as shown in Figure 2-6.
When you click OK you are asked to confirm the name of the app and specify the site to which you want Visual Studio to deploy the app and how you want to host your app, as shown in Figure 2-7.
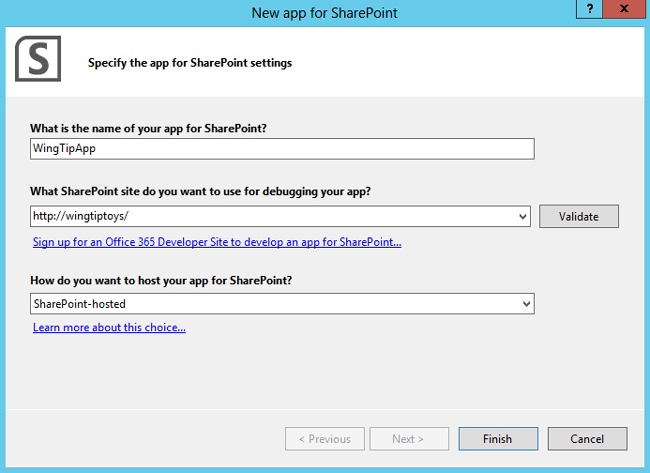
SharePoint apps will be discussed in detail in Chapter 4. For now, you will create a SharePoint-hosted app, which means that all of the app will be deployed to a SharePoint site. When you click the Finish button in the SharePoint Customization Wizard, Visual Studio takes a few seconds to create and configure the new project. Figure 2-8 shows what the new SharePoint project looks like in Solution Explorer.
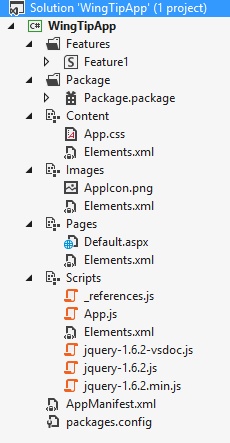
A SharePoint app is created with some default content. There is a style sheet, an app icon image, a default page, and several JavaScript files. The AppManifest.xml file contains metadata such as the name and the title of the app, the app icon, and the scopes at which the app needs to have permissions. You use the Features node of the App for SharePoint 2013 project to add new features to the app. Notice that the Features node of a SharePoint app contains one feature, called Feature1, when the app is created. Feature1 contains the default content and is web scoped. A feature in a SharePoint app can only be web scoped, it is not supported to use a SharePoint app to deploy a site, web application, or farm-scoped feature. You use the Package node to track project-wide settings related to building the project into a solution package .wsp file and an app package .app file.
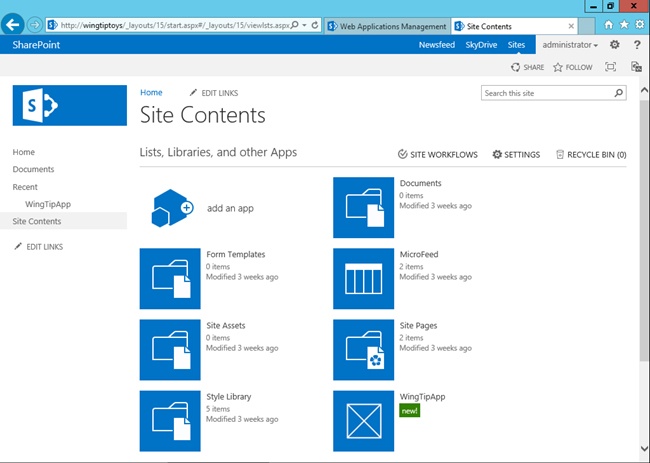
Just like normal SharePoint projects, SharePoint apps also have three special menu commands to support deployment and packaging of the app: Deploy, Package, and Retract. These menu commands are available when you right-click the top-level project node in Solution Explorer. You can run the Package command to build a SharePoint project into a solution package. You can use the Deploy command to run a sequence of deployment steps that deploy the solution package in the local farm so that you can test and debug your work. The Retract command reverses the act of deployment by retracting the solution package from the local farm. When you click the Deploy button, Visual Studio deploys the app to the site you listed in the Customization Wizard. You can find the app on the Site Contents page and in the navigation pane on the left side of the page, under the Recent heading, as shown in Figure 2-9. Clicking the app name or icon will open the app’s default.aspx page.
Choosing a development approach
At least as important as knowing how to create a solution is knowing when to create a solution and what type of solution to create. Even though this is a book about custom development, the best approach when using SharePoint is to use out-of-the-box functionality. Customizations are the number-one cause of problems with SharePoint environments. Knowing this, you have to make sure that when you create a custom solution, the same functionality couldn’t be achieved by using out-of-the-box functionality. If you do have to create a custom solution, you have to make sure that you create the right type of solution and that you build the solution in a way that uses the least amount of resources from the SharePoint server.
When you open up Visual Studio, the first thing you have to decide is what type of project you want to create. With the new SharePoint 2013 app model added into the mix, you can now choose between a SharePoint 2013 farm solution, a SharePoint 2013 sandboxed solution, and a SharePoint 2013 app. There isn’t one right project type; the best type depends on what kind of customizations you want to build and to what type of environment you want to deploy the customizations.
The best option is always the project type that puts the least amount of load on the SharePoint server. However, the solution also has to be maintainable and upgradable. The solution should not be overly complex, so that it can be maintained by others. The solution design should follow best practices to ensure that it can be upgraded to a next version of SharePoint. Of course, you also have to make sure that the solution can be deployed to the environment that you are creating the customizations for. To summarize, when you create SharePoint customizations, the following things have to be taken into account:
Put the least possible load on the SharePoint server.
Keep the customizations as simple as possible.
Make sure you follow best practices, so the solutions don’t block the SharePoint environment from being upgraded.
Ensure that the solution can be deployed to the target environment.
Because a SharePoint app can’t deploy server-side code to the SharePoint server, that will always be the project type that puts the least amount of load on the SharePoint server. Sandboxed solutions can deploy server-side code to the SharePoint server; however, a sandboxed solution can only use a limited amount of server resources before it is shut down. A farm solution can technically use all the resources that are available on the server, and because of that, a farm solution can bring down an entire SharePoint farm. This is not just a theoretical scenario; it actually happens on a regular basis to both small and really large SharePoint environments.
It is likely that the version of the customizations that you are building is not the last version. Either the customizations will be a huge hit and users will ask for more functionality, or they aren’t what users were expecting and they need modifications to fit the user’s needs. To make the solution easy to maintain, make it as simple as possible. This means that even though your first choice should be to build a SharePoint app, because that would consume the least amount of SharePoint server resources, you shouldn’t do it at all costs. If creating an app would create a solution that is significantly more complex, the best solution is probably to build a sandboxed or farm solution.
If the SharePoint environment is successful, it’s very likely that at some point the environment will have to be upgraded to the next version of SharePoint. Some SharePoint customizations can block the upgrade of a SharePoint environment. For instance, if a solution makes unsupported changes to the database or to SharePoint files on the file system, it won’t be possible to upgrade the environment. Also, when certain customizations such as site definitions are involved, it will be significantly more difficult to move the contents of the SharePoint farm to a cloud-hosted environment. Because Microsoft has positioned the SharePoint app model as the SharePoint customization type of the future, and because almost all parts of the SharePoint app live outside of SharePoint, creating apps is your safest bet when you want to guarantee that your environment can upgrade without being hindered by the customizations.
Using farm solutions means that the solution will have to be upgraded when the SharePoint farm gets upgraded. Sandboxed solutions live in the content database and can only affect the site collection that they are deployed in. This means that the impact they can have on an upgrade to a new version of SharePoint is a lot smaller than for farm solutions. However, sandboxed solutions are deprecated in SharePoint 2013. This means that although both sandboxed solutions that were created for SharePoint 2010 and new sandboxed solutions created for SharePoint 2013 are still fully supported, Microsoft is planning to remove support for sandboxed solutions at some point in the future. This doesn’t necessarily have to be in the next release; it could be in the release after that, or an even later release. Investing in large-scale sandboxed solutions is probably not a good idea, though.
If your environment is a cloud-hosted environment such as Office 365, you might not have much of a choice, because you won’t be allowed to deploy full trust solutions, and not all customizations can be created by using apps. In those cases, you will probably still want to create new sandboxed solutions. The advice would then be to try and create the solutions in such a way that you can remove the sandboxed solution without the entire site breaking down. When Microsoft then at some point removes the support for sandboxed solutions, at least your existing content is still accessible.
When you are upgrading from SharePoint 2010 to SharePoint 2013, you can choose how you want to upgrade you custom solutions:
You can deploy your SharePoint 2010 solutions as is. Microsoft has designed SharePoint 2013 to make sure that your solutions keep working. This means that the entire solution should work when a site is in SharePoint 2010 mode. When a site is in SharePoint 2013 mode, most of the solution should work, but some things might not work. Things that don’t work are mostly related to functionality that is no longer available in SharePoint. For instance, custom solutions that use the SharePoint 2010 Web Analytics features will not work in a SharePoint 2013 environment, because the Web Analytics Service Application and all related functionality has been removed. In most cases, you will not just deploy your existing solutions as is. The only case in which it makes sense to not make any changes and just deploy an existing SharePoint 2010 solution as is to a SharePoint 2013 environment is when the solution is only there to keep existing SharePoint 2010 sites working in SharePoint 2010 mode in the SharePoint 2013 environment. In all other cases, you will at least want to recompile your solution.
The second way to move SharePoint 2010 solutions to a SharePoint 2013 environment is to open the SharePoint 2010 solution in Visual Studio 2012. The solution can then be recompiled against the SharePoint 2013 DLLs. While you are doing this, you can decide to make some minor changes to the solution. You should definitely remove any references to functionality that no longer exists in SharePoint 2013, such as the Web Analytics functionality. Another example of something that will definitely not work in a SharePoint 2013 mode are SharePoint 2010 visual designs. Any master pages and style sheets that were created for SharePoint 2010 will not work in sites that are in SharePoint 2013 mode. Normally SharePoint will just not use the SharePoint 2010 designs in SharePoint 2013 mode sites. However, if you had a stapling feature in SharePoint 2010 that stapled a custom design to sites in the environment, especially if it stapled the design to all sites in the environment by stapling it to the GLOBAL site definition, you will want to remove the stapling feature before moving the solution to SharePoint 2013. Stapling a SharePoint 2010 design to the GLOBAL site definition and deploying it to SharePoint 2013 can make it impossible to create any fully functional sites, either by using out-of-the-box site definitions or custom web templates.
The third approach that can be taken when moving solutions from SharePoint 2010 to SharePoint 2013 is to rebuild the solution to use the new SharePoint 2013 functionality where possible. Rebuilding the solution could mean replacing custom features with new out-of-the-box functionality. In a lot of cases, the aim should be to minimize the amount of customizations in an environment, which means that cutting customizations in favor of new out-of-the-box functionality is a very valid change to invest in. Do keep in mind, though, that in order to be able to upgrade existing sites you might need to have certain SharePoint 2010 customizations deployed in your environment, even if you don’t want to actively use them anymore in your SharePoint 2013 environment. There are also cases in which a customization can’t be replaced by out-of-the-box functionality but could be replaced by SharePoint apps, by an application that runs external to SharePoint and that uses the SharePoint Web Services or the vastly improved SharePoint Client Object Model. This should only be done if replacing the functionality by using a SharePoint app or an external solution doesn’t make the solution significantly more complex. If that is not the case, rebuilding functionality as a SharePoint app or as an external service will give you practice and experience in using the new development options, and it will make sure that your solution is easier to deploy in hosted environments. Assuming that the SharePoint app model is here to stay, it will also make sure that your solution becomes more future proof.
Using the SharePoint APIs
In SharePoint 2013, you can now choose from three different APIs: the server-side object model (SSOM), the client-side object model (CSOM), and the REST API. All three APIs give you the option to build customizations for your SharePoint environment. This section will provide an overview of the three different APIs. Each API will then be used extensively in examples throughout the book. For specific detailed coverage of CSOM and REST, see Chapter 5.
Understanding the server-side object model
The core server-side object model of SharePoint Foundation is loaded through an assembly named Microsoft.SharePoint.dll. When you reference this assembly within a Visual Studio 2012 project, you can start programming against the classes in the server-side object model, such as SPSite, SPWeb, and SPList. There are two initial requirements for a Visual Studio project that programs against the server-side object model by using the Microsoft.SharePoint assembly. First, the project must be configured to use .NET Framework 4 or 4.5 as its target framework. Pay extra attention if you are upgrading a SharePoint 2010 solution, because that will have been built using the .NET Framework 3.5 as its target framework. The second requirement is that your project must have a platform target setting that is compatible with a 64-bit environment, which is essential for properly loading the Microsoft.SharePoint assembly.
Another critical requirement for any application or component that is programmed against the server-side object model is that the application or component must be deployed and run on a SharePoint server in the farm in which you want to use the component. The deployment of applications or components that use the SharePoint server-side object model should always be done by using a SharePoint Solution or .wsp file. To deploy the solution, you will need access to at least one SharePoint server in the farm where the solution should be deployed. In most production environments, this means that you will hand off the solution and a document that describes how to deploy the solution to the administrator of the server. In your development environment, Visual Studio will usually do the deployment for you.
You can also create client applications with Visual Studio 2012 that program against the server-side object model. For example, you can create a standard console application that uses the server-side object model to access a site and the elements inside the site, such as lists and items. However, keep in mind that any client application that depends on the Microsoft.SharePoint assembly can be run only when launched on a server that has SharePoint installed on it and that is part of a SharePoint farm. This means that it’s not likely that you will encounter real-world scenarios that call for creating client applications that use the server-side object model. Even so, creating simple console applications that program against the Microsoft.SharePoint assembly in your development environment can be useful, because it gives you a quick and easy way to write and test code as you begin learning the server-side object model.
Most of the SharePoint Foundation APIs reside in Microsoft.SharePoint.dll. However, if you are building a custom solution, using the server-side object model you might also want to use SharePoint Server APIs and functionality. The bulk of the SharePoint Server APIs reside in Microsoft.Office.Server.dll; however, this isn’t the only available DLL that contains SharePoint Server APIs. For a full list of SharePoint APIs and the DLLs in which you can find them, see the MSDN page .NET server API reference for SharePoint 2013 at http://msdn.microsoft.com/en-us/library/jj193058.aspx.
Using the client-side object model
SharePoint 2010 introduced the SharePoint Foundation client-side object model, which allows developers to use SharePoint content and objects in their client-side solutions. As a developer, you could now create a very simple solution that would be deployed into a SharePoint site or onto a user’s desktop and that could read or manage data in a SharePoint site.
In SharePoint 2010, the client-side object model was only available for SharePoint Foundation objects. In SharePoint 2013, however, the client-side object model has again been vastly improved by making a lot of the SharePoint Server objects available through the client-side object model. In SharePoint 2010 there were three client-side object models, and in SharePoint 2013 there are four. SharePoint 2013 allows you to choose between the Managed, Silverlight, Mobile, and JavaScript object models. Each of the four object models provides an object interface to SharePoint functionality that is based on the objects available in the Microsoft.SharePoint namespace. All four client-side object models also have support for at least part of the SharePoint Server 2013 functionality, but not all of them include the same SharePoint Server 2013 components.
The four client-side object models also all have their own usages. Each of the four object models presents an object interface in front of a service proxy. Developers write client-side code by using the object model, but the operations are batched and sent as a single XML request to the Client.svc service. When the XML request is received, the Client.svc service makes calls to the server-side object model on behalf of the client. The results of the server-side calls are then sent back to the calling client in the form of a JavaScript Object Notation (JSON) object.
The object model for Microsoft Silverlight can be used to build Silverlight applications, Web Parts, ASP.NET applications, apps for SharePoint and Office, and Silverlight applications for phones that use SharePoint data or SharePoint objects. A Silverlight application is compiled into an .xap file that can pretty much be stored anywhere. Examples of where .xap files can be deployed are a client computer, the file system of a SharePoint server, a list in a SharePoint library, and an external (web) server. The Silverlight client-side object model is contained in assemblies in the LAYOUTSClientBin folder. The following DLLs are available:
Microsoft.SharePoint.Client.Silverlight.dll
Microsoft.SharePoint.Client.Silverlight.Runtime.dll
Microsoft.SharePoint.Client.DocumentManagement.Silverlight.dll
Microsoft.SharePoint.Client.Publishing.Silverlight.dll
Microsoft.SharePoint.Client.Search.Applications.Silverlight.dll
Microsoft.SharePoint.Client.Search.Silverlight.dll
Microsoft.SharePoint.Client.UserProfiles.Silverlight.dll
Microsoft.SharePoint.Client.WorkflowServices.Silverlight.dll
Microsoft.Office.Client.Policy.Silverlight.dll
Microsoft.Office.Client.TranslationServices.Silverlight.dll
The Mobile object model can be used to create applications that run on Windows Phones. The Mobile client-side object model is a special version of the Silverlight client-side object model. The Mobile object model contains most of the same functionality as the Silverlight object model. A couple of areas are missing, but when you are creating a Windows Phone application using the Mobile object model you can use the REST APIs to access these areas. The Mobile client-side object model also contains some functionality that is specific to phones, such as APIs that enable a phone app to register for notifications from the Microsoft Push Notification Service. The Mobile client-side object model can be found in the same folder as the Silverlight client-side object model, in the LAYOUTSClientBin folder. The DLLs that are available for the Mobile client-side object model are:
Microsoft.SharePoint.Client.Phone.dll
Microsoft.SharePoint.Client.Phone.Runtime.dll
Microsoft.SharePoint.Client.DocumentManagement.Phone.dll
Microsoft.SharePoint.Client.Publishing.Phone.dll
Microsoft.SharePoint.Client.Taxonomy.Phone.dll
Microsoft.SharePoint.Client.UserProfiles.Phone.dll
Microsoft.Office.Client.Policy.Phone.dll
Microsoft.Office.Client.TranslationServices.Phone.dll
The Managed object model can be used to create .NET applications that run on Windows operating systems that aren’t phones or SharePoint servers. This means that the Managed object model can be used to create applications that run on client computers, or on Windows web servers not running SharePoint. The Managed object model can be found in the ISAPI folder and is contained in the following DLLs:
Microsoft.SharePoint.Client.dll
Microsoft.SharePoint.Client.Runtime.dll
Microsoft.SharePoint.Client.ServerRuntime.dll
Microsoft.SharePoint.Client.DocumentManagement.dll
Microsoft.SharePoint.Client.Publishing.dll
Microsoft.SharePoint.Client.Search.Applications.dll
Microsoft.SharePoint.Client.Taxonomy.dll
Microsoft.SharePoint.Client.UserProfiles.dll
Microsoft.SharePoint.Client.WorkflowServices.dll
Microsoft.Office.Client.Education.dll
Microsoft.Office.Client.Policy.dll
Microsoft.Office.Client.TranslationServices.dll
Microsoft.Office.SharePoint.ClientExtensions.dll
The last client-side object model is the JavaScript object model. The JavaScript object model can be used in inline script or in separate .js files. Using the JavaScript client-side object model is an excellent way to add custom SharePoint code to a SharePoint-hosted app. The JavaScript object model is different from the other three in that it is not contained in a set of DLLs. Instead, it is contained in a JavaScript library, inside of .js files. The many .js files that make up the JavaScript client-side object model are located in the LAYOUTS folder. The core SharePoint functionality can be found in SP.js and in SP.Core.js.
Though the four client-side object models don’t contain exactly the same functionality, Microsoft has taken great care to ensure that the four models return objects that behave similarly. This means that if you know how to write code against one of the models, you can easily port that code to either of the other three models. Table 2-2 shows some of the main objects supported by each model alongside the related object from the server-side model.
Server model | Managed model | Silverlight model | Mobile model | JavaScript model |
SPContext | ClientContext | ClientContext | ClientContext | ClientContext |
SPSite | Site | Site | Site | Site |
SPWeb | Web | Web | Web | Web |
SPList | List | List | List | List |
SPListItem | ListItem | ListItem | ListItem | ListItem |
SPField | Field | Field | Field | Field |
As in the standard code you write against the server-side object model, code written for client object models requires a starting point in the form of a context object. The context object provides an entry point into the associated API that can be used to gain access to other objects. When you have access to the objects, you can interact with the scalar properties of the object freely (for example, Name, Title, Url, and so on). Example 2-4 shows how to create a context in each of the models and return an object representing a site collection. After the site collection object is returned, the Url property is examined. Code for the server model is included for comparison.
//Server Object Model
SPSite siteCollection = SPContext.Current.Site;
string url = siteCollection.Url;

//Managed Client Object Model
using (ClientContext ctx = new ClientContext("http://intranet.wingtiptoys.com"))
{
    Site siteCollection = ctx.Site;
    ctx.Load(siteCollection);
    ctx.ExecuteQuery();
    string url = siteCollection.Url;
}

//Silverlight Client Object Model
using (ClientContext ctx =
    new ClientContext("http://intranet.wingtiptoys.com"))
{
    Site siteCollection = ctx.Site;
    ctx.Load(siteCollection);
    ctx.ExecuteQuery();
    string url = siteCollection.Url;
}

//Mobile Client Object Model
using (ClientContext ctx =
    new ClientContext("http://intranet.wingtiptoys.com"))
{
    Site siteCollection = ctx.Site;
    ctx.Load(siteCollection);
    ctx.ExecuteQuery();
    string url = siteCollection.Url;
}

//JavaScript Client Object Model
var siteCollection;
function getSiteCollection
{
    var ctx = new SP.ClientContext("/");
    siteCollection = ctx.get_site;
    ctx.load(site);
    ctx.executeQueryAsync(success, failure);
}

function success {
    string url = siteCollection.get_url;
}

function failure {
    alert("Failure!");
}
The ClientContext class in the Managed, Silverlight, and Mobile object models inherits from the ClientContextRuntime class. By using the ClientContext class, you can get a valid run-time context by passing in the URL of a site. In addition, this class provides several members that are needed to access data and invoke methods on the server.
The SP.ClientContext class in the JavaScript client object model inherits from the SP.ClientContextRuntime class and provides equivalent functionality to the ClientContext class found in the Managed, Silverlight, and Mobile client object models. As with the Managed and Silverlight models, you can get a run-time context in the JavaScript model by using the SP.ClientContext class and passing a URL. Unlike the other client object models, however, the JavaScript model also allows you to get a run-time context to the current site by using a constructor with no arguments, so the example above could be rewritten as simply var ctx = new SP.ClientContext.
All four client-side object models only communicate with the SharePoint server when the code calls the ExecuteQuery or ExecuteQueryAsync method. This is to prevent the object models from making too many calls to the SharePoint server and from affecting the SharePoint server’s health by querying the server too much. This means that when you are writing your code, you have to really think about when the statements that you are writing actually have to be executed on the server. You will want to minimize traffic to the server, but you will need to communicate with the server if you want to request data from, or send data into, the SharePoint environment.
The ExecuteQuery method creates an XML request and passes it to the Client.svc service. The client then waits synchronously while the batch is executed and the JSON results are returned. The ExecuteQueryAsync method, which is used in the Silverlight and Mobile client object models, sends the XML request to the server, but it returns immediately. Designated success and failure callback methods receive notification when the batch operation is complete.
The JavaScript model works like the Managed and Silverlight models by loading operations and executing batches. In the case of the JavaScript model, however, all batch executions are accomplished asynchronously. This means that you must call the ExecuteQueryAsync method and pass in the name of functions that will receive success and failure callbacks, as shown earlier in Example 2-4.
Using the REST APIs
The most lightweight option for performing relatively simple operations on data in SharePoint lists and sites is to use the REST capabilities that are built into SharePoint 2013. The SharePoint 2013 implementation of a REST web service uses the Open Data Protocol (OData) to perform CRUD operations on data in SharePoint. Using REST allows your code to interact with SharePoint by using standard HTTP requests and responses. Table 2-3 shows the mapping between HTTP verbs and data operations.
HTTP verb | Data operation |
GET | Retrieve |
POST | Create |
PUT | Update all fields |
DELETE | Delete |
MERGE | Update specified fields |
The Client.svc web service handles the HTTP request and serves a response in either Atom or JSON format.
To access any object on a site by using a RESTful call, the URL you should use will start with the following construction:
http://<server>/<site>/_api
To access an actual object within the site you simply add the object to the URL:
//Access a site collection
http://<server>/<site>/_api/site

//Access a specific site
http://<server>/<site>/_api/web

//Access a list in a specific site
http://<server>/<site>/_api/web/lists('GUID')
You can use the querystring syntax to specify parameters for the methods that you call by using a RESTful HTTP request:
//Apply a "blank" site site definition to a SharePoint site
http://<server>/<site>/_api/web/applyWebTemplate?template="STS#1"
The query strings can become rather complex, but because of that the queries that can be performed are rather powerful as well. You can select, sort, page, filter, and expand data by using a RESTful query. The filtering allows both numeric and string comparisons as well as date and time comparisons. The next example of a RESTful query requests the FirstName, LastName, and PhoneNumber columns from a list with a specific GUID and filters the items by items where the FirstName starts with an a:
http://<server>/<site>/_api/web/lists('GUID')/items?$select=FirstName,LastName,
PhoneNumber$filter=startWith(FirstName, a)
Summary
In this chapter, all the basics of developing a custom SharePoint solution have been touched on. The first step is to determine what type of development environment you need to create the solution that you want to create, or to complete the project that you are working on. When you have your hardware and the design of the development environment in place, you can install and configure it manually, but you can also use Windows PowerShell to configure your server. Especially if you need to create multiple development environments, scripting the installation and configuration can save you time and will help to ensure that all development environments are identical.
The next step is to determine a development approach. The best approach for your solution depends on the functionality that you want to build and on the environment that the solution should be deployed to. If the solution has to be deployed to a cloud-hosted environment, creating a farm solution is not an option, because you won’t be able to deploy it. The most future-proof approach is to create a SharePoint app. However, some of the functionality that you might want to build might not be able to be created by using a SharePoint app (yet). This forces you to make a decision between creating an app that implements as much of the functionality as possible and creating a farm solution that implements the exact functionality that you are looking for. If you deploying a farm solution, you will have to upgrade it if you want to upgrade your environment, and at some point in the future Microsoft might remove support for farm solutions completely. Although it will be a while before this happens, it should already be a consideration when you are determining the development approach you are going to use for your solution.
After your solution is deployed, you might have to debug it. There are several debugging tools that can be used to debug custom SharePoint solutions. The best tool to use depends on the type of problem you are trying to debug and on what type of environment your solution is in. The ULS and Windows Event Logs, and the Developer Dashboard, can give you valuable information from all types of environments and are all useful tools to help you identify the cause of a problem on your farm.