
Chapter 3. Server-side solution development
Microsoft SharePoint 2013 offers a new way to customize your SharePoint environment called the SharePoint app model. However, the approaches you used to customize your SharePoint environment prior to SharePoint 2013 are for the most part still valid. You can still build farm solutions and sandboxed solutions. This chapter walks you through how to create farm and sandboxed solutions and talks about dos and don’ts for both approaches. It also guides you through what’s different in SharePoint 2013 compared to SharePoint 2010, both in terms of changes to the tools and object model and in terms of changes to the guidance around using farm and sandboxed solutions.
A farm solution is a solution that will be deployed via the SharePoint Central Administration website or Windows PowerShell. Someone with access to the SharePoint server will upload the solution by using Windows PowerShell, and the solution will be stored in the Farm Solutions store, which is persisted in the SharePoint Configuration Database. This is the database that also stores a lot of the farm settings for the SharePoint farm. It is not a content database, which means that there are no SharePoint site settings and site content stored in it. After the solution has been added to the Farm Solutions store it can be deployed, which means that the files packaged in the solution can be deployed to the right locations and that users and administrators can start using the functionality that was packaged in the solution. Deployment can either be done through Central Administration or via Windows PowerShell. The Windows PowerShell script to upload and deploy a SharePoint solution can be found in Example 2-1 in Chapter 2.
A sandboxed solution is a solution that is uploaded to a site collection’s Solution Gallery. Sandboxed solutions can be uploaded and activated by site collection administrators. The sandbox solution will also be stored in the content database that the site collection is stored in. A sandboxed solution and its contents will not be deployed to the SharePoint server’s file system. The functionality from a sandboxed solution is only available in the site collection or collections where it has been deployed.
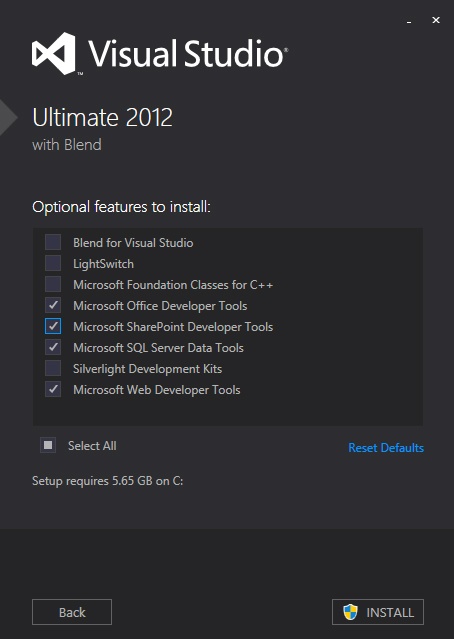
To build farm or sandboxed solutions for SharePoint 2013 you use Microsoft Visual Studio 2012 Professional, Premium, or Ultimate, including the SharePoint Developer Tools. As shown in Figure 3-1, the SharePoint Developer Tools can be installed as an optional feature during Visual Studio installation.
The new SharePoint Developer Tools include support for building farm solutions, sandboxed solutions, and SharePoint and Office apps. As in SharePoint 2010, you will need a SharePoint farm on your development server to build farm or sandboxed solutions. The farm can be either a SharePoint Server or a SharePoint Foundation farm. In general the recommendation is to make sure that the SharePoint version that you use in your development environment is the same as the version used in the production environment.
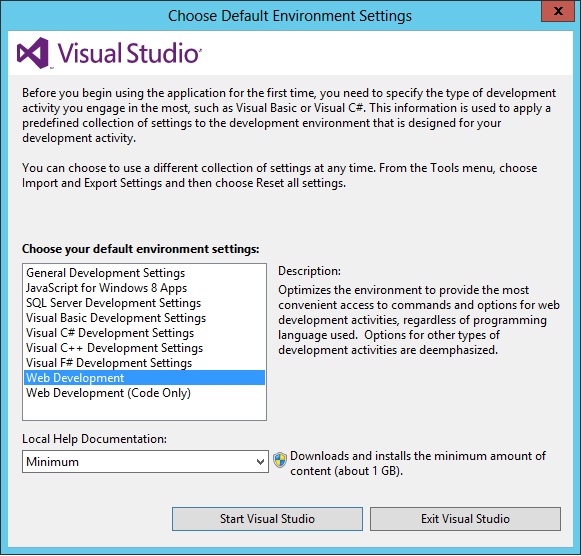
The first time you start Visual Studio after installing it, Visual Studio asks for your default environment settings, as shown in Figure 3-2. The options don’t include settings for “SharePoint Development,” so you’ll have to make do with one of the other options. The options that come closest are either Web Development or Visual C# Development Settings. For this example, we chose Web Development.
Visual Studio 2012 is now fully installed; however, Visual Studio 2012 doesn’t include the templates for SharePoint and Microsoft Office 2013 development. The Office Developer Tools for Visual Studio 2012 can be downloaded separately from http://www.microsoft.com/web/handlers/WebPI.ashx?command=GetInstallerRedirect&appid=OfficeToolsForVS2012GA. After the installation is complete, you can open Visual Studio and either watch some of the introductory videos or start a new project.
Understanding the server-side object model
SharePoint’s high-level architecture is based upon a hierarchy of components:
The highest level is the farm. This is the collection of all physical and logical components that make up an environment.
At the next level are the most important and most notable physical components, the servers. A small development farm can consist of a single server, whereas a large production environment can contain dozens of servers.
The third level is the web application. Web applications are the highest level of logical component. Each web application has its own website in Internet Information Services (IIS). Most farms have between 2 and 10 web applications. Every farm has a Central Administration web application; without it the farm will not be supported or operational.
The next level is the content database. Content databases are SQL databases that contain all of the data and many of the settings that are stored in site collections.
Site collections themselves are the next level. They are logical containers within a web application. Within a site collection, a visual design, navigation, workflows, and policies can be shared. A farm should contain no more than 250,000 “non-personal” site collections. On top of the 250,000 non-personal site collections it is also possible to have 500,000 personal sites (also known as my sites).
Within site collections, up to 250,000 sites can be created.
Sites contain lists and libraries that are used to store files, documents, and items. Examples of libraries are a document library, a pages library, and a picture library. Examples of lists are a tasks list, a calendar, and an announcements list.
This bring us to the lowest level, the items. An item can be a document, a picture, a page, a task, an announcement, or a calendar item. A folder is also considered an item.
This hierarchy can also be found in the server-side object model, in Microsoft.SharePoint.dll. The names of the objects are pretty self-explanatory if you understand the SharePoint hierarchy, as shown in Table 3-1.
SharePoint component | Server-side OM object | Namespace |
Farm | SPFarm | Microsoft.SharePoint.Administration |
Server | SPServer | Microsoft.SharePoint.Administration |
Web application | SPWebApplication | Microsoft.SharePoint.Administration |
Content database | SPContentDatabase | Microsoft.SharePoint.Administration |
Site collection | SPSite | Microsoft.SharePoint |
Site | SPWeb | Microsoft.SharePoint |
List/library | SPList | Microsoft.SharePoint |
Item | SPItem | Microsoft.SharePoint |
The only thing that stands out when you compare the component names to the object names are the SPSite and the SPWeb objects. A site collection is represented by the SPSite object, and a site is an SPWeb object.
Example 3-1 shows an example of how the objects that represent the SharePoint hierarchy can be used in a custom solution. Be aware that the example in Example 3-1 is iterating through all objects in the farm, which is a very poor practice. The code in the listing only serves as an example to demonstrate the different objects. If you are using the server-side object model in a farm solution, the resources you can use are not limited or controlled by the system. By the time your solution has used all of the available resources, it’s likely that you will have also brought down the entire farm. This means that building farm solutions using the server-side object model comes with a lot of power, but also with a lot of responsibility.
Iterating over SharePoint objects such as site collections, sites, lists, or items will seldom cause problems in a development environment. However, if you are creating a solution that iterates over SharePoint objects, try to estimate how many objects you will be iterating over in the production environment. Also consider how that may change over time—for instance, in a year from now. You might very well end up iterating over more objects than you can or should iterate over, especially if your code called synchronously, while a user is waiting for it. In that case, the best way to avoid this would be to build your solution so that you don’t need the iteration, maybe using search instead. If that’s not an option, you can create a (timer) job that runs at night when there are not as many users using the environment and cache the results in a custom database or XML file.
SPFarm farm = SPFarm.Local;
hierarchyInfo += "Farm: " + farm.Name + "</br></br>";
SPServerCollection servers = farm.Servers;

foreach (SPServer server in servers)
{
    hierarchyInfo += "Server: " + server.DisplayName + "</br>";
}

SPWebService service = farm.Services.GetValue<SPWebService>("");
foreach (SPWebApplication webApplication in service.WebApplications)
{
    hierarchyInfo += "<br>Web Application: " + webApplication.Name + "</br>";

    foreach (SPContentDatabase database in webApplication.ContentDatabases)
    {
        hierarchyInfo += "Content Database: " + database.Name + "</br>";

        foreach (SPSite site in database.Sites)
        {
            hierarchyInfo += "Site Collection: " + site.Url + "</br>";

            foreach (SPWeb web in site.AllWebs)
            {
                hierarchyInfo += "Site: " + web.Title + "</br>";

                foreach (SPList list in web.Lists)
                {
                    if (!list.Hidden)
                    {
                        hierarchyInfo += "List: " + list.Title + "</br>";
                        hierarchyInfo += "Items: " + list.ItemCount + "</br>";
                    }
                }
                web.Dispose();
            }
            site.Dispose();
        }
    }
}
In a sandboxed solution, you can only access objects that are within the boundaries of the site collection to which the solution is deployed. This means that you can use one SPSite object, the SPSite object that represents the site collection that the solution is deployed to. Within that site collection, you can iterate through the SPWeb, SPList, and SPListItem objects. Keep in mind, though, that a sandboxed solution is only allowed to consume a limited amount of resources. These resources are normalized to Resource Points. When the Resource Points of a specific site collection have been used up, all sandboxed solutions in that site collection are shut down until the Resource Points are reset. This happens once every 24 hours by default. This makes iterating through objects in a sandboxed solution a risky exercise, because it can quickly consume many of the available Resource Points. If the site collection that the solution is deployed to grows, it might use a lot of memory and cause issues not just for your solution, but also for other sandboxed solutions in that site collection. When you are designing and building a sandboxed solution, it is important to constantly be aware that the solution should minimize resource usage and ensure that the resources used are as predictable as possible, regardless of the size of the environment. The good news, though, is that you can’t hurt the entire farm from a sandboxed solution—you will only affect the site collection.
Another thing that is crucial to understand when working with the server-side object model is that the original SharePoint objects are created in unmanaged code, in Component Object Model (COM). Some of the current objects are only wrappers around these COM objects, and because of that, they are not automatically disposed of. If you are using a lot of these objects—for example, when you’re iterating through them—you will create a memory leak that can cause serious problems in your environment. The objects that we have to be worried about in the earlier example are the SPSite and SPWeb objects. We have to dispose of these objects in the solutions.
The code in Example 3-1 disposes of the SPSite and SPWeb objects by using SPSite.Dispose() and SPWeb.Dispose(). It is also possible to leverage Using statements to make sure that objects are automatically disposed of. Because not all SPSite and SPWeb objects should be disposed of, it is important that you gain some understanding of when objects should be disposed of and when they shouldn’t. A very extensive article on the subject can be found on MSDN (http://msdn.microsoft.com/en-us/library/ee557362.aspx). This article was written for SharePoint 2010 but is still relevant for SharePoint 2013. There is also a tool that can help, SPDisposeCheck. You can run this tool against your code, or include the SPDisposeCheck rules in the static code analysis tool of your choice (for instance, FXCop) to check your code for memory leaks before you deploy it. Because SPDisposeCheck can occasionally report false positives, you should not just rely on the tool, you should also study the article to gain a good understanding of when objects should be disposed of.
Developing farm solutions
Now it’s time to open up Visual Studio and create a new project. In this section, you will create a new Visual Studio project that will contain a SharePoint 2013 farm solution, a feature, some declarative elements, and a feature receiver. After that, you will make some changes to the solution and look at how to upgrade existing solutions and features.
Creating a SharePoint project in Visual Studio
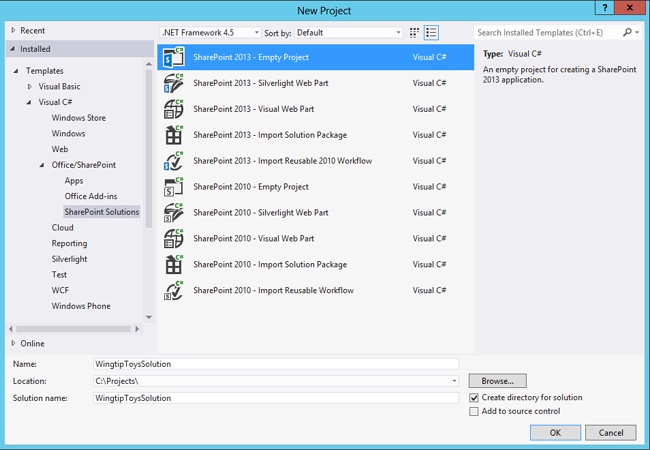
Start a new project by clicking the New Project link on the left side of the screen. The next step is to select a project template. Depending on how you installed Visual Studio, you will be able to select different project templates for different types of projects and different programming languages. The SharePoint project templates are available in Microsoft Visual Basic and Microsoft Visual C#. By default, Visual Basic is selected; if you want to use Visual C# to create SharePoint solutions, you will have to select Visual C# and choose Office | SharePoint. This gives you the option to choose between Apps, Office Add-ins, and SharePoint Solutions. Select SharePoint Solutions and choose the SharePoint 2013 - Empty Project template, as shown in Figure 3-3. By choosing the empty project template you will give yourself maximum flexibility.
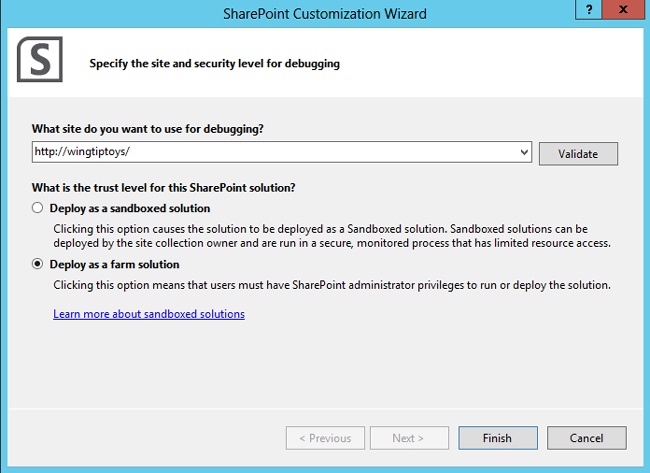
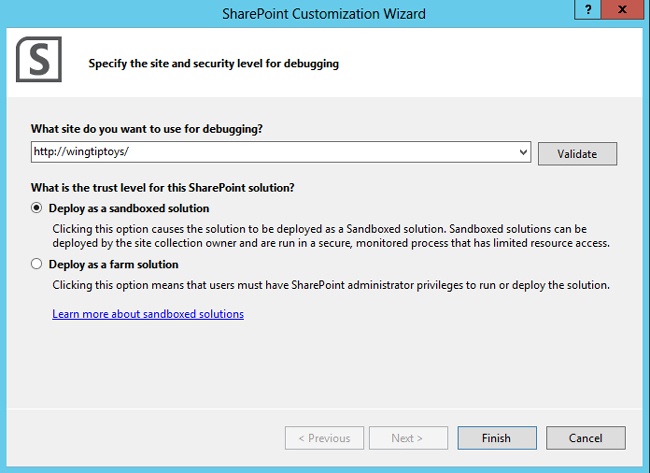
After you click OK, the SharePoint Customization Wizard starts (see Figure 3-4). From here you can choose a URL of the team site that Visual Studio will use as the URL of the site to which the solution will be deployed, and with which the solution can be debugged. When you enter the URL in the SharePoint Customization Wizard, you must provide the URL to a site that is accessible within the local SharePoint farm. The SharePoint Developer Tools use this site URL when testing and debugging the project. The wizard also allows you to choose between a sandboxed solution and a farm solution. WingtipToysSolution will be deployed as a farm solution to http://wingtiptoys. You will find that the solution really is rather empty after creation; it only contains the absolute basics.
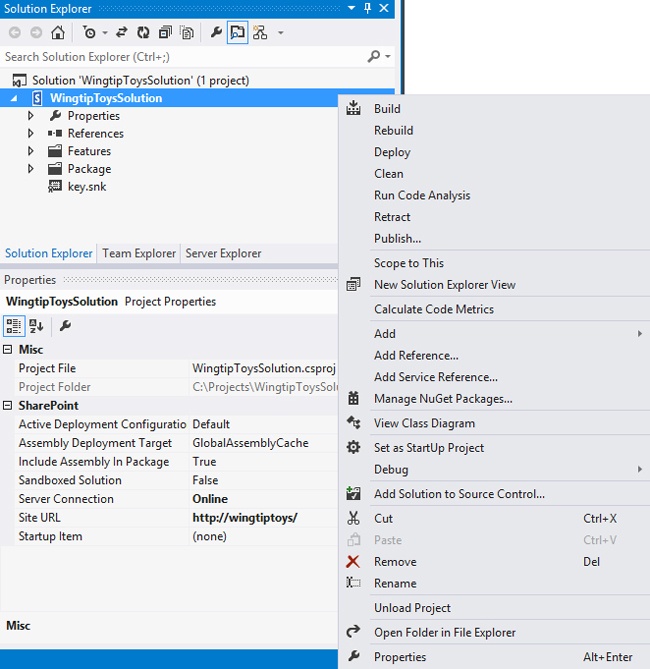
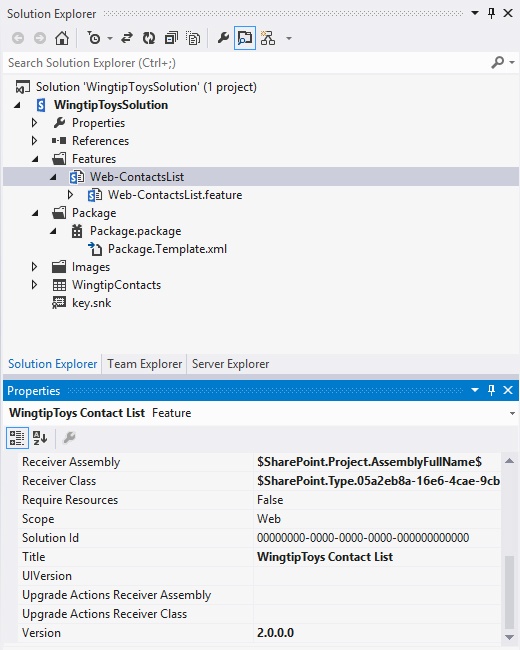
When the new project is created, it is automatically opened and will always show the Solution Explorer. In the Solution Explorer, as shown in Figure 3-5, you can view the contents of your solution. Like all Visual Studio projects, a SharePoint project contains standard nodes such as Properties and References. SharePoint projects have two additional nodes that exist only within SharePoint projects: the Features node and the Package node. You use the Features node to add new features to a SharePoint project. Notice that the Features node is empty when you create a new SharePoint project by using the empty SharePoint project template. You use the Package node to track project-wide settings related to building the project into a SharePoint solution package, or .wsp file.
All SharePoint projects also have two special menu commands: Deploy and Retract. These menu commands, exclusive to SharePoint projects, are available when you right-click the top-level project node in the Solution Explorer. These two menu commands are shown in Figure 3-5. You can use the Deploy command to run a sequence of deployment steps that deploy the solution package to the local farm and the site that you selected in the customization wizard, so that you can test and debug your work. The Retract command reverses the act of deployment by retracting the solution package from the local farm and site.
Designing your SharePoint solution: Features
You now have an empty SharePoint project and can start adding files to it. These files will create the actual functionality that the solution will provide. When you start adding SharePoint files into the solution, features will be added to the Features node automatically. For most files, a web-scoped feature will be created with the name Feature 1. Web-scoped means that the feature can be activated at the lowest level at which features can be activated, which is the subsite or SPWeb level. In all cases you will want to rename the feature so that the name of the feature describes what kind of functionality it contains. It is also a best practice to put the scope of the feature in the name. If you were deploying a custom contacts list, for instance, you could call the feature Web-ContactsList. A feature also has a title and a description. This is displayed in the user interface after deployment, so it should be something descriptive that will tell the person who is thinking about activating the feature what functionality will be added to the site when the feature is activated.
It is important to design the features that you use to add functionality properly. First of all, you have to determine what type of SharePoint files or artifacts you are creating in your solution, and in what scope these artifacts have to be activated. You can choose between the following scopes:
Farm
Web application
Site
Web
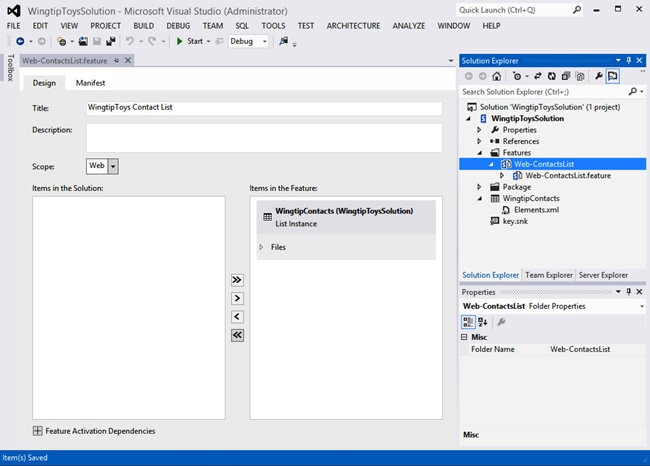
Farm-scoped features contain functionality that should be available in the entire farm. An example is a web template that should be available for users everywhere to create sites based on it. Web application–scoped features contain functionality that is targeted at a specific web application. An example is a timer job. A site-scoped feature is used to add functionality to specific site collections, such as content types and site columns. A web-scoped feature, as shown in Figure 3-6, could be used to add a custom type of list or library to a subsite.
When you are designing your solution and its features, it is important that you create the right amount of features for the right reasons. There is no magic number; as with everything related to SharePoint, the right amount of features depends on your solution. You will definitely need different features for functionality that has to be activated at a different scope. This is relatively easy to determine. Some SharePoint artifacts can only be activated at a specific scope. Content types and site columns, for instance can only be activated at the site collection level, so they will always be activated by using a site-scoped feature. Lists are a bit more difficult; they can be activated at the site collection or subsite level. It is up to you to determine whether you want the list to always be created in the root site of a site collection, or whether you want the list to be available on subsites as well. If you want users of subsites to be able to use the list, you can activate it by using a web-scoped feature. Farm-scoped and web application–scoped features can only be managed from Central Administration or by using Windows PowerShell. This means that they can only be activated or deactivated by SharePoint administrators who have access to the server. Site-scoped and web-scoped features can be activated by site collection administrators (site) or site owners (web).
When you have several features that can be activated at the same scope, think about whether you always want the artifacts to be activated and deactivated at the same time, as well as whether they should be updated at the same time, and whether the different artifacts are part of the same piece of functionality, or whether they are completely different things. For instance, site columns and content types, and master pages and style sheets, are often activated at the site collection level. Activating site columns and content types at the same time makes sense, and updates to both are often deployed at the same time. Master pages and style sheets, however, provide a completely different type of functionality (a custom look and feel for the site), and it’s likely that when a column is added to the site, the visual design won’t change. Similarly, when the visual design changes, that doesn’t necessarily mean that the content types on the site collection would have to change. In this case, you would likely create two features:
Site-ColumnsAndContentTypes
Site-WingtipToysDesign
Try to make sure that the feature names have a reasonable length. If names get too long, it can cause problems with deployment.
Adding declarative elements
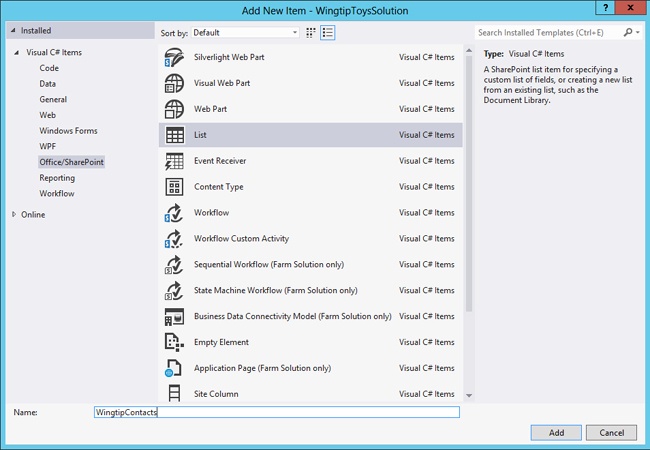
Let’s add a list to the solution. You can do this by right-clicking the project node in the Solution Explorer and clicking Add and New Item. Next you can select the type of item to add to your solution. For this example, choose List and call it WingtipContacts (see Figure 3-7).
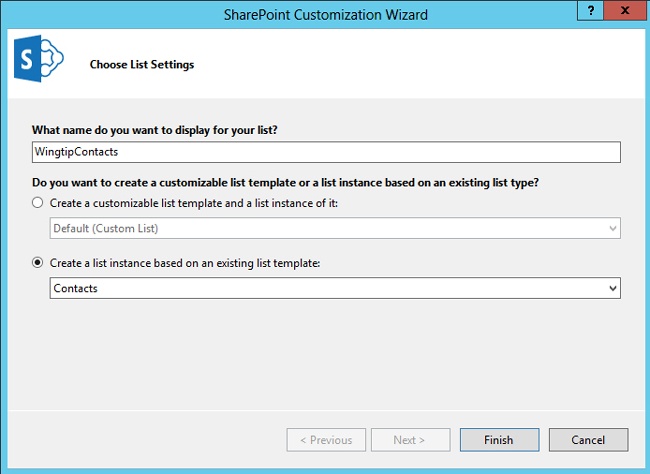
In the next dialog box, you can choose the display name of the list and whether you want the list to be customizable or non-customizable. You can also choose what type of list you want to base your custom list on.
If you create a customizable list, you will create a custom list definition and a custom list instance. With the custom list definition, you will be adding a new list template or a new type of list to the site. Users can use this custom list type to create their own list instances based on it. When you create a custom list definition, you choose a list type that you will use as a basis for your custom list type. Using this as a starting point, you can then add, remove, or modify columns and views that are created when a list instance is created based on your custom list definition. A custom list instance is also created when the feature that your list is part of is activated.
If you create a non-customizable list, you are only creating a custom list instance, based on the list type that you select as the basis for your custom list instance in Visual Studio. When the feature that the list instance is part of is activated, the list instance will be created on the site. In this example, you will be creating a non-customizable list, and thus a list instance (see Figure 3-8).
After you add the list instance to the solution, a feature will be created. The feature will be called Feature 1, and it will be web scoped. The list instance will be added to the feature automatically. Rename the feature to Web-ContactsList and leave the scope at Web. If you are creating multiple SharePoint artifacts in the same solution and you want to use multiple features to activate the artifacts in your SharePoint environment, you will have to make sure that you manage your features properly. Whenever a new artifact is added to your solution, SharePoint will add it to a feature. This might not be the right feature, though. And even if you add your artifact to the right feature, it will not be automatically removed from any other features to which it was added, so make sure you actively check all features to make sure that they contain the right artifacts before you deploy your solution.
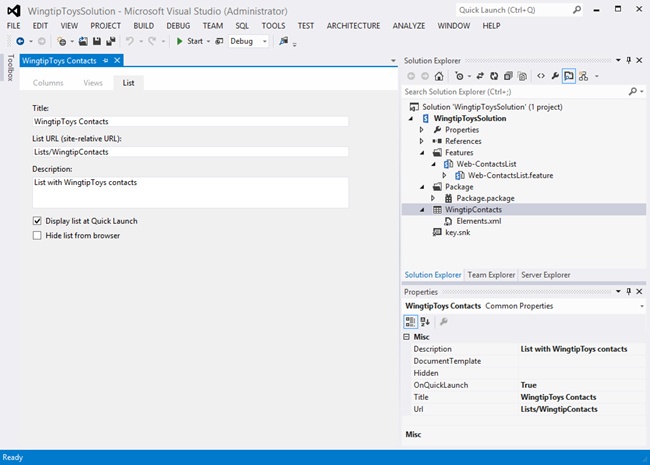
Figure 3-9 shows the designer view of the WingtipToys contacts list instance. Here you can fill in a title, description, and URL, and choose whether the list should be displayed on the Quick Launch bar on the left side of the screen and whether the list should be hidden or not. The title and description are seen by users who are working with the list, so make sure this is something they can relate to.
Adding a feature receiver
Every feature can have a feature receiver added to it. You can use a feature receiver to write an event handler that will fire when a feature is activated or deactivated. For both events, you can choose whether to fire the event handler synchronously while the feature is being activated or deactivated, or whether to fire it asynchronously after the feature has been activated or deactivated. The code you write in these event handlers can access the SharePoint server-side object model, and it can use the properties to access and modify the site collection or site on which the feature is activated or deactivated. For example, you can write an event handler that fires during feature activation and performs routine initialization tasks such as creating new lists and adding list items. You can also extend the site by adding pages, navigation links, and Web Part instances.
To create a feature receiver, right-click the feature’s top-level node and click Add Event Receiver. When you add an event receiver by using this technique, the SharePoint Developer Tools do quite a bit of work for you behind the scenes. First, they add a source file, which is based on either C# or Visual Basic, depending on the language of the underlying project. If you create a feature receiver for the feature named Web-ContactsList, the SharePoint Developer Tools create a C# source file named Web-ContactsList.EventReceiver.cs. The SharePoint Developer Tools also add configuration data behind the scenes that hooks up the feature receiver to the feature by adding the ReceiverClass and ReceiverAssembly attributes to the feature, so that SharePoint recognizes the feature receiver and so that the event handlers added to the feature receiver are executed at the correct times.
The source file created for the feature receiver contains a class definition for the feature receiver that inherits from the SPFeatureReceiver class. The feature receiver contains method stubs that are commented out that represent the events that you can handle. You simply uncomment the stubs and add your custom code. The SharePoint Developer Tools also add a special GUID attribute when creating a new feature receiver class, to give it a unique identifier. You shouldn’t remove the GUID attribute from a feature receiver class, because the SharePoint Developer Tools use the GUID behind the scenes during the packaging process.
In the following example, you will add code for the FeatureActivated and FeatureDeactivating methods so that you can run custom C# code whenever the feature is activated or deactivated. Example 3-2 shows the stubs for the different events for which you can create event handlers. Implementations have been created for the FeatureActivated and FeatureDeactivating events. When the feature is activated, a custom view is added to the Project Contacts list that shows a first name, last name, company, email address, and mobile phone number for a contact. The event handler also makes sure that the list is displayed on the Quick Launch bar on the left side of the screen. When the feature is deactivated, you remove the custom view and also remove the link to the list from the Quick Launch bar. Note that when the feature is deactivated, you can still access the list by browsing to the Site Contents page. SharePoint doesn’t clean up by deleting the list that was created when the feature was activated. This is a good thing; if SharePoint deleted the list, users might lose data because the feature is deactivated. You should be aware of this yourself as well. Although using an event receiver to clean up after yourself is a good thing in almost all cases, you should make sure not to delete a user’s data while cleaning up.
using System;
using System.Runtime.InteropServices;
using System.Security.Permissions;
using Microsoft.SharePoint;
using System.Collections.Specialized;

namespace WingtipToysSolution.Features.Web_ContactsList
{
    /// <summary>
    /// This class handles events raised during feature activation,
    /// deactivation, installation, uninstallation, and upgrade.
    /// </summary>
    /// <remarks>
    /// The GUID attached to this class may be used during packaging
    /// and should not be modified.
    /// </remarks>

    [Guid("05a2eb8a-16e6-4cae-9cb1-4a181c94fd1e")]
    public class Web_ContactsListEventReceiver : SPFeatureReceiver
    {
        string _viewName = "Project Contacts";
        public override void FeatureActivated(SPFeatureReceiverProperties properties)
        {
            SPWeb web = properties.Feature.Parent as SPWeb;
            SPList contactsList = web.GetList("/Lists/WingtipContacts");
            contactsList.OnQuickLaunch = true;

            SPViewCollection listViews = contactsList.Views;
            StringCollection viewFields = new StringCollection();
            viewFields.Add("FirstName");
            viewFields.Add("Title");
            viewFields.Add("Company");
            viewFields.Add("Email");
            viewFields.Add("CellPhone");

            listViews.Add(_viewName, viewFields, string.Empty, 30, true, true);
            contactsList.Update();
        }


        public override void FeatureDeactivating(SPFeatureReceiverProperties properties)
        {
            SPWeb web = properties.Feature.Parent as SPWeb;
            SPList contactsList = web.GetList("/Lists/WingtipContacts");
            contactsList.OnQuickLaunch = false;

            SPView listView = contactsList.Views[_viewName];
            contactsList.Views.Delete(listView.ID);
            contactsList.Update();
        }

    }
}
Understanding the SharePoint root directory
The fundamental architecture of SharePoint Foundation relies on a set of template files that are stored in a special directory on the local file system of each SharePoint server. This folder is called the SharePoint root directory. On a SharePoint 2007 server, the name of this folder was 12; on a SharePoint 2010 server, it was 14. On a SharePoint 2013 server, the root folder is called 15, but you will find that all SharePoint 2013 servers also contain a 14 folder. This folder is used to make sure that site collections can run in SharePoint 2010 mode. When you run in SharePoint 2010 mode, a site collection on SharePoint 2013 looks like a SharePoint 2010 site. This is mainly useful when you are upgrading an environment from SharePoint 2010 to SharePoint 2013. Typically the root directory can be found at the following path:
C:Program FilesCommon FilesMicrosoft SharedWeb Server Extensions15
If you’ve installed only SharePoint Foundation and not SharePoint Server 2013, the SharePoint root directory contains a stock set of images, templates, features, and pages. If you install SharePoint Server 2013, the SharePoint root directory contains the same stock files for SharePoint Foundation and also a wealth of template files to provide additional functionality beyond that supplied by SharePoint Foundation.
When you are creating a SharePoint solution that is to be deployed as a farm solution, many of the types of template files that you add to your solution will be deployed in specific directories within the SharePoint root directory. Table 3-2 lists some of the more commonly used directories, along with the types of template files they contain.
Path relative to SharePoint root directory | Template file types |
/ISAPI | Web services (.svc, .ashx, and .asmx) |
/Resources | Resource files (.resx) |
/TEMPLATE/ADMIN | Application pages used exclusively in Central Administration |
/TEMPLATE/CONTROLTEMPLATES | ASP.NET user controls (.ascx) |
/TEMPLATE/FEATURES | Feature files |
/TEMPLATE/IMAGES | Images |
/TEMPLATE/LAYOUTS | Application pages (.aspx) |
/TEMPLATE/LAYOUTS/1033/STYLES | CSS Files (.css) |
/TEMPLATE/LAYOUTS/ClientBin | CSOM files (.jz, .xap) |
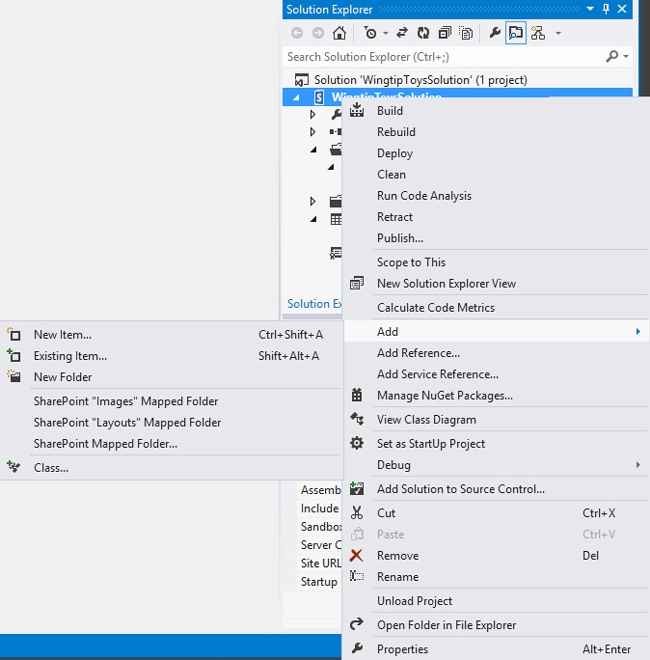
Several SharePoint artifacts that are part of the SharePoint Development Tools are deployed to the SharePoint root directory when a project is deployed, either by using Visual Studio or by using Windows PowerShell. For instance, features and the files that they contain are automatically deployed to the /TEMPLATE/FEATURES folder in the SharePoint root directory. You can also use Visual Studio to add files to the SharePoint root directory in a different way. When you right-click the project name and click Add, you can choose to add a mapped folder (see Figure 3-10). You can map a folder to any subfolder of the SharePoint root directory. When you add a file to a mapped folder in Visual Studio, the file will be deployed to the mapped directory in the SharePoint root directory when the solution isdeployed. The SharePoint Development Tools have made it easy by creating two shortcuts for creating mapped folders to the IMAGES and the LAYOUTS folders.
You will now add an image to the example solution that you will deploy to the IMAGES directory in the SharePoint root directory. Just right-click the top-level project node in Solution Explorer, expand the Add menu, and click the SharePoint “Images” Mapped Folder command. After you’ve created the Images folder inside your project, you should be able to observe that the SharePoint Developer Tools automatically created a child folder with the same name as the current project. In this example, the SharePoint Developer Tools created an Images folder inside the project that contains a child folder named WingTipToysSolution, as shown in Figure 3-11. This child folder is added to make sure that you can never accidentally overwrite out-of-the-box SharePoint files or files deployed by using a different custom solution. It is a best practice to always use a namespaced subfolder when deploying files into the SharePoint root directory, and the Developer Tools make this an easy best practice to follow.
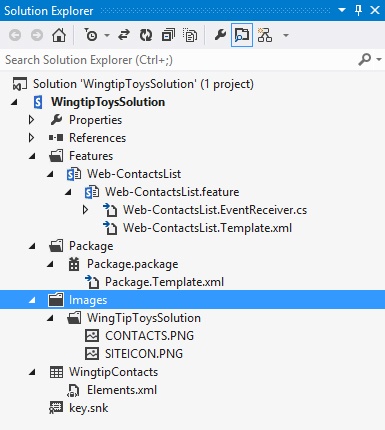
You can add custom image files to this folder, such as Contacts.png and SiteIcon.png, the ones shown in Figure 3-11. You can add files to a mapped folder by right-clicking the child folder (in this case, the one named WingTipToysSolution) and then clicking Add | Existing Items. When the resulting dialog box opens, you can navigate to the folder on your development workstation that contains the files you want, and select them to be copied into your mapped folder. You can also browse to the files you want to include in the solution by using Windows Explorer. You can then simply copy the files and paste them into the WingtipToysSolution folder by right-clicking the folder and choosing Paste. Mapped folders don’t have to be added to features to be deployed; they are automatically deployed when the .wsp solution is deployed.
Deploying and debugging farm solutions
Now that you have a SharePoint project with a list, a feature, a feature receiver, and two images, it’s time to package and deploy the solution.
If you expand the Package node in a SharePoint project, you’ll find an inner node named Package.package. If you double-click this node, the SharePoint Developer Tools display the Package Designer. In the lower left-hand corner of the Package Designer are three tabs: Design, Advanced, and Manifest. These tabs allow you to switch back and forth between different views of the project’s solution package. The Design view allows you to add features and files to the package. By default, all features and files that don’t have the NoDeployment property set on them are added to the package by the Developer Tools. The Manifest view reveals the XML that is written into the manifest.xml file when the SharePoint Developer Tools builds the project into a solution package. In most scenarios, a developer doesn’t need to inspect or care about the XML that goes into the manifest.xml file. After all, the SharePoint Developer Tools take care of creating the package for you.
In other scenarios, however, a developer will need to directly edit the manifest.xml file. For example, when you need to add an XML element that the SharePoint Developer Tools don’t directly support, such as the ActivationDependencies element, you have to add it manually to manifest.xml.
If you look at the Package node in Solution Explorer in Figure 3-11, you’ll notice a source file named Package.Template.xml. If you open this file, you’ll find that it has a top-level Solution element but no inner elements. All you need to do is add the ActivationDependencies element to this file inside the Solution element. When the SharePoint Developer Tools generate the manifest.xml file, they merge the XML elements they create behind the scenes with any XML elements you have added to Package.Template.xml. By using this technique, you can call on your knowledge of SharePoint development to supplement what the SharePoint Developer Tools support directly.
When your solution is properly packaged up, you can deploy it. If you right-click the top-level project node inside Solution Explorer to display the shortcut menu, you’ll find a Deploy command and a Retract command. You’ll use these commands constantly when you test and debug SharePoint projects.
You might be wondering what happens when you execute the Deploy command. The answer is, it depends. More specifically, it depends on which deployment configuration your project is using. You can view and modify the available deployment configurations for a SharePoint project on the SharePoint tab of the project properties dialog box, as shown in Figure 3-12. Every new SharePoint project is created with two deployment configurations, Default and No Activation. You can add more deployment configurations if you want something different. However, you can’t modify the Default and No Activation configurations. You can only modify deployment configurations you’ve added.
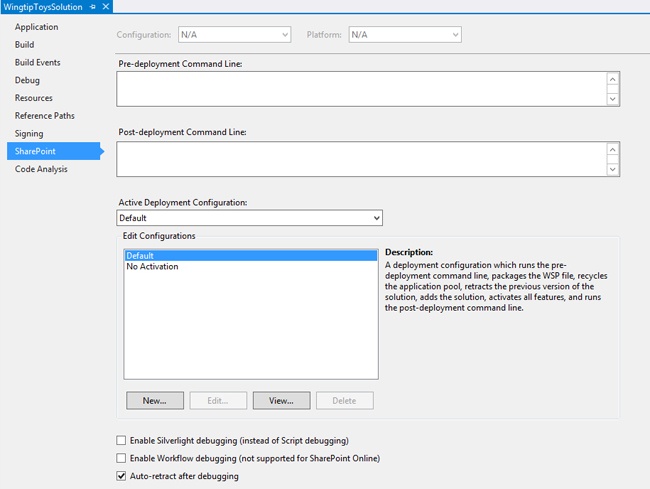
Notice the two text boxes on the SharePoint tab: Pre-Deployment Command Line and Post-Deployment Command Line. By using these text boxes, you can add command-line instructions that will execute either just before or directly after the active deployment configuration is processed. For example, you can add a command-line instruction to call a custom Windows PowerShell script. This ability to change or modify the deployment configuration for a SharePoint project provides a convenient degree of flexibility. The SharePoint Developer Tools allow you to control the processing that occurs behind the Deploy and Retract commands by using units of execution known as deployment steps.
To view the deployment steps within a specific deployment configuration, select that deployment configuration on the SharePoint tab and then click the View button. Figure 3-13 shows the sequence of deployment steps for the Default deployment configuration. First, the target IIS application pool is recycled. Then, any previous deployment of the solution package is retracted and removed. Next, the latest build of the project’s solution package is installed and deployed. Finally, any project features that have a Scope setting of either Web or Site are automatically activated.
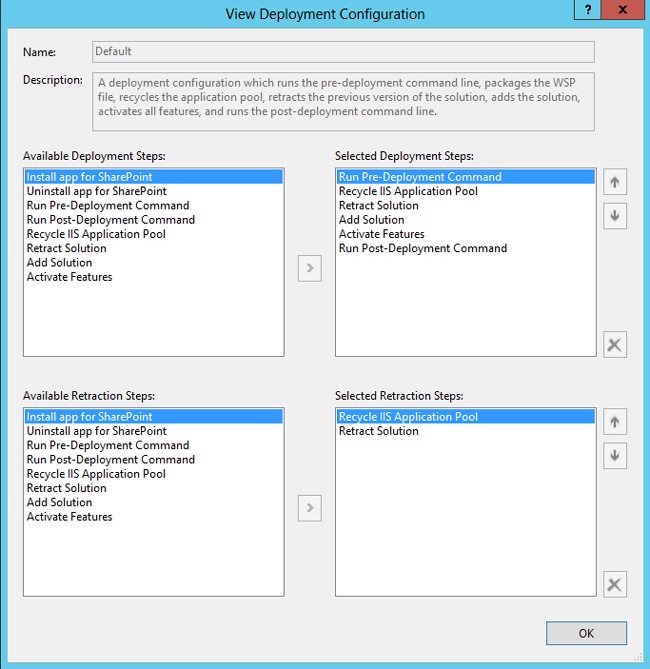
On the left side of the View Deployment Configuration dialog box shown in Figure 3-13, there is a list of available deployment steps that come out of the box with the SharePoint Developer Tools. If you add a new deployment configuration, you can use this screen to add the steps you want in your custom deployment configuration.
To deploy your solution to your development server, all you have to do now is click the Deploy command. However, if you want to deploy your solution on a separate test server or even a production server, you need to get the .wsp solution package and move that to the server you want to deploy it to. When the Deploy or Publish command is run, the .wsp package is created and put in the binDebug or binRelease folder of the project, depending on whether you have your build configuration set to Debug or Release. If you were to deploy your solution to a production environment, you should create a Release build by using Deploy or Publish. However, if you want to deploy to your development server and you want to test and potentially debug your solution, you should create a Debug build. When you’ve got the package, you can copy it to the server or farm you want to deploy it to and run the Windows PowerShell scripts from Chapter 2 to install it.
Go ahead and deploy your solution to your development environment by clicking the Deploy command. If you want to see how your code is executed, you can debug your solution. You will use debugging to step through the execution of the code-behind in your solution one line at a time. This can be useful if you are seeing issues you can’t explain, or if you are seeing results you didn’t expect. You can start debugging by pressing F5 or by opening up the Debug menu in Visual Studio 2012 and clicking Start Debugging, or you can attach your project to a process by clicking Attach To Process. Code that is called from the browser usually runs in the w3wp.exe process, so by attaching your project to the w3wp.exe processes, you can browse your SharePoint site as you normally would, and Visual Studio will hold execution when a breakpoint is hit. You can then go into your solution and step through your code to monitor exactly what happens during execution.
For the WingtipToysSolution example, you can use both approaches. Click Start Debugging. The solution will be rebuilt and deployed, and a new browser window will open with the site that you have set as the site the solution should be deployed to. Debugging will have to be enabled in the web.config of the site; if this is not yet the case, Visual Studio 2012 will prompt you about this and will offer to resolve it, as shown in Figure 3-14.

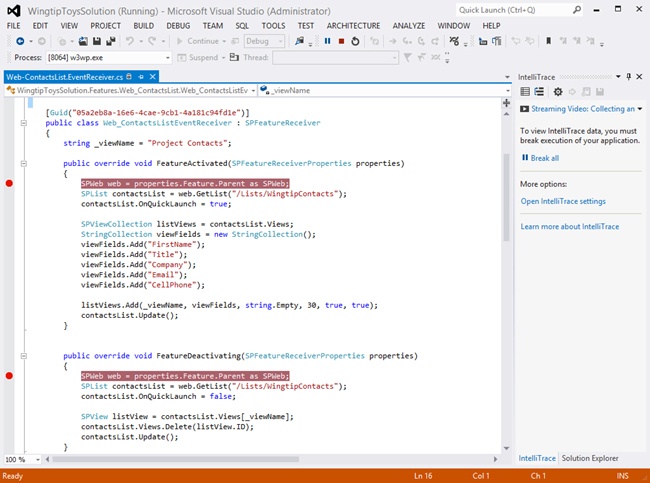
The only code-behind in WingtipToysSolution is in the feature receiver, so you should set a breakpoint in the event receiver code. The breakpoints from Figure 3-15 will be hit when the feature is either activated or deactivated. You can then use F11 and F10, or Step Into and Step Over, to step through the code. You can check the values of individual objects and variables to make sure that these are what you expect them to be.
Updating farm solutions
After one of your solution packages has been deployed in a production farm, you might need to update some of the files that have already been deployed. SharePoint supports the concept of updating a solution package. This technique allows you to replace existing files that have already been deployed, as well as to deploy new files that weren’t part of the original solution package deployment.
For example, imagine a simple scenario in which WingtipToysSolution.wsp has already been deployed and its feature definition has been activated in several sites. What if, after the fact, Wingtip Toys decides that they want to add a custom document library to the solution as well? SharePoint makes it easy to accommodate this change. You can simply update your Visual Studio project by adding a document library and a feature. Then you can rebuild the solution package and run the Update-SPSolution cmdlet to deploy the updated solution:
$SolutionPackageName  = "WingtipToysSolution.wsp"
$SolutionPackagePath = "C:SolutionsWingtipToysSolution.wsp"
Update-SPSolution -Identity $SolutionPackageName
                  -LiteralPath $SolutionPackagePath
                  -Local -GACDeployment
As you’ll learn in the next section, using the technique of updating a solution provides the means to update a feature definition when you need to upgrade a feature. Updating a solution also provides a simple way to replace files and components with enhanced versions. For example, imagine that you need to fix a bug in the C# code you’ve written inside the ActivateFeature event handler, or you want to replace an existing image of a logo with a new one. You can simply update the code or the image and build a new version of the solution package. When you update the solution, the old copy of WingtipToysSolution.dll in the global assembly cache is replaced with the new copy, and the SharePoint worker process restarts to ensure that the new version gets loaded.
A lot of the things that you can do by updating a solution can also be done by retracting and reinstalling a solution, as long as you are not using the feature upgrade functionality described in the next section. Microsoft considers updating the solution to be a best practice at this point, though, and also enforces it when solutions are deployed to SharePoint Online dedicated environments.
There is currently no Upgrade command available to upgrade solutions directly from Visual Studio 2012. You could solve this by creating a new deployment configuration that doesn’t contain the deployment steps for Retract Solution or Add Solution. Then you could add a Post-Deployment Command Line instruction call to a custom Windows PowerShell script that runs the Update-SPSolution cmdlet.
Another approach is to either create or find a custom deployment step that adds the functionality you need. This option is possible because the team that created the SharePoint Developer Tools designed deployment steps to be extensible. A developer can create a custom extension for Visual Studio 2012 and the SharePoint Developer Tools that adds custom deployment steps. Within the SharePoint developer community, Visual Studio extensions that extend the SharePoint Developer Tools with a custom deployment step for updating solutions—and much more—are already available.
Upgrading features
SharePoint Foundation supports feature activation at four different levels: site, site collection, web application, and farm. Whenever a feature definition is activated, SharePoint Foundation creates a feature instance that tracks metadata about the underlying feature definition. The feature instance tracks feature properties such as Id, Title, and Version. The Version property of a feature instance represents the current version of the feature definition at the time of activation. After you’ve pushed a feature definition into a production farm and it has been activated, you might be required to update it to deal with changing business requirements. You can define upgrade actions inside a feature definition that will be processed when a feature instance is upgraded to the new version. Upgrade actions can be created inside the feature.xml file by using declarative XML and can also execute custom event handlers written in C# or Visual Basic.
After you’ve updated a feature definition in a Visual Studio project such as WingtipToysSolution, you can rebuild the solution package and push the new version out into a production farm or a staging farm by using the Update-SPSolution cmdlet. However, pushing out a new version of a feature definition by using Update-SPSolution is only half the story.
The farm now has an updated feature definition, but all the existing feature instances are still based on a previous version of the feature definition. You have a couple of different options with regard to how to go about updating existing feature instances. You can either update feature instances one at a time by querying for the ones that need to be updated, or you can update all of them at the same time by running either the SharePoint Products Configuration wizard or PSConfig.
Updating a feature definition with upgrade actions
SharePoint Foundation tracks the version numbers for feature definitions by using a four-part number similar to version numbers for assemblies in the Microsoft .NET Framework. The initial version of the WingtipToys Contacts List feature had a version number of 1.0.0.0. This version number will have to be specified explicitly when the initial version of a feature is created, because by default it will be set to 0.0.0.0. All the sites in which the WingtipToys Contacts List feature has been activated also have version 1.0.0.0 feature instances.
The initial version of the WingtipToys Contacts List feature definition includes a single element manifest named elements.xml. This element manifest is referenced by using an ElementManifest element in the feature.xml file:
<Feature xmlns="http://schemas.microsoft.com/sharepoint/"
         Title="WingtipToys Contact List"
         Id="593228ab-7fcd-4a81-a4b8-ea77b2cbe1cc"
         Scope="Web">
  <ElementManifests>
    <ElementManifest Location="WingtipContactsElements.xml" />
  </ElementManifests>
</Feature>
Now you’ll begin updating the Wingtip Contacts List feature definition. Start by incrementing the Version number. You can do this in the feature’s property pane, as shown in Figure 3-16.
The next step is to add a new ListInstance element to the feature definition to create a Calendar along with the Contacts list, to store appointments in. You can add the calendar as a separate feature, or you could add the ListInstance XML for the calendar into the Contacts list element.xml file. Neither of these options would allow you to use the feature upgrade framework, though, and both would require you to come up with a solution to update existing instances or sites. Adding the XML into an existing elements.xml is not a recommended approach, but in certain scenarios, adding a different feature can be a valid option. In this case, however, you will want to use the feature upgrade framework, so in order to do that you will add a new element manifest file to the Contacts List feature. This element manifest will have to contain the elements that you want to provision during the upgrade process.
To create the Calendar list instance, follow the same steps that you did for the Contacts list instance, but this time base your list instance on a Calendar list, instead of a Contacts list. The list instance will automatically be added to the feature, but it will only be created when the feature is activated. This means that the Calendar will not be created on sites that already have the first instance of the feature activated on them. To add the new Calendar list to sites that have the first instance of the feature activated on them, you have to modify the feature.xml file. You can do this by going to the Manifest tab of the feature in Visual Studio 2012 and displaying the Edit options. You can now add an UpgradeActions element inside the top-level Feature element. The UpgradeActions element can optionally contain a VersionRange element that defines a BeginVersion attribute and an EndVersion attribute. If no VersionRange is specified, the upgrade action will be applied to all instances of the feature, regardless of their version. Inside the VersionRange element (or the UpgradeActions element if no VersionRange is specified), you should add an ApplyElementManifests element with an inner ElementManifest element. By making the following modification to the feature.xml file, you can ensure that SharePoint will inspect the Calendar’s elements.xml file during the feature upgrade process for a site and provision the Calendar list (see Example 3-3). Visual Studio and the SharePoint Developer Tools will merge the changes that you make with the generated feature.xml contents.
<Feature xmlns="http://schemas.microsoft.com/sharepoint/"
         Title="WingtipToys Contact List" Id="593228ab-7fcd-4a81-a4b8-ea77b2cbe1cc"
         ReceiverAssembly="WingtipToysSolution, Version=1.0.0.0, Culture=neutral,
                          PublicKeyToken=d829d679b4cb139f"
         ReceiverClass="WingtipToysSolution.Features.
                       Web_ContactsList.Web_ContactsListEventReceiver"
         Scope="Web"
         Version="2.0.0.0">
  <UpgradeActions>
    <VersionRange BeginVersion="0.0.0.0" EndVersion="2.0.0.0">
      <ApplyElementManifests>
        <ElementManifest Location="ContactsCalendarElements.xml" />
      </ApplyElementManifests>
    </VersionRange>
  </UpgradeActions>
  <ElementManifests>
    <ElementManifest Location="WingtipContactsElements.xml" />
    <ElementManifest Location="ContactsCalendarElements.xml" />
  </ElementManifests>
</Feature>
The updated version of feature.xml has two different references to ContactsCalendarElements.xml. The first reference is used when an older feature instance is upgraded to version 2.0.0.0. The second reference is used by SharePoint when a user activates the Wingtip Contact list feature definition in a site for the first time, using version 2.0.0.0. In this case, the feature instance is never upgraded, but the feature definition must still provision a Calendar list.
Adding code-behind custom upgrade actions
Earlier in this chapter, you saw how to extend a feature definition with a feature receiver by creating a public class that inherited from SPFeatureReceiver. In addition to the event handler methods you added, FeatureActivated and FeatureDeactivating, you will now add another event handler method, FeatureUpgrading, which must be overwritten to execute code during a custom upgrade action. The FeatureUpgrading event handler is a bit more complicated than the event handlers for FeatureActivated and FeatureDeactivating. When you add a feature receiver to a feature, the SharePoint Developer Tools will add ReceiverAssembly and ReceiverClass attributes to the UpgradeActions element, as shown in Example 3-4. To add upgrade steps, you must add one or more CustomUpgradeAction elements inside the UpgradeActions element and optionally also inside a VersionRange element.
<Feature xmlns="http://schemas.microsoft.com/sharepoint/"
         Title="WingtipToys Contact List"
         Id="593228ab-7fcd-4a81-a4b8-ea77b2cbe1cc"
         ReceiverAssembly="WingtipToysSolution, Version=1.0.0.0, Culture=neutral,
                          PublicKeyToken=d829d679b4cb139f"
         ReceiverClass="WingtipToysSolution.
                       Features.Web_ContactsList.Web_ContactsListEventReceiver"
         Scope="Web"
         Version="2.0.0.0">
  <UpgradeActions
   ReceiverAssembly="WingtipToysSolution, Version=1.0.0.0, Culture=neutral,
     PublicKeyToken=d829d679b4cb139f"
  ReceiverClass="WingtipToysSolution.Features.Web_ContactsList.
  Web_ContactsListEventReceiver">
    <VersionRange BeginVersion="0.0.0.0" EndVersion="2.0.0.0">
      <CustomUpgradeAction Name="UpdateContactsListTitle">
        <Parameters>
          <Parameter Name="NewListTitle">New and improved Contacts</Parameter>
        </Parameters>
      </CustomUpgradeAction>
      <ApplyElementManifests>
        <ElementManifest Location="ContactsCalendarElements.xml" />
      </ApplyElementManifests>
    </VersionRange>
  </UpgradeActions>
  <ElementManifests>
    <ElementManifest Location="WingtipContactsElements.xml" />
    <ElementManifest Location="ContactsCalendarElements.xml" />
  </ElementManifests>
</Feature>
As shown in Example 3-4, a CustomUpgradeAction element is defined with the Name attribute and a parameter collection, which here contains only a single entry. It is essential to understand that the FeatureUpgrading event handler will execute once for each CustomUpgradeAction element. If you don’t add at least one CustomUpgradeAction element, the FeatureUpgrading event handler will never fire.
You can add as many CustomUpgradeAction elements as you want. When you implement the FeatureUpgrading event handler, you can use the parameter named upgradeActionName to determine which custom upgrade action is being processed, and you can use the argument-named parameters to retrieve the parameters defined by the currently processing custom upgrade action.
In this case, the only custom upgrade action is named UpdateContactsListTitle, and it contains a single parameter, NewListTitle. The implementation of the FeatureUpgrading event handler in Example 3-5 uses a C# switch statement to execute the correct code for the custom upgrade action, named UpdateContactsListTitle. Notice how the implementation must retrieve the value for the NewListTitle parameter to properly update the list title.
public override void FeatureUpgrading(SPFeatureReceiverProperties properties,
    string upgradeActionName,
    System.Collections.Generic.IDictionary<string, string> parameters)
{
    // perform common initialization for all custom upgrade actions
    SPWeb web= properties.Feature.Parent as SPWeb;

    if (web != null)
    {
        SPList contactsList = web.GetList("/Lists/WingtipContacts");

        // determine which custom upgrade action is executing
        switch (upgradeActionName)
        {
            case "UpdateContactsListTitle":

                //*** begin code for UpdateContactsListTitle upgrade action
                string newListTitle = parameters["NewListTitle"];
                contactsList.Title = newListTitle;
                contactsList.Update();
                //*** end for UpdateSiteTitle upgrade action

                break;
            default:
                // unexpected feature upgrade action
                break;
        }
    }
}
We’ve now walked through adding an UpgradeActions element to the feature.xml file to upgrade a feature instance from version 1.0.0.0 to version 2.0.0.0. Keep in mind that this structure of the UpgradeActions element provides a good deal of flexibility to help you deal with future updates. Consider the scenario of pushing out a version 3.0.0.0 update. You might need to upgrade some feature instances that are currently in version 1.0.0.0, in addition to feature instances that are in version 2.0.0.0. You can add multiple VersionRange elements to differentiate between these two scenarios. VersionRange elements are processed in the order in which they are specified. If VersionRange elements overlap, all upgrade actions that apply to a feature instance will be executed. In the following example, the first two actions will both be applied to feature instances that are currently on version 1.0.0.0:
<UpgradeActions>

  <VersionRange BeginVersion="1.0.0.0" EndVersion="2.0.0.0">
    <!-- upgrade actions for upgrading from version 1 to 2 -->
  </VersionRange>

  <VersionRange BeginVersion="1.0.0.0" EndVersion="3.0.0.0">
    <!-- upgrade actions for upgrading from version 1 to 3 -->
  </VersionRange>

  <VersionRange BeginVersion="2.0.0.0" EndVersion="3.0.0.0">
    <!-- upgrade actions for upgrading from version 2 to 3 -->
  </VersionRange>

</UpgradeActions>
Upgrading feature instances
After you’ve updated the feature definition, you must then push out the updated files by using the Update-SPSolution cmdlet, as shown earlier in the chapter. You’re still not done, however, because you still have to make sure that all existing feature instances are updated as well. You can either update feature instances one at a time by querying for the ones that need to be updated, or you can update all of them at the same time by running the SharePoint Products Configuration wizard or PSConfig.
To run the SharePoint Products Configuration wizard, start it by selecting it from the Start menu if you are running Windows Server 2008 R2, or you can select the app tile if you are running Windows Server 2012. After the wizard is started, you can simply click Next until the end. Be aware, though, that running the wizard means that your SharePoint farm will temporarily be offline because the IIS sites and the SharePoint timer job will be reset. Microsoft also uses this approach to update existing features. This is one of the reasons why you always have to run the Configuration wizard or PSConfig after installing a SharePoint Cumulative Update (CU) or Service Pack (SP).
If you prefer a more gracious approach, you will have to put more effort into updating existing feature instances. You must run a query to find all the feature instances that need to be updated, and you must then call the Upgrade method on each feature instance to trigger the feature upgrade process. When the Upgrade method is called on a feature instance, SharePoint triggers the upgrade actions you’ve defined in your feature definition.
You can use the server-side object model to query for all the feature instances that require an upgrade. The SPWebApplication class exposes a QueryFeatures method that accepts the GUID identifier for a feature definition and returns all the associated feature instances. The QueryFeatures method has an overloaded implementation, which also allows you to filter the query based on whether the feature instance is up to date with the farm’s current version of the feature definition. Here’s a simple C# console application that executes a query to retrieve all feature instances requiring upgrade and explicitly calls the Upgrade method:
// get reference to target web application
Uri webAppUrl = new Uri("http://wingtiptoys");
SPWebApplication webApp = SPWebApplication.Lookup(webAppUrl);

// query web application for feature instances needing an upgrade
Guid featureDefinitionId = new Guid("593228ab-7fcd-4a81-a4b8-ea77b2cbe1cc ");
SPFeatureQueryResultCollection features =
  webApp.QueryFeatures(featureDefinitionId, true);

// enumerate through feature instances and call Upgrade
foreach (SPFeature  feature in features) {
  feature.Upgrade(true);
}
Although the C# code from the console application is easy to read and understand, it doesn’t provide a practical way to upgrade feature instances in a production farm. It makes more sense to add the equivalent code to a Windows PowerShell script. The Windows PowerShell script in Example 3-6 has been written to upgrade all the feature instances in the web application at http://wingtiptoys.
Add-PSSnapin Microsoft.SharePoint.Powershell -ErrorAction "SilentlyContinue"
$WebAppUrl = "http://wingtiptoys"
$featureId = New-Object System.Guid
                        -ArgumentList "593228ab-7fcd-4a81-a4b8-ea77b2cbe1cc"

$webApp = Get-SPWebApplication $WebAppUrl
$features = $webApp.QueryFeatures($FeatureId, $true)

foreach($feature in $features){
  $feature.Upgrade($true)
}
Now that you’ve seen the entire process, let’s summarize how feature upgrade works. Remember that feature upgrade only makes sense in a scenario in which a feature definition has been deployed and feature instances have already been created. The first step is to update the feature definition to include one or more upgrade actions. The second step is to rebuild the solution package and push the updates out into the farm by using the Update-SPSolution cmdlet. The final step is to run a Windows PowerShell script or use another approach to trigger the upgrade process on specific feature instances, or to run the SharePoint Products Configuration wizard to upgrade all feature instances. When you trigger the upgrade process, SharePoint begins to process your upgrade actions.
Developing sandboxed solutions
Sandboxed solutions were introduced in SharePoint 2010. They are SharePoint solutions that are packaged into .wsp files, just like farm solutions. They are deployed into the site collection Solution Gallery by site collection administrators. When the code from a sandboxed solution is executed, it runs in a partially trusted environment referred to as the sandbox. The sandbox has been designed to bring greater stability to a SharePoint farm by restricting actions that could cause problems with performance, security, or other areas. This stability is achieved by limiting the functionality accessible to custom code solutions through the use of code access security (CAS) policies, by restricting access to portions of the object model, by limiting the amount of resources that can be used by a sandboxed solution, and by the fact that the code from a sandboxed solution runs in a different process than the SharePoint farm.
Prior to SharePoint 2010, the vast majority of custom code had to be deployed to the global assembly cache. Because of this, developers often operated with full trust in the SharePoint server not only to call any part of the object model, but also to access databases, web services, directories, and more. The result of this situation was that nearly all code in the farm ran with full trust and potentially with access to all data and functionality in SharePoint and to all resources on the SharePoint servers. The drawback of this approach is that the SharePoint farm was (and is) occasionally destabilized by custom code. In fact, the most common problem that Microsoft sees when they get a support call is poorly behaving custom code.
As an example, consider the case in which an intermediate-level SharePoint developer is writing a Web Part designed to aggregate all sites that a user has access to within the web application to display on the intranet home page. Suppose that the developer building the Web Part is unaware of fact that he should use search to get a list of all sites for a particular user, and instead he loops through all the sites in the web application. The developer will also have to use elevated privileges with the Web Part code to ensure that the Web Part can iterate through all sites without throwing access-denied errors for users who don’t have access to all sites. This simple Web Part could easily destabilize the entire farm.
If there are many sites looping, through all of them will take a long time and use a lot of memory. If the developer is unaware that he will have to dispose of all Microsoft.SharePoint.SPSite and Microsoft.SharePoint.SPWeb objects, he will create a serious memory leak that will quickly destabilize the farm. If this simple Web Part is deployed to the global assembly cache, it will have no limitations on the resources it can consume. If the Web Part is then put on the home page of the portal, it could be hit by potentially thousands of users. It wouldn’t be long before the farm was brought to a standstill because of low memory availability. This is not just a made-up example; this has brought down a large farm on its launch day in real life.
Part of the sandboxed solution capability has been deprecated in SharePoint 2013. Although the sandbox is still a great way to create declarative solutions by using Collaborative Application Markup Language (CAML), avoid creating new sandboxed solutions containing a lot of code-behind. Code-behind in sandboxed solutions will still work in SharePoint 2013, but because the sandbox is deprecated, there is no way to tell what will happen in future versions of SharePoint. If you have a choice, it would be better to use a SharePoint app. You don’t always have a choice, though, because SharePoint apps have their own limitations, and you can’t deploy farm solutions to a hosted environment such as SharePoint Online.
If you have to use code-behind in your sandboxed solution, it’s worth trying to build it in a way that allows you to remove the solution without breaking your site. If you use code-behind to configure a site or a list, for instance, removing the solution won’t break the configured site or list, so there is no real risk.
The following is a list of supported CAML elements that you can use in your declarative sandboxed solutions:
ContentType
CustomAction
Field
ListInstance
ListTemplate
Module
PropertyBag
Receivers
WebTemplate
WorkflowActions
WorkflowAssociation
Understanding the sandbox execution environment
The sandbox is a separate process in which a SharePoint solution runs in isolation. This separate process exposes a subset of the Microsoft.SharePoint namespace that an assembly can call. Additionally, the process runs under a CAS policy that restricts programmatic access to any resource outside the sandbox. Enabling sandboxed solutions in a SharePoint farm is simple and can be done by starting the SharePoint Foundation User Code Service on the Central AdministrationSystem SettingsManage Services On Server page. The User Code Service is responsible for managing the execution of sandboxed solutions across the farm. Each server in the farm that will participate in hosting sandboxed solutions must have the User Code Service enabled. Generally, this service simply runs under the Farm account. If you have installed your SharePoint server by using a standalone installation, the User Code Service will run under the Network Service account. When this service is enabled, you can begin running sandboxed solutions.
Although the User Code Service is responsible for managing the execution of sandboxed solutions throughout the farm, several other components and processes are involved in the system. These components and processes include the Execution Manager, the Worker Service, and the Worker Service Proxy. Figure 3-17 shows an architectural diagram of the sandboxing system.
The sandboxing system uses a component named the Execution Manager to handle the loading and execution of sandboxed solution code. The Execution Manager runs within the IIS application pool and is responsible for making a call out to the User Code Service (SPUCHostService.exe) requesting that a sandboxed solution be loaded.
As stated earlier, the User Code Service can be running on many different servers in the farm. You specify load balancing execution across the servers in the farm through administrative settings in Central AdministrationSystem SettingsManage User Solutions. By using these options, you can choose to execute the sandboxed solution on the same server where the user request was made or on a dedicated set of servers. In either case, the User Code Service makes a request of the Worker Service (SPUCWorkerProcess.exe) to load the sandboxed solution.
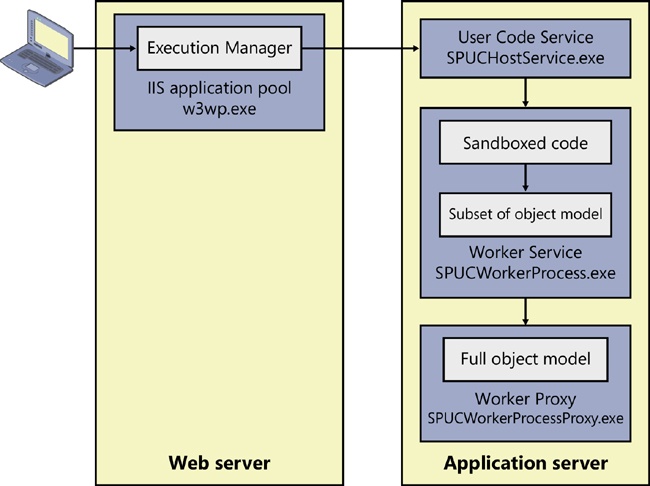
After the assembly of a sandboxed solution is loaded into the Worker Service, its code can be executed. A pool of AppDomains is maintained within SPUCWorkerProcess.exe, and an available AppDomain is used to execute the request. Only one request at a time is executed in any AppDomain, so there won’t be conflicts between the solutions.
As mentioned previously, execution of the code is limited to a subset of the Microsoft.SharePoint namespace and subject to CAS policy restrictions. Any calls to the SharePoint object model are first filtered against the subset object model to prevent any disallowed calls and then executed against the full object model, which runs in the Worker Service Proxy. When the code execution completes, the results are bubbled back up to the client request, which has been waiting synchronously for the request to complete. The final page is then drawn and delivered to the user.
If you know which processes are supporting the sandbox, you can debug your solutions. In a full-trust solution, you can debug code by attaching to the w3wp.exe process. However, sandboxed solutions are running in a separate process, so you must attach the Visual Studio 2012 debugger to the SPUCWorkerProcess.exe process instead. If you use F5 to debug your solution, Visual Studio will automatically attach to the right process.
The components that make up the sandboxing system can be found in the SharePoint System Directory at C:Program FilesCommon FilesMicrosoft SharedWeb Server Extensions15UserCode. In this directory, you’ll find SPUCHostService.exe, SPUCWorkerProcess.exe, and SPUCWorkerProcessProxy.exe. Along with the executables, you’ll also find a web.config file that references the CAS policy restrictions, in the file C:Program FilesCommon FilesMicrosoft SharedWeb Server Extensions15CONFIGwss_usercode.config. Finally, this folder also contains a subfolder named Assemblies. The Assemblies folder contains the assemblies Microsoft.SharePoint.dll, Microsoft.SharePoint.SubsetProxy.dll, and Microsoft.SharePoint.UserCode.dll, which support the object model subset.
Creating a SharePoint project for a sandboxed solution
When you create a new SharePoint solution in Visual Studio 2012, the SharePoint Customization Wizard offers you the option to deploy your solution either as a farm solution or as a sandboxed solution. Farm solutions have been discussed extensively in the previous section. If you choose to create a sandboxed solution, it will not be deployed to Central Administration, but instead it will be deployed directly to a site collection.
The WingtipToysSolution project has been created with two ListInstance items, which are used to create a Contacts list and Calendar list. These list instances are fully compatible with the sandbox. The solution also contains a feature receiver that adds a new view to the list and that adds a link to the list to the Quick Launch bar. In SharePoint 2013 this is also fully compatible with sandboxed solutions. In future versions of SharePoint, the feature receiver code might not be supported in a sandboxed solution anymore, but removing the code-behind from the WingtipToysSolution won’t break any sites on which the feature is currently activated. It is therefore safe to deploy the entire WingtipToysSolution as a sandboxed solution. If you are building the solution from scratch, though, you might want to try and find a different solution for the feature receiver to avoid possible rework on the solution in the future. To convert the WingtipToysSolution from a farm solution to a sandboxed solution, all you have to do is change the Sandboxed Solution property of the project in the project property pane from False to True.
Now it’s time to walk through an example of creating a sandboxed solution. You’ll start again by creating an empty SharePoint project, naming it WingtipToysSandbox. When you click OK to create the new project, the Visual Studio SharePoint Customization Wizard allows you to select Deploy As A Sandboxed Solution, as shown in Figure 3-18.
After you create the project in Visual Studio, you can alter the deployment target by editing the Sandboxed Solution property of the project in the project property pane. Along with changing the deployment target, the Sandboxed Solution property also determines whether the System.Security.AllowPartiallyTrustedCallers attribute appears in the AssemblyInfo file. By default, assemblies targeting the sandbox have this attribute and assemblies targeting the farm do not.
From the perspective of Visual Studio, there is no difference between a sandboxed solution and a farm solution. Both solutions are packaged and built in exactly the same manner. The differences are strictly related to the deployment target and the functionality that you can use in the solution. If you do try to use functionality that is not available in a sandboxed solution, Visual Studio will throw an error when it tries to compile the solution.
Now you will add a custom content type and a custom site column to the WingtipToysSandbox solution. The content type is called Toys and will be added to a list that will contain a list of toys. The site column that will be added to the content type is Age Group, indicating what age group the toys are suitable for. Both the content type and the site column will be added to a site by using a single site collection–scoped feature called Site-WingtipContentTypes. Example 3-7 shows the content type, and Example 3-8 shows the site column. The structure of the solution and the Sandboxed Solution property of the project are displayed in Figure 3-19.
<?xml version="1.0" encoding="utf-8"?>
<Elements xmlns="http://schemas.microsoft.com/sharepoint/">
  <Field
       ID="{742e3245-a013-4537-82d3-727ddbfb981a}"
       Name="AgeGroup"
       DisplayName="Age Group"
       Type="Choice"
       Required="TRUE"
       Group="WingtipToys Columns">
    <CHOICES>
      <CHOICE>0-1</CHOICE>
      <CHOICE>1-3</CHOICE>
      <CHOICE>3-6</CHOICE>
      <CHOICE>6-9</CHOICE>
      <CHOICE>9-12</CHOICE>
      <CHOICE>12+</CHOICE>
    </CHOICES>
  </Field>
</Elements><?xml version="1.0" encoding="utf-8"?>
<Elements xmlns="http://schemas.microsoft.com/sharepoint/">
<!-- Parent ContentType: Item (0x01) -->
<ContentType ID="0x01007E6057B85C8A465D9A695CC2E60AB705"
Name="Toys"
Group="WingtipToys Content Types"
Description="Content type used to store information about toys"
Inherits="TRUE"
Version="0">
<FieldRefs>
<FieldRef ID="{742e3245-a013-4537-82d3-727ddbfb981a}"
DisplayName="Age Group"
Required="TRUE"
Name="AgeGroup" />
</FieldRefs>
</ContentType>
</Elements>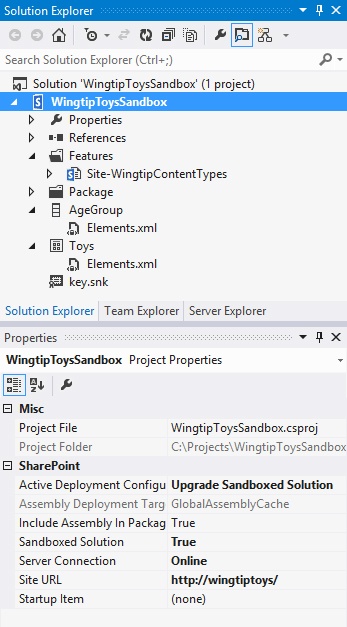
Deploying and debugging sandboxed solutions
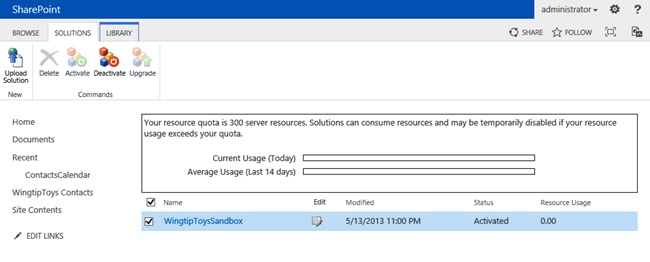
When the Sandboxed Solution property is set to True, selecting Build | Deploy Solution deploys the solution to the site collection’s Solution Gallery. This new gallery is the repository for all sandboxed solutions uploaded within the site collection. You can access the gallery from the Site Settings page, in the Galleries area, by using the Solutions link. Figure 3-20 shows the Solution Gallery with the uploaded solution.
Keep in mind that there is a terminology difference between the two deployment methods. Farm solutions are installed and deployed. Sandboxed solutions are uploaded and activated. The installation step in a farm deployment is similar to the upload step in a sandboxed deployment. Likewise, the deploy step in a farm deployment is similar to the activate step in a sandboxed deployment. The one notable difference is that the activation of a sandboxed solution automatically activates any feature scoped to the level of the site collection.
For the content type and site column elements defined in the CAML earlier, there is no difference in behavior between a sandboxed solution or a farm solution. Even at this point, however, you can notice a significant difference in the deployment process. When a solution is deployed to the farm-level gallery, the farm administrator must become involved. This requirement gives the farm administrator significant control over the solution, but he will also have to make time to deploy the solution and can be called responsible for a solution that is being deployed to the farm. Because of that, he should review the solution, or have someone other than the original development team do a review for him.
A SharePoint solution designed for the sandbox, such as the WingtipToysSandbox solution, doesn’t require farm-level deployment. Instead, the sandbox approach allows the site collection administrator to upload the solution and deploy it without involving the farm administrator. The farm administrator is thus relieved from the burden of dealing with solution deployment, and the site collection administrator is empowered to make decisions regarding the functionality available in the site collection. Furthermore, the sandbox is protecting the farm from instability by isolating the solution.
Because a site collection administrator can upload and activate a sandboxed solution, it is very difficult, if not impossible, for a farm administrator to keep track of what sandboxed solution is deployed where. It might be useful for the administrator to know this, though, so that she can identify sandboxed solutions that are deployed in a lot of sites and that might have to be rebuilt as farm solutions to reduce maintenance; or if a farm has to be upgraded to a new version of SharePoint, so that she can warn site collection administrators that their sandboxed solutions might not work anymore after the upgrade.
To solve this problem, you can create a custom solution validator that runs whenever a solution is activated within a site collection. Your custom solution validator can write some information about the activated sandboxed solution to a dedicated list somewhere in the SharePoint environment. Validators can also be used to do some testing on a solution that is being activated and can help you decide whether you want to allow or prohibit a solution. For example, you can decide to allow only sandboxed solutions with assemblies that have been compiled by using your company’s private signing key.
To develop a validator, you create a class that inherits from Microsoft.SharePoint.UserCode.SPSolutionValidator. The SPSolutionValidator class in turn inherits from the Microsoft.SharePoint.Administration.SPPersistedObject class, which means that SPSolutionValidator can serialize its state into the SharePoint database. The impact of this capability is that you can use a generic List<string> collection to store any information you want to support validation. For example, you could use this approach to store information about known bad publishers.
When you inherit from the SPSolutionValidator class, you must provide a System.Runtime.InteropServices.Guid for your validator that is surfaced as the ProviderID property of the validator. Your validator must provide a default constructor that takes no arguments, as well as a constructor that takes a Microsoft.SharePoint.UserCode.SPUserCodeService object. In the second constructor, you must set the Signature property to a unique value. Example 3-9 shows a basic validator class with constructors.
[Guid("D1735DCC-141F-4F1A-8DFE-8F3F48DACD1F")]
public class SimpleSolutionValidator : SPSolutionValidator {
    [Persisted]
    List<string> allowedPublishers;

    private const string validatorName = "Simple Solution Validator";

    public SimpleSolutionValidator() { }
    public SimpleSolutionValidator(SPUserCodeService userCodeService)
        : base(validatorName, userCodeService) {
        this.Signature = 5555;
    }
}
After coding the basic class and constructors, you must override the ValidateSolution and ValidateAssembly methods. ValidateSolution is called once for each solution, and ValidateAssembly is called once for each assembly within each solution. The ValidateSolution method receives a SPSolutionValidationProperties object, which contains information about the solution. The ValidateAssembly method receives a SPSolutionValidationProperties object as well, but it also receives a SPSolutionFile object with additional information about the assembly being validated. Example 3-10 shows the ValidateSolution and ValidateAssembly methods, which for the sake of this demonstration are simply checking whether the name of any file in the solution or assembly begins with the string “Bad_”. If any file begins with this string, the file fails validation.
public override void
  ValidateSolution(SPSolutionValidationProperties properties) {
    base.ValidateSolution(properties);
    bool isValid = true;

    //Check the name of the package
    if (properties.PackageFile.Location.StartsWith("Bad_",
                               StringComparison.CurrentCultureIgnoreCase)) {
        isValid = false;
    }

    //Look at the files in the package
    foreach (SPSolutionFile file in properties.Files) {
        if (file.Location.StartsWith("Bad_",
                                     StringComparison.CurrentCultureIgnoreCase))
            isValid = false;
    }

    //set error handler
    properties.ValidationErrorMessage = "Failed simple validation.";
    properties.ValidationErrorUrl =
       "/_layouts/Simple_Validator/ValidationError.aspx?SolutionName="
       + properties.Name;
    properties.Valid = isValid;
}

public override void ValidateAssembly(
    SPSolutionValidationProperties properties, SPSolutionFile assembly) {
    base.ValidateAssembly(properties, assembly);
    bool isValid = true;

    //Check the name of the assembly
    if (assembly.Location.StartsWith("Bad_",
                 StringComparison.CurrentCultureIgnoreCase))
        isValid = false;

    //set error handler
    properties.ValidationErrorMessage = "Failed simple validation.";
    properties.ValidationErrorUrl =
           "/_layouts/Simple_Validator/ValidationError.aspx?SolutionName="
           + properties.Name;
    properties.Valid = isValid;
}
When a solution fails validation, you can elect to display an error page. The ValidationErrorMessage and ValidationErrorUrl properties are used to set the values for handling validation errors. Typically, you simply create an application page in the LAYOUTS directory that is called when validation fails.
Before a custom solution validator can be used, it must be registered with the farm. This means that you can’t deploy any custom solution validators to a cloud-hosted environment to which you cannot deploy a farm solution. To register the validator with the farm, you use a feature receiver in a farm-level feature. In fact, it’s best to package the custom validator, application page, and feature receiver into a single feature. This way, the farm administrator can simply activate a single farm-level feature and the validator will be active. Example 3-11 shows a feature receiver for registering and unregistering a custom validator.
public class FeatureEventReceiver : SPFeatureReceiver {
  public override void
   FeatureActivated(SPFeatureReceiverProperties properties) {
    SPUserCodeService userCodeService = SPUserCodeService.Local;
    SPSolutionValidator validator =
       new SimpleSolutionValidator(userCodeService);
    userCodeService.SolutionValidators.Add(validator);
  }

  public override void
    FeatureDeactivating(SPFeatureReceiverProperties properties) {
    SPUserCodeService userCodeService = SPUserCodeService.Local;
    SPSolutionValidator validator =
      new SimpleSolutionValidator(userCodeService);
    userCodeService.SolutionValidators.Remove(validator.Id);
  }
}
If after deployment of your sandboxed solution you want to debug the solution, you can use F5 or open up the Debug menu in Visual Studio 2012 and click Start Debugging. You can also attach your project to the process that the solution runs in by clicking Attach To Process and then selecting the SPUCWorkerProcess.exe process. From that point on, debugging a sandboxed solution is exactly the same as debugging a farm solution. The only difference is the process in which the solution runs.
Updating and upgrading sandboxed solutions
Just as with farm solutions, you might want to make changes to a sandboxed solution after it has been deployed and after features from it have been activated on sites. Sandboxed solutions and the features in them can be upgraded, just like farm solutions and features. The way upgrading the solutions and features works is a bit different for sandboxed solutions, though.
Let’s start by creating a feature upgrade action for the Toys content type that you created earlier. You will add an extra column to the content type to store the price of the toys. Example 3-12 shows the XML for the new site column. You have to add a new site column to the solution or a new elements file to the AgeGroup site column to ensure that you can add the column when upgrading existing instances of the feature.
<Field
        ID="{f75c27ba-e321-4bbe-a30b-be0e085a5517}"
        Name="ToysPrice"
        DisplayName="Price"
        Type="Currency"
        LCID="1033"
        Decimals="2"
        Required="TRUE"
        Group="WingtipToys Columns">
  </Field>
Next you will add the new column to the Toys content type. You can add the column to the elements.xml file directly by modifying the XML, or you can use the designer and simply select the new Price column, as shown in Figure 3-21.
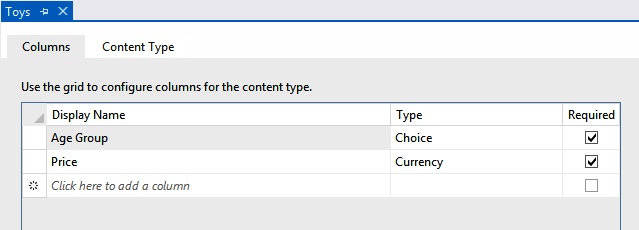
By doing this you have ensured that new instances of the Site-WingtipContentTypes feature will add both columns to the Toys content type. However, in order to make sure you can add the new column to existing instances of the feature and content type as well, you have to first increase the version number of the Site-WingtipContentTypes feature.
Next you can add UpgradeActions to the feature. Just as when you were upgrading a farm solution, you will use a VersionRange and an ApplyElementManifests element. This time, you will also use the AddContentTypeField element to add the new Price field to existing instances of the content type. Example 3-13 contains the complete XML of the Site-WingtipContentTypes feature.
<Feature xmlns="http://schemas.microsoft.com/sharepoint/"
  Title="WingtipToysSandbox WingtipToys Content Types"
  Description="This feature contains the WingtipToys
                 Content Types and Site Columns"
  Id="d531e843-9706-48d1-bd38-bae81c916ec7"
  Scope="Site"
  Version="2.0.0.0">
  <UpgradeActions>
    <VersionRange EndVersion="2.0.0.0">
      <ApplyElementManifests>
        <ElementManifest Location="PriceElements.xml" />
      </ApplyElementManifests>
      <AddContentTypeField
        ContentTypeId="0x01007E6057B85C8A465D9A695CC2E60AB705"
        FieldId="{f75c27ba-e321-4bbe-a30b-be0e085a5517}"
        PushDown="TRUE" />
    </VersionRange>
  </UpgradeActions>
  <ElementManifests>
    <ElementManifest Location="AgeGroupElements.xml" />
    <ElementManifest Location="ToysElements.xml" />
  </ElementManifests>
</Feature>
The solution is now ready to be deployed. Upgrading a sandboxed solution is accomplished by creating a new solution (.wsp) file with a different name than the previous version, but with the same solution ID. When you subsequently deploy the new solution version by uploading it into the Solution Gallery of a site collection, SharePoint will recognize that the ID matches an existing solution and prompt you to upgrade the solution. After the solution is upgraded, the old solution is automatically deactivated. Unlike upgrading farm solutions, upgrading sandboxed solutions doesn’t require any additional steps such as upgrading feature instances using SPFeature.Upgrade or running PSConfig.
Testing the upgrade of your sandboxed solution from Visual Studio requires some additional configuration steps. First you have to create a new deployment configuration by opening up the properties of the project and going to the SharePoint tab. Click the New button and call the new deployment configuration Upgrade Sandboxed Solution. The previous version of the solution must be in the Solution Gallery when you upload the new version of the solution, so you don’t want to retract the solution. All you need is the Add Solution step in the deployment steps, as shown in Figure 3-22. The next step to enable upgrading of your sandboxed solution is to double-click Package and to adjust the name of the package; for instance, by adding v2 to it.
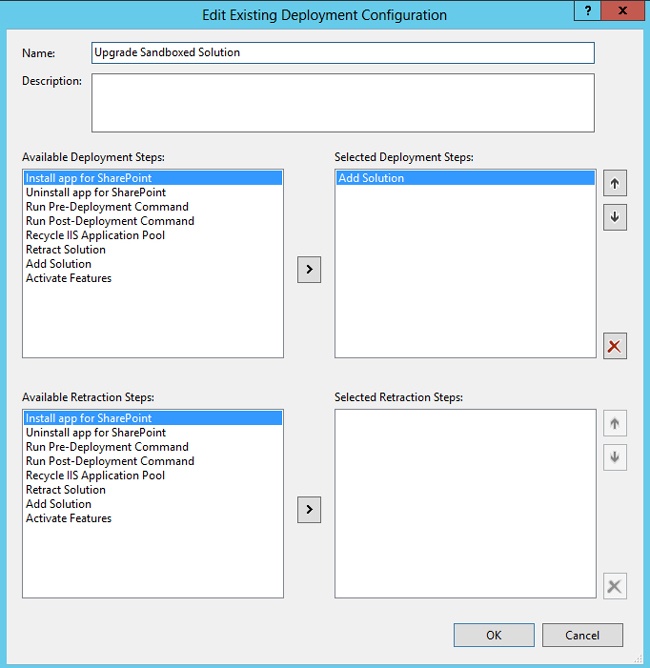
Now you can right-click the project and click Deploy. This will automatically deactivate the previous version of the solution and activate the new version (see Figure 3-23). It will also automatically upgrade all existing instances of the feature in the site collection. Note that this behavior is different from the feature upgrade behavior of a farm solution, where you have to explicitly upgrade existing instances of the feature after a new version of a solution has been deployed.
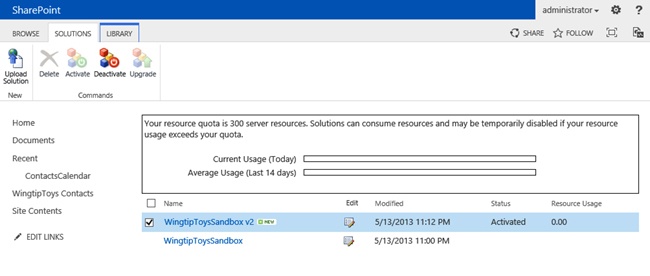
Summary
When you are developing SharePoint solutions, there are innumerable options to customize your SharePoint environment. You can add functionality to it by creating farm solutions or sandboxed solutions.
Farm solutions are deployed to Central Administration and are available in the entire farm. Deploying a farm solution requires farm administrator access and access to at least one of the SharePoint servers in the farm. Code from a farm solution can run under full trust permissions and can use as many resources as there are available in the farm. This means that creating farm solutions gives you great power, but with that great power comes great responsibility. A badly built farm solution could bring down an entire SharePoint farm.
Sandboxed solutions are deployed to a site collection’s Solution Gallery, and functionality from them is only available in the site collection in which it is deployed. A sandboxed solution can also only access data and objects from within the site collection. The amount of resources that a sandboxed solution can consume is limited by the number of resource points that are assigned to a site collection. Using code-behind in sandboxed solutions is deprecated in SharePoint 2013. This means that although you can still use sandboxed solutions with code-behind in them and they will work fine, if you are creating new sandboxed solutions, the use of code-behind is discouraged. It would be better to try to find an alternative. Sandboxed solutions will provide the developer with less flexibility and power, but they will prevent that developer from bringing down the SharePoint farm.