
In this chapter, you’ll learn how to:
Launch applications and scripts automatically at startup.
Synchronize your system time with an external time server.
Control the startup using the System Configuration Utility.
Control the startup using Boot.ini.
Customize the shutdown process using batch files and scripts.
In times past, launching Microsoft Windows was the perfect opportunity to catch up on your voice mail or grab another cup of coffee. That’s because the Windows startup used to be a glacially paced affair that often took minutes to complete (and few minutes are as long as those spent waiting for a computer to boot). Windows XP changed all that by being, if not exactly zippy, at least pleasingly faster than previous incarnations. Note, however, that we’re talking here about out-of-the-box startup performance. Drivers, network logons and scripts, and program launches can still slow the startup process to a crawl. To ensure the best startup performance, and to ensure that Windows XP is set up the way you want it each time you boot your machine, you need to take charge of all phases of the startup process. This chapter will show you how to do just that by taking you through some little known but very useful tools. Tools and techniques such as launching programs and scripts, editing Boot.ini, and using the Windows Advanced Options Menu will expedite startup, and using the SHUTDOWN command and deleting files while shutting down will expedite shutdown.
If you have one or more programs that you start as soon as Windows XP fires up, you can save yourself the hassle of launching these programs manually by getting Windows XP to do it for you automatically at startup. Similarly, you can direct Windows XP to automatically launch scripts or batch files at startup. To get these applications or scripts started automatically when Windows XP starts up, you can use the Startup folder, the registry, or the Group Policy snap-in.
The Startup folder is a regular file folder, but Windows XP treats the contents of this folder uniquely: You can enjoy automatic startup for your desired program or script simply by adding a shortcut for that item to the Startup folder. (Adding shortcuts to the Startup folder is one of the Start menu customizations that is discussed in more detail in Chapter 10.) Note that the Startup folder appears twice in the Windows XP interface:
Via the Start menu (click Start, select All Programs, Startup; or left-click Start, select Open).
Via Windows Explorer as a subfolder in d:Documents and Settings (where d is the drive on which Windows XP is installed). Actually, three different subfolders are available here:
userStart MenuProgramsStartup. Here, user is the name of a user defined on the system (see Chapter 5). A shortcut placed in this folder will run automatically when this user logs on to the system.
All UsersStart MenuProgramsStartup. A shortcut placed in this folder will run automatically when any user logs on to the system.
Default UserStart MenuProgramsStartup. A shortcut placed in this folder will be copied automatically to a user’s Startup folder whenever you create a new user account. (Note that the Default User subfolder is hidden by default. To display it, select Tools, Folder Options in Windows Explorer, select the View tab, and then select the Show Hidden Files And Folders option.)
Note that only users with administrator-level rights can access all three of these subfolders. Users with lesser privileges can work only with their own Startup folders. (They can see the All Users version of the Startup folder, but Windows XP prevents them from adding files to it.)
Later in this chapter, we’ll show you how to use the System Configuration Utility to control the launching of individual Startup folder items. For now, though, let’s mention that you can prevent all of the Startup items from running by holding down the Shift key while Windows XP loads user-specific files (hold down Shift after logging on).
The Startup folder method has two drawbacks: Users can easily delete shortcuts from their own Startup folders, and users can bypass Startup items by holding down the Shift key while Windows XP loads. You can avoid both issues by using the Registry Editor (regedit.exe) instead. (We cover the Registry Editor in Chapter 2.) Assuming you’re logged on as the user you want to work with, the registry offers two keys:
HKCUSoftwareMicrosoftWindowsCurrentVersionRun. The values in this key run automatically each time the user logs on.
HKCUSoftwareMicrosoftWindowsCurrentVersionRunOnce. The values in this key run only the next time the user logs on, and are then deleted from the key. (Note that this key may not be present in your registry. In that case, you need to add this key yourself.)
If you want an item to run at startup no matter who logs on, use the following keys:
HKLMSOFTWAREMicrosoftWindowsCurrentVersionRun. The values in this key run automatically each time any user logs on.
HKLMSOFTWAREMicrosoftWindowsCurrentVersionRunOnce. The values in this key run only the next time any user logs on, and are then deleted from the key. (Don’t confuse this key with the RunOnceEx key. This is an "extended" version of RunOnce that’s used by developers to create more robust startup items that include features such as error handling and improved performance.)
To create a startup item, add a string value to the appropriate key, give it whatever name you like, and then set its value to the full path of the executable file or script file that you want to launch at startup.
If you prefer not to edit the registry directly, or if you prefer to place a graphical user interface (GUI) between you and the registry, the Group Policy snap-in can help. (See Chapter 1, for details on using this snap-in.) Note, however, that Group Policy doesn’t work directly with the Run keys in the HKLM and HKCU hives. Instead, those Run keys are considered to be legacy keys, meaning that they’re used mainly by older programs. The new keys (new as of Windows 2000, that is) are the following:
HKLMSOFTWAREMicrosoftWindowsCurrentVersionpoliciesExplorerRun
HKCUSoftwareMicrosoftWindowsCurrentVersionPoliciesExplorerRun
Note that these keys do not appear in Windows XP by default. You see them only after you specify startup programs in the Group Policy Editor, as discussed in the next section. (Alternatively, you can add these keys yourself using the Registry Editor.)
Insider Secret
The startup items run in the following order:
HKLMSOFTWAREMicrosoftWindowsCurrentVersionRunOnce
HKLMSOFTWAREMicrosoftWindowsCurrentVersionpoliciesExplorerRun
HKLMSOFTWAREMicrosoftWindowsCurrentVersionRun
HKCUSoftwareMicrosoftWindowsCurrentVersionRun
HKCUSoftwareMicrosoftWindowsCurrentVersionPoliciesExplorerRun
HKCUSoftwareMicrosoftWindowsCurrentVersionRunOnce
Startup folder (all users)
Startup folder (current user)
As mentioned, you can add values to these keys either via the Registry Editor or via the Group Policy snap-in. In the Group Policy Editor, you have two choices:
To work with startup programs for all users, select Computer Configuration, Administrative Templates, System, Logon. The items here will affect the registry keys in the HKLM (all users) registry hive.
To work with startup programs for the current user, select User Configuration, Administrative Templates, System, Logon. The items here will affect the registry keys in the HKCU (current user) hive.
Either way you’ll see at least the following three items:
Run These Programs At User Logon Use this item to add or remove startup programs using the PoliciesExplorerRun keys in the registry. To add a program, double-click the item, select the Enabled option, and then click Show. In the Show Contents dialog box, click Add, enter the full path of the program or script you want to run at startup, and then click OK.
Do Not Process The Run Once List Use this item to toggle whether Windows XP processes the RunOnce registry keys (which we discussed in the previous section). Double-click this item and then select the Enabled option to put this policy into effect (that is, programs listed in the RunOnce key are not launched at startup).
Do Not Process The Legacy Run List Use this item to toggle whether Windows XP processes the legacy Run key. Double-click this item and then select the Enabled option to put this policy into effect (that is, programs listed in the legacy Run key are not launched at startup).
You also can use the Group Policy snap-in to specify script files to run at startup or at logon. You can specify script files at two places:
Computer Configuration, Windows Settings, Scripts (Startup/Shutdown). Use the Startup item to specify one or more script files to run each time the computer starts (and before the user logs on). Note that by default, if you specify two or more scripts, Windows XP runs them synchronously. That is, Windows XP runs the first script, waits for it to finish, runs the second script, waits for it to finish, and so on.
User Configuration, Windows Settings, Scripts (Logon/Logoff). Use the Logon item to specify one or more script files to run each time any user logs on. By default, logon scripts are run asynchronously.
Finally, note that Windows XP has policies that dictate how these scripts run. For example, you can see the startup script policies by selecting Computer Configuration, Administrative Templates, System, Scripts. Three items reside there that affect logon and startup scripts:
Run Logon Scripts Synchronously. If you select this item, Windows XP runs the logon scripts at the same time that it loads the user interface.
Run Startup Scripts Asynchronously. If you select this item, Windows XP runs the startup scripts at the same time.
Run Startup Scripts Visible. If you select this item, Windows XP makes the startup script commands visible to the user in a command window.
Caution
Logon scripts are supposed to execute before the Windows XP interface is displayed to the user. However, Windows XP’s new Fast Logon Optimization can interfere with that by displaying the interface before all the scripts are done. (The Fast Logon Optimization feature runs both the computer logon scripts and the user logon scripts asynchronously, which greatly reduces the logon time since no script has to wait for another to finish.) To prevent this interference, select Computer Configuration, Administrative Templates, System, Logon and choose the Always Wait For The Network At Computer Startup And Logon setting.
Note that for logon scripts, a similar set of policies appears in the User Configuration, Administrative Templates, System, Scripts section. However, any setting for Run Logon Script Synchronously in Computer Configuration takes precedence over the value for that policy in User Configuration.
Note
Yet another way to set up a program or script to run at startup is to use the Scheduled Tasks folder (select Start, All Programs, Accessories, System Tools, Scheduled Tasks; select Scheduled Tasks from Control Panel; or use Windows Explorer to display the %SystemRoot%Tasks folder). When you create a new task, two of the options you’ll see are:
When My Computer Starts. Choose this option to run the program when your computer boots, no matter which user logs on. Note that only someone logged on under the Administrator account can select this option. (The tasks will run otherwise, but they won’t be displayed.)
When I Log On. Choose this option to run the program only when the user logs on. This is the option to use for accounts other than Administrator.
In this section, we’ll take you through a few sample scripts that you can implement to improve your Windows XP startups.
One of the hassles faced by mobile users is the need to access resources when they return to the office and connect to the network. For example, the user may have to connect to a network printer. If you face this or a similar chore, you can take some of the drudgery out of it by using a script that automates the process. Here’s some VBScript code that asks the user whether he or she wants to connect to the network printer. (We discuss scripting in Chapter 3.) If the user clicks Yes in the popup, the script connects the printer and sets it as the default.
Option Explicit
Dim wshShell, wshNetwork, strPrinterName, strDriverName

' First ask the user if he or she wants to connect the printer
Set wshShell=CreateObject("WScript.Shell")
If wshShell.Popup("Do you want to connect to the network printer?", ,
"Logon", vbYesNo + vbQuestion) = vbYes Then

    ' If so, use the Network object to connect to the network printer
    Set wshNetwork = CreateObject("WScript.Network")

    ' Store the UNC path and driver
    strPrinterName = "\ComputerNamePrinterName"
    strDriverName = "DriverName"

    ' Connect the printer and set it to the default
    wshNetwork.AddWindowsPrinterConnection strPrinterName, strDriverName
    wshNetwork.SetDefaultPrinter strPrinterName
End If
Note that when you’re setting the strPrinterName value, you need to change ComputerName to the name of the network computer that hosts the printer, and you need to change PrinterName to the shared named of the printer. Similarly, for the strDriverName value, change DriverName to the name of the printer driver.
Computer clocks are often unreliable beasts, sometimes gaining or losing minutes in a day. To keep your system time accurate, create a startup item that synchronizes your machine’s time with the time on a server.
If your computer is part of an Active Directory (AD) domain, the Windows Time Service will automatically synchronize your system time with the time of the domain controller. If your computer is part of a non-AD domain or a workgroup, and the network has a computer that keeps accurate time, include the following line in a startup batch file and replace ComputerName with the name of the network computer that keeps the accurate time:
NET TIME //ComputerName /SETThe NET TIME command used with the /SET switch synchronizes your system time with the system time on the computer specified by ComputerName.
How do you ensure your network has a computer that holds accurate time? The best way is to synchronize the computer with an external source, such as an Internet host that offers public access to a time server. Windows XP should already be set up to do this. (To check, open Control Panel’s Date And Time icon, select the Internet Time tab, and make sure the Automatically Synchronize With An Internet Time Server check box is selected.) To sync up with another external time server, open the Windows XP command prompt and enter the following two commands:
W32TM /CONFIG /MANUALPEERLIST:peerlist /SYNCFROMFLAGS:MANUAL
W32TM /CONFIG /UPDATE
| This is the command-line version of the Windows Time service, which synchronizes the system date and time. |
| This switch specifies that the time service is being reconfigured. |
| This switch specifies the location of a time server. Replace peerlist with the Domain Name System (DNS) name of the time server. You can also use the Internet Protocol (IP) address, but these addresses often change, so the DNS name is better. |
| This switch tells the time service to synchronize the time, based on the server named in the peerlist. |
| This switch tells the time service to put the new configuration into effect. |
For example, you can synchronize with the National Institute of Standards and Technology time server—time.nist.gov— by running the following commands:
W32TM /CONFIG /MANUALPEERLIST:time.nist.gov /SYNCFROMFLAGS:MANUAL
W32TM /CONFIG /UPDATE
You can place these commands in a startup batch file to ensure your computer is always synchronized with the external server. The addresses of other time servers can be found at the following sites:
http://www.boulder.nist.gov/timefreq/service/time-servers.html
Most Windows XP services will display an alert if they fail to start, but not all do. Here’s a script that uses Windows Management Instrumentation (WMI) to get a list of the services that don’t display failure alerts and reconfigures them so that they will display an alert:
Option Explicit
Dim objWMIService, objService, colServiceList
Dim strServices, errReturn
Const NORMAL_ERROR_CONTROL = 2

' Connect to WMI on the local computer
Set objWMIService=GetObject("winmgmts:{impersonationLevel=impersonate}_
    " & "!\.
ootcimv2")

' Query WMI to get the collection of services
' that don't issue alerts when they fail to start
Set colServiceList = objWMIService.ExecQuery _
    ("Select * from Win32_Service where ErrorControl = 'Ignore'")

' Run through the collection of services
strServices = ""
For Each objService in colServiceList

    ' Configure the service to issue an alert if it fails to start
    errReturn = objService.Change(, , , NORMAL_ERROR_CONTROL)
    strServices = strServices & objService.DisplayName & vbCrLf
Next

' Display the list of services that were changed
WScript.Echo "Alerts activated for the following services:" & _
vbCrLf & vbCrLf & strServicesAs you saw earlier in this chapter, Windows XP offers many different ways to handle startup programs and scripts, and working with all of these methods can be confusing. You can simplify things a great deal by using the System Configuration Utility, which gives you a graphical front end that offers precise control over how Windows XP starts.
To launch the System Configuration Utility, select Start, Run, type msconfig, and click OK. The System Configuration Utility window appears, as shown in Figure 4-1.
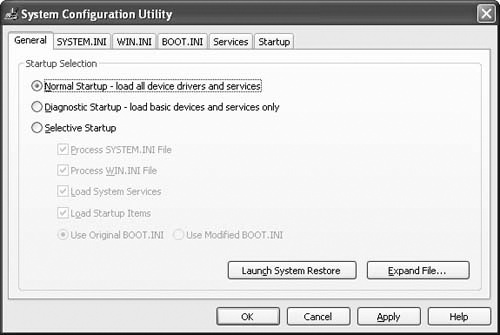
The General tab has three startup options:
Normal Startup. This option loads Windows XP normally.
Diagnostic Startup. This option loads Windows XP with a minimal set of drivers. If Windows XP won’t start normally, diagnostic startup is useful because it should enable you to load a basic version of Windows XP and then troubleshoot the problem.
Selective Startup. When you select this option, the check boxes below it become available. You use these check boxes to select which of the startup options should be processed.
For a selective startup, you control how Windows XP processes items in five categories, represented in the utility by the other five tabs:
SYSTEM.INI. The file associated with this tab contains system-specific information about your computer’s hardware and device drivers. Most such hardware data is stored in the registry, but the System.ini file retains a few settings that are needed for backward compatibility with older programs.
WIN.INI. The file associated with this tab contains some configuration settings relating to Windows XP and to installed Windows applications. Again, the bulk of such data is stored in the registry, but Win.ini is kept around for compatibility.
BOOT.INI. The file associated with this tab controls how Windows XP boots and governs the layout of the OS (operating system) Choices menu that appears at system startup. See the next section for details.
Services. This category refers to the system services that Windows XP loads at startup. The specific services loaded by Windows XP are listed on the Services tab, which you’ll notice has an Essential column. Only those services that have Yes in this column are loaded when you choose the Diagnostic Startup option.
Startup. This refers to items in your Windows XP Startup menu and the Run items specified in the registry.
To control these startup items, the System Configuration Utility gives you two choices:
To prevent Windows XP from loading every item in a particular category, choose Selective Startup on the General tab and then clear the check box for the category you want. For example, to disable all items in Win.ini, clear the Process WIN.INI File check box.
To prevent Windows XP from loading only specific items in a category, select the category’s tab and then clear the check box beside the items you want to bypass at startup.
Note that making changes on any of the System Configuration Utility tabs, other than the General tab, will cause the Selective Startup option to be set on the General tab. After completing your problem diagnosis and correction, you will need to return to the General tab in the System Configuration Utility and reselect the Normal Startup option.
Here’s a basic procedure to follow for using the System Configuration Utility to troubleshoot a startup problem:
In the System Configuration Utility, select the Diagnostic Startup option and then reboot the computer. If the problem did not occur during the restart, then you know the cause lies in System.ini, Win.ini, the system services, or the startup items.
Choose the Selective Startup option.
Select one of the four check boxes and then reboot the computer.
Repeat step 3 for each of the other check boxes until the problem reoccurs. When this happens, you know that the source of the problem is in whatever item you selected just before rebooting.
Select the tab of the item that is causing the problem. For example, if the problem reoccurred after you selected the Load Startup Items check box, select the Startup tab.
Select Disable All to clear all the check boxes.
Select one of the check boxes to enable an item and then reboot the computer.
Repeat step 7 for each of the other check boxes until the problem reoccurs. When this happens, you know that the source of the problem is in whatever item you selected just before rebooting.
Insider Secret
If you have a large number of check boxes to test (such as on the Services tab), selecting one check box at a time and rebooting can be tedious, to say the least. A faster method—called "troubleshooting by halves"—is to begin by selecting the first half of the check boxes and rebooting. One of two things will happen:
The problem doesn’t reoccur. This means that one of the items represented by the cleared check boxes is the culprit. Clear all the check boxes, select the other half of the check boxes, and then reboot.
The problem reoccurs. This means that one of the selected check boxes is the problem. Select only half of those check boxes and reboot.
Keep halving the number of selected check boxes until you isolate the offending item.
On the System Configuration Utility’s General tab, select the Normal Startup option.
Fix or work around the problem:
If the problem is an item in System.ini or Win.ini, select the appropriate tab, select the problem item, and then click Disable.
If the problem is a system service, you can either disable the service or expand a new copy of the service executable file from the Windows XP installation files (use the Expand File button on the System Configuration Utility’s General tab).
If the problem is caused by a Startup item, either delete the program from the Startup menu or delete the item from the appropriate Run key in the registry. (If the item is a program, consider uninstalling or reinstalling the program.)