
JUnit is a testing framework written specifically for Java. It allows the user to test each method one by one and makes sure that code refactoring or improvements to your project does not break the other classes, dependent methods, or subsystems. For example, you have several classes dependent on each other and you need to ensure that any changes that you are making to one class won't break the other classes. JUnit tests provide this functionality, allowing you to make sure that your changes do not break the system. Often, projects include JUnit tests in their build process and do not approve the built result unless all JUnit tests pass. Moreover, JUnit tests not only make your programs more stable, but also save you a lot of time.
There is one more big advantage of being an Eclipse user in terms of JUnit tests. In all the new versions of Eclipse with JDT, the JUnit framework comes prepackaged, so you don't need to download and install it.
To create a JUnit test case, execute the following steps:
- Go to File | New | Other… | Java | JUnit | JUnitTest Case as shown in the following screenshot:

- Click on Next>.
- In the Package field enter
how.to.eclipse.tests. - In the Name field enter
EmployeeTests. - Click on Finish. (If you are asked to add JUnit 4 to build a path, click on Ok.)
If you have done everything correctly, you should see a couple of new things in your Package Explorer.
- Go to Java Perspective if you are not already there. See the following screenshot if you forgot how to switch perspectives:

- In Package Explorer expand our how-to-debug project.
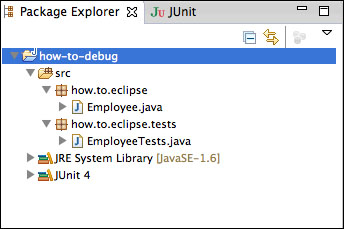
You should see a couple of new things. First of all, under src | how.to.eclipse.tests there is a new
ExmployeeTestsclass. This is our test class, which we will be using to put our tests for theEmployeeclass. Secondly, there is a JUnit 4 library added to our build path, so that we are able to run JUnit tests.If we open the
EmployeeTestsclass, we will see that there is onetest()method with a method callfail()in it. -
Click the
 icon (Run).
After running the EmployeeTests method you should see the JUnit tests' interface that looks like the following screenshot:
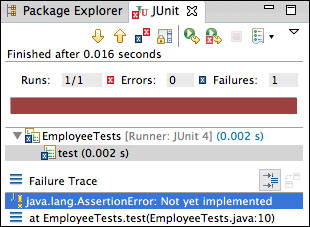
The JUnit interface is straightforward. On the top of the JUnit view is a menu that helps to navigate through the test classes. Below the menu is a time indicator, which shows how much time it took to run the test. Under the time indicator there is a test statistics and an indicator of whether the tests have passed (green) or failed (red). Finally, below the red/green indicator there is a hierarchy of tests and Failure Trace. We will see how all these tools work when we start creating JUnit tests for our Employee class.
Meanwhile, if you get through all these steps, congratulations. You know how to set up JUnit tests, which, as I have already mentioned, is a very straightforward process.