
2. Introduction to HTML5: Part 1
He had a wonderful talent for packing thought close, and rendering it portable.
—Thomas Babington Macaulay
High thoughts must have high language.
—Aristophanes
Objectives
In this chapter you’ll:
• Understand important components of HTML5 documents.
• Use HTML5 to create web pages.
• Add images to web pages.
• Create and use hyperlinks to help users navigate web pages.
• Mark up lists of information.
• Create tables with rows and columns of data.
• Create and use forms to get user input.
2.4 W3C HTML5 Validation Service
2.7.3 Using Images as Hyperlinks
2.8 Special Characters and Horizontal Rules
Summary | Self-Review Exercises | Answers to Self-Review Exercises | Exercises
2.1. Introduction
This chapter begins unlocking the power of web-based application development with HTML5. Unlike programming languages, such as C, C++, C#, Java and Visual Basic, HTML5 is a markup language that specifies the structure and content of documents that are displayed in web browsers.
We introduce some basics, then cover more sophisticated HTML5 techniques such as:
• tables, which are particularly useful for structuring information from databases (i.e., software that stores structured sets of data)
• forms for collecting information from web-page visitors
• internal linking for easier page navigation
• meta elements for specifying information about a document
In Chapter 3, we introduce many new features in HTML5. In Chapter 4, we discuss CSS3, a technology for specifying how web pages look.
2.2. Editing HTML5
We’ll create HTML5 documents by typing HTML5 markup text in a text editor (such as Notepad, TextEdit, vi, emacs) and saving it with the .html or .htm filename extension.
Computers called web servers store HTML5 documents. Clients (such as web browsers running on your local computer or smartphone) request specific resources such as HTML5 documents from web servers. For example, typing www.deitel.com/books/downloads.html into a web browser’s address field requests the file downloads.html from the books directory on the web server running at www.deitel.com. We discuss web servers in Chapter 17. For now, you’ll simply place the HTML5 documents on your computer and render (i.e., display) them by opening them locally with a web browser.
2.3. First HTML5 Example
This chapter presents HTML5 markup capabilities and provides screen captures that show how a browser renders (that is, displays) the HTML5. You can download the examples from www.pearsonhighered.com/deitel. The HTML5 documents we show have line numbers for your convenience—these are not part of the documents. Open each HTML5 document in various web browsers so you can view and interact with it.
Figure 2.1 is an HTML5 document named main.html, which is stored in the examples/ch02 folder. This first example displays the message Welcome to HTML5! in the browser. Now let’s consider each line of the document.
1 <!DOCTYPE html>
2
3 <!-- Fig. 2.1: main.html -->
4 <!-- First HTML5 example. -->
5 <html>
6 <head>
7 <meta charset = "utf-8">
8 <title>Welcome</title>
9 </head>
10
11 <body>
12 <p>Welcome to HTML5! </p>
13 </body>
14 </html>

Fig. 2.1. First HTML5 example.
Document Type Declaration
The document type declaration (DOCTYPE) in line 1 is required in HTML5 documents so that browsers render the page in standards mode, according to the HTML and CSS specifications. Some browsers operate in quirks mode to maintain backward compatibility with web pages that are not up-to-date with the latest standards. You’ll include the DOCTYPE in each HTML5 document you create.
Blank Lines
We include blank lines (lines 2 and 10) to make our documents easier to read—the browser ignores them.
Comments
Lines 3–4 are HTML5 comments. You’ll insert comments in your HTML5 markup to improve readability and describe the content of a document. The browser ignores comments when your document is rendered. HTML5 comments start with <!-- and end with -->. We include in our examples comments that specify the figure number and file name and state the example’s purpose. We’ll often include additional comments, especially to explain new features.
html, head and body Elements
HTML5 markup contains text (and images, graphics, animations, audios and videos) that represents the content of a document and elements that specify a document’s structure and meaning. Some important elements are the html element (which starts in line 5 and ends in line 14), the head element (lines 6–9) and the body element (lines 11–13). The html element encloses the head section (represented by the head element) and the body section (represented by the body element). The head section contains information about the HTML5 document, such as the character set (UTF-8, the most popular character-encoding scheme for the web) that the page uses (line 7)—which helps the browser determine how to render the content—and the title (line 8). The head section also can contain special document-formatting instructions called CSS3 style sheets and client-side programs called scripts for creating dynamic web pages. (We introduce CSS3 style sheets in Chapter 4 and explain scripting with the JavaScript language in Chapters 6–13.) The body section contains the page’s content, which the browser displays when the user visits the web page.
Start Tags and End Tags
HTML5 documents delimit most elements with a start tag and an end tag. A start tag consists of the element name in angle brackets (for example, <html> in line 5). An end tag consists of the element name preceded by a forward slash (/) in angle brackets (for example, </html> in line 14). There are several so-called “void elements” that do not have end tags.
As you’ll soon see, many start tags have attributes that provide additional information about an element, which browsers use to determine how to process the element. Each attribute has a name and a value separated by an equals sign (=).
 Good Programming Practice 2.1
Although HTML5 element and attribute names are case insensitive (you can use uppercase and lowercase letters), it’s a good practice to use only lowercase letters.
title Element
Line 8 specifies a title element. This is called a nested element, because it’s enclosed in the head element’s start and end tags. The head element is also a nested element, because it’s enclosed in the html element’s start and end tags. The title element describes the web page. Titles usually appear in the title bar at the top of the browser window, in the browser tab on which the page is displayed, and also as the text identifying a page when users add the page to their list of Favorites or Bookmarks, enabling them to return to their favorite sites. Search engines use the title for indexing purposes and when displaying results.
Indenting nested elements emphasizes a document’s structure and promotes readability. We use three spaces for each level of indentation.
Line 11 begins the document’s body element, which specifies the document’s content, which may include text, images, audios and videos.
Paragraph Element (<p>...</p>)
Some elements, such as the paragraph element denoted with <p> and </p> in line 12, help define the structure of a document. All the text placed between the <p> and </p> tags forms one paragraph. When a browser renders a paragraph, it places extra space above and below the paragraph text. The key line in the program is line 12, which tells the browser to display Welcome to HTML5!.
End Tags
This document ends with two end tags (lines 13–14), which close the body and html elements, respectively. The </html> tag informs the browser that the HTML5 markup is complete.
Opening an HTML5 File in Your Default Web Browser
To open an HTML5 example from this chapter, open the folder where you saved the book’s examples, browse to the Chapter 2 folder and double click the file to open it in your default web browser. At this point your browser window should appear similar to the sample screen capture shown in Fig. 2.1. We resized the browser window to save space.
2.4. W3C HTML5 Validation Service
You must use proper HTML5 syntax to ensure that browsers process your documents properly. The World Wide Web Consortium (W3C) provides a validation service (at validator.w3.org) for checking a document’s syntax. Documents can be validated by
• providing the URL of an online web page
• uploading a file to the validator
• pasting code directly into a text area provided on the validator site
All of the HTML5 examples in this book have been validated by uploading a file to:
validator.w3.org/#validate-by-upload
To use validator.w3.org/#validate-by-upload, click the Choose File button to select a file from your computer to validate. Next, click More Options. In the Document Type drop-down list, select HTML5 (experimental). Select the Verbose Output checkbox, then click the Check button to validate your document. If it contains syntax errors, the validation service displays error messages describing the errors. Since the HTML5 validator is still considered experimental, you’ll receive a warning each time you validate an HTML5 document.
 Error-Prevention Tip 2.1
Most browsers attempt to render HTML5 documents even if they’re invalid. This can lead to unexpected and undesirable results. Use a validation service, such as the W3C MarkUp Validation Service, to confirm that an HTML5 document is syntactically correct.
2.5. Headings
Some text in an HTML5 document may be more important than other text. HTML5 provides six heading elements (h1 through h6) for specifying the relative importance of information (Fig. 2.2). Heading element h1 (line 12) is considered the most significant one and is typically rendered in a larger font than the other five (lines 13–17). Each successive heading element (h2, h3, etc.) is typically rendered in a progressively smaller font.
 Portability Tip 2.1
The text size used to display each heading element can vary between browsers. In Chapter 4, we use CSS to control the text size and other text properties.
 Look-and-Feel Observation 2.1
Placing a heading at the top of each page helps viewers understand the purpose of the page. Headers also help create an outline for a document and are indexed by search engines.
1 <!DOCTYPE html>
2
3 <!-- Fig. 2.2: heading.html -->
4 <!-- Heading elements h1 through h6. -->
5 <html>
6 <head>
7 <meta charset = "utf-8">
8 <title>Headings</title>
9 </head>
10
11 <body>
12 <h1>Level 1 Heading</h1>
13 <h2>Level 2 heading</h2>
14 <h3>Level 3 heading</h3>
15 <h4>Level 4 heading</h4>
16 <h5>Level 5 heading</h5>
17 <h6>Level 6 heading</h6>
18 </body>
19 </html>

Fig. 2.2. Heading elements h1 through h6.
2.6. Linking
One of the most important HTML5 features is the hyperlink, which references (or links to) other resources, such as HTML5 documents and images. When a user clicks a hyperlink, the browser tries to execute an action associated with it (for example, navigate to a URL or open an e-mail client). Any displayed element can act as a hyperlink. Web browsers typically underline text hyperlinks and color their text blue by default so that users can distinguish hyperlinks from plain text. In Fig. 2.3, we create text hyperlinks to four websites.
1 <!DOCTYPE html>
2
3 <!-- Fig. 2.3: links.html -->
4 <!-- Linking to other web pages. -->
5 <html>
6 <head>
7 <meta charset = "utf-8">
8 <title>Links</title>
9 </head>
10
11 <body>
12 <h1>Here are my favorite sites:</h1>
13 <p><strong>Click a name to visit that site.</strong></p>
14
15 <!-- create four text hyperlinks -->
16 <p><a href = "http://www.facebook.com">Facebook</a></p>
17 <p><a href = "http://www.twitter.com">Twitter</a></p>
18 <p><a href = "http://www.foursquare.com">Foursquare</a></p>
19 <p><a href = "http://www.google.com">Google</a></p>
20 </body>
21 </html>
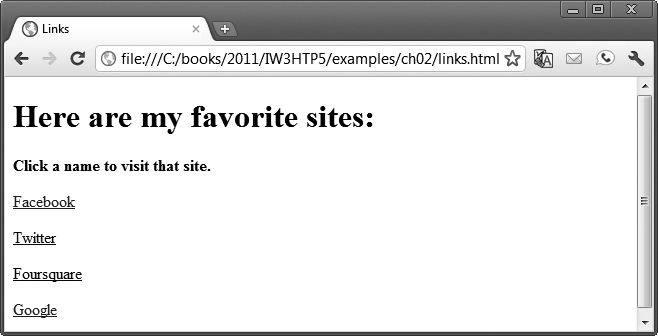
Fig. 2.3. Linking to other web pages.
Line 13 introduces the strong element, which indicates that its content has high importance. Browsers typically render such text in a bold font.
Links are created using the a (anchor) element. Line 16 defines a hyperlink to the URL assigned to attribute href (hypertext reference), which specifies a resource’s location, such as
• a web page or location within a web page
• a file
• an e-mail address
The anchor element in line 16 links the text Facebook to a web page located at http://www.facebook.com. The browser changes the color of any text link once you’ve clicked the link (in this case, the links are purple rather than blue). When a URL does not indicate a specific document on the website, the web server returns a default web page. This page is often called index.html, but most web servers can be configured to use any file as the default web page for the site. If the web server cannot locate a requested document, it returns an error indication to the web browser (known as a 404 error), and the browser displays a web page containing an error message.
 Software Engineering Observation 2.1
Although not required in HTML5, enclosing attribute values in either single or double quotes is recommended.
Hyperlinking to an E-Mail Address
Anchors can link to e-mail addresses using a mailto: URL. When the user clicks this type of anchored link, most browsers launch the user’s default e-mail program (for example, Mozilla Thunderbird, Microsoft Outlook or Apple Mail) to enable the user to write an e-mail message to the linked address. Figure 2.4 demonstrates this type of anchor. Lines 13–14 contain an e-mail link. The form of an e-mail anchor is <a href = "mailto:emailAddress">...</a>. In this case, we link to the e-mail address [email protected]. Line 13 includes the e-mail address as it will appear in the message displayed on the browser.
1 <!DOCTYPE html>
2
3 <!-- Fig. 2.4: contact.html -->
4 <!-- Linking to an e-mail address. -->
5 <html>
6 <head>
7 <meta charset = "utf-8">
8 <title>Contact Page</title>
9 </head>
10
11 <body>
12 <p>
13 To write to <a href = "mailto:[email protected]">
14 Deitel & Associates, Inc.</a>, click the link and your default
15 email client will open an email message and address it to us.
16 </p>
17 </body>
18 </html>


Fig. 2.4. Linking to an e-mail address.
2.7. Images
We’ve shown how to mark up documents that contain only text, but web pages may also contain images, animations, graphics, audios and even videos. The most popular image formats used by web developers today are PNG (Portable Network Graphics) and JPEG (Joint Photographic Experts Group). Users can create images using specialized software, such as Adobe Photoshop Express (www.photoshop.com), G.I.M.P. (www.gimp.org), Inkscape (www.inkscape.org) and many more. Images may also be acquired from various websites, many of which offer royalty-free images (Fig. 2.5)—read each site’s Terms of Service to determine if you’ll need permission to use their images, especially in commercial, for-profit applications. Figure 2.6 demonstrates how to include images in web pages.
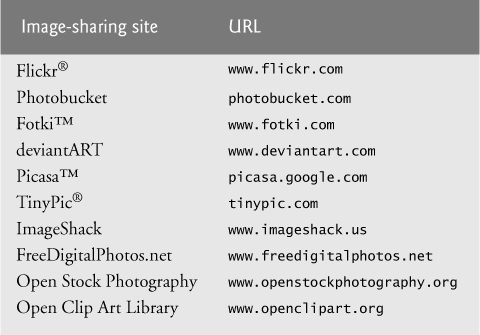
Fig. 2.5. Popular image-sharing sites.
1 <!DOCTYPE html>
2
3 <!-- Fig. 2.6: picture.html -->
4 <!-- Including images in HTML5 files. -->
5 <html>
6 <head>
7 <meta charset = "utf-8">
8 <title>Images</title>
9 </head>
10
11 <body>
12 <p>
13 <img src = "cpphtp.png" width = "92" height = "120"
14 alt = "C++ How to Program book cover">
15 <img src = "jhtp.png" width = "92" height = "120"
16 alt = "Java How to Program book cover">
17 </p>
18 </body>
19 </html>
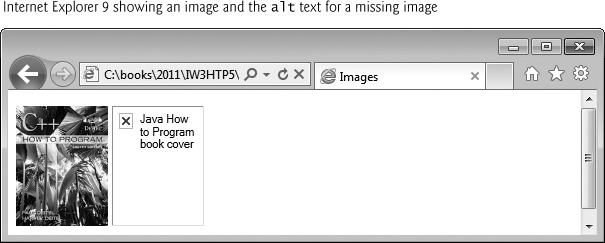
Fig. 2.6. Including images in HTML5 files.
Lines 13–14 use an img element to include an image in the document. The image file’s location is specified with the src (source) attribute. This image is located in the same directory as the HTML5 document, so only the image’s file name is required. This is known as a relative path—the image is stored relative to the location of the document. Optional attributes width and height specify the image’s dimensions. You can scale an image by increasing or decreasing the values of the image width and height attributes. If these attributes are omitted, the browser uses the image’s actual width and height. Images are measured in pixels (“picture elements”), which represent dots of color on the screen. Image-editing programs display the dimensions, in pixels, of an image. The image in Fig. 2.6 is 92 pixels wide and 120 pixels high.
 Performance Tip 2.1
Always include the width and the height of an image in the <img> tag so that when the browser loads the HTML5 file, it will know how much screen space to provide and can lay out the page properly, even before it downloads the image. Including the width and height attributes in an <img> tag can help the browser load and render pages faster.
Entering new dimensions for an image that change its width-to-height ratio distorts the appearance of the image. To avoid distortion, if your image is 200 pixels wide and 100 pixels high, for example, any new dimensions should maintain the 2:1 width-to-height ratio.
2.7.1. alt Attribute
A browser may not be able to render an image for several reasons. It may not support images—as is the case with text-only browsers—or the client may have disabled image viewing to reduce download time. Every img element in an HTML5 document must have an alt attribute. If a browser cannot render an image, the browser displays the alt attribute’s value. Figure 2.6 shows the Internet Explorer browser rendering a red X symbol and displaying the alt attribute’s value, signifying that the image (jhtp.png) cannot be found.
The alt attribute is also important for accessibility—speech synthesizer software can speak the alt attribute’s value so that a visually impaired user can understand what the browser is displaying. For this reason, the alt attribute should describe the image’s contents.
2.7.2. Void Elements
Some HTML5 elements (called void elements) contain only attributes and do not mark up text (i.e., text is not placed between a start and an end tag). Although this is not required in HTML5, you can terminate void elements (such as the img element) by using the forward slash character (/) inside the closing right angle bracket (>) of the start tag. For example, lines 15–16 could be written as follows:
<img src = "jhtp.png" width = "92" height = "120"
alt = "Java How to Program book cover" />
2.7.3. Using Images as Hyperlinks
By using images as hyperlinks, you can create graphical web pages that link to other resources. In Fig. 2.7, we create five different image hyperlinks. Clicking an image in this example takes the user to a corresponding web page—one of the other examples in this chapter.
1 <!DOCTYPE html>
2
3 <!-- Fig. 2.7: nav.html -->
4 <!-- Images as link anchors. -->
5 <html>
6 <head>
7 <meta charset = "utf-8">
8 <title>Navigation Bar</title>
9 </head>
10
11 <body>
12 <p>
13 <a href = "links.html">
14 <img src = "buttons/links.jpg" width = "65"
15 height = "50" alt = "Links">
16 </a>
17
18 <a href = "list.html">
19 <img src = "buttons/list.jpg" width = "65"
20 height = "50" alt = "List of Features">
21 </a>
22
23 <a href = "contact.html">
24 <img src = "buttons/contact.jpg" width = "65"
25 height = "50" alt = "Contact Me">
26 </a>
27
28 <a href = "table1.html">
29 <img src = "buttons/table.jpg" width = "65"
30 height = "50" alt = "Tables Page">
31 </a>
32
33 <a href = "form.html">
34 <img src = "buttons/form.jpg" width = "65"
35 height = "50" alt = "Feedback Form">
36 </a>
37 </p>
38 </body>
39 </html>

Fig. 2.7. Images as link anchors.
Lines 13–16 create an image hyperlink by nesting an img element in an anchor element. The img element’s src attribute value specifies that this image (links.jpg) resides in a directory named buttons. The buttons directory and the HTML5 document are in the same directory. Images from other web documents also can be referenced by setting the src attribute to the name and location of the image. If you refer to an image on another website, the browser has to request the image resource from that site’s server. [Note: If you’re hosting a publicly available web page that uses an image from another site, you should get permission to use the image and host a copy of the image on your own website. The image’s owner may require you to acknowledge their work.] Clicking an image hyperlink takes a user to the web page specified by the surrounding anchor element’s href attribute. When the mouse hovers over a link of any kind, the URL that the link points to is displayed in the status bar at the bottom of the browser window.
2.8. Special Characters and Horizontal Rules
When marking up text, certain characters or symbols may be difficult to embed directly into an HTML5 document. Some keyboards do not provide these symbols (such as ©), or their presence in the markup may cause syntax errors (as with <). For example, the markup
<p>if x < 10 then increment x by 1</p>
results in a syntax error because it uses the less-than character (<), which is reserved for start tags and end tags such as <p> and </p>. HTML5 provides character entity references (in the form &code;) for representing special characters (Fig. 2.8). We could correct the previous line by writing
<p>if x < 10 then increment x by 1</p>
which uses the character entity reference < for the less-than symbol (<). [Note: Before HTML5, the character entity reference & was required to display an & in a web page. This is no longer the case.]
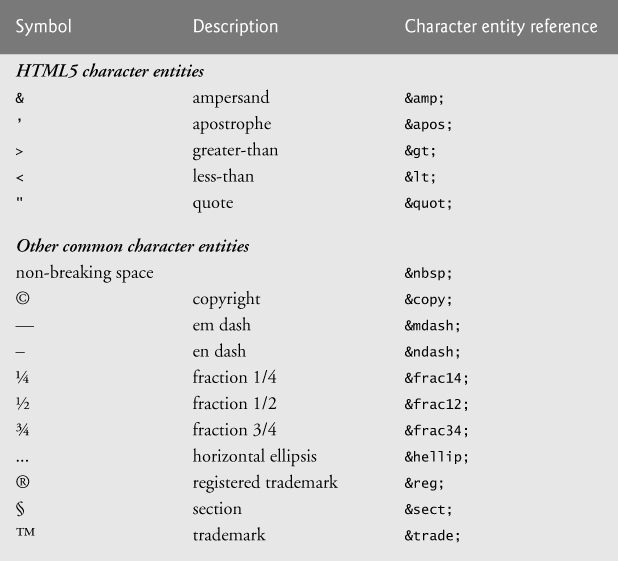
Fig. 2.8. Some common HTML character entity references.
Figure 2.9 demonstrates how to use special characters in an HTML5 document. For an extensive list of character entities, see
www.w3.org/TR/REC-html40/sgml/entities.html
1 <!DOCTYPE html>
2
3 <!-- Fig. 2.9: contact2.html -->
4 <!-- Inserting special characters. -->
5 <html>
6 <head>
7 <meta charset = "utf-8">
8 <title>Contact Page</title>
9 </head>
10
11 <body>
12 <p>
13 <a href = "mailto:[email protected]">Send an email to
14 Deitel & Associates, Inc.</a>.
15 </p>
16
17 <hr> <!-- inserts a horizontal rule -->
18
19 <!-- special characters are entered -->
20 <!-- using the form &code; -->
21 <p>All information on this site is <strong>©
22 Deitel & Associates, Inc. 2012.</strong> </p>
23
24 <!-- to strike through text use <del> element -->
25 <!-- to subscript text use <sub> element -->
26 <!-- to superscript text use <sup> element -->
27 <!-- these elements are nested inside other elements -->
28 <p><del>You may download 3.14 x 10<sup>2</sup>
29 characters worth of information from this site.</del>
30 The first item in the series is x<sub>1</sub>.</p>
31 <p>Note: < ¼ of the information
32 presented here is updated daily.</p>
33 </body>
34 </html>

Fig. 2.9. Inserting special characters.
The paragraph in lines 12–15 allows the user to click the link to send an e-mail to Deitel & Associates, Inc. In this case, we represented the & with the character entity reference & to show that it still works even though it’s not required in HTML5.
In addition to special characters, this document introduces a horizontal rule, indicated by the <hr> tag in line 17. Most browsers render a horizontal rule as a horizontal line with extra space above and below it. As a professional, you’ll see lots of older code—known as legacy code. The horizontal rule element should be considered a legacy element and you should avoid using it. As you’ll learn, CSS can be used to add horizontal rules and other formatting to documents.
Lines 21–22 contain other special characters, which can be expressed as either character entity references (coded using word abbreviations such as © for copyright) or numeric character references—decimal or hexadecimal (hex) values representing special characters. For example, the & character is represented in decimal and hexadecimal notation as & and &, respectively. Hexadecimal numbers are base 16 numbers—digits in a hexadecimal number have values from 0 to 15 (a total of 16 different values). The letters A–F represent the hexadecimal digits corresponding to decimal values 10–15. Thus in hexadecimal notation we can have numbers like 876 consisting solely of decimal-like digits, numbers like DA19F consisting of digits and letters, and numbers like DCB consisting solely of letters. We discuss hexadecimal numbers in detail in Appendix E, Number Systems, which is available online at www.deitel.com/books/iw3htp5/.
In lines 28–30, we introduce four new elements. Most browsers render the del element as strike-through text. With this format users can indicate document revisions. To superscript text (i.e., raise text above the baseline and in a decreased font size) or subscript text (i.e., lower text below the baseline and in a decreased font size), use the sup or sub element, respectively. We also use character entity reference < for a less-than sign and ¼ for the fraction 1/4 (line 31).
2.9. Lists
Now we show how to use lists in a web page to organize content that similar in nature. Figure 2.10 displays text in an unordered list (i.e., a simple bullet-style list that does not order its items by letter or number). The unordered-list element ul (lines 16–22) creates a list in which each item begins with a bullet symbol (typically a disc). Each entry in an unordered list is an li (list item) element (lines 18–21). Most web browsers render each li element on a new line with a bullet symbol indented from the beginning of the line.
1 <!DOCTYPE html>
2
3 <!-- Fig. 2.10: links2.html -->
4 <!-- Unordered list containing hyperlinks. -->
5 <html>
6 <head>
7 <meta charset = "utf-8">
8 <title>Links</title>
9 </head>
10
11 <body>
12 <h1>Here are my favorite sites</h1>
13 <p><strong>Click on a name to go to that page</strong></p>
14
15 <!-- create an unordered list -->
16 <ul>
17 <!-- the list contains four list items -->
18 <li><a href = "http://www.youtube.com">YouTube</a></li>
19 <li><a href = "http://www.wikipedia.org">Wikipedia</a></li>
20 <li><a href = "http://www.amazon.com">Amazon</a></li>
21 <li><a href = "http://www.linkedin.com">LinkedIn</a></li>
22 </ul>
23 </body>
24 </html>
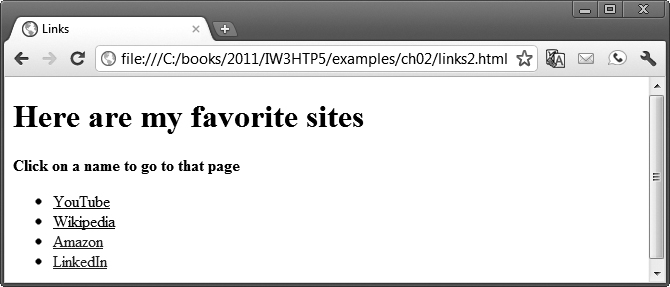
Fig. 2.10. Unordered list containing hyperlinks.
Nested Lists
Lists may be nested to represent hierarchical relationships, as in a multilevel outline. Figure 2.11 demonstrates nested lists and ordered lists. The ordered-list element ol creates a list in which each item begins with a number.
In many browsers, the items in the outermost unordered list (lines 15–55) are preceded by discs. List items nested inside the unordered list of line 15 are preceded in many browsers by hollow circular bullets. A web browser indents each nested list to indicate a hierarchical relationship. The first ordered list (lines 29–33) includes two items. Items in an ordered list are enumerated 1., 2., 3. and so on. Nested ordered lists are enumerated in the same manner. Although not demonstrated in this example, subsequent nested unordered list items are often preceded by square bullets. The bullet styles used may vary by browser.
1 <!DOCTYPE html>
2
3 <!-- Fig. 2.11: list.html -->
4 <!-- Nested lists and ordered lists. -->
5 <html>
6 <head>
7 <meta charset = "utf-8">
8 <title>Lists</title>
9 </head>
10
11 <body>
12 <h1>The Best Features of the Internet</h1>
13
14 <!-- create an unordered list -->
15 <ul>
16 <li>You can meet new people from countries around
17 the world.</li>
18 <li>
19 You have access to new media as it becomes public:
20
21 <!-- this starts a nested unordered list, which uses a -->
22 <!-- different bullet. The list ends when you -->
23 <!-- close the <ul> tag. -->
24 <ul>
25 <li>New games</li>
26 <li>New applications
27
28 <!-- nested ordered list -->
29 <ol>
30 <li>For business </li>
31 <li>For pleasure </li>
32 </ol>
33 </li> <!-- ends line 27 new applications li-->
34
35 <li>Around the clock news</li>
36 <li>Search engines</li>
37 <li>Shopping</li>
38 <li>Programming
39
40 <!-- another nested ordered list -->
41 <ol>
42 <li>XML</li>
43 <li>Java</li>
44 <li>HTML5</li>
45 <li>JavaScript</li>
46 <li>New languages</li>
47 </ol>
48 </li> <!-- ends programming li of line 38 -->
49 </ul> <!-- ends the nested list of line 24 -->
50 </li>
51
52 <li>Links</li>
53 <li>Keeping in touch with old friends</li>
54 <li>It's the technology of the future!</li>
55 </ul> <!-- ends the unordered list of line 15 -->
56 </body>
57 </html>
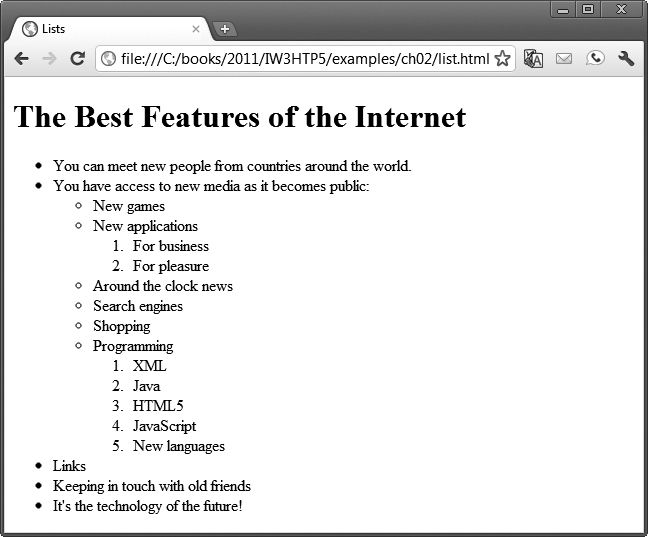
Fig. 2.11. Nested lists and ordered lists.
2.10. Tables
Tables are frequently used to organize data into rows and columns. Our first example (Fig. 2.12) creates a table with six rows and two columns to display price information for various fruits. Tables are defined with the table element (lines 13–58). Line 13 specifies the table element’s start tag. The border attribute with the value "1" specifies that the browser should place borders around the table and the table’s cells. The border attribute is a legacy attribute that you should avoid. When we introduce CSS3 (Chapter 4), we’ll use CSS’s border property, which is the preferred way to format a table’s borders.
The caption element (lines 17–18) specifies a table’s title. Text in this element is typically rendered above the table. In addition, it’s good practice to include a general description of a table’s information in the table element’s summary attribute—one of the many HTML5 features that make web pages more accessible to users with disabilities. Speech devices use this attribute to make the table more accessible to users with visual impairments.
1 <!DOCTYPE html>
2
3 <!-- Fig. 2.12: table1.html -->
4 <!-- Creating a basic table. -->
5 <html>
6 <head>
7 <meta charset = "utf-8">
8 <title>A simple HTML5 table</title>
9 </head>
10
11 <body>
12 <!-- the <table> tag opens a table -->
13 <table border = "1">
14
15 <!-- the <caption> tag summarizes the table's -->
16 <!-- contents (this helps visually impaired people) -->
17 <caption><strong>Table of Fruits (1st column) and
18 Their Prices (2nd column)</strong></caption>
19
20 <!-- the <thead> section appears first in the table -->
21 <!-- it formats the table header area -->
22 <thead>
23 <tr> <!-- <tr> inserts a table row -->
24 <th>Fruit</th> <!-- insert a heading cell -->
25 <th>Price</th>
26 </tr>
27 </thead>
28
29 <!-- the <tfoot> section appears last in the table -->
30 <!-- it formats the table footer -->
31 <tfoot>
32 <tr>
33 <th>Total</th>
34 <th>$3.75</th>
35 </tr>
36 </tfoot>
37
38 <!-- all table content is enclosed -->
39 <!-- within the <tbody> -->
40 <tbody>
41 <tr>
42 <td>Apple</td> <!-- insert a data cell -->
43 <td>$0.25</td>
44 </tr>
45 <tr>
46 <td>Orange</td>
47 <td>$0.50</td>
48 </tr>
49 <tr>
50 <td>Banana</td>
51 <td>$1.00</td>
52 </tr>
53 <tr>
54 <td>Pineapple</td>
55 <td>$2.00</td>
56 </tr>
57 </tbody>
58 </table>
59 </body>
60 </html>
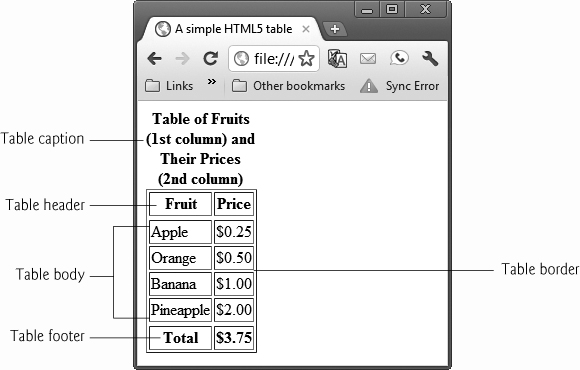
Fig. 2.12. Creating a basic table.
A table has three distinct sections—head, body and foot. The head section (or header cell) is defined with a thead element (lines 22–27), which contains header information such as column names. Each tr element (lines 23–26) defines an individual table row. The columns in the thead section are defined with th elements. Most browsers center text formatted by th (table header column) elements and display them in bold. Table header elements (lines 24–25) are nested inside table row elements.
The body section, or table body, contains the table’s primary data. The table body (lines 40–57) is defined in a tbody element. In the table body, each tr element specifies one row. Data cells contain individual pieces of data and are defined with td (table data) elements in each row.
The tfoot section (lines 31–36) is defined with a tfoot (table foot) element. The text placed in the footer commonly includes calculation results and footnotes. Here, we manually entered the calculation total. In later chapters, we’ll show how to perform such calculations dynamically. Like other sections, the tfoot section can contain table rows, and each row can contain cells. As in the thead section, cells in the foot section are created using th elements, instead of the td elements used in the table body. Before HTML5, the tfoot section was required to appear above the tbody section of the table. As of HTML5, the tfoot section can be above or below the tbody section in the code.
In this example, we specified only the table’s data, not its formatting. As you can see, in the browser’s default formatting each column is only as wide as its largest element, and the table itself is not visually appealing. In Chapter 4, we’ll use CSS to specify HTML5 elements’ formats.
Using rowspan and colspan with Tables
Figure 2.12 explored a basic table’s structure. Figure 2.13 presents another table example and introduces new attributes that allow you to build more complex tables.
The table begins in line 14. Table cells are sized to fit the data they contain, but you can control a table’s formatting using CSS3. You can create cells that apply to more than one row or column using the attributes rowspan and colspan. The values assigned to these attributes specify the number of rows or columns occupied by a cell. The th element at lines 22–25 uses the attribute rowspan = "2" to allow the cell containing the picture of the camel to use two vertically adjacent cells (thus the cell spans two rows). The th element in lines 28–31 uses the attribute colspan = "4" to widen the header cell (containing Camelid comparison and Approximate as of 10/2011) to span four cells.
Line 29 introduces the br element, which most browsers render as a line break. Any markup or text following a br element is rendered on the next line, which in this case appears within the same four-column span. Like the img element, br is an example of a void element. Like the hr element, br is considered a legacy formatting element that you should avoid using—in general, formatting should be specified using CSS.
1 <!DOCTYPE html>
2
3 <!-- Fig. 2.13: table2.html -->
4 <!-- Complex HTML5 table. -->
5 <html>
6 <head>
7 <meta charset = "utf-8">
8 <title>Tables</title>
9 </head>
10
11 <body>
12 <h1>Table Example: Spanning Rows and Columns</h1>
13
14 <table border = "1">
15 <caption>A more complex sample table</caption>
16
17 <thead>
18 <!-- rowspans and colspans merge the specified -->
19 <!-- number of cells vertically or horizontally -->
20 <tr>
21 <!-- merge two rows -->
22 <th rowspan = "2">
23 <img src = "camel.png" width = "205"
24 height = "167" alt = "Picture of a camel">
25 </th>
26
27 <!-- merge four columns -->
28 <th colspan = "4">
29 <strong>Camelid comparison</strong><br>
30 Approximate as of 10/2011
31 </th>
32 </tr>
33 <tr>
34 <th># of humps</th>
35 <th>Indigenous region</th>
36 <th>Spits?</th>
37 <th>Produces wool?</th>
38 </tr>
39 </thead>
40 <tbody>
41 <tr>
42 <th>Camels (bactrian)</th>
43 <td>2</td>
44 <td>Africa/Asia</td>
45 <td>Yes</td>
46 <td>Yes</td>
47 </tr>
48 <tr>
49 <th>Llamas</th>
50 <td>1</td>
51 <td>Andes Mountains</td>
52 <td>Yes</td>
53 <td>Yes</td>
54 </tr>
55 </tbody>
56 </table>
57 </body>
58 </html>

Fig. 2.13. Complex HTML5 table.
2.11. Forms
When browsing websites, users often need to provide information such as search queries, e-mail addresses and zip codes. HTML5 provides a mechanism, called a form, for collecting data from a user.
Data that users enter on a web page is normally sent to a web server that provides access to a site’s resources (for example, HTML5 documents, images, animations, videos). These resources are located either on the same machine as the web server or on a machine that the web server can access through the Internet. When a browser requests a publicly available web page or file that’s located on a server, the server processes the request and returns the requested resource. A request contains the name and path of the desired resource and the protocol (method of communication). HTML5 documents are requested and transferred via the Hypertext Transfer Protocol (HTTP).
Figure 2.14 is a simple form that sends data to the web server for processing. The web server typically returns a web page back to the web browser—this page often indicates whether or not the form’s data was processed correctly. [Note: This example demonstrates only client-side functionality. If you submit this form (by clicking Submit), the browser will simply display www.deitel.com (the site specified in the form’s action), because we haven’t yet specified how to process the form data on the server. In later chapters, we present the server-side programming (for example, in PHP, ASP.NET and JavaServer Faces) necessary to process information entered into a form.]
1 <!DOCTYPE html>
2
3 <!-- Fig. 2.14: form.html -->
4 <!-- Form with a text field and hidden fields. -->
5 <html>
6 <head>
7 <meta charset = "utf-8">
8 <title>Forms</title>
9 </head>
10
11 <body>
12 <h1>Feedback Form</h1>
13
14 <p>Please fill out this form to help
15 us improve our site.</p>
16
17 <!-- this tag starts the the form, gives the -->
18 <!-- method of sending information and the -->
19 <!-- location of the form-processing script -->
20 <form method = "post" action = "http://www.deitel.com">
21 <!-- hidden inputs contain non-visual -->
22 <!-- information that will also be submitted -->
23 <input type = "hidden" name = "recipient"
24 value = "[email protected]">
25 <input type = "hidden" name = "subject"
26 value = "Feedback Form">
27 <input type = "hidden" name = "redirect"
28 value = "main.html">
29
30 <!-- <input type = "text"> inserts a text field -->
31 <p><label>Name:
32 <input name = "name" type = "text" size = "25"
33 maxlength = "30">
34 </label></p>
35
36 <p>
37 <!-- input types "submit" and "reset" insert -->
38 <!-- buttons for submitting and clearing the -->
39 <!-- form's contents, respectively -->
40 <input type = "submit" value = "Submit">
41 <input type = "reset" value = "Clear">
42 </p>
43 </form>
44 </body>
45 </html>

Fig. 2.14. Form with a text field and hidden fields.
method Attribute of the form Element
The form is defined in lines 20–43 by a form element. Attribute method (line 20) specifies how the form’s data is sent to the web server. Using method = "post" appends form data to the browser request, which contains the protocol (HTTP) and the requested resource’s URL. This method of passing data to the server is transparent—the user doesn’t see the data after the form is submitted. The other possible value, method = "get", appends the form data directly to the end of the URL of the script, where it’s visible in the browser’s Address field. The post and get methods for sending form data are discussed in detail in Chapter 17.
action Attribute of the form Element
The action attribute in the form element in line 20 specifies the URL of a script on the web server that will be invoked to process the form’s data. Since we haven’t introduced server-side programming yet, we set this attribute to http://www.deitel.com for now.
Lines 24–43 define input elements that specify data to provide to the script that processes the form (also called the form handler). There are several types of input elements. An input’s type is determined by its type attribute. This form uses a text input, a submit input, a reset input and three hidden inputs.
Hidden Inputs
Forms can contain visual and nonvisual components. Visual components include clickable buttons and other graphical user interface components with which users interact. Nonvisual components, called hidden inputs (lines 23–28), store any data that you specify, such as e-mail addresses and HTML5 document file names that act as links.
The three hidden input elements in lines 23–28 have the type attribute hidden, which allows you to send form data that’s not input by a user. The hidden inputs are an e-mail address to which the data will be sent, the e-mail’s subject line and a URL for the browser to open after submission of the form. Two other input attributes are name, which identifies the input element, and value, which provides the value that will be sent (or posted) to the web server. The server uses the name attribute to get the corresponding value from the form.
text input Element
The text input in lines 32–33 inserts a text field in the form. Users can type data in text fields. The label element (lines 31–34) provides users with information about the input element’s purpose. The input element’s size attribute specifies the number of characters visible in the text field. Optional attribute maxlength limits the number of characters input into the text field—in this case, the user is not permitted to type more than 30 characters.
submit and reset input Elements
Two input elements in lines 40–41 create two buttons. The submit input element is a button. When the submit button is pressed, the form’s data is sent to the location specified in the form’s action attribute. The value attribute sets the text displayed on the button. The reset input element allows a user to reset all form elements to their default values. The value attribute of the reset input element sets the text displayed on the button (the default value is Reset if you omit the value attribute).
Additional Form Elements
In the previous example, you saw basic elements of HTML5 forms. Now we introduce elements and attributes for creating more complex forms. Figure 2.15 contains a form that solicits user feedback about a website.
The textarea element (lines 31–32) inserts a multiline text area into the form. The number of rows is specified with the rows attribute, and the number of columns (i.e., characters per line) with the cols attribute. In this example, the textarea is four rows high and 36 characters wide. To display default text in the textarea, place the text between the <textarea> and </textarea> tags. Default text can be specified in other input types, such as text fields, by using the value attribute.
1 <!DOCTYPE html>
2
3 <!-- Fig. 2.15: form2.html -->
4 <!-- Form using a variety of components. -->
5 <html>
6 <head>
7 <meta charset = "utf-8">
8 <title>More Forms</title>
9 </head>
10
11 <body>
12 <h1>Feedback Form</h1>
13 <p>Please fill out this form to help
14 us improve our site.</p>
15
16 <form method = "post" action = "http://www.deitel.com">
17
18 <input type = "hidden" name = "recipient"
19 value = "[email protected]">
20 <input type = "hidden" name = "subject"
21 value = "Feedback Form">
22 <input type = "hidden" name = "redirect"
23 value = "main.html">
24
25 <p><label>Name:
26 <input name = "name" type = "text" size = "25">
27 </label></p>
28
29 <!-- <textarea> creates a multiline textbox -->
30 <p><label>Comments:<br>
31 <textarea name = "comments"
32 rows = "4" cols = "36">Enter comments here.</textarea>
33 </label></p>
34
35 <!-- <input type = "password"> inserts a -->
36 <!-- textbox whose display is masked with -->
37 <!-- asterisk characters -->
38 <p><label>E-mail Address:
39 <input name = "email" type = "password" size = "25">
40 </label></p>
41
42 <p>
43 <strong>Things you liked:</strong><br>
44
45 <label>Site design
46 <input name = "thingsliked" type = "checkbox"
47 value = "Design"></label>
48 <label>Links
49 <input name = "thingsliked" type = "checkbox"
50 value = "Links"></label>
51 <label>Ease of use
52 <input name = "thingsliked" type = "checkbox"
53 value = "Ease"></label>
54 <label>Images
55 <input name = "thingsliked" type = "checkbox"
56 value = "Images"></label>
57 <label>Source code
58 <input name = "thingsliked" type = "checkbox"
59 value = "Code"></label>
60 </p>
61
62 <!-- <input type = "radio"> creates a radio -->
63 <!-- button. The difference between radio buttons -->
64 <!-- and checkboxes is that only one radio button -->
65 <!-- in a group can be selected. -->
66 <p>
67 <strong>How did you get to our site?:</strong><br>
68
69 <label>Search engine
70 <input name = "howtosite" type = "radio"
71 value = "search engine" checked></label>
72 <label>Links from another site
73 <input name = "howtosite" type = "radio"
74 value = "link"></label>
75 <label>Deitel.com Web site
76 <input name = "howtosite" type = "radio"
77 value = "deitel.com"></label>
78 <label>Reference in a book
79 <input name = "howtosite" type = "radio"
80 value = "book"></label>
81 <label>Other
82 <input name = "howtosite" type = "radio"
83 value = "other"></label>
84 </p>
85
86 <p>
87 <label>Rate our site:
88
89 <!-- the <select> tag presents a drop-down -->
90 <!-- list with choices indicated by the -->
91 <!-- <option> tags -->
92 <select name = "rating">
93 <option selected>Amazing</option>
94 <option>10</option>
95 <option>9</option>
96 <option>8</option>
97 <option>7</option>
98 <option>6</option>
99 <option>5</option>
100 <option>4</option>
101 <option>3</option>
102 <option>2</option>
103 <option>1</option>
104 <option>Awful</option>
105 </select>
106 </label>
107 </p>
108
109 <p>
110 <input type = "submit" value = "Submit">
111 <input type = "reset" value = "Clear">
112 </p>
113 </form>
114 </body>
115 </html>

Fig. 2.15. Form using a variety of components.
The password input in line 39 inserts a password box with the specified size (maximum number of displayed characters). A password box allows users to enter sensitive information, such as credit card numbers and passwords, by “masking” the information input with asterisks (*). The actual value input is sent to the web server, not the masking characters.
Lines 45–59 introduce the checkbox input element. checkboxes enable users to select an option. When a user selects a checkbox, a check mark appears in the checkbox. Otherwise, the checkbox remains empty. Each checkbox input creates a new checkbox. checkboxes can be used individually or in groups. checkboxes that belong to a group are assigned the same name (in this case, "thingsliked").
 Common Programming Error 2.1
When your form has several checkboxes with the same name, make sure that they have different values, or the web server scripts will not be able to distinguish them.
After the checkboxes, we present two more ways to allow the user to make choices. In this example, we introduce two new input types. The first is the radio button (lines 69–83) specified with type radio. radio buttons are similar to checkboxes, except that only one radio button in a group of radio buttons may be selected at any time. The radio buttons in a group all have the same name attributes and are distinguished by their different value attributes. The attribute checked (line 71) indicates which radio button, if any, is selected initially. The checked attribute also applies to checkboxes.
Not setting the name attributes of the radio buttons in a group to the same name is a logic error because it lets the user select all of the radio buttons at the same time.
The select element (lines 92–105) provides a drop-down list from which the user can select an item. The name attribute identifies the drop-down list. The option elements (lines 93–104) add items to the drop-down list. The option element’s selected attribute specifies which item initially is displayed as the selected item in the select element. If no option element is marked as selected, the browser selects the first option by default.
2.12. Internal Linking
Earlier in the chapter, we discussed how to hyperlink one web page to another. Figure 2.16 introduces internal linking—a mechanism that enables the user to jump between locations in the same document. Internal linking is useful for long documents that contain many sections. Clicking an internal link enables the user to find a section without scrolling through the entire document.
1 <!DOCTYPE html>
2
3 <!-- Fig. 2.16: internal.html -->
4 <!-- Internal Linking -->
5 <html>
6 <head>
7 <meta charset = "utf-8">
8 <title>Internal Links</title>
9 </head>
10
11 <body>
12 <!-- id attribute creates an internal hyperlink destination -->
13 <h1 id = "features">The Best Features of the Internet</h1>
14
15 <!-- an internal link's address is "#id" -->
16 <p><a href = "#bugs">Go to <em>Favorite Bugs</em></a></p>
17
18 <ul>
19 <li>You can meet people from countries
20 around the world.</li>
21 <li>You have access to new media as it becomes public:
22 <ul>
23 <li>New games</li>
24 <li>New applications
25 <ul>
26 <li>For Business</li>
27 <li>For Pleasure</li>
28 </ul>
29 </li>
30
31 <li>Around the clock news</li>
32 <li>Search Engines</li>
33 <li>Shopping</li>
34 <li>Programming
35 <ul>
36 <li>HTML5</li>
37 <li>Java</li>
38 <li>Dynamic HTML</li>
39 <li>Scripts</li>
40 <li>New languages</li>
41 </ul>
42 </li>
43 </ul>
44 </li>
45
46 <li>Links</li>
47 <li>Keeping in touch with old friends</li>
48 <li>It is the technology of the future!</li>
49 </ul>
50
51 <!-- id attribute creates an internal hyperlink destination -->
52 <h1 id = "bugs">My 3 Favorite Bugs</h1>
53 <p>
54 <!-- internal hyperlink to features -->
55 <a href = "#features">Go to <em>Favorite Features</em></a>
56 </p>
57 <ol>
58 <li>Fire Fly</li>
59 <li>Gal Ant</li>
60 <li>Roman Tic</li>
61 </ol>
62 </body>
63 </html>
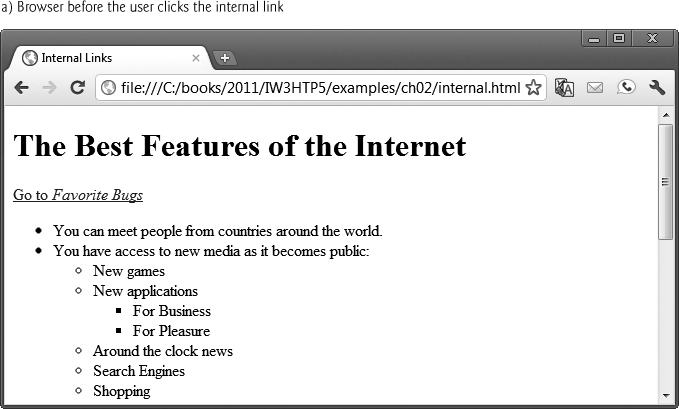
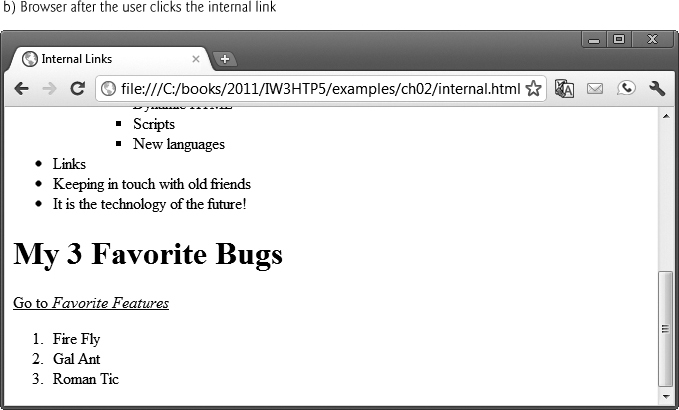
Fig. 2.16. Internal hyperlinks to make pages more navigable.
Line 13 contains a tag with the id attribute (set to "features") for an internal hyperlink. To link to a tag with this attribute inside the same web page, the href attribute of an anchor element includes the id attribute value, preceded by a pound sign (as in #features). Line 55 contains a hyperlink with the id features as its target. Clicking this hyperlink in a web browser scrolls the browser window to the h1 tag in line 13. You may have to resize your browser to a small window and scroll down before clicking the link to see the browser scroll to the h1 element.
A hyperlink can also reference an internal link in another document by specifying the document name followed by a pound sign and the id value, as in:
href = "filename.html#id"
For example, to link to a tag with the id attribute booklist in books.html, href is assigned "books.html#booklist". You can send the browser to an internal link on another website by appending the pound sign and id value of an element to any URL, as in:
href = "URL/filename.html#id"
2.13. meta Elements
Search engines catalog sites by following links from page to page (often known as spidering or crawling the site) and saving identification and classification information for each page. One way that search engines catalog pages is by reading the content in each page’s meta elements, which specify information about a document. Using the meta element is one of many methods of search engine optimization (SEO)—the process of designing and tuning your website to maximize your findability and improve your rankings in organic (non-paid) search engine results.
Two important attributes of the meta element are name, which identifies the type of meta element, and content, which provides the information search engines use to catalog pages. Figure 2.17 introduces the meta element.
1 <!DOCTYPE html>
2
3 <!-- Fig. 2.17: meta.html -->
4 <!-- meta elements provide keywords and a description of a page. -->
5 <html>
6 <head>
7 <meta charset = "utf-8">
8 <title>Welcome</title>
9
10 <!-- <meta> tags provide search engines with -->
11 <!-- information used to catalog a site -->
12 <meta name = "keywords" content = "web page, design,
13 HTML5, tutorial, personal, help, index, form,
14 contact, feedback, list, links, deitel">
15 <meta name = "description" content = "This website will
16 help you learn the basics of HTML5 and web page design
17 through the use of interactive examples and
18 instruction.">
19 </head>
20 <body>
21 <h1>Welcome to Our Website!</h1>
22
23 <p>We have designed this site to teach about the wonders
24 of <strong><em>HTML5</em></strong>. <em>HTML5</em> is
25 better equipped than <em>HTML</em> to represent complex
26 data on the Internet. <em>HTML5</em> takes advantage of
27 XML's strict syntax to ensure well-formedness. Soon you
28 will know about many of the great features of
29 <em>HTML5.</em></p>
30
31 <p>Have Fun With the Site!</p>
32 </body>
33 </html>
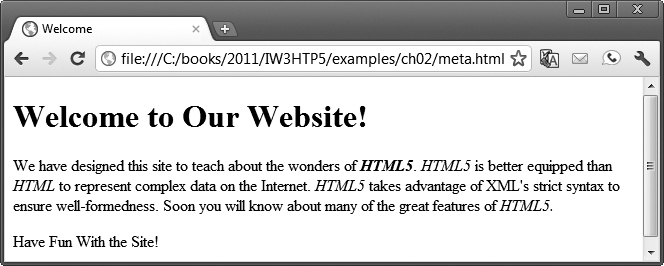
Fig. 2.17. meta elements provide keywords and a description of a page.
Lines 12–14 demonstrate a "keywords" meta element. The content attribute of such a meta element provides search engines with a list of words that describe the page. These words are compared with words in search requests. Thus, including meta elements and their content information can draw more viewers to your site.
Lines 15–18 demonstrate a "description" meta element. The content attribute of such a meta element provides a three- to four-line description of a site, written in sentence form. Search engines also use this description to catalog your site and sometimes display this information as part of the search results.
Software Engineering Observation 2.2
meta elements are not visible to users. They must be placed inside the head section of your HTML5 document; otherwise they will not be read by search engines.
2.14. Web Resources
Visit our online HTML5 Resource Center to find categorized links to mostly free HTML5 introductions, tutorials, demos, videos, documentation, books, blogs, forums, sample chapters and more.
Summary
Section 2.1 Introduction
• HTML5 is a markup language that specifies the structure and content of documents that are displayed in web browsers.
Section 2.2 Editing HTML5
• Computers called web servers store HTML5 documents.
• Clients (for example, web browsers running on your local computer or smartphone) request specific resources (p. 38) such as HTML5 documents from web servers.
Section 2.3 First HTML5 Example
• The document type declaration (DOCTYPE; p. 39) is required in HTML5 documents so that browsers render the page in standards mode (p. 39).
• HTML5 comments (p. 39) always start with <!-- (p. 39) and end with --> (p. 39). The browser ignores all text inside a comment.
• The html element (p. 40) encloses the head section (represented by the head element; p. 40) and the body section (represented by the body element; p. 40).
• The head section contains information about the HTML5 document, such as its title (p. 40). It also can contain special document-formatting instructions called style sheets (p. 40) and client-side programs called scripts (p. 40) for creating dynamic web pages.
• The body section contains the page’s content, which the browser displays when the user visits the web page.
• HTML5 documents delimit an element with start and end tags. A start tag (p. 40) consists of the element name in angle brackets (for example, <html>). An end tag (p. 40) consists of the element name preceded by a forward slash (/) in angle brackets (for example, </html>).
• The title element names a web page. The title usually appears in the colored bar (called the title bar; p. 40) at the top of the browser window and also appears as the text identifying a page when users add your page to their list of Favorites or Bookmarks.
• The paragraph element (p. 40), denoted with <p> and </p>, helps define the structure of a document. All the text placed between the <p> and </p> tags forms one paragraph.
Section 2.4 W3C HTML5 Validation Service
• You must use proper HTML5 syntax to ensure that browsers process your documents properly.
• The World Wide Web Consortium (W3C) provides a validation service (validator.w3.org; p. 41) for checking a document’s syntax.
Section 2.5 Headings
• HTML5 provides six heading elements (h1 through h6; p.41) for specifying the relative importance of information. Heading element h1 is considered the most significant and is rendered in a larger font than the other five. Each successive heading element (h2, h3, etc.) is rendered in a progressively smaller font.
Section 2.6 Linking
• Hyperlinks (p. 42) reference (or link to) other resources, such as HTML5 documents and images.
• The strong element (p. 43) typically causes the browser to render text in a bold font.
• Links are created using the a (anchor) element (p. 43). The href (“hypertext reference”) attribute (p. 43) specifies the location of a linked resource, such as a web page, a file or an e-mail address.
• Anchors can link to an e-mail address using a mailto: URL (p. 44). When someone clicks this type of anchored link, most browsers launch the default e-mail program to initiate an e-mail message addressed to the linked address.
Section 2.7 Images
• The img element’s (p. 46) src attribute (p. 46) specifies an image’s location.
• Every img element in an HTML5 document must have an alt attribute (p. 47). If a browser cannot render an image, the browser displays the alt attribute’s value.
• The alt attribute helps you create accessible web pages (p. 47) for users with disabilities, especially those with vision impairments who use text-only browsers.
• Void HTML5 elements (such as img; p. 47) contain only attributes, do not mark up text and do not have a closing tag.
Section 2.8 Special Characters and Horizontal Rules
• HTML5 provides character entity references in the form &code; (p. 49) for representing characters.
• Most browsers render a horizontal rule (p. 51), indicated by the <hr> tag (a void element), as a horizontal line with a blank line above and below it.
• Special characters can also be expressed as numeric character references (p. 51)—decimal or hexadecimal (hex; p. 51) values.
• Most browsers render the del element (p. 51) as strike-through text. With this format users can indicate document revisions.
Section 2.9 Lists
• The unordered-list element ul (p. 51) creates a list in which each item begins with a bullet symbol (called a disc). Each entry in an unordered list is an li (list item) element (p. 51). Most web browsers render these elements on a new line with a bullet symbol indented from the beginning of the line.
• Lists may be nested to represent hierarchical data relationships.
• The ordered-list element ol (p. 52) creates a list in which each item begins with a number.
Section 2.10 Tables
• Tables are frequently used to organize data into rows and columns. Tables are defined with the table element (p. 54).
• The caption element (p. 54) specifies a table’s title. The text inside the <caption> tag is rendered above the table by most browsers. It’s good practice to include a general description of a table’s information in the table element’s summary attribute—one of the many HTML5 features that make web pages more accessible to users with disabilities. Speech devices use this attribute to make the table more accessible to users with visual impairments.
• A table has three distinct sections: head, body and foot (p. 56). The head section (or header cell) is defined with a thead element (p. 56), which contains header information such as column names.
• Each tr element (p. 56) defines an individual table row (p. 56). The columns in the head section are defined with th elements (p. 56).
• The table body, defined in a tbody element (p. 56), contains the table’s primary data.
• The foot section is defined with a tfoot element (p. 56). The text placed in the footer commonly includes calculation results and footnotes.
• You can create larger data cells using the attributes rowspan (p. 57) and colspan (p. 57). The values assigned to these attributes specify the number of rows or columns occupied by a cell.
• The br element (p. 57) causes most browsers to render a line break (p. 57). Any markup or text following a br element is rendered on the next line.
Section 2.11 Forms
• HTML5 provides forms (p. 58) for collecting information from a user.
• Forms can contain visual and nonvisual components. Visual components include clickable buttons and other graphical user-interface components with which users interact. Nonvisual components, called hidden inputs (p. 61), store any data that you specify, such as e-mail addresses and HTML5 document file names that act as links.
• A form is defined by a form element (p. 60).
• Nonvisual components, called hidden inputs (p. 61), store any data that you specify.
• Attribute method (p. 60) specifies how the form’s data is sent to the web server.
• The action attribute (p. 60) in the form element specifies the URL of the script on the web server that will be invoked to process the form’s data.
• The text input (p. 61) inserts a text field into the form. Users can type data into text fields.
• The input element’s size attribute (p. 61) specifies the number of characters visible in the text field. Optional attribute maxlength (p. 61) limits the number of characters input into the text field.
• The submit input (p. 61) is a button that, when pressed, sends the user to the location specified in the form’s attribute. The reset input element sets the text displayed on the button (the default value is Reset if you omit the value attribute).
• The textarea element (p. 61) inserts a multiline text area into a form. The number of rows is specified with the rows attribute (p. 61) and the number of columns (i.e., characters per line) with the cols attribute (p. 61).
• The password input (p. 64) inserts a password box with the specified size (maximum number of characters allowed).
• A password box allows users to enter sensitive information, such as credit card numbers and passwords, by “masking” the information input with asterisks (*). Asterisks are usually the masking character used for password boxes. The actual value input is sent to the web server, not the characters that mask the input.
• checkboxes (p. 64) enable users to select from a set of options. When a user selects a checkbox, a check mark appears in the checkbox. Otherwise, the checkbox remains empty. checkboxes can be used individually or in groups. checkboxes that are part of the same group have the same name.
• radio buttons (p. 64) are similar to checkboxes, except that only one radio button in a group can be selected at any time. The radio buttons in a group all have the same name attribute and are distinguished by their different value attributes.
• The select element (p. 65) provides a drop-down list from which the user can select an item. The name attribute identifies the drop-down list. The option element adds items to the drop-down list.
Section 2.12 Internal Linking
• Internal linking (p. 67) is a mechanism that enables the user to jump between locations in the same document.
• To link to a tag with its attribute inside the same web page, the href attribute of an anchor element includes the id attribute value preceded by a pound sign (as in #features).
Section 2.13 meta Elements
• Search engines catalog sites by following links from page to page (often known as spidering or crawling) and saving identification and classification information for each page.
• One way that search engines catalog pages is by reading the content in each page’s meta elements (p. 67), which specify information about a document.
• Two important attributes of the meta element are name (p. 67), which identifies the type of meta element, and content (p. 67), which provides information search engines use to catalog pages.
• The content attribute of a keywords meta element provides search engines with a list of words that describe the page. These words are compared with words in search requests.
• The content attribute of a description meta element provides a three- to four-line description of a site, written in sentence form. Search engines also use this description to catalog your site and sometimes display this information as part of the search results.
Self-Review Exercises
2.1 State whether each of the following is true or false. If false, explain why.
a. An ordered list cannot be nested inside an unordered list.
b. Element br represents a line break.
c. Hyperlinks are denoted by link elements.
d. The width of all data cells in a table must be the same.
e. You’re limited to a maximum of five internal links per page.
2.2 Fill in the blanks in each of the following:
a. The ________ element inserts a horizontal rule.
b. A superscript is marked up using the ________ element, and a subscript is marked up using the ________ element.
c. The least significant heading element is ________ and the most significant heading element is ________.
d. Element ________ marks up an unordered list.
e. Element ________ marks up a paragraph.
f. The ________ attribute in an input element inserts a button that, when clicked, resets the contents of the form.
g. The ________ element marks up a table row.
h. ________ are usually used as masking characters in a password box.
Answers to Self-Review Exercises
2.1
a. False. An ordered list can be nested inside an unordered list and vice versa.
b. True.
c. False. Hyperlinks are denoted by a elements.
d. False. You can specify the width of any column, either in pixels or as a percentage of the table width.
e. False. You can have an unlimited number of internal links.
2.2
a. hr.
b. sup, sub.
c. h6, h1.
d. ul.
e. p.
f. type = "reset".
g. tr.
h. Asterisks.
Exercises
2.3 Use HTML5 to create a document that contains the following text:
Internet and World Wide Web How to Program: Fifth Edition
Welcome to the world of Internet programming. We have provided
coverage for many Internet-related topics.
Use h1 for the title (the first line of text), p for text (the second and third lines of text). Insert a horizontal rule between the h1 element and the p element. Open your new document in a web browser to view the marked-up document.
2.4 An image named deitel.png is 200 pixels wide and 150 pixels high. Write an HTML5 statement using the width and height attributes of the img element to perform each of the following transformations:
a. Increase the size of the image by 100 percent.
b. Increase the size of the image by 50 percent.
c. Change the width-to-height ratio to 2:1, keeping the width attained in part (a).
2.5 Create a link to each of the following:
a. The file index.html, located in the files directory.
b. The file index.html, located in the text subdirectory of the files directory.
c. The file index.html, located in the other directory in your parent directory. [Hint:.. signifies parent directory.]
d. The President’s e-mail address ([email protected]).
e. The file named README in the pub directory of ftp.cdrom.com. [Hint: Use ftp://.]
2.6 Create an HTML5 document containing an ordered list of three items—ice cream, soft serve and frozen yogurt. Each ordered list should contain a nested, unordered list of your favorite flavors. Provide three flavors in each unordered list.
2.7 Create an HTML5 document that uses an image as an e-mail link. Use attribute alt to provide a description of the image and link.
2.8 Create an HTML5 document that contains links to your five favorite daily deals websites (possibly Groupon, Living Social, etc.). Your page should contain the heading “My Favorite Daily Deals Web Sites.” Click on each of these links to test your page.
2.9 Create an HTML5 document that contains an unordered list with links to all the examples presented in this chapter. [Hint: Place all the chapter examples in an examples directory, then link to the files in that directory.]
2.10 Identify each of the following HTML5 items as either an element or an attribute:
a. html
b. width
c. href
d. br
e. h3
g. src
2.11 State which of the following statements are true and which are false. If false, explain why.
a. A valid HTML5 document cannot contain uppercase letters in element names.
b. HTML5 documents can have the file extension .htm.
c. &less; is the character entity reference for the less-than (<) character.
d. In a valid HTML5 document, <li> can be nested inside either <ol> or <ul> tags.
2.12 Fill in the blanks in each of the following:
a. HTML5 comments begin with <!-- and end with ________.
b. In HTML5, attribute values can be enclosed in ________.
c. ________ is the character entity reference for an ampersand.
d. Element ________ can be used to make text bold.
2.13 Categorize each of the following as an element or an attribute:
a. width
b. td
c. th
d. name
e. select
f. type
2.14 Create the HTML5 markup that produces the table shown in Fig. 2.18. Use <em> and <strong> tags as necessary. The image (camel.png) is included in the Chapter 2 examples directory.
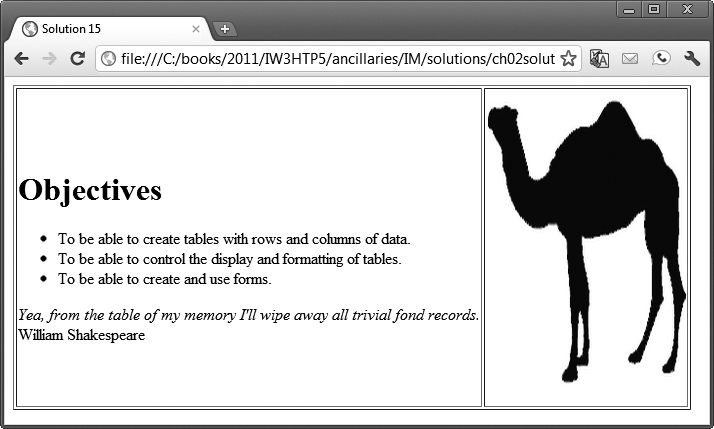
Fig. 2.18. HTML5 table for Exercise 2.14.
2.15 Write an HTML5 document that produces the table shown in Fig. 2.19.
2.16 A local university has asked you to create an HTML5 document that allows prospective college students to provide feedback about their campus visit. Your HTML5 document should contain a form with text fields for a name and e-mail. Provide checkboxes that allow prospective students to indicate what they liked most about the campus. The checkboxes should include: campus, students, location, atmosphere, dorm rooms and sports. Also, provide radio buttons that ask the prospective students how they became interested in the college. Options should include: friends, television, Internet and other. In addition, provide a text area for additional comments, a submit button and a reset button. Use post to sent the information in the form to http://www.deitel.com.
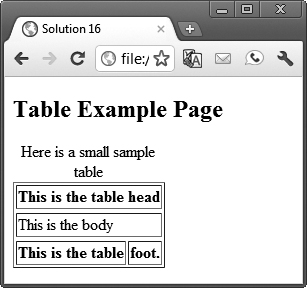
Fig. 2.19. HTML5 table for Exercise 2.15.
2.17 Create an HTML5 document titled “How to Get Good Grades.” Use <meta> tags to include a series of keywords that describe your document.