
26. JavaServer™ Faces Web Apps: Part 1
If any man will draw up his case, and put his name at the foot of the first page, I will give him an immediate reply. Where he compels me to turn over the sheet, he must wait my leisure.
—Lord Sandwich
Rule One: Our client is always right. Rule Two: If you think our client is wrong, see Rule One.
—Anonymous
A fair question should be followed by a deed in silence.
—Dante Alighieri
You will come here and get books that will open your eyes, and your ears, and your curiosity, and turn you inside out or outside in.
—Ralph Waldo Emerson
Objectives
In this chapter you’ll learn:
• To create JavaServer Faces web apps.
• To create web apps consisting of multiple pages.
• To validate user input on a web page.
• To maintain user-specific state information throughout a web app with session tracking.
26.2 HyperText Transfer Protocol (HTTP) Transactions
26.3 Multitier Application Architecture
26.4.1 The Default index.xhtml Document: Introducing Facelets
26.4.2 Examining the WebTimeBean Class
26.4.3 Building the WebTime JSF Web App in NetBeans
26.5 Model-View-Controller Architecture of JSF Apps
26.7 Validation Using JSF Standard Validators
26.8.2 Session Tracking with @SessionScoped Beans
Summary | Self-Review Exercises | Answers to Self-Review Exercises | Exercises
26.1. Introduction
In this chapter, we introduce web app development in Java with JavaServer Faces (JSF). Web-based apps create content for web browser clients. This content includes eXtensible HyperText Markup Language (XHTML), JavaScript client-side scripting, Cascading Style Sheets (CSS), images and binary data. XHTML is an XML (eXtensible Markup Language) vocabulary that is based on HTML (HyperText Markup Language). We discuss only the features of these technologies that are required to understand the examples in this chapter. This chapter begins with an overview of how interactions between a web browser and web server work. We then present several web apps implemented with JSF. We continue this discussion in Chapter 27 with more advanced web applications.
Java multitier applications are typically implemented using Java Enterprise Edition (Java EE). The technologies we use to develop web apps here and in Chapter 27 are part of Java EE 6 (www.oracle.com/technetwork/java/javaee/overview/index.html). After you study this chapter and the next, you can learn more about JavaServer Faces 2.0 in Oracle’s extensive Java EE 6 tutorial at download.oracle.com/javaee/6/tutorial/doc/.
We focus on the JavaServer Faces 2.01 subset of Java EE. JavaServer Faces is a web-application framework that enables you to build multitier web apps by extending the framework with your application-specific capabilities. The framework handles the details of receiving client requests and returning responses for you so that you can focus on your application’s functionality.
1 The JavaServer Faces Specification: http://bit.ly/JSF20Spec.
Required Software for This Chapter
To work with and implement the examples in this chapter and Chapters 27–28, you must install the NetBeans 6.9.1 IDE and the GlassFish 3.0.1 open-source application server. Both are available in a bundle from netbeans.org/downloads/index.html. You’re probably using a computer with the Windows, Linux or Max OS X operating system—installers are provided for each of these platforms. Download and execute the installer for the Java or All version—both include the required Java Web and EE and Glassfish Server Open Source Edition options. We assume you use the default installation options for your platform. Once you’ve installed NetBeans, run it. Then, use the Help menu’s Check for Updates option to make sure you have the most up-to-date components.
26.2. HyperText Transfer Protocol (HTTP) Transactions
To learn how JSF web apps work, it’s important to understand the basics of what occurs behind the scenes when a user requests a web page in a web browser. If you’re already familiar with this and with multitier application architecture, you can skip to Section 26.4.
XHTML Documents
In its simplest form, a web page is nothing more than an XHTML document (also called an XHTML page) that describes content to display in a web browser. HTML documents normally contain hyperlinks that link to different pages or to other parts of the same page. When the user clicks a hyperlink, the requested web page loads into the user’s web browser. Similarly, the user can type the address of a page into the browser’s address field.
URLs
Computers that run web-server software make resources available, such as web pages, images, PDF documents and even objects that perform complex tasks such as database lookups and web searches. The HyperText Transfer Protocol (HTTP) is used by web browsers to communicate with web servers, so they can exchange information in a uniform and reliable manner. URLs (Uniform Resource Locators) identify the locations on the Internet of resources, such as those mentioned above. If you know the URL of a publicly available web resource, you can access it through HTTP.
Parts of a URL
When you enter a URL into a web browser, the browser uses the information in the URL to locate the web server that contains the resource and to request that resource from the server. Let’s examine the components of the URL
http://www.deitel.com/books/downloads.html
The http:// indicates that the resource is to be obtained using the HTTP protocol. The next portion, www.deitel.com, is the server’s fully qualified hostname—the name of the server on which the resource resides. The computer that houses and maintains resources is usually is referred to as the host. The hostname www.deitel.com is translated into an IP (Internet Protocol) address—a unique numerical value that identifies the server, much as a telephone number uniquely defines a particular phone line. This translation is performed by a domain-name system (DNS) server—a computer that maintains a database of hostnames and their corresponding IP addresses—and the process is called a DNS lookup. To test web apps, you’ll often use your computer as the host. This host is referred to using the reserved domain name localhost, which translates to the IP address 127.0.0.1. The fully qualified hostname can be followed by a colon (:) and a port number. Web servers typically await requests on port 80 by default; however, many development web servers use a different port number, such as 8080—as you’ll see in Section 26.4.3.
The remainder of the URL (i.e., /books/downloads.html) specifies both the name of the requested resource (the HTML document downloads.html) and its path, or location (/books), on the web server. The path could specify the location of an actual directory on the web server’s file system. For security reasons, however, the path normally specifies the location of a virtual directory. The server translates the virtual directory into a real location on the server (or on another computer on the server’s network), thus hiding the resource’s true location. Some resources are created dynamically using other information, such as data from a database.
Making a Request and Receiving a Response
When given a URL, a web browser performs an HTTP transaction to retrieve and display the web page at that address. Figure 26.1 illustrates the transaction, showing the interaction between the web browser (the client) and the web server (the server).

Fig. 26.1. Client interacting with the web server. Step 1: The GET request.
In Fig. 26.1, the web browser sends an HTTP request to the server. Underneath the hood, the request (in its simplest form) is
GET /books/downloads.html HTTP/1.1
The word GET is an HTTP method indicating that the client wishes to obtain a resource from the server. The remainder of the request provides the path name of the resource (e.g., an HTML document) and the protocol’s name and version number (HTTP/1.1). As part of the client request, the browser also sends other required and optional information, such as the Host (which identifies the server computer) or the User-Agent (which identifies the web browser type and version number).
Any server that understands HTTP (version 1.1) can translate this request and respond appropriately. Figure 26.2 depicts the server responding to a request.
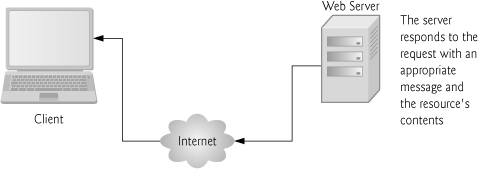
Fig. 26.2. Client interacting with the web server. Step 2: The HTTP response.
The server first responds by sending a line of text that indicates the HTTP version, followed by a numeric code and a phrase describing the status of the transaction. For example,
HTTP/1.1 200 OK
indicates success, whereas
HTTP/1.1 404 Not found
informs the client that the web server could not locate the requested resource. On a successful request, the server appends the requested resource to the HTTP response. A complete list of numeric codes indicating the status of an HTTP transaction can be found at www.w3.org/Protocols/rfc2616/rfc2616-sec10.html.
HTTP Headers
The server then sends one or more HTTP headers, which provide additional information about the data that will be sent. If the server is sending an HTML text document, one HTTP header would read:
Content-type: text/html
The information provided in this header specifies the Multipurpose Internet Mail Extensions (MIME) type of the content that the server is transmitting to the browser. MIME is an Internet standard that specifies data formats so that programs can interpret data correctly. For example, the MIME type text/plain indicates that the sent information is text that can be displayed directly, without any interpretation of the content as HTML markup. Similarly, the MIME type image/jpeg indicates that the content is a JPEG image. When the browser receives this MIME type, it attempts to display the image. For a list of available MIME types, visit www.w3schools.com/media/media_mimeref.asp.
The header or set of headers is followed by a blank line, which indicates to the client browser that the server is finished sending HTTP headers. The server then sends the contents of the requested resource (such as, downloads.html). In the case of an HTML document, the web browser parses the HTML markup it receives and renders (or displays) the results.
HTTP GET and POST Requests
The two most common HTTP request types (also known as request methods) are GET and POST. A GET request typically asks for a resource on a server. Common uses of GET requests are to retrieve an HTML document or an image or to fetch search results from a search engine based on a user-submitted search term. A POST request typically sends data to a server. Common uses of POST requests are to send form data or documents to a server.
When a web page contains an HTML form in which the user can enter data, an HTTP request typically posts that data to a server-side form handler for processing. For example, when a user performs a search or participates in a web-based survey, the web server receives the information specified in the form as part of the request.
GET requests and POST requests can both send form data to a web server, yet each request type sends the information differently. A GET request sends information to the server in the URL, as in www.google.com/search?q=deitel. Here, search is the name of Google’s server-side form handler, q is the name of a variable in Google’s search form and deitel is the search term. A ? separates the query string from the rest of the URL in a request. A name/value pair is passed to the server with the name and the value separated by an equals sign (=). If more than one name/value pair is submitted, each is separated from the next by an ampersand (&). The server uses data passed in a query string to retrieve an appropriate resource. The server then sends a response to the client. A GET request may be initiated by submitting an HTML form whose method attribute is set to "get", by typing the URL (possibly containing a query string) directly into the browser’s address bar or through a hyperlink when the user clicks the link.
A POST request sends form data as part of the HTTP message, not as part of the URL. The specification for GET requests does not limit the query string’s number of characters, but some web browsers do—for example, Internet Explorer restricts the length to 2083 characters), so it’s often necessary to send large pieces of information using POST. Sometimes POST is preferred because it hides the submitted data from the user by embedding it in an HTTP message.
 Software Engineering Observation 26.1
The data sent in a POST request is not part of the URL, and the user can’t see the data by default. However, tools are available that expose this data, so you should not assume that the data is secure just because a POST request is used.
Client-Side Caching
Browsers often cache (save on disk) web pages for quick reloading. If there are no changes between the version stored in the cache and the current version on the web, the browser uses the cached copy to speed up your browsing experience. An HTTP response can indicate the length of time for which the content remains “fresh.” If this amount of time has not been reached, the browser can avoid another request to the server. Otherwise, the browser requests the document from the server. Thus, the browser minimizes the amount of data that must be downloaded for you to view a web page. Browsers typically do not cache the server’s response to a POST request, because the next POST might not return the same result. For example, in a survey, many users could visit the same web page and answer a question. The survey results could then be displayed for the user. Each new answer changes the survey results.
When you use a web-based search engine, the browser normally supplies the information you specify in an HTML form to the search engine with a GET request. The search engine performs the search, then returns the results to you as a web page. Such pages are sometimes cached by the browser in case you perform the same search again.
26.3. Multitier Application Architecture
Web apps are multitier applications (sometimes referred to as n-tier applications). Multitier applications divide functionality into separate tiers (i.e., logical groupings of functionality). Although tiers can be located on the same computer, the tiers of web apps often reside on separate computers. Figure 26.3 presents the basic structure of a three-tier web app.
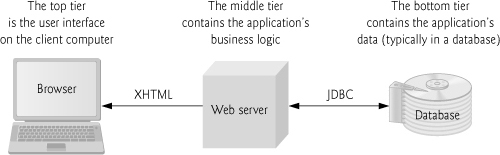
Fig. 26.3. Three-tier architecture.
The information tier (also called the data tier or the bottom tier) maintains data pertaining to the application. This tier typically stores data in a relational database management system (RDBMS). We discussed RDBMSs in Chapter 18. For example, a retail store might have a database for storing product information, such as descriptions, prices and quantities in stock. The same database also might contain customer information, such as user names, billing addresses and credit card numbers. This tier can contain multiple databases, which together comprise the data needed for our application.
The middle tier implements business logic, controller logic and presentation logic to control interactions between the application’s clients and the application’s data. The middle tier acts as an intermediary between data in the information tier and the application’s clients. The middle-tier controller logic processes client requests (such as requests to view a product catalog) and retrieves data from the database. The middle-tier presentation logic then processes data from the information tier and presents the content to the client. Web apps typically present data to clients as HTML documents.
Business logic in the middle tier enforces business rules and ensures that data is reliable before the server application updates the database or presents the data to users. Business rules dictate how clients can and cannot access application data, and how applications process data. For example, a business rule in the middle tier of a retail store’s web app might ensure that all product quantities remain positive. A client request to set a negative quantity in the bottom tier’s product-information database would be rejected by the middle tier’s business logic.
The client tier, or top tier, is the application’s user interface, which gathers input and displays output. Users interact directly with the application through the user interface (typically viewed in a web browser), keyboard and mouse. In response to user actions (e.g., clicking a hyperlink), the client tier interacts with the middle tier to make requests and to retrieve data from the information tier. The client tier then displays the data retrieved from the middle tier to the user. The client tier never directly interacts with the information tier.
26.4. Your First JSF Web App
Let’s begin with a simple example. Figure 26.4 shows the output of our WebTime app. When you invoke this app from a web browser, the browser requests the app’s default JSF page. The web server receives this request and passes it to the JSF web-application framework for processing. This framework is available in any Java EE 6-compliant application server (such as the GlassFish application server used in this chapter) or any JavaServer Faces 2.0-compliant container (such as Apache Tomcat). The framework includes the Faces servlet—a software component running on the server that processes each requested JSF page so that the server can eventually return a response to the client. In this example, the Faces servlet processes the JSF document in Fig. 26.5 and forms a response containing the text "Current time on the web server:" followed by the web server’s local time. We demonstrate this chapter’s examples on the GlassFish server that you installed with NetBeans locally on your computer.
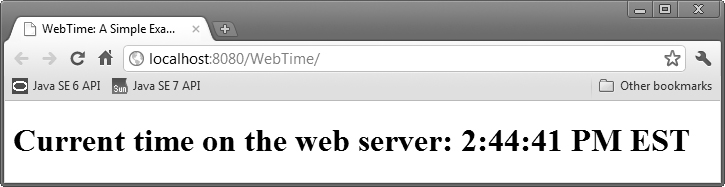
Fig. 26.4. Sample output of the WebTime app.
Executing the WebTime App
To run this example on your own computer, perform the following steps:
1. Open the NetBeans IDE.
2. Select File > Open Project... to display the Open Project dialog.
3. Navigate to the ch26 folder in the book’s examples and select WebTime.
4. Click the Open Project button.
5. Right click the project’s name in the Projects tab (in the upper-left corner of the IDE, below the toolbar) and select Run from the pop-up menu.
This launches the GlassFish application server (if it isn’t already running), installs the web app onto the server, then opens your computer’s default web browser which requests the WebTime app’s default JSF page. The browser should display a web page similar to that in Fig. 26.4.
26.4.1. The Default index.xhtml Document: Introducing Facelets
This app contains a single web page and consists of two related files—a JSF document named index.xhtml (Fig. 26.5) and a supporting Java source-code file (Fig. 26.6), which we discuss in Section 26.4.2. First we discuss the markup in index.xhtml and the supporting source code, then we provide step-by-step instructions for creating this web app in Section 26.4.3. Most of the markup in Fig. 26.5 was generated by NetBeans. We’ve reformatted the generated code to match our coding conventions used throughout the book.
1 <?xml version='1.0' encoding='UTF-8' ?>
2
3 <!-- index.xhtml -->
4 <!-- JSF page that displays the current time on the web server -->
5 <!DOCTYPE html PUBLIC "-//W3C//DTD XHTML 1.0 Transitional//EN"
6 "http://www.w3.org/TR/xhtml1/DTD/xhtml1-transitional.dtd">
7 <html xmlns="http://www.w3.org/1999/xhtml"
8 xmlns:h="http://java.sun.com/jsf/html">
9 <h:head>
10 <title>WebTime: A Simple Example</title>
11 <meta http-equiv="refresh" content="60" />
12 </h:head>
13 <h:body>
14 <h1>Current time on the web server: #{webTimeBean.time}</h1>
15 </h:body>
16 </html>
Fig. 26.5. JSF page that displays the current time on the web server.
Facelets: XHTML and JSF Markup
You present your web app’s content in JSF using Facelets—a combination of XHTML markup and JSF markup. XHTML—the Extensible HyperText Markup Language—specifies the content of a web page that is displayed in a web browser. XHTML separates the presentation of a document (that is, the document’s appearance when rendered by a browser) from the structure of the document’s data. A document’s presentation might specify where the browser should place an element in a web page or what fonts and colors should be used to display an element. The XHTML 1.0 Strict Recommendation allows only a document’s structure to appear in a valid XHTML document, and not its presentation. Presentation is specified with Cascading Style Sheets (CSS). JSF uses the XHTML 1.0 Transitional Recommendation by default. Transitional markup may include some non-CSS formatting, but this is not recommended.
XML Declaration, Comments and the DOCTYPE Declaration
With the exception of lines 3–4, 10–11 and 14, the code shown in Fig. 26.5 was generated by NetBeans. Line 1 is an XML declaration, indicating that the JSF document is expressed in XML 1.0 syntax. Lines 3–4 are comments that we added to the document to indicate its file name and purpose. Lines 5–6 are a DOCTYPE declaration indicating the version of XHTML used in the markup. This can be used by a web browser to validate the syntax of the document.
Specifying the XML Namespaces Used in the Document
Line 7 begins the document’s root html element, which spans lines 7–16. Each element typically consists of a starting and ending tag. The starting <html> tag (lines 7–8) may contain one or more xmlns attributes. Each xmlns attribute has a name and a value separated by an equal sign (=), and specifies an XML namespace of elements that are used in the document. Just as Java packages can be used to differentiate class names, XML namespaces can be used to differentiate sets of elements. When there’s a naming conflict, fully qualified tag names can be used to resolve the conflict.
Line 7 specifies a required xmlns attribute and its value (http://www.w3.org/1999/xhtml) for the html element. This indicates that the html element and any other unqualified element names are part of the default XML namespace that’s used in this document.
The xmlns:h attribute (line 8) specifies a prefix and a URL for JSF’s HTML Tag Library, allowing the document to use JSF’s elements from that library. A tag library defines a set of elements that can be inserted into the XHTML markup. The elements in the HTML Tag Library generate XHTML elements. Based on line 7, each element we use from the HTML Tag Library must be preceded by the h: prefix. This tag library is one of several suppoorted by JSF that can be used to create Facelets pages. We’ll discuss others as we use them. For a complete list of JSF tag libraries and their elements and attributes, visit
javaserverfaces.java.net/nonav/docs/2.0/pdldocs/facelets/
The h:head and h:body Elements
The h:head element (lines 9–12) defines the XHTML page’s head element. In this example the head contains an HTML title element and a meta element. The document’s title (line 10) typically appears in the browser window’s title bar, or a browser tab if you have multiple web pages open in the browser at once. The title is also used when search engines index your web pages. The meta element (line 11) tells the browser to refresh the page every 60 seconds. This forces the browser to re-request the page once per minute.
The h:body element (lines 13–15) represent’s the page’s content. In this example, it contains a XHTML h1 header element (line 14) that represents the text to display when this document is rendered in the web browser. The h1 element contains some literal text (Current time on the web server:) that’s simply placed into the response to the client and a JSF Expression Language (EL) expression that obtains a value dynamically and inserts it into the response. The expression
#{webTimeBean.time}
indicates that the web app has an object named webTimeBean which contains a property named time. The property’s value replaces the expression in the response that’s sent to the client. We’ll discuss this EL expression in more detail shortly.
26.4.2. Examining the WebTimeBean Class
JSF documents typically interact with one or more Java objects to perform the app’s tasks. As you saw, this example obtains the time on the server and sends it as part of the response.
JavaBeans
JavaBeans objects are instances of classes that follow certain conventions for class design. Each JavaBean class typically contains data and methods. A JavaBean exposes its data to a JSF document as properties. Depending on their use, these properties can be read/write, read-only or write-only. To define a read/write property, a JavaBean class provides set and get methods for that property. For example, to create a String property firstName, the class would provide methods with the following first lines:
public String getFirstName()
public void setFirstName( String name )
The fact that both method names contain “FirstName” with an uppercase “F” indicates that the class exposes a firstName property with a lowercase “F.” This naming convention is part of the JavaBeans Specification (available at bit.ly/JavaBeansSpecification). A read-only property would have only a get method and a write-only property only a set method. The JavaBeans used in JSF are also POJOs (plain old Java objects), meaning that—unlike prior versions of JSF—you do not need to extend a special class to create the beans used in JSF applications. Instead various annotations are used to “inject” functionality into your beans so they can be used easily in JSF applications. The JSF framework is responsible for creating and managing objects of your JavaBean classes for you—you’ll see how to enable this momentarily.
Class WebTimeBean
Figure 26.6 presents the WebTimeBean class that allows the JSF document to obtain the web server’s time. You can name your bean classes like any other class. We chose to end the class name with “Bean” to indicate that the class represents a JavaBean. The class contains just a getTime method (lines 13–17), which defines the read-only time property of the class. Recall that we access this property at line 14 of Fig. 26.5. Lines 15–16 create a Date object, then format and return the time as a String.
1 // WebTimeBean.java
2 // Bean that enables the JSF page to retrieve the time from the server
3 package webtime;
4
5 import java.text.DateFormat;
6 import java.util.Date;
7 import javax.faces.bean.ManagedBean;
8
9 @ManagedBean( name="webTimeBean" )
10 public class WebTimeBean
11 {
12 // return the time on the server at which the request was received
13 public String getTime()
14 {
15 return DateFormat.getTimeInstance( DateFormat.LONG ).format(
16 new Date() );
17 } // end method getTime
18 } // end class WebTimeBean
Fig. 26.6. Bean that enables the JSF page to retrieve the time from the server.
The @ManagedBean Annotation
Line 9 uses the @ManagedBean annotation (from the package javax.faces.bean) to indicate that the JSF framework should create and manage the WebTimeBean object(s) used in the application. The parentheses following the annotation contain the optional name attribute—in this case, indicating that the bean object created by the JSF framework should be called webTimeBean. If you specify the annotation without the parentheses and the name attribute, the JSF framework will use the class name with a lowercase first letter (that is, webTimeBean) as the default bean name.
Processing the EL Expression
When the Faces servlet encounters an EL expression that accesses a bean property, it automatically invokes the property’s set or get method based on the context in which the property is used. In line 14 of Fig. 26.5, accessing the property webTimeBean.time results in a call to the bean’s getTime method, which returns the web server’s time. If this bean object does not yet exist, the JSF framework instantiates it, then calls the getTime method on the bean object. The framework can also discard beans that are no longer being used. [Note: We discuss only the EL expressions that we use in this chapter. For more EL details, see Chapter 6 of the Java EE 6 tutorial at download.oracle.com/javaee/6/tutorial/doc/ and Chapter 5 of the JSF 2.0 specification at bit.ly/JSF20Spec.]
26.4.3. Building the WebTime JSF Web App in NetBeans
We’ll now build the WebTime app from scratch using NetBeans.
Creating the JSF Web Application Project
Begin by opening the NetBeans IDE and performing the following steps:
1. Select File > New Project... to display the New Project dialog. Select Java Web in the Categories pane, Web Application in the Projects pane and click Next >.
2. In the dialog’s Name and Location step, specify WebTime as the Project Name. In the Project Location field, specify where you’d like to store the project (or keep the default location). These settings will create a WebTime directory to store the project’s files in the parent directory you specified. Keep the other default settings and click Next >.
3. In the dialog’s Server and Settings step, specify GlassFish Server 3 as the Server and Java EE 6 Web as the Java EE Version (these may be the default). Keep the default Context Path and click Next >.
4. In the dialog’s Frameworks step, select JavaServer Faces, then click Finish to create the web application project.
Examining the NetBeans Projects Window
Figure 26.7 displays the Projects window, which appears in the upper-left corner of the IDE. This window displays the contents of the project. The app’s XHTML documents are placed in the Web Pages node. NetBeans supplies the default web page index.xhtml that will be displayed when a user requests this web app from a browser. When you add Java source code to the project, it will be placed in the Source Packages node.
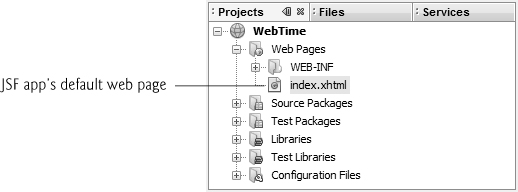
Fig. 26.7. Projects window for the WebTime project.
Examining the Default index.xhtml Page
Figure 26.8 displays index.xthml—the default page that will be displayed when a user requests this web app. We reformatted the code to match our coding conventions. When this file is first created, it contains elements for setting up the page, including linking to the page’s style sheet and declaring the JSF libraries that will be used. By default, NetBeans does not show line numbers in the source-code editor. To view the line numbers, select View > Show Line Numbers.
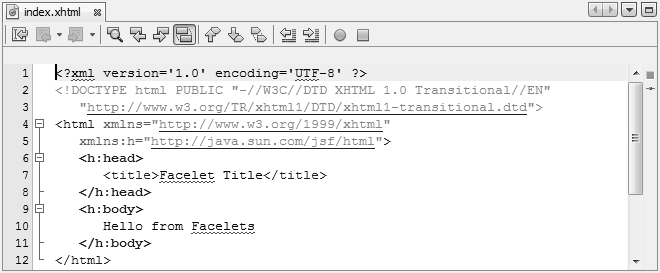
Fig. 26.8. Default index.xhtml page generated by NetBeans for the web app.
Editing the h:head Element’s Contents
Modify line 7 of Fig. 26.8 by changing the title element’s content from "Facelet Title" to "Web Time: A Simple Example". After the closing </title> tag, press Enter, then insert the meta element
<meta http-equiv="refresh" content="60" />
which will cause the browser to refresh this page once per minute. As you type, notice that NetBeans provides a code-completion window to help you write your code. For example, after typing “<meta” and a space, the IDE displays the code-completion window in Fig. 26.9, which shows the list of valid attributes for the starting tag of a meta element. You can then double click an item in the list to insert it into your code. Code-completion support is provided for XHTML elements, JSF elements and Java code.

Fig. 26.9. NetBeans code-completion window.
Editing the h:body Element’s Contents
In the h:body element, replace "Hello from Facelets" with the h1 header element
<h1>Current time on the web server: </h1>
Don’t insert the expression #{webTimeBean.time} yet. After we define the WebTimeBean class, we’ll come back to this file and insert this expression to demonstrate that the IDE provides code-completion support for the Java classes you define in your project.
Defining the Page’s Logic: Class WebTimeBean
We’ll now create the WebTimeBean class—the @ManagedBean class that will allow the JSF page to obtain the web server’s time. To create the class, perform the following steps:
1. In the NetBeans Projects tab, right click the WebTime project’s Source Packages node and select New > Other... to display the New File dialog.
2. In the Categories list, select JavaServer Faces, then in the File Types list select JSF Managed Bean. Click Next >.
3. In the Name and Location step, specify WebTimeBean as the Class Name and webtime as the Package, then click Finish.
NetBeans creates the WebTimeBean.java file and places it within the webtime package in the project’s Source Packages node. Figure 26.10 shows this file’s default source code displayed in the IDE. At line 16, notice that NetBeans added the @RequestScoped annotation to the class—this indicates that an object of this class exists only for the duration of the request that’s being processed. (We’ll discuss @RequestScoped and other bean scopes in more detail in Section 26.8.) We did not include this annotation in Fig. 26.6, because all JSF beans are request scoped by default. Replace the code in Fig. 26.10 with the code in Fig. 26.6.

Fig. 26.10. Default source code for the WebTimeBean class.
Adding the EL Expression to the index.xhtml Page
Now that you’ve created the WebTimeBean, let’s go back to the index.xhtml file and add the EL expression that will obtain the time. In the index.xhtml file, modify the line
<h1>Current time on the web server: </h1>
by inserting the expression #{webTimeBean.time} before the h1 element’s closing tag. After you type the characters # and {, the IDE automatically inserts the closing }, inserts the cursor between the braces and displays the code-completion window. This shows various items that could be placed in the braces of the EL expression, including the webTimeBean object (of type WebTimeBean). To insert webTimeBean in the code, you can type the object’s name or double click it in the code-completion window. As you type, the list of items in the code-completion window is filtered by what you’ve typed so far.
When you type the dot (.) after webTimeBean, the code-completion window reappears, showing you the WebTimeBean methods and properties that can be used in this context (Fig. 26.11). In this list, you can double click the time property, or you can simply type its name.
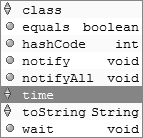
Fig. 26.11. NetBeans code-completion window for the webTimeBean object.
Running the Application
You’ve now completed the WebTime app. To test it, right click the project’s name in the Projects tab and select Run from the pop-up menu. The IDE will compile the code and deploy (that is, install) the WebTime app on the GlassFish application server running on your local machine. Then, the IDE will launch your default web browser and request the WebTime app’s default web page (index.xhtml). Because GlassFish is installed on your local computer, the URL displayed in the browser’s address bar will be
http://localhost:8080/WebTime/
where 8080 is the port number on which the GlassFish server runs by default. Depending on your web browser, the http:// may not be displayed (Fig. 26.4).
Debugging the Application
If there’s a problem with your web app’s logic, you can press <Ctrl> F5 to build the application and run it in debug mode—the NetBeans built-in debugger can help you troubleshoot applications. If you press F6, the program executes without debugging enabled.
Testing the Application from Other Web Browsers
After deploying your project, you can test it from another web browser on your computer by entering the app’s URL into the other browser’s address field. Since your application resides on the local file system, GlassFish must be running. If you’ve already executed the application using one of the techniques above and have not closed NetBeans, GlassFish will still be running. Otherwise, you can start the server from the IDE by opening the Services tab (located in the same panel as the Projects), expanding the Servers node, right clicking GlassFish Server 3 and selecting Start. Then you can type the URL in the browser to execute the application.
26.5. Model-View-Controller Architecture of JSF Apps
JSF applications adhere to the Model-View-Controller (MVC) architecture, which separates an application’s data (contained in the model) from the graphical presentation (the view) and the processing logic (the controller). Figure 26.12 shows the relationships between components in MVC.

Fig. 26.12. Model-View-Controller architecture.
In JSF, the controller is the JSF framework and is responsible for coordinating interactions between the view and the model. The model contains the application’s data (typically in a database), and the view presents the data stored in the model (typically as web pages). When a user interacts with a JSF web app’s view, the framework interacts with the model to store and/or retrieve data. When the model changes, the view is updated with the changed data.
26.6. Common JSF Components
As mentioned in Section 26.4, JSF supports several tag libraries. In this section, we introduce several of the JSF HTML Tag Library’s elements and one element from the JSF Core Tag Library. Figure 26.13 summarizes elements discussed in this section.
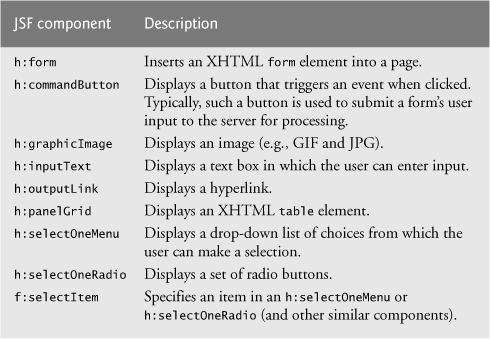
Fig. 26.13. Commonly used JSF components.
All of these elements are mapped by JSF framework to a combination of XHTML elements and JavaScript code that enables the browser to render the page. JavaScript is a scripting language that’s interpreted in all of today’s popular web browsers. It can be used to perform tasks that manipulate web-page elements in a web browser and provide interactivity with the user. You can learn more about JavaScript in our JavaScript Resource Center at www.deitel.com/JavaScript/.
Figure 26.14 displays a form for gathering user input. [Note: To create this application from scratch, review the steps in Section 26.4.3 and name the application WebComponents.] The h:form element (lines 14–55) contains the components with which a user interacts to provide data, such as registration or login information, to a JSF app. This example uses the components summarized in Fig. 26.13. This example does not perform a task when the user clicks the Register button. Later, we demonstrate how to add functionality to many of these components.
1 <?xml version='1.0' encoding='UTF-8' ?>
2
3 <!-- index.xhtml -->
4 <!-- Registration form that demonstrates various JSF components -->
5 <!DOCTYPE html PUBLIC "-//W3C//DTD XHTML 1.0 Transitional//EN"
6 "http://www.w3.org/TR/xhtml1/DTD/xhtml1-transitional.dtd">
7 <html xmlns="http://www.w3.org/1999/xhtml"
8 xmlns:h="http://java.sun.com/jsf/html"
9 xmlns:f="http://java.sun.com/jsf/core">
10 <h:head>
11 <title>Sample Registration Form</title>
12 </h:head>
13 <h:body>
14 <h:form>
15 <h1>Registration Form</h1>
16 <p>Please fill in all fields and click Register</p>
17 <h:panelGrid columns="4" style="height: 96px; width:456px;">
18 <h:graphicImage name="fname.png" library="images"/>
19 <h:inputText id="firstNameInputText"/>
20 <h:graphicImage name="lname.png" library="images"/>
21 <h:inputText id="lastNameInputText"/>
22 <h:graphicImage name="email.png" library="images"/>
23 <h:inputText id="emailInputText"/>
24 <h:graphicImage name="phone.png" library="images"/>
25 <h:inputText id="phoneInputText"/>
26 </h:panelGrid>
27 <p><h:graphicImage name="publications.png" library="images"/>
28 <br/>Which book would you like information about?</p>
29 <h:selectOneMenu id="booksSelectOneMenu">
30 <f:selectItem itemValue="CHTP"
31 itemLabel="C How to Program" />
32 <f:selectItem itemValue="CPPHTP"
33 itemLabel="C++ How to Program" />
34 <f:selectItem itemValue="IW3HTP"
35 itemLabel="Internet & World Wide Web How to Program" />
36 <f:selectItem itemValue="JHTP"
37 itemLabel="Java How to Program" />
38 <f:selectItem itemValue="VBHTP"
39 itemLabel="Visual Basic How to Program" />
40 <f:selectItem itemValue="VCSHTP"
41 itemLabel="Visual C# How to Program" />
42 </h:selectOneMenu>
43 <p><h:outputLink value="http://www.deitel.com">
44 Click here to learn more about our books
45 </h:outputLink></p>
46 <h:graphicImage name="os.png" library="images"/>
47 <h:selectOneRadio id="osSelectOneRadio">
48 <f:selectItem itemValue="WinVista" itemLabel="Windows Vista"/>
49 <f:selectItem itemValue="Win7" itemLabel="Windows 7"/>
50 <f:selectItem itemValue="OSX" itemLabel="Mac OS X"/>
51 <f:selectItem itemValue="Linux" itemLabel="Linux"/>
52 <f:selectItem itemValue="Other" itemLabel="Other"/>
53 </h:selectOneRadio>
54 <h:commandButton value="Register"/>
55 </h:form>
56 </h:body>
57 </html>
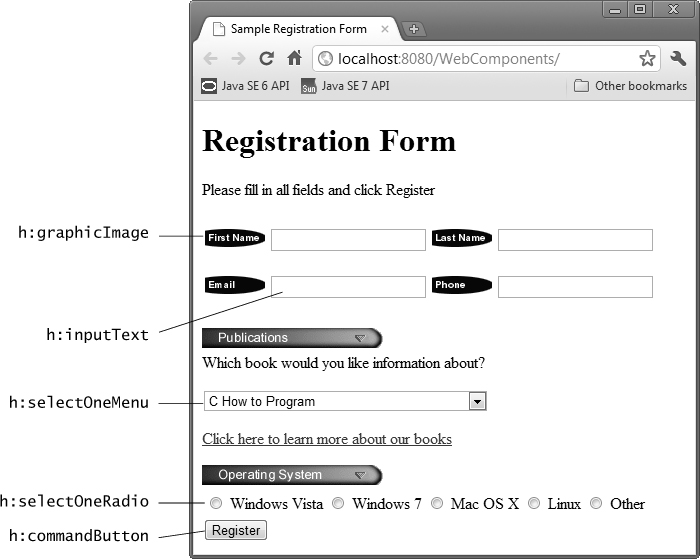
Fig. 26.14. Registration form that demonstrates various JSF components.
h:panelGrid Element
Lines 17–26 define an h:panelGrid element for organizing elements in the page. This element inserts an XHTML table in the page. The h: prefix indicates that panelGrid is from the JSF HTML Tag Library. The columns attribute specifies the number of columns in the table. The elements between the h:panelGrid’s start tag (line 17) and end tag (line 26) are automatically placed into the table’s columns from left to right in the order they appear in the JSF page. When the number of elements in a row exceeds the number of columns, the h:panelGrid creates a new row. We use the h:panelGrid to control the positions of the h:graphicImage and h:inputText elements in the user information section of the page. In this case, there are eight elements in the h:panelGrid, so the first four (lines 18–21) are placed in the table’s first row and the last four are placed in the second row. The h:panelGrid’s style attribute specifies the CSS formatting for the table. We use the CSS attributes width and height to specify the width and height of the table in pixels (px). The h:panelGrid contains pairs of h:graphicImage and h:inputText elements.
h:graphicImage Element and Resource Libraries
Each h:graphicImage displays an image in the page. For example, line 18 inserts the image fname.png—as specified by the name attribute. As of JSF 2.0, you add resources that are used throughout your app—such as images, CSS files, JavaScript files—to your web apps by placing them in the app’s resources folder within your project’s Web Pages node. Each subfolder of resources represents a resource library. Typically, images are placed in an images library and CSS files in a css library. In line 18, we specify that the image is located in the images library with the library attribute. JSF knows that the value of this attribute represents a folder within the resources folder.
You can create any library you like in the resources folder. To create this folder:
1. Expand your app’s node in the NetBeans Projects tab.
2. Right click the Web Pages node and select New > Folder... to display the New Folder dialog. [Note: If the Folder... option is not available in the popup menu, select Other..., then in the Categories pane select Other and in the File Types pane select Folder and click Next >.
3. Specify resources as the Folder Name and press Finish.
Next, right click the resources folder you just created and create an images subfolder. You can then drag the images from your file system onto the images folder to add them as resources. The images in this example are located in the images directory with the chapter’s examples.
The h:graphicImage in line 18 is a so-called empty element—an element that does not have content between its start and end tags. In such an element, data is typically specified as attributes in the start tag, such as the name and library attributes in line 18. You can close an empty element either by placing a slash immediately preceding the start tag’s right angle bracket, as shown in line 18, or by explicitly writing an end tag.
h:inputText Element
Line 19 defines an h:inputText element in which the user can enter text or the app can display text. For any element that might be accessed by other elements of the page or that might be used in server-side code, you should specify an id attribute. We specified these attributes in this example, even though the app does not provide any functionality. We’ll use the id attribute starting with the next example.
h:selectOneMenu Element
Lines 29–42 define an h:selectOneMenu element, which is typically rendered in a web page as a drop-down list. When a user clicks the drop-down list, it expands and displays a list from which the user can make a selection. Each item to display appears between the start and end tags of this element as an f:selectItem element (lines 30–41). This element is part of the JSF Core Tag Library. The XML namespace for this tag library is specified in the html element’s start tag at line 9. Each f:selectItem has itemValue and itemLabel attributes. The itemLabel is the string that the user will see in the browser, and the itemValue is the value that’s returned when you programmatically retrieve the user’s selection from the drop-down list (as you’ll see in a later example).
h:outputLink Element
The h:outputLink element (lines 43–45) inserts a hyperlink in a web page. Its value attribute specifies the resource (http://www.deitel.com in this case) that’s requested when a user clicks the hyperlink. By default, h:outputLink elements cause pages to open in the same browser window, but you can set the element’s target attribute to change this behavior.
h:selectOneMenu Element
Lines 47–53 define an h:selectOneRadio element, which provides a series of radio buttons from which the user can select only one. Like an h:selectOneMenu, an h:selectOneRadio displays items that are specified with f:selectItem elements.
h:commandButton Element
Lines 54 defines an h:commandButton element that triggers an action when clicked—in this example, we don’t specify the action to trigger, so the default action occurs (re-requesting the same page from the server) when the user clicks this button. An h:commandButton typically maps to an XHTML input element with its type attribute set to "submit". Such elements are often used to submit a form’s user input values to the server for processing.
26.7. Validation Using JSF Standard Validators
Validating input is an important step in collecting information from users. Validation helps prevent processing errors due to incomplete, incorrect or improperly formatted user input. For example, you may perform validation to ensure that all required fields contain data or that a zip-code field has the correct number of digits. The JSF Core Tag Library provides several standard validator components and allows you to create your own custom validators. Multiple validators can be specified for each input element. The validators are:
• f:validateLength—determines whether a field contains an acceptable number of characters.
• f:validateDoubleRange and f:validateLongRange—determine whether numeric input falls within acceptable ranges of double or long values, respectively.
• f:validateRequired—determines whether a field contains a value.
• f:validateRegex—determines whether a field contains a string that matches a specified regular expression pattern.
• f:validateBean—allows you to invoke a bean method that performs custom validation.
Validating Form Data in a Web Application
[Note: To create this application from scratch, review the steps in Section 26.4.3 and name the application Validation.] The example in this section prompts the user to enter a name, e-mail address and phone number in a form. When the user enters any data and presses the Submit button to submit the form’s contents to the web server, validation ensures that the user entered a value in each field, that the entered name does not exceed 30 characters, and that the e-mail address and phone-number values are in an acceptable format. In this example, (555) 123-4567, 555-123-4567 and 123-4567 are all considered valid phone numbers. Once valid data is submitted, the JSF framework stores the submitted values in a bean object of class ValidationBean (Fig. 26.15), then sends a response back to the web browser. We simply display the validated data in the page to demonstrate that the server received the data. A real business application would typically store the submitted data in a database or in a file on the server.
Class ValidationBean
Class ValidationBean (Fig. 26.15) provides the read/write properties name, email and phone, and the read-only property result. Each read/write property has an instance variable (lines 11–13) and corresponding set/get methods (lines 16–25, 28–37 and 40–49) for manipulating the instance variables. The read-only property response has only a getResult method (lines 52–60), which returns a paragraph (p) element containing the validated data. (You can create the ValidationBean managed bean class by using the steps presented in Fig. 26.4.3.)
1 // ValidationBean.java
2 // Validating user input.
3 package validation;
4
5 import java.io.Serializable;
6 import javax.faces.bean.ManagedBean;
7
8 @ManagedBean( name="validationBean" )
9 public class ValidationBean implements Serializable
10 {
11 private String name;
12 private String email;
13 private String phone;
14
15 // return the name String
16 public String getName()
17 {
18 return name;
19 } // end method getName
20
21 // set the name String
22 public void setName( String name )
23 {
24 this.name = name;
25 } // end method setName
26
27 // return the email String
28 public String getEmail()
29 {
30 return email;
31 } // end method getEmail
32
33 // set the email String
34 public void setEmail( String email )
35 {
36 this.email = email;
37 } // end method setEmail
38
39 // return the phone String
40 public String getPhone()
41 {
42 return phone;
43 } // end method getPhone
44
45 // set the phone String
46 public void setPhone( String phone )
47 {
48 this.phone = phone;
49 } // end method setPhone
50
51 // returns result for rendering on the client
52 public String getResult()
53 {
54 if ( name != null && email != null && phone != null )
55 return "<p style="background-color:yellow;width:200px;" +
56 "padding:5px">Name: " + getName() + "<br/>E-Mail: " +
57 getEmail() + "<br/>Phone: " + getPhone() + "</p>";
58 else
59 return ""; // request has not yet been made
60 } // end method getResult
61 } // end class ValidationBean
Fig. 26.15. ValidationBean stores the validated data, which is then used as part of the response to the client.
index.xhtml
Figure 26.16 shows this app’s index.xhtml file. The initial request to this web app displays the page shown in Fig. 26.16(a). When this app is initially requested, the beginning of the JSF application lifecycle uses this index.xhtml document to build the app’s facelets view and sends it as the response to the client browser, which displays the form for user input. During this initial request, the EL expressions (lines 22, 30, 39 and 47) are evaluated to obtain the values that should be displayed in various parts of the page. Nothing is displayed initially as a result of these four EL expressions being evaluated, because no default values are specified for the bean’s properties. The page’s h:form element contains an h:panelGrid (lines 18–45) with three columns and an h:commandButton (line 46), which by default submits the contents of the form’s fields to the server.
1 <?xml version='1.0' encoding='UTF-8' ?>
2
3 <!-- index.xhtml -->
4 <!-- Validating user input -->
5 <!DOCTYPE html PUBLIC "-//W3C//DTD XHTML 1.0 Transitional//EN"
6 "http://www.w3.org/TR/xhtml1/DTD/xhtml1-transitional.dtd">
7 <html xmlns="http://www.w3.org/1999/xhtml"
8 xmlns:h="http://java.sun.com/jsf/html"
9 xmlns:f="http://java.sun.com/jsf/core">
10 <h:head>
11 <title>Validating Form Data</title>
12 <h:outputStylesheet name="style.css" library="css"/>
13 </h:head>
14 <h:body>
15 <h:form>
16 <h1>Please fill out the following form:</h1>
17 <p>All fields are required and must contain valid information</p>
18 <h:panelGrid columns="3">
19 <h:outputText value="Name:"/>
20 <h:inputText id="nameInputText" required="true"
21 requiredMessage="Please enter your name"
22 value="#{validationBean.name}"
23 validatorMessage="Name must be fewer than 30 characters">
24 <f:validateLength maximum="30" />
25 </h:inputText>
26 <h:message for="nameInputText" styleClass="error"/>
27 <h:outputText value="E-mail:"/>
28 <h:inputText id="emailInputText" required="true"
29 requiredMessage="Please enter a valid e-mail address"
30 value="#{validationBean.email}"
31 validatorMessage="Invalid e-mail address format">
32 <f:validateRegex pattern=
33 "w+([-+.']w+)*@w+([-.]w+)*.w+([-.]w+)*" />
34 </h:inputText>
35 <h:message for="emailInputText" styleClass="error"/>
36 <h:outputText value="Phone:"/>
37 <h:inputText id="phoneInputText" required="true"
38 requiredMessage="Please enter a valid phone number"
39 value="#{validationBean.phone}"
40 validatorMessage="Invalid phone number format">
41 <f:validateRegex pattern=
42 "(((d{3}) ?)|(d{3}-))?d{3}-d{4}" />
43 </h:inputText>
44 <h:message for="phoneInputText" styleClass="error"/>
45 </h:panelGrid>
46 <h:commandButton value="Submit"/>
47 <h:outputText escape="false" value="#{validationBean.response}"/>
48 </h:form>
49 </h:body>
50 </html>
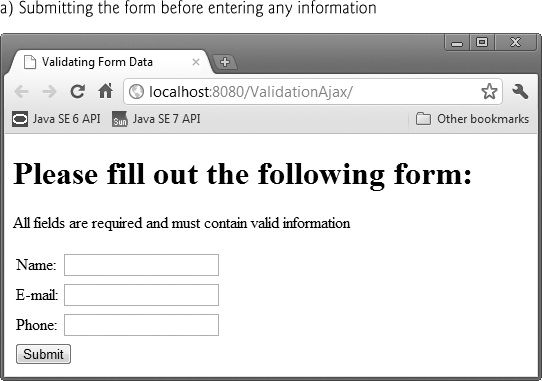
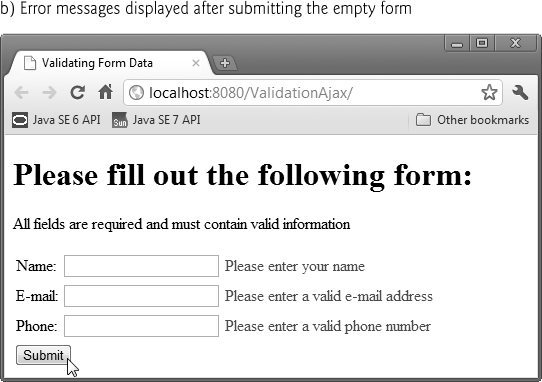


Fig. 26.16. Form to demonstrate validating user input.
First Row of the h:panelGrid
In this application, we demonstrate several new elements and attributes. The first new element is the h:outputText element (line 19; from the JSF HTML Tag Library), which inserts text in the page. In this case, we insert a literal string ("Name:") that is specified with the element’s value attribute.
The h:inputText element (lines 20–25) displays a text box in which the user can enter a name. We’ve specified several attributes for this element:
• id—This enables other elements or server-side code to reference this element.
• required—Ensuring that the user has made a selection or entered some text in a required input element is a basic type of validation. When set to "true", this attribute specifies that the element must contain a value.
• requiredMessage—This specifies the message that should be displayed if the user submits the form without first providing a value for this required element.
• value—This specifies the value to display in the field or to be saved into a bean on the server. In this case, the EL expression indicates the bean property that’s associated with this field.
• validatorMessage—This specifies the message to display if a validator is associated with this h:inputText and the data the user enters is invalid.
The messages specified by the requiredMessage and validatorMessage attributes are displayed in an associated h:message element (line 26) when validation fails. The element’s for attribute specifies the id of the specific element for which messages will be displayed (nameInputText), and the styleClass attribute specifies the name of a CSS style class that will format the message. For this example, we defined a CSS style sheet, which was inserted into the document’s head element at line 12 using the h:outputStylesheet element. We placed the style sheet in the css library within the resources folder. The style sheet contains the following CSS rule:
.error
{
color:red;
}
which creates a style class named error (the dot indicates that it’s a style class) and specifies that any text to which this is applied, such as the error messages, should be red. We use this CSS style for all the h:message elements in this example.
Validating the nameInputText Element’s Contents
If the user submits the form without a value in the nameInputText, the required-Message "Please enter your name" is displayed in the corresponding h:message element. If the user specifies a value for the nameInputText, the JSF framework executes the f:validateLength validator that’s nested in the h:inputText element. Here, we check that the name contains no more than 30 characters—as specified by the validator’s maximum attribute. This might be useful to ensure that a value will fit within a particular database field.
Users can type as much text in the nameInputText as they wish. If the name is too long, the validatorMessage is displayed in the h:message element after the user submits the form. It’s also possible to limit the length of user input in an h:inputText without using validation by setting its maxlength attribute, in which case the element’s cursor will not advance beyond the maximum allowable number of characters. This would prevent the user from submitting data that exceeds the length limit.
Second and Third Rows of the h:panelGrid
The next two rows of the h:panelGrid have elements similar to those in the first row. In addition to being required elements, the h:inputText elements at lines 28–34 and 37–43 are each validated by h:validateRegex validators as described next.
Validating the e-Mail Address
The h:validateRegex element at lines 32–33 uses the regular expression
w+([-+.']w+)*@w+([-.]w+)*.w+([-.]w+)*
which indicates that an e-mail address is valid if the part before the @ symbol contains one or more word characters (that is, alphanumeric characters or underscores), followed by zero or more strings comprised of a hyphen, plus sign, period or apostrophe and additional word characters. After the @ symbol, a valid e-mail address must contain one or more groups of word characters potentially separated by hyphens or periods, followed by a required period and another group of one or more word characters potentially separated by hyphens or periods. For example, bob'[email protected], [email protected] and [email protected] are all valid e-mail addresses. If the address the user enters has an invalid format, the validatorMessage (line 31) will be displayed in the corresponding h:message element (line 35).
Validating the Phone Number
The h:validateRegex element at lines 41–42 uses the regular expression
(((d{3}) ?)|(d{3}-))?d{3}-d{4}
which indicates that a phone number can contain a three-digit area code either in parentheses and followed by an optional space or without parentheses and followed by a required hyphen. After an optional area code, a phone number must contain three digits, a hyphen and another four digits. For example, (555) 123-4567, 555-123-4567 and 123-4567 are all valid phone numbers. If the phone number the user enters has an invalid format, the validatorMessage (line 40) will be displayed in the corresponding h:message element (line 44).
Submitting the Form—More Details of the JSF Lifecycle
As we mentioned earlier in this section, when the app receives the initial request, it returns the page shown in Fig. 26.16(a). When a request does not contain any request values, such as those the user enters in a form, the JSF framework simply creates the view and returns it as the response.
The user submits the form to the server by pressing the Submit h:commandButton (defined at line 46). Since we did not specify an action attribute for this h:commandButton, the action is configured by default to perform a postback—the browser re-requests the page index.xhtml and sends the values of the form’s fields to the server for processing. Next, the JSF framework performs the validations of all the form elements. If any of the elements is invalid, the framework renders the appropriate error message as part of the response.
If the values of all the elements are valid, the framework uses the values of the elements to set the properties of the validateBean—as specified in the EL expressions in lines 22, 30 and 39. Each property’s set method is invoked, passing the value of the corresponding element as an argument. The framework then formulates the response to the client. In the response, the form elements are populated with the values of the validateBean’s properties (by calling their get methods), and the h:outputText element at line 47 is populated with the value of the read-only result property. The value of this property is determined by the getResult method (lines 52–60 of Fig. 26.15), which uses the submitted form data in the string that it returns.
When you execute this app, try submitting the form with no data (Fig. 26.16(b)), with invalid data (Fig. 26.16(c)) and with valid data (Fig. 26.16(d)).
26.8. Session Tracking
Originally, critics accused the Internet and e-business of failing to provide the customized service typically experienced in “brick-and-mortar” stores. To address this problem, businesses established mechanisms by which they could personalize users’ browsing experiences, tailoring content to individual users. They tracked each customer’s movement through the Internet and combined the collected data with information the consumer provided, including billing information, personal preferences, interests and hobbies.
Personalization
Personalization enables businesses to communicate effectively with their customers and also helps users locate desired products and services. Companies that provide content of particular interest to users can establish relationships with customers and build on those relationships over time. Furthermore, by targeting consumers with personal offers, recommendations, advertisements, promotions and services, businesses create customer loyalty. Websites can use sophisticated technology to allow visitors to customize home pages to suit their individual needs and preferences. Similarly, online shopping sites often store personal information for customers, tailoring notifications and special offers to their interests. Such services encourage customers to visit sites more frequently and make purchases more regularly.
Privacy
A trade-off exists between personalized business service and protection of privacy. Some consumers embrace tailored content, but others fear the possible adverse consequences if the info they provide to businesses is released or collected by tracking technologies. Consumers and privacy advocates ask: What if the business to which we give personal data sells or gives that information to another organization without our knowledge? What if we do not want our actions on the Internet—a supposedly anonymous medium—to be tracked and recorded by unknown parties? What if unauthorized parties gain access to sensitive private data, such as credit-card numbers or medical history? These are questions that must be addressed by programmers, consumers, businesses and lawmakers alike.
Recognizing Clients
To provide personalized services, businesses must be able to recognize clients when they request information from a site. As we have discussed, the request/response system on which the web operates is facilitated by HTTP. Unfortunately, HTTP is a stateless protocol—it does not provide information that would enable web servers to maintain state information regarding particular clients. This means that web servers cannot determine whether a request comes from a particular client or whether the same or different clients generate a series of requests.
To circumvent this problem, sites can provide mechanisms by which they identify individual clients. A session represents a unique client on a website. If the client leaves a site and then returns later, the client will still be recognized as the same user. When the user closes the browser, the session typically ends. To help the server distinguish among clients, each client must identify itself to the server. Tracking individual clients is known as session tracking. One popular session-tracking technique uses cookies (discussed in Section 26.8.1); another uses beans that are marked with the @SessionScoped annotation (used in Section 26.8.2). Additional session-tracking techniques are beyond this book’s scope.
26.8.1. Cookies
Cookies provide you with a tool for personalizing web pages. A cookie is a piece of data stored by web browsers in a small text file on the user’s computer. A cookie maintains information about the client during and between browser sessions. The first time a user visits the website, the user’s computer might receive a cookie from the server; this cookie is then reactivated each time the user revisits that site. The collected information is intended to be an anonymous record containing data that is used to personalize the user’s future visits to the site. For example, cookies in a shopping application might store unique identifiers for users. When a user adds items to an online shopping cart or performs another task resulting in a request to the web server, the server receives a cookie containing the user’s unique identifier. The server then uses the unique identifier to locate the shopping cart and perform any necessary processing.
In addition to identifying users, cookies also can indicate users’ shopping preferences. When a Web Form receives a request from a client, the Web Form can examine the cookie(s) it sent to the client during previous communications, identify the user’s preferences and immediately display products of interest to the client.
Every HTTP-based interaction between a client and a server includes a header containing information either about the request (when the communication is from the client to the server) or about the response (when the communication is from the server to the client). When a Web Form receives a request, the header includes information such as the request type and any cookies that have been sent previously from the server to be stored on the client machine. When the server formulates its response, the header information contains any cookies the server wants to store on the client computer and other information, such as the MIME type of the response.
The expiration date of a cookie determines how long the cookie remains on the client’s computer. If you do not set an expiration date for a cookie, the web browser maintains the cookie for the duration of the browsing session. Otherwise, the web browser maintains the cookie until the expiration date occurs. Cookies are deleted by the web browser when they expire.
 Portability Tip 26.1
Users may disable cookies in their web browsers to help ensure their privacy. Such users will experience difficulty using web applications that depend on cookies to maintain state information.
26.8.2. Session Tracking with @SessionScoped Beans
The previous web applications used @RequestScoped beans by default—the beans existed only for the duration of each request. In the next application, we use a @SessionScoped bean to maintain selections throughout the user’s session. Such a bean is created when a session begins and exists throughout the entire session. A @SessionScoped bean can be accessed by all of the app’s pages during the session, and the app server maintains a separate @SessionScoped bean for each user. By default a session expires after 30 minutes of inactivity or when the user closes the browser that was used to begin the session. When the session expires, the server discards the bean associated with that session.
Software Engineering Observation 26.2
@SessionScoped beans should implement the Serializable interface. Websites with heavy traffic often use groups of servers (sometimes hundreds or thousands of them) to respond to requests. Such groups are known as server farms. Server farms often balance the number of requests being handled on each server by moving some sessions to other servers. Making a bean Serializable enables the session to be moved properly among servers.
Test-Driving the App
This example consists of a SelectionsBean class that is @SessionScoped and two pages (index.xhtml and recommendations.xhtml) that store data in and retrieve data from a SelectionsBean object. To understand how these pieces fit together, let’s walk through a sample execution of the app. When you first execute the app, the index.xhtml page is displayed. The user selects a topic from a group of radio buttons and submits the form (Fig. 26.17).

Fig. 26.17. index.xhtml after the user has made a selection and is about to submit the form for the first time.
When the form is submitted, the JSF framework creates a SelectionsBean object that is specific to this user, stores the selected topic in the bean and returns the index.xhtml page. The page now shows how many selections have been made (1) and allows the user to make another selection (Fig. 26.18).
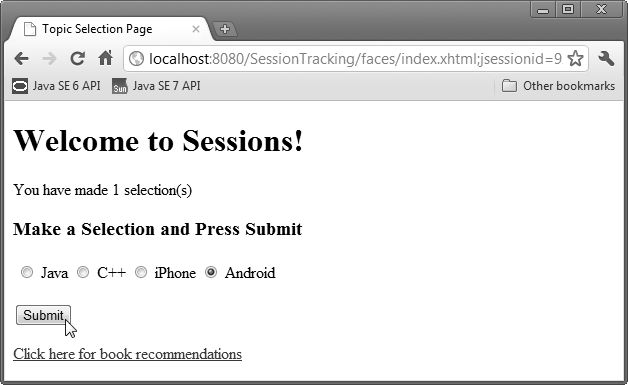
Fig. 26.18. index.xhtml after the user has submitted the form the first time, made another selection and is about to submit the form again.
The user makes a second topic selection and submits the form again. The app stores the selection in this user’s existing SelectionsBean object and returns the index.xhtml page (Fig. 26.19), which shows how many selections have been made so far (2).

Fig. 26.19. index.xhtml after the user has submitted the form the second time and is about to click the link to the recommendations.xhtml page.
At any time, the user can click the link at the bottom of the index.xhtml page to open recommendations.xhtml, which obtains the information from this user’s SelectionsBean object and creates a recommended books list (Fig. 26.20) for the user’s selected topics.

Fig. 26.20. recommendations.hxtml showing book recommendations for the topic selections made by the user in Figs. 26.18 and 26.19.
@SessionScoped Class SelectionsBean
Class SelectionsBean (Fig. 26.21) uses the @SessionScoped annotation (line 13) to indicate that the server should maintain separate instances of this class for each user session. The class maintains a static HashMap (created at lines 17–18) of topics and their corresponding book titles. We made this object static, because its values can be shared among all SelectionsBean objects. The static initializer block (lines 23–28) specifies the HashMap’s key/value pairs. Class SelectionsBean maintains each user’s selections in a Set<String> (line 32), which allows only unique keys, so selecting the same topic multiple times does not increase the number of selections.
1 // SelectionsBean.java
2 // Manages a user's topic selections
3 package sessiontracking;
4
5 import java.io.Serializable;
6 import java.util.HashMap;
7 import java.util.Set;
8 import java.util.TreeSet;
9 import javax.faces.bean.ManagedBean;
10 import javax.faces.bean.SessionScoped;
11
12 @ManagedBean( name="selectionsBean" )
13 @SessionScoped
14 public class SelectionsBean implements Serializable
15 {
16 // map of topics to book titles
17 private static final HashMap< String, String > booksMap =
18 new HashMap< String, String >();
19
20 // initialize booksMap
21 static
22 {
23 booksMap.put( "java", "Java How to Program" );
24 booksMap.put( "cpp", "C++ How to Program" );
25 booksMap.put( "iphone",
26 "iPhone for Programmers: An App-Driven Approach" );
27 booksMap.put( "android",
28 "Android for Programmers: An App-Driven Approach" );
29 } // end static initializer block
30
31 // stores individual user's selections
32 private Set< String > selections = new TreeSet< String >();
33 private String selection; // stores the current selection
34
35 // return number of selections
36 public int getNumberOfSelections()
37 {
38 return selections.size();
39 } // end method getNumberOfSelections
40
41 // returns the current selection
42 public String getSelection()
43 {
44 return selection;
45 } // end method getSelection
46
47 // store user's selection
48 public void setSelection( String topic )
49 {
50 selection = booksMap.get( topic );
51 selections.add( selection );
52 } // end method setSelection
53
54 // return the Set of selections
55 public String[] getSelections()
56 {
57 return selections.toArray( new String[ selections.size() ] );
58 } // end method getSelections
59 } // end class SelectionsBean
Fig. 26.21. @SessionScoped SelectionsBean class.
Methods of Class SelectionsBean
Method getNumberOfSelections (lines 36–39) returns the number of topics the user has selected and represents the read-only property numberOfSelections. We use this property in the index.xhtml document to display the number of selections the user has made so far.
Methods getSelection (lines 42–45) and setSelection (lines 48–52) represent the read/write selection property. When a user makes a selection in index.xhtml and submits the form, method setSelection looks up the corresponding book title in the booksMap (line 50), then stores that title in selections (line 51).
Method getSelections (lines 55–58) represents the read-only property selections, which returns an array of Strings containing the book titles for the topics selected by the user so far. When the recommendations.xhtml page is requested, it uses the selections property to get the list of book titles and display them in the page.
index.xhtml
The index.xhtml document (Fig. 26.22) contains an h:selectOneRadio element (lines 19–26) with the options Java, C++, iPhone and Android. The user selects a topic by clicking a radio button, then pressing Submit to send the selection. As the user makes each selection and submits the form, the selectionsBean object’s selection property is updated and this document is returned. The EL expression at line 15 inserts the number of selections that have been made so far into the page. When the user clicks the h:outputLink (lines 29–31) the recommendations.xhtml page is requested. The value attribute specifies only recommendations.xhtml, so the browser assumes that this page is on the same server and at the same location as index.xhtml.
1 <?xml version='1.0' encoding='UTF-8' ?>
2
3 <!-- index.xhtml -->
4 <!-- Allow the user to select a topic -->
5 <!DOCTYPE html PUBLIC "-//W3C//DTD XHTML 1.0 Transitional//EN"
6 "http://www.w3.org/TR/xhtml1/DTD/xhtml1-transitional.dtd">
7 <html xmlns="http://www.w3.org/1999/xhtml"
8 xmlns:h="http://java.sun.com/jsf/html"
9 xmlns:f="http://java.sun.com/jsf/core">
10 <h:head>
11 <title>Topic Selection Page</title>
12 </h:head>
13 <h:body>
14 <h1>Welcome to Sessions!</h1>
15 <p>You have made #{selectionsBean.numberOfSelections} selection(s)
16 </p>
17 <h3>Make a Selection and Press Submit</h3>
18 <h:form>
19 <h:selectOneRadio id="topicSelectOneRadio" required="true"
20 requiredMessage="Please choose a topic, then press Submit"
21 value="#{selectionsBean.selection}">
22 <f:selectItem itemValue="java" itemLabel="Java"/>
23 <f:selectItem itemValue="cpp" itemLabel="C++"/>
24 <f:selectItem itemValue="iphone" itemLabel="iPhone"/>
25 <f:selectItem itemValue="android" itemLabel="Android"/>
26 </h:selectOneRadio>
27 <p><h:commandButton value="Submit"/></p>
28 </h:form>
29 <p><h:outputLink value="recommendations.xhtml">
30 Click here for book recommendations
31 </h:outputLink></p>
32 </h:body>
33 </html>
Fig. 26.22. index.xhtml allows the user to select a topic.
recommendations.xhtml
When the user clicks the h:outputLink in the index.xhtml page, the browser requests the recommendations.xhtml (Fig. 26.23), which displays book recommendations in an XHTML unordered (bulleted) list (lines 15–19). The h:outputLink (lines 20–22) allows the user to return to index.xhtml to select additional topics.
1 <?xml version='1.0' encoding='UTF-8' ?>
2
3 <!-- recommendations.xhtml -->
4 <!-- Display recommended books based on the user's selected topics -->
5 <!DOCTYPE html PUBLIC "-//W3C//DTD XHTML 1.0 Transitional//EN"
6 "http://www.w3.org/TR/xhtml1/DTD/xhtml1-transitional.dtd">
7 <html xmlns="http://www.w3.org/1999/xhtml"
8 xmlns:h="http://java.sun.com/jsf/html"
9 xmlns:ui="http://java.sun.com/jsf/facelets">
10 <h:head>
11 <title>Recommended Books</title>
12 </h:head>
13 <h:body>
14 <h1>Book Recommendations</h1>
15 <ul>
16 <ui:repeat value="#{selectionsBean.selections}" var="book">
17 <li>#{book}</li>
18 </ui:repeat>
19 </ul>
20 <p><h:outputLink value="index.xhtml">
21 Click here to choose another topic
22 </h:outputLink></p>
23 </h:body>
24 </html>
Fig. 26.23. recommendations.xhtml displays book recommendations based on the user’s selections.
Iterating Through the List of Books
Line 9 enables us to use elements from the JSF Facelets Tag Library. This library includes the ui:repeat element (lines 16–18), which can be thought of as an enhanced for loop that iterates through collections JSF Expression Language. The element inserts its nested element(s) once for each element in a collection. The collection is specified by the value attribute’s EL expression, which must return an array, a List, a java.sql.ResultSet or an Object. If the EL expression does not return an array, a List or a ResultSet, the ui:repeat element inserts its nested element(s) only once for the returned Object. In this example, the ui:repeat element renders the items returned by the selectionsBean’s selections property.
The ui:repeat element’s var attribute creates a variable named book to which each item in the collection is assigned in sequence. You can use this variable in EL expressions in the nested elements. For example, the expression #{book} in line 17 inserts between the <li> and </li> tags the String representation of one item in the collection. You can also use the variable to invoke methods on, or access properties of, the referenced object.
Summary
Section 26.1 Introduction
• Web-based apps create content for web browser clients. This content includes eXtensible HyperText Markup Language (XHTML), JavaScript client-side scripting, Cascading Style Sheets (CSS), images and binary data.
• XHTML is an XML (eXtensible Markup Language) vocabulary that is based on HTML (HyperText Markup Language).
• Java multitier applications are typically implemented using the features of Java Enterprise Edition (Java EE).
• The JavaServer Faces subset of Java EE is a web-application framework (p. 26-2) for building multitier web apps by extending the framework with your application-specific capabilities. The framework handles the details of receiving client requests and returning responses for you.
Section 26.2 HyperText Transfer Protocol (HTTP) Transactions
• In its simplest form, a web page is nothing more than an XHTML document that describes to a web browser how to display and format the document’s information.
• XHTML documents normally contain hyperlinks that link to different pages or to other parts of the same page. When the user clicks a hyperlink, the requested web page loads into the browser.
• Computers that run web-server software (p. 26-3) make resources available, such as web pages, images, PDF documents and even objects that perform complex tasks.
• The HTTP protocol allows clients and servers to interact and exchange information.
• HTTP uses URLs (Uniform Resource Locators) to locate resources on the Internet.
• A URL contains information that directs a browser to the resource that the user wishes to access.
• The computer that houses and maintains resources is usually referred to as the host (p. 26-3).
• Host names are translated into IP addresses by domain-name system (DNS) servers (p. 26-3).
• The path in a URL typically specifies a virtual directory on the server. The server translates this into a real location, thus hiding a resource’s true location.
• When given a URL, a web browser performs an HTTP transaction to retrieve and display the web page at that address.
• HTTP headers (p. 26-5) provide additional information about the data that will be sent.
• Multipurpose Internet Mail Extensions (MIME; p. 26-5) is an Internet standard that specifies data formats so that programs can interpret data correctly.
• The two most common HTTP request types are GET and POST (p. 26-5). A GET request typically asks for a specific resource on a server. A POST request typically posts (or sends) data to a server.
• GET requests and POST requests can both be used to send form data to a web server, yet each request type sends the information differently. A GET request sends information to the server in the URL’s query string (p. 26-6). A POST request sends form data as part of the HTTP message.
• Browsers often cache (p. 26-6) web pages for quick reloading. If there are no changes between the cached version and the current version on the web, this speeds up your browsing experience.
• An HTTP response can indicate the length of time for which the content remains “fresh.” If this amount of time has not been reached, the browser can avoid another request to the server.
• Browsers typically do not cache the server’s response to a POST request, because the next POST might not return the same result.
Section 26.3 Multitier Application Architecture
• Web-based applications are multitier (n-tier) applications (p. 26-6) that divide functionality into separate tiers (i.e., logical groupings of functionality). Although tiers can be located on the same computer, the tiers of web-based applications often reside on separate computers.
• The information tier (p. 26-7) maintains data pertaining to the application.
• The middle tier (p. 26-7) implements business logic, controller logic and presentation logic to control interactions between the application’s clients and the application’s data. Business logic in the middle tier enforces business rules and ensures that data is reliable before the server application updates the database or presents the data to users. Business rules dictate how clients can and cannot access application data, and how applications process data.
• The client tier (p. 26-7) is the application’s user interface, which gathers input and displays output. Users interact directly with the application through the user interface. In response to user actions (e.g., clicking a hyperlink), the client tier interacts with the middle tier to make requests and to retrieve data from the information tier.
Section 26.4 Your First JSF Web App
• The JSF web-application framework’s Faces servlet (p. 26-8) processes each requested JSF page so that the server can eventually return a response to the client.
Section 26.4.1 The Default index.xhtml Document: Introducing Facelets
• You present your web app’s content in JSF using Facelets (p. 26-9)—a combination of XHTML markup and JSF markup.
• XHTML (p. 26-9) specifies the content of a web page that is displayed in a web browser. XHTML separates the presentation of a document from the structure of the document’s data.
• Presentation is specified with Cascading Style Sheets (CSS).
• JSF uses the XHTML 1.0 Transitional Recommendation by default. Transitional markup may include some non-CSS formatting, but this is not recommended.
• The starting <html> tag may contain one or more xmlns attributes (p. 26-9). Each has a name and a value separated by an equal sign (=), and specifies an XML namespace of elements that are used in the document.
• The attribute xmlns:h="http://java.sun.com/jsf/html" specifies a prefix and a URL for JSF’s HTML Tag Library (p. 26-9), allowing the document to use JSF’s elements from that library.
• A tag library defines a set of elements that can be inserted into the XHTML markup.
• The elements in the HTML Tag Library generate XHTML elements.
• The h:head element (p. 26-10) defines the XHTML page’s head element.
• The document’s title typically appears in the browser window’s title bar, or a browser tab if you have multiple web pages open in the browser at once.
• The h:body (p. 26-10) element represents the page’s content.
• A JSF Expression Language (EL; p. 26-10) expression can interact with a JavaBean to obtain data.
Section 26.4.2 Examining the WebTimeBean Class
• JSF documents typically interact with one or more Java objects to perform the app’s tasks.
• JavaBeans objects (p. 26-10) are instances of classes that follow certain conventions for class design. A JavaBean exposes its data as properties (p. 26-10). Properties can be read/write, read-only or write-only. To define a read/write property, a JavaBean class provides set and get methods for that property. A read-only property would have only a get method and a write-only property only a set method.
• The JavaBeans used in JSF are also POJOs (plain old Java objects; p. 26-10)
• The JSF framework creates and manages objects of your JavaBean classes for you.
• The @ManagedBean annotation (from the package javax.faces.bean; p. 26-11) indicates that the JSF framework should create and manage instances of the class. The parentheses following the annotation contain the optional name attribute. If you specify the annotation without the parentheses and the name attribute, the JSF framework will use the class name with a lowercase first letter as the default bean name.
• When the Faces servlet encounters an EL expression that accesses a bean property, it automatically invokes the property’s set or get method based on the context in which the property is used.
Section 26.5 Model-View-Controller Architecture of JSF Apps
• JSF applications adhere to the Model-View-Controller (MVC; p. 26-16) architecture, which separates an application’s data (contained in the model) from the graphical presentation (the view) and the processing logic (the controller).
• In JSF, the controller is the JSF framework and is responsible for coordinating interactions between the view and the model. The model contains the application’s data (typically in a database), and the view presents the data stored in the model (typically as web pages).
Section 26.6 Common JSF Components
• Elements from the JSF HTML Tag Library are mapped by the JSF framework to a combination of XHTML elements and JavaScript code that enables the browser to render the page.
• The h:form element (p. 26-17) contains the components with which a user interacts to provide data, such as registration or login information, to a JSF app.
• An h:panelGrid element (p. 26-18) organizes elements in an XHTML table. The columns attribute specifies the number of columns in the table. The style attribute specifies the CSS formatting for the table.
• A h:graphicImage (p. 26-19) displays an image (specified by the name attribute) in the page.
• As of JSF 2.0, you add resources (p. 26-19) that are used throughout your app—such as images, CSS files, JavaScript files—to your web apps by placing them in the app’s resources folder within your project’s Web Pages node. Each subfolder of resources represents a resource library (p. 26-19).
• An empty element (p. 26-19) does not have content between its start and end tags. In such an element, data can be specified as attributes in the start tag. You can close an empty element either by placing a slash immediately preceding the start tag’s right angle bracket or by explicitly writing an end tag.
• An h:selectOneMenu element (p. 26-20) is typically rendered in a web page as a drop-down list. Each item to display appears between the start and end tags of this element as an f:selectItem element (from the JSF Core Tag Library; p. 26-20). An f:selectItem’s itemLabel is the string that the user will see in the browser, and its itemValue is the value that’s returned when you programmatically retrieve the user’s selection from the drop-down list.
• An h:outputLink element (p. 26-20) inserts a hyperlink in a web page. Its value attribute specifies the resource that’s requested when a user clicks the hyperlink.
• An h:selectOneRadio element (p. 26-20) provides a series of radio buttons from which the user can select only one.
• An h:commandButton element (p. 26-20) triggers an action when clicked. An h:commandButton typically maps to an XHTML input element with its type attribute set to "submit". Such elements are often used to submit a form’s user input values to the server for processing.
Section 26.7 Validation Using JSF Standard Validators
• Form validation (p. 26-20) helps prevent processing errors due to incomplete or improperly formatted user input.
• An f:validateLength validator (p. 26-20) determines whether a field contains an acceptable number of characters.
• f:validateDoubleRange and f:validateLongRange validators (p. 26-20) determine whether numeric input falls within acceptable ranges.
• An f:validateRequired validator (p. 26-20) determines whether a field contains a value.
• An f:validateRegex validator (p. 26-20) determines whether a field contains a string that matches a specified regular expression pattern.
• An f:validateBean validator (p. 26-20) invokes a bean method that performs custom validation.
• An h:outputText element (p. 26-25) inserts text in a page.
• An input element’s required attribute (when set to "true"; p. 26-25) ensures that the user has made a selection or entered some text in a required input element is a basic type of validation.
• An input element’s requiredMessage attribute (p. 26-25) specifies the message that should be displayed if the user submits the form without first providing a value for the required element.
• An input element’s validatorMessage attribute (p. 26-25) specifies the message to display if a validator is associated with the element and the data the user enters is invalid.
• The messages specified by the requiredMessage and validatorMessage attributes are displayed in an associated h:message element (p. 26-25) when validation fails.
• To limit the length of user input in an h:inputText, set its maxlength attribute (p. 26-26)—the element’s cursor will not advance beyond the maximum allowable number of characters.
• In a postback (p. 26-27), the browser re-requests the page and sends the values of the form’s fields to the server for processing.
Section 26.8 Session Tracking
• Personalization (p. 26-27) makes it possible for e-businesses to communicate effectively with their customers and also improves the user’s ability to locate desired products and services.
• A trade-off exists between personalized e-business service and protection of privacy. Some consumers embrace the idea of tailored content, but others fear the possible adverse consequences if the information they provide to e-businesses is released or collected by tracking technologies.
• HTTP is a stateless protocol—it does not provide information that would enable web servers to maintain state information regarding particular clients.
• To help the server distinguish among clients, each client must identify itself to the server. Tracking individual clients, known as session tracking, can be achieved in a number of ways. One popular technique uses cookies; another uses the @SessionScoped annotation.
Section 26.8.1 Cookies
• A cookie (p. 26-28) is a piece of data stored in a small text file on the user’s computer. A cookie maintains information about the client during and between browser sessions.
• The expiration date (p. 26-29) of a cookie determines how long the cookie remains on the client’s computer. If you do not set an expiration date for a cookie, the web browser maintains the cookie for the duration of the browsing session.
Section 26.8.2 Session Tracking with @SessionScoped Beans
• A @SessionScoped bean (p. 26-29) can maintain a user’s selections throughout the user’s session. Such a bean is created when a session begins and exists throughout the entire session.
• A @SessionScoped bean can be accessed by all of the app’s pages, and the app server maintains a separate @SessionScoped bean for each user.
• By default a session expires after 30 minutes of inactivity or when the user closes the browser that was used to begin the session. When the session expires, the server discards the bean that was associated with that session.
• The ui:repeat element (from the JSF Facelets Tag Library; p. 26-35) inserts its nested element(s) once for each element in a collection. The collection is specified by the value attribute’s EL expression, which must return an array, a List, a java.sql.ResultSet or an Object.
• The ui:repeat element’s var attribute creates a variable to which each item in the collection is assigned in sequence.
Self-Review Exercises
26.1 State whether each of the following is true or false. If false, explain why.
a. A URL contains information that directs a browser to the resource that the user wishes to access.
b. Host names are translated into IP addresses by web servers.
c. The path in a URL typically specifies a resource’s exact location on the server.
d. GET requests and POST requests can both be used to send form data to a web server.
e. Browsers typically cache the server’s response to a POST request.
f. A tag library defines a set of elements that can be inserted into the XHTML markup.
g. You must create and manage the JavaBean objects that are used in your JSF web applications.
h. When the Faces servlet encounters an EL expression that accesses a bean property, it automatically invokes the property’s set or get method based on the context in which the property is used.
i. An h:panelGrid element organizes elements in an XHTML table.
j. An h:selectOneMenu element is typically rendered in a web page as a set of radio buttons.
k. The messages specified by an element’s requiredMessage and validatorMessage attributes are displayed in an associated h:message element when validation fails.
l. The HTTP protocol provides information that enables web servers to maintain state information regarding particular clients.
m. The ui:repeat element inserts its nested element(s) once for each element in a collection. The collection can be any IEnumerable type.
26.2 Fill in the blanks in each of the following statements:
a. Java multitier applications are typically implemented using the features of ________.
b. Computers that run ________ software make resources available, such as web pages, images, PDF documents and even objects that perform complex tasks.
c. The JSF web-application framework’s ________ processes each requested JSF page.
d. A(n) ________ exposes its data as read/write, read-only or write-only properties.
e. The ________ annotation indicates that the JSF framework should create and manage instances of the class.
f. A(n) ________ element contains the components with which a user interacts to provide data, such as registration or login information, to a JSF app.
g. A(n) ________ element triggers an action when clicked.
h. A(n) ________ validator determines whether a field contains an acceptable number of characters.
i. A(n) ________ validator determines whether a field contains a string that matches a specified regular expression pattern.
j. In a(n) ________, the browser re-requests the page and sends the values of the form’s fields to the server for processing.
k. A(n) ________bean is created when a session begins and exists throughout the entire session.
Answers to Self-Review Exercises
26.1
a. True.
b. False. Host names are translated into IP addresses by DNS servers.
c. False. The server translates a virtual directory into a real location, thus hiding a resource’s true location.
d. True.
e. False. Browsers typically do not cache the server’s response to a POST request, because the next POST might not return the same result.
f. True.
g. False. The JSF framework creates and manages objects of your JavaBean classes for you.
h. True.
i. True.
j. False. An h:selectOneRadio element is rendered as a set of radio buttons. An h:selectOneMenu is rendered as a drop-down list.
k. True.
l. False. HTTP is a stateless protocol that does not provide information that enables web servers to maintain state information regarding particular clients—a separate tracking technology must be used.
m. False. A ui:repeat element can iterate over only arrays, Lists and ResultSets. For any other object, the elements in a ui:repeat element will be inserted once.
26.2
a. Java Enterprise Edition (Java EE).
b. web-server.
c. Faces servlet.
d. JavaBean.
e. @ManagedBean.
f. h:form.
g. h:commandButton.
h. f:validateLength.
i. f:validateRegex.
j. postback.
k. @SessionScoped.
Exercises
26.3 (Registration Form Modification) Modify the WebComponents application to add functionality to the Register button. When the user clicks Register, validate all input fields to make sure the user has filled out the form completely and entered a valid email address and phone number. Then, display a message indicating successful registration and show the user’s registration information at the bottom of the page. (This is similar to the example in Section 26.7.) You’ll need to create an appropriate bean class to store the user’s registration information.
26.4 (Shopping Cart Application) Using the techniques you learned in Section 26.8.2, create a simple shopping cart application. Display a list of books as an h:selectOneRadio element. When the user submits the form, store the user’s selection in a @SessionScoped managed bean. Allow the user to return to the list of books and make additional selections. Provide a link to view the shopping cart. On the shopping cart page, display the list of selections the user made, the price of each book and the total of all books in the cart.
26.5 (Guestbook Application) In Section 26.8.2, you used an @SessionScoped managed bean to maintain an individual user’s selections. JSF also provides the @ApplicationScoped annotation for managed beans that should be shared among all users of a JSF app. For this exercise, create an @ApplicationScoped GuestbookBean that maintains a List of GuestbookEntry objects. The application should provide a form, similar to the one in Fig. 26.16 that enables a user to enter a name, an email address and a message. When the user submits the form, the GuestbookBean should create a GuestbookEntry object containing the submitted values and insert it at the beginning of the List of GuestbookEntry objects—this places the most recent entry first. The GuestbookBean should also provide a read-only property that returns the List of GuestbookEntry objects. The page should use a ui:repeat element to display all of the items in the List so the user can see all the guestbook entries so far. [Note: In the next chapter, you’ll implement a similar exercise that stores this information in a database.]