In the previous chapter, we learned the basics of Tkinter. We learned how to create buttons, labels, frames, menus, checkboxes, radio buttons, and so on with Tkinter. We also learned how to design our widgets and make our widgets do stuff based on events (click, mouse move, keyboard press, etc.). Finally, we learned how to draw using canvas.
In this chapter, let’s apply what we learned in the last chapter and create our very first big project: a tic-tac-toe game! We’ll also learn about events and binding them to our widgets.
Bind events – make your apps dynamic!
In the last chapter, we learned a lot about Tkinter. I’m sure you’re bored of learning all the concepts, and you’d rather create a project now. Bear with me for a few minutes, okay? Let’s quickly learn how to bind events to our widgets and get started with our tic-tac-toe game.
So, what’s binding? Well, let’s say you click your button (with your left mouse button), and you want to execute a function when that happens. What would you do? You’d use “command”, yes, but what if you want to distinguish between the left and right mouse button clicks? Open different functions according to which mouse button was clicked or which keyboard key was pressed?
Events help you do all of that and more.
Let’s look at the button click events first. Let’s create binds that execute separate functions when the left and right mouse buttons are clicked on a button widget.
from tkinter import *
w = Tk()
def left_clicked(event):
print('Left mouse button clicked')
return
def right_clicked(event):
print('Right mouse button clicked')
return
button = Button(w,text='Click here!')
button.pack()
button.bind('<Button-1>',left_clicked)
button.bind('<Button-3>',right_clicked)
w.mainloop()
Look at the preceding code snippet. We created the button, packed it, and then used the bind() method to create two binds. The first argument denotes the event we want to bind to our button, and the second argument is the function that needs to be called when the event happens.
The events need to be specified within quotes, and <Button-1> denotes the left mouse button click and <Button-3> is the right mouse button click because <Button-2> is the middle mouse button click.
Now, in the function definition, we’ve accepted an argument, event, even though we didn’t send any arguments from the function call. How is that possible? Well, whenever an event is bound to a widget, your program automatically sends an event object to the function. This “event” will have a lot of information on the event that just happened.
For example, we can find the x and y coordinate positions of the left mouse button click by using event.x and event.y. Let’s try that on a frame.
from tkinter import *
w = Tk()
def click(event):
print("X:{},Y:{}".format(event.x,event.y))
frame = Frame(w,width=200,height=200)
frame.pack()
frame.bind('<Button-1>',click)
w.mainloop()
Now, let me click a random position on the frame (Figure 17-1).
Figure 17-1
Left mouse button click event
I clicked somewhere in the middle, and the result was this:
Similarly, you can look for keyboard key presses too. You need to use the <Key> bind for that, and you can use the event.char property to print out the exact key that was pressed. This only works for keys that are printable and not for keys like space, F1, and so on. There are separate event binds for that.
You can use the <Motion> event to run functions when you move the mouse cursor over your widget. The <Return> event fires when the user presses the Enter key and so on.
Okay, now that you’ve learned how events work, let’s start working on our tic-tac-toe game!
Tic-tac-toe game – explanation
We’ve just been creating mini projects so far. But in the real world, you need to do a lot more than draw a few shapes or run a bunch of loops. In the real world, you’ll create games and apps that are used in people’s everyday life.
So in this chapter, we’re going to create our very first such game. Let’s create the classic tic-tac-toe game. Our app will look something like this (Figure 17-2).
Figure 17-2
Tic-tac-toe game in Tkinter
We have our game board with nine boxes on which you can draw. There are two players: X and O, who get alternate turns to draw on the board. If a player draws on three consecutive boards (vertically, horizontally, or diagonally), then that player wins. If no one achieved that and all nine boards are filled, the game is a draw.
It’s a simple game. I’m going to be introducing “messagebox” which will help you create the message popups you see in your laptop’s programs.
Set up Tkinter
Let’s start by importing everything from Tkinter, as usual. But we also need to import messagebox because when you use *, you’re just importing the outside classes and functions, not exactly “everything”.
from tkinter import *
from tkinter import messagebox
Let’s set up our window next. I’m going to change my window’s title to ‘tic-tac-toe’.
w = Tk()
w.title('Tic Tac Toe')
Create global variables
We looked at global variables in the function chapter, remember? Global variables can be used to keep track of changes happening across multiple functions. We need multiple global variables in this case.
For instance, we need to keep track of the overall changes happening to the “turn” variable that counts the number of turns used up by the players (tic-tac-toe offers nine turns in total).
turn = 0
Next, we need a list that’ll keep track of who’s played on which box. This list will have nine pre-defined items that currently hold empty strings. We’ll replace them with either “X” or “O” depending on who plays on which box.
state = ['','','','','','','','','']
Next, we need a two-dimensional list (lists within a bigger list) that’ll hold all the win states (Figure 17-3). We’ll compare these win states after every player plays to check if someone won the game.
Figure 17-3
Tic-tac-toe boxes (numbered)
Look at the preceding image. In tic-tac-toe, a player wins if they draw their symbol on three consecutive boxes, either vertically, horizontally, or diagonally. 1,4,7 is the first vertical win state. 1,2,3 is the first horizontal win state. 1,5,9 is the first diagonal win state and so on.
There are three vertical win states, three horizontal win states, and two diagonal win states. A total of eight win states.
Let’s store them in our list. But since we’re working with lists here, and their index start from 0, let’s convert 1,2,3 to 0,1,2. Do the same for the rest of the win states, and you’ll get something like this:
Finally, let’s create a variable “game” that’ll store the state of the game. It’ll be True when we start the game, and if someone won, or if the game ends in a draw (all nine boxes were used up but no one won), we will change the value of “game” to False so no one can draw on the boxes.
game = True
Create the buttons
We need nine boxes on which the players can “draw”, am I right? Why not make things simple and create buttons? We can make their text a single-spaced string to start with, and every time a player plays, we can change the text to either “X” or “O”. That’ll work!
Before we create the buttons, let’s define a variable “font” that’ll store the fonts we need for the button text (what our players “draw” on the buttons). “Helvetica”, 20 for the text size, and “bold” font.
font = ('Helvetica',20,'bold')
Next, let’s create nine buttons, one for each box. We’re going to make the text a single space, height 2, and width 4. Let’s assign the “font” variable we created to the font.
Finally, we’re going to see some real use of the “lambda” functions we learned about in the functions chapter. So far, whenever we used the command property on a button, we didn’t have to send arguments to the function being called.
But now, we need to send two arguments: one being the actual button that was clicked and the other being the number of the button that was clicked (starting from 1).
If you want to send arguments an event like that, you need to wrap the function call around a lambda, like you’ll see in the following. You don’t need any arguments for the lambda in itself because it’s serving as an anonymous function now. And your one line of code will be the function call to the buttonClick() function with the arguments b1 and 1 sent inside it.
Let’s repeat this process for the rest of the buttons. Let’s also place the buttons in the grid parallelly. It’s a normal grid arrangement.
Create a buttonClick() function definition on top of the buttons and just place a pass on it (so you don’t get an error saying that the function is empty). We’ll fill the function definition with the relevant code in the next part.
Let’s run the program, and we get this (Figure 17-4).
Figure 17-4
Nine boxes – created
This is what we have so far. Nice!
When the button is clicked, draw on it
Now let’s define our buttonClick() function. This should come above the block of text where we created our buttons (function definition before function call rule).
We’ll be accessing the global variables turn, state, and game in this function, so let’s load them first.
#When a button is clicked
def buttonClick(b,n):
global turn,state,game
Next, before drawing on the particular box, let’s check if the box is currently empty. If it is occupied (a player already drew on it), we shouldn’t draw on it again, and instead, your game has to pop up an error message.
Also, check if the game is still True (no one won, and the nine tries aren’t used up yet).
if b['text'] == ' ' and game == True:
If the conditions hold true, then check who’s currently playing. Player “X” starts the game, and since we started our “turn” at 0, whenever it’s X’s turn, the value of “turn” will be an even number. You know how to check for an even number, right? Do that.
#hasn't been clicked on yet
if turn % 2 == 0:
So, if it’s X’s turn, then change the button’s text to “X”, increase the value of turn by 1, and change the value of state[n–1] to “X”. Why n–1? Well, a list’s index starts from 0, and our buttons’ number started from 1, so we need to decrease the value by one before using it in “state”.
#player X's turn
b['text'] = 'X'
turn += 1
state[n-1] = 'X'
The minute you draw on a box, call the winner_check() function and send “X” as the parameter. We’ll define the winner_check() function shortly. If you’re coding along with me, for now, just type pass inside the function so you don’t get an error for not defining it, but calling it. Also, create the winner_check() function above the buttonClick() function because we’re calling from buttonClick.
#winner check
winner_check('X')
Okay, now that’s done, let’s check if turn is even, that is, if it’s O’s turn. If it is, do the same as earlier, but just for “O”.
elif turn % 2 == 1:
#player O's turn
b['text'] = 'O'
turn += 1
state[n-1] = 'O'
winner_check('O')
Let’s run what we have so far and see if we can “draw” on our boxes (Figure 17-5).
Figure 17-5
“Draw” on the boxes
Yes, we can!
Finally, check for the “else” condition. Either the game is already over, or someone already drew on the box, and you don’t want a repeat.
In messagebox, you have a showinfo method that can be used to, yup, you guessed it, print a message. Let’s use that.
If the “game” variable is False (game over), print ‘Game over! Start a new game.’ If the box was already drawn on, print ‘This box is occupied!’.
else:
if game == False:
messagebox.showinfo('showinfo','Game over! Start a new game.')
#because even when the game is over, the buttons will be occupied, so check for that first
elif b['text'] != ' ':
messagebox.showinfo('showinfo','This box is occupied!')
Let’s check if the error boxes work now (Figure 17-6).
Figure 17-6
Box is occupied
I tried drawing on an occupied box, and this message popped up. Great! The other condition isn’t relevant right now because we haven’t checked for winners yet, so the game won’t get “over” yet.
It looks like the program is almost over, right? We’ve drawn on it. We’ve even created the winner_check() function to work on next. But are we really done with buttonClick()? Nope.
We still need to check for the draw condition! What if the value of turn is greater than 8 (players have played nine times) and the value of “game” is still true? If “game” is still True, that means no one has won yet because when we call the winner_check() function, if we find someone has won, we immediately change “game” to False.
So, the only reason we’re out of turns and the game is still True is because we’re at a draw. Let’s print that message and end the game (change “game” to False).
#game ended on draw
if turn > 8 and game == True:
messagebox.showinfo('showinfo','The match was a Draw')
game = False
That’s it for buttonClick()! Whew. That was big.
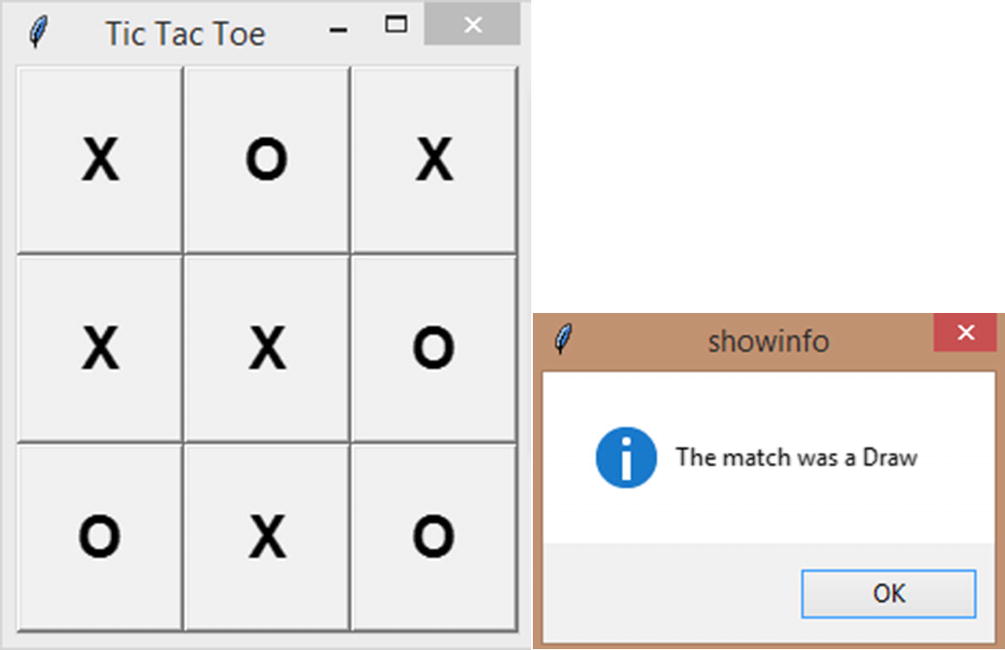
Let’s run the program, and check if the “draw” condition works (Figure 17-7).
Figure 17-7
Match was a draw
Yup, it works! But we need the winner_check() to make everything work properly.
Let’s look at winner_check() next.
Check if a player won during each turn
Every time a player plays, we need to check if that player just won the game at that turn. This function accepts the player (“X” or “O”) as its argument.
#Every time a button is clicked, check for win state
def winner_check(p):
Let’s also import the global variables state, winner, and game, because we’ll need them.
global state,winner,game
Now, we need to loop through the winner. So for every iteration of the loop, “i” will have one of the “win” state lists.
For every iteration, let’s check if state[i[0]], state[i[0]], and state[i[0]] hold the same value of player (“X” or “O”).
For example, the first inner list is [0,1,2], so we’re checking for state[0], state[1], and state[2], and if they all hold the string “X”, then plalyer “X” won. If they all hold “O”, “O” won. That’s it!
for i in winner:
if((state[i[0]] == p) and (state[i[1]] == p) and (state[i[2]] == p)):
If the condition holds true, then create a string that basically says “X won!” or “O won!” and create a message with it. Finally, change the value of “game” to False.
string = '{} won!'.format(p)
messagebox.showinfo('showinfo',string)
game = False
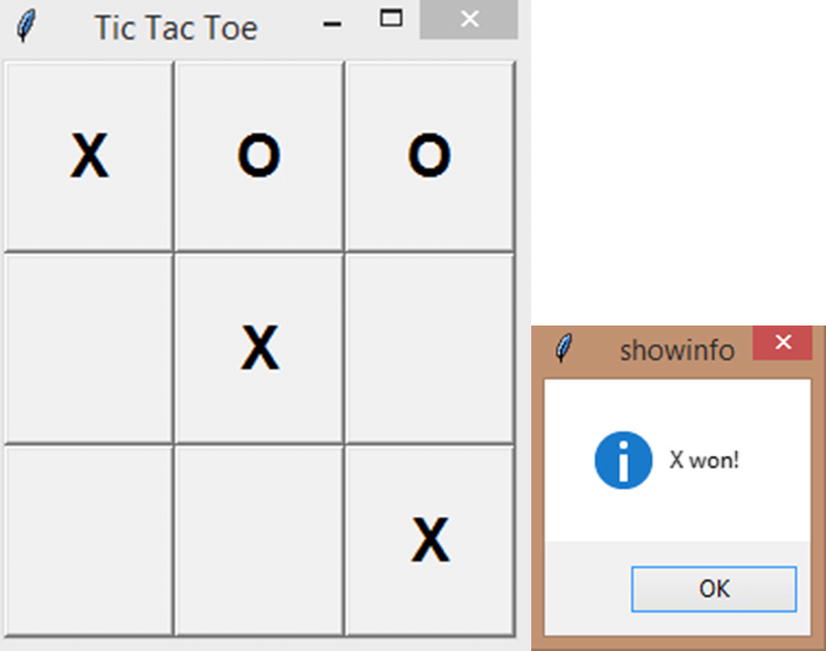
Let’s run our program now, and we get this (Figure 17-8).
Figure 17-8
X won!
Whoa! It works!
Does the “Game over” condition work? Let me close the current message box and try to draw on one of the empty boxes by clicking it (Figure 17-9).
Figure 17-9
Game over!
Look at that! Our “Game over!” message just popped up. Our game works perfectly!
New game button
Why don’t we add a “New game” button to our game? Right now, our game just hangs after it’s over. We have to run the program again to start a new game. If we had a button that just reset everything, that’d be great, won’t it?
Let’s do that. Let’s create a button first.
new = Button(w,text='New Game',command=new_game)
new.grid(row=3,column=1)
This button will execute the new_game() function when clicked.
Now, let’s create the new_game() function above the “new” button.
Before we define the function, let’s create a list of all our buttons. We’ll need this to loop through the buttons and clear them (so we can draw on them again).
#create a list of the buttons so we can change their text
boxes = [b1,b2,b3,b4,b5,b6,b7,b8,b9]
Our new_game() function needs the global variables state, game, turn, and boxes. We need to import state, game, and turn so we can reset them back to their original values.
#New game
def new_game():
global state,game,turn,boxes
Let’s reset turn, state, and game.
turn = 0
state = ['','','','','','','','','']
game = True
Finally, let’s loop through “boxes” and change the text value of each box to a single space.
for b in boxes:
b['text'] = ' '
That’s it for our program! I’m sure you’d have done that already, but if you forgot, add a mainloop() at the end of your program.
w.mainloop()
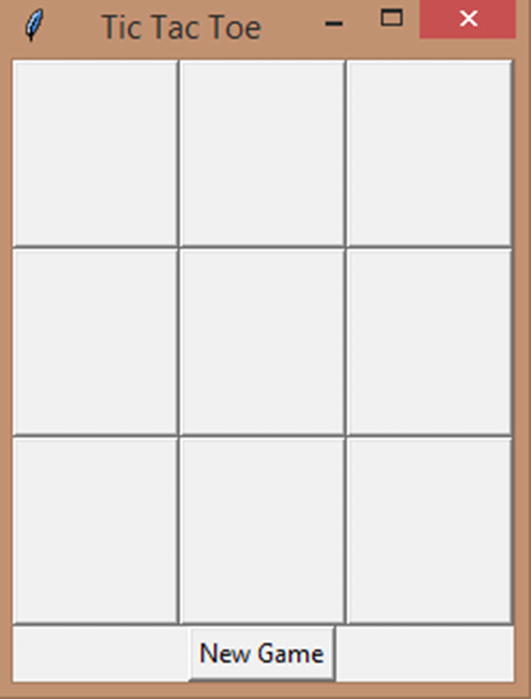
Let’s run the program now, and we get this (Figure 17-10).
Figure 17-10
New Game button
We have our “New Game” button now. Try testing it. It works perfectly!
Did you have fun creating the game? I know I had fun creating it and teaching you how to create it. Tinker with the game. Change fonts, colors, and so on. All the best!
Entire program
Now that you’ve learned how to create a tic-tac-toe game in Tkinter, here’s the entire program in the order in which it should be written. Use it for your reference.
#create a list of the buttons so we can change their text
boxes = [b1,b2,b3,b4,b5,b6,b7,b8,b9]
#New game
def new_game():
global state,game,turn,boxes
turn = 0
state = ['','','','','','','','','']
game = True
for b in boxes:
b['text'] = ' '
new = Button(w,text='New Game',command=new_game)
new.grid(row=3,column=1)
w.mainloop()
Summary
In this chapter, we started with comments in Python and how to create single and multi-line comments. Then we moved on to variables, how to create them, their naming conventions, and what you can store in them. Then we looked at the vast number of data types available in the Python programming language and how to use them. Then we looked at type checking in Python, and finally we looked at getting inputs in Python and displaying them in your output.
In the next chapter, let’s go deep into strings, how to create them and use them, and the various pre-defined string methods Python equips you with.