
Although Arquillian does not depend on a specific build tool, it is commonly used with Maven; it offers dependency management and thus simplifies the task of including the Arquillian libraries in the application since they are distributed in the Central Maven repository.
Depending on the type of archetype you have used for generation, you might have a different folder structure in your project; that is not an issue. What is really important is that you provide the following structure under your src folder:
main/java/: Place all application Java source files here (under the Java package)resources/: Place all application configuration files here
test/java/: Place all test Java source files here (under the Java package)resources/: Place all test configuration files here (for example,persistence.xml)
So by now, we will be working under test/java, which is where we will place our first Arquillian test class.
If you have been working with JUnit (http://www.junit.org), you will find an Arquillian test very similar, just with some extra spice in it.
In order to do that, we will use Eclipse and Maven, just as we have done so far. If you are about to add test classes to your project, there is obviously no need to create a new project for this purpose. However, for learning purposes, we have delivered this example in a separate project so that you can see exactly what to add in order to run Arquillian tests.
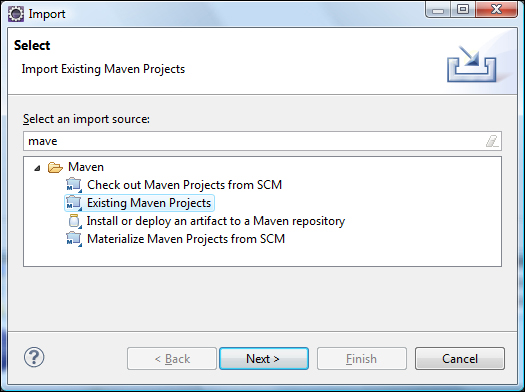
In order to avoid recreating the whole project from scratch, you could simply clone the ticket-agency-jpa project and name it ticket-agency-test, moving the root package from com.packtpub.as7development.chapter5 to com.packtpub.as7development.chapter6. If that still seems like too much work, you could simply import the chapter6 project from the book samples as we are going to show in a minute. From the File menu, navigate to Import | Existing Maven Projects from the given options.
Now point to the folder where you have your Maven project for Chapter 6, and select the root folder that contains the pom.xml folder:
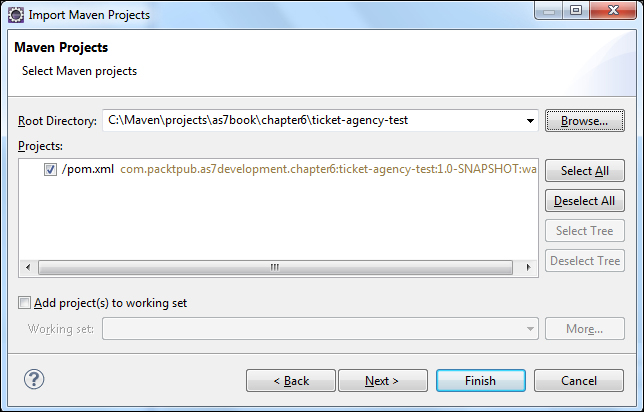
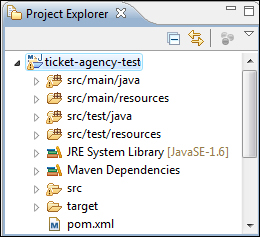
Now you can click on Finish and check if you have the following structure in the Project Explorer view:
Okay, now let's see what core dependencies are needed to run the Arquillian test case.
The first thing that is necessary to include in order to run an Arquillian test is the junit dependency that is required to run our unit tests:
<dependency>
  <groupId>junit</groupId>
  <artifactId>junit</artifactId>
  <scope>test</scope>
</dependency>
As you can see, this dependency (just like the following ones) bears the test scope; this means that it will be used by Maven when running tests, so it will not add this library to the final artifact.
Next, if you want to test enterprise features such as EJB and the Java Transaction API (JTA), you need to include the org.jboss.arquillian.junit dependency as well:
<dependency>
  <groupId>org.jboss.arquillian.junit</groupId>
  <artifactId>arquillian-junit-container</artifactId>
  <scope>test</scope>
</dependency>
After that, since our Arquillian test uses a protocol to communicate with the server application, we will need to add the org.jboss.arquillian.protocol dependency (named so as it's compatible with Servlet 2.5/3.0 specifications):
<dependency>
  <groupId>org.jboss.arquillian.protocol</groupId>
  <artifactId>arquillian-protocol-servlet</artifactId>
  <scope>test</scope>
</dependency>
The last dependency that we will add is the weld container dependency; this will be needed as we will test some advanced CDI techniques such as ConversationScoped communication:
<dependency>
  <groupId>org.jboss.weld</groupId>
  <artifactId>weld-core-test-arquillian</artifactId>
  <version>1.1.9.Final</version>
</dependency>
After getting done with the dependencies, we will now include two profiles into our configuration. A profile can basically be used to create different target environments for our goals; in our case, we will create two profiles:
- The first profile is named
arq-jbossas-managed; it will start a new JBoss AS instance and execute the test, shutting it down when done:<profile> <id>arq-jbossas-managed</id> <dependencies> <dependency> <groupId>org.jboss.as</groupId> <artifactId>jboss-as-arquillian-container-managed</artifactId> <scope>test</scope> </dependency> </dependencies> </profile> - The second profile is named
arq-jbossas-remote; it will perform testing against a remote JBoss AS instance:<profile> <id>arq-jbossas-remote</id> <dependencies> <dependency> <groupId>org.jboss.as</groupId> <artifactId>jboss-as-arquillian-container-remote</artifactId> <scope>test</scope> </dependency> </dependencies> </profile>
Once the configuration is complete, we will finally code our test. So, create a Java class named TicketTest under the package com.packtpub.as7development.chapter6.test. The first thing that you will add to our class is the following annotation that tells JUnit to use Arquillian as the test controller:
@RunWith(Arquillian.class)
public class TicketTest {
}
Arquillian then looks for a static method with the @Deployment annotation; it creates a micro deployment, including all the resources, just as you would when packaging your applications with your favorite tool:
@Deployment
public static Archive<?> createTestArchive() {


    return ShrinkWrap.create(WebArchive.class, "ticket-agency-test.war")
        .addPackage(SeatProducer.class.getPackage())
        .addPackage(Seat.class.getPackage())
        .addPackage(TicketService.class.getPackage())
        .addPackage(DataManager.class.getPackage())
        .addAsResource("META-INF/persistence.xml")
        .addAsWebInfResource(EmptyAsset.INSTANCE, "beans.xml");

  }
The fluent API provided by the
ShrinkWrap project (http://www.jboss.org/shrinkwrap) makes this technique possible using the create method, which accepts the type of deployment unit (WebArchive) as the argument the deployment name (in our case, we will name it ticket-agency-test.war) and all the resources are included in this archive. In our case, instead of including all the single classes, we are using the addPackage utility method that adds all the classes that are contained in a class package (for example, by adding the Seat.class.getPackage() method, we will include all the classes that are in the same package as the Seat class):
Finally, we add one test method to it:
@javax.inject.Inject
TicketService ticketService;


@Inject
Logger log;

@Test
public void testTicketAgency () throws Exception {

  SeatType seatType = new SeatType();
  seatType.setDescription("description");
  seatType.setPrice(30);
  seatType.setQuantity(5);

  ticketService.createSeatType(seatType);
   log.info("Seat type created "+seatType.getDescription());
  assertNotNull(seatType.getId());
}
Here, the testTicketAgency method will create a new SeatType attribute using the createSeatType method
from the TicketService class. Note how we inject TicketService just as we would if we were running this code on the server side.
Our first test case is now ready. We will just need to add an Arquillian configuration file named arquillian.xml into our project, under src/test/resources:
<?xml version="1.0" encoding="UTF-8"?>

<arquillian xmlns="http://jboss.org/schema/arquillian"
  xmlns:xsi="http://www.w3.org/2001/XMLSchema-instance"
  xsi:schemaLocation="http://jboss.org/schema/arquillian
        http://jboss.org/schema/arquillian/arquillian_1_0.xsd">


  <defaultProtocol type="Servlet 3.0" />

  <container qualifier="jboss" default="true">
    <configuration>
         <property name="managementAddress">localhost</property>
         <property name="managementPort">9999</property>
    </configuration>
  </container>

</arquillian>
The defaultProtocol element forces Arquillian to use the Servlet 3.0 protocol with all containers as it is the most mature option.
Besides this, you have to set the remote management address and the management port in case the container configuration differs from the default values (in our example, we have included the default values, which are localhost and 9999, just to show their correct location in the configuration file).
Now before running the test, let's have a look at your project with all elements in the right place:

In order to score our first goal, it's highly recommended that we perform a project clean/recompilation in order to remove all the artifacts that were part of the earlier ticket-agency-jpa project (if any). Therefore, issue the following Maven goal either from your Eclipse IDE or from the command line located at the root of your project:
mvn clean install
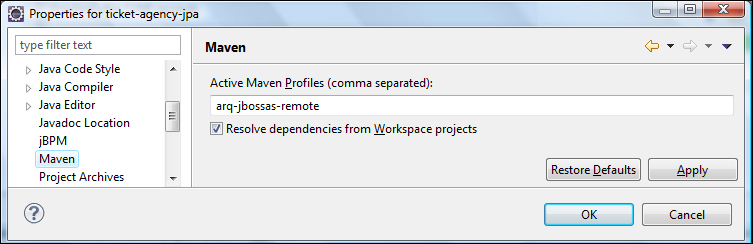
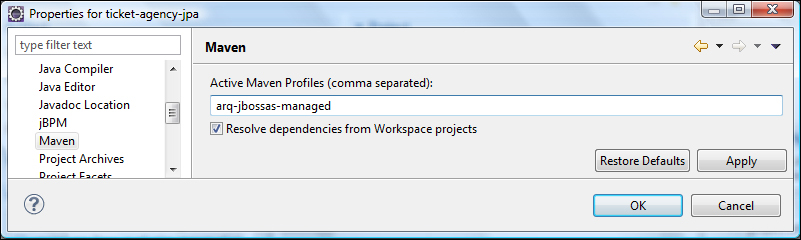
Next, we need to choose whether we want to use the remote Arquillian profile (that will be run against an existing JBoss AS 7 instance) or whether we want to start a new JBoss AS 7 instance with the managed profile. My guess is that you already have a JBoss application server running, so navigate to the project properties and select the Maven property. In the Active Maven Profiles field, enter arq-jbossas-remote, which we declared earlier in the pom.xml file:
Now all you have to do is right-click on your TicketTest class and select Run As JUnit Test. The Arquillian engine will start, producing the outcome of the test in the JUnit view (you can make it appear by navigating to Menu | Window | Show View | JUnit):
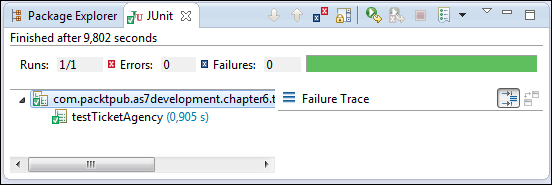
Congratulations! The JUnit console accounts for the first test that was run successfully.
Tip
Test run successful; but where is my logging?
When you run your Arquillian tests using a remote container, you may be confused as to why you are not seeing your System.out or log statements in the test output. The reason is that your test is not running in the same Java VM as the test runner. See the log or console of the JBoss application server that should contain the following statements:
17:40:14,728 INFO [com.packtpub.as7development.chapter6.test.TicketTest] (http--127.0.0.1-8080-2) Created Seat Type Balcony
When using the remote container (for example, arq-jbossas-remote), Arquillian simply needs to know that the container is running and communicates with it using management instruments.
On the other hand, you can choose to use the managed container option by setting the corresponding profile into Maven's plugin properties:
Besides this, Arquillian needs to know where JBoss AS is installed so that it can manage the lifecycle of the container using the startup script. You can configure the JBOSS HOME application into the arquillian.xml file shown as follows:
<?xml version="1.0" encoding="UTF-8"?>

<arquillian xmlns="http://jboss.org/schema/arquillian"
  xmlns:xsi="http://www.w3.org/2001/XMLSchema-instance"
  xsi:schemaLocation="http://jboss.org/schema/arquillian
        http://jboss.org/schema/arquillian/arquillian_1_0.xsd">


  <defaultProtocol type="Servlet 3.0" />

  <container qualifier="jboss" default="true">
    <configuration>

      <property name="jbossHome">C:jboss-as-7.1.1.Final</property>
    </configuration>
  </container>

</arquillian>
That's all. Now your test will kick-start a JBoss AS 7 instance before deploying the application on it. This JBoss AS 7 node will be shut down as soon as the test is complete.
You might have noticed that we have, on purpose, created just a part of the integration tests we needed. We did not reach the last mile, that is, creating seats and reserving one. As a matter of fact, if you remember, our ticket application uses ConversationScope to track the user's navigation. Thus, we need to bind ConversationScope into our test as well.
Luckily, the weld container provides all that you need with org.jboss.weld.context.bound.BoundConversationContext that needs to be injected into your test class:
@Inject BoundConversationContext conversationContext;

@Before
public void init() {
      conversationContext.associate(
      new MutableBoundRequest(new HashMap<String, Object>(),
                              new HashMap<String, Object>()));
      conversationContext.activate();
}
Note
Note that the @Before annotation is invoked before each test method and after injections have occurred. In our case, it is used to associate conversationContext with MutableBoundRequest before being activated by conversationContext.activate. This is needed to mimic the conversation behavior from within the Arquillian test bed.
Just for completeness, you must be aware that BoundRequest interfaces are defined into the weld API to hold a conversation that spans multiple requests, but are shorter than a session.
So here's the full TicketTest class that also contains the Theatre creation and a booking seat reservation in the testTicketAgency method:
@RunWith(Arquillian.class)
public class TicketTest {
@Inject BoundConversationContext conversationContext;
@Before
public void init() {
conversationContext.associate(
new MutableBoundRequest(new HashMap<String, Object>(),
new HashMap<String, Object>()));
conversationContext.activate();
}
@Deployment
public static Archive<?> createTestArchive() {
return ShrinkWrap.create(WebArchive.class, "ticket.war")
.addPackage(SeatProducer.class.getPackage())
.addPackage(Seat.class.getPackage())
.addPackage(TicketService.class.getPackage())
.addPackage(DataManager.class.getPackage())
.addAsResource("META-INF/persistence.xml")
.addAsWebInfResource(EmptyAsset.INSTANCE, "beans.xml");
}
@Inject
TicketService ticketService;
@Inject
BookerService bookerService;
@Inject
Logger log;
@Test
public void testTicketAgency () throws Exception {
SeatType seatType = new SeatType();
seatType.setDescription("Balcony");
seatType.setPrice(20);
seatType.setQuantity(5);
ticketService.createSeatType(seatType);
log.info("Created Seat Type");
assertNotNull(seatType.getId());
List<SeatType> listSeats = new ArrayList();
listSeats.add(seatType);
ticketService.createTheatre(listSeats);
log.info("Created Theatre");
log.info(seatType.getDescription() + " was persisted with id " + seatType.getId());
bookerService.bookSeat(new Long(seatType.getId()), seatType.getPrice());
log.info("Created Theatre");
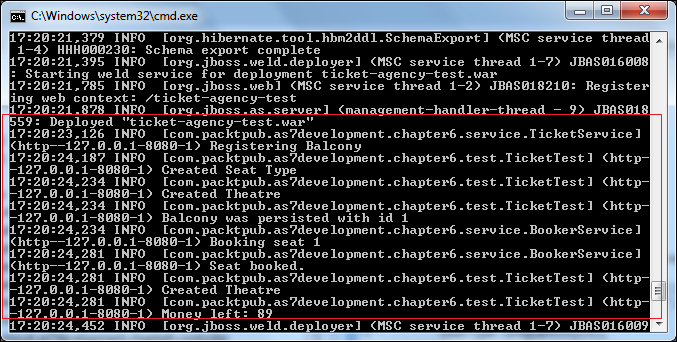
log.info("Money left: " +bookerService.getMoney());
assertTrue(bookerService.getMoney() <100);
}
}The expected output of the application server console should be pretty much like the following screenshot:
The Arquillian project is an evolving framework with many other interesting topics. Describing all its extensions, however, is out of the scope of this book, but you can learn more about it from the online documentation that is available at http://arquillian.org/guides/.