In the earlier chapter, we discussed the Java Messaging Service API that is commonly used to develop loosely coupled applications and also to develop a common integration pattern for Java-to-Java systems. In this chapter, we will learn about web services that are defined by W3C as software systems, and are designed to support interoperable machine-to-machine interaction over a network.
What makes web services different from other forms of distributed computing is that information is exchanged using only simple and nonproprietary protocols. This means the services can communicate with each other regardless of location, platform, or programming language. Essentially, web services protocols provide a platform-independent way to perform Remote Procedure Calls (RPCs).
The focus of this chapter will be on the two chief web services standards, JAX-WS (JSR 224) and JAX-RS (JSR 311), and how they are implemented into JBoss AS 7. As you can imagine, there is a lot of ground to cover, so we will quickly get our hands dirty with the following topics:
- A short introduction to SOAP web services
- Creating, deploying, and testing web services using the JBoss JAX-WS implementation (Apache CXF)
- A quick overview of REST web services
- How to create, deploy, and test RESTful services using the JBoss JAX-RS implementation (RESTEasy)
As stated, web services are based on the exchange of messages using nonproprietary protocol messages. The messages themselves are not sufficient to define the web service platform. We actually need a list of standard components, including the following:
- A language used to define the interfaces provided by a web service in a manner that is not dependent on the platform on which it is running or the programming language used to implement it
- A common standard format for exchanging messages between web service providers and web service consumers
- A registry within which service definitions can be placed
The Web Service Description Language, also known as WSDL, (http://www.w3.org/TR/wsdl) is the de facto standard for providing a description of a web service contract exposed to clients. In particular, a WSDL document describes a web service in terms of the operations that it provides, and the data types that each operation requires as inputs and can return in the form of results.
Communication between the service provider and service consumer happens by means of XML messages that rely on the SOAP specification.
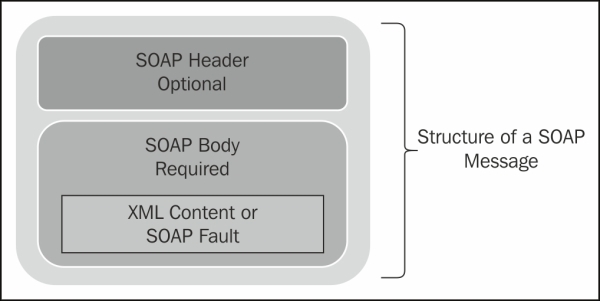
A basic SOAP message consists of an envelope that may contain any number of headers and a body. These parts are delimited by XML elements called envelope, header, and body that belong to a namespace defined by the SOAP specification. The following figure depicts the basic structure of a SOAP message:
As we have just learned, the service description is provided by a commonly-used document interface named WSDL that exposes the services as a collection of networks, endpoints, and ports, using the XML format.
You may logically be inclined to think that it is necessary to state the corresponding programming interfaces at the beginning of the contract of the service and then produce them.
Actually, you can follow two approaches for developing your SOAP web services:
- Top-down: This development strategy involves creating a web service from a WSDL file. The top-down approach is likely to be used when creating web services from scratch. It is the preferred choice of "purist" web service engineers because it's business driven, that is, the contract is defined by business people and so the software is designed to fit the web service contract.
- Bottom-up: This approach requires the WSDL file to be generated by the programming interfaces. It is likely to be used when we have existing applications that we want to expose as web services. As it does not require a deep knowledge of the WSDL syntax, it is the easiest choice if you want to turn your Java classes or EJB into web services.
As the audience of this book is composed mainly of Java developers with little or no knowledge at all of WSDL basics, we will focus primarily on the bottom-up approach.
Designing top-down web services, on the other hand, will require you to integrate the basic web services notions provided with this chapter with a comprehensive awareness of the WSDL standard.
All JAX-WS functionalities provided on top of JBoss Application Server are currently served through a proper integration of the JBoss web services stack with most of the Apache CXF project.
Apache CXF is an open source web service framework that provides an easy-to-use, standard-based programming model for developing both SOAP and REST web services. The integration layer (JBossWS-CXF in short hereafter) allows us to:
- Use standard web services APIs (including JAX-WS) on a JBoss Application Server; this is performed internally by leveraging Apache CXF, without requiring the user to deal with it
- Leverage Apache CXF's advanced native features on top of a JBoss Application Server without the need for the user to deal with all the required integration steps for running the application in such a container
Therefore, the focus of the next section will be developing JAX-WS web services using the built-in Apache CXF configuration. If you want to further expand your knowledge about Apache CXF's native features, you can refer to the official documentation that is available at http://cxf.apache.org/.
When a SOAP message sent by the client enters the web service runtime environment, it is captured by a component named Server endpoint listener that, in turn, uses the Dispatcher module to deliver the SOAP message to that Service.
At this point, the HTTP request is converted internally into a SOAP Message. The message content is extracted from the transport protocol and is processed through the handler chain configured for the web service.
SOAP message handlers are used to intercept SOAP messages as they make their way from the client to the endpoint service and vice versa. These handlers intercept SOAP messages for both the request and response of the web service.
The next step is unmarshalling the SOAP message into Java objects. This process is governed by WSDL to Java Mapping and XML to Java Mapping. The former is performed by the JAX-WS engine, and it determines which endpoint to invoke from the SOAP message. The latter, performed by the JAXB libraries, deserializes the SOAP message so that it is ready to invoke the endpoint method.
Finally, the deserialized SOAP message reaches the actual web service implementation and the method is invoked.
Once the call is completed, the process is reversed. The return value from the web service method is marshalled into a SOAP response message using JAX-WS WSDL to Java mapping and JAXB 2.0 XML to Java mapping.
Note
The Java Architecture for XML Binding (JAXB) provides a fast and convenient way to bind XML schemas and Java representations, making it easy for Java developers to incorporate XML data and process functions in Java applications. As part of this process, JAXB provides methods for unmarshalling XML instance documents into Java content trees, and then marshalling Java content trees back into XML instance documents. JAXB also provides a way to generate XML schema from Java objects.
Then, the outbound message is processed by handlers before returning it to the dispatcher and endpoint listener that will transmit the message as an HTTP response.
The following diagram describes how data flows from a web service client to a web service endpoint and back:

In the first deliverable, we will show how easily you can turn a plain Java class into a web service. The newly created Service will be then tested using a simple Eclipse-based testing GUI. The second part of this section will draw your attention to how EJBs can be exposed as web service endpoints by enhancing your Ticket application with a web service.
We will start developing web services, using a Maven project named ticket-agency-ws as a template based on the webapp-javaee6 archetype and com.packtpub.as7development.chapter8 base package.
Our first class will not be related to our Ticket application, but it will just demonstrate how to create a web service from a POJO class named POJOWebService. This class has a method named calculatePower that returns the power of an argument as shown in the following highlighted code:
package com.packtpub.as7development.chapter8.webservice;

public class POJOWebService
{
    public double calculatePower(double argument,
    double power)
    {
       return Math.pow(argument,power);
    }
}
Now we will turn this simple class into a web service by adding the mandatory @WebService annotation.
package com.packtpub.as7development.chapter8.webservice;
import javax.jws.WebMethod;
import javax.jws.WebParam;
import javax.jws.WebResult;
import javax.jws.WebService;
import javax.jws.soap.SOAPBinding;
import javax.servlet.annotation.*;

@WebService(targetNamespace = "http://www.packtpub.com/",
serviceName = "CalculatePowerService")
@SOAPBinding(style = SOAPBinding.Style.RPC)
@WebServlet(name="POJOService", urlPatterns={"/pojoService"} )
public class POJOWebService
{

  @WebMethod
  @WebResult(name="result")  [1]
  public double calculatePower(@WebParam(name="base") [2]double base,@WebParam(name="exponent")double exponent {
              return Math.pow(base,exponent);
  }
}
Inside the @WebService annotation, you can specify additional elements, such as the targetNamespace element, that declares the namespace used for the WSDL elements generated by the web service. If you don't specify this element, the web service container will use the Java package name to generate a default XML namespace.
You can also use the serviceName element to specify the Service name. The name specified using serviceName is used for generating the name attribute in the Service element in the WSDL interface. If you don't specify the serviceName element, the server will generate it using the default, which is the bean class name appended with the Service.
In the next row, we have stated that the web service is of the type Remote Procedure Call using the
@javax.jws.SOAPBinding annotation. The possible values are DOCUMENT and RPC, the first one being the default value.
Note
The choice between the RPC and Document style boils down to the different ways we can construct Services using these two styles. The body of an RPC-style SOAP message is constructed in a specific way, which is defined in the SOAP standard. This is built around the assumption that you want to call the web service just like you would call a normal function or method that is part of your application code.
Therefore, the RPC is more tightly coupled because if you make any changes in the message structure, you'll need to change all the clients and servers processing that kind of message.
A document-style web service, on the other hand, contains no restrictions for how the SOAP body must be constructed. It allows you to include whatever XML data you want and also to include a schema for this XML. Therefore, the Document style is probably more flexible, but the effort for implementing the web service and clients may be slightly larger.
In the end, the likeliness of change is a factor that one has to consider when choosing whether to use either RPC- or Document-style web services.
Attaching the @WebMethod attribute to a public method indicates that you want the method exposed as part of the web service.
The
@WebParam annotation is used to specify the parameter's name that needs to be exhibited in the WSDL. You should always consider using a WebParam annotation, especially when using multiple parameters, else the WSDL will use the default argument parameter (in this case arg0), which is meaningless for web service consumers.
The @WebResult annotation is quite similar to @WebParam in the sense that it can be used to specify the name of the value returned by the WSDL.
Your web service is now complete. In order to deploy your web service, run the following Maven goal that will package and deploy your web service to your running JBoss AS 7 instance.
mvn install jboss-as:deploy
JBoss AS will provide a minimal output on the console; this will inform you that the web service project has been deployed and the WSDL file has been generated:
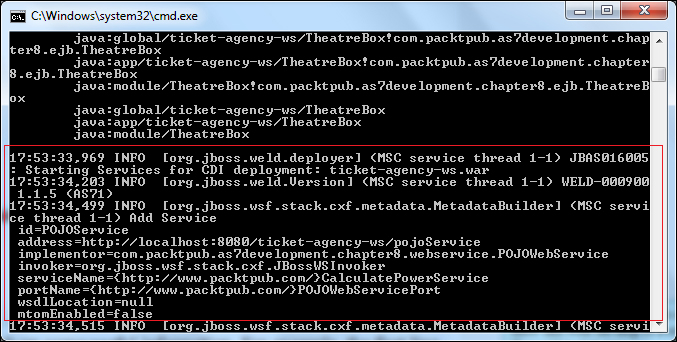
From the short log shown in the previous screenshot, you can pick up some useful information. For example, the first line states that the web service has been bound in the endpoint registry as POJOService. Next is the information about the web context path that, by default, has the same name as your project, that is, ticket-agency-ws. The last piece of information is about the web service address that is http://localhost:8080/ticket-agency-ws/pojoService. By appending the ?wsdl suffix at the end of the address, you can inspect the web service contract.
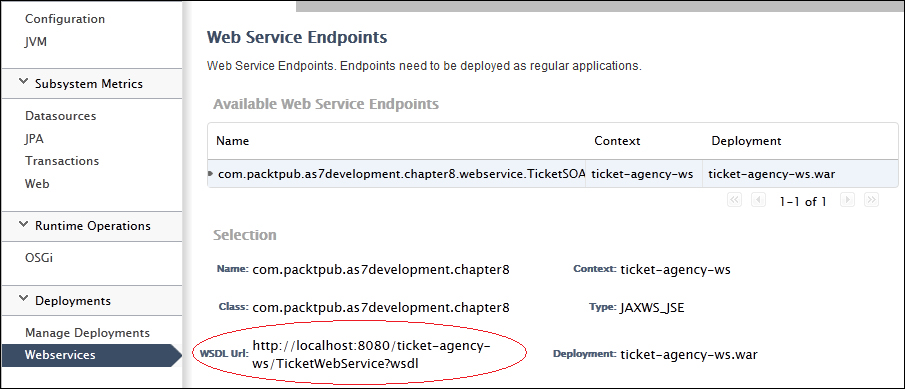
You can inspect the web services subsystem by moving to the web admin console and navigating to Runtime | Deployments | Web Services.
Here, you can gather some useful information about the services deployed. In fact, its most useful option is the list of endpoint contracts available that is needed when developing our clients. The following screenshot shows a view of the web service endpoints from the console:
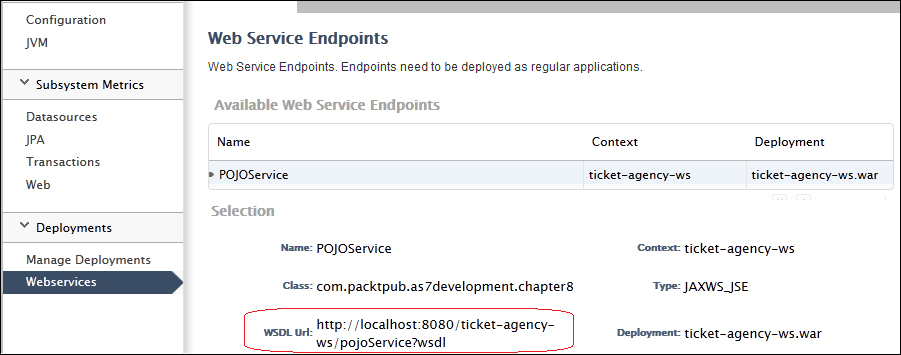
Particularly in the lower part of the screen, you can read the web service endpoint address that bears the web application context name and the registered name for the web service. In our case, it is http://localhost:8080/ticket-agency-ws/pojoService?wsdl.
Since our first web service is not yet connected with our Ticketing System, we will use an external client application to test our web service. One of my favorite tools for testing web services is soapUI.
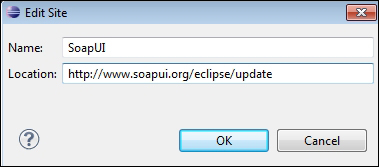
SoapUI is a free, open source, cross-platform functional testing solution with an easy-to-use graphical interface and enterprise-class features. This tool allows you to easily and rapidly create and execute automated, functional, regression, compliance, and load tests. SoapUI is available as an Eclipse plugin at the site, http://www.soapui.org/eclipse/update.
Install the plugin by navigating to Help | Install New Software from the menu. Now add the previous location and install the plugin as shown in the following screenshot. Once completed, Eclipse will need restarting.
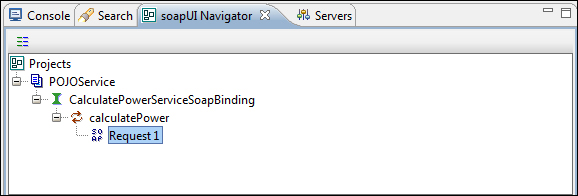
Open the soapUI perspective; then, navigate to Window | Open Perspective | Other... and select soapUI from the list. The perspective will open two views as follows:
- A soapUI Navigator view to the left containing the same navigator and details tab as the standalone soapUI version
- A soapUI Logs view at the bottom containing the same log tabs as the standalone soapUI version
Now in the soapUI Navigator view, right-click on your project and choose New soapUI Project. Fill in the next dialog with the WSDL information available on the JBoss AS server as shown in the following screenshot:

You will see that the project automatically discovers the operations exposed by the web service:
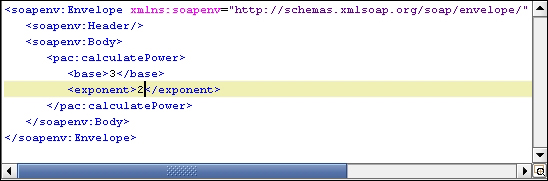
Double-click on the Request 1 tree element; the soapUI request perspective will appear, where you can enter the named parameters. Enter the two arguments for the web service as shown in the following screenshot:
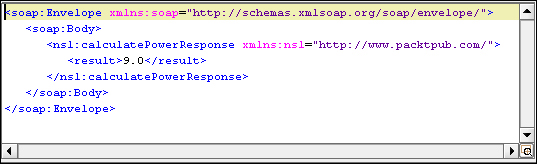
Click on the Submit button on the toolbar and check the result in the SOAP response window:
The JAX-WS programming model supports the same set of annotations on EJB3 Stateless Session Beans as on POJO endpoints. Now that we already have some web service muscle, we will engineer one of the examples introduced in this book.
Our main web service class will be named TicketSOAPService
and will use some of the core classes that we described in Chapter 3, Beginning Java EE 6 – EJBs, such as TheatreBox that will keep in memory the ticket bookings and the Seat class as the model. The business methods of our web service will be described by a Service Endpoint Interface (SEI) named TicketSOAPServiceItf.
package com.packtpub.as7development.chapter8.webservice;
import java.util.List;
import javax.jws.WebService;
import com.packtpub.as7development.chapter8.model.Seat;

@WebService
public interface TicketSOAPServiceItf {
  public  List<Seat>  getSeats();

  public boolean bookSeat(int seatId);
}
We will now implement the interface by providing the business logic to the interface methods in the TicketSOAPService class:
package com.packtpub.as7development.chapter8.webservice;

import java.io.Serializable;
import java.util.List;

import javax.inject.Inject;
import javax.jws.*;

import com.packtpub.as7development.chapter8.ejb.TheatreBox;
import com.packtpub.as7development.chapter8.exception.*;
import com.packtpub.as7development.chapter8.model.Seat;
import com.packtpub.as7development.chapter8.producer.*;

@WebService(targetNamespace = "http://www.packtpub.com/", serviceName = "TicketWebService")
public class TicketSOAPService implements TicketSOAPServiceItf, Serializable {
  @Inject TheatreBox theatreBox;
  @Inject TheatreInfoBean infoBean;

  @WebMethod
  @WebResult(name="listSeats")
  public  List<Seat>  getSeats() {
     return infoBean.getSeats();
  }

  @WebMethod
  public boolean bookSeat(@WebParam(name="seatId") int seatId) {
    try {
         theatreBox.buyTicket(seatId);
         return true;
    } catch (SeatBookedException e) {
         System.out.println("Error! "+e.getException());
         return false;

    }

  }
}
As you can see, the implementation class contains the getSeats method that returns the list of seats that are self generated when the InfoBean object is initialized. The bookSeat method will be able to book seats for your web service clients as well.
Now deploy your web service and verify on the Console that it has been correctly registered:
The web service consumer of the TicketSOAPService class will be coded using the Apache CXF utility classes; we will use a factory class named JaxWsProxyFactoryBean
that, as the name suggests, can be used to create proxies for your JAX-WS interfaces. This factory is peculiar to Apache CXF, however it provides a greater control over your web services in terms of logging and debugging.
Right, now add a class named TicketWebServiceIT to your project in the package com.packtpub.as7development.chapter8.test:
package com.packtpub.as7development.chapter8.test;

import static org.junit.Assert.*;

import java.util.List;

import javax.xml.ws.BindingProvider;
import org.apache.cxf.interceptor.*;

import org.apache.cxf.jaxws.JaxWsProxyFactoryBean;
import org.junit.Test;

import com.packtpub.as7development.chapter8.model.Seat;
import com.packtpub.as7development.chapter8.webservice.*;


public class TicketWebServiceIT {

  @Test
  public void testSOAP() {

        JaxWsProxyFactoryBean factory = new JaxWsProxyFactoryBean();
        factory.setServiceClass(TicketSOAPServiceItf.class);
        factory.setAddress("http://localhost:8080/ticket-agency-ws/TicketWebService?wsdl");
        factory.getInInterceptors().add(new LoggingInInterceptor());
        factory.getOutInterceptors().add(new LoggingOutInterceptor());

        TicketSOAPServiceItf infoService = (TicketSOAPServiceItf) factory.create();
        System.out.println("Got the Service: "+infoService);

        infoService.bookSeat(1);

        List<Seat>  list = infoService.getSeats();

        dumpSeatList(list);

        assertTrue(list.size() > 0);
        assertTrue(list.get(1).isBooked());


  }
}
As you can see, the native Apache CXF client is pretty short in code and requires just one class named JaxWsProxyFactoryBean to get instantiated. This class handles the hard job of binding the SEI to a local proxy using the setProxyClass method. In order to read the web service contract, you need to provide the WSDL location (in our example, it is http://localhost:8080/ticket-agency-ws/TicketWebService?wsdl) using the setAddress method.
Optionally, you can bind a set of logging interceptors to your web service endpoint to debug your web services.
Finally, the create method of your JAX-WS factory will return a proxy to your web service that can be used for testing two basic operations: booking a seat and checking from the Seat list if the seat has actually been reserved.
In order to compile this client, you need to add the following Apache CXF dependencies to your pom.xml file:
<properties>
  <cxf.version>2.2.3</cxf.version>
</properties>

<dependency>
  <groupId>org.apache.cxf</groupId>
  <artifactId>cxf-rt-frontend-jaxws</artifactId>
  <version>${cxf.version}</version>
  <scope>provided</scope>
</dependency>
<dependency>
  <groupId>org.apache.cxf</groupId>
  <artifactId>cxf-rt-transports-http</artifactId>
  <version>${cxf.version}</version>
  <scope>provided</scope>
</dependency>
Also, since we are using JUnit for testing, we need to include the JUnit stack in the list of dependencies as well:
<dependency>
  <groupId>junit</groupId>
  <artifactId>junit</artifactId>
  <scope>test</scope>
</dependency>
Since we are building an integration test, we will use the maven-failsafe-plugin that has specifically been designed for running integration tests and decouple the failing builds if there are test failures from actually running the tests. (On the other hand, the maven-surefire-plugin we have learned of so far has been designed for running unit tests; if any of the tests fail, it will fail the build immediately.)
Here's the plugin declaration that needs to be added in the build section:
<build>
  <plugins>
    <plugin>
      <artifactId>maven-failsafe-plugin</artifactId>
      <version>2.6</version>
      <executions>
        <execution>
          <goals>
            <goal>integration-test</goal>
            <goal>verify</goal>
          </goals>
        </execution>
      </executions>
    </plugin>
  </plugins>
</build>
You can run the test on your application using the previous profile.
Now you can execute the integration test with:
mvn install jboss-as:deploy
mvn verify
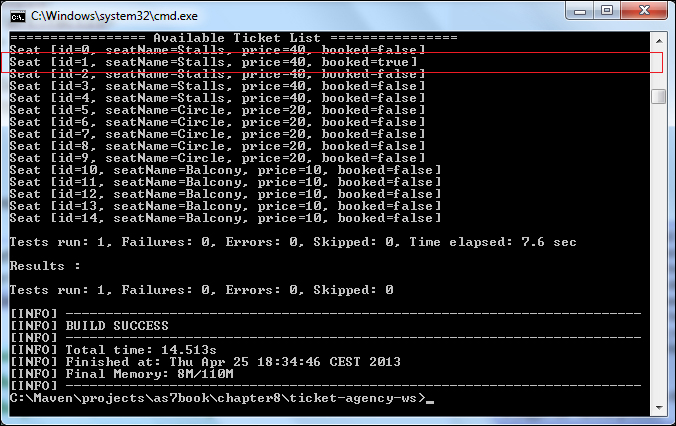
The expected output is pretty verbose since it includes all the activity that is performed behind the scenes by the Apache CXF Bus and the SOAP exchange data. The most interesting part, however, is at the bottom of the maven output where the Ticket list is dumped after booking one seat, as depicted in the following screenshot: