If you have tried starting your standalone or domain set of cluster nodes, you will be surprised that there is no information at all about clustering in your server logging. Believe it, it is not a bug, but a feature! One of the key features of JBoss AS 7 is that only a minimal set of services is started; therefore, in order to see a cluster's live demonstration, you need to deploy a cluster-aware application. In order to trigger clustering libraries in your application, you can follow two approaches:
- If your application uses Enterprise JavaBeans, you can tag it as clusterable by adding a JBoss proprietary annotation,
(@org.jboss.ejb3.annotation.Clustered), or via the EJB configuration file (jboss-ejb3.xml) - If your application includes a web application archive, you can use the portable
<distributable />element in yourweb.xmlfile. Let's see both the approaches, starting from clustering EJBs.
All that is necessary to cluster an EJB is to mark (annotate) the EJB component explicitly as clustered by adding the @org.jboss.ejb3.annotation.Clustered annotation to your EJB at the class level. You can apply this annotation on your stateless EJB, enabling load balancing over the cluster nodes for a remote client:
@Stateless
@Clustered
public class StatelessLBBean
{
public void doSomething()
{
// Do something
}
}
On the other hand, marking a stateful EJB enables, in addition to load balancing, the replication of session data between the cluster nodes:
@Stateful
@Clustered
public class StatefulHABean
{
public void doSomething()
{
// Do something
}
}
If you prefer to keep your code "neutral" from this point of view, you can use the clustered element into the jboss-ejb3.xml file, as shown in the following code snippet:
<jboss xmlns="http://www.jboss.com/xml/ns/javaee"
       xmlns:jee="http://java.sun.com/xml/ns/javaee"
       xmlns:c="urn:clustering:1.0">


    <jee:assembly-descriptor>
        <c:clustering>
            <jee:ejb-name>StatefulHABean</jee:ejb-name>
            <c:clustered>true</c:clustered>
        </c:clustering>
    </jee:assembly-descriptor>
</jboss>Clustered SFSB have built-in failover capabilities. This means that the state of the @Stateful and @Clustered EJBs are replicated across the cluster nodes so that if one of the nodes in the cluster goes down, some other node will be able to take over the invocations.
The following diagram depicts a typical exchange of information between the EJB client application and the remote EJB component:
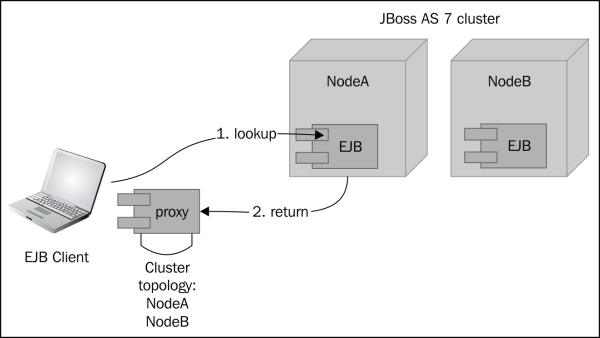
As you can see, after a successful lookup of an SFSB via JNDI, a proxy is returned to the client for subsequent method invocations.
Note
Since the EJB is clustered, it will return back a session ID and along with it the "affinity" of that session, that is, the name of the cluster to which the stateful bean belongs on the server side. This affinity will later help the EJB client to route the invocations on the proxy appropriately to a specific node in the cluster.
While this session creation request is going on, NodeA will also send back an asynchronous message that contains the cluster topology. The JBoss EJB client implementation will take note of this topology information, and will later use it for creation of connections to nodes within the cluster and routing invocations to those nodes, whenever necessary.
Now let's assume that NodeA goes down, and the client application subsequently invokes on the proxy. At this stage the JBoss EJB client implementation will be aware of the cluster topology; therefore, it knows that the cluster has two nodes: NodeA and NodeB. When the invocation now arrives, it detects that the NodeA is down; so it uses a selector to fetch a suitable node from among the cluster nodes.
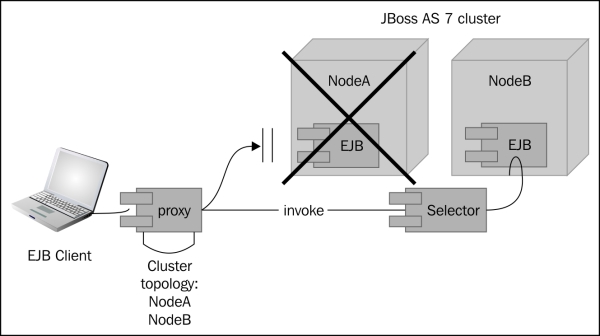
If a suitable node is found, the JBoss EJB client implementation creates a connection to that node (in our case NodeB) and creates an EJB receiver out of it. At the end of this process, the invocation has now been effectively failed over to a different node within the cluster.
In Chapter 3, Beginning Java EE 6 – EJBs, we have shown our Ticket System example, which was built around the following:
- A stateful EJB to hold the session data
- A singleton EJB to store the cache of data
- A stateless EJB to perform some business methods
Let's see how to apply the necessary changes to move our application in a cluster context.
So let's start from our stateful EJB:
@Stateful
@Remote(TheatreBooker.class)
@Clustered
public class TheatreBookerBean implements TheatreBooker {
  private static final Logger logger =
      Logger.getLogger(TheatreBookerBean.class);

  int money;
  @EJB TheatreBox theatreBox;

  @PostConstruct
  public void createCustomer() {
    this.money=100;
  }


  public String bookSeat(int seatId) throws SeatBookedException,NotEnoughMoneyException {
     // Unchanged method
  }
 }
As you can see, the only relevant change to our stateful EJB is the @org.jboss.ejb3.annotation.Clustered annotation, which is added at the class level. We can also apply this annotation in the stateless EJB, which will add load-balancing capabilities to your business methods, there by improving its scalability:
@Clustered
@Stateless
@Remote(TheatreInfo.class)
public class  TheatreInfoBean implements TheatreInfo  {
@EJB TheatreBox box;

@Override
public StringBuffer printSeatList() {
// Unchanged method

}


}
As it is, our Ticket application is ready to be deployed in a cluster; however, there's a last pitfall. As a matter of fact, the singleton EJB used to hold the cache of seat will be instantiated once in each JVM of the cluster. This means that if there's a server failure, the data in the cache will be lost and a new one (unsynchronized) will be used.
There are several alternatives to set up a cache in a clustered environment:
- Use a JBoss proprietary solution that is deploying a clustered version of
SingletonService, which exposes an HA-singleton oforg.jboss.msc.service.Service(An example of this approach is contained in the JBoss quickstart demo at https://github.com/jboss-jdf/jboss-as-quickstart/tree/master/cluster-ha-singleton) - Move your cache to a persistent storage, which means using JPA to store and read data from the cache (See Chapter 5, Combining Persistence with CDI, which includes a JPA-based example of our application)
- Use a distributed data cache such as Infinispan to store our data, providing a failover and data consistency to your cache
Showing all possible solution implementations would, however, make this section excessively long; therefore, we will illustrate how to pursue the last option, which can provide a good architectural pattern with the least amount of effort.
Infinispan is a distributed data grid platform that exposes a JSR-107-compatible cache interface in which you can store data and enhance it by providing additional APIs and features (such as transactional cache, data eviction and expiration, asynchronous operations on the cache, and more). Its primary interface is javax.cache.Cache, which is similar to the Java SE java.util.ConcurrentMap, with some modifications for distributed environments. In particular, it adds the ability to register, deregister, and list event listeners, and it defines a CacheLoader interface for loading/storing cached data. Cache instances can be retrieved using an appropriate CacheManager, which represents a collection of caches.
So here's our singleton TheatreBox class rewritten using the Infinispan API:
@Singleton
@Startup
public class TheatreBox {
  @Resource(lookup="java:jboss/infinispan/container/cluster")
  private org.infinispan.manager.CacheContainer container;
  private org.infinispan.Cache<Integer, Seat> cache;
  private static final Logger logger =
      Logger.getLogger(TheatreBox.class);
  @PostConstruct  public void start() {
     try {
         cache = container.getCache();
         logger.info("Got Infinispan cache");
            setupTheatre();
        } catch ( Exception e) {
              logger.info("Error! "+e.getMessage());


        }

      }
  public void setupTheatre(){

    int id = 0;
    for (int i=0;i<5;i++) {
      int cacheid=++id;
      Seat seat = new Seat(cacheid,"Stalls",40);
      cache.put(new Integer(cacheid), seat);
    }
    for (int i=0;i<5;i++) {
      int cacheid=++id;
      Seat seat = new Seat(cacheid,"Circle",20);
      cache.put(new Integer(cacheid), seat);
    }
    for (int i=0;i<5;i++) {
      int cacheid=++id;
      Seat seat = new Seat(cacheid,"Balcony",10);
      cache.put(new Integer(cacheid), seat);
    }
    logger.info("Seat Map constructed.");

  }
  public List<Seat> getSeatList() {
    List<Seat> dataList = new ArrayList<Seat>();
    dataList.addAll(cache.values());
    return dataList;
  }

  public Seat getSeat(int seatId) {
    return cache.get(seatId);
  }

  public void buyTicket(int seatId )     {
    Seat seat = cache.get(seatId);
    seat.setBooked(true);
    cache.put(seatId,seat);
  }
}

public Seat getSeat(int seatId) {

   return cache.get(seatId);
}


public void buyTicket(int seatId )     {

   Seat seat = cache.get(seatId);
   seat.setBooked(true);
   cache.put(seatId,seat);

}

}
The first thing we want to stress is the @Resource annotation, which injects a org.infinispan.manager.CacheContainer instance; when the JBoss AS deployer encounters this annotation, your application will include a dependency on the requested cache container. Consequently, the cache container will automatically start deploying and stop (including all caches) undeploying of your application.
Note
Please notice that the @Resource annotation bears a lookup attribute, which is not included in the default JDK implementation of the @javax.annotation.Resource annotation. In order to solve this issue and avoid a compilation problem, you need to copy the JAR file jboss-annotations-api_1.X_spec-1.X.X.Final.jar (contained in JBOSS_HOME/modules/javax/annotation/api/main) into JAVA_HOME/jre/lib/endorsed of your JDK distribution. As an alternative, you can pass -Djava.endorsed.dirs to the JVM parameters, indicating the folder where the JBoss API is located.
Subsequently, when the EJB is instantiated (see the method start, which is annotated as @PostConstruct), org.infinispan.Cache is created using CacheContainer as a factory. This cache will be used to store our highly available set of data.
The operations performed against the distributed cache are quite intuitive: the put method is used to store instances of the Seat object in the cache and the corresponding get method is used to retrieve elements from it, just what you would do from an ordinary hashtable.
As far as application deployment is concerned, you need to state a dependency to the Infinispan API explicitly, which is not included as an implicit dependency in the AS 7 class loading policy. This is most easily done by adding the following line to your application's META-INF/MANIFEST.MF:
Dependencies: org.infinispan export
The remote EJB client will not need any particular change in order to be able to achieve high availability. We have added a pressAKey method between each ticket transaction so that you will be able to shut down the application server that is pinned to our EJB client, and thus test failover on the other server node:
private static void testRemoteEJB() throws NamingException {


    final TheatreInfo theatreInfo = lookupTheatreInfoEJB();
    final TheatreBooker theatreBook = lookupTheatreBookerEJB();

    try {
      String retVal = theatreBook.bookSeat(5);
      logger.info(retVal);
      logger.info(theatreInfo.printSeatList().toString());
    }

    catch ( Exception e) {
      logger.info(e.getMessage());
    }
    logger.info("Press [Enter] to continue");
      // Await for key press. Not included for brevity
    pressAKey();

    try {
      String retVal = theatreBook.bookSeat(7);
      logger.info(retVal);
      logger.info(theatreInfo.printSeatList().toString());
    }

    catch ( Exception e) {
      logger.info(e.getMessage());
    }
}
Now that we are done with the client, our last effort would be deploying a jboss-ejb-client.properties file, which will contain the list of servers that will be initially contacted (via remoting) by our client application:
remote.connectionprovider.create.options.org.xnio.Options.SSL_ENABLED=false
remote.connections=node1,node2
remote.connection.node1.host=localhost
remote.connection.node1.port = 4447
remote.connection.node1.connect.options.org.xnio.Options.SASL_POLICY_NOANONYMOUS=false

remote.connection.node2.host=localhost
remote.connection.node2.port = 4647
remote.connection.node2.connect.options.org.xnio.Options.SASL_POLICY_NOANONYMOUS=false
As you can see from this file, we assume that you are running a two-node cluster on the localhost address, the first one running the default port settings and the second one using an offset of 200 (just as shown in the second paragraph of the Starting a cluster of standalone nodes section).
Replace the remote.connection.nodeX.host variable value with the actual IP or host if you are running your server nodes on different machines from your client.
Deploying an application to a cluster can be achieved in several ways; if you prefer automation instead of copying each archive into the deployments folder, you can re-use the CLI deployment script contained in the earlier chapter.
Alternatively, if you are using JBoss'Maven plugin to deploy, you can parameterize its configuration, including the hostname and the port as variables, which will be passed to the command line:
<plugin>
      <groupId>org.jboss.as.plugins</groupId>
      <artifactId>jboss-as-maven-plugin</artifactId>
      <version>${version.org.jboss.as.plugins.maven.plugin}</version>
      <configuration>
          <filename>${project.build.finalName}.jar</filename>
          <hostname>${hostname}</hostname>
          <port>${port}</port>
      </configuration>
</plugin>
Therefore, you will use the following shell to compile the package and deploy the application on the first node:
mvn install jboss-as:deploy –Dhostname=localhost –Dport=9999
For the second node, you will use the following:
mvn install jboss-as:deploy –Dhostname=localhost –Dport=10199
Note
Deploying in the domain node works the same as in the preceding example, except that you need to add the domain tag in your configuration, and you also need to specify at least one server group. Visit https://docs.jboss.org/jbossas/7/plugins/maven/latest/examples/deployment-example.html for more information about it.
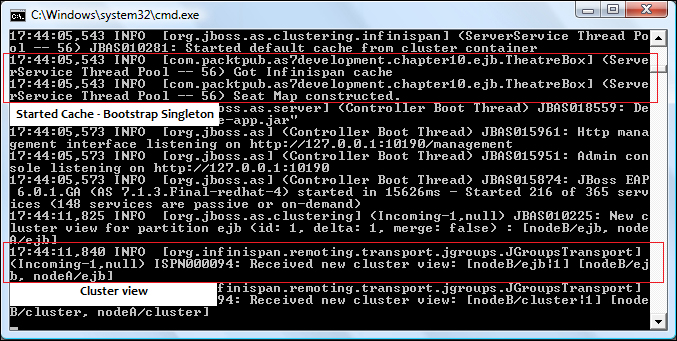
Once you have deployed both applications on your server node, you should be able to see the cluster view in the server console logs, and also see that the Infinispan cache has been started. The following is the expected log for the first node:
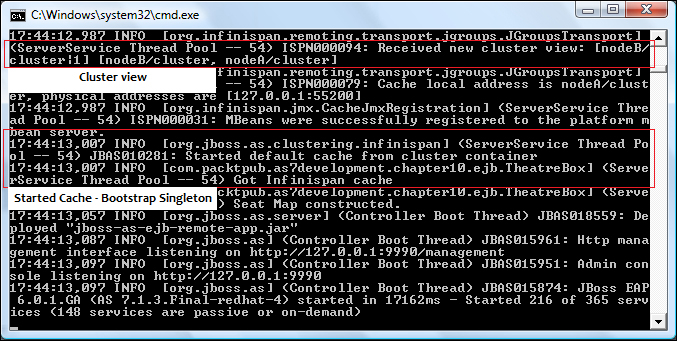
The following is the corresponding log for the second node, which is bound to the same server address (localhost) with a port offset of 200:
Before launching your application, update Maven's exec plugin information, which should now reference our remote EJB client application, as shown in the highlighted section of the following code snippet:
<plugin>
   <groupId>org.codehaus.mojo</groupId>
   <artifactId>exec-maven-plugin</artifactId>
   <version>${version.exec.plugin}</version>
   <executions>
     <execution>
         <goals>
            <goal>exec</goal>
         </goals>
     </execution>
   </executions>
   <configuration>
     <executable>java</executable>
     <workingDirectory>${project.build.directory}/exec-working-directory</workingDirectory>
     <arguments>
       <argument>-classpath</argument>
       <classpath>
       </classpath>
       <argument>com.packtpub.as7development.chapter10.client.RemoteEJBClient</argument>
     </arguments>
   </configuration>
</plugin>
You can run it using the following command:
mvn exec:exec
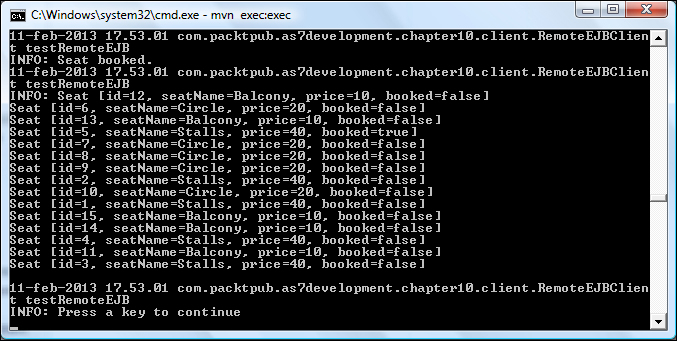
The first part of the client will show the evidence that we have successfully completed the first transaction. On the client console, you will see the return value from the booking transaction and the Seat list:
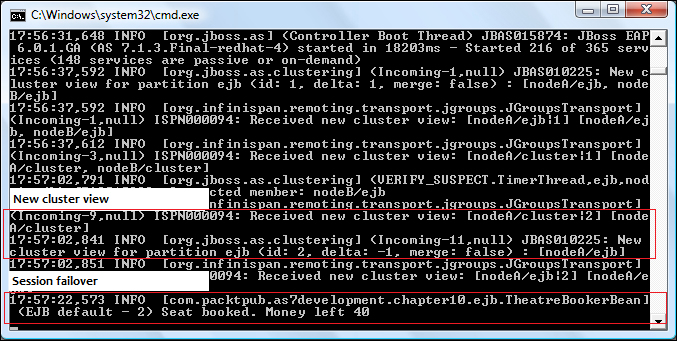
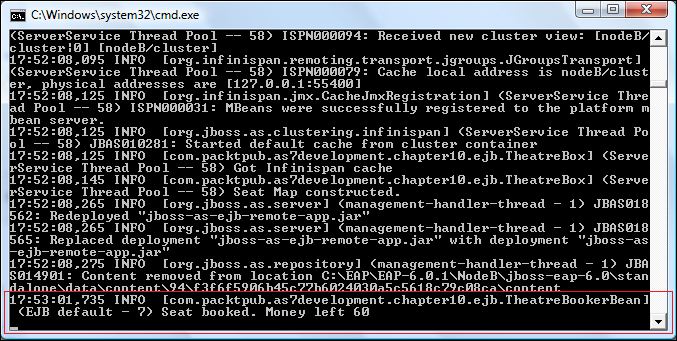
The following screenshot shows the server node where our EJB client landed:
Now shut down the preceding server node (Ctrl + C would suffice if you are starting it as a foreground process), and press Enter (or Return in Mac) on the client application.
As you can see from the following screenshot, you should see that the session continues to run on the survivor node and correctly displays the session values (the money left). Your client window should also display the updated cache information.