If you were to create a mission-critical application with just the bare concepts we have learned until now, you are not guaranteed to be shielded from all security threats. For example, if you need to design a payment gateway, where the credit card information is transmitted by means of an EJB or servlet, using just the authorization and authentication stack is really not enough, as the sensitive information is still sent across a network and it could be disclosed by an hacker.
In order to prevent disclosure of critical information to unauthorized individuals or systems, you have to use a protocol that provides encryption of the information. Encryption is the conversion of data into a form that cannot be understood by unauthorized people. Conversely, decryption is the process of converting encrypted data back into its original form so that it can be understood.
The protocols used to secure the communication are SSL and TLS, the latter being considered a replacement for the older SSL.
Tip
The differences between the two protocols are minor and very technical. In short, TLS uses stronger encryption algorithms and has the ability to work on different ports. For the rest of this chapter, we will refer to SSL for both protocols. Check Wikipedia for more information on it: http://en.wikipedia.org/wiki/Transport_Layer_Security.
There are two basic techniques for encrypting information: symmetric encryption (also called secret-key encryption) and asymmetric encryption (also called public-key encryption.)
Symmetric encryption is the oldest and best-known technique. It is based on a secret key, which is applied to the text of a message to change the content in a particular way. As long as both sender and recipient know the secret key, they can encrypt and decrypt all messages that use this key. These encryption algorithms typically work fast and are well suited for encrypting blocks of messages at once.
One significant issue with symmetric algorithms is the requirement of a safe administrative organization to distribute keys to users. This generally results in more overhead from the administrative aspect while the keys remain vulnerable to unauthorized disclosure and potential abuse.
For this reason, a mission-critical enterprise system usually relies on the asymmetric encryption algorithms, which tend to be easier to employ, manage, and are ultimately more secure.
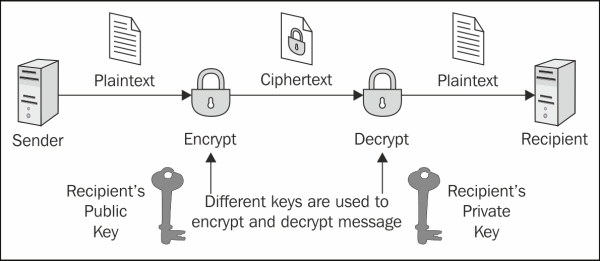
Asymmetric cryptography , also known as public-key cryptography , is based on the concept that the key used to encrypt is not the same as the key that is used to decrypt the message. In practice, each user holds a couple of keys: the public key that is distributed to other parties and the private key that is kept as secret. Each message is encrypted with the recipient's public key and can only be decrypted (by the recipient) with his private key:
Using asymmetric encryption, you can be sure that your message cannot be disclosed by a third party. However, there is still one vulnerability.
Suppose you want to exchange some valuable information with a business partner and to that end are requesting his public key by telephone or by email. A fraudulent user intercepts your email or simply listens to your conversation and quickly sends you a fake mail with his public key. Now, even if your data transmission will be secured, it will be directed to the wrong person!
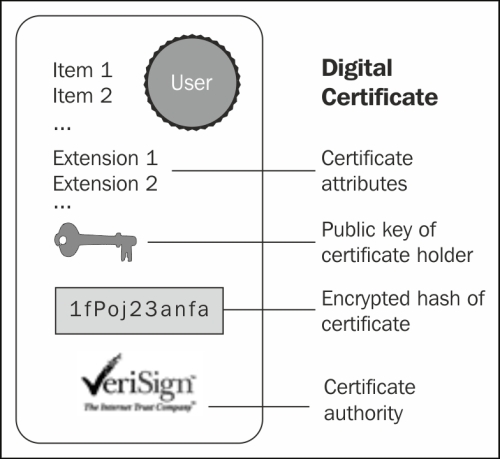
In order to solve this issue, we need a document that verifies that the public key belongs to a particular individual. This document is called a digital certificate or public key certificate. A digital certificate consists of a formatted block of data that contains the name of the certificate holder (which may be either a user or a system name) and the holder's public key, along with the digital signature of a Certification Authority (CA) for authentication. The certification authority attests that the sender's name is the one associated with the public key in the document:
Public key certificates are commonly used for secure interaction with websites. By default, the web browser ships with a set of predefined CAs; they are used to verify that the public certificate served to a browser when you enter a secure site has actually been issued by the owner of the website. In short, if you connect your browser to https://www.abc.com and your browser doesn't give any certificate warning, you can safely interact with the entity in charge of the site. That is, unless the site or your browser has been hacked. But this is another story.
Tip
Simple authentication and client authentication
In the previous example, we have depicted a simple authentication (also called server authentication). In this scenario, the only party that needs to prove its identity is the server.
SSL however, is able to perform mutual authentication (also called client or two-way authentication); here too the server requests a client certificate during the SSL handshake over the network.
Client authentication requires a client certificate in x.509 format from a CA. The x.509 format is an industry-standard format for SSL certificates. In the next section, we will explore which tools are available to generate digital certificates and how to get your certificates signed by a CA.
The JBoss AS uses the Java Secure Socket Extension (JSSE), which is bundled in the J2SE to leverage the SSL/TLS communication.
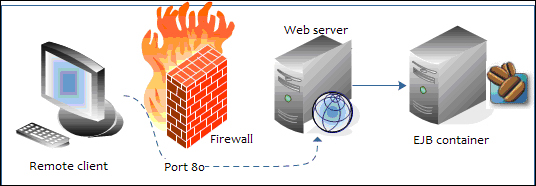
An Enterprise application can be secured at two different locations: the HTTP level for web applications and the RMI level for applications using EJB. HTTP communication is handled by the web subsystem within the standalone.xml/domain.xml file. Securing the RMI transport is, on the other hand, not always a compelling requirement of your applications. Actually, in most production environments, JBoss AS is placed behind a firewall.
As you can see from the following diagram, this implies that your EJBs are not directly exposed to untrusted networks, which usually connect through the web server placed in a demilitarized zone:
In order to get started with the JBoss AS and SSL, we need a tool that generates a public/private key pair in the form of an X509 certificate for use by the SSL server sockets. This is covered in the next section.
One tool that can be used to set up a digital certificate is keytool , a key and certificate management utility that ships with the Java SE. It enables users to administer their own public/private key pairs and associated certificates for use in self-authentication (where the user authenticates himself or herself to other users or services) or data integrity and authentication services, using digital signatures. It also allows users to cache the public keys (in the form of certificates) of their communicating peers.
The keytool stores the keys and certificates in a file termed keystore, a repository of certificates used for identifying a client or server. Typically, a keystore contains one client or server's identity, which is protected by a password. Let's see an example of keystore generation:
keytool -genkey -keystore jboss.keystore -storepass mypassword -keypass mypassword -keyalg RSA -validity 180 -alias as7alias -dname "cn=Francesco Marchioni,o=PackPub,c=GB"
This command creates the keystore named jboss.keystore in the working directory, and assigns it the password mypassword. It generates a public/private key pair for the entity whose unique name has the common name Francesco Marchioni, organization PacktPub, and two-letter country code GB.
The result of this action will be a self-signed certificate (using the RSA signature algorithm) that includes the public key and the unique name's information. This certificate will be valid for 180 days, and is associated with the private key in a keystore entry referred to by the alias as7alias.
Now let's see how you can use this keystore file to secure your JBoss web channel. Open your server configuration file and locate the web subsystem.
Within the web subsystem, you have to first change the default schema and socket-binding to "https" and add the secure element to it. Next, you have to insert an ssl stanza within it, which contains the details of your keystore object (in our example, we have dropped the file jboss.keystore into the server configuration directory):
<subsystem xmlns="urn:jboss:domain:web:1.1" default-virtual-server="default-host" native="false">
 <connector name="http" protocol="HTTP/1.1" scheme="https" socket-binding="https" secure="true">

   <ssl key-alias="as7alias" password="mypassword" certificate-key-file="${jboss.server.config.dir}/jboss.keystore"
  cipher-suite="ALL" protocol="TLS"/>
 </connector>
             . . . . . .
</subsystem>
You have to restart the JBoss AS to activate the changes. You should see the following log at the bottom of your console, which informs you about the new HTTPS channel running on port 8443.
INFO [org.apache.coyote.http11.Http11Protocol] (MSC service thread 1-4) Starting Coyote HTTP/1.1 on http--127.0.0.1-8443:
The following screen is what will be displayed by the Internet Explorer browser (the same kind of error message, with a different format, will be displayed by other browsers such as Firefox and Google Chrome) if you try to access the Ticket example using the secured channel (for example, https://localhost:8443/ticket-agency-cdi):
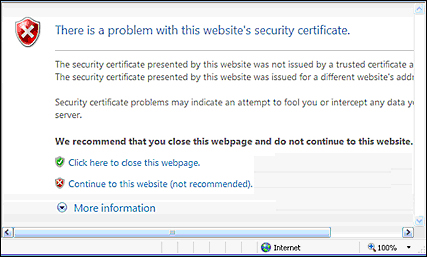
What happened? Once you have established a secure connection with the web server, the server certificate has been sent to the browser. Since the certificate has not been signed by any recognized CA, the browser security sandbox warns the user about the potential security threat.
This is an in-house test so we can safely proceed by choosing Continue to this website. That's all you need to do in order to activate the Secure Socket Layer with a self-signed certificate.
Having your certificate signed requires a certificate-signing request (CSR) to be issued to a CA, which will return a signed certificate to be installed on your server. This implies a cost for your organization, which depends on how many certificates you are requesting, the encryption strength, and other factors.
Firstly, generate a CSR using the newly created keystore and keyentry:
keytool -certreq -keystore jboss.keystore -alias as7alias -storepass mypassword -keypass mypassword -keyalg RSA -file certreq.csr
This will create a new certificate request named certreq.csr, bearing the following format:
-----BEGIN NEW CERTIFICATE REQUEST-----
. . . . . .
-----END NEW CERTIFICATE REQUEST-----
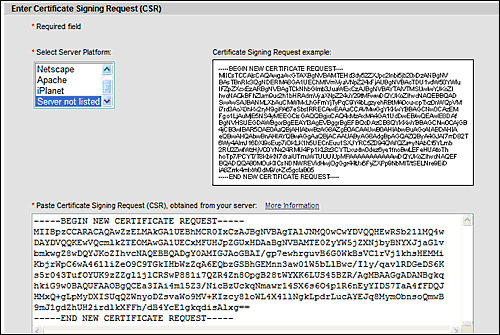
The previous certificate needs to be transmitted to the CA. For example, supposing you have chosen Verisign as the CA, the following is a screenshot of the request:
At the end of the enrollment phase, the CA will return a signed certificate that needs to be imported into your keychain. The following code assumes you have saved your CA certificate in a file named signed_ca.txt:
keytool -import -keystore jboss.keystore -alias testkey1 -storepass mypassword -keypass mypassword -file signed_ca.txt
Now your web browser will recognize your new certificate as being signed by a CA, so it won't complain about not being able to validate the certificate.
EJB clients interact with the Enterprise EJB tier using the RMI-IIOP protocol. The RMI-IIOP protocol has been developed by Sun to combine the RMI programming model with the IIOP underlying transport.
Securing the EJB transport is required for applications having strict secure policies, which cannot be carried out using clear-text transmission. In order to do that, we need to complete the following steps:
- First generate the SSL certificates and then store the client's public key in the server's
keystoreobject and the server's public key on the client'struststore. - Next, we need to create an SSL-aware security realm that will be used by the
remotingtransport. - Finally, we need to apply some changes to our EJB application so that is actually uses the SSL secure channel.
Start by generating a public/private key pair for the entity whose unique name has the common name Francesco Marchioni, organization PacktPub, and two-letter country code GB.
keytool -genkey -v -alias as7alias -keyalg RSA -keysize 1024 -keystore jboss.keystore -validity 180 -keypass mypassword -storepass mypassword -dname "cn=Francesco Marchioni,o=PacktPub,c=GB"
Next, export the server's public key into a certificate named sslPublicKey.cer that is using the password mypassword.
keytool -export -keystore jboss.keystore -alias as7alias -file sslPublicKey.cer -keypass mypassword -storepass mypassword
Now we have finished with the server, we will now generate a key pair for the client too. We will do this by using the alias ejbclientalias and the same properties as we did for the server's keystore object:
keytool -genkey -v -alias ejbclientalias -keyalg RSA -keysize 1024 -keystore jbossClient.keystore -validity 180 -keypass clientPassword -storepass clientPassword -dname "cn=Francesco Marchioni,o=PacktPub,c=GB"
The client public key will also be exported into a certificate named clientPublicKey.cer.
keytool -export -keystore jbossClient.keystore -alias ejbclientalias -file clientPublicKey.cer -keypass clientPassword -storepass clientPassword
Now, in order to complete the SSL handshake successfully, we need to first import the client's public key into the server's truststore object:
keytool -import -v -trustcacerts -alias ejbclientalias -file clientPublicKey.cer -keystore jboss.keystore -keypass mypassword -storepass mypassword
The server certificate also needs to be trusted by the client. You have two available options to solve this issue, as follows:
- Import the server certificate into the client's JDK bundle of certificates
- Create a new repository of certificates trusted by the client (
truststore)
Importing the server certificate into the client JDK means executing a certificate import into the client's certified authorities.
keytool -import -v -trustcacerts -alias as7alias -file sslPublicKey.cer -keystore C:Javajdk1.6.0_31jrelibsecuritycacerts
You have just to replace the path we have used with your actual JDK path and use the client store password in order to complete this operation (default value is changeit).
Otherwise, if you want to import the certificate into a newly created truststore object, just substitute the cacerts destination with your client's truststore object.
keytool -import -v -trustcacerts -alias as7alias -file sslPublicKey.cer -keystore jbossClient.keystore -keypass clientPassword -storepass clientPassword
Within JBoss AS 7, security realms are used to secure access to the management interfaces and remote JNDI and EJB access. Within a security realm, it is also possible to define an identity for the server; this identity can be used for both inbound connections to the server and outbound connections being established by the server.
Therefore, in order to enable SSL communication for our EJB communication, we will define a security realm (named EJBRealm) that is bound to a server identity that references the server's keystore object:
<security-realm name="EJBRealm">
<server-identities>
      <ssl>
       <keystore path="jboss.keystore" relative-to="jboss.server.config.dir" keystore-password="mypassword"/>
      </ssl>
   </server-identities>
   <authentication>
        <jaas name="ejb-security-domain"/>
   </authentication>
</security-realm>
Besides containing the location where SSL certificates are stored, this security realm also contains the authentication policy used by your EJBs, which is defined by the JAAS's security domain, named ejb-security-domain.
The following is a security domain definition that is a simple file-based security domain containing the user credentials and roles in the files ejb-users.properties and ejb-roles.properties respectively:
<security-domain name="ejb-security-domain" cache-type="default">
<authentication>
  <login-module code="Remoting" flag="optional">
    <module-option name="password-stacking" value="useFirstPass"/>
  </login-module>
  <login-module code="org.jboss.security.auth.spi.UsersRolesLoginModule" flag="required">
    <module-option name="defaultUsersProperties" value="${jboss.server.config.dir}/ejb-users.properties"/>
    <module-option name="defaultRolesProperties" value="${jboss.server.config.dir}/ejb-roles.properties"/>
    <module-option name="usersProperties" value="${jboss.server.config.dir}/ejb-users.properties"/>
    <module-option name="rolesProperties" value="${jboss.server.config.dir}/ejb-roles.properties"/>
    <module-option name="password-stacking" value="useFirstPass"/>
  </login-module>
</authentication>
</security-domain>
As you can imagine, you need to create the two property files each with some values in them. For example, here's the ejb-user.properties file to be placed in the server configuration's folder:
adminUser=admin123
And this is corresponding ejb-roles.properties file that grants the role ejbRole to the adminUser role:
adminUser=ejbRole
The last configuration effort would be specifying it in the security-realm attribute of your remoting connector's element:
<subsystem xmlns="urn:jboss:domain:remoting:1.1">
     <connector name="remoting-connector"
      socket-binding="remoting"
      security-realm="EJBRealm"/>
</subsystem>As we have learned in Chapter 3, Beginning Java EE 6 – EJBs, the RMI-IIOP connection properties are specified in the jboss-ejb-client.properties file, which needs to be tweaked a bit to enable SSL connections:
remote.connections=node1
remote.connection.node1.host=localhost
remote.connection.node1.port = 4447
remote.connection.node1.username=adminUser
remote.connection.node1.password=admin123
remote.connectionprovider.create.options.org.xnio.Options.SSL_ENABLED=true
remote.connection.node1.connect.options.org.xnio.Options.SSL_STARTTLS=true
remote.connection.node1.connect.options.org.xnio.Options.SASL_POLICY_NOANONYMOUS=true
The SSL_ENABLED option, when set to true, enables the remoting connector's SSL communication.
The STARTTLS option specifies whether to use Tunneled Transport Layer Security (TTLS) mode at startup or when needed.
The SASL_POLICY_NOANONYMOUS option specifies whether Simple Authentication and Security Layer (SASL) mechanisms, which accept anonymous logins, are permitted.
Finally, since our security realm also included an authentication security domain, we can choose to restrict access to some methods by specifying a @RolesAllowed annotation, which requires the role ejbRole:
@RolesAllowed("ejbRole")
public String bookSeat(int se;atId)  throws SeatBookedException {
 . . . .
}
In order to activate the security domain on your EJBs, we need to mention it in the assembly descriptor of your jboss-ejb3.xml file:
<jboss:ejb-jar>
<assembly-descriptor>
<s:security>
<ejb-name>*</ejb-name>
<s:security-domain>ejb-security-domain</s:security-domain>
</s:security>
</assembly-descriptor>
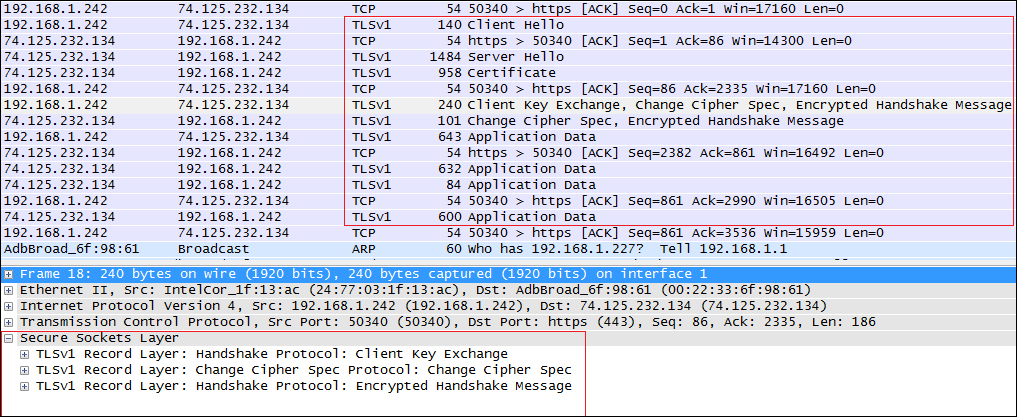
</jboss:ejb-jar>Now redeploy the Ticket EJB example application, following the directions contained in Chapter 3, Beginning Java EE 6 – EJBs, and execute the client.
As you can see from the following screenshot (taken from the WireShark network analyzer), the remote handshake is successfully executed using the Secure Sockets Layer: