
A self-explanatory title for your report helps identify the report among other reports. A popular style of designing self-explanatory titles is to have a main title and a subtitle. The main title is normally brief and the subtitle is a more elaborate form of the main title.
In this recipe, you will learn how to provide a main title and a subtitle for your business report. We are going to create, size, position, and color the title.
There is no database connection required in this recipe.
If you have not made any database connection so far in your iReport installation, you will see an Empty datasource selected in a drop-down list just below the main iReport menu. This is the requirement to run this recipe. If any other option (for example, some database connection) is previously selected, then change it to Empty datasource from the drop-down list, as follows:

the following steps are very simple, and demonstrate how you can design a basic title for your report:
- Open the
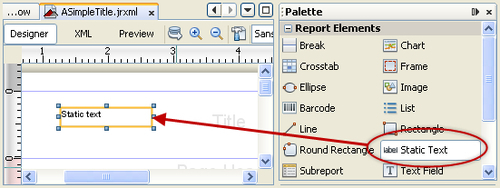
ASimpleTitle.jrxmlfile from theTask3folder of the source code for this chapter. The Designer tab of iReport will show a blank report in the Designer tab of its main window. You can see various sections of your report. The first section at the top of the report is Title, which is a placeholder for the title of your report. - Now you will insert a title into your report. A palette of components is available on the right of the main iReport window. Select the Static Text component from the palette and drag it into the Title section in the Designer tab.
- Double-click and edit the Static Text component to provide a title for your report (for example "Monthly Customer Invoices").
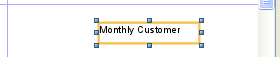
- You will see that some of the title text will disappear from view. This is because your title is bigger than the standard rectangular boundary of the static text component, which contains the title. So, enlarge the rectangle boundary of this component by dragging one of its corners.
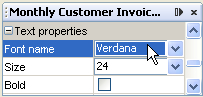
- Now you will give your title a prominent look by increasing its font size. Select the title; the properties of the title field will appear in the Properties window just below the palette of components. Find the Size property among the Text properties and set it to 24.
- Similarly, find the Font property and set it to Verdana, as shown next:
- Your report title will get a bold prominent look, as shown here:
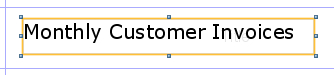
- You can see from the previous image that the title is not well positioned within the Title section. In order to position the title, right-click on the main title, and a pop-up menu will appear; select Position, and another pop up will appear; select Center Horizontally. This will center your title horizontally in the Title section.
- Next, you insert a subtitle for your report by dragging another static text component from the palette into the Title section of your report and repeating steps 2, 3, and 4. I have provided a self-explanatory subtitle "All invoices for a specific customer, in a specific period of time and for a specific product."
- Now, repeat step 5 for the subtitle and choose 13 as the font size.
- Switch to the Preview tab, which shows what your report looks like.

- You have successfully designed the title of your report. Save it by selecting Save from the File menu.
Switch to the XML tab and you will see the following JRXML code:
<?xml version="1.0" encoding="UTF-8"?>
<jasperReport>
<!-- other JasperReports XML tags -->
<title>
<band height="79" splitType="Stretch">
<staticText>
<reportElement x="107" y="10" width="340" height="33"/>
<textElement>
<font fontName="Verdana" size="24"/>
</textElement>
<text><![CDATA[Monthly Customer Invoices]]></text>
</staticText>
<staticText>
<reportElement x="24" y="48" width="512" height="21"/>
<textElement>
<font size="13"/>
</textElement>
<text>
<![CDATA[All invoices for a specific customer, in a specific period of time and for a specific product]]>
</text>
</staticText>
</band>
</title>
<!-- other JasperReports XML tags -->
</jasperReport>
I have shown only the<title> tag in the code and omitted other JRXML tags that are not relevant to this discussion.
The<title> tag is a wrapper for both of the static text components you dropped into the Title section of your report. Each static text component is represented by a<staticText> child tag of the<title> tag. The first child of the<staticText> tag is named<reportElement>. A<reportElement> tag describes the position (using x and y attributes) and dimensions (using height and width attributes) of the static text component.
The x and y attributes control the position of a component. Both of these represent the positioning of the component with respect to the top-left corner of the Title section. You can play around by changing the value of the x and y attributes of the first<reportElement> tag to 0 in the JRXML code. The Designer tab will show that the main title of your report will move to the top-left corner of the Title section.
When you centered your main title horizontally in step 8 of this recipe, iReport calculated the values of these x and y attributes for you. This just shows the usefulness of iReport as a graphical report editor.
The height and width attributes control the size of a component. You can also play with these attributes to change the size of your title and subtitle.
The second child,<textElement>, of the<staticText> tag contains a<font> tag, which carries the text formatting information (for example, the name and size of font). You will notice that the<font> tag in the second<textElement> does not have the fontName attribute. That is because you did not change the font property of your subtitle. This means that the subtitle uses the default font, which is SansSerif.
You can see that the title (Monthly Customer Invoices) and subtitle (All invoices for a specific customer, in a specific period of time and for a specific product) of your report are wrapped inside two<text> tags, which go inside<staticText> tags. This means that whenever you drop a static text into the Title section of your report, iReport simply inserts a<staticText> child tag in the<title> tag of your report. Later, when you type the actual title, iReport simply wraps it in the<text> child tag of the<staticText> tag.
You can try editing the title directly from your JRXML. You will see that manual edits in the JRXML are reflected in the designer view of your report.
You can also play with the x, y, height, and width attributes from the Designer tab by changing the properties of your main title and subtitle. The x attribute appears as the Left property shown in the Properties window just below the palette of components. Similarly, the y attribute appears as the Top property. The height and width attributes appear as properties with the same name.
iReport also allows you to align two or more JasperReports components with respect to each other in your report. For example, you may like aligning the subtitle parallel to the main title. In order to do this, you simply follow the following steps:
- Open the
ASimpleTitle_Final.jrxmlfile from theTask2folder of the source code for this cookbook. The Designer tab of the iReport shows that the report contains a title and a subtitle. - Hold down the Ctrl key of your keyboard. First, click on the subtitle, which is a reference for you to set alignment of the target component (that is the main title).
- Secondly, click on the main title and release the Ctrl key. You will see that now both components are viewed as selected.
- Right-click on any of the components, and a pop-up menu will appear; select Align, and another pop up will appear; select Align Left. This will align the main title with the subtitle, as shown next:
