
You will often need to set margins for your report as well as its individual sections such as the report title, header, body, and footer.
This recipe shows you how you can set the margins for your report and also how to align the different components of your header with respect to each other as well as the report margin.
In order to work with this recipe, you will need the PostgreSQL database. Refer to the installPostgreSQL.txt file included in the source code download for this chapter, which shows how you can install and run PostgreSQL. Note that your installation of PostgreSQL should be up and running before you proceed.
The source code for this chapter also includes a file named copySampleDataIntoPGS.txt. The copySampleDataIntoPGS.txt file will help you create a database named jasperdb1, a table named CustomerInvoices with five columns (InvoiceID, CustomerName, InvoicePeriod, ProductName, and InvoiceValue) and copy sample data for this recipe into the table.
After inserting the required data, you will connect iReport to your database hosted on PostgreSQL using the steps described in the Creating a report from relational data recipe later in Chapter 4.
- Open the
HeaderMarginAndAlignmentSample.jrxmlfile from theTask7folder of the source code for this chapter. This will display a report with a title and a multi-line header containing three name-value pairs of components, as shown next. Each name-value pair contains a static text and a text field component. For example, the first name-value pair shown contains a static text component (that is,Customer Name:)and a text field component (that is,$F{CustomerName}).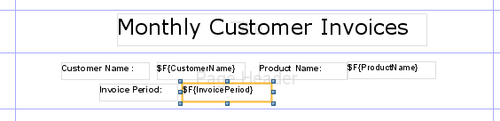
- Click on the Format menu and then choose the Page format item from the drop-down menu, as shown here:
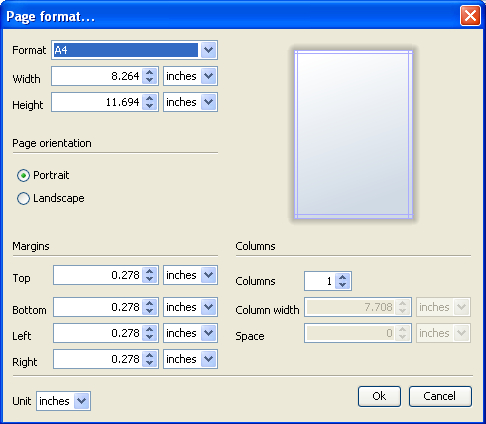
- From the Page format window you may choose the format, report dimensions, margins, and page orientation of your report. This recipe focuses on margins. Other features will be covered in later recipes. Choose 0.5 inches as the left margin (a bit more then the default value) because most reports need some binding on the left side. Leave all other margins (that is right, top, and bottom) at their default values.
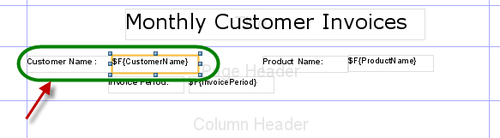
- You will notice that the name-value pairs of the multi-line header are not properly aligned. You can align first two pairs in two columns and center-align the third. Right-click on the Static Text component (Customer Name:) of the first name-value pair. A pop-up window will appear. Select Align from the pop-up menu, then select the Align to Left Margin option from the pop-up menu. You will see that the static text component is shifted to the extreme left side of the report margin, as shown next:

- Click on the text field component ($F{CustomerName}) of the Customer Name: pair. Use the mouse or arrow keys to drag it to the left till it sits adjacent to the Customer Name static text component.
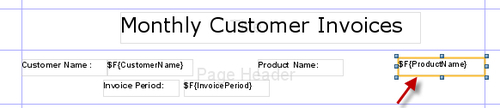
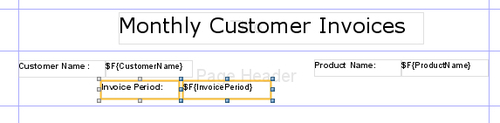
- Right-click on the text field component of the second name-value pair. A pop-up menu will appear; select Align from the pop-up menu, and then choose the Align to Right Margin option from the menu. This will shift the text field component to the extreme right of the report margin, as follows:
- Now click on the static text component of the second name-value pair (Invoice Period:). Use the mouse or arrow keys to drag it to right till it sits adjacent to the accompanying text field component you right-aligned in step 6, as shown below.
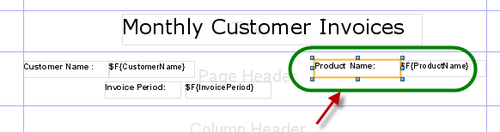
- Now look at the third name-value pair, which is on the second line of the header. You want to centre-align this name-value pair. Unfortunately, there is no way to accurately center-align this name-value pair using iReport. You will have to do it manually. For this purpose, hold down the Ctrl key and select the static text component (that is Product Name:). While holding the Ctrl key down, select the Text Field component of this name-value pair. This will select both components simultaneously, as shown next:
- Right-click on the selected name-value pair; a pop-up menu will appear. Select the Position option from the pop-up menu. A submenu will pop up; choose the Center Horizontally option from the submenu. This will center-align the selection, making the two components overlap each other, as shown in the following screenshot:

- Left-click on the name-value pair, which is now overlapped and center-aligned. This will select the text field component of the name-value pair. Press the right key 48 times to move the component to the right. Now left-click on the static text component and press the left-arrow key 48 times to move the static text component to the left. Now this name-value pair is approximately center-aligned, as shown here:

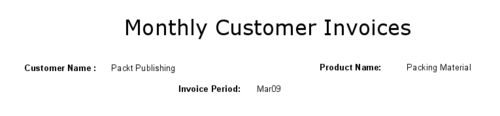
- Save your report by selecting Save from the File menu and switch to the Preview tab. You will get a preview as shown here:
Switch to XML tab to see the following JRXML code:
<?xml version="1.0" encoding="UTF-8"?>
<jasperReport leftMargin="36" rightMargin="20" topMargin="20" bottomMargin="20">
<!-- other tags of JasperReports XML -->
<pageHeader>
<band height="63" splitType="Stretch">
<staticText>
<reportElement x="0" y="11" width="100" height="20"/>
<textElement>
<font isBold="true"/>
</textElement>
<text><![CDATA[Customer Name :]]></text>
</staticText>
<textField>
<reportElement x="100" y="11" width="100" height="20"/>
<textElement/>
<textFieldExpression class="java.lang.String">
<![CDATA[$F{field}]]>
</textFieldExpression>
</textField>
<!-- other tags of JasperReports XML -->
</band>
</pageHeader>
<!-- other tags of JasperReports XML -->
</jasperReport>
In this JRXML, you can see from the<jasperReport> tag that its attribute named leftMargin is highlighted. Notice that you set the leftMargin attribute to 0.5 inches in step 3 of this recipe. iReport automatically translates the value 0.5 inches into a corresponding value of the leftMargin attribute.
The<band> tag of<pageHeader> contains three pairs of<staticText> and<textField> tags. I have shown only one name-value pair for the sake of clarity. The<staticText> and<textField> tags contain a<reportElement> child. Look at the x and y attributes of the<reportElement> tag that I have shown highlighted. The y attributes of both<reportElement> tags have the same values. The x attributes are different and their difference is equal to the width of the first component (the width attribute of the first<reportElement> tag).