
You may need to reset the page numbering of your report at certain places. For example, if you are generating a weekly or monthly report of all customer invoices, you may want to reset page numbering in your report with the start of every customer. This is sometimes convenient, as it allows you to generate just one report (that is, a report of all invoices issued in a month), which actually consists of many reports (that is, a report for each of your customers).
JasperReports offers an interesting feature known as grouping of records, which you can use to do many tricks in report designing. This recipe demonstrates how to use the grouping feature to reset page numbering in your report.
Refer to installPostgreSQL.txt file included in the source code download of this chapter to install and run PostgreSQL, which should be up and running before you proceed forward. The source code of this chapter also includes a file named copySampleDataIntoPGS.txt, which helps you create a database named jasperdb6 and copy sample data for this recipe into the database.
- Open
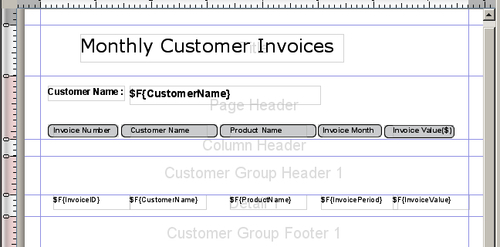
ResetPageCount.jrxmlfile from theTask4folder of the source code of this chapter. The Designer tab of iReport shows the report containing a title, a page header, and empty page footer as shown in the following screenshot:
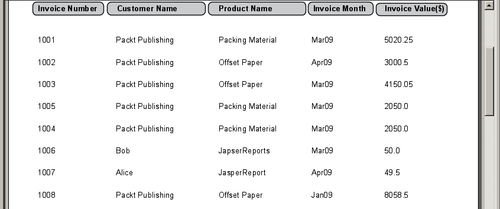
- Switch to the Preview tab to see the preview of your report. You will see a random arrangement of records and no page numbers in your report.
- Switch to the Designer tab. Drag a new Page X of Y component from the Tools section of the Palette and drop it into the Page Footer section of your report. This will add two Text Field components into the Page Footer section of your report. The first component will have an expression
"Page "+$V{PAGE_NUMBER}+" of"and the second component will have an expression+ $V{PAGE_NUMBER}.
- Select both the Text Field components you just dropped into the Page Footer section of your report by holding down the
Ctrlkey and left-clicking them one by one. Now release theCtrlkey and align the components horizontally and vertically to the top-right position in the Page Footer section of your report using the arrow keys of your keyboard, as shown in the next screenshot:
- Switch to the Preview tab to see page numbers in your report page footer.
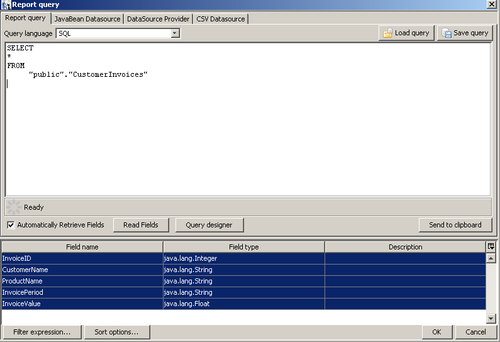
- Switch to the Designer tab. Press Report query button at the top of the report window. A Report query dialog will appear, as shown in the following screenshot:
- While your cursor is in Query editor, press the Enter key to bring it to the next blank line and type
Order By "CustomerName"as shown in the next screenshot. Click the OK button.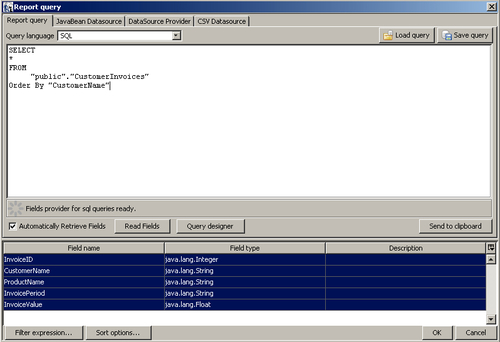
- Switch to the Preview tab to see the preview of your report. Compare this preview with the preview of step 2. You will notice that the records are now arranged by order of customer names.

- Switch to the Designer tab. Right-click on the top-most element
ResetPageCountin the Report Inspector and click on Add Report Group.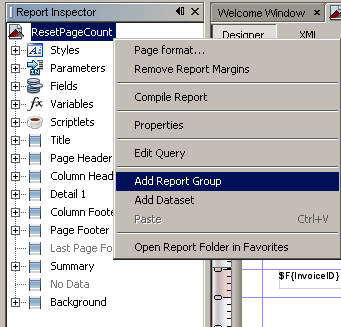
- A New group wizard dialog box will appear. Type
Customerin the Group name field and selectCustomerName Fieldfrom the Group by the following report object: option, as shown in the following screenshot:
- Press the Next button, and the dialog will change.
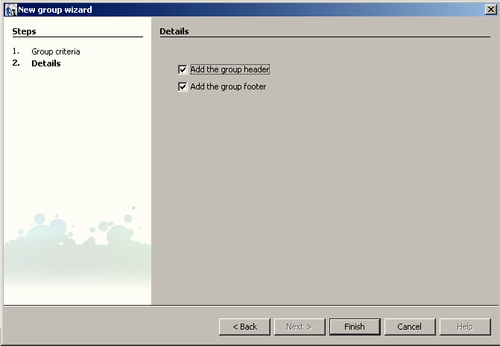
- Press the Finish button to dismiss the dialog. You will notice that Customer Group Header 1 and Customer Group Footer 1 sections have been added into your report.
- Switch to the Preview tab to see the preview of your report. You will see a clear grouping of records based on customer names, separated by wide spaces, as shown in the next screenshot. Navigate through all the pages and note that the page numbers are counted for the whole report.
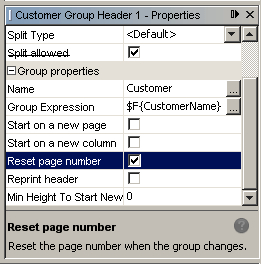
- Switch to the Designer tab. Click on the Group Header 1 section of your report and go to the Group properties section of Properties below Palette and select the Reset page number property. Mark the checkbox beside it.
- Now select the second Text Field component from step 3, which has the expression
+ $V{PAGE_NUMBER}and go to the Text field properties section of Properties below Palette. Select the Evaluation Time property and change its value toGroup.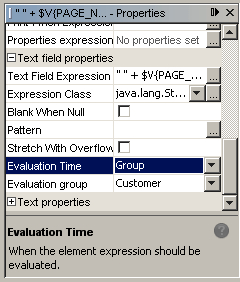
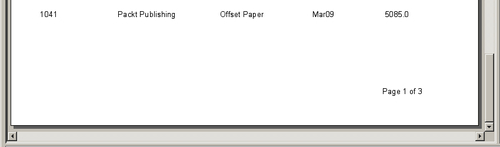
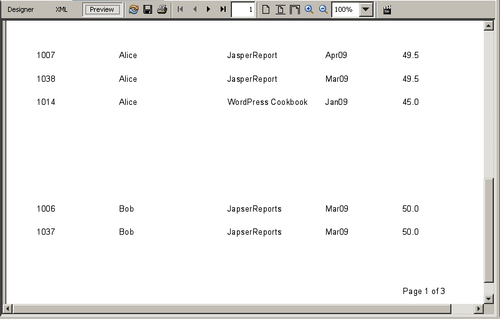
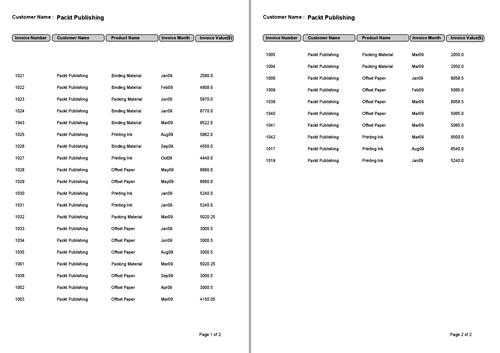
- Switch to the Preview tab to see the preview of your report. Press the Next Page button at the top of your report to navigate through all pages of your report. Compare this preview with the preview of step 13. You will notice that each customer group starts with a new page, and also the page numbering resets with the start of a new customer.
You have used the grouping feature of JasperReports in this recipe. A group is specified by a<group> tag with three children named groupExpression, groupHeader, and groupFooter. Switch to the XML tab of see what a<group> tag looks like:
<?xml version="1.0" encoding="UTF-8"?>
<jasperReport>
<!-- other JasperReports XML tags -->
<group name="Customer" isResetPageNumber="true">
<groupExpression>
<![CDATA[$F{CustomerName}]]>
</groupExpression>
<groupHeader>
<band height="29"/>
</groupHeader>
<groupFooter>
<band height="37"/>
</groupFooter>
</group>
<pageFooter>
<band height="43" splitType="Stretch">
<textField>
<reportElement x="426" y="7" width="80" height="20"/>
<textElement textAlignment="Right"/>
<textFieldExpression class="java.lang.String">
<![CDATA["Page "+$V{PAGE_NUMBER}+" of"]]>
</textFieldExpression>
</textField>
<textField evaluationTime="Group" evaluationGroup="Customer">
<reportElement x="506" y="7" width="40" height="20"/>
<textElement/>
<textFieldExpression class="java.lang.String">
<![CDATA[" " + $V{PAGE_NUMBER}]]>
</textFieldExpression>
</textField>
</band>
</pageFooter>
<!-- other JasperReports XML tags -->
</jasperReport>
Recall that you chose CustomerName in the Group by the following report object option in step 10 of the recipe. This is why you can see CustomerName as part of the content of the<groupExpression> tag in the code shown above. Grouping is done by whatever field you chose in the Group by the following report object option.
Also notice that the<group> tag has an attribute named isResetPageNumber whose value is true. iReport authored this attribute when you checked the checkbox in step 14 of this recipe. As you can guess, this attribute results in resetting the page numbering.
Notice the first<textField> tag inside<pageFooter> tag in the code shown above. This<textField> tag corresponds to the first component of step 3 (with an expression"Page "+$V{PAGE_NUMBER}+" of"). This component displays the page numbering and is reset every time a new group starts.
Look at the second<textField> tag that has an evaluationTime attribute whose value is Group. This means that this page numbering field will be evaluated at the end of a group, therefore showing the total number of pages in a group.