
This recipe teaches you how to design a simple wrapper class in Java that wraps JasperReports functionality to process and compile an existing JRXML file, fetch application data, and combine the processed JRXML with application data to generate and save your JasperReport in PDF format.
Refer to the installPostgreSQL.txt file included in the source code download for this chapter to install and run PostgreSQL, which should be up and running before you proceed.
The source code of this chapter also includes a file named copySampleDataIntoPGS.txt, which helps you create a database named jasperdb9 and copy sample data for this recipe into the database.
You will need Java Development Kit (JDK) version 1.6.X to compile and run the Java application of this recipe. You will find all the necessary downloads and instructions on Sun's official website. After installing JDK, you will also set the JAVA_HOME environment variable to point to the main folder of your JDK installation (..jdk1.6.X).
You will be using a JRXML file named MonthlyCustomerReport.jrxml and two Java files named ConnectionManager.java and JasperReportsWrapper.java in this recipe. You will find these three files in the Task1 folder of the source code download of this chapter. In addition, you will also find two .bat files named compile.bat and run.bat and two folders named com and lib in the same Task1 folder. Copy all five files along with the com and lib folders (with their contents) to the C:JasperReportsCookBookSamples folder on your PC.
In order to compile JasperReportsWrapper.java, you will need the following seven JAR files:
You will find all seven JAR files in the ..JaspersoftiReport-nb-3.Xireportmodulesext folder of your iReport installation.
Although your JasperReportsWrapper.java will compile with these seven JAR files, your complete application will not run without the JDBC JAR file that contains the driver for PostgreSQL. The name of the JAR file is postgresql-8.2-506.jdbc3.jar. You can download the PostgreSQL JDBC driver from http://jdbc.postgresql.org/download.html. You can also find this postgresql-8.2-506.jdbc3.jar file in the ..JaspersoftiReport-nb-3.Xide8modulesext folder of your iReport installation.
Once you have all the JAR files ready, you will put them in the C:JasperReportsCookBookSampleslib folder on your PC. The compile.bat and run.bat files assume that all JAR files are located in the C:JasperReportsCookBookSampleslib folder.
The following steps demonstrate how to incrementally design a wrapper Java class to process your JasperReport and generate its PDF.
- Browse to the
C:JasperReportsCookBookSamplesfolder on your PC into which you copied files from theTask1folder from the source code for this chapter. - Double-click the
compile.batfile, and a command prompt will appear. It will compile yourJasperReportsWrapper.javafile and show the compilation results. After successful compilation, dismiss the command prompt by clicking the Close button on its top-right corner. Now you will see that aJasperReportsWrapper.classfile will appear in theC:JasperReportsCookBookSamplescomfolder.
- Now double-click the
run.batfile to execute the compiledJasperReportsWrapperclass. You will see that your Java application displays a Connection with database established successfully message on command prompt. Dismiss the command prompt by clicking the Close button.
- Open the
JasperReportsWrapper.javafile from theC:JasperReportsCookBookSamplesfolder on your PC in a text editor. The file contains code for yourJasperReportsWrapperclass. You will find five methods namedconnect2DB(), compileJRXMLFile(), fillReport(), saveReportInPDF(), andmain()in theJasperReportsWrapperclass. The first method namedconnect2DB()is ready to be used in the recipe. Theconnect2DB()method connects to your PostgreSQL database and returns the connection in the form of aConnectionobject. You will incrementally build the rest of the four methods in this recipe to compile, fill, and save your JasperReport. - Now you will use the JasperReports API to compile your
MonthlyCustomerInvoices.jrxmlfile. For this purpose, type the following code in thetryblock of thecompileJRXMLFile()method in theJasperReportsWrapper.javafile.JasperReport jr = JasperCompileManager.compileReport(jasperXMLFileName); if (jr != null) System.out.println ("Your report compiled successfully"); return jr;After you have typed the code, the complete
compileJRXMLFile()method will look as follows:// Compile JasperReports XML file public JasperReport compileJRXMLFile(String jasperXMLFileName) { try { JasperReport jr = JasperCompileManager.compileReport(jasperXMLFileName); if (jr != null) System.out.println ("Your report compiled successfully"); return jr; } catch (Exception e) { e.printStackTrace(); } return null; }Save your
JasperReportsWrapper class. - Now add a call to the
compileJRXMLFile()method at the end of the existing code in themain()method of yourJasperReportsWrapperclass. The call to thecompileJRXMLFile()filewill look as follows:JasperReport compiledJasperReport = wrapper.compileJRXMLFile(path2JRXMLFile);
After adding the call, the
main()method will become:public static void main (String[] args) { JasperReportsWrapper wrapper = new JasperReportsWrapper(); Connection connection = wrapper.connect2DB( dbServerAdd, dbServerPort, dbName, dbUser, dbPass); // Compile JRXML file JasperReport compiledJasperReport = wrapper.compileJRXMLFile(path2JRXMLFile); }Save your
JasperReportsWrapper class. - Double-click the
compile.batfile to compile theJasperReportsWrapperclass. A command prompt will appear. It will compile your application. After successful compilation, dismiss the command prompt by clicking on the Close button. - Double-click the
run.batfile to execute the compiledJasperReportsWrapper.classfile. You will see that your Java application displays Connection with database established successfully and Your report compiled successfully messages. Dismiss the command prompt by clicking the Close button. - Next you will fill your compiled JasperReport with your application data. You will use the
Connectionobject that you saw earlier in step 4 to connect to your PostgreSQL database. Recall from step 4 thatconnect2DB()method returned thisConnectionobject. You will pass theConnectionobject to theFillManagerclass of JasperReports by typing the following code in thetryblock of thefillReport()method of theJasperReportsWrapperclass:if (connection != null) { JasperPrint jp = JasperFillManager.fillReport(jr, params, con); if (jp != null) System.out.println (" Your report filled with application data"); return jp; }After typing the code, the
fillReport()method will look as follows:// Fill data in compiled JasperReports file public JasperPrint fillReport ( JasperReport jr, Map params, Connection con) { try { if (connection != null) { JasperPrint jp = JasperFillManager.fillReport(jr, params, con); if (jp != null) System.out.println (" Your report filled with application data"); return jp; } } catch (Exception e) { e.printStackTrace(); } return null; }Save your JasperReportsWrapper class.
- Now add a call to the
fillReport()method at the end of the existing code in themain()method of yourJasperReportsWrapperclass, as shown below:JasperPrint jasperPrint = wrapper.fillReport(compiledJasperReport, null, connection);
After adding the call, the
main()method will become:public static void main(String[] args) { JasperReportsWrapper wrapper = new JasperReportsWrapper(); Connection connection = wrapper.connect2DB( dbServerAdd, dbServerPort, dbName, dbUser, dbPass); // Compile JRXML file JasperReport compiledJasperReport = wrapper.compileJRXMLFile(path2JRXMLFile); // Fill data in compiled JRXML file JasperPrint jasperPrint = wrapper.fillReport( compiledJasperReport, null, connection); }Save your
JasperReportsWrapperclass. - Double-click the
compile.batfile to compile theJasperReportsWrapperclass. A command prompt will appear that will compile your Java file. After successful compilation, dismiss the command prompt by pressing the Close button. - Now double-click the
run.batfile to execute the compiledJasperReportsWrapper.classfile. You will see that your Java application displays Connection with database established successfully, Your report compiled successfully, and Your report filled with application data messages. Click the Close button to dismiss the command prompt. - 13 Next you will add code to save your report in PDF format. For this purpose, you will fill the
saveReportInPDF()method of theJasperReportsWrapperclass with Java code in itstryblock as follows:JasperExportManager.exportReportToPdfFile( jasperPrint, pdfFileName); System.out.println ("Your report successfully saved in PDF");After typing the code, the
saveReportInPDF()method will look like as follows:// Compile, fill and save report in JasperReport public void saveReportInPDF (JasperPrint jasperPrint, String pdfFileName) { try { JasperExportManager.exportReportToPdfFile( jasperPrint, pdfFileName); System.out.println (" Your report successfully saved in PDF"); } catch (Exception e) { e.printStackTrace(); } }Save your
JasperReportsWrapperclass. - Now add a call to the
saveReportInPDF()at the end of the existing code in themain()method of yourJasperReportsWrapperclass as follows:wrapper.saveReportInPDF(jasperPrint, pdfFileName);
After adding the call, the
main()method will become:public static void main(String[] args) { JasperReportsWrapper wrapper = new JasperReportsWrapper(); Connection connection = wrapper.connect2DB( dbServerAdd, dbServerPort, dbName, dbUser, dbPass); // Compile JRXML file JasperReport compiledJasperReport= wrapper.compileJRXMLFile(); // Fill data in compiled jasper file JasperPrint jasperPrint = wrapper.fillReport( compiledJasperReport, null, connection); // Save compiled and filled Jasper report in PDF wrapper.saveReportInPDF(jasperPrint, pdfFileName); } - Double-click the
compile.batfile to compile theJasperReportsWrapperclass. A command prompt will appear that will compile your Java file. After successful compilation, click the Close button to dismiss the command prompt. - Now double-click the
run.batfile to execute the compiledJasperReportsWrapper.classfile. You will see that your Java application displays Connection with database established successfully, Your report compiled successfully, Your report filled with application data, and Your report successfully saved in PDF messages. Click the Close button to dismiss the command prompt. Now you can browse to theC:JasperReportsCookBookSamplesfolder on your PC, where you will find aMonthlyCustomerInvoices.pdffile. This is the JasperReport, which yourJasperReportsWrapperJava application has generated and saved for you.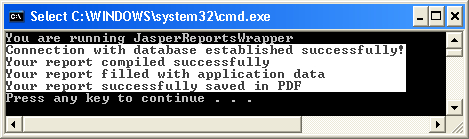
Your Java application has compiled, generated, and saved your JasperReport in this recipe. In order to do all this, you used a wrapper class named JasperReportsWrapper, which wraps the functionality of JasperReports.
When you started, the JasperReportsWrapper class only had the functionality of connecting to a database. You incrementally built it to provide functionality to fetch application data, compile a JRXML file, supply application data to the compiled JRXML file, generate your JasperReport, and finally save it as a PDF file.
In step 5 of the recipe, you used a manager class of JasperReports named JasperCompileManager to compile your JRXML file. Then, in step 9, you used another manager class named JasperFillManager to fill the compiled report with application data. Note that the JasperFillManager class takes both a compiled JasperReport and a database Connection object. It internally fetches application data and provides the data to the compiled report to generate your actual JasperReport.
Finally, in step 13, you used another manager class named JasperExportManager to export your filled JasperReport into a PDF file, which you could browse and find in the C:JasperReportsCookBookSamples folder on your PC.
The following diagram shows the steps that are followed to generate a report:
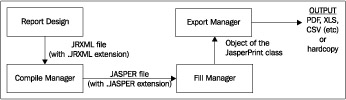
You can see four steps in the diagram; each step is represented by a box:
- Report Design: This step produces a JRXML file. You will normally design your report using iReport, as you have learned in the recipes of the first eight chapters of this cookbook.
- Compile Manager: The compile manager compiles the JRXML file into a JASPER file. You used the compile manager in step 5 of this recipe.
- Fill Manager: It takes a JASPER file and combines with actual report data to produce your report. You used Jasper's fill manager in step 9.
- Export Manager: Finally the last box named Export Manager takes your report and generates a PDF file for the report. This is what you did in step 13.