
A header normally appears on every page of your report. The header of your report contains the data that was used to generate the report. For example, if you generate a "Monthly Customer Invoices" report, the header will tell you the name of the customer and the month for which you generated a particular copy of the report.
The header consists of a number of name-value pairs, in which the name is actually the label of a field (for example, the label can be "Customer Name" when the header shows the name of a customer) and is normally simple text. On the other hand, the value in the name-value pair is actually some application data (for example, actual name of a customer) that comes from a data source such as a relational database.In this recipe, you will learn how to place a header just below the title of your report. As an example, I am going to generate the header of a report containing list of invoices issued to a particular customer in a specific month.
In order to work with this recipe, you will need the PostgreSQL database. Refer to the installPostgreSQL.txt file included in the source code download for this chapter, which shows how you can install and run PostgreSQL. Note that your installation of PostgreSQL should be up and running before you proceed.
The source code for this chapter also includes a file named copySampleDataIntoPGS.txt. The copySampleDataIntoPGS.txt file will help you to create a database named jasperdb1, a table named CustomerInvoices with five columns (InvoiceID,CustomerName, InvoicePeriod, ProductName, and InvoiceValue), and copy sample data for this recipe into the table.
After inserting the required data, you will connect iReport to your database hosted on PostgreSQL using the steps described in the Creating a report from relational data recipe later in Chapter 4.
- Open the
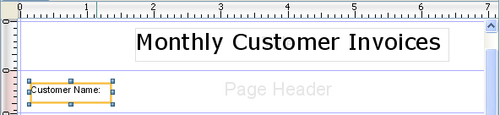
ASimpleHeader.jrxmlfile from theTask6folder of the source code for this chapter. The Designer tab of iReport shows an empty report with just a title (Monthly Customer Invoices). - You are about to enhance the report by adding a header. You can start by placing the label for your first name-value pair. Use the palette of components on the right of the main iReport window and drag a static text component into the Page Header section in the Designer tab of your report.
- Double-click the static text and enter a label for your component (for example, "Customer Name"). Now use the mouse or keyboard arrow keys to place the static text appropriately, as shown in the following screenshot:
- Now you will add a value field for your name-value pair. Drag a text field from the palette of components into the Page Header section and place it to the right of the Static Text labeled "Customer Name." A text field is just like static text except that it is attached to some data source at the backend through a database query or an XPath expression.
- Open the Report query window by clicking the report query button to the right of the Preview tab. Unfortunately, it is a bit difficult to find this button in iReport 3.6.0, as it shows no tool tip when you move your mouse over it. Its icon is similar in shape to a standard database icon and looks like A Report query window will appear, as shown in the following screenshot:
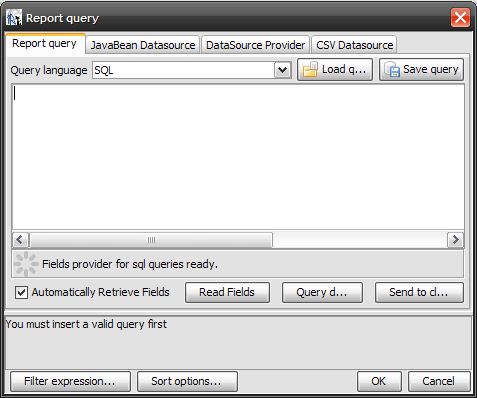
- Enter the following SQL query into the Report query window:
SELECT * from "public"."CustomerInvoices" WHERE "public"."CustomerInvoices"."CustomerName" = 'Packt Publishing' AND "public"."CustomerInvoices"."InvoicePeriod" = 'Mar09'
- The Report query window will automatically fetch all columns of the
CustomerInvoicestable according to the condition given in the SQL query. You will see that all the columns of theCustomerInvoicestable (that isCustomerName, CustomerPhone, InvoicePeriod, ProductName, andTotalValue)will be displayed in the lower part of the Report query window, as shown next. Click the OK button and exit the Report query window. - Now you have to link the
CustomerNamecolumn of theCustomerInvoicestable with the text field you placed into your Page Header section in step 5. Right-click the text field and select the Edit Expression option from the pop-up window, as shown here:
- An Expression editor window will open. Delete the existing text
($F(field))from the Field Expression window and then double-click theCustomerNamefield in the second column of the lower half of the Field Expression window and click Apply. This will attach theCustomerNamecolumn of theCustomerInvoicestable with the text field. - Now drag another static text and text field components as per steps 2, 3, and 4 for your second name-value pair (that is, Invoice Period = "invoicing month") as shown next. This time the static text will get
Invoice Periodas its label and the text field will link to theInvoicePeriodcolumn of theCustomerInvoicestable.
- Repeat steps 8 and 9 to attach the
InvoicePeriodcolumn with theInvoice Periodtext field of your Page Header section. Eventually, your header will look like the following: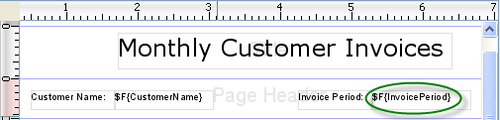
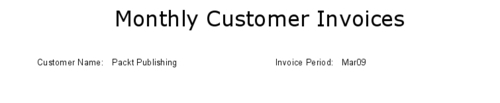
- Switch to the Preview tab; you will see the preview of your report as shown here:
Open the XML tab of your report and you will see the following XML:
<?xml version="1.0" encoding="UTF-8"?>
<jasperReport>
<!-- other tags of JasperReports XML -->
<queryString>
<![CDATA[SELECT * from CustomerInvoices WHERE CustomerName = 'Packt Publishing' AND
ProductName = 'Offset Paper' AND
InvoicePeriod = 'Mar09']]>
</queryString>
 <pageHeader>
<band height="39" splitType="Stretch">
<staticText>
<reportElement x="120" y="11" width="115" height="22"/>
<textElement textAlignment="Left">
<font size="12"/>
</textElement>
<text><![CDATA[Customer Name]]></text>
</staticText>
<textField>
<reportElement x="128" y="12" width="100" height="20"/>
<textElement/>
<textFieldExpression class="java.lang.String">
  <![CDATA[$F{CustomerName}]]>
 </textFieldExpression>
</textField>
<!-- other static text and text field tags -->
</band>
</pageHeader>
<!-- other tags of JasperReports XML -->
</jasperReport>
Notice the<queryString> tag that I have shown highlighted in the preceding JRXML code. The<queryString> tag wraps the SQL query that you authored in step 6 of this recipe. This query brings all the five columns of the customer invoice table, each of which can be attached to a text field.
You can also see a<pageHeader> tag in this JRXML code. The<pageHeader> tag represents the header of your report, which you just authored in this recipe. The<band> child of the<pageHeader> tag contains two pairs of<staticText> and<textField> tags. I have shown only one pair for clarity. You can guess that each pair corresponds to a name-value pair you dragged-and-dropped in the Page Header section of your report. Notice that the<textField> tag has a child named<textFieldExpression>. The<textFieldExpression> has an expression ($F{CustomerName}) as its content. $F{CustomerName} refers to the name of a column in the CustomerInvoices table you linked with the text field in steps 8 and 9 of this recipe.
Changing this expression in the XML tab will affect the report in the Designer and Preview tabs as well. For example, if you delete the $F{CustomerName} expression in the XML tab, you will see that there is no content shown as the value of that text field in the Designer tab.
If you look at the SQL query that you entered into the Report query window, you will see that the name of the customer and the invoicing month have been hardcoded in the query. This data normally comes from the user who generates the report.
In order to allow the user to provide these values, you will need to declare a parameter and link it to your text fields (that is, the customer name and invoicing month) according to steps 3 to 9 of the Using dynamic titles that can change during report processing recipe of this chapter.
In this case, you also need to have a dynamic query, which will use the parameters that you have linked to your text fields. So the fixed SQL query of step 6 of this recipe will change to the following dynamic query:
SELECT * from "public"."CustomerInvoices" WHERE "public"."CustomerInvoices"."CustomerName" = $P{CustomerName} AND "public"."CustomerInvoices"."InvoicePeriod" = $P{InvoiceMonth}
Now when you switch to the Preview tab, iReport will not show you the preview immediately. It will first ask you to provide a customer name and invoicing month. Enter Packt Publishing as the customer name and Mar09, as invoicing month; iReport will now display the preview.
Also note that, once entered, iReport remembers parameter values, so it will not ask you to re-enter parameter values each time you generate the preview. It will ask you for new parameter values only when you close and reopen your report in iReport or make any change in the design view.