
You may need to generate a summary report that collects, processes, and summarizes large amounts of data into a single document. JasperReports allows you to do that.
In this recipe, you will design a monthly billing report for an electricity supplying company. The company has many feeders to supply electricity; each feeder feeds into many transformers, and each transformer serves many electricity consumers. The report of this recipe calculates the sum of monthly bills of all consumers connected to a transformer. Then it gathers the billing data of all transformers of a feeder into a single monthly feeder billing summary.
Refer to the installPostgreSQL.txt file included in the source code download for this chapter to install and run PostgreSQL, which should be up and running before you proceed.
The source code for this chapter also includes a file named CopyFeederDataIntoPG.txt, which helps you to create a database named jasperdb8 and two tables named Feeder and Transformer. The text file also helps you to copy sample data for this recipe into the tables.
You will be using two JRXML files, MonthlyTransformerBill.jrxml and FeederSummaryReport.jrxml, in this recipe. You will find these files in the Task2 folder of the source code download for this chapter. The FeederSummaryReport.jrxml file is the main report, which uses the subreport named MonthlyTransformerBill.jrxml. The main report has to refer to its subreport using a complete path (you cannot use relative paths). This means you have to copy the main and subreport JRXML files to the C:JasperReportsCookBookSamples folder on your PC. I have hardcoded this complete path in the master report (FeederSummaryReport.jrxml).
Let's discover how to work with a multi-level summary report by going through the steps of the recipe:
- Open the
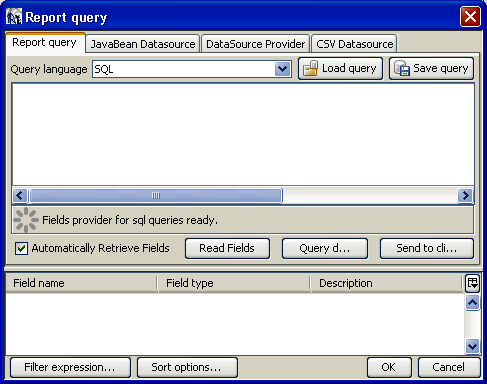
MonthlyTransformerBill.jrxmlfile from theC:JasperReportsCookBookSamplesfolder on your PC. The Designer tab of iReport shows an empty report. - Open the Report query window by clicking the Report query button on the right side of the Preview tab button. A Report query window will appear, as shown in the following screenshot:
- Enter the following SQL query into the Report query window:
SELECT SUM("Transformer"."Bill") FROM "Transformer"The lower part of the Report query window will show a sum field. Click OK.
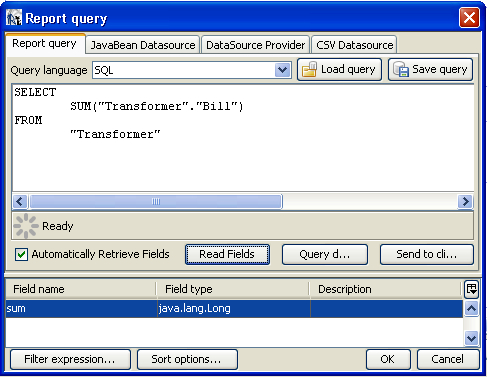
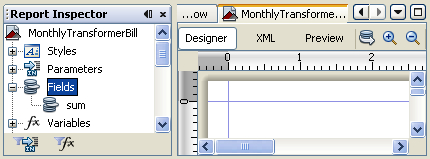
- From the Report Inspector window on the left-side of the Designer tab, double-click the Fields node to expand it. You will notice a single field named sum in the expanded fields list, as shown in the following screenshot:
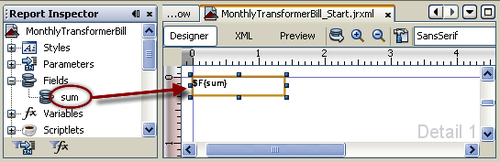
- Drag-and-drop the sum field from the Fields list into the Detail 1 section at the top-left corner of your report, as shown in the following screenshot:
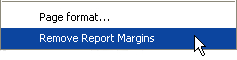
- Click Format from the main iReport menu and select the Remove Report Margins option, as shown in the following screenshot:
- Double-click the blue line at the bottom of the Detail 1 section. The height of the Detail 1 section will become equal to the height of the sum field you dropped into the Detail 1 section in step 5.
- Click anywhere in the Title section; its properties will appear in the Properties window below the Palette. Select the Band height property and set
0as its value. - Similarly, repeat step 8 for the Page Header, Column Header, Column Footer, Page Footer, and Summary sections and set
0as the value for their Band height properties. The report in the Designer tab will look as shown:
- Right-click the Parameters node in the Report Inspector window on the left of the Designer tab. A pop-up menu will appear. Choose the Add Parameter option from the pop-up menu.
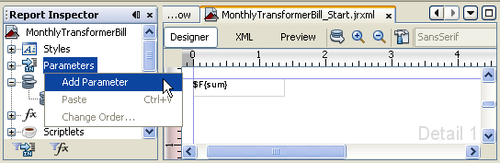
- The Parameters node will expand to show the newly added parameter named parameter1 at the end of the parameters list. Select parameter1 from the list; its properties will appear in the Properties window below the Palette.
- Click on the Name property of the parameter and type
TransformerIDas its value. The name of the parameter1 parameter will change to TransformerID. - Click on the Parameter Class property and select
java.lang.Integeras its value. - Click on the Default Value Expression property and enter
0as its value. Leave the rest of the parameter properties at their default values.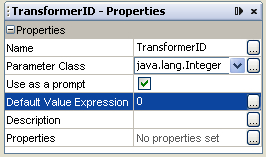
- Now right-click on the Parameters node in the Report Inspector window. A pop-up menu will appear. Choose the Add Parameter option. The Parameters node will expand to show the newly added parameter named parameter1 at the end of the parameters list. Select parameter1 from the list; its properties will appear in the Properties window below the Palette. Click on the Name property of the parameter in the Properties window and type
BillingMonthas its value. The name of the parameter will change to BillingMonth. - Click on the Default Value Expression property and enter
""as its value.
- Open the Report query window by clicking the Report query button on the right of the Preview tab button. A Report query window will appear.
- Type the following SQL query at the end of the existing text into the Report query window that you previously entered in step 3:
WHERE "Transformer"."TransformerID" = $P{TransformerID} AND "Transformer"."Month" = $P{BillingMonth}The complete expression in the editor will become:
SELECT SUM("Transformer"."Bill") FROM "Transformer" WHERE "Transformer"."TransformerID" = $P{TransformerID} AND "Transformer"."Month" = $P{BillingMonth}Click OK.
- Switch to the Preview tab. You will see a Parameter prompt dialog, which will ask you to enter a TransformerID. Type
2001as the value and click OK. Another parameter dialog will appear, which will ask you to enter the value of the billing month. TypeJan-10as the value and click OK. The preview will appear, which will show just a figure, as shown next. The figure is actually the sum of the bills of all consumers connected to a transformer. YourMonthlyTransformerBill.jrxmlsubreport is now ready.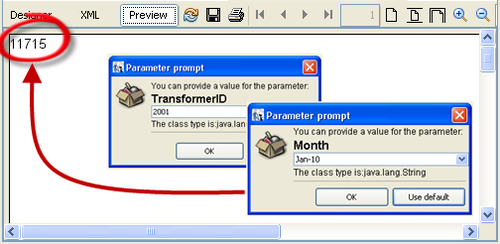
- Switch back to the Designer tab. Open the
FeederSummaryReport.jrxmlfile from theC:JasperReportsCookBookSamplesfolder on your PC. The Designer tab of iReport shows a report containing data in the Title, Page Header, Column Header, and Detail 1 sections, as shown in the following screenshot: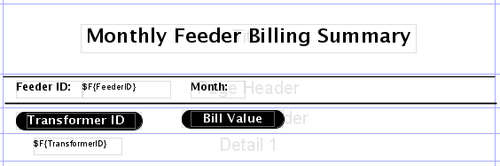
- Switch to the Preview tab. You will see a Parameter prompt dialog, enter
1001as the value of the FeederID parameter. It will display a list for transformers of the specified feeder: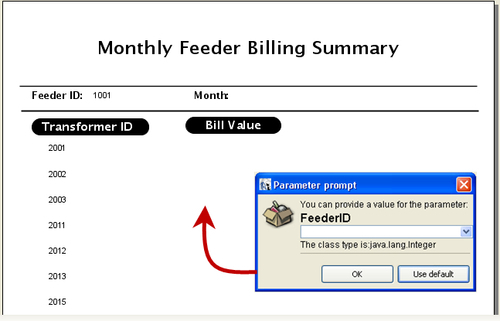
- Switch back to the Designer tab. Right-click on the Parameters node in the Report Inspector window. A pop-up menu will appear. Choose the
Add Parameteroption. The Parameters node will expand to show the newly added parameter namedparameter1at the end of the parameters list. Selectparameter1from the list; its properties will appear in the Properties window below the Palette. Click on the Name property of the parameter in the Properties window and typeBillingMonthas its value. The name of the parameter will change toBillingMonth. - Click on the Default Value Expression property and enter
""as its value.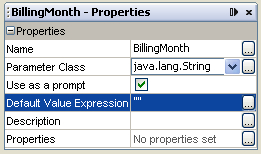
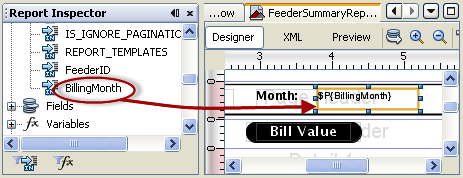
- Double-click the Parameters node in the Report Inspector window on the left side of the Designer tab. The Parameters node will expand to show a list of parameters.
- Drag-and-drop the BillingMonth parameter from the Parameters node into the Page Header section on the right side of the static text component labeled Month:
- Drag-and-drop a Subreport component from the Palette into the Detail 1 section just below the Bill Value column header. A Subreport wizard dialog will appear, as shown in the following screenshot:

- Select the Use an existing report option and click the Browse button to browse to the
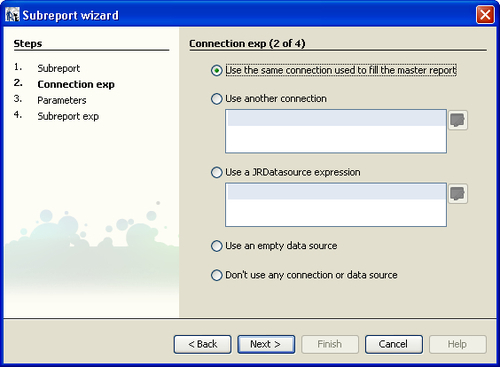
MonthlyTransformerBill.jrxmlsubreport file located in theC:JasperReportsCookBookSamplesfolder and click the Open button. The browser dialog will disappear. Click the Next button in the Subreport wizard dialog. - A Connection exp (2 of 4) dialog will appear, as shown next. Notice that now the left side of the Subreport wizard shows four steps (Subreport, Connection exp, Parameters, Subreport exp). You are at step 2 (Connection exp), which is shown in bold. Click the Next button.
- A Parameters (3 of 4) dialog will appear. This will show the
TransformerIDandBillingMonthparameters of theMonthlyTransformerBill.jrxmlsubreport and allow you to enter an expression to map these parameters to elements (that is, Fields or Variables) of the mainFeederSummaryReport.jrxmlreport.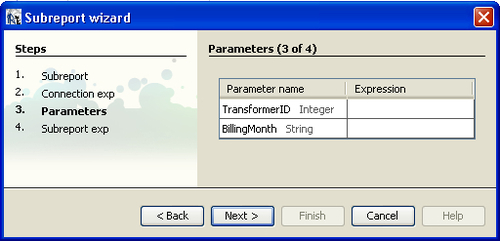
- Click on the Expression field beside the TransformerID parameter. A drop-down list will open. This will show all the elements of the main
FeederSummaryReport.jrxmlreport in the form of a drop-down list. Select the TransformerID field from the list. - Now click on the expression field beside the
BillingMonthparameter. A drop-down list will open; selectBillingMonthparameter from the list. Click the Next button.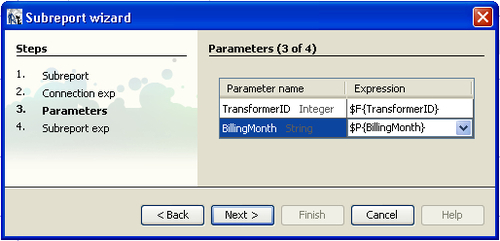
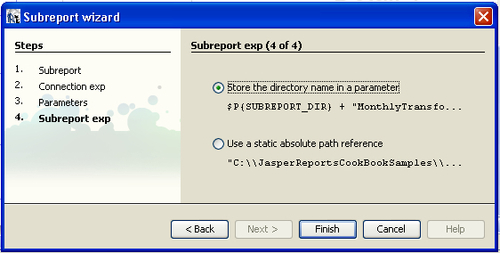
- A Subreport exp (4 of 4) dialog will appear. Continue with the Store the directory name in a parameter option selected and click the Finish button.
- The subreport element will be placed in the Detail 1
section.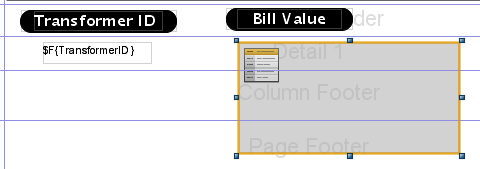
- Click on the subreport element; its properties will appear in the Properties window below the Palette. Find the Height property and set
19as its value. The size of the subreport element will become appropriate according to the size of the other field placed in the Detail 1 section. Use your mouse to align this subreport element in the Detail 1 section, as shown in the following screenshot:
- Click the Preview button. You will see the Parameter prompt dialogs. Enter
1001andJan-10as value of feeder ID and billing month parameters. The report will show bill values for all transformers of the specified feeder for the particular month, as shown in the following screenshot: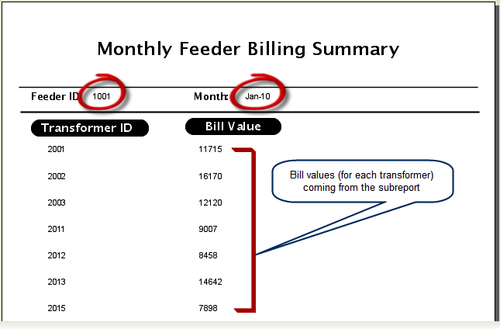
You have done two main things in this recipe. First you designed a subreport in steps 1 to 19. The subreport shows only one figure in its view, as shown in the screenshot for step 19. The figure represents the total bill of all customers connected to a particular transformer of the electricity supply company.
Notice from the SQL query of step 3 that it has a SUM function. The subreport uses the SUM function of SQL to calculate the sum of all bills.
Then in step 20, you opened a main report named FeederSummaryReport.jrxml and later in steps 26 to 33 you inserted the MonthlySummaryReport.jrxml subreport in the Detail 1 section of the main report. Anything that resides inside the Detail 1 section gets processed once with every record. Each record in the main report represents a transformer of the electric supply company. Therefore, the main FeederSummaryReport.jrxml report gets a copy of the subreport for each transformer.
Recall from steps 30 and 31 of the recipe that you mapped TransformerID and BillingMonth parameters of the main FeederSummaryReport.jrxml report to the same parameters of the MonthlyTransformerBill.jrxml subreport. This means the main FeederSummaryReport.jrxml report will pass the transformer ID and billing month to the subreport. The subreport will provide the total bill of all consumers connected to that transformer for the particular month. This way, the main FeederSummaryReport.jrxml report passes all transformer IDs one by one to the subreport, with the same billing month every time, and gathers the bills of all transformers of the particular feeder into the monthly feeder billing summary.
You selected the Store the directory name in a parameter option in step 32. As a result, iReport stored the path to the MonthlyTransformerBill.jrxml subreport file in a parameter named SUBREPORT_DIR, which is useful whenever you need to relocate your subreport files (especially if there are multiple subreports in a master report).
Relocating subreports simply requires changing the value of the SUBREPORT_DIR parameter, which you do directly from the Report Inspector window. For this purpose, you will first click on the SUBREPORT_DIR parameter in the Parameters node from the Report Inspector window. Then you will find the Default Value Expression property from the Properties window and provide a path to the directory where your subreport files are located. For example, if your files are located in a directory named JasperReportsCookBookSamples on your C: drive, the value of the Default Value Expression property should be C:JasperReportsCookBookSamples.
Especially notice that the expression is given in double-quotes ("") and it uses double backslashes (\) in the directory path notation.