
IN THIS CHAPTER
Configuring Flex
Testing the configuration
There are a number of different ways to configure your Flex development projects, depending on the amount of code involved, the intended usage of your Flex code, and other factors. In this chapter, you learn several ways to configure your Flex projects for these various scenarios as well as explore a few useful libraries to include in your projects that make working with Java on the server side easier.
Note
This chapter assumes that you've already installed the Flex SDK and the Flex Builder IDE. For more information on installing these tools, see Appendix A.
There are a number of options available to you when writing a Flex project by using Flex Builder. Among the project types available in Flex Builder are:
Flex project. This type of project involves creating a main application MXML file along with any other resources, such as ActionScript classes, images, and CSS files. The code you write is compiled by the Flex compiler into an SWF file. An HTML wrapper file for the SWF file can also be optionally generated to run your compiled SWF file in a Web browser. Flex projects allow you to develop by using a visual editor that lets you add components directly to your application via drag and drop as well as visually resize and lay out components. Flex projects also make use of a property editor that lets you modify the properties of your components, such as text labels and styles. You can also directly edit the MXML source code.
ActionScript project. This type of project involves creating a set of ActionScript classes by using the Adobe Flash API. This type of project doesn't use the Flex framework and, as such, doesn't include a visual editor or Design view in Flex Builder. Rather than creating application UI classes by using MXML files and visual components, an ActionScript project typically consists of both visual and nonvisual components written in ActionScript code exclusively. You compile these projects into stand-alone SWF files just like a Flex application and then run them in the stand-alone Flash Player. ActionScript code can be used in Flex applications, Flash applications, and Adobe AIR applications.
Flex Library project. This type of project involves creating MXML files, ActionScript classes, and other resources that are compiled and packaged into an SWC file. An SWC file in a Flex application is much like a JAR file in a Java application. It acts as a library whose resources are made available to a Flash or Flex application at runtime. A library can be used in a couple of different ways. First, the resources of the library can be included in the SWF file of an application when that application is compiled. In this case, only the specific resources needed by the application are included in the compiled SWF file. Second, the library can be deployed with the application and the resources in the library accessed at runtime by the application. This is most similar to the Java way of doing things.
Let's take a look at these Flex and Flex Library project types and how to configure them. In general, each of the different project types has the same structure. A source folder holds all the ActionScript and MXML resources, which are compiled to some output folder. Any external libraries needed by the application are included in the project's build path, along with any necessary Flex framework code, such as JavaScript files that help determine the user's version of Flash Player and work with the browser's history for accessibility purposes.
Note
Because you won't use the ActionScript project type in this book, it's not discussed in detail here. The Flex Builder documentation can provide you with more information about ActionScript projects should you choose to explore them on your own.
To create a Flex project with Java code in Flex Builder, follow these steps:
Choose Window

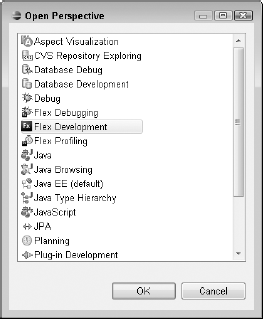
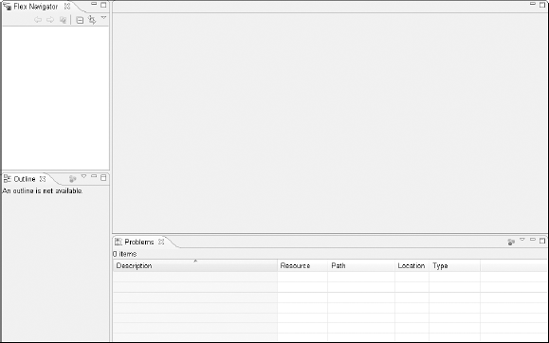
Choose Flex Development from the list and then click OK. The Flex Development perspective, as shown in Figure 2.2, opens. The Flex Development perspective is used to create all three types of Flex projects in Flex Builder: Flex projects, ActionScript projects, and Flex Library projects. The tab in the top-left corner of the Flex Builder window is the Flex Navigator view. This view is where your Flex projects appear when created.
Right-click in the Flex Navigator view and then choose New
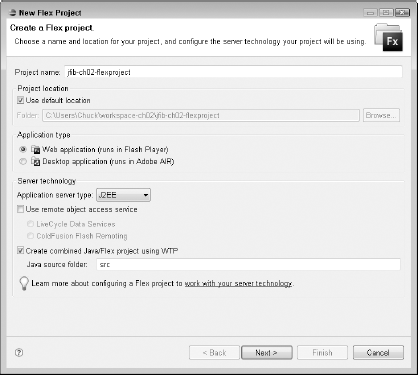
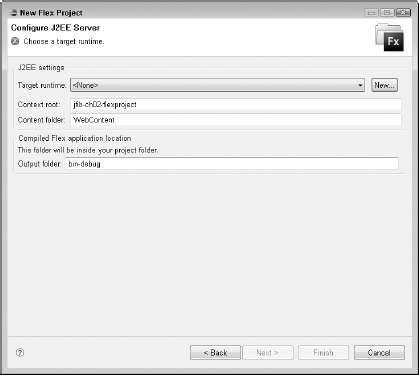
Type jfib-ch02-flexproject in the Project name text field, choose J2EE from the Application server type dropdown list, deselect the Use remote object access service check box, and then click Next. The Configure J2EE Server screen of the New Flex Project wizard, as shown in Figure 2.4, opens.
Choose your J2EE server configuration:
If your JBoss configuration appears in the Target runtime dropdown list, choose it from the list.
If your JBoss configuration doesn't appear in the Target runtime dropdown list, follow these steps to add it:
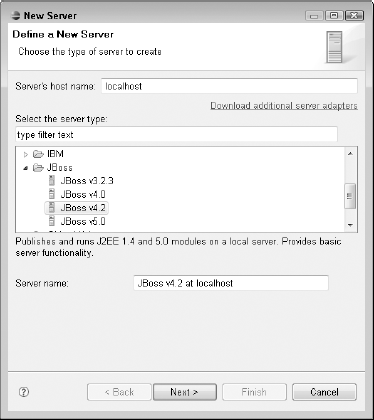
Click the New button next to the Target runtime dropdown list. The New Server dialog box, as shown in Figure 2.5, opens.
Click the arrow next to JBoss to expand it and then choose JBoss v4.2 from the list. The default values are appropriate.
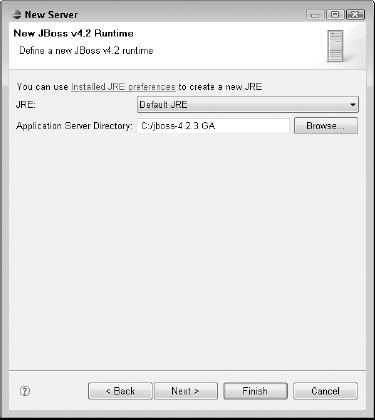
Click Next. The first screen of the New JBoss v4.2 Runtime wizard, as shown in Figure 2.6, opens.
Click the Browse button next to the Application Server Directory text field. The Browse for Folder dialog box opens.
Choose the root of your JBoss installation from the Browse for Folder dialog box (
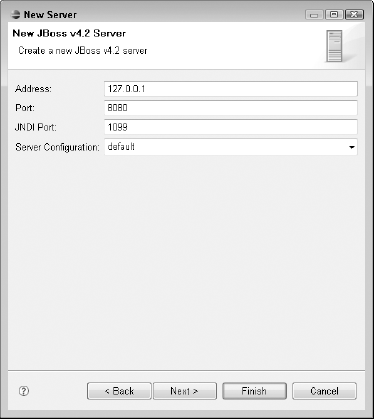
c:jboss-4.2.3.GA, for example) and then click OK. The Browse for Folder dialog box closes, and the path to your JBoss installation appears in the Application Server Directory text field on the New JBoss v4.2 Runtime wizard screen.Click Next. The next screen of the New JBoss v4.2 Runtime wizard, as shown in Figure 2.7, opens. The default values are appropriate.
Click Finish. The New JBoss v4.2 Runtime wizard closes.
Choose JBoss v4.2 from the Target runtime dropdown list.
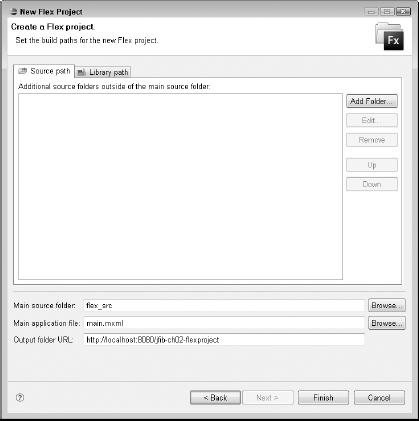
Click Next. The Create a Flex project screen of the New Flex Project wizard, as shown in Figure 2.8, opens. The default values are appropriate.
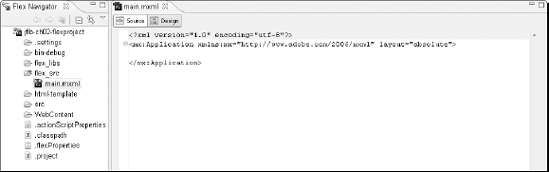
Click Finish. The New Flex Project wizard closes. The newly created Flex project appears in the Flex Navigator view, and the
Main.mxmlapplication file opens in the editor, as shown in Figure 2.9.
A Java and Flex project contains the following folder structure:
bin-debug. This folder contains the compiled SWF files and HTML wrapper files for your project, along with any necessary Flex libraries and JavaScript utility files.flex_libs and flex_src. These two folders contain any Flex libraries needed to compile the application and the source MXML and ActionScript files for the application, respectively.html-template. This folder also contains the utility JavaScript files as well as an HTML template used to generate the HTML wrapper file for the application SWF at runtime. The HTML template contains parameters passed into the SWF when the HTML page is loaded into a browser and JavaScript code that checks to see whether the Flash Player is installed in the browser and that it's the version of the Flash Player that the SWF needs to run. These values are determined by the compile options in the Flex Builder project.src. This folder contains the Java source files for your project.WebContent. This folder contains all the deployment configuration files for the Web application, such as theweb.xmlfile.
Note
For more on the various Flex user interface components and classes, see Chapter 4.
Ensure that the Flex Development perspective is still open. Then, to create a Flex Library project, follow these steps:
Right-click in the Flex Navigator view and then choose New
Type jfib_ch02_libraryproject as the project name. Note the use of underscores here rather than dashes. The default values for the other settings are appropriate.
Click Next. The second screen of the New Flex Library Project wizard, as shown in Figure 2.11, opens.
On the Classes tab, click the check box next to the
srcfolder.Click the Assets tab and then click the check box next to the
srcfolder.Click Finish. The New Flex Library Project wizard closes, and the newly created project appears in the Flex Navigator view.
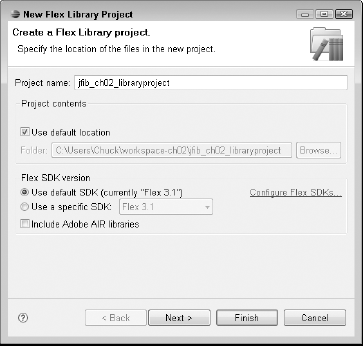
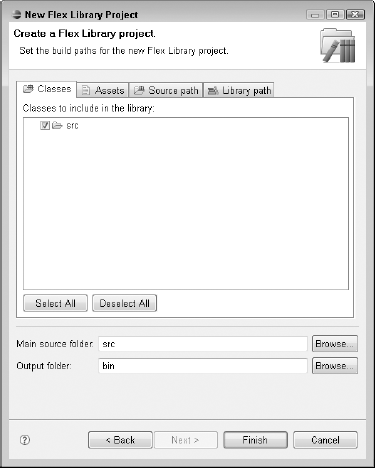
Figure 2.11. On the second screen of the New Flex Library Project wizard, you can choose the ActionScript class folders as well as the folders containing nonembedded assets that are added to your library.
This project contains only two folders: an src folder that contains the source code for ActionScript and MXML files to be included in the library and a bin folder to hold the compiled SWC file created from the source code. Remember that an SWC file isn't something that runs on its own but instead contains code that's referenced by other MXML or ActionScript code that's compiled into an SWF application.
When you create this project, Flex Builder places a red X next to the project in the Flex Navigator view. If you click the Problems tab at the bottom of the workspace, you see that the red X indicates that there are no source code files included in the library. This makes sense because a library that includes nothing isn't much of a library! Once you add some ActionScript and MXML files to the src folder for this library project, you can add them to the classes included in the library by right-clicking the file and then choosing Include Class in Library from the popup menu.
It's useful to create a library when you have a set of ActionScript or MXML code that can be reused in several Flex applications. For example, you might create an ActionScript class that contains mathematical or string manipulation functions that you can use in multiple applications.
Because you've configured Flex Builder to output to your configured JBoss application server, you can quickly test your Flex Builder project configurations to make sure that your applications deploy and run properly on the server. First, you learn to deploy your application to the JBoss server and then run it online. After that, you learn how to add debug information to the compiler and then trace information to your Flex code to help you debug your Flex applications from within the Flex Builder IDE.
You can build, deploy, and test your Java and Flex projects all from within Flex Builder with a single command. There's a simple configuration change that's needed in order to set things up properly to allow this to work correctly.
In a Java Web application, a configuration file called web.xml contains information about the Web application, including definitions for any Java servlets, servlet filters (Java classes that are run before the servlets when a request is made to the server for a particular servlet), and other identifying information about the Web application.
Note
For more on Java Web applications, see Chapter 6.
One of the other things defined in web.xml is a set of welcome files. These files are the ones used if no specific file is given in a URL. Typically, index.html is the default welcome file. If you visit a URL such as www.somewebserver.com, the Web server uses the default welcome file to fulfill the request, so that the page you're actually visiting is www.somewebserver.com/index.html. In a Java Web application, you can specify multiple welcome files in the web.xml configuration file. The application server checks for each one of them in the order specified and then uses the first one it finds to fulfill the request.
When Flex Builder creates the Flex project for a Java and Flex application, it adds a default set of welcome files to the web.xml configuration file. However, none of these files actually exist in the project. The only HTML file that's created by Flex Builder when you create your Java and Flex project is a wrapper HTML file with the same name as your MXML application file. By default, Flex Builder names the MXML application file Main.mxml and the corresponding HTML file main.html. In order to deploy and run your project from inside Flex Builder, you must do one of two things:
Add an HTML file or JSP page to your project that uses one of the names listed in the
web.xmlconfiguration file. This option is most likely to be used in a production environment, where you may want the user to log in or choose between a Flash and non-Flash site before entering your main application area.Add the
main.htmlfile to the welcome file list in theweb.xmlconfiguration file. This is a quick configuration change that can get your application up and running in Flex Builder quickly so that you can experiment and test things as you develop.
Because this project is currently just a shell with no real application logic yet, adding the main.html file to the list of welcome files in the web.xml configuration file is the quickest way to get started with this project. To modify the web.xml configuration file and build, deploy, and run the project within Flex Builder, follow these steps:
Click the arrow next to the
jfib-ch02-flexprojectproject in the Flex Navigator view to expand it.Click the arrow next to the
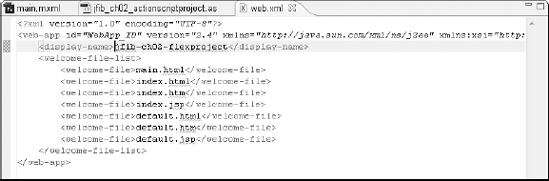
WebContentfolder to expand it and then click the arrow next to theWEB-INFfolder to expand it.Double-click
web.xmlto open it in the editor. The code listing is shown in Figure 2.12.Add the
main.htmlfile to the top of the list of welcome files. Be sure to put it between opening and closing<welcome-file>tags like the rest of the welcome files in the list.Click the Save button or choose File
Right-click the
jfib-ch02-flexprojectproject in the Flex Navigator view and then choose Run AsClick the
JBoss v4.2 at localhostitem in the server selection box and then click Finish. The Run On Server dialog box closes.
When you click the Finish button to close the Run On Server dialog box, a few things happen:
An Ant build script is run, which packages all the files in the application into a Java Web application archive (WAR) file and then deploys that WAR file to the JBoss application server.
The JBoss server is started.
Once the JBoss server is started, the Web browser built into Flex Builder is launched with the URL of your project. Java Web applications are given a context, which is a way of deploying several applications to the same application server while keeping them separate from one another by providing a specific URL pattern in which they run. A Web application can specify a context, but if no context is specified, the default context name is the name of the WAR file without the
.warextension. In this case, the application was built and deployed asjfib-ch02-flexproject.war, so the URL ishttp://localhost:8080/jfib-ch02-flexproject/. The address of the application server islocalhost. It runs on port8080— the port must be specified if the application isn't running on the default HTTP port of 80. Finally, the application runs in the contextjfib-ch02-flexproject.
Note
For more on installing Apache Ant, see Chapter 1. For more on Apache Ant build scripts, see Chapter 6.
You can see what the application running inside the Flex Builder Web browser looks like in Figure 2.14. It opens in its own tab in the editor view, alongside any source code files you have open in the editor.
The MXML file created by the New Flex Project wizard contains only empty opening and closing <mx:Application> MXML tags, so the resulting compiled SWF isn't very interesting. Close the Flex Builder Web browser by clicking the X on the right side of the tab.
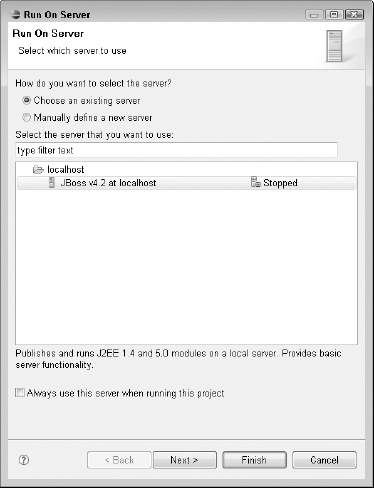
Figure 2.13. The Run On Server dialog box lets you choose a server configuration to deploy and run your application on. The JBoss configuration you created previously appears here for you to use.
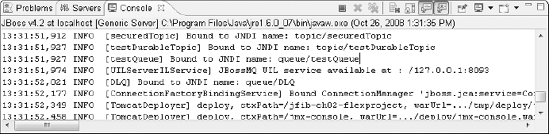
Figure 2.14. Using the Run On Server dialog box causes the application to be built and packaged into a WAR file, deployed to the JBoss application server, and launched in Flex Builder's built-in Web browser.
To give you a sneak preview of Flex development and show how Flex Builder makes it easy to redeploy your applications as you develop to see how they're progressing, add a few components to the MXML file by following these steps:
Click the arrow next to the
jfib-ch02-flexprojectproject in the Flex Navigator view to expand it.Click the arrow next to the
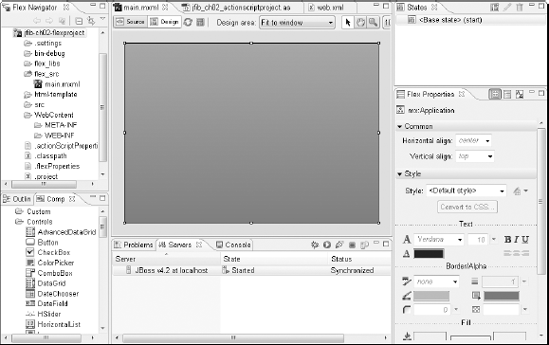
flex_srcfolder to expand it and then double-clickMain.mxml. TheMain.mxmlfile opens in the editor in Source view.Click the Design button below the
Main.mxmltab in the editor. TheMain.mxmlfile editor switches to Design view, and the Flex Properties, States, and Components views, as shown in Figure 2.15, open.Click the arrow next to Controls in the Components view to expand it and then click
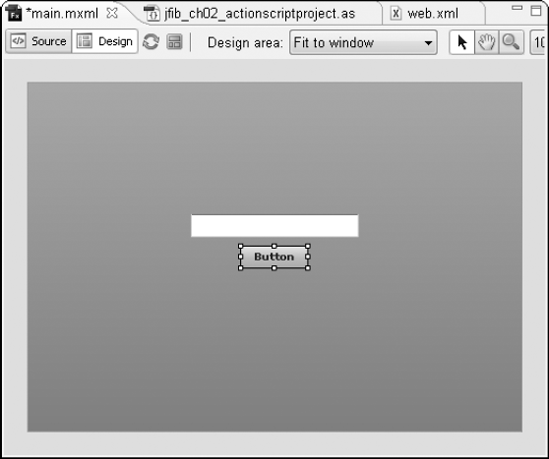
TextInputand drag it onto theMain.mxmlapplication in the editor. ATextInputcontrol appears inside theMain.mxmlapplication.Click
Buttonin the Components view and then drag it onto theMain.mxmlapplication in the editor below theTextInputcontrol. AButtoncontrol appears inside theMain.mxmlapplication. The application should look like Figure 2.16.Click the
TextInputcontrol in theMain.mxmlapplication. The Flex Properties view on the right changes to show the properties of theTextInputcontrol.Type theMessage in the ID text field of the Flex Properties view.
Click the
Buttoncontrol in theMain.mxmlapplication. The Flex Properties view on the right changes to show the properties of theButtoncontrol.Type theButton in the ID text field of the Flex Properties view.
Type Get A Message! in the Label text field of the Flex Properties view.
Type theMessage.text = "Hello, World!" in the On click text field of the Flex Properties view.
Click the Save button to save the
Main.mxmlapplication. The file is saved, and the Ant build script is run to rebuild the application.
Redeploy and run the application by using the previous steps. This time, when the Web browser opens the application, you see the Button and TextInput controls you added to the application. Click the Button control, and you see the message you added to the Button control's on-click event appear in the TextInput control, as shown in Figure 2.17.
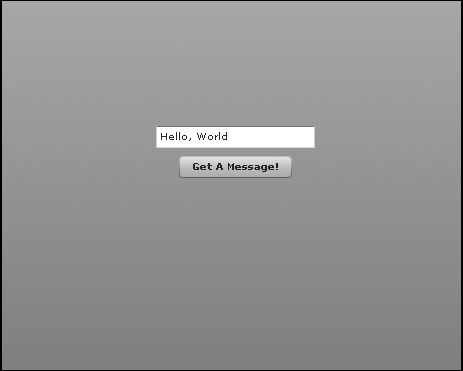
Figure 2.17. After adding some controls to the application, you can rebuild, deploy, and run it on the JBoss application server the same way you did before to see the updated version. Being able to update and run the application while developing helps you see how your application functions as you add more features and lets you correct problems as you go.
During Flex development, it's sometimes helpful to be able to see messages and inspect the code during runtime to diagnose any problems that arise. This is especially true in large applications, where many MXML and ActionScript files make up a single application and the application flows through code in many different files. Two means of examining what's going on in your code are adding trace messages and setting debugging breakpoints.
The trace() function in Flex allows you to print out messages to the console while running in Flex Builder so that you can see what's happening in an application at any given point. This is useful if, for example, your application code uses many different functions for a given feature and you want to print out a message in each one to be sure they're all being called — and in the proper order.
You typically don't leave trace messages in your final application — they're useful only during development, where you can see them being output in the Flex Builder console. In production applications, they only add unnecessary overhead.
To view trace messages in Flex Builder, your application must be running in Debug mode within Flex Builder. Debug mode allows you to inspect the output of any trace messages as well as set breakpoints in your application. A breakpoint pauses execution of the application at the selected location. You can use Flex Builder's Flex Debugging perspective to inspect the values of variables while the application is paused or to step through the application one line at a time to see what the code is doing. To debug with Flex Builder, your application must be compiled with debug information added. This increases the size of the final SWF file, so it's not recommended that this information be included in the final release version of your application. Flex Builder automatically compiles your Flex applications with debug information included for use in development. For production releases, you can create an optimized SWF file by choosing Project
To demonstrate using trace messages and debugging the application, you can change the click action of the Button control to call an ActionScript function that performs a few functions. Then, you can add a trace message to the ActionScript function and set a breakpoint to see how the debugger operates.
Click the Source button below the Main.mxml editor tab to switch the editor back to Source view. The MXML code for the Button and TextInput controls has been added to the source code. Add the following MXML block to the Main.mxml application just above the <mx:TextInput> tag:
<mx:Script>
     <![CDATA[
          private function setMessage(e:MouseEvent):void
          {
                  trace("entering setMessage function");
                  var buttonLabel:String = (e.target as Button).label;
                  var dateTime:Date = new Date();
                  var dateString:String = dateTime.
        toLocaleDateString();
                  var timeString:String = dateTime.
        toLocaleTimeString();
                theMessage.text = "Clicked " + buttonLabel + " on "
        + dateString + " at " + timeString;
                  trace("exiting setMessage function");
                }
         ]]>
    </mx:Script>
Note
For more on Flex and ActionScript code and concepts, see Chapter 4.
This code constructs a String based on the label of the button that was clicked as well as the date and time and then sets the text property of the TextInput control to that String. At the beginning and end of the function, Flex trace messages are output to the console. To tie this function to the clicking of the Button control, change the click attribute of the <mx:Button> tag to the following:
click="setMessage(event)"
To set a breakpoint in the code in Flex Builder, you simple double-click the left margin next to the line of code at which you want the application execution to pause. Double-click the left margin next to the second line of the setMessage() function where the value of the buttonLabel variable is set. You see a blue dot icon appear in the left margin, as shown in Figure 2.18.
Note
When you debug your application, Flex Builder may launch it in your default system Web browser rather than the internal Flex Builder Web browser. You must have the debug version of Flash Player installed, which is included by default when you install Flex Builder.
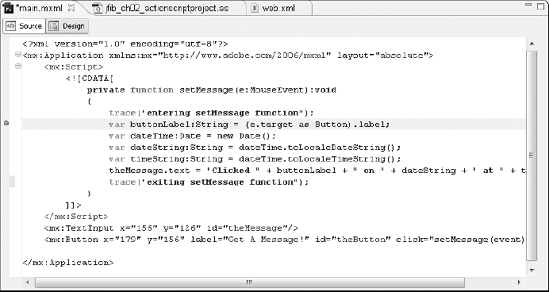
Figure 2.18. When you set a breakpoint in Flex Builder, a blue dot icon appears in the margin to the left of the line containing the breakpoint. The highlighted line has this icon before it.
To run your application, follow the steps you previously used to build, deploy, and run the application on the JBoss server. Once the application is started, close the internal Flex Builder Web browser by clicking the X on the right side of the tab and then start up the debugger by following these steps:
Right-click the
jfib-ch02-flexprojectproject in the Flex Navigator view and then choose Debug AsFlex Application from the popup menu. A Web browser launches with the application running.Click the
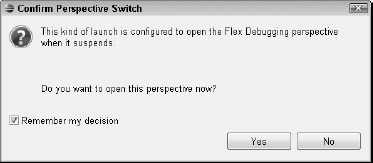
Get A Message!button in the application. The Flex Builder window returns to the front, and a dialog box opens, asking you to switch to the Flex Debugging perspective, as shown in Figure 2.19.Click the Remember my decision check box and then click Yes. The Flex Debugging perspective, as shown in Figure 2.20, opens.
Take a moment to explore the Flex Debugging perspective. In the top-right corner is a set of views that includes the Variables, Breakpoints, and Expressions views. The Variables view lets you see the current value of variables in your application at the point where the application has paused. The Breakpoints view lets you see and toggle your breakpoints on and off. The Expressions view lets you type expressions whose value you want to evaluate. In the Console view at the bottom of the screen, the trace message you set at the beginning of the setMessage() function has been output to the console.
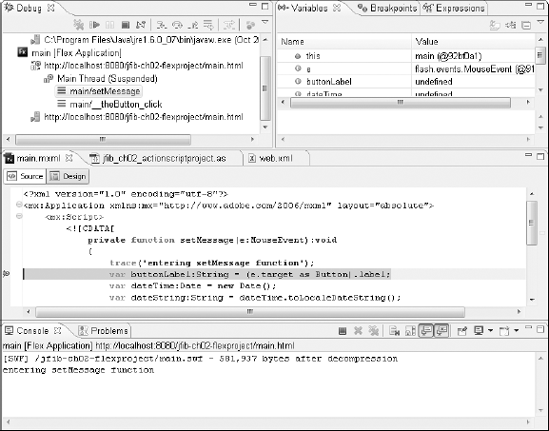
Figure 2.20. The Flex Debugging perspective contains a number of views that let you inspect variable values, see and toggle breakpoints, and step through the code one line at a time.
To step to the next line of the application, press F6. As you step line by line through the application code, the Variables view updates the values of the variables as they're set. The first time you press F6, for example, the value of the buttonLabel variable changes from undefined to Get A Message! Step through the code line by line, and watch all the variable values change in the Variables view. When you reach the end of the function, the final trace message is printed out to the Console view. If you keep pressing F6, the debugger actually steps into the internals of the Flex framework. To continue running your application, press the green Run arrow button in the Debug view to the left of the Variables view.
Now switch to the Breakpoints view and then click the check box next to the breakpoint to toggle it off. Switch back to your Web browser and then click the Get A Message! button again. This time, the application doesn't stop, but going back into Flex Builder reveals that the trace messages still print out to the Console view. The ability to turn breakpoints on and off as needed comes in handy when stepping through a large body of code to try to pinpoint the location of a problem. You can have the application stop at some breakpoints and skip others while still keeping the locations of all breakpoints intact.
Using trace() is most appropriate during development by using the debug version of the Flash Player. However, you probably want to be able to also log errors and other information in your deployed applications. Flex includes a logging framework that allows you to write such information out to log files. Flex logging consists of two main components:
The target tells the logging framework where to output log messages. Flex includes a target implementation,
TraceTarget, that outputs log messages by using the same internal mechanism as thetrace()function. You can also implement a custom Flex logging target by extending the FlexAbstractTargetclass and providing an implementation of the abstractlogEvent()function.The logger is the component that actually sends the log messages to the target. The logger provides details about the code sending the message, the level of the message (info, debug, error, etc.), and the text of the message itself. The logger also contains the set of targets that receive the messages. Multiple targets can be added to a logger, and each of these targets can be configured to receive a subset of the logged messages based on which code is logging them and the level of the message.
Changing the Main.mxml application to use the Flex logging framework requires only a few changes to the code. First, add the following code to the Main.mxml file just above the setMessage() function:
import mx.logging.*;
import mx.logging.targets.TraceTarget;

private function setupLogger():void
{
   var target:TraceTarget = new TraceTarget();

   // possible values: ALL, DEBUG, INFO, WARN, ERROR, FATAL
   target.level = LogEventLevel.ALL;
   target.includeCategory = true;

   // log the level
   target.includeLevel = true;

   // log the date and time
   target.includeDate = true;
   target.includeTime = true;

   Log.addTarget(target);
}
First, the Flex logging classes are imported into the Main.mxml application. This code uses the built-in TraceTarget. The setupLogger() function configures the target and adds it to the logger. This target logs messages at all levels (LogEventLevel.ALL), but you could specify a less verbose level of logging by choosing a specific value. Each level includes messages at that level or higher. For example, specifying LogEventLevel.WARN logs messages at the WARN, ERROR, and FATAL levels. The target is then configured to include category, level, date and time information along with the message being logged. Finally, the target is added to the logger.
To ensure that the setupLogger() function is executed when the application begins, add a creationComplete attribute to the <mx:Application> tag so that it matches the following code:
<mx:Application xmlns:mx="http://www.adobe.com/2006/mxml"
   creationComplete="setupLogger();" layout="absolute">
The creationComplete attribute specifies a function to be run once the application has been fully instantiated. Here, the setupLogger() function runs, and the logging framework is configured and ready to use.
Now change the two trace() statements in the setMessage() function to use the logger instead. The first statement changes from this:
trace("entering setMessage function");to this:
Log.getLogger("main").debug("entering setMessage function");This statement retrieves the logger for the category "main", referring to the Main.mxml application, and sends a debug level message. This message is sent to the TraceTarget added to the logger, which in turn outputs this message — along with the category, level, date, and time information — by using the trace mechanism.
Although this example uses the TraceTarget class, you could also implement a custom logging target that extends AbstractTarget and sends the output to a server (by using a Web service or other remote call, for example) or splits the output among multiple log files on the client machine. Using the logging framework rather than simply using trace() provides more flexibility for getting debug and error information from your deployed applications.
In this chapter, you learned how to set up your Flex Builder configuration for integration with Java applications and deployment to the JBoss application server.
First, you learned about the different Flex project types available to you in the Flex Builder IDE. Next, you looked at each project type individually and explored their similarities and differences. After that, you learned how to test your configuration and then deploy it to the JBoss server in the Flex Builder IDE.
Finally, you learned how to add trace information, logging configuration, and breakpoints to your Flex applications so they can be run in the Flex debugger to provide valuable information to you while you develop your Flex code.