
Chapter 2. Working with HTML
In 1995 Netscape tasked software developer Brendan Eich with creating a programming language designed for adding interactivity to pages in the Netscap Navigator browser. In response, Eich infamously developed the first version of JavaScript in 10 days. A few years later, JavaScript has became a cross-browser standard through the adoption of the ECMAScript standardization.
Despite the early attempt at standardization, web developers battled for years with browsers that had different JavaScript engine interpretations or features. Popular libraries, such as jQuery effectively allowed us to write simple cross-browser JavaScript. Thankfully, today’s browsers share a near uniform implementation of the language. Allowing web developers to write “vanilla” (library-free) JavaScript to iteract with an HTML page.
When working with HTML, we are working with the Document Object Model (DOM), which is the data representation of the HTML page. The recipes in this chapter will review how to interact with the DOM of an HTML page by selecting, updating, and removing elements from the page.
2.1 Accessing a Given Element and Finding Its Parent and Child Elements
Problem
You want to access a specific web page element, and then find its parent and child elements.
Solution
Give the element a unique identifier:
<divid="demodiv"><p>This is text.</p></div>
Use document.getElementById() to get a reference to the specific element:
constdemodiv=document.getElementById("demodiv");
Find its parent via the parentNode property:
constparent=demodiv.parentNode;
Find its children via the childNodes property:
constchildren=demodiv.childNodes;
Discussion
A web document is organized like an upside-down tree, with the topmost element at the root and all other elements branching out beneath. Except for the root element (HTML), each element has a parent node, and all of the elements are accessible via the document.
There are several different techniques available for accessing these document elements, or nodes as they’re called in the Document Object Model (DOM). Today, we access these nodes through standardized versions of the DOM, such as the DOM Levels 2 and 3. Originally, though, a de facto technique was to access the elements through the browser object model, sometimes referred to as DOM Level 0. The DOM Level 0 was invented by the leading browser company of the time, Netscape, and its use has been supported (more or less) in most browsers since. The key object for accessing web page elements in the DOM Level 0 is the document object.
The most commonly used DOM method is document.getElementById(). It takes one parameter: a case-sensitive string with the element’s identifier. It returns an element object, which is referenced to the element if it exists; otherwise, it returns null.
Note
There are numerous ways to get one specific web page element, including the use of selectors, covered later in the chapter. But you’ll always want to use the most restrictive method possible, and you can’t get more restrictive than document.getElementById().
The returned element object has a set of methods and properties, including several inherited from the node object. The node methods are primarily associated with traversing the document tree. For instance, to find the parent node for the element, use the following:
constparent=document.getElementById("demodiv").parentNode;
You can find out the type of element for each node through the nodeName property:
consttype=parent.nodeName;
If you want to find out what children an element has, you can traverse a collection of them via a NodeList, obtained using the childNodes property:
letoutputString='';if(demodiv.hasChildNodes()){constchildren=demodiv.childNodes;children.forEach(child=>{outputString+=`has child${child.nodeName}`;});}console.log(outputString);;
Given the element in the solution, the output would be:
"has child #text has child P has child #text "You might be surprised by what appeared as a child node. In this example, whitespace before and after the paragraph element is itself a child node with a nodeName of #text. For the following div element:
<divid="demodiv"class="demo"><p>Some text</p><p>Some more text</p></div>
the demodiv element (node) has five children, not two:
haschild#texthaschildPhaschild#texthaschildPhaschild#text
The best way to see how messy the DOM can be is to use a debugger such as the Firefox or Chrome developer tools, access a web page, and then utilize whatever DOM inspection tool the debugger provides. I opened a simple page in Firefox and used the developer tools to display the element tree, as shown in Figure 2-1.
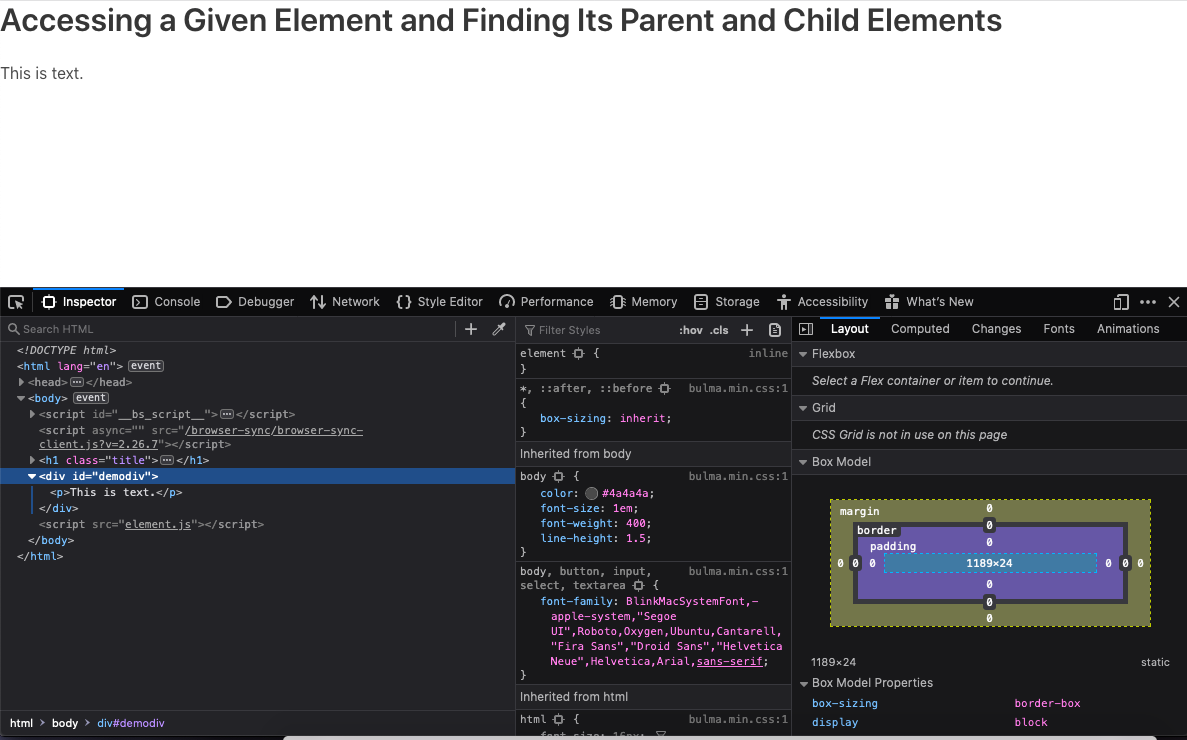
Figure 2-1. Examining the element tree of a web page using Firefox’s developer tools
2.2 Traversing the Results from querySelectorAll() with forEach()
Problem
You want to loop over the nodeList returned from a call to querySelectorAll().
Solution
In modern browsers, you can use forEach() when working with a NodeList (the collection returned by querySelectorAll()):
// use querySelector to find all list items on a pageconstitems=document.querySelectorAll('li');items.forEach(item=>{console.log(item.firstChild.data);});
Discussion
forEach() is an Array method, but the results of querySelectorAll() is a NodeList which is a different type of object than an Array. Thankfully, modern browsers have built in support for forEach, allowing us to iterate over a NodeList like an array.
Unfortunately, Internet Explorer (IE) does not support using forEach in this way. If you’d like to support IE, the recommended approach is to include a polyfill that uses a standard for loop under the hood:
if(window.NodeList&&!NodeList.prototype.forEach){NodeList.prototype.forEach=function(callback,thisArg){thisArg=thisArg||window;for(vari=0;i<this.length;i++){callback.call(thisArg,this[i],i,this);}};}
In the polyfill, we check for the existence of Nodelist.prototype.forEach. If it does not exist, a forEach method is added to the Nodelist prototype that uses a for loop to iterate over the results of a DOM query. By doing so, you can use the forEach syntax freely across your codebase.
2.3 Adding Up Values in an HTML Table
2.4 Problem
You want to sum all numbers in a table column.
Solution
Traverse the table column containing numeric string values, convert to numbers, and sum the numbers:
letsum=0;// use querySelector to find all second table cellsconstcells=document.querySelectorAll('td:nth-of-type(2)');// iterate over eachcells.forEach(cell=>{sum+=Number.parseFloat(cell.firstChild.data);});
Discussion
The parseInt() and parseFloat() methods convert strings to numbers, but parseFloat() is more adaptable when it comes to handling numbers in an HTML table. Unless you’re absolutely certain all of the numbers will be integers, parseFloat() can work with both integers and floating-point numbers.
As you traverse the HTML table and convert the table entries to numbers, sum the results. Once you have the sum, you can use it in a database update, pop up a message box, or print it to the page, as the solution demonstrates.
You can also add a sum row to the HTML table. Example 2-1 demonstrates how to convert and sum up numeric values in an HTML table, and then how to insert a table row with this sum, at the end. The code uses document.querySelectorAll(), which uses a different variation on the CSS selector, td + td, to access the data this time. This selector finds all table cells that are preceded by another table cell.
Example 2-1. Converting table values to numbers and summing the results
<!DOCTYPE html><htmllang="en"><head><metacharset="UTF-8"><metaname="viewport"content="width=device-width, initial-scale=1.0"><metahttp-equiv="X-UA-Compatible"content="ie=edge"><title>Adding Up Values in an HTML Table</title></head><body><h1>Adding Up Values in an HTML Table</h1><table><tbodyid="table1"><tr><td>Washington</td><td>145</td></tr><tr><td>Oregon</td><td>233</td></tr><tr><td>Missouri</td><td>833</td></tr><tbody></table><script>letsum=0;// use querySelector to find all second table cellsconstcells=document.querySelectorAll('td + td');// iterate over eachcells.forEach(cell=>{sum+=Number.parseFloat(cell.firstChild.data);});// now add sum to end of tableconstnewRow=document.createElement('tr');// first cellconstfirstCell=document.createElement('td');constfirstCellText=document.createTextNode('Sum:');firstCell.appendChild(firstCellText);newRow.appendChild(firstCell);// second cell with sumconstsecondCell=document.createElement('td');constsecondCellText=document.createTextNode(sum);secondCell.appendChild(secondCellText);newRow.appendChild(secondCell);// add row to tabledocument.getElementById('table1').appendChild(newRow);</script></body></html>
Being able to provide a sum or other operation on table data is helpful if you’re working with dynamic updates via an Ajax operation, such as accessing rows of data from a database. The Ajax operation may not be able to provide summary data, or you may not want to provide summary data until a web page reader chooses to do so. The users may want to manipulate the table results, and then push a button to perform the summing operation.
Adding rows to a table is straightforward, as long as you remember the steps:
-
Create a new table row using
document.createElement("tr"). -
Create each table row cell using
document.createElement("td"). -
Create each table row cell’s data using
document.createTextNode(), passing in the text of the node (including numbers, which are automatically converted to a string). -
Append the text node to the table cell.
-
Append the table cell to the table row.
-
Append the table row to the table. Rinse, repeat.
Extra: forEach and querySelectorAll
In the above example, I’m using the forEach() method to iterate over the results of querySelectorAll(), which returns a NodeList, not an array. Though forEach() is an array method, modern browsers have implemented NodeList.prototype.forEach(), which enables it iterating over a NodeList with the forEach() syntax. The alternative would be a loop:
letsum=0;// use querySelector to find all second table cellsletcells=document.querySelectorAll("td:nth-of-type(2)");for(vari=0;i<cells.length;i++){sum+=parseFloat(cells[i].firstChild.data);}
Extra: Modularization of Globals
As part of a growing effort to _modularize_ JavaScript, the +parseFloat()+ and +parseInt()+ methods are now attached to the Number object, as new _static_ methods, as of ECMAScript 2015:
// modular methodconstmodular=Number.parseInt('123');// global methodconstglobal=parseInt('123');
These modules have reached widespread browser adoption, but can be polyfilled for older browser support, using a tool like Babel, or on their own:
if(Number.parseInt===undefined){Number.parseInt=window.parseInt}
2.5 Finding All Elements That Share an Attribute
Problem
You want to find all elements in a web document that share the same attribute.
Solution
Use the universal selector (*) in combination with the attribute selector to find all elements that have an attribute, regardless of its value:
constelems=document.querySelectorAll('*[class]');
The universal selector can also be used to find all elements with an attribute that’s assigned the same value:
constreds=document.querySelectorAll('*[class="red"]');
Discussion
The solution demonstrates a rather elegant query selector, the universal selector (*). The universal selector evaluates all elements, so it’s the one you want to use when you need to verify something about each element. In the solution, we want to find all of the elements with a given attribute.
To test whether an attribute exists, all you need to do is list the attribute name within square brackets ([attrname]). In the solution, we’re first testing whether the element contains the class attribute. If it does, it’s returned with the element collection:
varelems=document.querySelectorAll('*[class]');
Next, we’re getting all elements with a class attribute value of red. If you’re not sure of the class name, you can use the substring-matching query selector:
constreds=document.querySelectorAll('*[class="red"]');
Now any class name that contains the substring “red” matches.
You could also modify the syntax to find all elements that don’t have a certain value. For instance, to find all div elements that don’t have the target class name, use the :not negation operator:
constnotRed=document.querySelectorAll('div:not(.red)');
2.6 Accessing All Images in a Page
Problem
You want to access all img elements in a given document.
Solution
Use the document.getElementsByTagName() method, passing in img as the parameter:
constimgElements=document.getElementsByTagName('img');
Discussion
The document.getElementsByTagName() method returns a collection of nodes (a NodeList) of a given element type, such as the img tag in the solution. The collection can be traversed like an array, and the order of nodes is based on the order of the elements within the document (the first img element in the page is accessible at index 0, etc.):
constimgElements=document.getElementsByTagName('img');for(leti=0;i<imgElements.length;i+=1){constimg=imgElements[i];...}
The NodeList collection can be traversed like an array, but it isn’t an Array object—you can’t use Array object methods, such as push() and reverse(), with a NodeList. Its only property is length, and its only method is item(), returning the element at the position given by an index passed in as parameter:
constimg=imgElements.item(1);// second image
NodeList is an intriguing object because it’s a live collection, which means changes made to the document after the NodeList is retrieved are reflected in the collection. Example 2-2 demonstrates the NodeList live collection functionality, as well as getElementsByTagName.
In the example, three images in the web page are accessed as a NodeList collection using the getElementsByTagName method. The length property, with a value of 3, is output to the console. Immediately after, a new paragraph and img elements are created, and the img is appended to the paragraph. To append the paragraph following the others in the page, getElementsByTagName is used again, this time with the paragraph tags (p). We’re not really interested in the paragraphs, but in the paragraphs’ parent elements, found via the parentNode property on each paragraph.
The new paragraph element is appended to the paragraph’s parent element, and the previously accessed NodeList collection’s length property is again printed out. Now, the value is 4, reflecting the addition of the new img element.
Example 2-2. Demonstrating getElementsByTagName and the NodeList live collection property
<!DOCTYPE html><html><head><title>NodeList</title></head><body><p><imgsrc="firstimage.jpg"alt="image description"/></p><p><imgsrc="secondimage.jpg"alt="image description"/></p><p><imgsrc="thirdimage.jpg"alt="image description"/></p><script>constimgs=document.getElementsByTagName('img');console.log(imgs.length);constp=document.createElement('p');constimg=document.createElement('img');img.src='./img/someimg.jpg';p.appendChild(img);constparas=document.getElementsByTagName('p');paras[0].parentNode.appendChild(p);console.log(imgs.length);</script></body></html>
In addition to using getElementsByTagName() with a specific element type, you can also pass the universal selector (*) as a parameter to the method to get all elements:
constallElems=document.getElementsByTagName('*');
See Also
In the code demonstrated in the discussion, the children nodes are traversed using a traditional for loop. In modern browsers the forEach(), method be used directly with a NodeList, as is demonstrated in Recipe 2.2.
2.7 Discovering All Images in Articles Using the Selectors API
Problem
You want to get a list of all img elements that are descendants of article elements, without having to traverse an entire collection of elements.
Solution
Use the Selectors API and access the img elements contained within article elements using CSS-style selector strings:
constimgs=document.querySelectorAll('article img');
Discussion
There are two selector query API methods. The first, querySelectorAll(), is demonstrated in the solution; the second is querySelector(). The difference between the two is querySelectorAll(), which returns all elements that match the selector criteria, while querySelector() only returns the first found result.
The selectors syntax is derived from CSS selector syntax, except that rather than style the selected elements, they’re returned to the application. In the example, all img elements that are descendants of article elements are returned. To access all img elements regardless of parent element, use:
constimgs=document.querySelectorAll('img');
In the solution, you’ll get all img elements that are direct or indirect descendants of an article element. This means that if the img element is contained within a div that’s within an article, the img element will be among those returned:
<article><div><imgsrc="..."/></div></article>
If you want only those img elements that are direct children of an article element, use the following:
constimgs=document.querySelectorAll('article> img');
If you’re interested in accessing all img elements that are immediately followed by a paragraph, use:
constimgs=document.querySelectorAll('img + p');
If you’re interested in an img element that has an empty alt attribute, use the following:
constimgs=document.querySelectorAll('img[alt=""]');
If you’re only interested in img elements that don’t have an empty alt attribute, use:
constimgs=document.querySelectorAll('img:not([alt=""])');
The negation pseudoselector (:not) is used to find all img elements with alt attributes that are not empty.
Unlike the collection returned with getElementsByTagName() covered earlier, the collection of elements returned from querySelectorAll() is not a “live” collection. Updates to the page are not reflected in the collection if the updates occur after the collection is retrieved.
Note
Though the Selectors API is a wonderful creation, it shouldn’t be used for every document query. You should always use the most restrictive query when accessing elements. For instance, it’s more efficient to use getElementById() to get one specific element given an identifier.
See Also
There are three different CSS selector specifications, labeled as Selectors Level 1, Level 2, and Level 3. CSS Selectors Level 3 contains links to the documents defining the other levels. These documents provide the definitions of, and examples for, the different types of selectors.
2.8 Setting an Element’s Style Attribute
Problem
You want to add or replace a style setting on a specific web page element.
Solution
To change one CSS property, modify the property value via the element’s style property:
elem.style.backgroundColor='red';
To modify one or more CSS properties for a single element, you can use setAttribute() and create an entire CSS style rule:
elem.setAttribute('style','background-color: red; color: white; border: 1px solid black');
Or you can predefine the style rule, assign it a class name, and set the class property for the element:
.stripe{background-color:red;color:white;border:1pxsolidblack;}...elem.setAttribute('class','stripe');
Discussion
An element’s CSS properties can be modified in JavaScript using one of three approaches. As the solution demonstrates, the simplest approach is to set the property’s value directly using the element’s style property:
elem.style.width='500px';
If the CSS property contains a hyphen, such as font-family or background-color, use the CamelCase notation for the property:
elem.style.fontFamily='Courier';elem.style.backgroundColor='rgb(255,0,0)';
The CamelCase notation removes the dash, and capitalizes the first letter following the dash.
You can also use setAttribute() to set the style property:
elem.setAttribute('style','font-family: Courier; background-color: yellow');
The setAttribute() method is a way of adding an attribute or replacing the value of an existing attribute for a web page element. The first argument to the method is the attribute name (automatically lowercased if the element is an HTML element), and the new attribute value.
When setting the style attribute, all CSS properties that are changed settings must be specified at the same time, as setting the attribute erases any previously set values. However, setting the style attribute using setAttribute() does not erase any settings made in a stylesheet, or set by default by the browser.
A third approach to changing the style setting for the element is to modify the class attribute:
elem.setAttribute('class','classname');
Advanced
Rather than using setAttribute() to add or modify the attribute, you can create an attribute and attach it to the element using createAttribute() to create an Attr node, set its value using the nodeValue property, and then use setAttribute() to add the attribute to the element:
conststyleAttr=document.createAttribute('style');styleAttr.nodeValue='background-color: red';someElement.setAttribute(styleAttr);
You can add any number of attributes to an element using either createAttribute() and setAttribute(), or setAttribute() directly. Both approaches are equally efficient, so unless there’s a real need, you’ll most likely want to use the simpler approach of setting the attribute name and value directly using setAttribute().
When would you use createAttribute()? If the attribute value is going to be another entity reference, as is allowed with XML, you’ll need to use createAttribute() to create an Attr node, as setAttribute() only supports simple strings.
Extra: Accessing an Existing Style Setting
For the most part, accessing existing attribute values is as easy as setting them. Instead of using setAttribute(), use getAttribute():
constclassName=document.getElementById('elem1').getAttribute('class');
Getting access to a style setting, though, is much trickier, because a specific element’s style settings at any one time is a composite of all settings merged into a whole. This computed style for an element is what you’re most likely interested in when you want to see specific style settings for the element at any point in time. Happily, there is a method for that: window.getComputedStyle(), which will return the current computed styles applied to the element.
conststyle=window.getComputedStyle(elem);
2.9 Inserting a New Paragraph
Problem
You want to insert a new paragraph just before the third paragraph within a div element.
Solution
Use some method to access the third paragraph, such as getElementsByTagName(), to get all of the paragraphs for a div element. Then use the createElement() and insertBefore() DOM methods to add the new paragraph just before the existing third paragraph:
// get the target divconstdiv=document.getElementById('target');// retrieve a collection of paragraphsconstparas=div.getElementsByTagName('p');// create the element and append text to itconstnewPara=document.createElement('p');consttext=document.createTextNode('New paragraph content');newPara.appendChild(text);// if a third para exists, insert the new element before// otherwise, append the paragraph to the end of the divif(paras[2]){div.insertBefore(newPara,paras[2]);}else{div.appendChild(newPara);}
Discussion
The document.createElement() method creates any HTML element, which then can be inserted or appended into the page. In the solution, the new paragraph element is inserted before an existing paragraph using insertBefore().
Because we’re interested in inserting the new paragraph before the existing third paragraph, we need to retrieve a collection of the div element’s paragraphs, check to make sure a third paragraph exists, and then use insertBefore() to insert the new paragraph before the existing one. If the third paragraph doesn’t exist, we can append the element to the end of the div element using appendChild().
2.10 Adding Text to a New Paragraph
Problem
You want to create a new paragraph with text and insert it into the document.
Solution
Use the createTextNode method to add text to an element:
constnewPara=document.createElement('p');consttext=document.createTextNode('New paragraph content');newPara.appendChild(text);
Discussion
The text within an element is, itself, an object within the DOM. Its type is a Text node, and it is created using a specialized method, createTextNode(). The method takes one parameter: the string containing the text.
Example 2-3 shows a web page with a div element containing four paragraphs. The JavaScript creates a new paragraph from text provided by the user via a prompt. The text could just as easily have come from a server communication or other process.
The provided text is used to create a text node, which is then appended as a child node to the new paragraph. The paragraph element is inserted in the web page before the first paragraph.
Example 2-3. Demonstrating various methods for adding content to a web page
<!DOCTYPE html><html><head><title>Adding Paragraphs</title></head><body><divid="target"><p>There is a language 'little known,'<br/>Lovers claim it as their own.</p><p>Its symbols smile upon the land,<br/>Wrought by nature's wondrous hand;</p><p>And in their silent beauty speak,<br/>Of life and joy, to those who seek.</p><p>For Love Divine and sunny hours<br/>In the language of the flowers.</p></div><script>// use getElementById to access the div elementconstdiv=document.getElementById('target');// get paragraph textconsttxt=prompt('Enter new paragraph text','');// use getElementsByTagName and the collection index// to access the first paragraphconstoldPara=div.getElementsByTagName('p')[0];// create a text nodeconsttxtNode=document.createTextNode(txt);// create a new paragraphconstpara=document.createElement('p');// append the text to the paragraph, and insert the new parapara.appendChild(txtNode);div.insertBefore(para,oldPara);</script></body></html>
Caution
Inserting user-supplied text directly into a web page without scrubbing the text first is not a good idea. When you leave a door open, all sorts of nasty things can crawl in. Example 2-3 is for demonstration purposes only.
2.11 Deleting Rows from an HTML Table
Problem
You want to remove one or more rows from an HTML table.
Solution
Use the removeChild() method on an HTML table row, and all of the child elements, including the row cells, are also removed:
constparent=row.parentNode;constoldrow=parent.removeChild(parent);
Discussion
When you remove an element from the web document, you’re not only removing the element, you’re removing all of its child elements. In this DOM pruning you get a reference to the removed element if you want to process its contents before it’s completely discarded. The latter is helpful if you want to provide some kind of undo method in case the person accidentally selects the wrong table row.
To demonstrate the nature of DOM pruning, in Example 2-4, DOM methods createElement() and createTextNode() are used to create table rows and cells, as well as the text inserted into the cells. As each table row is created, an event handler is attached to the row’s click event. If any of the new table rows is clicked, a function is called that removes the row from the table. The removed table row element is then traversed and the data in its cells is extracted and concatenated to a string, which is printed out.
Example 2-4. Adding and removing table rows and associated table cells and data
<!DOCTYPE html><htmllang="en"><head><metacharset="UTF-8"/><metaname="viewport"content="width=device-width, initial-scale=1.0"/><metahttp-equiv="X-UA-Compatible"content="ie=edge"/><title>Deleting Rows from an HTML Table</title><style>table{border-collapse:collapse;}td,th{padding:5px;border:1pxsolid#ccc;}tr:nth-child(2n+1){background-color:#eeffee;}</style></head><body><h1>Deleting Rows from an HTML Table</h1><tableid="mixed"><tr><th>Value One</th><th>Value two</th><th>Value three</th></tr></table><divid="result"></div><script>// table valuesconstvalues=newArray(3);values[0]=[123.45,'apple',true];values[1]=[65,'banana',false];values[2]=[1034.99,'cherry',false];constmixed=document.getElementById('mixed');consttbody=document.createElement('tbody');functionpruneRow(){// remove rowconstparent=this.parentNode;constoldRow=parent.removeChild(this);// dataString from removed row dataletdataString='';oldRow.childNodes.forEach(row=>{dataString+=`${row.firstChild.data}`;});// output messageconstmsg=document.createTextNode(`removed${dataString}`);constp=document.createElement('p');p.appendChild(msg);document.getElementById('result').appendChild(p);}// for each outer array rowvalues.forEach(value=>{consttr=document.createElement('tr');// for each inner array cell// create td then text, appendvalue.forEach(cell=>{consttd=document.createElement('td');consttxt=document.createTextNode(cell);td.appendChild(txt);tr.appendChild(td);});// attache event handlertr.onclick=pruneRow;// append row to tabletbody.appendChild(tr);mixed.appendChild(tbody);});</script></body></html>
2.12 Hiding Page Sections
Problem
You want to hide an existing page element and its children until needed.
Solution
You can set the CSS visibility property to hide and show the message:
msg.style.hidden='visible';// to displaymsg.style.hidden='hidden';// to hide
or you can use the CSS display property:
msg.style.display='block';// to displaymsg.style.display='none';// to remove from display
Discussion
Both the CSS visibility and display properties can be used to hide and show elements. There is one major difference between the two that impacts which one you’ll use.
The visibility property controls the element’s visual rendering, but its physical presence still affects other elements. When an element is hidden, it still takes up page space. The display property, on the other hand, removes the element completely from the page layout.
The display property can be set to several different values, but four are of particular interest to us:
-
none: When display is set tonone, the element is removed completely from display. -
block: When display is set toblock, the element is treated like ablockelement, with a line break before and after. -
inline-block: When display is set toinline-block, the contents are formatted like ablockelement, which is then flowed like inline content. -
inherit: This is the default display, and specifies that thedisplayproperty is inherited from the element’s parent.
There are other values, but these are the ones we’re most likely to use within JavaScript applications.
Unless you’re using absolute positioning with the hidden element, you’ll want to use the CSS display property. Otherwise, the element will affect the page layout, pushing any elements that follow down and to the right, depending on the type of hidden element.
There is another approach to removing an element out of page view, and that is to move it totally offscreen using a negative left value. This could work, especially if you’re creating a slider element that will slide in from the left. It’s also an approach that the accessibility community has suggested using when you have content that you want rendered by assistive technology (AT) devices, but not visually rendered.
See Also
Speaking of accessibility, [Link to Come] demonstrates how to incorporate accessibility into forms feedback, and Recipe 2.16 touches on creating an updatable, accessible page region.
2.13 Creating Hover-Based Pop-Up Info Windows
Problem
You want to create an interaction where a user mouses over a thumbnail image and additional information is displayed.
Solution
This interaction is based on four different functionalities.
First, you need to capture the mouseover and mouseout events for each image thumbnail, in order to display or remove the pop-up window, respectively. In the following code, the cross-browser event handlers are attached to all images in the page:
window.onload=()=>{constimgs=document.querySelectorAll('img');imgs.forEach(img=>{img.addEventListener('mouseover',()=>{getInfo(img.id);},false);img.addEventListener('mouseout',()=>{removeWindow();},false);});};
Second, you need to access something about the item you’re hovering over in order to know what to use to populate the pop-up bubble. The information can be in the page, or you can use web server communication to get the information:
functiongetInfo(id){// get the data}
Third, you need to either show the pop-up window, if it already exists and is not displayed, or create the window. In the following code, the pop-up window is created just below the object, and just to the right when the web server call returns with the information about the item. The getBoundingClientRect() method is used to determine the location where the pop up should be placed, and createElement() and createTextNode() are used to create the pop up:
// compute position for pop upfunctioncompPos(obj){constrect=obj.getBoundingClientRect();letheight;if(rect.height){height=rect.height;}else{height=rect.bottom-rect.top;}consttop=rect.top+height+10;return[rect.left,top];}// process returnfunctionshowWindow(id,response){constimg=document.getElementById(id);console.log(img);// derive location for pop upconstloc=compPos(img);constleft=`${loc[0]}px`;consttop=`${loc[1]}px`;// create pop upconstdiv=document.createElement('popup');div.id='popup';consttxt=document.createTextNode(response);div.appendChild(txt);// style pop updiv.setAttribute('class','popup');div.setAttribute('style',`position: fixed; left:${left}; top:${top}`);document.body.appendChild(div);}
Lastly, when the mouseover event fires, you need to either hide the pop-up window or remove it—whichever makes sense in your setup. Since the application created a new pop-up window in the mouseover event, it removes the pop-up in the mouseout event handler:
functionremoveWindow(){constpopup=document.getElementById('popup');if(popup)popup.parentNode.removeChild(popup);}
Discussion
Creating a pop-up information or help window doesn’t have to be complicated if you keep the action simple and follow the four steps outlined in the solution. If the pop up provides help for form elements, then you might want to cache the information within the page, and just show and hide pop-up elements as needed. However, if you have pages with hundreds of items, you’ll have better performance if you get the pop-up window information on demand via a web service call (i.e., Ajax or WebSockets).
When I positioned the pop up in the example, I didn’t place it directly over the object. The reason is that I’m not capturing the mouse position to have the pop up follow the cursor around, ensuring that I don’t move the cursor directly over the pop up. But if I statically position the pop up partially over the object, the web page readers could move their mouse over the pop up, which triggers the event to hide the pop up…which then triggers the event to show the pop up, and so on. This creates a flicker effect, not to mention a lot of network activity.
If, instead, I allowed the mouse events to continue by returning true from either event handler function, when the web page readers move their mouse over the pop up, the pop up won’t go away. However, if they move the mouse from the image to the pop up, and then to the rest of the page, the event to trigger the pop-up event removal won’t fire, and the pop up is left on the page.
The best approach is to place the pop up directly under (or to the side, or a specific location in the page) rather than directly over the object.
2.14 Validating Form Data
Problem
Your web application gathers data from the users using HTML forms. Before you send that data to the server, though, you want to make sure it’s well formed, complete, and valid while providing feedback to the user.
Solution
Use HTML5’s built in form validation attributes, which can be extended with an external library for string validation.
<formid="example"name="example"action=""method="post"><fieldset><legend>Example Form</legend><div><labelfor="email">Email (required):</label><inputtype="text"id="email"name="email"value=""required/></div><div><labelfor="postal">Postal Code:</label><inputtype="text"id="postal"name="url"value=""/></div><divid="error"></div><div><inputtype="submit"value="Submit"/></div></fieldset></form>
You can use a standalone library, such as validator.js to check for validity as a user types:
<scripttype="text/javascript">functioninputValidator(id,value){// check email validityif(id==='email'){returnvalidator.isEmail(value);}// check US postal code validityif(id==='postal'){returnvalidator.isPostalCode(value,'US');}returnfalse;}constinputs=document.querySelectorAll('#example input');inputs.forEach(input=>{// fire an event each time an input value changesinput.addEventListener('input',()=>{// pass the input value to the validation functionconstvalid=inputValidator(input.id,input.value);// if not valid set the aria-invalid attribute to trueif(!valid&&input.value.length>0){this.setAttribute('aria-invalid','true');}});});</script>
Discussion
By now, we should not be writing our own forms validation routines. Not unless we’re dealing with some really bizarre form behavior and/or data. And by bizarre, I mean so far outside the ordinary that trying to incorporate a JavaScript library would actually be harder than doing it ourselves—a “the form field value must be a string except on Thursdays, when it must be a number—but reverse that in even months” type of validation.
You have a lot of options for libraries, and I’ve only demonstrated one. The validator.js library is a nice, simple, easy-to-use library that provides validation for many different types of strings. It doesn’t require that you modify the form fields, either, which means it’s easier to just drop it in, instead of reworking the form. Any and all styling and placement of error messages is developer dependent, too.
In the solution, the code adds an event listener to each input element. When a user makes any change to the field, the input event listener is fired and calls the inputValidator function, which checks the value against the validator.js library. If the value is invalid, minimal CSS styling is used to add a red border to the input field. When the value is valid, no style is added.
Sometimes you need a smaller library specifically for one type of data validation. Credit cards are tricky things, and though you can ensure a correct format, the values contained in them must meet specific rules in order to be considered valid credit card submissions.
In addition to the other validation libraries, you can also incorporate a credit card validation library, such Payment, which provides a straightforward validation API. As an example, specify that a field is a credit card number after the form loads:
constcardInput=document.querySelector('input.cc-num');Payment.formatCardNumber(cardInput);
And then when the form is submitted, validate the credit card number:
varvalid=Payment.fns.validateCardNumber(cardInput.value);if(!valid){message.innerHTML='You entered an invalid credit card number';returnfalse;}
The library doesn’t just check format; it also ensures that the value meets a valid card number for all of the major card companies. Depending on how you are processing credit cards, the payment processor may provide similar functionality in the client-side code. For exampke, the payment processor Stripe’s Stripe.js, includes a credit card validation API.
Lastly, you can pair client and server validation, using the same library, or different ones. In the example, we are using validator.js in the browser, but it can also be used to validate inputs on the back-end in a Node application.
Extra: HTML5 Form Validation Techniques
HTML5 offers fairly extensive built in form validation, which does not require JavaScript. Including:
-
minandmax: The minimum and maximum values of numeric inputs -
minlengthandmaxlength: The minimum and maximum length of string inputs -
pattern: A regular expression pattern that the entered input must follow. -
required: Required inputs must be completed before the form can be submitted. -
type: Allows developers to specify a content type for an input, such as date, email address, number, password, URL, or some other specific preset type.
Additionally, CSS pseudo selectors can be used to match :valid and :invalid inputs.
Because of this, for simple forms you may not need an JavaScript at all. If you need finite control over the appearance and behavior of form validation, you’re better off using a JavaScript library than depending on the HTML5 and CSS forms validation specifications. If you do, though, make sure to incorporate accessibility features into your forms. I recommend reading WebAIM’s “Creating Accessible Forms”.
2.15 Highlighting Form Errors and Accessibly
Problem
You want to highlight form field entries that have incorrect data, and you want to ensure the highlighting is effective for all web page users.
Solution
Use CSS to highlight the incorrectly entered form field, and use WAI-ARIA (Accessible Rich Internet Applications) markup to ensure the highlighting is apparent to all users:
[aria-invalid]{background-color:#f5b2b2;}
For the fields that need to be validated, assign a function to the form field’s oninput event handler that checks whether the field value is valid. If the value is invalid, pop up an alert with information about the error at the same time that you highlight the field:
functionvalidateField(){// check for numberif(typeofthis.value!=='number'){this.setAttribute('aria-invalid','true');generateAlert('You entered an invalid value. Only numeric values such as 105 or 3.54 are allowed');}}document.getElementById('number').oninput=validateField;
For the fields that need a required value, assign a function to the field’s onblur event handler that checks whether a value has been entered:
functioncheckMandatory(){// check for dataif(this.value.length===0){this.setAttribute('aria-invalid','true');generateAlert('A value is required in this field');}}document.getElementById('required-field').onblur=checkMandatory;
If any of the validation checks are performed as part of the form submission, make sure to cancel the submission event if the validation fails.
Discussion
The WAI-ARIA (Accessible Rich Internet Applications) provides a way of marking certain fields and behaviors in such a way that assistive devices do whatever is the equivalent behavior for people who need these devices. If a person is using a screen reader, setting the aria-attribute attribute to true (or adding it to the element) should trigger a visual warning in the screen reader—comparable to a color indicator doing the same for people who aren’t using assistive technologies.
Note
Read more on WAI-ARIA at the Web Accessibility Initiative at the W3C. I recommend using NVDA, an open source, freely available screen reader, for testing whether your application is responding as you think it should with a screen reader.
In addition, the role attribute can be set to several values of which one, “alert”, triggers a comparable behavior in screen readers (typically saying out the field contents).
Providing these cues are essential when you’re validating form elements. You can validate a form before submission and provide a text description of everything that’s wrong. A better approach, though, is to validate data for each field as the user finishes, so they’re not left with a lot of irritating error messages at the end.
As you validate the field, you can ensure your users know exactly which field has failed by using a visual indicator. They shouldn’t be the only method used to mark an error, but they are an extra courtesy.
If you highlight an incorrect form field entry with colors, avoid those that are hard to differentiate from the background. If the form background is white, and you use a dark yellow, gray, red, blue, green, or other color, there’s enough contrast that it doesn’t matter if the person viewing the page is color blind or not. In the example, I used a darker pink in the form field.
I could have set the color directly, but it makes more sense to handle both updates—setting aria-invalid and changing the color—with one CSS setting. Luckily, CSS attribute selectors simplify our task in this regard.
In addition to using color, you also need to provide a text description of the error, so there’s no question in the user’s mind about what the problem is.
How you display the information is also an important consideration. None of us really like to use alert boxes, if we can avoid them. Alert boxes can obscure the form, and the only way to access the form element is to dismiss the alert with its error message. A better approach is to embed the information in the page, near the form. We also want to ensure the error message is available to people who are using assistive technologies, such as a screen reader. This is easily accomplished by assigning an ARIA alert role to the element containing the alert for those using screen readers or other AT devices.
One final bonus to using aria-invalid is it can be used to discover all incorrect fields when the form is submitted. Just search on all elements where the attribute is present and if any are discovered, you know there’s still an invalid form field value that needs correcting.
Example 2-5 demonstrates how to highlight an invalid entry on one of the form elements, and highlight missing data in another. The example also traps the form submit, and checks whether there are any invalid form field flags still set. Only if everything is clear is the form submission allowed to proceed.
Example 2-5. Providing visual and other cues when validating form fields
<!DOCTYPE html><head><title>Validating Forms</title><style>[aria-invalid]{background-color:#ffeeee;}[role="alert"]{background-color:#ffcccc;font-weight:bold;padding:5px;border:1pxdashed#000;}div{margin:10px0;padding:5px;width:400px;background-color:#ffffff;}</style></head><body><formid="testform"><div><labelfor="firstfield">*First Field:</label><br/><inputid="firstfield"name="firstfield"type="text"aria-required="true"required/></div><div><labelfor="secondfield">Second Field:</label><br/><inputid="secondfield"name="secondfield"type="text"/></div><div><labelfor="thirdfield">Third Field (numeric):</label><br/><inputid="thirdfield"name="thirdfield"type="text"/></div><div><labelfor="fourthfield">Fourth Field:</label><br/><inputid="fourthfield"name="fourthfield"type="text"/></div><inputtype="submit"value="Send Data"/></form><script>document.getElementById("thirdfield").onchange=validateField;document.getElementById("firstfield").onblur=mandatoryField;document.getElementById("testform").onsubmit=finalCheck;functionremoveAlert(){varmsg=document.getElementById("msg");if(msg){document.body.removeChild(msg);}}functionresetField(elem){elem.parentNode.setAttribute("style","background-color: #ffffff");varvalid=elem.getAttribute("aria-invalid");if(valid)elem.removeAttribute("aria-invalid");}functionbadField(elem){elem.parentNode.setAttribute("style","background-color: #ffeeee");elem.setAttribute("aria-invalid","true");}functiongenerateAlert(txt){// create new text and div elements and set// Aria and class values and idvartxtNd=document.createTextNode(txt);msg=document.createElement("div");msg.setAttribute("role","alert");msg.setAttribute("id","msg");msg.setAttribute("class","alert");// append text to div, div to documentmsg.appendChild(txtNd);document.body.appendChild(msg);}functionvalidateField(){// remove any existing alert regardless of valueremoveAlert();// check for numberif(!isNaN(this.value)){resetField(this);}else{badField(this);generateAlert("You entered an invalid value in Third Field. "+"Only numeric values such as 105 or 3.54 are allowed");}}functionmandatoryField(){// remove any existing alertremoveAlert();// check for valueif(this.value.length>0){resetField(this);}else{badField(this);generateAlert("You must enter a value into First Field");}}functionfinalCheck(){removeAlert();varfields=document.querySelectorAll("[aria-invalid='true']");if(fields.length>0){generateAlert("You have incorrect fields entries that must be fixed "+"before you can submit this form");returnfalse;}}</script></body>
If either of the validated fields is incorrect in the application, the aria-invalid attribute is set to true in the field, and an ARIA role is set to alert on the error message, as shown in Figure 2-2. When the error is corrected, the aria-invalid attribute is removed, as is the alert message. Both have the effect of changing the background color for the form field.

Figure 2-2. Highlighting an incorrect form field
Notice in the code that the element wrapping the targeted form field is set to its correct state when the data entered is correct, so that when a field is corrected it doesn’t show up as inaccurate or missing on the next go-round. I remove the existing message alert regardless of the previous event, as it’s no longer valid with the new event.
You can also disable or even hide the correctly entered form elements, as a way to accentuate those with incorrect or missing data. However, I don’t recommend this approach. Your users may find as they fill in the missing information that their answers in other fields are incorrect. If you make it difficult for them to correct the fields, they’re not going to be happy with the experience—or the company, person, or organization providing the form.
Another approach you can take is to only do validation when the form is submitted. Many built-in libraries operate this way. Rather than check each field for mandatory or correct values as your users tab through, you only apply the validation rules when the form is submitted. This allows users who want to fill out the form in a different order to do so without getting irritating validation messages as they tab through.
Using JavaScript to highlight a form field with incorrect and missing data is only one part of the form submission process. You’ll also have to account for JavaScript being turned off, which means you have to provide the same level of feedback when processing the form information on the server, and providing the result on a separate page.
It’s also important to mark if a form field is required ahead of time. Use an asterisk in the form field label, with a note that all form fields with an asterisk are required. Use the aria-required and attribute to ensure this information is communicated to those using assistive devices. I also recommend using the HTML5 required attribute when using aria-required, which provides built-in browser validation.
See Also
In Recipe 2.14 I cover form validation libraries and modules to simplify form validation. I also touch on using HTML5’s declarative form validation techniques.
2.16 Creating an Accessible Automatically Updated Region
Problem
You have a section of a web page that is updated periodically, such as a section that lists recent updates to a file, or one that reflects recent Twitter activity on a subject. You want to ensure that when the page updates, those using a screen reader are notified of the new information.
Solution
Use WAI-ARIA region attributes on the element being updated:
<divid="update"role="log"aria-alive="polite"aria-atomic="true"aria-relevant="additions"></div>
Discussion
A section of the web page that can be updated after the page is loaded, and without direct user intervention, calls for WAI-ARIA Live Regions. These are probably the simplest ARIA functionality to implement, and they provide immediate, positive results. And there’s no code involved, other than the JavaScript you need to create the page updates.
<divid="update"role="log"aria-alive="polite"aria-atomic="true"aria-relevant="additions"></div>
From left to right: the role is set to log, which would be used when polling for log updates from a file. Other options include status, for a status update, and a more general region value, for an undetermined purpose.
The aria-live region attribute is set to polite, because the update isn’t a critical update. The polite setting tells the screen reader to voice the update, but not interrupt a current task to do so. If I had used a value of assertive, the screen reader would interrupt whatever it is doing and voice the content. Always use polite, unless the information is critical.
The aria-atomic is set to false, so that the screen reader only voices new additions, based on whatever is set with aria-relevant. It could get very annoying to have the screen reader voice the entire set with each new addition, as would happen if this value is set to true.
Lastly, the aria-relevant is set to additions, as we don’t care about the entries being removed from the top. This setting is actually the default setting for this attribute, so, technically, it isn’t needed. In addition, assistive technology devices don’t have to support this attribute. Still, I’d rather list it than not. Other values are removals, text, and all (for all events). You can specify more than one, separated by a space.
This WAI-ARIA–enabled functionality was probably the one that impressed me the most. One of my first uses for Ajax, years ago, was to update a web page with information. It was frustrating to test the page with a screen reader (JAWS, at the time) and hear nothing but silence every time the page was updated. I can’t even imagine how frustrating it was for those who needed the functionality.
Now we have it, and it’s so easy to use. It’s a win-win.