
One of my favorite books as a child was Where the Wild Things Are by Maurice Sendak. If you are not familiar with the story, it goes like this: one night, a little boy named Max, dressed in a wolf costume, misbehaves and is sent to bed without supper. There, a sea, a wild forest, and mysterious creatures spring from his imagination. Max sails to the land of the wild things, who crown him king. But even though the creatures do his bidding, Max grows hungry for love. So, he sails home to find his supper waiting for him, still hot.
In 2009, Spike Jonze directed a film adaptation of Where the Wild Things Are. As the book contains just 338 words, Jonze and cowriter Dave Eggers obviously had to add dialogue. For example, prior to the wild rumpus in the book, Jonze and Eggers have Max blurt, "I'll be on my own side. By myself." Then later, as warring factions emerge, they have Max wonder, "How do I make everyone OK?"
Those two quotes came to mind as I wrote this chapter. Though Internet Explorer, Firefox, Safari, and Opera faithfully implement ECMAScript, a standard we explored in the first six chapters, such is not the case with DOM, a standard we will explore in this chapter and the next two. Not entirely anyway. Firefox, Safari, and Opera faithfully implement DOM, too. Internet Explorer, on the other hand, does not—at least not always. For some DOM features, Internet Explorer abides by DOM. For others, it blurts, like little Max, "I'll be on my own side. By myself."
That's the bad news. Now for the good. There's no need for you to wonder like Max, "How do I make everyone OK?" That is to say, how to solve the problem of warring browser factions in regard to DOM. By way of feature testing, we will script DOM in the standard way for Firefox, Safari, or Opera, but in a proprietary way for Internet Explorer. Note too that the three DOM chapters were written in order of increasing Internet Explorer childishness. In other words, we will have to do some cross-browser scripting in this chapter, a little more in Chapter 8, and quite a bit in Chapter 9. But you will be battle hardened by then!
DOM provides a way for JavaScript to represent the nested tags in HTML or XML markup as a tree of nested objects, referred to as nodes. Like any other JavaScript value of the object datatype, a node is a container for related variables and functions. Moreover, node members provide a way for scripters like us to query and manipulate markup, doing things like finding, creating, or deleting content. But just remember that a node is an object. Everything you learned in Chapter 5 works for a node.
Why not just call a node an object? Things are already confusing enough with having to remember that arrays and functions are of the object datatype. Now we're adding nodes to the list. Enough already! Now before you get your dander up, bumpkin, there is a reason for saying node rather than simply object. Not a bad one either. DOM is not just for JavaScript. Many other languages use it too, such as Java, PHP, Perl, and so on. Those languages have their own datatypes. So, saying node rather than JavaScript object makes DOM language neutral. Internet Explorer, for example, implements DOM with COM objects, while Firefox, Safari, and Opera implement DOM with JavaScript objects. For this reason, DOM objects do not behave like JavaScript objects in Internet Explorer, but do so in Firefox, Safari, and Opera. So, there's your first taste of Internet Explorer's "I'll be on my own side. By myself." mischief.
Note
If you are curious as to what COM objects are, visit the following Wikipedia page: http://en.wikipedia.org/wiki/Component_Object_Model.
DOM is language-neutral, but it is a pretty loose standard, too. Rather than very specifically documenting classes, DOM tells Internet Explorer, Firefox, Safari, and Opera what to do by way of interfaces. Interfaces list methods and members that must be implemented together. Just as an interface is an intentionally vague blueprint for an object, the JavaScript interpreter for Firefox implements DOM features differently than the JavaScript interpreter for Internet Explorer or Safari does. Moreover, a node in the DOM tree can implement more than one interface. For example, a <div> tag from your markup is represented with an Element node in the DOM tree. Those have all the features listed in the Node, Element, and HTMLElement interfaces, among others.
With this in mind, in order to know what members and methods are available for you to manipulate a node with, you have to know which interfaces list those features. Although DOM is comprised of hundreds of interfaces, we will explore just 11 in this chapter. Did I hear a sigh of relief?
Thought so. Anyway, knowing key interface names will also prove invaluable whenever you need to look up features in a DOM reference, printed or online. For those reasons, I preface DOM methods and members with their interface names. For example, the method createElement() is listed in the Document interface, so I refer to it as Document.createElement(). That way, you know it can be invoked only on a Document node. Also, you know to look under the Document interface in a DOM reference whenever you want more information.
Alrighty then, these are the 11 DOM interfaces we will explore in this chapter:
Attr
CharacterData
Document
Element
HTMLCollection
HTMLDocument
HTMLElement
NamedNodeMap
Node
NodeList
Text
Every node is not the same; there are 12 different kinds of nodes. But as a DOM scripting beginner, and even later in life when you are a guru, you will really only ever work with four. First, every tag in your markup is represented with an Element node. Second, tag attributes like id or href are represented with Attr nodes. Next, not surprisingly, text content is represented with Text nodes. And finally, the whole enchilada is represented with a Document node—in other words, the root to the DOM tree is a Document node. Every other kind of node is a descendant of this root node.
This brings to mind one further point. Much DOM jargon is borrowed from traditional family trees. So, this chapter will be sprinkled with terms like parent, child, sibling, ancestor, and descendant. These terms mean what you think they mean. So, you already are in good shape with the tree jargon.
Now then, as you might guess, every kind of node has the methods and members defined by the Node interface, so every kind of node implements Node. That's simple to remember, and things do not get any harder from here. Element nodes have those defined by the Element interface. Text nodes pick up features from the Text and CharacterData interfaces; Document nodes from the Document interface; Attr nodes from the Attr interface. You get the picture.
For a DOM tree representing a web page (that is, HTML markup rather than XML), nodes pick up some HTML-only features. For example, Element nodes representing HTML tags like <div> receive members from the HTMLElement and HTMLDivElement interfaces. Note that the former defines members common to every element in an HTML node tree, such as id and class.
To start this example, download seven.html (shown here) from the chapter downloads at www.apress.com. Then open it with Firefox and press F12 to enable Firebug.
<!DOCTYPE html PUBLIC "-//W3C//DTD XHTML 1.0 Strict//EN"
"http://www.w3.org/TR/xhtml1/DTD/xhtml1-strict.dtd">
<html xmlns="http://www.w3.org/1999/xhtml">
<head>
<meta http-equiv="Content-Type" content="text/html; charset=utf-8" />
<title>Firebug</title>
</head>
<body>
<div>
  <h4>Talk to me:</h4>
  <ul>
    <li id="twitter" class="sprite"><a href="http://www.twitter.com">Twitter</a></li>
    <li id="facebook" class="sprite"><a href="http://www.facebook.com">Facebook</a></li>
    <li id="flickr" class="sprite"><a href="http://www.flickr.com">Flickr</a></li>
    <li id="linkedin" class="sprite"><a href="http://www.linkedin.com">LinkedIn</a></li>
  </ul>
</div>
</body>
</html>
As noted, the root to the DOM tree representing this simple XHTML file is a Document node. Typically, you query this object by way of the document member of window. In other words, document is an identifier for a global variable. With this in mind, let's query document in Firebug by typing its identifier and clicking Run:
document;
// Document dom.html
Firebug tells you the node's type and the URL of the markup it represents. Now let's query a few members that document, like any other node in the DOM tree, receives from the Node interface. First, nodeType contains an integer between 1 and 12 that tells you the kind of node you have on your hands:
document.nodeType;
// 9
Did you get 9? Yup, me too. nodeType will always be 9 for a Document node. And for Element and Text nodes, nodeType will always be 1 and 3, respectively. Write those down for later reference, as in Table 7-1.
nodeType commonly appears in the boolean expression for if conditions. Say you want to be sure you have an Element node on your hands, you might write an if condition comparing nodeType to 3. If === returns true, you may query any of the members or invoke any of the methods listed in the Element interface in the if block. So, you do something like this:
if (nodeFromTree.nodeType === 3) {
  // do something to Element node
}
In addition to testing nodeType with number literals, you can do so with constants, that is to say, in Firefox, Safari, and Opera. As of version 8, Internet Explorer still does not implement nodeType constants. However, you can create those for Internet Explorer. Just code an if condition testing whether window has a Node member. If not, create one like so:
if (typeof Node === "undefined") {
  var Node = {ELEMENT_NODE: 1, TEXT_NODE: 3, DOCUMENT_NODE: 9}
}
Note that you are just adding the nodeType constants commonly scripted. There are nine more of those. But you won't need them for anything.
Having created the Node object in the event that it is missing, you can now rewrite the nodeType test like so:
if (nodeFromTree.nodeType === Node.ELEMENT_NODE) {
  // do something to Element node
}
Constants do read better than number literals. But most JavaScript programmers just go with the number literals, viewing laziness as a virtue. Even so, let's add a nodeType constant column, as in Table 7-2.
Now let's query the nodeName member. Note that, for a Document node, this will always be the string "#document":
document.nodeName;
// "#document"
For Element nodes, nodeName will be the name of the markup tag in uppercase letters, such as "DIV" for a <div> element and "LI" for an <li> element. It doesn't matter whether your markup contains lowercase or uppercase tags; nodeName always contains a string of uppercase letters.
On the other hand, nodeName for a Text node, like that for a Document node, is carved in stone. This will always be the string "#text". Let's add a column for nodeName, as in Table 7-3.
Table 7-3. nodeType Literals, nodeType Constants, and nodeName Values for Commonly Scripted Nodes
Node |
|
|
|
|---|---|---|---|
|
|
|
|
|
|
|
|
|
|
|
|
Finally, in addition to nodeType and nodeName, every node regardless of type has a nodeValue member. So, let's query this member for document in Firebug:
document.nodeValue;
// null
Did you get null? Good. For a Document or Element node, nodeValue will always be null. On the other hand, for a Text node, nodeValue will contain the text content from your markup. So, add a fourth column for nodeValue to finish our node decoder table, which appears in Table 7-4.
Table 7-4. Our Final Secret Decoder Table for Commonly Scripted Nodes
Node |
|
|
|
|
|---|---|---|---|---|
|
|
|
|
|
|
|
|
| Text from markup |
|
|
|
|
|
Now that you can figure out the kind of node you are sitting on in the DOM tree, let's go ahead and start climbing about the nodes representing the markup.
The DOM tree is like a family tree in that terms like parent, child, and sibling apply. So, the node one tier above another is its parent. Conversely, any nodes one tier beneath another are its children. Sibling nodes are those on the same tier.
A Document node will never have a parent or siblings but will always have children. On the other hand, a Text node will always have a parent but will never have children. Like a Text node, an Element node will always have a parent. But unlike a Text node, an Element node, unless it is representing an empty tag such as <img> or <meta>, will always have children. Both a Text or Element node may have siblings.
With that in mind, if you ascend the DOM, you will eventually dead end at a Document node. Conversely, if you descend the DOM, you will likely dead end at a Text or empty Element node. Moving laterally generally takes you to an Element or Text node.
To traverse the DOM tree, you simply jump to a child, sibling, or parent node by way of one of the following members listed in the Node interface:
Node.childNodes
Node.firstChild
Node.lastChild
Node.nextSibling
Node.previousSibling
Node.parentNode
Let's begin with the first one in the list, Node.childNodes.
Now then, like any of the 12 node types, Document, Element, and Text nodes have a childNodes member containing a NodeList, which is an arraylike object. Remember from earlier in the book that an arraylike object contains elements and a length property but lacks array methods such as slice() or pop(). childNodes is aptly named in that it contains any child nodes, which is to say direct descendants, of a parent node. Note that, for Text nodes, childNodes will always be empty and therefore have a length of 0. Note too that childNodes will never contain null. That is, childNodes will always contain a NodeList object, even if the parent node is childless.
So, how many children does document have?
document.childNodes;
// [DocumentType, html]
Just two. First, a DocumentType node for:
<!DOCTYPE html PUBLIC "-//W3C//DTD XHTML 1.0 Strict//EN"
"http://www.w3.org/TR/xhtml1/DTD/xhtml1-strict.dtd">
Second, an Element node representing our <html> element. Note that, for document, childNodes may contain only one Element node and one DocumentType node. Note too that document has a member named documentElement that refers to the one Element child node that it is permitted by DOM. For web pages, documentElement will always refer to the <html> Element node. Finally, although Firefox, Safari, and Opera implement DocumentType nodes, Internet Explorer does not. So for Internet Explorer, document.childNodes would contain just one member, the <html> Element node.
To query an element in a NodeList, use the [] operator like so:
document.childNodes[1].nodeName;
// "HTML"
Another way to query a NodeList element is with NodeList.item():
document.childNodes.item(1).nodeType;
// 1
But since [] takes fewer keystrokes, no one ever queries a NodeList with item().
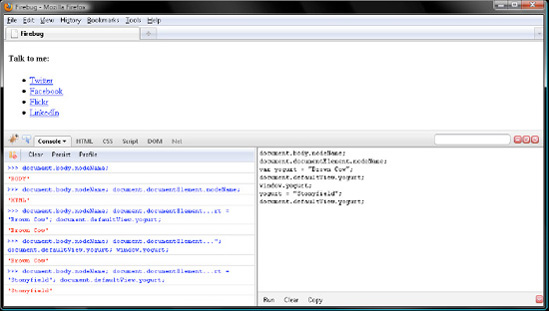
document has a few shortcut members referring to <body>, <html>, and window. Those are named body, documentElement, and defaultView, respectively. So try them out in Firebug. Remember that a commented line is your cue to click Run; in the following example, you would do so five times.
document.body.nodeName;
// "BODY"
document.documentElement.nodeName;
// "HTML"
var yogurt = "Brown Cow";
document.defaultView.yogurt;
// "Brown Cow"
window.yogurt;
// "Brown Cow"
yogurt = "Stonyfield";
document.defaultView.yogurt;
// "Stonyfield"
Verify your work with Figure 7-1.
You can descend the DOM tree with childNodes, but is there a way to do the inverse? Of course. You can ascend with parentNode, a member defined by every type of node. This one is fairly predictable. For a Document node, parentNode is null. For a Text node, parentNode is an Element node. And for an Element node, parentNode is either an Element or a Document node. So, although people have two parents, Text and Element nodes have just one. Kind of like bacteria.
Alright, given that the <html> element contains the <body> element, document.body.parentNode ought to refer to the <html> element. Let's see whether this is so:
document.body.parentNode.nodeName;
// "HTML"
In turn, document is the parent of the <html> element:
document.body.parentNode.parentNode.nodeName;
// "#document"
But as I said, document is an orphan, which means its parentNode member contains null:
document.parentNode;
// null
Now for some bad news. For an Element node, childNodes may contain Text nodes representing the whitespace you formatted your markup with. Browsers create a single Text node to represent the whitespace between tags. If you separate two tags with a new line and four spaces, the browser will create a Text node with the data member "
" to represent the whitespace. Note that browsers only ever create one Text node to represent any combination of whitespace between markup tags. So initially, childNodes will not have two consecutive whitespace Text nodes. However, if you later add or remove nodes by script, childNodes may then contain consecutive whitespace Text nodes. Later in the chapter, that very thing will happen.
Let's take a look at the markup and figure out where the whitespace Text nodes are:
<!DOCTYPE html PUBLIC "-//W3C//DTD XHTML 1.0 Strict//EN"
"http://www.w3.org/TR/xhtml1/DTD/xhtml1-strict.dtd">
<html xmlns="http://www.w3.org/1999/xhtml">
<head>
<meta http-equiv="Content-Type" content="text/html; charset=utf-8" />
<title>Firebug</title>
</head>
<body>
<div>
  <h4>Talk to me:</h4>
  <ul>
    <li id="twitter" class="sprite"><a href="http://www.twitter.com">Twitter</a></li>
    <li id="facebook" class="sprite"><a href="http://www.facebook.com">Facebook</a></li>
    <li id="flickr" class="sprite"><a href="http://www.flickr.com">Flickr</a></li>
    <li id="linkedin" class="sprite"><a href="http://www.linkedin.com">LinkedIn</a></li>
  </ul>
</div>
</body>
</html>
First, since childNodes for a Document node may not contain Text nodes, JavaScript does not create a Text node for the new line between our doctype and html tags:
document.childNodes;
// [DocumentType, html]
On the other hand, for the <ul> tag, which is represented by an Element node, childNodes contains five whitespace Text nodes. To verify this, enter and run the following in Firebug:
document.childNodes[1].childNodes[1].childNodes[1].childNodes[3].childNodes;
 // [
// <TextNode textContent="
 ">,
// li#twitter,
// <TextNode textContent="
 ">,
// li#facebook,
// <TextNode textContent="
 ">,
// li#flickr,
// <TextNode textContent="
 ">,
// li#linkedin,
// <TextNode textContent="
 ">
// ]
With this in mind, you would query the Flickr <li> with the childNodes index of 5 rather than 2:
document.childNodes[1].childNodes[1].childNodes[1].childNodes[3].childNodes[5];
// <li id="flickr">
Note
Internet Explorer does not bother to represent markup formatting with whitespace Text nodes. Don't you wish that Firefox, Safari, and Opera would disregard this most stupid of all DOM requirements, too?
Oftentimes. you will find yourself chaining together a bunch of . or [] refinements while querying the DOM. Rather than write one extraordinarily long line of code, break the statement over several lines by coding cascade style. To do so, follow the . operator with a new line and indentation of two or four spaces. Note that in this book all indents are two spaces. Remember from Chapter 3 that breaking a statement between the operands of a binary operator prevents JavaScript from implicitly terminating lines with semicolons. Therefore, separating the . operator from its right operand by a new line and two spaces is totally safe. So, enter and run the following in Firebug. Do not key in the comments; they are present for information as you read the book only:
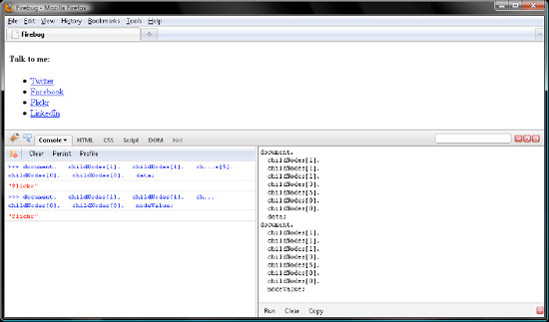
document.
  childNodes[1]. // <html>
  childNodes[1]. // <body>
  childNodes[1]. // <div>
  childNodes[3]. // <ul>
  childNodes[5]. // <li>
  childNodes[0]. // <a>
  childNodes[0]. // Text node
  data;
// "Flickr"
So here you descended seven tiers of the DOM tree in order to query the "Flickr"Text node with a single statement spanning nine lines.
document.
  childNodes[1].
  childNodes[1].
  childNodes[1].
  childNodes[3].
  childNodes[5].
  childNodes[0].
  childNodes[0].
  nodeValue;
// "Flickr"
As illustrated in Figure 7-2, data and nodeValue both contain the string of text the Text node represents.
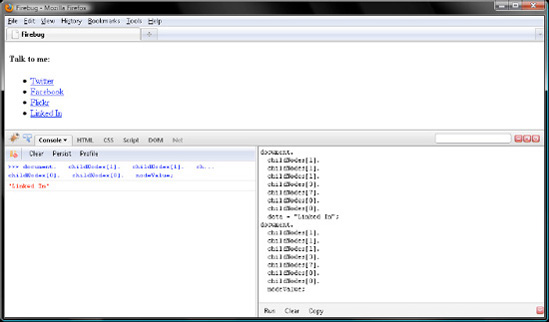
However, data requires fewer keystrokes and so is preferable to nodeValue. But either way will do, since both members contain the same value. To illustrate this in Firebug, let's change the final link from "LinkedIn" to "Linked In" with data and then read the new value with nodeValue.
document.
  childNodes[1].
  childNodes[1].
  childNodes[1].
  childNodes[3].
  childNodes[7].
  childNodes[0].
  childNodes[0].
  data = "Linked In";
document.
  childNodes[1].
  childNodes[1].
  childNodes[1].
  childNodes[3].
  childNodes[7].
  childNodes[0].
  childNodes[0].
  nodeValue;
// "Linked In";
Verify your work with Figure 7-3.
Note that this changes the display in Firefox. However, if you press Ctrl+U (Cmd+U) to view the XHTML markup, the link still contains "LinkedIn", as Figure 7-4 displays. So, JavaScript modifies the DOM tree floating around in memory, not the XHTML file on the server.

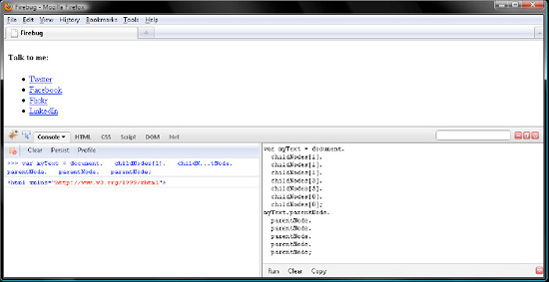
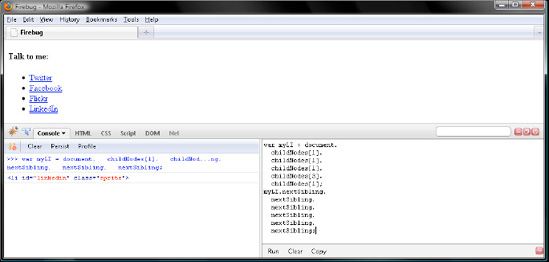
Finally, let's try ascending cascade style with parentNode. Doing so is much simpler than descending with childNodes insofar as there are no element indexes, muddied by whitespace Text nodes, for you to worry about. So, in Firebug, click Clear in both panels, and save the "Flickr" Text node to a variable named myText.
var myText = document.
  childNodes[1].
  childNodes[1].
  childNodes[1].
  childNodes[3].
  childNodes[5].
  childNodes[0].
  childNodes[0];
Then ascend from myText to the <html> element by chaining parentNode queries.
myText.parentNode.
  parentNode.
  parentNode.
  parentNode.
  parentNode.
  parentNode;
// <html xmlns="http://www.w3.org/1999/xhtml">
Verify your work with Figure 7-5.
Note that, while ascending the DOM tree with parentNode from a Text or Element node, you will only ever pass through an Element node, and eventually you will dead end at the Document node. In Chapter 9, you will learn to lay event listener functions such as traps along this parentNode path upward through the DOM tree. Those event listeners will then be triggered as event objects move along this parentNode trail. We will cover event objects in Chapter 9.
So, with childNodes and parentNode, you can move vertically within the DOM tree. But what if you want to move laterally? Two Node members, nextSibling and previousSibling, provide a way to do so. Like human siblings, node siblings have the same parent. So in the markup, the four <li> Element nodes and five formatting Text nodes are all siblings.
Click Clear in both Firebug panels, and try the following nextSibling sample:
var myLI = document.
  childNodes[1].
  childNodes[1].
  childNodes[1].
  childNodes[3]. // <ul>
  childNodes[0]. // <TextNode textContent="
 ">
  nextSibling; // <li>
myLI;
// <li id="twitter" class="sprite">
So here you went from the first formatting Text node contained by the <ul> to the first <li> Element node. Just as with childNodes and parentNode, you can chain nextSibling queries, too. Try the following cascade, and then verify your work with Figure 7-6.
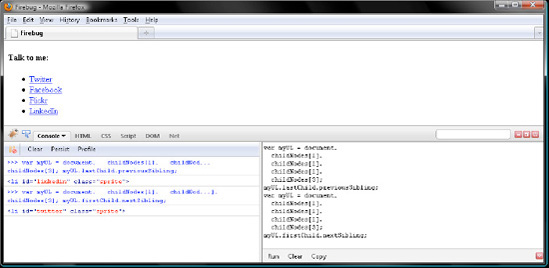
var myLI = document.
  childNodes[1].
  childNodes[1].
  childNodes[1].
  childNodes[3].
  childNodes[1];
myLI.nextSibling.
  nextSibling.
  nextSibling.
  nextSibling.
  nextSibling.
  nextSibling;
// <li id="linkedin" class="sprite">
Here you went from the first <li> to the fourth <li>. Not surprisingly, previousSibling does the reverse of nextSibling. So, let's go from the fourth <li> to the first <li> with previousSibling:
var myLI = document.
  childNodes[1].
  childNodes[1].
  childNodes[1].
  childNodes[3].
  childNodes[7];
myLI;
// <li id="linkedin" class="sprite">
myLI.previousSibling.
  previousSibling.
  previousSibling.
  previousSibling.
  previousSibling.
  previousSibling;
// <li id="twitter" class="sprite">
Now then, what would happen if a node does not have a next or previous sibling? I'll give you a hint: DOM nodes are of the object datatype and are therefore saved to the heap just like an ordinary object, array, or function would be. So, how do you represent no data on the heap? Yup, with null.
So, there it is. Let's verify this in Firebug by querying nextSibling on the final child node of the <ul> like so:
var myUL = document.
  childNodes[1].
  childNodes[1].
  childNodes[1].
  childNodes[3];
myUL.childNodes[myUL.childNodes.length - 1].nextSibling;
// null
Similarly, querying previousSibling on the first child node of the <ul> returns null, too:
var myUL = document.
  childNodes[1].
  childNodes[1].
  childNodes[1].
  childNodes[3];
myUL.childNodes[0].previousSibling;
// null
Now then, is there a simpler way to query the last child node of the <ul> than keying in childNodes[myUL.childNodes.length - 1]? Oh, you betcha. Just query the aptly named lastChild member:
var myUL = document.
  childNodes[1].
  childNodes[1].
  childNodes[1].
  childNodes[3];
myUL.lastChild.previousSibling;
// <li id="linkedin" class="sprite">
Conversely, every kind of node has a firstChild member referring to its first child node. So rather than querying childNodes[0], you can save a few keystrokes with firstChild. Note that, in addition to saving keystrokes, lastChild and firstChild read better than their childNodes equivalents.
So, click Clear in both Firebug panels and give firstChild a try, verifying this and the previous sample with Figure 7-7:
var myUL = document.
  childNodes[1].
  childNodes[1].
  childNodes[1].
  childNodes[3];
myUL.firstChild.nextSibling;
// <li id="twitter" class="sprite">
Even though childNodes contains elements that you query like an array (with an integer index and the [] operator), childNodes is not an array. Rather, as mentioned earlier, childNodes is a NodeList object. So, it does not have any array methods like slice() or pop(). Additionally, NodeList objects are live DOM queries. That is, JavaScript has to re-create the NodeList any time you query one of its members, including length. With those two things in mind, scripters oftentimes convert NodeList objects to an array. Doing so not only makes the array methods available but also eliminates the live DOM query sluggishness.
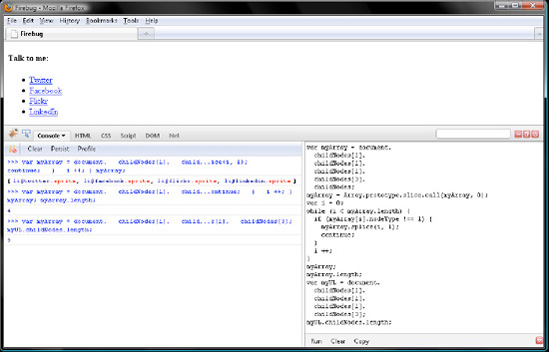
Click Clear in both Firebug panels, and let's convert a NodeList object to an array. For this sample, you will work with the NodeList returned by the childNodes member of the <ul> element. Yup, the one with five Text nodes and four <li> element nodes in it.
var myArray = document.
  childNodes[1].
  childNodes[1].
  childNodes[1].
  childNodes[3].
  childNodes;
myArray = Array.prototype.slice.call(myArray, 0);
Now loop through myArray, deleting formatting Text nodes with the array method, splice():
var i = 0;
while (i < myArray.length) {
  if (myArray[i].nodeType !== 1) {
    myArray.splice(i, 1);
    continue;
  }
  i ++;
} myArray; // [li#twitter.sprite, li#facebook.sprite, li#flickr.sprite, li#linkedin.sprite]
Now myArray just contains the four <li>Element nodes and therefore has a length of 4.
myArray.length;
// 4
On the other hand, childNodes still has a length of 9.
var myUL = document.
  childNodes[1].
  childNodes[1].
  childNodes[1].
  childNodes[3];
myUL.childNodes.length;
// 9
Verify your work in this section with Figure 7-8.
So, initially myArray and childNodes had nine arrows on the stack pointing to nine values on the heap. In other words, there were eighteen arrows on the stack and nine values on the heap. You then deleted five arrows from the stack with splice(). Doing so left two arrows per Element node but one arrow per Text node.
Remember from Chapter 5 that values on the heap are manipulated by way of arrows on the stack. With this in mind, you can now manipulate the four <li> elements via their arrows in myArray, while being able to manipulate myArray with array methods like splice() or pop(). In turn, the code runs faster too since you are working with an array now rather than a live NodeList.
One of the many failings Internet Explorer has in regard to DOM is that NodeList objects are not JavaScript objects (they are COM objects). Therefore, you cannot pass a NodeList as the first parameter to Function.call() in Internet Explorer because doing so will return an error since that parameter must be a JavaScript object. But don't worry. By rewriting the NodeList to array conversion with a try catch statement, which is covered in Chapter 4, you can accommodate Internet Explorer, too. So click Clear in both Firebug panels, and then enter and run the following cross-browser NodeList to array conversion.
var myArray, i, j, myNodeList = document.
  childNodes[1].
  childNodes[1].
  childNodes[1].
  childNodes[3].
  childNodes;
try {
  myArray = Array.prototype.slice.call(myNodeList, 0);
} catch (errorObject) {
  myArray = [];
  for (i = 0, j = myNodeList.length; i < j; i += 1) {
    myArray[i] = myNodeList[i];
  }
}
myArray instanceof Array;
// true
Verify your work with Figure 7-9.
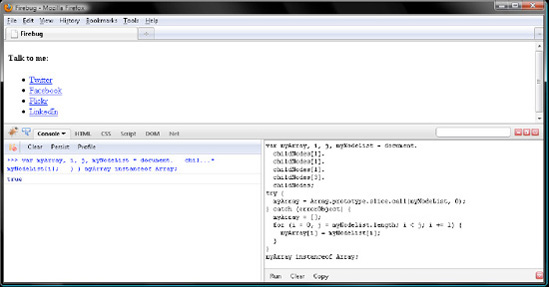
Firefox, Safari, and Opera convert the NodeList to an array by way of the try block, while Internet Explorer does so by way of the catch block, which JavaScript runs in the event that the try block throws an error.
Because you are running the code in Firefox, you need to make the try block throw an error in order to test the catch block. To do so, simply mistype the myNodeList identifier in the parameter list and then click Run:
var myArray, i, j, myNodeList = document.
  childNodes[1].
  childNodes[1].
  childNodes[1].
  childNodes[3].
  childNodes;
try {
  myArray = Array.prototype.slice.call(myNodes, 0);
} catch (errorObject) {
  myArray = [];
  for (i = 0, j = myNodeList.length; i < j; i += 1) {
    myArray[i] = myNodeList[i];
  }
}
myArray instanceof Array;
// true
Both our try path, which Firefox, Safari, and Opera will take, and our inelegant catch path, which only Internet Explorer will take, run fine. Note that, whenever you loop through a NodeList and do not add or delete nodes from it within the body of the loop, you can improve performance by saving the length member to a variable. Why would that be? length, like any other member in a NodeList, is a live DOM query. So, by saving length to a variable named j in the previous sample, JavaScript queried DOM one time rather than nine.
Note
Every object in the DOM tree is represented with a COM object rather than a JavaScript object in Internet Explorer. This failing will be a thorn in your side for DOM scripting.
childNodes is not really necessary because you can navigate to any node in the DOM tree by way of the firstChild, nextSibling, lastChild, previousSibling, and parentNode members. DOM traversal functions typically are implemented by way of those five members. So, click Clear in both Firebug panels, and let's write one of those ourselves:
function traverseTree(node, func) {
func(node);
node = node.firstChild;
while (node !== null) {
arguments.callee(node, func);
node = node.nextSibling;
}
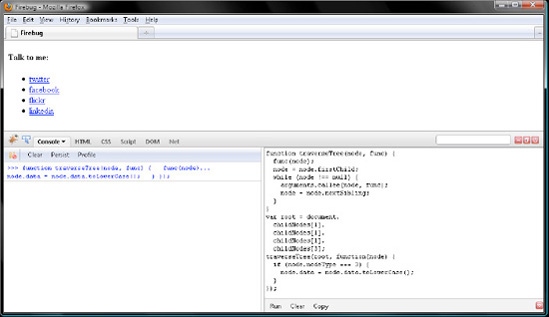
}traverseTree() works with two parameters. node is obviously a node from the DOM tree. func is a function to invoke on node. By way of recursion, which I covered in Chapter 6, of the firstChild and nextSibling members, traverseTree() descends the DOM tree and invokes func on every descendant of the first element you pass to it in node. So, save the <ul> element to a variable named root and have that be the starting point where traverseTree() descends from. Then pass in a function literal for func that will invoke toLowerCase() on the data member of any Text node you happen upon.
function traverseTree(node, func) {
  func(node);
  node = node.firstChild;
  while (node !== null) {
    arguments.callee(node, func);
    node = node.nextSibling;
  }
}
var root = document.
  childNodes[1].
  childNodes[1].
  childNodes[1].
  childNodes[3];
traverseTree(root, function(node) {
  if (node.nodeType === 3) {
    node.data = node.data.toLowerCase();
  }
});
Now click Run and verify your work with Figure 7-10.
One final note on traverseTree(): although you stepped through child nodes by way of firstChild and nextSibling, you could have done so with lastChild and previousSibling, too. Click the Refresh icon in Firefox to revert the text in the <li> elements to that from our markup, and then simply edit traverseTree(), changing firstChild to lastChild and nextSibling to previousSibling. Click Run to verify that traverseTree() works just as well traversing child nodes in reverse. More often than not, you will traverse child nodes moving forward with nextSibling rather than in reverse with previousSibling.
function traverseTree(node, func) {
  func(node);
  node = node.lastChild;
  while (node !== null) {
    arguments.callee(node, func);
    node = node.previousSibling;
  }
}
var root = document.
  childNodes[1].
  childNodes[1].
  childNodes[1].
  childNodes[3];
traverseTree(root, function(node) {
  if (node.nodeType === 3) {
    node.data = node.data.toLowerCase();
  }
});Traversing the node tree is one way to find an element. But the most direct way is simply to pass Document.getElementById() the id of the element you want to work with. So, click Clear in both Firebug panels and Refresh in Firefox (to revert its display to the original markup). Then retrieve one of the <li> elements by its id:
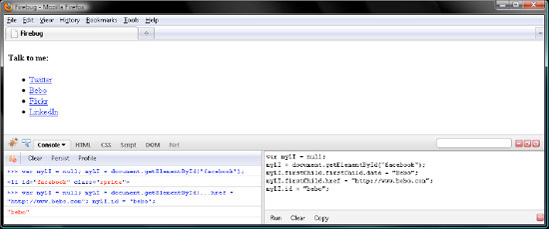
var myLI = null;
myLI = document.getElementById("facebook");
// <li id="facebook" class="sprite">
Now that you have an element in myLI, let's do something to it.
Hmm.
Now let's see.
I know, why don't you change the text of its child Text node and then correspondingly update its id?
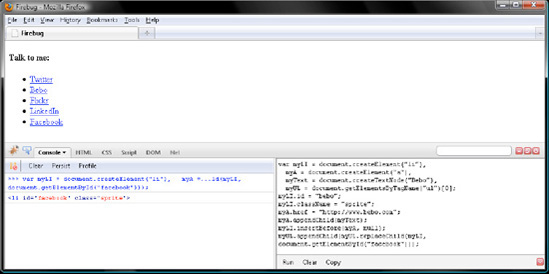
myLI.firstChild.firstChild.data = "Bebo";
myLI.firstChild.href = "http://www.bebo.com";
myLI.id = "bebo";
Now verify that Firefox updated its display, as in Figure 7-11.
Click Clear in both Firebug panels, and query myLI to verify that JavaScript changed the id to "bebo" from "facebook":
myLI;
// <li id="bebo" class="sprite">
Then verify that the href attribute was updated, too:
myLI.firstChild;
// <a href="http://www.bebo.com">
Did everything work for you? Great! Now it's time for some notes on Document.getElementById(). First, type its identifier carefully. JavaScript is case sensitive, so getElementByID is not the same as getElementById. Second, if no element in your markup has the desired id, then Document.getElementById() returns null. This is what you ought to expect inasmuch as an Element node is of the object datatype, which is to say its value is stored on the heap. Finally, in the event that more than one element in your markup has the desired id, which is a markup error, Document.getElementById() may return null, or it may randomly return one of the elements. Note that, other than in Internet Explorer prior to version 8, the id parameter is case sensitive in all relevant browsers. Therefore, for our <li> with an id of "twitter", passing Document.getElementById() the parameter "Twitter" returns null in Firefox, Safari, Opera, and Internet Explorer 8+. On the other hand, Internet Explorer 7 or older returns the <li> by mistake. With this in mind, do not give different elements id attributes that vary only by case, such as "sprite" and "Sprite", since Internet Explorer may consider those to be the same id.
Oftentimes, you will want to do some stuff to elements with the same tag name. Say you want to turn every <li> element with a class of "sprite" into a CSS sprite. Rather than traverse the DOM tree with a function like traverseTree(), simply pass either Document.getElementsByTagName() or Element.getElementsByTagName() a string indicating the tag name of the elements you want, and JavaScript will return a NodeList containing those elements for your scripting pleasure. Take care to note that it is Elements, plural, in getElementsByTagName(), but it's Element, singular, in getElementById().
So, you can call getElementsByTagName() on either an Element or a Document node. What's the difference? If you want JavaScript to return all the elements in your markup that have the same tag name, go with Document.getElementsByTagName(). On the other hand, if you just want descendants of a certain element that have the same tag name, meaning you just want to work with a branch of the DOM tree rather than the whole thing, then turn to Element.getElementsByTagName().
Click Refresh in Firefox (to revert the second <li> to "Facebook") and then click Clear in both Firebug panels. Let's try Document.getElementsByTagName() first:
var myElements = document.getElementsByTagName("a");
myElements;
// [a www.twitter.com, a www.facebook.com, a www.flickr.com, a www.linkedin.com]
JavaScript returns a NodeList containing every <a>Element node from the DOM tree. myElements contains four members. Now let's try Element.getElementsByTagName() on just a branch of the tree:
myElements = document.getElementById("twitter").getElementsByTagName("a");
// [a www.twitter.com]
Verify your work with Figure 7-12.
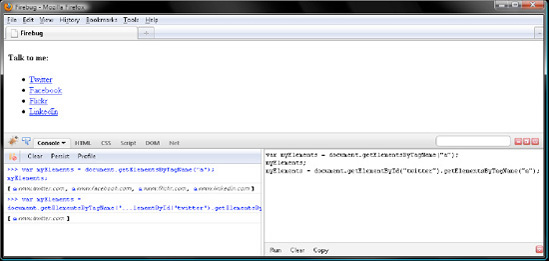
Here JavaScript returns every <a> element that is a descendant of the Twitter <li> element. So, myElements contains a NodeList with just one member, the Twitter <a>. Because Element.getElementsByTagName() searches for fish in a smaller pond than Document.getElementsByTagName() does, it is more efficient. Thus, favor Element.getElementsByTagName() whenever you can.
With Document.getElementsByTagName() or Element.getElementsByTagName(), you can find elements by their tag name. Document.getElementById() provides a way to find elements by the value of their id attribute. Is there a method, say Document.getElementsByClass(), that would enable you to find elements by the value of their class attribute? No, sorry. But you can write one with the help of the DOM traversal function traverseTree().
Take a moment to remember where you put traverseTree(). Then click Clear in Firebug, and paste traverseTree() there. Or, if you forgot to save traverseTree() for later, just retype it like so:
function traverseTree(node, func) {
  func(node);
  node = node.firstChild;
  while (node !== null) {
    arguments.callee(node, func);
    node = node.nextSibling;
  }
}
Now define a function named findClass() that works with two arguments. name will contain the class to find, and root will contain a node to descend the DOM tree from. Note that root is optional and will default to the <body> element by way of the || operator, which I covered in Chapter 3. I'll present my code in a moment, but try writing the code yourself first and see how they compare at the end. Next, create an array named found, which will be the return value of findClass(). found will contain any elements of the class name that are descendants of root. Say that three times fast!
Now invoke traverseTree(), passing root as the first parameter and a function literal for the second parameter. Note that the first time that traverseTree() calls the anonymous function, it will pass root as the value of the argument node. Thereafter, traverseTree() will pass, one by one, every descendant of root.
So, the anonymous function will be passed every descendant of root in turn. Now what will it do with all those nodes? It will determine whether the node is an Element node with a class attribute other than the default "" empty string. You kill both of those birds with one stone with an if condition for the expression !! node.className. Of the 12 node types, only Element nodes have a className member. For the other 11, including those bothersome Text nodes representing markup formatting, node.className returns undefined. Remember from earlier in the book that the !! idiom converts a value of a datatype to a boolean and that undefined and "" convert to false. So, at the end of the day, JavaScript will run the if block only if node refers to an Element node that is a member of one or more classes.
Now className contains a string; therefore, you can manipulate its value with any of the wrapper methods that I covered in Chapter 2. In the event that the element is a member of two or more classes, those will be separated by whitespace. So, with those two things in mind, let's invoke String.split() on the className value and save the returned array to a names variable. Note that you declare names and the traditional loop variable i in the initialization part of a for loop. In this way, JavaScript creates the names array before taking the first roundabout of the for loop.
In the for block, you compare each member of names to the class you are trying to match, which is in the argument name. In the event you have a winner, you append the element in node to found by way of Array.push(), which I covered in Chapter 5. Then at the end of the day, findClass() returns the found array. Here's my finished code:
function traverseTree(node, func) {
func(node);
node = node.firstChild;
while (node !== null) {
arguments.callee(node, func);
node = node.nextSibling;
}
}
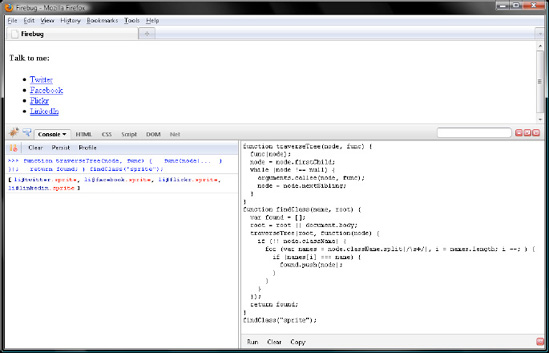
function findClass(name, root) {
var found = [];
root = root || document.body;
traverseTree(root, function(node) {
if (!! node.className) {
for (var names = node.className.split(/s+/), i = names.length; i --; ) {
if (names[i] === name) {
found.push(node);
}
}
}
});
return found;
}Now for the moment of truth. Pass "sprite" as the first parameter to findClass(), and let root default to <body>. Take a deep breath and click Run. Then verify your work with Figure 7-13.
function traverseTree(node, func) {
  func(node);
  node = node.firstChild;
while (node !== null) {
arguments.callee(node, func);
node = node.nextSibling;
}
}
function findClass(name, root) {
var found = [];
root = root || document.body;
traverseTree(root, function(node) {
if (!! node.className) {
for (var names = node.className.split(/s+/), i = names.length; i --; ) {
if (names[i] === name) {
found.push(node);
}
}
}
});
return found;
}
findClass("sprite");
// [li#twitter.sprite, li#facebook.sprite, li#flickr.sprite, li#linkedin.sprite]Did JavaScript return an array containing your four <li> elements? Good job. You're not a JavaScript bumpkin anymore!
In addition to the members defined in the Node and Element interfaces, every Element node picks up id, className, title, lang, and dir members from HTMLElement and a style member from CSSStyleDeclaration. These members provide a way to query the tag attributes id, class, style, title, lang, and dir. Note that class is one of the reserved keywords in JavaScript, so the member is named className rather than class.
There are three ways to query attributes. The first and preferred way is with the . or [] operator. It's just like querying a Node member like nodeType or an Element member like tagName.
Click Clear in both Firebug panels, and let's query some members from HTMLElement:
var myElement = document.getElementById("twitter");
myElement.className;
// "sprite"
myElement.id;
// "twitter"
myElement.dir;
// ""
As you can see, if an attribute is set in your markup, JavaScript returns the value (as a string). Otherwise, it returns the default, "". You get a truthy string if the attribute is set and a falsy string if not, which provides a way to branch flow with an if condition.
Note that, like any member of an object, you may query an attribute with the . operator and an identifier. Or you can do so with the [] operator and a string, like so:
var myElement = document.getElementById("twitter");
myElement["className"];
// "sprite"
Generally, attributes contain a string. However, style is an exception. Rather than a string, style contains a CSSStyleDeclaration object, which I will cover in gory detail in Chapter 8. Note that CSSStyleDeclaration is an arraylike object. Remember that it has a length member but no array methods. Element.style.length returns an integer equal to the number of inline CSS declarations in your markup or added by script. So, style for the Twitter <li> refers to a CSSStyleDeclaration object with a length of 0:
var myElement = document.getElementById("twitter");
myElement.style;
// CSSStyleDeclaration length=0
Simple elements like <span> and <em> do not have any additional attributes other than id, class, style, title, lang, and dir, but the rest do. For those, there are myriad DOM interfaces that simply define members mirroring the additional tag attributes. For example, a <style> element picks up the disabled, media, and type members from a DOM interface named HTMLStyleElement. Note that essentially all of the additional element interfaces follow that naming convention: HTML and then the tag name in title case and then Element. For a <div> element, the DOM interface is named HTMLDivElement. For a <select> element, the DOM interface is named HTMLSelectElement, and so on. Keep that in mind whenever you refer to DOM documentation or a JavaScript tome, because doing so will save you some time.
Although I recommend that you query element attributes in the same way that you query other element members, which is to say with the . or [] operator, the Element interface defines 13 methods that work only with markup attributes. You can query id with them but not nodeType.
Now for some good news: of those 13 methods, I will cover just three. First, to read the value of an attribute, pass Element.getAttribute() the name of the attribute as a string. The method will then return the attribute value as a string. In the event that the attribute is not defined, Element.getAttribute() ought to return "". But most browsers return null by mistake. Because both "" and null are falsy and every string other than "" is truthy, this bug generally is not a problem. For example, an if condition with truthy and falsy paths will work regardless of whether the browser returns "" or null for an undefined attribute.
Tip
To verify that Element.getAttribute() ought to return "" rather than null, visit www.w3.org/TR/DOM-Level-2-Core/core.html and scroll down to the Element interface. Or just take my word for it and be done.
Enough talk. Double-clear Firebug, and try querying an attribute or two with Element.getAttribute():
var myElement = document.getElementById("twitter");
myElement.getAttribute("class");
// "sprite"
Note that, while you query the class member with the . or [] operator and the identifier className, you simply pass the string "class" to Element.getAttribute(). Now why would that be?
Hmm.
There are forbidden identifiers, class being one of them, but no forbidden strings.
Uh-huh.
Now then, let's see whether Firefox returns "" or null for an undefined attribute:
var myElement = document.getElementById("twitter");
myElement.getAttribute("dir");
// null
So, Firefox has the null bug, too. Bad Firefox, bad.
Now try to query a member, say tagName, that is not an attribute with Element.getAttribute():
var myElement = document.getElementById("twitter");
myElement.getAttribute("tagName");
// null
On the other hand, querying tagName as a member with the . or [] operator returns "LI" rather than null:
var myElement = document.getElementById("twitter");
myElement.tagName;
// "LI"
Although you can query an attribute with either the . or [] operator or Element.getAttribute(), the same is not true for other members of an Element node.
Did you just have a eureka moment? Great. Now for Element.getAttribute()'s partner in crime, Element.setAttribute(), which writes the value of an attribute. Element.setAttribute() takes two string parameters, the name and value of the attribute.
Let's try writing an attribute with Element.setAttribute(). Maybe change class from "sprite" to "sprout" for the Twitter <li>:
var myElement = document.getElementById("twitter");myElement.setAttribute("class", "sprout");Then verify the change with Element.getAttribute():
myElement.getAttribute("class");
// "sprout"
That worked. Note that, in the event the element does not have the attribute passed in the first parameter, JavaScript will add a new attribute to the element. It doesn't even have to be a standard one:
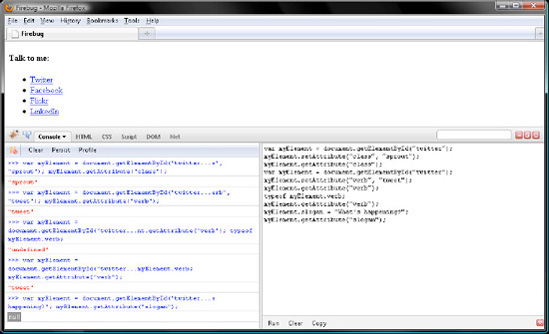
var myElement = document.getElementById("twitter");
myElement.setAttribute("verb", "tweet");
Then verify the addition with Element.getAttribute():
myElement.getAttribute("verb");
// "tweet"
Let's try to query myElement.verb as a member with the . operator:
typeof myElement.verb;
// "undefined"
Where did the value for our custom attribute verb go? Nowhere, it is still there.
myElement.getAttribute("verb");
// "tweet"
In a nutshell, if you add a custom attribute to an element with Element.setAttribute() or directly in your XHTML markup, then you must query the attribute with Element.getAttribute().
Conversely, if you add a member with the . or [] operators, it will become an attribute only if the DTD for your markup defines an attribute by that name. To illustrate this, try the following sample, verifying your work with Figure 7-14.
myElement.slogan = "What's happening?";
myElement.getAttribute("slogan");
// null
To JavaScript, predefined attributes like href or id are both attributes and members, while custom attributes like verb are attributes but not members. Conversely, predefined members like tagName and custom members like slogan are members but not attributes. At least, that's true in all browsers except for the one making mischief in its wolf suit. For Internet Explorer, custom attributes like verb are members, and custom members like slogan are attributes. That's just one more reason to query attributes like members with the . or [] operator.
Now for a couple more reasons. First, the style member, which I cover in Chapter 8, contains a CSSStyleDeclaration object, but the style attribute contains a string of text. Second, event listener members, which I cover in Chapter 9, contain a function, but event listener attributes contain a string of text—except in Internet Explorer. Prior to version 8, Internet Explorer returns a CSSStyleDeclaration object for both the style member and attribute and a function for event listener members and attributes.
With this mess in mind, only query custom attributes with DOM methods.
Note
If you are wondering whether an attribute is distinct from the member it maps to, it is. An attribute is represented by an Attr node, but its corresponding member is not.
DOM provides a way to represent both HTML and XML markup. Whereas HTML attribute values may be fully represented with strings, this is not so for XML attributes. For this reason, DOM provides an Attr interface for representing attributes as nodes. Those are not part of the DOM tree. So, you will not bump into them while traversing the DOM.
Anyway, for HTML markup, Attr nodes have a single Text node child that you may query by way of the value member. On the other hand, XML Attr nodes may contain both a Text and EntityReference node, which is why XML attributes cannot be conveyed with just a string.
Click Clear in both Firebug panels, and let's try querying the members of the Attr node representing the class attribute for the Twitter <li>. First save the Attr node in a variable named myAttrNode. Note that you can query the Attr node with Element.getAttributeNode(). So, append Node to Element.getAttribute(), and you're good to go:
var myAttrNode = document.getElementById("twitter").getAttributeNode("class");Now query some members from the Node interface. Remember to stop and click Run prior to each comment in order to verify the return value:
myAttrNode.nodeType;
// 11
myAttrNode.nodeName;
// "class"
myAttrNode.nodeValue;
// "sprite"
Now query some members the Attr node received by way of the Attr interface:
myAttrNode.name;
// "class"
myAttrNode.value;
// "sprite"
myAttrNode.value = "sprout";
myAttrNode.value;
// "sprout"
myAttrNode.specified;
// true
So for an Attr node, Node.nodeName and Attr.name contain the same value, a string indicating the name of the attribute. Similarly, both Node.nodeValue and Attr.value contain the value of the attribute as a string. So, the first two members, name and value, are redundant. On the other hand, Attr.specified contains a boolean: true if you explicitly set the attribute in your markup or by JavaScript and false if not. So, false means the attribute value is a default from the document's DTD. With those things in mind, querying Attr.specified will likely be the only time you work with an attribute through the Attr interface (as a node) rather than the Element interface (as a string).
For 11 of the 12 node types, the Node.attributes member simply contains null. But not for Element nodes. For those, Node.attributes contains a NamedNodeMap, which is an arraylike object. Remember that those contain numerically indexed members and a length member just like a genuine array but none of the handy array methods like Array.splice().
What does Node.attributes contain? For every attribute explicitly set in your markup or by script, Node.attributes contains a corresponding Attr node. So, no default Attr nodes in there.
Alrighty then, click Clear in both Firebug panels, and let's explore Node.attributes:
var arrayOfAttrNodes = document.getElementById("twitter").attributes;
arrayOfAttrNodes.length;
// 2
So two Attr nodes appear, one for id and one for class. But there are no default ones like style or dir. Now then, the numerical indexes in a NamedNodeMap are there just for enumeration purposes. That is to say, DOM does not specify whether those should be ordered relative to source code, alphabetically, or by any other pattern. So, browsers will vary in their numbering. For example, id appears first in the Twitter <li> but has an index of 1, not 0, in Firefox:
var arrayOfAttrNodes = document.getElementById("twitter").attributes;
arrayOfAttrNodes[1].name;
// "id"
But a NamedNodeMap is called a NamedNodeMap for a reason. You can, you know, query members by name, with an identifier and the . operator or with a string and the [] operator. Try both ways, verifying your work with Figure 7-15:
var arrayOfAttrNodes = document.getElementById("twitter").attributes;
arrayOfAttrNodes.id.value;
// "twitter"
var arrayOfAttrNodes = document.getElementById("twitter").attributes;
arrayOfAttrNodes["class"].value;
// "sprite"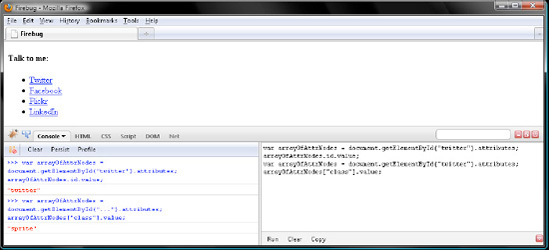
In regard to Node.attributes, Internet Explorer again says, "I'll be on my own side. By myself." Prior to version 8, Internet Explorer put every default attribute from the DTD in an element's attributes member. So, there might be like 100 in there. Yipes! Internet Explorer 8 does not have the bug.
Let's take a moment to sigh ruefully over this Internet Explorer bug. Then find a workaround for Internet Explorer 7 and earlier.
Hmm.
Why don't we...
No, that won't work.
I know, filter the Attr nodes in attributes by their specified member. Just throw away the ones with a value of false. Click Clear in both Firebug panels, and then define a helper function named filterDefaultAttrNodes() like so:
function filterDefaultAttrNodes(elem) {
  var filtered = [];
  for (var i = 0, j = elem.attributes.length; i < j; i ++) {
    if (elem.attributes[i].specified) {
      filtered.push(elem.attributes[i]);
    }
  }
  return filtered;
}
Note that the NamedNodeMap object in Node.attributes is a live DOM query just like a NodeList object is. To improve performance, you save the length member to a loop variable named j. In this way, you query the DOM one time for length rather than maybe 100 times for Internet Explorer.
Now pass the Twitter <li> as the parameter to filterDefaultAttrNodes().
function filterDefaultAttrNodes(elem) {
  var filtered = [];
  for (var i = 0, j = elem.attributes.length; i < j; i ++) {
    if (elem.attributes[i].specified) {
      filtered.push(elem.attributes[i]);
    }
  }
  return filtered;
}
filterDefaultAttrNodes(document.getElementById("twitter"));
// [Attr, Attr]
Verify your work with Figure 7-16.
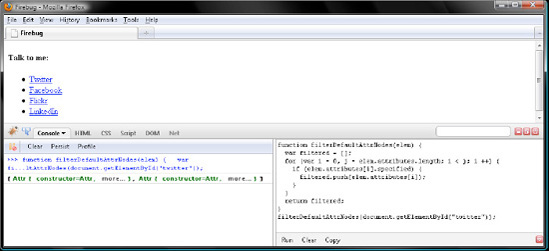
Two Attr nodes are in there. Note that, for Firefox, Safari, Opera, and Internet Explorer 8, elem.attributes[i].specified will always be true. So, this function does nothing for nonbuggy browsers. But for Internet Explorer 7 and older, it eliminates about 100 unwanted default Attr nodes. As an added benefit, the return value is a real array. Thus, unlike the arraylike attributes object, this one has all the array methods. You can manipulate the Attr nodes with those methods. Moreover, Node.attributes is a live DOM query and is memory intensive. On the other hand, the filtered array is not live, so it is very fast in comparison.
From an Internet Explorer lemon, we made lemonade!
Oftentimes, you will want to create Element or Text nodes with JavaScript and then insert them into the DOM tree. Doing so is one way to dynamically add content to a web page.
One of the implications of DOM being defined with interfaces rather than classes is that you cannot, for example, create an Element node by writing something like this:
var myLI = new Element("li");Rather than creating DOM nodes with constructor functions, you do so with factory methods from the Document interface. So let's try that. Click Clear in both Firebug panels, and create an Element node, say an <li>, with the factory method Document.createElement():
var myLI = document.createElement("li");That was pretty straightforward. Just pass Document.createElement() the tag name of the element as a string, and this factory method returns a new Element node to you. But it's blank; it has no attributes other than defaults from the DTD. It contains no child nodes either. So, you have some work to do before adding the <li> to the DOM tree. Let's tackle attributes first. You already know how—set id to "blog" and class to "sprite":
var myLI = document.createElement("li");
myLI.id = "bebo";
myLI.className = "sprite";
Now it's time for the children. The existing four <li> elements have a child <a> element with a child Text node. That's what you want this new <li> to have, too. Create the <a> first. Do it the same way as you did the <li>. Then add an href attribute with a value of "http://www.bebo.com".
var myLI = document.createElement("li"), myA = document.createElement("a");
myLI.id = "bebo";
myLI.className = "sprite";
myA.href = "http://www.bebo.com";
Now for the Text node. Like the element factory method, this one is defined by the Document interface, too. But be wary, unlike the element factory method, the identifier for this one ends with Node: createTextNode, not createText. Document.createTextNode() works with just one parameter, which is the string of text you want the node to represent.
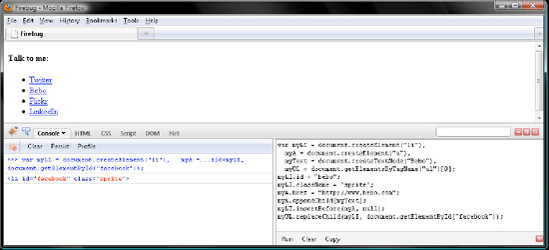
var myLI = document.createElement("li"),
  myA = document.createElement("a"),
  myText = document.createTextNode("Bebo");
myLI.id = "bebo";
myLI.className = "sprite";
myA.href = "http://www.bebo.com";
Now you have two Element nodes and one Text node floating around in the ether. How do you insert those into the DOM tree? Well, every kind of node, yup all 12 of 'em, has three methods to do so:
Node.appendChild()
Node.insertBefore()
Node.replaceChild()
What do those do? The first one, Node.appendChild(), appends the node you pass to it to the end of the childNodes array of the node you invoke it upon. Invoke Node.appendChild() on myA, passing myText as the parameter:
var myLI = document.createElement("li"),myA = document.createElement("a"),
myText = document.createTextNode("Bebo");
myLI.id = "bebo";
myLI.className = "sprite";
myA.href = "http://www.bebo.com";
myA.appendChild(myText);So now you have the DOM representation of the following <a> tag floating around in memory:
<a href="http://www.bebo.com">Bebo</a>
Now let's try Node.insertBefore(). This one takes two parameters. First, it takes a node to insert, just like the parameter to Node.appendChild(). The second parameter is a node in the childNodes member of whatever node you call insertBefore() on. JavaScript inserts the node in the first parameter before the child node in the second parameter. So that's why the method is named insertBefore(). Uh-huh.
In the event that you pass null in as the second parameter, Node.insertBefore() does the same thing as Node.appendChild(). Take advantage of that feature so that you can call Node.insertBefore() on myLI, which does not have any child nodes for you to choose the second parameter from:
var myLI = document.createElement("li"),
myA = document.createElement("a"),
  myText = document.createTextNode("Bebo");
myLI.id = "bebo";
myLI.className = "sprite";
myA.href = "http://www.bebo.com";
myA.appendChild(myText);
myLI.insertBefore(myA, null);Great. Now you have an <li> element like the following floating around in memory, just waiting for you to insert it into the DOM tree:
<li id="bebo" class="sprite"><a href="http://www.bebo.com">Bebo</a></li>
So now for the moment of truth. By way of the third method, Node.replaceChild(), you will swap the Facebook <li> for the new Bebo <li>.Node.replaceChild() takes two parameters, a child node to insert and a child node to remove.
OK, so for the DOM tree, you want to call Node.replaceChild() on the <ul> element, passing myLI for the first parameter and the Facebook <li> for the second parameter:
var myLI = document.createElement("li"),
  myA = document.createElement("a"),
  myText = document.createTextNode("Bebo"),
  myUL = document.getElementsByTagName("ul")[0];
myLI.id = "bebo";
myLI.className = "sprite";
myA.href = "http://www.bebo.com";
myA.appendChild(myText);
myLI.insertBefore(myA, null);
myUL.replaceChild(myLI, document.getElementById("facebook"));
// <li id="facebook" class="sprite">
Click Run, and verify that Firefox updated its display like in Figure 7-17. Note that all three insertion methods have a return value that is a node. As Figure 7-17 shows, for Node.replaceChild(), the return value is the node you removed. So, that is why Firebug printed <li id="facebook" class="sprite">. For the other two, Node.appendChild() and Node.insertBefore(), it's the node you inserted.
Insofar as a node can be in only one place in the DOM tree at a time, the return value for Node.appendChild() and Node.insertBefore() is not very useful. On the other hand, you can reinsert the node returned by Node.replaceChild() somewhere else. So, click Refresh in Firefox to revert the display to our initial markup and then try reinserting the Facebook <li> like so:
var myLI = document.createElement("li"),
  myA = document.createElement("a"),
  myText = document.createTextNode("Bebo"),
  myUL = document.getElementsByTagName("ul")[0];
myLI.id = "bebo";
myLI.className = "sprite";
myA.href = "http://www.bebo.com";
myA.appendChild(myText);
myLI.insertBefore(myA, null);
myUL.appendChild(myUL.replaceChild(myLI, document.getElementById("facebook")));
// <li id="facebook" class="sprite">
As Figure 7-18 illustrates, JavaScript replaced the Facebook <li> with the new Bebo <li>. Then reinserted the Facebook <li> at the very end of the NodeList in myUL.childNodes. So, Firefox displays five <li> elements rather than four.
Note
Content created with JavaScript does not have empty Text nodes representing formatting since there is none. That is to say, dynamically generated content is like markup where every opening tag is flush to the preceding element's closing tag.
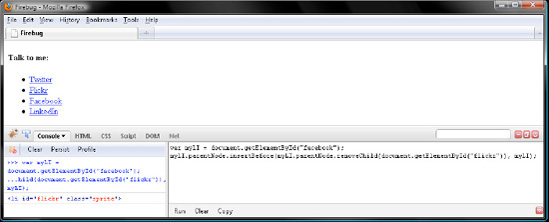
Now what if you simply want to delete some content without inserting any in its place? Doing so is straightforward. Just call Node.removeChild() on the parent of the node you want to delete. Pass Node.removeChild() the unwanted child node, and you're done. So, let's give the Flickr <li> the axe. But before doing so, click Clear in both Firebug panels and refresh Firefox so that it reverts its display to the original markup:
var myUL = document.getElementsByTagName("ul")[0];
myUL.removeChild(document.getElementById("flickr"));
Take a peek at Firefox's display. There are just three <li> elements now.
Since JavaScript printed <li id="flickr" class="sprite"> in the left panel of Firebug, does that mean Node.removeChild() returns the node it deleted? Yup.
It turns out you can use that return value to reinsert the deleted node elsewhere. Let's give that a try. But first click Refresh in Firefox so that you get the Flickr <li> back. Double-clear Firebug, too. Then enter and run the following:
var myUL = document.getElementsByTagName("ul")[0],myLI = document.getElementById("facebook");
myUL.insertBefore(myUL.removeChild(document.getElementById("flickr")), myLI);Now then, Node.removeChild() and Node.insertBefore() are called on the parent node of their parameters. With this in mind, you can call them on the parentNode member of the deleted or inserted node. In other words, you can be totally clueless about who the parent is. So, refresh Firefox; then rework the previous sample like so:
var myLI = document.getElementById("facebook");
myLI.parentNode.insertBefore(myLI.parentNode.removeChild(document.getElementById("flickr")),
  myLI);
Then click Run, and verify your cleverness with Figure 7-19. Note that this mystery parent trick works for Node.appendChild() and Node.replaceChild(), too. As long as you know the node you want to manipulate, you can call any of those four methods on its parentNode member, since Element and Text nodes always have a parent, even if they don't know their name.
Insofar as a node can be in only one place in the DOM tree at any given time, you may think that there is no way to duplicate content. But you would be wrong. If you want to copy a node with or without its descendants, just call its cloneNode() method. Node.cloneNode() takes a boolean parameter. Pass in true if you want to duplicate the node and its descendants (the whole branch of the DOM tree). Otherwise, pass in false, and JavaScript will duplicate the element as if it were empty. For Text nodes, which have no descendants, the parameter is moot. But pass in false to show you know what you're doing. Note that any event listener functions registered for an element, something you will learn how to do in Chapter 9, are not copied. This is stupid, but it is what it is. You have to redo any event binding for the duplicate element.
Alright, double-clear Firebug, refresh Firefox, and try duplicating the <ul> and its descendants. Then reinsert the duplicate branch in the DOM tree:
var myUL = document.getElementsByTagName("ul")[0];
myUL.parentNode.appendChild(myUL.cloneNode(true));
Note that, although Node.cloneNode() gives you the option to do a deep or shallow copy, Node.appendChild(), Node.insertBefore(), Node.replaceChild(), and Node.removeChild() do not. Those four manipulate a node with its descendants, no matter what.
Creating an element containing descendants with Document.createElement(), Node.appendChild(), and other methods can be mind-numbingly repetitive. Why not eliminate some drudgery by writing a helper function to create elements with?
No, I cannot think of any reason not to either. Let's get to it. But, before beginning, double-clear Firebug and refresh Firefox. Now define a function named createElem() that works with three parameters. First, name will contain the tag name as a string. Next, members will contain an object containing the names and values of any attributes you want the element to have. Finally, children will contain an array containing any child nodes you want the element to have. For a Text node child, you may put a Text node or a string in children.
function createElem(name, members, children) {
}
Now declare local variables named elem and m, initializing elem to the return value of document.createElement(name) and letting m default to undefined.
function createElem(name, members, children) {
  var elem = document.createElement(name), m;
}
Now you have a vanilla Element node with its nodeName and tagName members both set to name. Of course, JavaScript will also initialize any other default attributes or members for that particular tag. Let's go ahead and enumerate members with a for in loop. In the for in block, you will initialize attributes with the [] operator and the string in m. Remember from Chapter 4 that, during each roundabout of a for in loop, JavaScript assigns the name of a member to the loop variable as a string, regardless of whether it was named with a string or identifier in the object. But before you do, make sure that the members parameter really does contain an object. To do so, wrap the for in loop with an if condition:
function createElem(name, members, children) {
  var elem = document.createElement(name), m;
  if (members instanceof Object) {
    for (m in members) {
      elem[m] = members[m];
    }
  }
}
Moving right along, let's do something very similar with the children array. Insofar as children is an array, go with a for loop instead of a for in loop. Within the for block, you will pass appendChild() an expression cobbled together with the ?: operator, which I covered in Chapter 3. In the event that children[i] is a node, which is to say an object, the ?: expression will simply evaluate to the node. Otherwise, it will evaluate to passing the string in children[i] to Document.createTextNode(), which will in turn return a Text node. Either way, appendChild() will have a node to work with. So, it will be happy as a clam.
function createElem(name, members, children) {
  var elem = document.createElement(name), m;
  if (members instanceof Object) {
for (m in members) {
elem[m] = members[m];
}
}
if (children instanceof Array) {
for (i = 0; i < children.length; i ++ ) {
elem.appendChild(
typeof children[i] === "object" ? children[i] : document.createTextNode(children[i])
);
}
}
}Right now, createElem() returns undefined, so the element and its descendants cannot be inserted into the DOM tree. No, not good.
What do you do? Just return elem. That way, you can pass the return value of createElem() to a method like Node.appendChild(). To save your bacon, just amend createElem() like so:
function createElem(name, members, children) {
  var elem = document.createElement(name), m;
  if (members instanceof Object) {
    for (m in members) {
      elem[m] = members[m];
    }
  }
  if (children instanceof Array) {
    for (i = 0; i < children.length; i ++ ) {
      elem.appendChild(
        typeof children[i] === "object" ? children[i] : document.createTextNode(children[i])
      );
    }
  }
  return elem;
}
Now for the moment of truth. Earlier in the day, you laboriously created a Bebo <li> like so:
var myLI = document.createElement("li"),
  myA = document.createElement("a"),
  myText = document.createTextNode("Bebo");
myLI.id = "bebo";
myLI.className = "sprite";
myA.href = "http://www.bebo.com";
myA.appendChild(myText);
Now try to replace all that with a call to the createElem() function. Then you'll append the Bebo <li> element to your <ul>. Enter and run the following amended sample, before verifying your work with Figure 7-20.
function createElem(name, members, children) {
  var elem = document.createElement(name), m;
  if (members instanceof Object) {
    for (m in members) {
      elem[m] = members[m];
    }
}
if (children instanceof Array) {
for (i = 0; i < children.length; i ++ ) {
elem.appendChild(
typeof children[i] === "object" ? children[i] : document.createTextNode(children[i])
);
}
}
return elem;
}
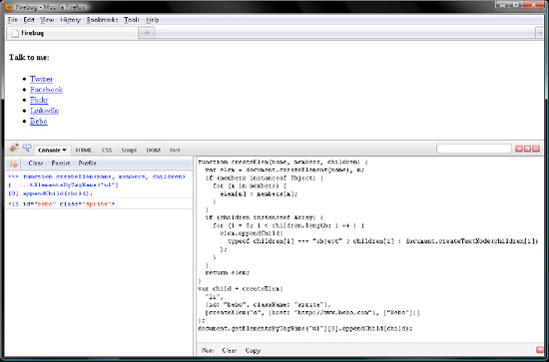
var child = createElem(
"li",
{id: "bebo", className: "sprite"},
[createElem("a", {href: "http://www.bebo.com"}, ["Bebo"])]
);
document.getElementsByTagName("ul")[0].appendChild(child);Did everything work for you? Good job. You're definitely well on your way from JavaScript dummy to expert.
Let's try a final sample so that many of the features covered in this chapter take firm root in your noggin. You're going to write a function named orderUL that will alphabetically reorder any descendant <li> elements of a <ul> regardless of whether it contains nested <ul> elements.
First, download seven2.html (shown here) from the chapter downloads at www.apress.com. Then open it with Firefox and press F12 to enable Firebug. Note that seven2.html lists the 30 ice hockey teams in the NHL.
<!DOCTYPE html PUBLIC "-//W3C//DTD XHTML 1.0 Strict//EN"
"http://www.w3.org/TR/xhtml1/DTD/xhtml1-strict.dtd">
<html xmlns="http://www.w3.org/1999/xhtml">
<head>
<meta http-equiv="Content-Type" content="text/html; charset=utf-8" />
<title>Firebug</title>
</head>
<body>
<ul>
  <li><a href="#">Western Conference</a>
    <ul>
      <li><a href="http://blackhawks.nhl.com">Chicago Blackhawks</a></li>
      <li><a href="http://bluejackets.nhl.com">Columbus Blue Jackets</a></li>
      <li><a href="http://redwings.nhl.com">Detroit Red Wings</a></li>
      <li><a href="http://predators.nhl.com">Nashville Predators</a></li>
      <li><a href="http://blues.nhl.com">St Louis Blues</a></li>
      <li><a href="http://flames.nhl.com">Calgary Flames</a></li>
      <li><a href="http://avalanche.nhl.com">Colorado Avalanche</a></li>
      <li><a href="http://oilers.nhl.com">Edmonton Oilers</a></li>
      <li><a href="http://wild.nhl.com">Minnesota Wild</a></li>
      <li><a href="http://canucks.nhl.com">Vancouver Canucks</a></li>
      <li><a href="http://ducks.nhl.com">Anaheim Ducks</a></li>
      <li><a href="http://stars.nhl.com">Dallas Stars</a></li>
      <li><a href="http://kings.nhl.com">Los Angeles Kings</a></li>
      <li><a href="http://coyotes.nhl.com">Phoenix Coyotes</a></li>
      <li><a href="http://sharks.nhl.com">San Jose Sharks</a></li>
    </ul>
  </li>
  <li><a href="#">Eastern Conference</a>
    <ul>
      <li><a href="http://devils.nhl.com">New Jersey Devils</a></li>
      <li><a href="http://islanders.nhl.com">New York Islanders</a></li>
      <li><a href="http://rangers.nhl.com">New York Rangers</a></li>
      <li><a href="http://flyers.nhl.com">Philadelphia Flyers</a></li>
      <li><a href="http://penguins.nhl.com">Pittsburgh Penguins</a></li>
      <li><a href="http://bruins.nhl.com">Boston Bruins</a></li>
      <li><a href="http://sabres.nhl.com">Buffalo Sabres</a></li>
      <li><a href="http://canadiens.nhl.com">Montreal Canadiens</a></li>
      <li><a href="http://senators.nhl.com">Ottawa Senators</a></li>
      <li><a href="http://mapleleafs.nhl.com">Toronto Maple Leafs</a></li>
      <li><a href="http://thrashers.nhl.com">Atlanta Thrashers</a></li>
      <li><a href="http://hurricanes.nhl.com">Carolina Hurricanes</a></li>
      <li><a href="http://panthers.nhl.com">Florida Panthers</a></li>
      <li><a href="http://lightning.nhl.com">Tampa Bay Lightning</a></li>
      <li><a href="http://capitals.nhl.com">Washington Capitals</a></li>
</ul> </li> </ul> </body> </html>
Begin by saving the invocation expression, document.getElementsByTagName("ul"), to a variable named myElements. Then define a function named orderUL that works with an argument named root, which will refer to an ancestor of the <li> elements you want to reorder.
var myElements = document.getElementsByTagName("ul");
function orderUL(root) {
}
Note that root will typically be a <ul>, but any ancestor of the <li> elements you want to reorder will do. Even document will work fine. However, for your sample, pass myElements[0] to orderUL(). Of course, you have to write orderUL() before you can think of calling it. So let's get back to work.
Initialize a local variable named nodeList to root.getElementsByTagName("li"), which evaluates to a NodeList containing every descendant <li> of the parameter passed to orderUL(). Then create an empty array named helperArray to copy the <li> elements in nodeList to. Recall from earlier in the chapter that doing this will make orderUL() run faster since NodeList objects are live DOM queries. Finally, declare the traditional loop variable i:
var myElements = document.getElementsByTagName("ul");
function orderUL(root) {
  var nodeList = root.getElementsByTagName("li"), helperArray = [], i;
}
Now write a for loop to copy the <li> elements in nodeList to helperArray. Doing so will enable you to reorder the <li> elements with Array.sort(). Moreover, later you will loop through helperArray, removing and reinserting an <li> element during each roundabout. This is the kind of loop you should never use on a live NodeList. So, you definitely have reasons for the way you're doing things!
var myElements = document.getElementsByTagName("ul");
function orderUL(root) {
  var nodeList = root.getElementsByTagName("li"), helperArray = [], i;
  for (i = 0; i < nodeList.length; i ++) {
    helperArray.push(nodeList[i]);
  }
}
Recall from Chapter 5 that by default Array.sort() reorders strings and numbers relative to their character encoding. For example, "Zebra" would come before "antelope", and 450 would come before 9. Rarely will this default behavior be desirable. Obviously, it isn't here. Pass Array.sort() a function literal to reorder helperArray with. In this function literal, you determine whether to return −1, 1, or 0 relative to the lowercase versions of the strings the child Text nodes represent. However, remember that String.toLowerCase() does not lowercase the string that you call it on. Rather, it returns a lowercased copy of the string. So, save those to local variables named txt1 and txt2. Comparing those lowercased copies with the < and > operators takes care of the string and number bugs noted earlier. So feeling clever, you now have this:
var myElements = document.getElementsByTagName("ul");
function orderUL(root) {
  var nodeList = root.getElementsByTagName("li"), helperArray = [], i;
for (i = 0; i < nodeList.length; i ++) { helperArray.push(nodeList[i]);}helperArray.sort(function(li1, li2) {var txt1 = li1.getElementsByTagName("a")[0].firstChild.nodeValue.toLowerCase();var txt2 = li2.getElementsByTagName("a")[0].firstChild.nodeValue.toLowerCase();if (txt1 < txt2) {return −1;} else if (txt1 > txt2) {return 1;} else {return 0;}});}
Now here's the question: helperArray contains every descendant <li> of the element passed in the root parameter. That is to say, the <li> elements in helperArray may very well be from different <ul> elements. At this point, you have the <li> elements reordered as you want. Now you need to reinsert each <li> to the right <ul>. How do you do that?
Did you figure it out yet?
Take your time.
No hurry.
Remember, there are no stupid answers.
So, what do you think?
Good try, but that's not it.
Do you remember how every element has a parent? For example, parentNode is never null for an Element node. In this case, for every <li> element in the helperArray, parentNode refers to the <ul> it belongs to. Moreover, since nodes may be only one place in the DOM tree at a time, if you blindly call Node.appendChild() on the parentNode member of each <li>, JavaScript will remove the <li> from the childNodes member of its containing <ul>. Then reinsert it at the very end of the same <ul> element's childNodes member. So, do so one <li> at a time by way of a for loop:
var myElements = document.getElementsByTagName("ul");
function orderUL(root) {
  var nodeList = root.getElementsByTagName("li"), helperArray = [], i;
  for (i = 0; i < nodeList.length; i ++) {
    helperArray.push(nodeList[i]);
  }
  helperArray.sort(function(li1, li2) {
      var txt1 = li1.getElementsByTagName("a")[0].firstChild.nodeValue.toLowerCase();
      var txt2 = li2.getElementsByTagName("a")[0].firstChild.nodeValue.toLowerCase();
      if (txt1 < txt2) {
        return −1;
      } else if (txt1 > txt2) {
        return 1;
      } else {
        return 0;
      }
    });
  for (i = 0; i < helperArray.length; i ++) {
    helperArray[i].parentNode.appendChild(helperArray[i]);
  }
}
Taking the time to explore core DOM features is paying dividends. Now for the moment of truth: pass myElements[0] to orderUL(), cross your fingers, and click Run.
var myElements = document.getElementsByTagName("ul");
function orderUL(root) {
  var nodeList = root.getElementsByTagName("li"), helperArray = [], i;
  for (i = 0; i < nodeList.length; i ++) {
    helperArray.push(nodeList[i]);
  }
  helperArray.sort(function(li1, li2) {
      var txt1 = li1.getElementsByTagName("a")[0].firstChild.nodeValue.toLowerCase();
      var txt2 = li2.getElementsByTagName("a")[0].firstChild.nodeValue.toLowerCase();
      if (txt1 < txt2) {
        return −1;
      } else if (txt1 > txt2) {
        return 1;
      } else {
        return 0;
      }
    });
  for (i = 0; i < helperArray.length; i ++) {
    helperArray[i].parentNode.appendChild(helperArray[i]);
  }
}
orderUL(myElements[0]);
So as Figure 7-21 illustrates, JavaScript reordered the team and conference <li> elements. One last thing before I call this chapter a wrap. Remember those whitespace Text nodes representing markup formatting? Where do you think those were moved to?
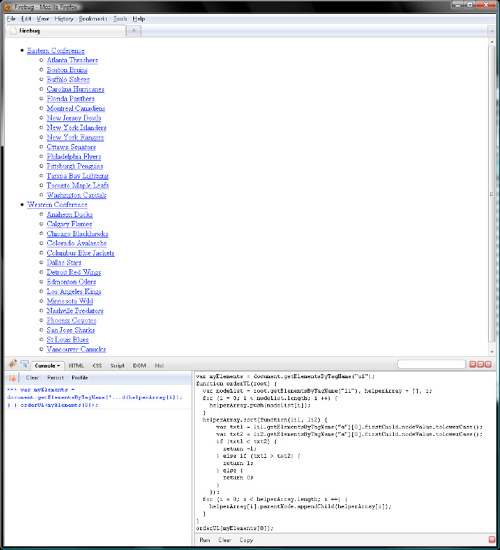
Now let's think this through. orderUL() plucked <li> elements from the DOM tree and reinserted them at the very end of the NodeList in the childNodes member of their parent <ul> element. Say that three times fast. Anyway, the formatting Text nodes were left alone. Therefore, after plucking an <li> from the tree, the formatting Text nodes that were on either side of the <li> wind up next to each other. By the time orderUL() finishes its work, the formatting Text nodes are bunched up at the beginning of the NodeList in the childNodes members of the <ul> elements.
Rather than take my word for it, refresh Firefox, and run the following amended sample:
var myElements = document.getElementsByTagName("ul");
function orderUL(root) {
  var nodeList = root.getElementsByTagName("li"), helperArray = [], i;
  for (i = 0; i < nodeList.length; i ++) {
    helperArray.push(nodeList[i]);
  }
  helperArray.sort(function(li1, li2) {
      var txt1 = li1.getElementsByTagName("a")[0].firstChild.nodeValue.toLowerCase();
      var txt2 = li2.getElementsByTagName("a")[0].firstChild.nodeValue.toLowerCase();
      if (txt1 < txt2) {
        return −1;
      } else if (txt1 > txt2) {
        return 1;
      } else {
        return 0;
      }
    });
  for (i = 0; i < helperArray.length; i ++) {
    helperArray[i].parentNode.appendChild(helperArray[i]);
  }
}
orderUL(myElements[0]);
myElements[1].childNodes;
JavaScript then prints the following in Firebug:
[<TextNode textContent="
 ">, <TextNode textContent="
 ">, <TextNode textContent="
 ">,
<TextNode textContent="
 ">, <TextNode textContent="
 ">, <TextNode textContent="
 ">,
<TextNode textContent="
 ">, <TextNode textContent="
 ">, <TextNode textContent="
 ">,
<TextNode textContent="
 ">, <TextNode textContent="
 ">, <TextNode textContent="
 ">,
<TextNode textContent="
 ">, <TextNode textContent="
 ">, <TextNode textContent="
 ">,
<TextNode textContent="
 ">, li, li, li, li, li, li, li, li, li, li, li, li, li, li, li]
So, although you initially had 17 formatting Text nodes interspersing 15 <li>Element nodes, now you have 17 formatting Text nodes followed by 15 <li>Element nodes. Having those formatting Text nodes bunched together does no harm. But if you want JavaScript to fold those 17 formatting Text nodes into one, call Node.normalize() on their parent or any other ancestor. JavaScript will then merge any adjacent Text nodes and delete any empty ones. Note that, by empty Text nodes, I mean those that do not even represent whitespace. As you might imagine, empty Text nodes are as rare as formatting Text nodes are prevalent.
Refresh Firefox; then run the following amended sample:
var myElements = document.getElementsByTagName("ul");
function orderUL(root) {
  var nodeList = root.getElementsByTagName("li"), helperArray = [], i;
for (i = 0; i < nodeList.length; i ++) {
helperArray.push(nodeList[i]);
}
helperArray.sort(function(li1, li2) {
var txt1 = li1.getElementsByTagName("a")[0].firstChild.nodeValue.toLowerCase();
var txt2 = li2.getElementsByTagName("a")[0].firstChild.nodeValue.toLowerCase();
if (txt1 < txt2) {
return −1;
} else if (txt1 > txt2) {
return 1;
} else {
return 0;
}
});
for (i = 0; i < helperArray.length; i ++) {
helperArray[i].parentNode.appendChild(helperArray[i]);
}
}
orderUL(myElements[0]);
myElements[0].normalize();
myElements[1].childNodes;JavaScript will then print the following in Firebug; as you can see, the 17 formatting Text nodes were folded into one:
[<TextNode textContent="


 ">, li, li, li, li,
li, li, li, li, li, li, li, li, li, li, li]
Now what if you don't want the giant whitespace Text node? Just delete it with Node.removeChild(), which we explored earlier. Refresh Firefox, and then run the amended sample, verifying your work with Figure 7-22:
var myElements = document.getElementsByTagName("ul");
function orderUL(root) {
  var nodeList = root.getElementsByTagName("li"), helperArray = [], i;
  for (i = 0; i < nodeList.length; i ++) {
    helperArray.push(nodeList[i]);
  }
  helperArray.sort(function(li1, li2) {
      var txt1 = li1.getElementsByTagName("a")[0].firstChild.nodeValue.toLowerCase();
      var txt2 = li2.getElementsByTagName("a")[0].firstChild.nodeValue.toLowerCase();
      if (txt1 < txt2) {
        return −1;
      } else if (txt1 > txt2) {
        return 1;
      } else {
        return 0;
      }
    });
  for (i = 0; i < helperArray.length; i ++) {
    helperArray[i].parentNode.appendChild(helperArray[i]);
  }
}
orderUL(myElements[0]);
myElements[0].normalize();
myElements[1].removeChild(myElements[1].firstChild);
myElements[1].childNodes;
// [li, li, li, li, li, li, li, li, li, li, li, li, li, li, li]So now the Eastern Conference <ul> has just <li> children, just as if you had removed all formatting whitespace from the XHTML markup (or if Internet Explorer were representing it).
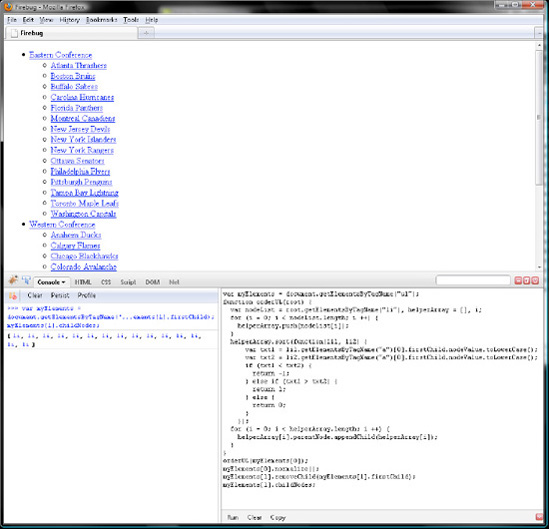
In this chapter, we explored how to query, traverse, and modify the DOM tree representing your markup; in other words, you learned how to manipulate the content layer of a web page. To do so, you worked with features provided by several interfaces, which are just lists of methods and members that need to be implemented together. Element, Document, Text, and other node types implement several interfaces. But every kind of node has the features listed in the Node interface. One member from Node, nodeType, returns an integer between 1 and 12 that tells you what other interface the node accumulates features from. For example, 1 tells you the node has the methods and members listed in the Element interface, too. Therefore, knowing what feature lists, or interfaces, to consult is very important to effectively script DOM.
In the next chapter, we will explore how to manipulate the presentation layer via the CSS module provided by DOM. Then, in Chapter 9, we will explore how to add a behavior layer with the Events module. There's much to look forward to!