
7. Components Part I: Controllers and Models
Components are typically the largest and most complex extensions and require the most knowledge and perseverance to create. If you have gotten this far in the book, you are likely ready for the challenge.
This chapter begins the in-depth look at the model-view-controller (MVC) design pattern used by all core components in Joomla!. We do this by examining the back end of the Weblinks component.
We start with an overview of the component’s files and then look in detail at the different tasks that the component can do. Then we explore how these tasks are implemented in the controller and model classes. We also discuss the JTable class and how it is used to work with the database.
What Is a Component?
A Joomla website contains two types of building blocks. One is the content that will be entered or displayed—for example, articles, contacts, products, and so on. The other is a set of menu items. These allow you to navigate through the site and work with the content. Both of these building blocks are based on components. In the back end of Joomla, administrative components are used to manage all the content in the site. In the front end, every menu item is based on a component.
Whenever we are doing any task other than simply displaying information, we normally use a component. For example, when we enter new information into the database, such as a new article, we use a component. When we click on a menu item, we are accessing a component.
As discussed in Chapter 3, each Joomla processing cycle begins by executing a component’s starting file (for example, components/com_content/content.php). For core components, this invokes the programs that make up the component’s MVC structure.
One point of possible confusion about components in Joomla is that we use components in the back end to create and manage the site. So we use back-end components to manage both front-end and back-end components, and we use components to manage all the other extension types: modules, plugins, languages, and templates. For example, the module manager is a back-end component, but its job is to help us create and manage modules on the site.
CRUD, Get, and Post
Another way to understand components is to think in terms of what we are asking Joomla to do. If we are simply asking to display information, we can do that in a module or a plugin. However, if we want the program to take an action—for example, to save some information to the database—we normally would do this in a component. In other words, any time we press a submit or save button in Joomla, there is normally a component that will process the request.
Most HTML forms use the attribute method="post" to process the form’s contents. This is almost always the case when you want the program to take some type of action other than simply display something. The post method places the values entered in the form into the PHP $_REQUEST variable. In most cases, when we process a form in Joomla with the post method, we use a component to handle the result.
CRUD is an acronym that stands for create, read, update, delete. CRUD tasks (other than read) are the parts of a component’s code that add, update, or delete rows in a table. Normally in Joomla, only components handle these CRUD tasks.
Components Are Unique
To summarize, components are the primary building blocks for a Joomla site. Components are
• The main building blocks of a Joomla website
• Used to maintain both the content of a site and the menus and menu items for the site
• The normal entry point for a Joomla processing cycle
• Used in the back end to manage all the administrative setup of the site
• Used to handle all the CRUD tasks for the database
• Normally used to handle any forms that use the post method
MVC Design Pattern
Before we dive into the details of a core component, let’s quickly look at the MVC design pattern that all the core components use.
As with all design patterns for object-oriented programming (OOP), the MVC design pattern attempts to maximize our ability to reuse code (classes and methods) by separating out the different types of tasks required and creating different classes to do each of these tasks. Using MVC also makes the code easier to read, understand, and maintain. People familiar with the pattern can quickly understand the organization of the code.
Let’s think about a typical session in Joomla where we are entering an article. Here is a summary of the events:
User: Clicks Add button in Article Manager.
Joomla: 1. Processes the button click and submits URL for the blank form.
2. Processes URL for blank form and displays it.
User: Enters information and clicks Save & Close button.
Joomla: 1. Processes the form.
2. Saves the article and related information to the database.
3. Creates the URL for the Article Manager with success message.
4. Processes the URL to display the Article Manager with success message.
The MVC design pattern divides these programming tasks into three groups. The Controller processes the user input. The model interacts with the database and “knows” how articles work. The view displays all the content on the page. By organizing the code in this way, we can make changes in one part of the component without having to change the other parts. For example, we could add a new view without having to change the controller or the model. If we add a new user action (for example, copy), we can add these to the controller and model but don’t have to modify any existing code. If we need to change how articles work (for example, it must have some minimum metadata values), we only change the model. The view and controller are unaffected.
Given this, you might expect that a Joomla component would have three files: a model, a view, and a controller. Alas, real life is more complicated than that, and a complex component has many program files, as we see in the next section. However, these files are mostly organized into these three categories, so the pattern helps us organize and understand the code.
Back-End Weblinks Component
Let’s start by looking at how the core Weblinks component works in the back end. This is a typical administrative component and is similar to many of the other back-end components for managing articles, users, modules, and so on.
Table 7.1 lists the programming files for the component. All these files are in the administator/components/com_weblinks folder. For the rest of this chapter, all Weblinks file names are relative to this home folder unless otherwise indicated.
Table 7.1. Back-End Weblinks Component Files (Excludes index.html Files)
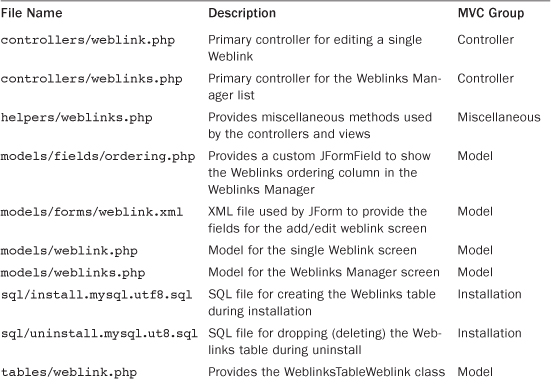
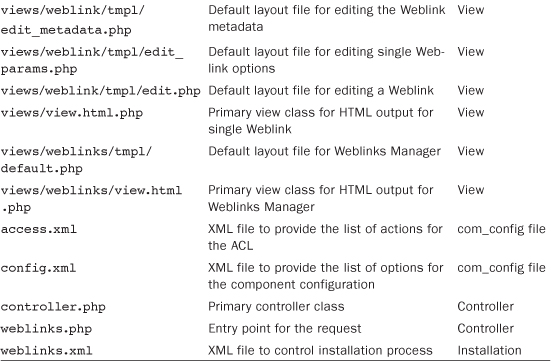
Most of the files are organized according to the MVC pattern. All the view files are inside the views subfolder, and the primary model and controller files are inside their respective model and controller subfolders. We also have installation, configuration, and helper files mixed in.
Installation Files
Three files execute when the component is installed or uninstalled. The two SQL files are SQL database scripts that are run by the install and uninstall program. In this case, the file sql/install.mysql.utf8.sql creates the #__weblinks table and the sql/uninstall.mysql.ut8.sql file deletes (or drops, in database jargon) the table. For some components, we might need to run a SQL script to populate the tables with data from other tables. If so, we would include this in the install script. The weblinks.xml file performs the same function as the XML files we created to install our example plugins and modules. It has the same elements for author, creationDate, and so on, as well as a list of the files and languages.
Note that all the core components are preinstalled when you first install Joomla. The installation folder has a file called installation/sql/mysql/joomla.sql that is run to populate the database tables with all the core extensions. A second SQL file, installation/sql/mysql/sample_data.sql, is executed if you install the default sample data. However, many core extensions can be uninstalled using the Extension Manager. In this case, the installation XML file is used to control the uninstall process.
Components Menu
When we create a component, we normally require one or more menu options in the administrative back end to manage the component. Menus in the Joomla back end are created differently from menus in the front end. Front-end menu items are defined by the site administrator using the back-end com_menus component. On the back end, menu options are added to the Components menu when components are installed. These options are defined in the component’s XML file.
For example, in the weblinks.xml file, inside the administration element, we see the following code:
<menu img="class:weblinks">Weblinks</menu>
<submenu>
<!--
Note that all & must be escaped to & for the file to be valid
XML and be parsed by the installer
-->
<menu link="index.php?option=com_weblinks" view="links" img="class:weblinks"
alt="Weblinks/Links">Links</menu>
<menu link="index.php?option=com_categories&extension=com_weblinks"
view="categories" img="class:weblinks-cat" alt="Weblinks/Categories">Categories
</menu>
</submenu>
These menu elements are used to add rows to the #__menus table when the component is installed. These rows are used to create the Components menu options in the Joomla back end, as shown in Figure 7.1.
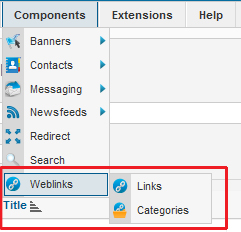
Figure 7.1. Weblinks menu options
We discuss the format of the menu element when we create our own component in Chapter 9.
Component Options (Parameters)
Component options are more complicated and more flexible than options for other extensions. For plugins, languages, modules, and templates, the config element from the installation XML file is read when the extension is created or edited to create the options for the extension. The set of options is defined for each instance of the extension.
For components, we can set component options at two or more levels. Global options can be set using the Options icon on the toolbar in the manager screen. Global options are used by the core components to set default options for new menu items. This process calls the back-end component com_config. It uses two XML files, config.xml and access.xml, to create a modal window with the options for the component. Each fieldset element in the config.xml file corresponds to a tab in the options window. By convention, the last fieldset is called permissions and has one field as follows:
<field name="rules" type="rules"
component="com_weblinks"
filter="rules"
validate="rules"
label="JCONFIG_PERMISSIONS_LABEL"
section="component" />
We discuss this in detail when we create our front-end component in Chapter 10.
Helper Methods
Two helper methods are used in the Weblinks back end. These are provided by the file helpers/weblinks.php. Helper classes are used to hold small methods that might be used in several places in the component and don’t fit into the model, view, or component.
The method addSubmenu() adds the submenu that displays on the Weblinks Manager screen, as shown in Figure 7.2.
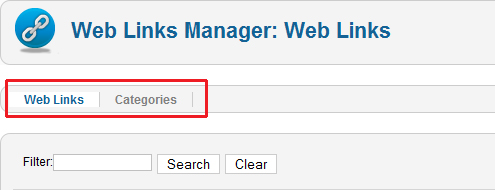
Figure 7.2. Weblinks submenu
These are not to be confused with the submenus in the Components menu, shown in Figure 7.1. Those submenus are created based on the component’s XML file during the component installation. These submenus are rendered as links on the Weblinks Manager screen and provide navigation between the two manager screens: Weblinks and Categories.
The second method, getActions(), is used to determine what actions a user is allowed for the component. The Weblinks Manager screen has a toolbar as shown in Figure 7.3.

Figure 7.3. Weblinks Manager toolbar
The Weblinks Manager: Weblink screen has the toolbar shown in Figure 7.4.

Figure 7.4. Weblinks Manager: Weblink toolbar
If a user doesn’t have permissions for one or more of these actions, the icon is not shown in the toolbar. The getActions() method returns an object that lists the possible actions for the component and whether the current user has permission for the action. This is used by the views to determine which toolbars to show.
As discussed elsewhere, it is important to remember that the feature of showing users only those toolbars that they have permissions for is a user-interface benefit but does not protect against a hacker trying an unauthorized action. These toolbar actions can still be attempted by a user who edits the PHP $_REQUEST variable directly in the browser, even if the button is not present. Therefore, removing the toolbar button is not a substitute for checking the user’s permissions in the controller or model before performing each task.
Weblinks Component Entry Point
Now let’s look more closely at the way the MVC design pattern works. We will start with the controller, because that is where the processing starts.
As we have seen earlier, the processing of a component begins with the file at the root folder of the component whose name is the component name, without the “com_” letters. We will call this the component entry point file.
The Weblinks Manager: Weblinks screen is loaded using the URL administrator/index.php?option=com_weblinks&view=weblinks. The processing of this URL starts with the file weblinks.php (in the folder administrator/com_weblinks/). This file is shown in Listing 7.1.
Listing 7.1. administrator/com_weblinks/weblinks.php File
<?php
/**
* @package Joomla.Administrator
* @subpackage com_weblinks
* @copyright Copyright (C) 2005 - 2012 Open Source Matters, Inc. All rights reserved.
* @license GNU General Public License version 2 or later; see LICENSE.txt
*/
// no direct access
defined('_JEXEC') or die;
// Access check.
if (!JFactory::getUser()->authorise('core.manage', 'com_weblinks')) {
return JError::raiseWarning(404, JText::_('JERROR_ALERTNOAUTHOR'));
}
// Include dependancies
jimport('joomla.application.component.controller'),
$controller = JController::getInstance('Weblinks'),
$controller->execute(JRequest::getCmd('task'));
$controller->redirect();
This file is a PHP script and does not declare any classes. Therefore, it is executed immediately when it is loaded.
The first thing the script does, after the defined statement, is to check that the user has permission for the core.manage action for Weblinks. The core.manage action is required before a user can do any back-end management tasks for the core components. By putting this check here, we prevent an unauthorized user from accessing the screen by directly typing the URL into the browser.
The next line imports the JController class (libraries/joomla/application/component/controller.php).
The last three lines of code are as follows:
$controller = JController::getInstance('Weblinks'),
$controller->execute(JRequest::getCmd('task'));
$controller->redirect();
These three lines of code are very important for understanding how the Joomla MVC pattern works for components. The first line uses the JController class to get an instance of the controller we need for our present task. The second line uses that controller object to execute the task. The third line then executes the controller’s redirect() method to take us to the next URL, if any.
Virtually all the core components have these same lines of code in their entry script. If we understand how this works in com_weblinks, we will have a great start in understanding MVC throughout Joomla.
Weblinks Controller in Action
Let’s look as how this works when a user performs some typical actions with the Weblinks Manager in the Joomla back end.
Example 1: User Selects Components -> Weblinks Menu Option
In this example, the user selects the Weblinks option from the Components menu. The URL for this is administrator/index.php?option=com_weblinks. The getInstance() method finds the correct controller class for the specified task. In this example, no task is specified, so we do the default task, which is “display”.
For the display task, the base Weblinks controller, WeblinksController (controller.php), is used.
The second line performs the execute() method for the given task. Again, since the task is not specified, the default “display” task is performed. This runs the display() method of the WeblinksContoller. This method displays the Weblinks Manager screen and does not set a redirect value.
The third line executes the WeblinksController redirect() method. Since there is no redirect specified, this method simply returns a boolean false and the manager screen displays.
The key values for this example are as follows:
• URL: administrator/index.php?option=com_weblinks
• Task: none (defaults to display)
• Controller: WeblinksController (controller.php)
• Controller Method executed: display()
• Controller Redirect: empty
Example 2: User Clicks a Weblink Title To Edit
The information for the first part of this example is as follows:
• URL: administrator/index.php?option=com_weblinks&task=weblink.edit&id=7
• Task: weblink.edit
• Controller: WeblinksControllerWeblink (controllers/weblink.php)
• Controller Method executed: JControllerForm->edit()
• Controller Redirect: index.php?option=com_weblinks&view=weblink&layout=edit&id=7
The URL specifies the task of “weblink.edit”. This tells the getInstance() method of JController to find a controller named WebinksControllerWeblink. This name is created as follows:
<component name> + Controller + <first segment of task name>.
The getInstance() method of JController (libraries/joomla/application/component/controller.php) contains the following code to process the task:
// Check for a controller.task command.
if (strpos($command, '.') !== false) {
// Explode the controller.task command.
list($type, $task) = explode('.', $command);
// Define the controller filename and path.
$file = self::createFileName('controller', array('name' => $type, 'format' => $format));
$path = $basePath.'/controllers/'.$file;
// Reset the task without the contoller context.
JRequest::setVar('task', $task);
This code breaks the task name into segments using the period character. In our example, “weblink.edit” becomes an array where the type is “weblink” and the task is “edit”. The type becomes the third part of the controller class name (the “Weblink” in WeblinksControllerWeblink). Then, the request variable for task is changed to include only the second segment. In our example, $_REQUEST['task'] is changed from weblink.edit to edit.
When we get to the $controller->execute() line, we are executing the edit task of the WeblinksControllerWeblink class. This class does not have its own edit() method, so it executes that method from its parent class, JControllerForm (libraries/joomla/application/component/controllerform.php). This method checks to make sure the current user can edit the given item and that the item is not checked out to another user. If everything is OK, the id of the item is saved in the user’s session variable. This is used in the next step, when we process the redirect and actually load the item for editing.
The last step is to create the redirect. This gives Joomla a new URL to load. In our case, the redirect URL is
index.php?option=com_weblinks&view=weblink&layout=edit&id=7
Since we are in the back end, the word “administrator” is added to the front of the URL when it is processed by the redirect() method.
Processing the redirect URL starts a second request cycle. The information for this is as follows:
• URL: administrator/index.php?option=com_weblinks&view=weblink&layout=edit&id=7
• Task: none (defaults to display)
• Controller: WeblinksController (controller.php)
• Controller Method executed: WeblinksController->edit()
• Controller Redirect: none
Since the URL contains no task, we again use the base WeblinksController and we again execute the default display() method. If we look at that method, we see the following code:
$view = JRequest::getCmd('view', 'weblinks'),
$layout = JRequest::getCmd('layout', 'default'),
$id = JRequest::getInt('id'),
// Check for edit form.
if ($view == 'weblink' && $layout == 'edit' && !$this->checkEditId('com_weblinks.edit.weblink', $id)) {
// Somehow the person just went to the form - we don't allow that.
$this->setError(JText::sprintf('JLIB_APPLICATION_ERROR_UNHELD_ID', $id));
$this->setMessage($this->getError(), 'error'),
$this->setRedirect( JRoute::_('index.php?option=com_weblinks&view=weblinks', false));
return false;
}
Recall that in the previous cycle we saved the item id in the session variable. In the checkEditId() method, we check the current item id to make sure it matches what we saved before. Why do we need to do this?
In the previous request cycle, we checked that the user was authorized to edit this item and that the item was not already checked out to another. We don’t want to redo those checks, but we need to guard against a hacker who tries to edit an item by directly entering a URL like the one we used to load the edit form. By checking against the session information stored in the previous cycle, we know that this is the same user we already checked.
If everything is OK, we continue with the display() method of the WeblinksController class. This time we have a view and layout specified, so we display the edit form instead of the manager form. Since we have no redirect, the edit form displays.
To summarize, we do one request cycle to check that the user can edit this item. That process creates a redirect URL to actually display the edit form.
Example 3: User Clicks Save & Close In Edit Form
The key values for this action are as follows:
• URL: administrator/index.php?option=com_weblinks&layout=edit&id=7
• Task: weblink.save
• Controller: WeblinksControllerWeblink (controllers/weblink.php)
• Controller Method executed: JControllerForm->save()
• Controller Redirect: administrator/index.php?option=com_weblinks&view=weblinks
In this example, the URL does not contain a task segment. Instead, the task comes from the edit form. The Save & Close icon contains the following attribute:
onclick="javascript:Joomla.submitbutton('weblink.save')"
When it is clicked, it executes a JavaScript function that puts the value “weblink.save” into a form field called “task” and submits the form. This puts the task in the request array.
As before, we get the third part of the controller name from the first segment of the task, so our controller is WeblinksControllerWeblink. We execute the save() method of this controller. Because this controller doesn’t have its own save() method, we execute the save() method of the parent class, JControllerForm.
There we get the model class for this controller. Then we again check to make sure the item id matches what we have stored in the session. As before, this ensures that a hacker hasn’t tried to save an item without proper permission. Then we make sure the user has permission to save the item. Next, we validate the data using the validate() method of the loaded model. Next, we save the data using the model’s save() method. If these are successful, we set the message to indicate that the save was successful.
The last thing we do is set the redirect. This depends on whether we are doing a Save, a Save & Close, or a Save & New. For the Save & Close, we remove the lock on the item and set the redirect to load the Weblinks Manager. When this redirect is executed, it will follow exactly the same cycle as in Example 1.
By separating the save into two request cycles—one for the save action and one for the redirect—we can use the same save() method for the different save actions. The first cycle is the same for all these actions. The difference is where the user is redirected. For the Save action, the user stays in the edit screen. For the Save & New, the user is taken to a new blank edit screen. In our example, the Save & Close, the user is taken back to the Weblinks Manager screen.
Example 4: User Trashes Some Weblinks
In this example, the user has checked the check box for one or more Weblink items in the Weblinks Manager and then presses the Trash icon in the toolbar. The key values are as follows:
• URL: administrator/index.php?option=com_weblinks&view=weblinks
• Task: weblinks.trash
• Controller: WeblinksControllerWeblinks (controllers/weblinks.php)
• Controller Method executed: JControllerAdmin->publish()
• Controller Redirect: administrator/index.php?option=com_weblinks&view=weblinks
The URL for this example simply returns us to the Weblinks Manager screen. The task “weblink.trash” comes from JavaScript, which is initiated by the onclick attribute of the toolbar icon anchor element. This attribute is as follows:
onclick="javascript:
if (document.adminForm.boxchecked.value==0){
alert('Please first make a selection from the list'),
} else {
Joomla.submitbutton('weblinks.trash')
}"
The toolbars on the back-end manager screens are provided by the administrative module mod_toolbar. The JavaScript code for the Trash icon is created for us by the JButtonStandard class (libraries/joomla/html/toolbar/button/standard.php). It works in a manner similar to the JavaScript code in the previous example, except that this code first checks that at least one item has been selected. If so, it enters the value “weblinks.trash” in the form element whose name equals “task” and then submits the form.
Since the first segment of the task is “weblinks,” we get the controller named WeblinksControllerWeblinks. The second segment of the task is “trash.” However, the controller method we execute is publish(). How do we get from a task called “trash” to a method called publish()?
Mapping Tasks to Methods
The answer is that we use an array field called $taskMap in the JController class to map tasks to methods. This field is created in the constructor method of the controller. Then, in the execute() method of the JController class, we look up the task in the $taskMap array and execute the controller method for that task.
Let’s look at how this works. Note: If you are unfamiliar with constructors and their role in OOP, see the sidebar called “Constructor Methods.”
The first line of the constructor for the JControllerAdmin class is as follows:
public function __construct($config = array())
{
parent::__construct($config);
This calls the constructor of the parent JController class. That constructor method uses a technique known as reflection to build an array of all the class’s public methods, using the following code:
// Determine the methods to exclude from the base class.
$xMethods = get_class_methods('JController'),
// Get the public methods in this class using reflection.
$r = new ReflectionClass($this);
$rName = $r->getName();
$rMethods = $r->getMethods(ReflectionMethod::IS_PUBLIC);
$methods = array();
foreach ($rMethods as $rMethod)
{
$mName = $rMethod->getName();
// Add default display method if not explicitly declared.
if (!in_array($mName, $xMethods) || $mName == 'display') {
$this->methods[] = strtolower($mName);
// Auto register the methods as tasks.
$this->taskMap[strtolower($mName)] = $mName;
}
}
This code populates the taskMap field with an associative array where both the key and values contain the names of all public methods in the class, excluding methods in the parent JController class. Also, a display method is always added (because it exists in the JController class). If you are new to OOP and to the idea of public, private, and protected methods and fields, see the sidebar entitled “Access Modifiers: Public, Protected, and Private.”
A few lines down in the same method, we find the following code:
// If the default task is set, register it as such
if (array_key_exists('default_task', $config)) {
$this->registerDefaultTask($config['default_task']);
}
else {
$this->registerDefaultTask('display'),
}
This code adds the default task with the key of “__default” and a value of “display”. This way, if no task is specified, Joomla knows what to do with the request. For core components, this is normally the display task.
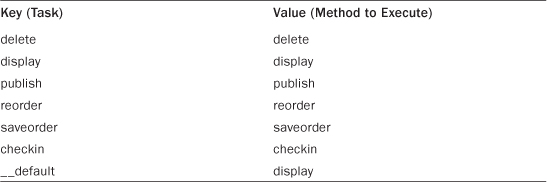
Let’s look at how this works in our current example. When we run the JController::getInstance() method, we create a new WeblinksControllerWeblinks controller class. Because WeblinksControllerWeblinks has no constructor, the parent JControllerAdmin constructor is executed. The first line, as shown earlier, executes the parent constructor, which builds the taskMap array. The class WeblinksControllerWeblinks only defines one method, called getModel(). Because this method exists in JController, it is excluded from the taskMap array.
The parent class, JControllerAdmin, defines the following methods: checkin(), delete(), display(), publish(), reorder(), and saveorder(). Of these, only the display() method is also defined in JController, and this is explicitly added to the array. So all these methods are added to the array. Also, the JController constructor explicitly adds an element with the key of __default that defaults to display.
After the parent constructor from JController executes, taskMap has the values shown in Table 7.2.
Table 7.2. taskMap Array Values after JController Constructor
The next section of the JControllerAdmin constructor method is as follows:
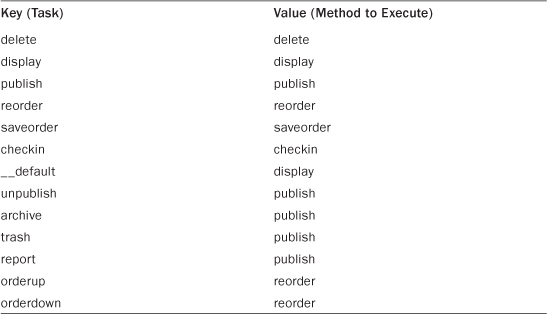
// Define standard task mappings.
$this->registerTask('unpublish', 'publish'), // value = 0
$this->registerTask('archive', 'publish'), // value = 2
$this->registerTask('trash', 'publish'), // value = -2
$this->registerTask('report', 'publish'), // value = -3
$this->registerTask('orderup', 'reorder'),
$this->registerTask('orderdown', 'reorder'),
This is where the additional tasks get mapped to the corresponding methods. For example, the highlighted line maps the “trash” task to the “publish” method by adding an element with the key “trash” and the value “publish.” After this code has executed, the taskMap array has the values shown in Table 7.3.
Table 7.3. taskMap Array Values after registerTask Code
This technique provides a combination of simplicity and flexibility. If we name our tasks to match our controller methods, we don’t have to do any work to create the mapping. Joomla does it for us. If we want to modify the mapping, we can use the registerTask() method as shown above.
In our example, it makes sense to use the same method for the publish, unpublish, archive, trash, and report tasks. All these tasks simply change the value of the “state” column in the #__weblinks table.
Using the Model
Now let’s look at the publish() method in JControllerAdmin. The first part of the method is as follows:
function publish()
{
// Check for request forgeries
JRequest::checkToken() or die(JText::_('JINVALID_TOKEN'));
This code checks that we got to this point from within a Joomla form. This prevents a hacker from trying to access the method directly from a browser without first logging in to Joomla.
Later in the method, we have the following code:
// Get items to publish from the request.
$cid = JRequest::getVar('cid', array(), '', 'array'),
$data = array('publish' => 1, 'unpublish' => 0, 'archive'=> 2, 'trash' => -2, 'report'=>-3);
$task = $this->getTask();
This code gets the list of ids from the request. In our example, these are the ids that we want to change to trashed. Then we build an associative array that maps the integer values of the state column to the tasks. For example, for the “publish” task, we will change the value to 1. For the “trash” task, we will change it to –2.
Then we get the task using the getTask() method. The task value is saved when a task is executed using the following code from the JController execute() method:
public function execute($task)
{
$this->task = $task;
Recall that the task in the request was changed in the getInstance() method so that we only have the second segment when we call the execute() method. In our example, we started with a task called “weblinks.trash” and this was changed to “trash”. The line of code above saves the modified task (“trash”) in the $task field of the JController class so it is available using the getTask() method when we need it.
The next line of code in the publish() method is as follows:
$value = JArrayHelper::getValue($data, $task, 0, 'int'),
This gets the value of the new state based on the associative array we created.
At this point, we know what task we are doing and we know the new value we need to set the state column equal to. The next portion of this method is as follows:
if (empty($cid)) {
JError::raiseWarning(500, JText::_($this-> text_prefix.'_NO_ITEM_SELECTED'));
}
else {
// Get the model.
$model = $this->getModel();
This gives an error if we don’t have any items to process. Otherwise, we process the task.
The next thing we do is invoke the getModel() method. This is a very important line of code. First, it is important to understand what class we are in. Even though we are executing code from the JControllerAdmin class, we are actually in the WeblinksControllerWeblinks class. We got here because the publish() method does not exist in the current class, so it is inherited from the parent class. So in the code
$this refers to the WeblinksControllerWeblinks class.
It is fundamental to the MVC design pattern that the controller “knows” how to get the right model for the task being executed. That’s what getModel() does. In fact, if we look at the WeblinksControllerWeblinks class, we see that this is the only method in the class! The entire code for this class is as follows:
class WeblinksControllerWeblinks extends JControllerAdmin
{
/**
* Proxy for getModel.
* @since 1.6
*/
public function getModel($name = 'Weblink', $prefix = 'WeblinksModel', $config = array('ignore_request' => true))
{
$model = parent::getModel($name, $prefix, $config);
return $model;
}
}
All this method—and class—does is provide the information needed to find the correct model for this controller. In this case, the model class name is WeblinksModelWeblink (note the second “Weblink” is singular, not plural).
Here we see a great example of how OOP and the MVC design pattern allow us to reuse code. The only thing unique about this particular controller is the name of the model it requires. So that is the only code it contains. All the other methods used by this class are inherited from its parent classes. This is true of many controllers in the back end of Joomla. For example, in Joomla version 2.5, there are 17 classes that extend the JControllerAdmin class. Of those, seven contain only a getModel() method. Most of the others also contain very little code and mostly use the code from their parent classes.
Now let’s get back to the publish() method in the controller (JControllerAdmin). Once we have the model, the next block of code is as follows:
// Make sure the item ids are integers
JArrayHelper::toInteger($cid);
// Publish the items.
if (!$model->publish($cid, $value)) {
JError::raiseWarning(500, $model->getError());
}
The first line uses a method in the JArrayHelper class to make sure all the array values are integers. Recall that these values came from the request, so we need to practice defensive programming to protect against hackers. Whenever we know something from the request should be an integer, it is good practice to cast it as an integer. This provides great protection, since integers cannot contain any special characters used to inject malicious code. That is also why it is a good design practice to use integers for id numbers and for columns like published state.
The next if block actually does the work. It calls the publish() method of the model, which returns a boolean true if the method succeeds. If the publish() method returns a boolean false, something went wrong and we show the error information from the model.
We discuss models later in this chapter and will discuss the publish() method there. However, it is important to note that this is the only interaction between the controller and the model for this task. First, we got the right model with the getModel() method. Then we called the desired method from the model. The only thing the controller “knows” about the model is its name and the name of the method to call for each task. As long as the model has the right name and the right methods, it can be modified without fear of breaking anything in the controller.
We frequently name the methods in the model to mirror the methods in the controller. Although not necessary, it makes it easier to follow the code.
The next portion of the controller’s publish() method is as follows:
else {
if ($value == 1) {
$ntext = $this->text_prefix.'_N_ITEMS_PUBLISHED';
}
else if ($value == 0) {
$ntext = $this->text_prefix.'_N_ITEMS_UNPUBLISHED';
}
else if ($value == 2) {
$ntext = $this->text_prefix.'_N_ITEMS_ARCHIVED';
}
else {
$ntext = $this->text_prefix.'_N_ITEMS_TRASHED';
}
$this->setMessage(JText::plural($ntext, count($cid)));
}
}
This is the code block that is processed if the model’s publish() method succeeds. It creates the correct message to show for each task. Note that the last line uses the JText::plural() method that was added in Joomla version 1.6. This method makes it easier to show messages that list counts of items with the correct plural forms for each language.
The last part of the publish() method is as follows:
$extension = JRequest::getCmd('extension'),
$extensionURL = ($extension) ? '&extension=' . JRequest::getCmd('extension') : '';
$this->setRedirect(JRoute::_('index.php?option='. $this->option.'&view='.$this->view_list.$extensionURL, false));
}
This code sets the redirect. In our example, we don’t have an extension in the request, so the redirect comes from the option (“com_weblinks”) and the view_list (“weblinks”). This takes us back to the Weblinks Manager screen. Because we set the message showing the success message, that message will show on that screen.
Weblinks Controller Tasks, Classes, and Methods
With this in mind, let’s look at the methods in the three Weblinks controllers and how they map to the component’s tasks.
As we saw earlier, the WeblinksController class (controller.php) contains the display() method that handles the default display task. Display is the only task this controller executes, and it is the only controller that displays anything.
The class WeblinksControllerWeblinks controls the Weblinks Manager screen. It extends the JControllerAdmin class, which in turn extends JController. As we discussed earlier, WeblinksControllerWeblinks itself contains only one method, getModel(). This method, although public, is not included in the taskMap array because it is also found in the JController class and JController's methods are excluded from taskMap. Because JControllerAdmin extends JController, the methods added to taskMap are the public methods contained in JControllerAdmin that are not found in JController.
Figure 7.5 is a screenshot from the Eclipse Type Hierarchy view showing the inheritance for WeblinksControllerWeblinks and the methods for JControllerAdmin.
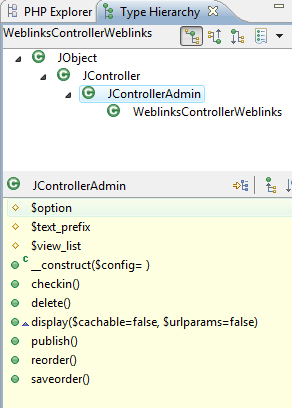
Figure 7.5. JControllerAdmin methods
Here we see that the public methods (with the circle) are the ones used to perform the tasks. As discussed earlier, in the constructor method, we map some additional tasks to the publish() and saveorder() methods. The small triangle to the left of the display() method indicates that this is overriding a display method from a parent class. The display() method is explicitly added to the taskMap array even though it exists in JController. However, the display() method in JControllerAdmin simply returns a false value and is never executed.
The third controller class is WeblinksControllerWeblink (controllers/weblink.php). The name is the same as the previous except that the third segment is singular (“Weblink”) instead of plural (“Weblinks”). This class controls the add/edit screen, where we are working with a single Weblink item. This naming convention—plural for the manager screen and singular for the edit screen—is used throughout the core Joomla components (although it is not required, as we see when we build our own component in Chapter 9).
The WeblinksControllerWeblink class itself only contains two private methods. The methods mapped in the taskMap array come from its parent class, JControllerForm. Its methods and the type hierarchy are shown in the Eclipse screenshot in Figure 7.6.
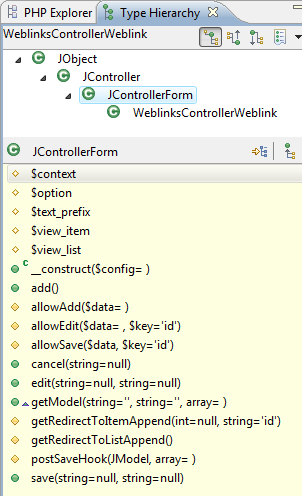
Figure 7.6. JControllerForm methods and type hierarchy
The public methods added to the taskMap are add(), cancel(), edit(), and save(). If we look at the constructor method for JControllerForm, we see the following code:
$this->registerTask('apply', 'save'),
$this->registerTask('save2new', 'save'),
$this->registerTask('save2copy', 'save'),
This maps the tasks apply, save2new, and save2copy to the save() method.
We can now summarize all the tasks that a user may perform in the back end with the Weblinks component. Table 7.4 shows the mapping of each toolbar icon in the Weblinks Manager: Weblinks screen (the list of Weblinks).
Table 7.4. Weblinks Manager: Weblinks Screen Tasks
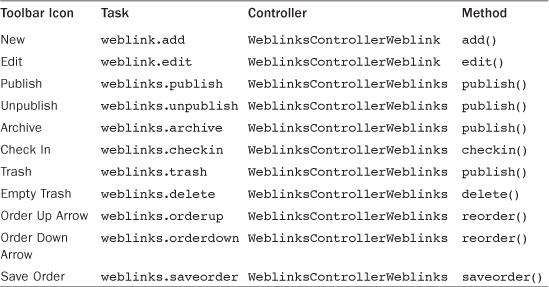
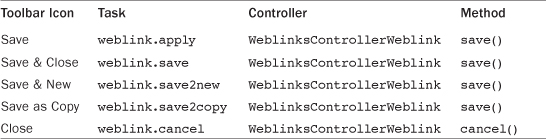
Table 7.5 shows the mapping for the Weblinks Manager: Weblink screen (adding or editing a single Weblink).
Table 7.5. Weblinks Manager: Weblink Screen Tasks
With this information, we know exactly where each task is executed. If we want to add a new task, we can either map it to an existing controller method in the class constructor and add logic to the mapped method or add a new method to the controller class whose name matches the name of the new task. If we want to add a new management screen, we can add a new controller for this screen with its own tasks and methods.
Review of Controllers in Components
Let’s review what we’ve learned about the role of controllers. The entry point of an MVC component contains three commands:
• Get the controller for this task.
• Execute the task using the controller.
• Execute the redirect, if any.
The controller class name follows rules based on the component name and the task name. If the task is something other than display, the task is executed and a redirect is set to display the desired page. If the task is not given, it defaults to display, which displays the page and doesn’t have a redirect.
Tasks are mapped to methods in the controller. Executing a task runs the controller method mapped to that task. The method name can be the same as the task name or can be mapped using the registerTask() method.
Weblinks Models
Now that we understand how the controllers work, let’s look at the Weblinks models. There are two primary model classes for Weblinks, WeblinksModelWeblink (models/weblink.php) and WeblinksModelWeblinks (models/weblinks.php). These follow the same naming convention as the controllers. WeblinksModelWeblink provides the methods to support the controller tasks that apply to individual Weblink items. WeblinksModelWeblinks provides the methods to display the list of Weblinks on the Weblinks Manager: Weblinks form.
Let’s start by looking at how the controller tasks are supported by the Weblinks ModelWeblink class. First, we need to know which model class to use. How do we link the controllers to the models? Recall that in the WeblinksControllerWeblinks (plural) class, we override the getModel() method to explicitly load the Weblinks ModelWeblink model. This links this controller to this model. In the case of WeblinksControllerWeblink (singular), we don’t have a getModel() method. When we execute getModel() inside this class, we use the method from the parent class JControllerForm. That method is as follows:
public function getModel($name = '', $prefix = '', $config = array('ignore_request' => true))
{
if (empty($name)) {
$name = $this->context;
}
return parent::getModel($name, $prefix, $config);
}
This method sets the $name variable from the context field of the class. The context field is set in the constructor to the word that follows the word “Controller” in the class name. In this case, since the class name is WeblinksControllerWeblink, the context field is set to “weblink.” Then we execute the parent’s (JController) getModel() method with the name equal to this value. This does a similar process to get the first part of the model name. If the $prefix variable is empty (which it is in our case), we use the field called model_prefix. This is set one of two ways: (1) from an array element in the $config argument for the constructor, or (2) from the first part of the class name.
In our case, we haven’t specified a model_prefix in the $config, so we use the normal naming convention. The end result of all this is that the default model name is the same as the controller name with the word “Controller” replaced by the word “Model.” However, you can easily override this convention. Simply specify a value for model_prefix in the $config array when the model is instantiated (created).
Next, let’s look at how the model supports the tasks initiated in the controllers. Tables 7.3 and 7.4 show the controller methods that are called for each task a user can do in Weblinks. The add(), edit(), and cancel() methods in the WeblinksControllerWeblink class are called when we load or close the edit screen. There are no corresponding methods in the model.
The add() method just checks to see if the user is authorized to add a Weblink item. If so, it sets the redirect to open the edit screen for a new Weblink item. It does not access any of the model’s methods.
The edit() method also checks for the user’s permissions. In addition, it uses the model’s getTable(), checkout(), and getError() methods to make sure the item is not checked out and to flag it as checked out before starting the edit session. Then the redirect is set to open the selected item for editing.
The cancel() method uses the model’s checkin() method to check in the item and then it redirects back to the Weblinks Manager: Weblinks screen.
The other methods are publish(), checkin(), delete(), reorder(), save(), and saveorder(). These call corresponding methods in the model. Figure 7.7 shows the methods available in WeblinksModelWeblink, inherited from JModelAdmin.
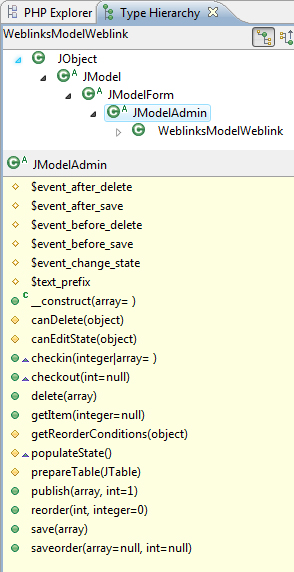
Figure 7.7. JModelAdmin methods
As expected, we see these same six public methods available in the model (with the circles to indicate they are public).
Model publish() Method
Earlier, we looked at the publish() method in the WeblinksControllerWeblinks class (inherited from JControllerAdmin) and saw the following block of code:
// Publish the items.
if (!$model->publish($cid, $value)) {
JError::raiseWarning(500, $model->getError());
}
This is where the model’s publish() method is called. If successful, it returns a boolean true. If not, it returns a false and has error information that can be retrieved with its getError() method.
Let’s look the model’s publish() method (from JModelAdmin). We invoke it with two arguments. Recall from earlier that the variable $cid contains an array of Weblink ids that have been checked in the list. The variable $value contains the value that we want to put in the state column in the #__weblinks table.
The first part of the method is as follows:
function publish(&$pks, $value = 1)
{
// Initialise variables.
$dispatcher = JDispatcher::getInstance();
$user = JFactory::getUser();
$table = $this->getTable();
$pks = (array) $pks;
// Include the content plugins for the change of state event.
JPluginHelper::importPlugin('content'),
Note that we name the first argument with the & in front of it. This means that we are passing this argument as a reference. If we change this array variable $pks inside the method, the changed array variable will be available in the calling method (as the variable $cid—the one used when the publish() method was called). We will see why we do this a little later on.
The next two lines initialize the dispatcher object and the user object. Recall from Chapter 5 that the dispatcher is used to trigger events for plugins.
Then we create an object for our table. This calls the getTable() method. Keep in mind that we are inside the WeblinksModelWeblink class, even though we have been executing the publish() method code from the JModelAdmin class. Because we have a getTable() method in the WeblinksModelWeblink class, we use that. The code for this is very simple, as follows:
public function getTable($type = 'Weblink', $prefix = 'WeblinksTable', $config = array())
{
return JTable::getInstance($type, $prefix, $config);
}
This gets an object of type WeblinksTableWeblink from the folder tables. This class provides the methods used to read and write data to this table in the database.
The last line forces the $pks variable to be an array. In our case, it already was an array so there is no change. Having this line allows us to call the publish() method either for one item, as an integer, or for an array. If we call it with a single id, it is converted to an array.
The next line of code is as follows:
// Include the content plugins for the change of state event.
JPluginHelper::importPlugin('content'),
This imports the content plugins so they will be executed when we trigger events. We fire the event called onContentChangeState when an item’s published state is changed.
The next code block is as follows:
// Access checks.
foreach ($pks as $i => $pk) {
$table->reset();
if ($table->load($pk)) {
if (!$this->canEditState($table)) {
// Prune items that you can't change.
unset($pks[$i]);
JError::raiseWarning(403, JText::_('JLIB_APPLICATION_ERROR_EDITSTATE_NOT_PERMITTED'));
return false;
}
}
}
Here we loop through each of the ids and check that the user is authorized to change the published state of each of them. First we reset the table columns to their default values with the reset() method. Then we execute the $table->load() method for each id value. This reads the row from the database table and loads it into our $table object. If successful, this method returns a boolean true. In this case, we then invoke $this->canEditState(). This method will return boolean true if the user can edit the state for this Weblink item and false if the user is not authorized to do so.
If the user is authorized, we skip the statements inside the if block and continue. If the user is not authorized to edit the state of a Weblink, we do three things.
First, we use the PHP unset command to remove this id from the $pks array. Second, we display a warning message to the user indicating they don’t have the correct permissions. Third, we exit from this method using return false. Note that when we use the return command anywhere in a method, we immediately exit and return to the calling method.
Recall that we put the & in front of this variable in the method signature (the first line that names the method’s arguments). This indicates that we are including this variable by reference. So when we remove an array element from $pks with the unset command here, this change to the array will be visible back in the calling method. In other words, when we change $pks here in the model’s publish() method, that will change $cid back in the controller where we called this method.
Recall in the publish() method of JControllerAdmin, we call the publish() method of the model with this code
if (!$model->publish($cid, $value)) {
and later we include the number of Weblinks published in this message with this line of code:
$this->setMessage(JText::plural($ntext, count($cid)));
If a user attempts to trash three Weblinks, but one of them is in a category for which the user does not have permission for the core.edit.state action, only two items will be trashed. Because we use unset to remove that item from the $pks array, and because we include that method argument by reference (with the &), changes we make to $pks inside the model publish() method are reflected in $cid in the controller publish() method. So, $cid in our example will only contain two elements and the message will correctly report that two items were trashed (instead of three).
Next let’s look at the canEditState() method of WeblinksModelWeblink, whose code is as follows:
protected function canEditState($record)
{
$user = JFactory::getUser();
if (!empty($record->catid)) {
return $user->authorise('core.edit.state', 'com_weblinks.category.'.(int) $record->catid);
}
else {
return parent::canEditState($record);
}
}
Note that this method has the protected access modifier, so it can only be used within this class or any classes that extend this class. That means that this method is intended to support the publish method but not to be used directly from outside the class.
The ACL (access control list) security introduced in Joomla version 1.6 includes a special permission for changing an item’s published state. For Weblinks, this can be set at the component level or at the category level. This method checks to see if the current record has a category. (Note that Weblinks always should have a category, so this check might be unneeded.) If so, we call the authorise() method (note the English spelling—United Kingdom English is the official language for Joomla) of the JUser class to check if the current user is authorized to change the published state for Weblinks in the current category. The arguments for the authorise() method are the action and the name of the asset. For categories, the asset name is formed as
<component name> + .category. + <category id>
If there is no category for the current record, we execute the parent class’s canEditState() method. That method (in JModelAdmin) has the following code:
return $user->authorise('core.edit.state', $this->option);
This checks the permission for the component level. The field $this->option contains the component name—in this case, com_weblinks.
Recall earlier in this chapter we looked at the access.xml file. That file contains the ACL actions for the component level and the category level for this component. In that file we define action elements with a name of “core.edit.state” for the component and category sections. The access.xml file allows us to edit those permissions for the component and the category. The code here checks those permissions.
The authorise() method returns a boolean true if the user is authorized to take the action and false otherwise. This value is returned by the canEditState() method as well.
The next block of code in the JModelAdmin publish() method is as follows:
// Attempt to change the state of the records.
if (!$table->publish($pks, $value, $user->get('id'))) {
$this->setError($table->getError());
return false;
}
This is the code that actually changes the value in the database. It calls the publish() method of the $table object, which again returns a boolean true or false to indicate success or failure. If this method fails, we get the error message from the method and return with a false result to indicate to the calling method that we had an error.
The next block of code processes the plugins for the onContentChangeState event, as follows:
$context = $this->option . '.' . $this->name;
// Trigger the onContentChangeState event.
$result = $dispatcher->trigger($this->event_change_state, array($context, $pks, $value));
if (in_array(false, $result, true)) {
$this->setError($table->getError());
return false;
}
First we set the context so the plugins will be able to check this as needed. Then we use the $dispatcher object created earlier to trigger our event. The field $this->event_change_state was set in the constructor method of the JModelAdmin class, with a default value of “onContentChangeState.”
The trigger() method returns an array of results from each plugin. If any of the plugins fail, we again get the error message from the table and return with a false value to indicate an error. This is an important feature in this model. This allows a developer to customize the workflow for publishing items. If we write a custom content plugin that uses the onContentChangeState event, we can control whether or not the publish task succeeds. For example, we might want to require approval from a site admin before the user can publish an item. This process could be controlled by such a plugin.
The publish() method finishes with the following code:
// Clear the component's cache
$this->cleanCache();
$return true;
The cleanCache() method clears the cache files for the Weblinks component. When we have caching enabled, Joomla saves web pages in cache files for a period of time. That way, if a user requests the same exact web page that has already been displayed earlier, we can get it faster by using this saved cache file. When we change the data in a table, any cached files that contain data from that table might now be out of date. We need to clear these files so we don’t risk showing out-of-date information to the user.
The last line of the method returns a boolean true to indicate success. Because we got this far, we know that none of the possible errors occurred.
Model save() Method
The save() method of JModelForm highlights some important aspects of saving data to the database. When we save a Weblink item after adding or editing, we invoke the save() method of JControllerForm (the parent of WeblinksControllerWeblink). This has the following code:
// Validate the posted data.
// Sometimes the form needs some posted data, such as for plugins and modules.
$form = $model->getForm($data, false);
if (!$form) {
$app->enqueueMessage($model->getError(), 'error'),
return false;
}
// Test if the data is valid.
$validData = $model->validate($form, $data);
Here we get an instance of the JForm object. We discuss the getForm() method in more detail later in Chapter 8. The last line calls the validate() method of the model. This method is found in JModelForm. Recall that our model, WeblinksModelWeblink, extends JModelAdmin, which in turn extends JModelForm. Because our class and its parent do not have a validate() method, we use the method from the next class up the inheritance hierarchy (JModelForm).
The validate() method contains the following code:
$data = $form->filter($data);
$return = $form->validate($data);
This is an important pattern to understand. The first line calls the JForm filter() method. This idea of filtering is to protect the database from getting harmful data, such as from a hacker. An example of filtering would be to require that an e-mail address only contains string characters.
The second line calls the JForm validate() method. Validation checks that the data in a field makes sense for that field. For example, to validate an e-mail address, we would check that it has some characters followed by an @ followed by a domain name.
Often when we validate data, we let the user know and require them to reenter the information. Filtering, on the other hand, can take place behind the scenes and simply remove harmful data before it gets saved.
Other Model Methods
Let’s take a high-level look at some of the other methods in the WeblinksModelWeblink class (inherited from JModelAdmin) that support the tasks in our controller. The same pattern we saw with the publish() method applies to the save(), delete(), reorder(), saveorder(), and checkin() methods. In each case, the controller method
• Does some preliminary work
• Gets an instance of the model
• Calls the model method of the same name
• Saves a success or failure message
• Returns true for success or false for failure
It is beyond the scope of this book to go into detail about all the methods, even for one component such as Weblinks. However, by knowing how the methods work together, you can follow the processing in each one and see what it is doing.
Weblinks Table Class
If we dig deeper into the model methods, we see that they in turn use methods from the table class. For example, the save() method in WeblinksModelWeblink calls the load(), bind(), check(), and store() methods from the WeblinksTableWeblink class. These methods are where the actual interaction with the database happens. They are described in the following sections.
Table load() Method
This method, inherited from JTable, loads the data for a row from the database table and binds the database columns to the fields in the JTable instance. The row is loaded based on the primary key of the table—in our example, the id column of #__weblinks.
The great thing here is that all the work to do this is already done by Joomla (in the parent class). The WeblinksTableWeblink class inherits this and doesn’t have to change a thing to use it.
Table bind() Method
This method takes as input an associative array or object and loads each element into a field of the JTable object. For example, when we read a row from the #__weblinks table, we end up with an associative array from this line of code in JTable::load():
$row = $this->_db->loadAssoc();
This array has a key for each column in the table with the value equal to the value for that row. The last line in that method is
return $this->bind($row);
The bind() method loads all the values from the array into the fields of the JTable object. The JTable class contains a field for each column in the table. These are created in the JTable constructor method. Because our WeblinksTableWeblink class extends JTable, we only have to code things that are unique to our table. Then we can just call the parent method to do the standard processing. This is what we do in the bind() method.
The special processing we have to do for WeblinksTableWeblink relates to the params and metadata columns in the #__weblinks table. If a table has a one-to-one mapping of columns to the fields in the JTable class, we can just use the parent JTable bind() method. However, the params and metadata columns are stored as JSON-formatted strings. Recall that JSON strings allow us to put multiple options (parameter) fields into one database column. This means we can add or remove options without having to alter the table structure in the database. This comes with a small cost, however. Before we can use these values in code, we need to unpack them into a more useful format.
The unpacking happens in the getItem() method of WeblinksModelWeblink. This method first calls the parent getItem() method (in JModelAdmin). This converts the params column from a JSON string to an array using the toArray() method of the JRegistry class. Then, back in the WeblinksModelWeblink getItem() method, we do the same thing for the metadata column. This way, we can work with the individual fields of the JSON strings as array elements inside the WeblinksTableWeblink class.
When it is time to write a row back to the #__weblinks table, we need to do the reverse operation and convert the arrays back to JSON strings. This is done in the bind() method of WeblinksTableWeblink with the following code:
public function bind($array, $ignore = '')
{
if (isset($array['params']) && is_array($array['params'])) {
$registry = new JRegistry();
$registry->loadArray($array['params']);
$array['params'] = (string)$registry;
}
if (isset($array['metadata']) && is_array($array['metadata'])) {
$registry = new JRegistry();
$registry->loadArray($array['metadata']);
$array['metadata'] = (string)$registry;
}
return parent::bind($array, $ignore);
}
In this method, the variable $array is an associative array of the data fields for the #__weblinks table. The array key is the column name and the value is the value to be written back to the database. This code checks to see if there is an array in the $array['parmas'] element. If so, we convert it to a JRegistry object and then use the __toString() method of JRegistry to convert it back to a JSON-formatted string. Recall that when we cast an object as a string (here using the (string) command), we invoke the __toString() method for that object. We repeat the exact same sequence to convert the metadata from an array to a JSON string.
The last line calls the bind() method of the parent class. This is very important because this is where the rest of the work is done to bind the other columns to our table object.
Table store() Method
The store() method uses this same pattern. We do some processing that is specific to this table and then we call the parent’s store() method to do the standard processing.
In our store() method, we check to see if we are editing an existing row or creating a new one. Based on this, we either update the modifed date and modified_by user columns or the created date and created_by user columns. Then we do some special processing to make sure that we don’t already have an item with this same alias and category id. The alias and category are used to generate the URL for Weblinks. If there are duplicates, the URL we generate will not be unique and might point to the wrong item. So we check for this when we save the item and show an error if the problem is detected.
At this point, we have done all the special processing required for the Weblinks. So we call the parent’s store() method and return its result.
Table check() Method
The check() method checks for cases where the data in a row is invalid or nonsensical. It works a bit differently from the others in two ways. First, this method is empty in the parent JTable class, so we don’t call the parent’s check method. Second, we try to fix up the data if possible instead of just reporting the error.
For Weblinks, we check the following:
• The URL contains only valid characters.
• The title is not blank.
• The URL starts with correct characters (adding “http://” if needed).
• We don’t already have a Weblink with the same name.
• The alias is set and valid (setting it if blank).
• The start publishing date is before the end publishing date (swapping dates if they are reversed).
• Keywords, if entered, are properly formatted and don’t contain any illegal characters.
If we compare the check() methods of the different core table classes, such as WeblinksTableWeblink, ContactsTableContact, BannersTableBanner, and NewsfeedsTableNewsfeed, we see a lot of duplicate code. For example, each one contains the same code to check and fix up the publishing dates. We could improve the design by moving this duplicate code to the parent class and calling the parent’s check() method in each subclass’s check() method to check, just as we do in the store() or publish() methods. Note that this would not change the way these programs function. It would just reduce the size of the code base by removing duplicate code. Duplicate code makes a program harder to maintain. For example, if we have to fix a bug in code that is duplicated, we have to do the same fix in multiple places.
The process of improving code without changing functionality is called refactoring. Refactoring can be done for a variety of reasons, including to reduce duplicate code, to make code easier to read, to reduce its complexity, and to improve standardization. In a large, complex program like Joomla, refactoring is an ongoing process. It is essential when refactoring that we do not accidentally change the way the program works and break existing functionality.
Summary
This chapter explored the use of controllers and models in the MVC design pattern, using the back end of the Weblinks component as our example. We also looked at how the JTable class is used to help with interacting with the database.
In the next chapter, we continue with the MVC pattern by looking at the views for the back end of Weblinks. Then we look at the front end of Weblinks and how MVC works for front-end components.