
5. Extending Joomla! with Plugins
In this chapter, we examine how plugins work and the different types of events that can trigger plugins. We look at some core plugins and then create our own plugin, based on the user registration form we created previously.
Then we create a zip archive that allows any Joomla! website to install and use our plugin extension. Next we add some parameters to the plugin and discuss the JForm class that handles parameters. We add a language file to handle translating the text for our plugin.
Finally, we discuss some powerful things that plugins allow us to do, including overriding models, tables, and other standard Joomla classes. We finish by discussing some best practices for developing and using plugins.
What Is a Plugin?
A plugin is simply a PHP program that executes at one or more predefined points in the Joomla execution cycle. These points are called events and are triggered from within Joomla.
A plugin can be very simple—for example, to set a value before saving a field to the database. Or it can be very complex—for example, to convert all the URLs in a document to a different format. Plugins can even be used to override standard core classes.
Plugins are tied to events. To understand plugins, we need to understand the predefined events in Joomla and also how to create our own events.
How Do Plugins Work?
Plugins work in three steps, as follows:
1. One or more plugin files are included into the current script, usually with the JPluginHelper::importPlugin() method. Because plugins are normally class declarations, no code is executed at this point.
2. An event is triggered, usually with the $dispatcher->trigger() method (where $dispatcher is a JDispatcher object). Each event has a name, such as onBeforeInitialise or onContentBeforeSave.
3. The event processing code looks for any enabled plugins that are currently loaded that have a method that matches the event name. If any matching methods are found, they are executed.
Loading and Executing PHP Scripts that Declare Classes
Most plugins in Joomla contain only a class declaration. This means that they declare a class and define the methods for the class, but they don’t include any lines of code outside the class declaration.
When this type of file is loaded (for example, with the PHP command require_once), a new class is created in working memory, with all its methods. However, none of the methods in the class actually get executed. A method will only get executed when a line of code calls that method.
This is why the JPluginHelper::importPlugin() method gets the plugin ready to execute, but it normally doesn’t actually execute any code. The plugin methods are only executed when the event is triggered, for example with the $dispatcher-> trigger() method.
Naming Conventions for Plugins
For plugins to be found by the JPluginHelper::importPlugin() method, we need to follow the correct naming conventions for the plugin file and class names.
Plugin folder and file names are created as follows:
plugins/<plugin type>/<plugin name>/<plugin name>.php
So, for example, the SEF file is plugins/system/sef/sef.php. Plugins have an XML file with the same name (for example, plugins/system/sef/sef.xml). We discuss the XML file later in the chapter when we talk about packaging a plugin extension.
The class name of the plugin is based on the naming convention
"plg" + <plugin type> + <plugin file name>
So, for example, the class name of the SEF plugin is plgSystemSEF.
Plugin Types: Where Can You Insert a Plugin?
Plugins execute when their events are triggered. Plugin events as defined in Joomla are different from events in event-driven programs. In event-driven programming, the program waits for an event, which is frequently a user action such as a mouse click or keyboard entry. Joomla events can be thought of as checkpoints along the various paths of the execution cycle. Every time the execution cycle reaches an event checkpoint, the event is triggered. The events are fixed, although different events get triggered depending on what type of execution cycle we are in. Let’s look briefly at each event type.
Authentication
There is only one event for authentication, called onUserAuthenticate. This event is triggered whenever a user attempts to log in to the front or back end of the site.
Captcha
Captcha is a way to prevent spamming by requiring a user to type some text based on a distorted image of the letters. Joomla version 2.5 added the ability to use captcha to validate user registration. This is implemented by means of three events: onInit, onDisplay, and onCheckAnswer.
Content
Content events are triggered when content is displayed or edited. This includes articles, contacts, and other types of content.
Editors
Editors are implemented in Joomla as plugins. However, they don’t really fit the pattern of plugins as discussed in this chapter. Adding a new editor in Joomla requires in-depth knowledge of JavaScript and is not an easy task. In this book, we do not discuss in detail how to add an editor, but we do show how to use editors in form fields.
Editors-XTD
Editors-XTD plugins are used to create the buttons that show below the editors (for example, Image, Pagebreak, and Read More). There is only one event for these plugins, called onDisplay.
Extension
This plugin type was introduced in Joomla version 1.6. Extension events are triggered when extensions are installed, uninstalled or edited and saved in the Module, Plugin, Template, or Language Manager.
Search
Search plugins implement the search functionality in Joomla. The core plugins are categories, contacts, content, news feeds, and Weblinks. The search events are onContentSearchAreas and onContentSearch. The onContentSearchAreas event is used to create an array of content items to search, and the onContentSearch event is used to actually execute the search for each of the content types. Extension developers can include search plugins to allow the Joomla search to work with their components.
Smart Search (Finder)
The Smart Search plugins are found in the plugins/finder folder. These plugins are used to index the site’s content for use with Smart Search. A plugin is provided for each content type (contacts, content, news feeds, and weblinks) and can be enabled to allow indexing of this type. The events provided are onFinderAfterDelete, onFinderAfterSave, onFinderBeforeSave, onFinderCategoryChangeState, and onFinderChangeState.
System
System plugins provide events that are triggered during each Joomla execution cycle. These include onAfterInitialise, the first event triggered in Joomla, and events tied to the render(), dispatch(), and route() methods. System events should be used for plugins that need to be triggered during every execution cycle, regardless of which task is being performed.
User
User events are triggered during two different tasks. One group of events is tied to editing user information in the User Manager. These include onUserAfterDelete, onUserAfterSave, onUserBeforeDelete, and onUserBeforeSave. A second group of events is related to logging on and off the site. These include onUserLogin and onUserLogout.
Tour of Selected Core Plugins
One confusing thing about plugins is that they vary so much. The only thing they have in common is how they are called. Given this, we will start our discussion with a quick look at a few core plugins. These examples will give you an idea of the variety of tasks you can accomplish with plugins.
System: SEF
Our first example is the SEF plugin. This is a class called plgSystemSef in the file plugins/system/sef/sef.php and enables Joomla to use search-engine-friendly (SEF) URLs.
Where Is It Triggered?
Let’s start with how this plugin gets executed—in other words, the code that includes the plugin class and triggers this plugin’s event.
The SEF plugin is a system plugin and it is triggered with the onAfterRender event. Before we trigger the event, we need to include the plugin file.
If we are loading a page in the front end of our site, we invoke the render() method of the JSite class (in the file includes/application.php). Near the end of this method, we see the following line of code:
JPluginHelper::importPlugin('system'),
This command loads all the enabled system plugins into working memory. (If a plugin is disabled in the Plugin Manager, it doesn’t get loaded.) We only have to do this command once during a given method. After the system plugin classes are loaded into working memory, we can trigger one or more system events.
Because these plugins are class declarations, we haven’t executed any code yet. Later in the render() method of the JSite class we actually trigger the onAfterRender() method:
// Trigger the onAfterRender event.
$this->triggerEvent('onAfterRender'),
This triggers the onAfterRender event. Let’s follow the code to see how it works. The variable $this is an object of type JSite, so $this->triggerEvent calls the triggerEvent() method of the JSite class with one argument, the string 'OnAfterRender'.
JSite extends the JApplication class (libraries/joomla/application/application.php). Because JSite doesn’t have its own triggerEvent() method (in other words, it does not override that method inherited from its parent class), it calls the method from JApplication.
So the triggerEvent() method from JApplication gets executed. This code is as follows:
function triggerEvent($event, $args=null)
{
$dispatcher = JDispatcher::getInstance();
return $dispatcher->trigger($event, $args);
}
This code creates an object of type JDispatcher and then calls the trigger() method for that object. The $event argument is set to “onAfterRender” and, because we didn’t pass a second argument, the $args argument is set to its default value of null.
The result is that it executes the onAfterRender() method of every enabled plugin that is available in working memory. In this case, the search is limited to system plugins because we specified the type as “system” when we called importPlugin('system'), so only system plugins are loaded into our working memory.
Normally, our plugin method names should be consistent with the plugin type. For example, we should only use system event method names in system plugins. If we follow this convention, it doesn’t matter if we have other plugin types loaded into memory, since only methods that match the event type will be executed.
We will not go into detail about exactly how the trigger() method is implemented in Joomla. To create plugins, we just need to know what it does, which is to execute all the methods that match the event name. If you are interested in digging deeper into how this works, you can explore the code. You will find that Joomla uses the “observer” design pattern, where events are “observable” and the plugins are “observers.”
What Does It Do?
Now let’s look at the SEF plugin code. The code for the first part of the sef.php file is as follows:
// no direct access
defined ('_JEXEC') or die;
/**
* Joomla! SEF Plugin
*
* @package Joomla
* @subpackage System
*/
class plgSystemSef extends JPlugin
{
/**
* Converting the site URL to fit to the HTTP request
*/
public function onAfterRender()
{
The first line of code (after the documentation block which is not shown) is our standard defined command, which ensures that we are running this code inside Joomla. Before version 2.5, we needed a jimport statement to import the library file libraries/joomla/plugin/plugin.php. Starting with version 2.5, this file is loaded for us automatically by the Joomla platform’s autoloader. It contains the class JPlugin, which is the parent class for all our plugins. We use it when we declare this class name, plgSystemSef, as a subclass of the JPlugin class.
In this case, the type is system and the file name is sef, hence the full name plgSystemSef. Finally, we declare the public function onAfterRender().
Upper and Lower Case in Class and Method Names
PHP doesn’t distinguish between uppercase and lowercase in class and method names. However, we normally use “camel case” for class and method names. Camel case is where the first letter in each word is capitalized. Normally, class names start with an uppercase letter and method names start with a lowercase letter, but for plugin class names we start with lowercase. This convention just makes the code easier for people to read.
This plugin scans the HTML document for links and converts those links to search-engine-friendly links. It also replaces relative URLs with full-path URLs for a few other types of links. We aren’t going to discuss the onAfterRender() method in detail, but let’s look at two of aspects of it.
First, let’s look at this code near the beginning of the method:
if ($app->getName() != 'site' || $app->getCfg('sef')=='0') {
return true;
}
This is checking two conditions. The first one, $app->getName() != 'site', checks to see if we are not in the front end of our website. The second condition, $app->getCfg('sef')=='0', checks whether we have the search-engine-friendly URL’s parameter set to zero (off) in our Global Configuration. If either of these conditions is true, then we exit the method immediately with a return value of boolean true.
Why do we do this? We only want to change the URLs when (a) we are in the front end of the site and (b) when the SEF setting is set to yes. However, we need to understand that this plugin is executed every time we encounter the onAfterRender event, whether we are in the front end or the administrative back end, and regardless of the SEF setting. That is why we have to put the check inside our plugin to make sure that the conditions for running this apply. We check that the conditions are met and, if not, we just exit the method before we have made any changes to the document object.
The second important point is that the onAfterRender() method does not take any arguments and it returns a boolean value to indicate whether or not it executed successfully. Different plugin types and methods have different method signatures (sets of arguments passed to the method) and return different values, so you have to be aware of these when you create a plugin.
Authentication: joomla Folder
This plugin is run when a user logs in to the site. It checks that the user name and password are valid. It is one of three authentication plugins included in the core Joomla distribution and is the default method for checking Joomla users.
This plugin is in the file plugins/authentication/joomla/joomla.php and its class name is plgAuthenticationJoomla.
How Does It Get Executed?
When a user attempts to log in to a Joomla site, the authenticate() method of the JAuthentication class (libraries/joomla/user/authentication.php) is executed. In that method, we see the expected line of code
$plugins = JPluginHelper::getPlugin('authentication'),
that loads all the enabled authentication plugins into working memory.
Later in that method, we see a foreach loop as follows:
foreach ($plugins as $plugin)
{
$className = 'plg'.$plugin->type.$plugin->name;
if (class_exists($className)) {
$plugin = new $className($this, (array)$plugin);
}
else {
// bail here if the plugin can't be created
JError::raiseWarning(50, JText::sprintf('JLIB_USER_ERROR_AUTHENTICATION_FAILED_LOAD_PLUGIN', $className));
continue;
}
// Try to authenticate
$plugin->onUserAuthenticate($credentials, $options, $response);
This loops through any enabled authentication plugins and checks that the class name exists. If any enabled authentication plugin does not exist, it fails with an error. If all the classes exist, then it executes the last line, which triggers the onUserAuthenticate method for each plugin. Note that three arguments are passed to the plugin: $credentials, $options, and $response. We discuss them in the next section.
What Does It Do?
The code for the onUserAuthenticate method is shown in Listing 5.1.
Listing 5.1. onUserAuthenciate Method for Joomla Authentication
function onUserAuthenticate($credentials, $options, &$response)
{
$response->type = 'Joomla';
// Joomla! does not like blank passwords
if (empty($credentials['password'])) {
$response->status = JAUTHENTICATE_STATUS_FAILURE;
$response->error_message = Text::_('JGLOBAL_AUTH_EMPTY_PASS_NOT_ALLOWED'),
return false;
}
// Initialise variables.
$conditions = '';
// Get a database object
$db = JFactory::getDbo();
$query = $db->getQuery(true);
$query->select('id, password'),
$query->from('#__users'),
$query->where('username=' . $db->Quote($credentials['username']));
$db->setQuery($query);
$result = $db->loadObject();
if ($result) {
$parts = explode(':', $result->password);
$crypt = $parts[0];
$salt = @$parts[1];
$testcrypt = JUserHelper::getCryptedPassword(
$credentials['password'], $salt);
if ($crypt == $testcrypt) {
// Bring this in line with the rest of the system
$user = JUser::getInstance($result->id);
$response->email = $user->email;
$response->fullname = $user->name;
if (JFactory::getApplication()->isAdmin()) {
$response->language = $user->getParam('admin_language'),
}
else {
$response->language = $user->getParam('language'),
}
$response->status = JAUTHENTICATE_STATUS_SUCCESS;
$response->error_message = '';
} else {
$response->status = JAUTHENTICATE_STATUS_FAILURE;
$response->error_message = JText::_('JGLOBAL_AUTH_INVALID_PASS'),
}
} else {
$response->status = JAUTHENTICATE_STATUS_FAILURE;
$response->error_message = JText::_('JGLOBAL_AUTH_NO_USER'),
}
}
Let’s discuss the code for this plugin. The first lines are as follows:
function onUserAuthenticate($credentials, $options, &$response)
{
The method takes three arguments. The variable $credentials is an associative array with two elements: “password” and “username.” This is the password and username the user has typed in to the form. The second argument, $options, is not used in this method.
The third argument, $response, is very important. Notice that there is an ampersand (“&”) in front of $response. This tells us that this variable is passed by reference. This means that when we make changes to this object during our method, the calling method will see the changed object. See the sidebar entitled “Assign by Reference and Pass by Reference” for more information on this.
This method returns a boolean false if the login does not succeed. If the login does succeed, no value is returned. We do, however, pass data back to the calling method, because we change the $response object and those changes are available to the calling method after this method finishes.
Before version 2.5, we needed to use jimport to import the user helper. We need this class later on to encrypt the test password. In version 2.5 and later this class is loaded by the autoloader.
The next line
$response->type = 'Joomla';
sets the type field of the $response object to 'Joomla'. This field indicates what authentication plugin was used to validate the user.
The next code block is as follows:
// Joomla! does not like blank passwords
if (empty($credentials['password'])) {
$response->status = JAUTHENTICATE_STATUS_FAILURE;
$response->error_message = JText::_('JGLOBAL_AUTH_EMPTY_PASS_NOT_ALLOWED'),
return false;
}
This is an if statement that checks that there was a password entered. If not, the authentication fails. To indicate this, we set the status and error_message fields of the $response object and we return a boolean false.
The next block of code does a simple database query to get the user ID and password from the Joomla database. This is our first example of a database query, and it uses the JDatabaseQuery class that was added in version 1.6. The line
$db = JFactory::getDbo();
creates a JDatabase object. This is normally the first step for any database query. The next line
creates the JDatabaseQuery object. The next line
$query->select('id, password'),
adds the database columns id and password to the SELECT part of the query. The next line
$query->from('#__users'),
adds the #__users table to the query. Note that we access the table with the prefix "#__" (pound sign and two underscore characters). Before the query is actually run, this prefix will be replaced with the table prefix selected when Joomla was installed (for example, "jos_").
The next line
$query->where('username=' .
$db->Quote($credentials['username']));
adds a WHERE clause that restricts the query to rows where the username column is equal to the username element in the $credentials array. Because the username column must be unique within the database, we will only get one row from this query.
The method $db->quote() is very important for security. It puts quotes around the username value and “escapes” any characters that have special meaning in SQL queries—for example, if single or double quotes could potentially be used to end one SQL statement and start a new statement. To protect against this, they are converted to ' or \". This causes the database to ignore the special meaning of these characters and prevents someone from entering in a SQL command in the username field.
Security Alert: Use $db->quote, (int), and (float) to Prevent SQL Injection
In this example, the variable $credentials['username'] is entered by a user of the website. As we have discussed earlier, we have to protect our data against would-be hackers who might try to enter malicious SQL commands by typing them into data fields. This type of attack or exploit is known as SQL injection.
We can prevent SQL injection by following two simple rules:
1. If a value is expected to be an integer (like –1 or 1234) or a floating decimal number (like 12.3456 or –2.3), use PHP to convert (or cast, in programming jargon) the value to the desired type. To do this, use the (int) or (float) command. For example, the line
$query->where('id =' . (int) $id);
uses the (int) command to convert $id to an integer. This guarantees that nothing but an integer will get into that SQL command. Anything other than numbers and the minus sign will be stripped. This prevents any SQL commands from being entered via the variable.
2. For any variable types other than integer and float (for example, text or dates), use $db->quote to ensure that the values are safe to use inside a query—for example,
$query->where('title =' . $db->quote($myTitle);
If $myTitle contains quotes or other characters that have special meaning inside SQL commands, they will be escaped. This causes the database to ignore their special meaning and just treat them as normal text.
If you follow these two rules, you help protect your data and prevent hackers from running unauthorized queries.
At this point, we have built our query and are ready to run it against the database. This is done in the following code:
$db->setQuery($query);
$result = $db->loadObject();
The first line passes the query to the database object, and the second line runs the query against the database and returns the query results to the $result variable. If for some reason the query was not successful, $result will be empty or the boolean false.
The remainder of the method is an if/then/else block that starts as follows:
if ($result) {
$parts = explode(':', $result->password);
$crypt = $parts[0];
$salt = @$parts[1];
$testcrypt = JUserHelper::getCryptedPassword($credentials['password'], $salt);
The first line checks that the $result variable evaluates to a boolean true. If it doesn’t, we skip down to the outside else code block as follows:
} else {
$response->status = JAUTHENTICATE_STATUS_FAILURE;
$response->error_message = JText::_('JGLOBAL_AUTH_NO_USER'),
}
This gives the user an error message saying the login was not successful.
Using Non-Boolean Values in PHP If Statement Conditions
If you are new to PHP, the way nonboolean variables (variables other than true and false) are used in if statements can be confusing. For example, in the statement "if ($result)", $result doesn’t have to be a boolean. If it isn’t a boolean, it is converted to a boolean and then evaluated. If it contains any data other than a blank or zero, it will evaluate to true and the code block after the if statement will be executed. For example, if $result is an object or array, it will be evaluated as true, regardless of what data it contains.
In the example "$result = $db->loadObject()", this is OK because the loadObject() method either returns an object or a boolean false. If it returns an object, the object will always evaluate as true, so we know if we got a valid result or an error.
There is a pitfall to watch out for when working with values that can be zero or blank. For example, if a method can return a zero as a valid value and returns a boolean false if there is an error, the code "if (!$result)" will not work to check for an error. If zero is returned, the variable $result will evaluate as false, so the expression "!$result" (not $result) will be true. So the code block will process as though there were an error even though we got a valid result.
Similarly, the statement "if ($result == false)" will not work. This is less obvious, but it has the same problem as the previous example. If $result is zero, it will evaluate to false and therefore "$result == false" will be true and again the code block will be executed as though there were an error.
The solution in this case is to use the PHP comparison operator "===" (three equal signs), which checks for an identical match. This means that the two values must be the same type (boolean, integer, string, and so on) and the same value. So the expression "$result === false" will be true only if $result is the boolean false. Using this method will fix our example, even if $result is an integer zero. If $result is zero, "$result === false" will be false.
The operators "===" and "!==" both check for an exact match of type as well as value and are useful in cases where you may have an integer zero, a string “0,” or a blank string as valid results of a method.
If the database query returned a valid result (in $result), then we execute the if code block. The first part is as follows:
$parts = explode(':', $result->password);
$crypt = $parts[0];
$salt = @$parts[1];
$testcrypt = JUserHelper::getCryptedPassword($credentials['password'], $salt);
In the Joomla database, the password is stored as two fields separated by a colon. The first line in the previous code block uses the PHP explode function to put the two parts of the password column into an array called $parts. Then we put the first part of that into a variable called $crypt and the second part into a variable called $salt.
By default, Joomla uses a one-way hash command called md5 to encrypt passwords. By one way, we mean that you can only encrypt a password. You cannot decrypt it. To check that the user has entered the right password, we encrypt the value entered by the user and store in the $testcrypt variable.
Then we do another “if/then/else” code block, based on whether or not the encrypted value of the entered password equals the encrypted value stored in the database. This code block is as follows:
if ($crypt == $testcrypt) {
// Bring this in line with the rest of the system
$user = JUser::getInstance($result->id);
$response->email = $user->email;
$response->fullname = $user->name;
if (JFactory::getApplication()->isAdmin()) {
$response->language = $user->getParam('admin_language'),
}
else {
$response->language = $user->getParam('language'),
}
$response->status = JAUTHENTICATE_STATUS_SUCCESS;
$response->error_message = '';
} else {
$response->status = JAUTHENTICATE_STATUS_FAILURE;
$response->error_message = JText::_('JGLOBAL_AUTH_INVALID_PASS'),
}
In the first part of the code block, our passwords match. So we get the user object and set the email and fullname fields of the $response object based on the user object values. Then we get the correct language object, depending on whether we are in the front or back end of the site. Finally, we set the status field of the $response to a success message.
If the passwords don’t equal, we set the status field to indicate a failure and set the error_message field.
Notice that we don’t issue a return command when the login is successful. Instead, this method uses a trick to communicate back to the calling method. The trick is that the $response variable is changed inside this method to show field values from the valid user object.
Recall that the plugin’s authenticate() method was called in our example from the authenticate() method of the JAuthentication class. If we look at the JAuthentication code after the plugin is called, we see the following:
// If authentication is successful break out of the loop
if ($response->status === JAUTHENTICATE_STATUS_SUCCESS)
{
if (empty($response->type)) {
$response->type = isset($plugin->_name) ? $plugin->_name :
$plugin->name;
}
if (empty($response->username)) {
$response->username = $credentials['username'];
}
if (empty($response->fullname)) {
$response->fullname = $credentials['username'];
}
if (empty($response->password)) {
$response->password = $credentials['password'];
}
}
}
return $response;
This altered version of the $response object is available to this method and, in fact, is returned by this method. Even though the plugin method doesn’t return the $response object, it still passes its results back to the calling method via the updated $response object.
Content: joomla Folder
This plugin is in the file plugins/content/joomla/joomla.php and its class name is plgContentJoomla.
It has two methods. The onContentAfterSave() method is used to send a notification e-mail to users when a new article has been saved. The onContentBefore Delete() method is used to check whether a category has any items assigned to it before deleting it. Let’s look at the onContentBeforeDelete() method.
How Does It Get Executed?
When a user deletes categories, articles, contacts, or other items in the administrative back end of Joomla, the onContentBeforeDelete event is triggered. One place this is done is in the JModelAdmin class (libraries/joomla/application/component/modeladmin.php). If we examine the delete() method, we see the following code:
// Trigger the onContentBeforeDelete event.
$result = $dispatcher->trigger($this->event_before_delete, array($context, $table));
In this class, the field event_before_delete has been set to the string onContentBeforeDelete in the class’s constructor method.
There are two things to note about this code. First, we are expecting a return value, which is stored in the $result variable. Second, we pass two arguments to the trigger() method: the event name and an array with two elements. The trigger() method unpacks this array and passes each of its elements as arguments to the onContentBeforeDelete() method. In this case, the two arguments are $context and $table. The variable $context is designed to tell us something about the context in which this event has been triggered (for example, “com_categories.category”). The variable $table is an array of the data that is about to be deleted.
What Does It Do?
The first part of the method is as follows:
public function onContentBeforeDelete($context, $data)
{
// Skip plugin if we are deleting something other than categories
if ($context != 'com_categories.category') {
return true;
}
As discussed earlier, this plugin will be executed any time a user is deleting any type of content. Because this plugin checks whether a category has any items assigned to it, it only makes sense in the context of deleting a category. So the first if statement checks to make sure we are trying to delete a category. If not, we exit the plugin, returning a boolean true.
As mentioned earlier, every plugin has a PHP file and an XML file. A plugin’s XML file does three things. First, it provides descriptive information about the plugin, such as its name, version, date, author, and license. Second, it lists all the files that need to be installed or uninstalled. Finally, it defines any parameters or options that can be set when using the plugin. These options show in the Plugin Manager screen when the plugin is opened for editing.
Parameters in Joomla allow the website administrator to control details about how the site will work without needing to write programming code. In this example, the Content → Joomla! plugin allows the administrator to control whether or not to check that categories are empty before deleting them. This is accomplished with a parameter by the name of check_categories. We will discuss parameters in more detail later in this chapter.
The check_categories parameter allows the administrator to disable the category check. This is accomplished in the next code block of the method:
// Check if this function is enabled.
if (!$this->params->def('check_categories', 1)) {
return true;
}
The object $this->params is a JRegistry object that contains the parameters saved in the #__extensions database table for this plugin. The def() method reads the parameter value, using a default value of 1 if the parameter is not defined. Recall that in PHP, a zero evaluates to a boolean false. Here we take advantage of this. The parameter will be zero if we don’t want to check categories and 1 if we do. If the parameter is zero, the condition (using the PHP “!” not operator) will be true, so we will halt the method and return true. If the parameter is not set or 1, we skip the return statement and continue with the method.
The next part of the method follows:
$extension = JRequest::getString('extension'),
Here, we get the $extension based on the value in the PHP $_REQUEST variable. Notice that we use the Joomla library method JRequest::getString(). We could just read the $_REQUEST array directly. However, it is strongly recommended always to use the JRequest methods to do this, since they provide built-in filtering. In this case, the getString() method filters out hex and URL-encoded characters. JRequest provides a number of methods for reading request variables (getString(), getInt(), getWord(), and so on), and we always want to use the most restrictive method that we can. In other words, if we know the request value should always be an integer, we should use getInt. See Appendix B for all the filter types available.
The next code block is shown here:
// Default to true if not a core extension
$result = true;
$tableInfo = array (
'com_banners' => array('table_name' => '#__banners'),
'com_contact' => array('table_name' => '#__contact_details'),
'com_content' => array('table_name' => '#__content'),
'com_newsfeeds' => array('table_name' => '#__newsfeeds'),
'com_weblinks' => array('table_name' => '#__weblinks')
);
Here, we set our result variable to true as a default value. Then, we build an array of the different table names for the different extension types. This plugin will only work for these five extensions. This array tells us the table name for each extension.
The next section of code is as follows:
// Now check to see if this is a known core extension
if (isset($tableInfo[$extension]))
{
// Get table name for known core extensions
$table = $tableInfo[$extension]['table_name'];
// See if this category has any content items
$count = $this->_countItemsInCategory($table, $data->get('id'));
This checks whether our current extension is in the array of the five core extensions. If it is, we execute the code inside the if statement. If the current extension is not one of the five core extensions, we skip to the bottom of the method and just return the $result variable, which we set to true earlier.
Inside the if code block, we set the $table variable to the table name we defined earlier. Then we set the $count variable, using the private method _countItemsInCategory(). This method runs the database query to see how many items (articles, contacts, and so on) are in this category. Note that we pass as arguments the name of the table ($table) and the value data->get('id'), which gives us the id field for the category from the $data object that was passed in as the second argument.
Variable Names in Methods and Variable Scope
If you are new to programming, there is a potentially confusing point here about the $table variable. Recall that the code that triggered this event passed an array defined as array($context, $table) and that this array was unpacked to become the two arguments for the onContentDelete() method here.
When the second argument was passed, it was called $table. However, the second argument in the function signature for the onContentDelete() method is called $data. Even though these have different names, the $data variable in our current method has the same value as the $table variable was when the event was triggered.
When arguments are passed to functions, the position of the argument is what is important, not the name of the variable. The first variable from the calling method gets loaded into the first variable in the method signature, and so on. The variable name in the method signature is the name for that variable inside the method.
In programming, this concept is called scope. The scope of a variable is the part of the program where that variable has a specific meaning. In PHP, most variables are local in scope. That means they are only defined inside the method or function where they are used. The great thing about local variables is that we don’t have to worry about whether we might have used the same variable name somewhere else in the program. We only have to keep track of variable names within a single method.
The variable $table is local to the onContentDelete() method, so it can mean something different in that method from what it might mean somewhere else in the program. Because we don’t use the variable name $table in the method signature of onContentDelete(), we are free to use it inside the method to mean anything we like. In this case, the variable $table in this method refers to the table name defined in the $tableInfo array.
The next section of code follows:
// Return false if db error
if ($count === false)
{
$result = false;
}
This checks whether we got a valid result from our _countItemsInCategory() method. This method returns a number or a boolean false. Note that we use the triple === comparison operator to check that $count is a boolean and is false. We have to do that because zero is a valid return value from our countItemsInCategory() method. If the method did return false, then for some reason the database query returned an error. In this case, we set the return value to false. If the method did return a valid result, we enter the else block of code that follows.
else
{
// Show error if items are found in the category
if ($count > 0) {
$msg = JText::sprintf('COM_CATEGORIES_DELETE_NOT_ALLOWED', $data->get('title')) .
JText::plural('COM_CATEGORIES_N_ITEMS_ASSIGNED', $count);
JError::raiseWarning(403, $msg);
$result = false;
}
// Check for items in any child categories (if it is a leaf, there are no child categories)
if (!$data->isLeaf()) {
$count = $this->_countItemsInChildren(
$table, $data->get('id'), $data);
if ($count === false)
{
$result = false;
}
elseif ($count > 0)
{
$msg = JText::sprintf('COM_CATEGORIES_DELETE_NOT_ALLOWED', $data->get('title')) .
JText::plural('COM_CATEGORIES_HAS_SUBCATEGORY_ITEMS', $count);
JError::raiseWarning(403, $msg);
$result = false;
}
}
}
The first if statement checks if the count is greater than zero. If so, we produce a warning message to the user and set the $result variable to false.
An important point here is that, by returning false, this plugin will prevent the user from deleting the category. Another point here is that we don’t actually do the return statement until the end of the method. So we continue to execute the code.
The next section of code checks whether there are any items contained in any child categories, using the _CountItemsInChildren() method. Note that we use a shortcut to save a little processing time. There is a method in the $data object called isLeaf(). This method returns a true if the current category is a “leaf” in the category “tree,” meaning that it doesn’t have any child categories. If so, we don’t have to check for items in child categories. In this case, we skip the whole code block.
If there are child categories, and if there are any items in these categories, we create another warning message and we set the $result variable to false. Note that if both warning conditions are present—meaning we have items in the current category and in child categories—then we issue both warnings. We use the JError::raisewarning() to display the warning to the user, and we include the count of items in the warning message.
A cool new method called plural() was added to the JText class in Joomla version 1.6. This allows Joomla to automatically select the right language tag based on whether the number being shown is 1 or more than 1. We use that to show both of our warning messages. For example, we want it to say “item” if there is one (“1 item”) but “items” if there are more than one (“5 items”). The JText::plural() method does this for us without requiring an if statement. Also, it handles languages where there are different forms of a word for one, two, or three items.
The end of the method is the code "return $result;", which just returns true if no items were found or false otherwise. As noted previously, this method only does any real work when we are deleting in the #__categories table. We could have added this check into the category table class instead of using a plugin. Why use a plugin?
The answer is flexibility. Performing this check in a plugin provides the administrator a number of options. First of all, plugins can be disabled, which allows an administrator to remove the category checking. Second, the parameters in the plugin allow the individual checks to be turned on and off. Third, you can provide your own plugin that either replaces or supplements the functionality of this or any core plugin. Finally, this plugin provides an easy-to-follow model for third-party extension developers to use to provide category checking for their extensions.
This is a great demonstration of the real power of plugins to enhance the flexibility of the system. They can be disabled or replaced without hacking any core files, allowing you to control lots of behind-the-scenes processing in Joomla.
onBeforeCompileHead
Now we are going to have some fun. We’re going to write a simple plugin that uses an event called onBeforeCompileHead. This event allows us to modify the HTML head element in the page just before it is rendered. So we can use this event to modify any HTML element that goes in the head, including meta, title, link, or script elements.
How Does It Get Executed?
The onBeforeCompileHead event is triggered in the fetchHead() method of JDocumentRendererHtml (libraries/joomla/document/html/renderer/head.php). This method reads the information for the head HTML element from the document object and prints it out to the buffer in HTML text format. The following code triggers the event:
// Trigger the onBeforeCompileHead event
$app = JFactory::getApplication();
$app->triggerEvent('onBeforeCompileHead'),
What Does It Do?
If we look at the HTML page source code for the home page of a site with the sample data installed, we see a series of meta elements inside the head element:
<meta name="robots" content="index, follow" />
<meta name="keywords" content="My keywords." />
<meta name="rights" content="My rights." />
<meta name="language" content="en-GB" />
Our plugin will be simple. It will add a “revised” attribute to the HTML meta element, based on a parameter that the user enters for the plugin. For example, the output of our plugin might be as follows:
<meta name="revised" content="Mark Dexter, 17 March 2012" />
where the content attribute is the text typed into the plugin parameter.
To do this, we will need to understand how the JDocumentHTML object stores the data for the HTML head element. Let’s do a bit of investigating. In the fetchHead() method of JDocumentRendererHead class where the onBeforeCompileHead is triggered, we see that we have a variable $document in the method signature. This is a JDocumentHTML object, which has a method called getHeadData() that returns the header data for the document or page. If we put the command
var_dump($document->getHeadData());
in the fetchHead() method of that class (for example, just before the code that triggers the event) and then display the home page on the site, we will see a long dump of the output of the getHeadData(), part of which is shown in the following.
array
'title' => string 'Home' (length=4)
'description' => string 'My description.' (length=15)
'link' => string '' (length=0)
'metaTags' =>
array
'http-equiv' =>
array
'content-type' => string 'text/html' (length=9)
'standard' =>
array
'robots' => string 'index, follow' (length=13)
'keywords' => string 'My keywords.' (length=12)
'rights' => string 'My rights.' (length=10)
'language' => string 'en-GB' (length=5)
If we compare this to the HTML source code shown earlier, we see that the meta elements with name attributes are stored in the object as an associative array stored in the standard element inside the metaTags element. The value of the name attribute is the key to the associative array (for example, “robots”), and the value of the content attribute is the value of the associative array (for example, “index, follow”).
We want our plugin to add a new meta element with the name attribute of “revised” and the value to be the option entered in the Plugin Manager form by the user. We want to keep any existing meta elements and just add this as a new one.
Our code is going to work as follows:
1. Read the existing header data from the document. This will be an array like the one shown earlier.
2. Add an element to the associative array that is stored inside the standard element of the array inside the metaTags element. The key for this array will be “revised” and the data will be the value entered by the user for the parameter.
3. Write back the modified array to the document object using the setHeaderData() (which is the mirror image of the getHeaderData() method).
4. Finally, we only want to do this if there is some data in the plugin parameter. If it is empty, don’t do anything.
Now we are going to create the plugin. Here are the steps:
1. Create the folder for the plugin. We’ll call the plugin “mymeta,” so we need to create a folder called plugins/system/mymeta.
2. To save typing, we can copy some existing files and just edit them. Copy the files index.html, p3p.php, and p3p.xml from the plugins/system/p3p folder to the new plugins/system/mymeta folder. Then rename the p3p.php and p3p.xml to mymeta.php and mymeta.xml.
3. Edit the mymeta.xml file so it appears as shown in Listing 5.2. Here we changed the name, author, creationDate, copyright, description, and filename XML tags.
<?xml version="1.0" encoding="utf-8"?>
<install version="1.6" type="plugin" group="system">
<name>My Meta Plugin</name>
<author>Mark Dexter and Louis Landry</author>
<creationDate>January 2012</creationDate>
<copyright>Copyright (C) 2012 Mark Dexter and Louis Landry. All rights reserved.</copyright>
<license>GNU General Public License version 2 or later; see LICENSE.txt
</license>
<authorEmail>[email protected]</authorEmail>
<authorUrl>www.joomla.org</authorUrl>
<version>2.5.0</version>
<description>My Meta Plugin</description>
<files>
<filename plugin="mymeta">mymeta.php</filename>
<filename>index.html</filename>
</files>
<config>
<fields name="params">
<fieldset name="basic">
<field name="revised" type="text"
description="Meta revised text for content attribute"
label="Revised Content"
default=""
size="50"
/>
</fieldset>
</fields>
</config>
</install>
We also changed the entire field element to add our new parameter. We set the name to “revised”; set the type to “text”; and set the description, label, and size.
4. At this point, we have the code for entering the parameter for our plugin. Next we need to actually write the plugin. Listing 5.3 shows the listing for the mymeta.php file, with the plugin code.
<?php
/**
* @copyright Copyright (C) 2012 Mark Dexter and Louis Landry.
* @license GNU General Public License version 2 or later; see LICENSE.txt
*/
// no direct access
defined('_JEXEC') or die;
jimport('joomla.plugin.plugin'),
/**
* Example System Plugin
*/
class plgSystemMyMeta extends JPlugin
{
function onBeforeCompileHead()
{
if ($this->params->get('revised')) {
$document = JFactory::getDocument();
$headData = $document->getHeadData();
$headData['metaTags']['standard']['revised'] =
$this->params->get('revised'),
$document->setHeadData($headData); }
}
}
We have renamed the class to plugSystemMyMeta and named the function onBeforeCompileHead, the same as the event we are using for the plugin. The code is simple, once you understand the array structure of the getHeadData() method.
First we check whether there is anything in the “revised” parameter from our plugin. If not, we skip all the processing.
If there is something in this parameter, we proceed. We get the document object and then save the results of getHeadData() in $headData.
We create a new associative array element called “revised” and set its value to the parameter value. Note that this is an array that is nested inside two other arrays, as we saw when we dumped this value earlier.
5. At this point, our plugin is complete and ready to go. However, our Joomla installation doesn’t know about it yet. The files are in the correct folders, but there is no row in the #__extensions table for the plugin.
Recall from Chapter 4 when we copied the beez20 template that we had to use the Discover feature to install the new template. The same thing holds true here.
So, in the administrative back end, navigate to the Extensions → Extension Manager and select the Discover tab. Then click the Discover icon in the toolbar. You should see something similar to Figure 5.1.
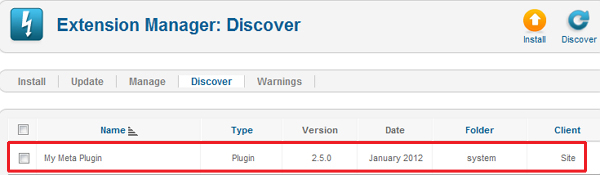
Figure 5.1. Discover screen showing new plugin
6. Now click the check box at the left and then click the Install icon in the toolbar. A message should display that indicates the plugin was successfully installed.
Installing an extension creates a row in the #__extensions table that stores information about the plugin. Joomla only “knows about” extensions that are in this table. The Discover process looks for extensions that are in the file system and not in the #__extensions table.
The normal way to install an extension is from an archive file created for that purpose. In the next section, we create a plugin and create a zip archive to allow it to be installed.
Now that our plugin is installed, let’s test it. Navigate to the Extensions → Plugin Manager and filter on system plugins. You should see the My Meta Plugin listed. Clicking on it should show a screen as shown in Figure 5.2.

Figure 5.2. Edit screen for My Meta Plugin
Change the plugin to Enabled, enter in something for the Revised Content, and then navigate to the home page of the site. In your browser, select the option to show the HTML source code for the page (for example, in Firefox, select View → Page source). You should see something like the following. The line added by the plugin is highlighted:
<meta name="robots" content="index, follow" />
<meta name="keywords" content="My keywords." />
<meta name="rights" content="My rights." />
<meta name="language" content="en-GB" />
<meta name="revised" content="Mark Dexter, 17 March 2011" />
<meta name="description" content="My description." />
As a final test, go back to the Plugin Editor and blank out the Revised Content value. Then redisplay the home page and check the source code. Now there should be no meta tag with the name="revised", since there was no content for this tag.
If we step back for a minute, we can appreciate how easy it was for us to make this change. We simply added two new files to the system and edited a few lines of code. With this small amount of work, we were able to change the content of the head element on every page in our site.
User Registration Plugin
For our next example, let’s add some validation to the override form we added in the previous chapter.
Update the Approval Override File
Recall that we added two check boxes to the user registration form, as shown in Figure 5.3.
Figure 5.3. Customized registration form
This was accomplished by adding the following code to the layout override file: templates/beez_20_copy/html/com_users/registration/approval.php:
<fieldset>
<legend><?php echo JText::_( 'BEEZ_20_COPY_TERMS_OF_SERVICE')?></legend>
<p><input type="checkbox" />
<?php echo JText::_()?> </p>
<?php if ($this->params->get('show_age_checkbox')) : ?>
<p><input type="checkbox" />
<?php echo JText::_('BEEZ_20_COPY_AGE')?> </p>
<?php endif; ?>
</fieldset>
We need to modify this code slightly before we write our plugin. Our plugin will check that both check boxes have been clicked by the user. If not, the plugin will return false, which will stop the registration process.
When we submit a PHP form with the post method, the values for the form are saved in the PHP super global variable called $_REQUEST. The values are saved in an associative array, where the key to the array is the name attribute of each input element. If an input element has no name attribute, it doesn’t get saved. Accordingly, we need to add name attributes to both of the check box fields. In the following code, we call the first check box tos_agree and the second one old_enough.
<fieldset>
<legend><?php echo JText::_(
'BEEZ_20_COPY_TERMS_OF_SERVICE')?></legend>
<p><input type="checkbox" name="tos_agree" />
<?php echo JText::_('BEEZ_20_COPY_AGREE')?> </p>
<?php if ($this->params->get('show_age_checkbox')) : ?>
<p><input type="checkbox" name = "old_enough" />
<?php echo JText::_('BEEZ_20_COPY_AGE')?> </p>
<?php endif; ?>
</fieldset>
Add the XML File
Next, we create the plugin PHP and XML files. The name of the plugin is “myregistration,” and it is a user plugin. So we will create a folder called plugins/user/myregistration and create our two plugin files, myregistration.xml and myregistration.php, in that folder.
The myregistraion.xml file listing is shown in Listing 5.4.
Listing 5.4. myregistration.xml File
<?xml version="1.0" encoding="utf-8"?>
<extension version="2.5" type="plugin" group="user">
<name>plg_user_myregistration</name>
<author>Mark Dexter and Louis Landry</author>
<creationDate>January 2012</creationDate>
<copyright>(C) 2012 Mark Dexter and Louis Landry.</copyright>
<license>GNU General Public License version 2 or later; see LICENSE.txt</license>
<authorEmail>[email protected]</authorEmail>
<authorUrl>www.joomla.org</authorUrl>
<version>2.5.0</version>
<description>PLG_USER_MYREGISTRATION_XML_DESCRIPTION</description>
<files>
<filename plugin="myregistration">myregistration.php</filename>
<filename>index.html</filename>
<folder>language</folder>
</files>
<config>
</config>
</extension>
This is similar to the earlier example plugin. Note that we are defining a language subfolder for our plugin. We discuss this when we create our zip archive file.
Add the PHP Plugin File
The code for the myregistration.php file is shown in Listing 5.5.
Listing 5.5. myregistration.php File
<?php
/**
* @copyright Copyright (C) 2012 Mark Dexter & Louis Landry. All rights reserved.
* @license GNU General Public License version 2 or later; see LICENSE.txt
*/
defined('JPATH_BASE') or die;
jimport('joomla.plugin.plugin'),
/**
* This is our custom registration plugin class. It verifies that the user
* checked the boxes indicating that he/she agrees to the terms of service
* and is old enough to use the site.
*/
class plgUserMyRegistration extends JPlugin
{
/**
* Method to handle the "onUserBeforeSave" event and determine
* whether we are happy with the input enough that we will allow
* the save to happen. Specifically we are checking to make sure that
* this is saving a new user (user registration), and that the
* user has checked the boxes that indicate agreement to the terms of
* service and that he/she is old enough to use the site.
*
* @param array $previousData The currently saved data for the user.
* @param bool $isNew True if the user to be saved is new.
* @param array $futureData The new data to save for the user.
*
* @return bool True to allow the save process to continue,
* false to stop it.
*
* @since 1.0
*/
function onUserBeforeSave($previousData, $isNew, $futureData)
{
// If we aren't saving a "new" user (registration), or if we are not
// in the front end of the site, then let the
// save happen without interruption.
if (!$isNew || !JFactory::getApplication()->isSite()) {
return true;
}
// Load the language file for the plugin
$this->loadLanguage();
$result = true;
// Verify that the "I agree to the terms of service for this site."
// checkbox was checked.
if (!JRequest::getBool('tos_agree')) {
JError::raiseWarning(1000,
JText::_('PLG_USER_MYREGISTRATION_TOS_AGREE_REQUIRED'));
$result = false;
}
// Verify that the "I am at least 18 years old." checkbox was checked.
if (!JRequest::getBool('old_enough')) {
JError::raiseWarning(1000,
JText::_('PLG_USER_MYREGISTRATION_OLD_ENOUGH_REQUIRED'));
$result = false;
}
return $result;
}
}
The first two lines of code should be familiar. First we ensure that we are inside Joomla. Then we import the parent class for this plugin. (Note that, because of the autoloader, this line of code is no longer required as of version 2.5.) The class name follows the required naming convention of “plg” plus the type (“user”) plus the plugin name (“myregistration”). The class extends JPlugin.
The class has one method, which is named according to the event that will trigger it. In this case the method is onUserBeforeSave(). This event is triggered when we try to save a new user in the back end or register a new user in the front end.
The first thing we do is to make sure we are creating a new user in the front end. If not, we just return true and skip the rest of the processing.
The next thing we do is to load the language file. This loads the file administrator/ language/en-GB/en-GB.plg_user_myregistration.ini, which we discuss a bit later. Then we set our $result variable to true.
The next section is an if block. We use the JRequest::getBool() method to get the tos_agree element from the PHP $_REQUEST variable. This method returns a boolean true or false. Since this is a check box, we expect it to either have the value “on” or it will not be defined. However, we are also mindful that a hacker can manipulate the $_REQUEST variable and put values in there that we don’t expect. By using the JRequestion::getBool() method, we know that we will always get a true or false value, no matter what a hacker might put in that field.
If the check box has been checked, the JRequest::getBool('tos_agree') will return a value of true and the expression (!JRequest::getBool('tos_agree')) will be false (recall that “!” means “not”). In this case, we don’t execute the code inside the block.
If the check box has not been checked, we enter the code block. Here we execute two lines of code. The first calls the JError::raiseWarning() method. The first argument is the error code, which we don’t use in this example (so it can be most anything). The second argument is the error text. Here we are using the JText::_() method to make the error text translatable. This means we will need to put the language key PLG_USER_MYREGISTRATION_TOS_AGREE_REQUIRED in our language file. The second line in the code block sets the $result variable to false. This means that the method will return a value of false, which will stop the save process.
The second if statement is identical to the first one, except that it checks that the second check box has been clicked and returns a different message to the user.
The last line of code just returns the $result variable, which will be true if both if code blocks were skipped. If the user forgot to check both check boxes, they will get both error messages, which is what we want.
Add the Language Files
The last step before we can try our plugin is to add the language files. Recall in our XML file we add the following lines:
<files>
<filename plugin="myregistration">myregistration.php</filename>
<filename>index.html</filename>
<folder>language</folder>
</files>
The folder element indicates that there will be a subfolder called “language” in the folder for our plugin.
When we create a plugin, we can choose whether to have the language files in the plugins folder or in the adminstrator/languages folder. For extensions, it is normally recommended to keep all extension files separate from core files, so putting extension language files in the folder for the extension is normally preferred.
In our example, we will have two language files: en-GB.plg_user_myregistration.ini and en-GB.plg_user_myregistration.sys.ini. These files will go into the folder plugins/user/myregistration/language/en-GB/.
The first file is the primary language file and contains the language keys that will be used when the plugin code is executed and also when the plugin is opened for editing in the Plugin Manager. In this file we put any keys we will need for front-end display or for editing options. Listing 5.5 shows the listing for the main plugin language file.
Listing 5.5. en-GB.plg_user_myregistration.ini File
; Language file for myregistration plugin
PLG_USER_MYREGISTRATION_TOS_AGREE_REQUIRED="You must agree to the terms of service."
PLG_USER_MYREGISTRATION_OLD_ENOUGH_REQUIRED="You must be at least 18 years old."
The second file (with the .sys in the name) is used to translate the name of the plugin when it is listed in the Extension Manager or Plugin Manager. We also put the description of the plugin in the .sys file so that we can translate the description in the message that shows when the plugin has been installed. This convention is used for all extension types. Listing 5.6 shows the listing for the .sys language file.
Listing 5.6. en-GB.plg_user_myregistration.sys.ini File
; sys language file for myregistration plugin
; The .sys.ini files are used when listing the extensions in the extension
; manager or plugin manager
PLG_USER_MYREGISTRATION="User - My Registration"
PLG_USER_MYREGISTRATION_XML_DESCRIPTION="Checks that terms and age boxes have been checked."
As a last step, copy an index.html file from another Joomla folder into the plugins/user/myregistration folder and the language and language/en-GB subfolders. As discussed earlier, every folder we create in Joomla should have an index.html file to prevent users from browsing the folder directly.
Test the Plugin
At this point, we can test our plugin. Again, we navigate to Extensions → Extension Manager → Discover and click on the Discover icon in the toolbar. Our new plugin extension should be listed using the translated text “User – My Registration” that we used in the .sys language file.
Tip: Using phpMyAdmin to Uninstall the Plugin
When you are testing and debugging a plugin or other extension, you may want to repeat the Discover and Install steps. In this case, you may not want to uninstall the extension, since that will delete the extension files from your Joomla folders.
A simple trick you can do is to delete the row for the extension in the #__extensions table in the database (for example, using phpMyAdmin). This undoes the installation without deleting the extension’s files.
If you are unfamiliar with MySQL and phpMyAdmin, we discuss these in Chapter 11.
Again, we click the check box to select the plugin and then click on the Install icon. When we have installed it, note that the plugin description from the .sys language file should show in the Extension Manager: Discover screen, as shown in Figure 5.4.
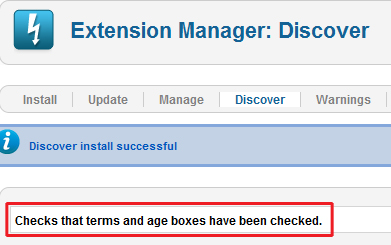
Figure 5.4. Plugin description from .sys language file
At this point, we can test the plugin. To test it, first enable it in Plugin Manager. Then try to register a new user with the approval.php override file without checking the two check boxes. You should see a message as shown in Figure 5.5.
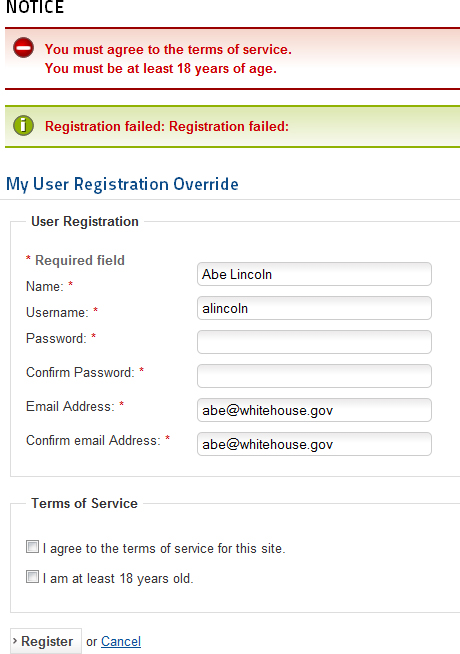
Figure 5.5. User plugin error messages
You should also test the other cases to make sure they work as expected. These include the following:
• Save with one check box checked (should get one error message).
• Save with both check boxes checked (should work correctly).
• Create a user from the administrative back end (Users → User Manager → Add New User should work correctly).
Package the Plugin
So far, we have used the Discover method to install our extensions. This works well during development. However, if we want to be able to install our extension on other Joomla sites, we need to package it in an installation archive file. This is very easy to do. We need a program that allows us to create archives in zip, tar.gz, or tar.bz2 format. For Windows, the free program “7-Zip” (http://www.7-zip.org/download.html) works well. For Linux and Mac OS X, programs to create a zip archive come installed with the operating system.
Note about Slashes (“/” and “”)
If you use Windows, the folders on your file system use the back-slash (“”) character. If you use Mac OS X or Linux, they use the forward-slash (“/”) character. For this book, we will use the forward slash. If you use Windows, just use the back slash instead.
The steps to create an installable zip archive are as follows:
1. Create a new folder on your disk system (for example, temp) and copy the three plugin files myregistration.xml, myregistration.php, and index.html, and the language folder (which contains the en-GB subfolder with the two language files) to this folder.
2. Create a zip file that includes the three files and the language folder. The exact command for creating the archive will depend on your operating system and the software you use.
For Windows with 7-Zip, you would highlight the three files and language folder in the Windows Explorer, right-click, and select 7-Zip → Add to Archive and then follow the instructions—for example, naming the zip file plg_user_myregistration.zip.
For Mac OS X, you would do something very similar, except you would select “Create Archive” from the file menu after highlighting the files.
In Linux, you could go to the command prompt in the temp folder and enter the command
$ zip -r plg_user_myregistration.zip *
3. After you create the zip archive, open it and check that it has the three files and one folder you expect.
4. Now we want to check that the file installs correctly. Uninstall the plugin by navigating to Extensions → Extension Manager → Manage. Select the plugin and click on the Uninstall icon in the toolbar. You should see the message “Uninstalling plugin was successful.” Note that this step will delete the files from your Joomla folders. However, you should already have these files copied to the temp directory created in step 1.
5. Navigate to Extension Manager → Install and click the Browse button. Browse to the zip archive file you created and click the Upload and Install button. You should get the message “Installing plugin was successful.”
At this point, we have a fully functioning plugin extension that can be installed on any site that runs Joomla version 1.6 or higher.
Improved User Registration Plugin
In the previous example, we created the myregistration plugin to add validation to the alternative user registration menu item we created in Chapter 4. This plugin depends on this alternative menu item. To transfer this functionality to another Joomla website, we would have to install the alternative menu item—including the beez_20_copy template—as well as the new myregistration plugin. It would be easier to manage if we could do the entire job in the plugin.
Using the new JForm class and the form event added in Joomla version 1.6, we can override the registration form inside the plugin, without creating a separate alternative Menu Item file. We can also use JForm to do the validation for us, and thereby eliminate the need for the onBeforeSave() plugin method. With this approach, we can package all this functionality into one small plugin extension and make it very easy to add this capability to another Joomla website.
We’ll call this version of the plugin myregistration2. It will contain the following files:
• forms/form.xml: File with the JForm information for the fields added by the plugin
• language/en-GB/en-GB.plg_user_myregistration2.ini: Main language file
• language/en-GB/en-GB.plg_user_myregistration2.sys.ini: Sys language file
• myregistration2.php: Plugin code file
• myregistration2.xml: Plugin XML file
Let’s go through the steps to create the plugin.
Create the Plugin XML File
As before, we create the plugin folder (plugins/user/myregistration2) and create our main XML file in that folder. The listing for the myregistration2.xml file is shown in Listing 5.7.
Listing 5.7. myregistration2.xml File
<?xml version="1.0" encoding="utf-8"?>
<extension version="2.5" type="plugin" group="user" method="upgrade" >
<name>plg_user_myregistration2</name>
<author>Mark Dexter and Louis Landry</author>
<creationDate>January 2012</creationDate>
<copyright>(C) 2012 Mark Dexter and Louis Landry. All rights reserved.
</copyright>
<license>GNU General Public License version 2 or later; see LICENSE.txt
</license>
<authorEmail>[email protected]</authorEmail>
<authorUrl>www.joomla.org</authorUrl>
<version>2.5.0</version>
<description>PLG_USER_MYREGISTRATION2_XML_DESCRIPTION</description>
<files>
<filename plugin="myregistration2">myregistration2.php</filename>
<filename>index.html</filename>
<folder>forms</folder>
<folder>language</folder>
</files>
<config>
</config>
</extension>
This file is similar to the previous example. Note that we change the name of the plugin in the name element and twice in the filename element. Also, we have added a folder element for the form folder. We discuss that in the next section.
Create the Form XML File
In this example, we use the JForm class to add our two fields to the registration form. With JForm, we can add fields to a form using one of two techniques:
• Load the fields from an XML file.
• Load the fields from a string (for example, created inside the plugin PHP file).
The first method is recommended for most cases, since it is generally easier to work with and maintain an XML file. Listing 5.8 shows the code for the form.xml file.
<?xml version="1.0" encoding="utf-8"?>
<form>
<fieldset name="tos"
label="PLG_USER_MYREGISTRATION2_TERMS_OF_SERVICE"
>
<field name="tos_agree" type="checkbox"
default="0"
filter="bool"
label="PLG_USER_MYREGISTRATION2_AGREE"
required="true"
value="1"
/>
<field name="old_enough" type="checkbox"
default="0"
filter="bool"
label="PLG_USER_MYREGISTRATION2_AGE"
required="true"
value="1"
/>
</fieldset>
</form>
This file defines the two fields we want to add to the user registration form, and it closely mirrors the actual HTML code that will be created by JForm. The outer element is called form and will create an HTML form element. It contains one fieldset element. A fieldset HTML element is used to group fields together on the form. Inside the fieldset, we have our two field elements.
Each field element has the following attributes:
• default: Default value (if unchecked)
• filter: The filter used to check the input from this field
• label: The label for this field (note that this will be translated)
• required: Flag to tell JForm to make this field required
• value: The value in the form when the checkbox is checked
The label and value attributes are standard attributes of the HTML input element. The filter attribute causes JForm to filter the input field using one of the standard JHtml filter values. In this case, we are filtering to allow only boolean true and false values. So even if a user changes the form in their browser to submit some other information (for example, some malicious SQL or JavaScript code), JForm will filter this and convert it to a boolean value.
The default attribute specifies the value to send if this input is not entered—in this case, if the check box is not checked. We specify a value of “0,” which will convert to a boolean false.
The required attribute causes JForm to require this input field to be filled out. In the case of a check box, this requires that the check box is checked. JForm will not allow the user to register without checking the box. Because JForm handles this validation automatically, we don’t need the onBeforeSave() method that we used in the myregistration plugin.
We see how this file is used in the next section.
Create the Plugin PHP File
Listing 5.9 shows the code for the myregistration2.php file.
Listing 5.9. myregistration2.php File
<?php
/**
* @copyright Copyright (C) 2012 Mark Dexter and Louis Landry
* @license GNU General Public License version 2 or later; see LICENSE.txt
*/
defined('JPATH_BASE') or die;
/**
* This is our custom registration plugin class. It verifies that the user checked the boxes
* indicating that he/she agrees to the terms of service and is old enough to use the site.
*
* @package Joomla.Plugins
* @subpackage User.MyRegistration2
* @since 1.0
*/
class plgUserMyRegistration2 extends JPlugin
{
/**
* Method to handle the "onContentPrepareForm" event and alter the user registration form. We
* are going to check and make sure that the form being prepared is the user registration form
* from the com_users component first. If that is the form we are preparing, then we will
* load our custom xml file into the form object which adds our custom fields.
*
* @param JForm $form The form to be altered.
* @param array $data The associated data for the form.
*
* @return bool
*
* @since 1.0
*/
public function onContentPrepareForm($form, $data)
{
// If we aren't in the registration form ignore the form.
if ($form->getName() != 'com_users.registration') {
return;
}
// Load the plugin language file
$this->loadLanguage();
// Load our custom registration xml into the user registration form.
$form->loadFile(dirname(__FILE__).'/forms/form.xml'),
}
}
The first part is the same as the earlier plugins. We rely on the autoloader to import the JPlugin class, and we extend that class. We name the plugin class according to the plugin naming convention—in this case, plgUserMyRegistration2.
The class has one method, onContentPrepareForm(). The onContentPrepareForm event is triggered at the point where the JForm has been prepared but not yet rendered. We are able to modify the JForm object in working memory just before it is used to create the form. Two arguments are passed to the class. The variable $form holds the JForm object and the variable $data holds a standard object with any data for the form.
Then we make sure we are processing a registration form. If we are not (meaning that we are processing some other form), we just want to quit. So we test the form name. If it is not equal to com_users.registration, we return without doing any processing.
At this point, we know we are processing the user registration form. Next we load the language file so we can translate the language text in our form.
Then the last line does all the work to create the two new fields. It calls the loadFile() method of JForm with our form.xml file as the argument. This causes JForm to merge the fields in the form.xml file with the form that is already in working memory from the standard XML file (in this case, components/com_users/models/forms/registration.xml). Since the two fields in our form.xml file are new fields (in other words, they have different names from those of the other fields in the form), the two new fields are added to the form.
That’s all there is to it. At this point, the fields in our form.xml file have been added to the form and will be included in the output. As mentioned earlier, because we use the required attribute in the fields, we don’t need additional code to ensure that these boxes are checked. JForm does it for us.
Add the Language Files
As before, we have two language files, located in the folder plugins/user/myregistration2/language/en-GB). The main file is en-GB.plg_user_myregistration2.ini. The .sys file is used for translating the plugin name and description in the plugin manager. These are shown in Listing 5.10 and Listing 5.11.
Listing 5.10. en-GB.plg_user_myregistration2.ini File
; Language file for myregistration2 plugin
PLG_USER_MYREGISTRATION2_TERMS_OF_SERVICE="Added Fields for Terms of Service Agreement"
PLG_USER_MYREGISTRATION2_AGREE="I agree to the terms."
PLG_USER_MYREGISTRATION2_AGE="I am at least 18 years old."
Listing 5.11. en-GB.plg_user_myregistration2.sys.ini File
; sys language file for myregistration2 plugin
; The .sys.ini files are used when listing the extensions in the extension manager or plugin manager
PLG_USER_MYREGISTRATION2="User - My Registration2"
PLG_USER_MYREGISTRATION2_XML_DESCRIPTION="Demonstration plugin that checks that overrides user registration. Checks that terms and age boxes have been checked."
Test the Plugin
Test the plugin as we have done in the previous examples, using the Extension Manager Discover and Install functions.
To test the plugin, you will need to disable the myregistration plugin (not the myregistration2 plugin), enable the myregistration2 plugin, and make sure that the Registration menu item uses the default menu item type instead of the alternative menu item type (Register With Approval) that we created in Chapter 4.
Once this is set up, when you load the Registration menu item, you should see the form shown in Figure 5.6.
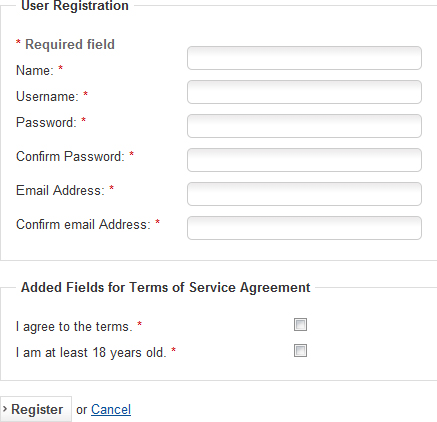
Figure 5.6. Custom registration form from MyRegistration2 plugin
Notice that the two new fields show the asterisk to indicate they are required, just like the other required fields on the form. If you press the Register button without checking the check boxes, you should see the following messages:
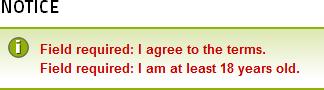
Figure 5.7. JForm required field messages
These are the standard messages that JForm shows when the user submits a form that is missing required fields.
Package the Plugin
To package the plugin for installation from an archive file, we follow the same process as described earlier:
1. Copy the files from the plugins/user/myregistration2 folder to a temporary folder on your computer.
2. Use an archive program to create a zip archive of these files. By convention, the archive would be called plg_user_myregistration2.zip (but it can be named anything as long as it contains all the correct files and folders).
Test that the archive file can be installed successfully by uninstalling the existing myregistration2 plugin and then installing it from the archive file.
Adding Parameters to Our Plugin
Next, let’s add a parameter to our plugin. Suppose we want the user to be able to configure whether or not to show the second check box. To do this, we need to do three things:
• Add a parameter field to our plugin XML file.
• Add logic to the plugin to check the parameter and remove the field if desired.
• Add the new language keys to the main language file.
The parameter field is added using a JForm field, similar to what we added in our form.xml file. The revised code for the config element is shown here:
<config>
<fields name="params">
<fieldset name="basic" >
<field name="show_age_checkbox" type="radio"
label="PLG_USER_MYREGISTRATION2_SHOW_AGE"
description="PLG_USER_MYREGISTRATION2_SHOW_AGE_DESC"
default="0">
<option value="0">JHIDE</option>
<option value="1">JSHOW</option>
</field>
</fieldset>
</fields>
</config>
This code is similar to the code for template parameters we saw in Chapter 3. It is used to add the options when we edit this plugin. We create a fields element with the name attribute equal to “params” to hold our fieldset and field elements and put the fields element inside the config element.
We need this fields element with the name attribute in our XML file. Otherwise the options will not show in the plugin edit screen. This is because the layout file used to create the form for editing plugins (administrator/components/com_plugins/views/plugin/tmpl/edit_options.php) looks for a fields element with a name of “params” and includes the contained fieldset elements as options in the form. If we don’t have this fields element, no options will show on the plugin edit screen. This is also true for components, modules, and templates.
Note that we didn’t need this fields element when we created our form.xml file. It is only required when we are adding parameters to the installation XML file for an extension.
Inside the fieldset element we define a new field with a type of “radio” with two option elements, “0” for Hide and “1” for Show. Notice that we use the language keys JHIDE and JSHOW. These are standard language keys used throughout Joomla, so we don’t have to add them to our plugin language file. Notice also that each option is a separate element. Field types that provide a list of options, like radio or list, use a series of option elements, one for each item in the list.
The next step is to add the two new keys to the language file. We add them to the en-GB.plug_user_myregistration2.ini file (not the .sys.ini file) because these are used when editing the individual plugin in Plugin Manager. The label attribute should be short, since it will be used to label the field. The description attribute can be longer. It will show up in the tool tip that pops up when you hover the mouse on the field.
The new language file lines are as follows:
PLG_USER_MYREGISTRATION2_SHOW_AGE="Show Age Checkbox"
PLG_USER_MYREGISTRATION2_SHOW_AGE_DESC="Whether to Hide or Show the Show Age check box. If it is shown, it will be required."
Figure 5.8 shows the two new language strings on the Plugin Manager form. Note that we have Debug Language enabled in the Global Configuration → System, so we see the double “**” around the text fields to indicate that they are properly translated.
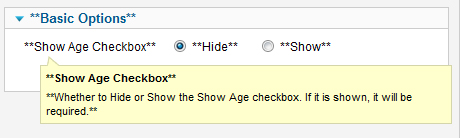
Figure 5.8. New parameter in Plugin Manager
The last step is to change the plugin code to check the new parameter and act on it. The revised code for the onContentPrepareForm() method is as follows:
public function onContentPrepareForm($form, $data)
{
// If we aren't in the registration form ignore the form.
if ($form->getName() != 'com_users.registration') {
return;
}
// Load the plugin language file
$this->loadLanguage();
// Load our custom registration xml into the user registration form.
$form->loadFile(dirname(__FILE__).'/forms/form.xml'),
if (!$this->params->get('show_age_checkbox', '1')) {
$form->removeField('old_enough'),
}
}
The only new code is the if statement at the end of the method. This gets the new parameter and uses it as a boolean value inside the if statement condition. If the Show option was selected, the parameter will be true. Since we use a not (“!”) in the if statement condition, the statement inside the if code block will not be executed when the parameter is true. So, if we have selected Show, we will skip the if block and the entire form will be shown.
If we have selected Hide, the statement
$form->removeField('old_enough'),
will execute. This uses the removeField() method of the JForm class to remove the field named “old_enough” from the form. That’s all we need to do. After you have made these changes, test that the parameter works as expected.
There are some other useful methods in JForm we can use to modify forms in a plugin. One is to change a field attribute. For example, suppose we wanted to have an option to choose whether or not to make a field required. We could use the command
$form->setFieldAttribute('old_enough', 'required', 'false'),
to change the “old_enough” field to no longer be required.
The important thing to remember is this: We can use the onContentPrepareForm event to intercept the JForm object before the form is shown. Then we can use JForm methods to add, remove, or alter fields in the form. This gives us a chance to tailor the form to fit our exact needs.
Using Plugins to Override Core Classes
We can use the existing plugin framework to override most core classes in Joomla. Note: This is an advanced topic and not something that you want to do unless you really need to. However, it is useful to know about in case you need it.
How Plugins Are Imported
We have seen that, to trigger a plugin, you first use the JPluginHelper::importPlugin() method to import the plugin. This adds the class and its methods to working memory. If we take a closer look at how this method works, we see that the code that actually does the import is in the private import() method of the JPluginHelper class (libraries/joomla/plugin/helper.php), as follows:
if (!isset($paths[$path])) {
require_once $path;
}
$paths[$path] = true;
The first line checks to see if this specific plugin has already been added. The $paths variable is an associative array containing all the plugins that have already been imported. The key to the array is the full path to each plugin file and the value of each element is the class name. We use the PHP function isset() to check if this element is in the array. If not, then the PHP command require_once includes this file.
Finally, the value for this element is set to the boolean true, which ensures that the next time through this element will be set in the array, so the require_once will not be called again for the same file.
There are two important points to understand about this process:
• As discussed earlier, normally plugin files declare classes, so no code is executed at that time. The only thing that happens is that the class and its methods are loaded into memory so that their methods can be called later in the cycle. In that case, no code is actually executed as a result of the JPluginHelper::importPlugin() method.
• Nothing in Joomla requires a plugin to be a class declaration. A plugin can be a simple PHP script—that is, one that executes as soon as it is included. If we make a plugin this way, it will execute immediately, as soon as the JPluginHelper::importPlugin method is executed (instead of when the event is triggered).
This provides a mechanism for loading any PHP script whenever we import plugins.
How Joomla Classes Are Loaded
Next, we need to understand an important point about how Joomla core classes are loaded into working memory. If we look at the jimport function that is typically used to load Joomla core classes, we see it is a function in the file libraries/loader.php. Note that this is a free-standing function, not a class method. That is why it is invoked just with the function name and no class name. The code for this function is shown here:
function jimport($path)
{
return JLoader::import($path);
}
It simply invokes the JLoader::import() method. The first lines of code in the JLoader::import() method are the following:
// Only import the library if not already attempted.
if (!isset(self::$imported[$key]))
This is checking to see whether we have already imported this class. The value self::$imported is a static associative array with a key (the variable $key) equal to the argument passed to JImport (for example, “joomla.plugin.plugin”) and a value of boolean true or false. When a class is imported, an element is added to this array, and the value is set to true if the import was successful and false if it was unsuccessful. So, once a class has been imported, Joomla won’t try to import it again.
The JLoader::load() and JLoader::_autoload() (the Platform “autoloader”) methods also check to see if a class has already been loaded before trying to load a class.
So the important point is this: if the class already exists—meaning it is already loaded into working memory—we skip loading this class. The method just returns a value of true and exits. None of the Joomla load methods will try to load a class a second time.
This means that we can use a plugin to load a class into working memory, as long as we do it before it gets loaded by the Joomla core programs. If we do this, the methods from our class will be used instead of the methods from the core class.
As it happens, system plugins are loaded into working memory very early in the Joomla execution cycle, before most (but not all) Joomla core classes.
Example: Override the JTableNested Class
Let’s do a quick example to illustrate this. We will override the core JTableNested class. This class is the parent class for all the nested table classes in Joomla (for example, JTableCategories for the #__categories table). In this example, we will demonstrate how to override this class but we will leave it to the reader to imagine what code and behavior you might want to change.
Here are the steps:
1. Create a new folder called plugins/system/myclasses and copy the file libraries/joomla/database/tablenested.php to this new folder. This will give you a file called plugins/system/myclasses/tablenested.php. (Remember to add index.html files to all the new folders we create.)
2. Edit the new file and replace the existing rebuild() method with the following code:
public function rebuild($parentId = null, $leftId = 0, $level = 0, $path = '')
{
exit('From myclasses/tabelnested.php file'),
}
This code will simply prove that we are running our override class in place of the core class. When we press the Rebuild option (for example, in the Category Manager: Articles), if we are running our method, the program should exit with the message just shown.
3. Now we need to add the plugin to load our class in place of the core class. We will call the plugin “myclasses.” To do this, create a new file called myclasses.php in the plugins/system/myclasses folder.
4. In the new file (plugins/system/myclasses/myclasses.php), add the code shown in Listing 5.7.
Listing 5.7. myclasses.php File
<?php
/**
* Demonstration plugin to replace a core class.
* This is fired on the first system import (before
* the onBeforeInitialise event).
*/
// no direct access
defined('_JEXEC') or die;
// Replace core JTableNested with override version
include_once JPATH_ROOT.'/plugins/system/myclasses/tablenested.php';
Notice that this code is not declaring a class. It is simply running a script. This means that it will be executed as soon as the system plugins are imported, before the first system event. This code just includes our new tablenested.php file.
5. Create the XML file for this plugin (plugins/system/myclasses/myclasses.xml) with the code shown in Listing 5.8.
Listing 5.8. myclasses.xml File
<?xml version="1.0" encoding="utf-8"?>
<extension version="2.5" type="plugin" group="system">
<name>plg_system_myclasses</name>
<author>Mark Dexter and Louis Landry</author>
<creationDate>January 2012</creationDate>
<copyright>Copyright (C) 2012 Mark Dexter and Louis Landry.</copyright>
<license>GPL2</license>
<authorEmail>[email protected]</authorEmail>
<authorUrl>www.joomla.org</authorUrl>
<version>1.6.0</version>
<description>MyClasses plugin demonstration</description>
<files>
<filename plugin="myclasses">myclasses.php</filename>
<filename>index.html</filename>
</files>
<config>
</config>
</extension>
6. Navigate to the back end of Joomla and Discover and Install the plugin as we have done before in the previous examples. Remember also to enable the plugin in the Plugin Manager.
7. Navigate to Content → Category Manager in the Joomla back end and click on the Rebuild icon. Joomla should halt and you should see the message “From myclasses/tabelnested.php file.” This indicates that we have successfully overridden this core class.
This technique can be used to override most Joomla core classes, except for those that are already loaded before the system plugins are imported.
If you override a core class in this manner, you don’t need to worry about your class getting overwritten during a Joomla upgrade. So this technique is much better than simply hacking core files. However, a word of caution is in order here. If there are bug fixes for any core classes you have overridden, you will need to check whether these fixes apply to your override classes. If so, you will need to apply the fixes yourself. This will be especially important if the bug fixes correct security issues.
Plugin Best Practices
The most important thing about plugins is to know when to use them. That means understanding the events available in Joomla and what standard behaviors you can override. In many cases, when you are having a difficult time figuring out how to solve a problem with a module or a component, a plugin might make the job a lot easier.
Here are some other tips about plugins:
• Plugins are executed in the order in which they appear in the Ordering column in Plugin Manager. In most cases, the ordering doesn’t matter. However, in some cases, where you have more than one plugin triggered from the same event, and where the results of one plugin can affect the processing of a subsequent one, the order can be important. In this case, you can change the order in the Plugin Manager by adjusting the Ordering values to control the execution order.
• Normally, we want to use the naming conventions for plugin class names and method names. Otherwise, the plugins won’t get called correctly. The exception is if you want the script to be run when the plugin is imported, in which case only the file and folder name is important (as in the class override example in the previous section).
• Different events require different method signatures. Make sure you are aware of what values are available for each event and what values, if any, your method should return. The Joomla repository includes a folder called tests/plugins. This folder contains example plugins for each plugin type. These example files show all the events and the method signatures for each. Also, the plugin events are documented in the Joomla wiki at http://docs.joomla.org/Plugin/Events.
• Try to pick the best event for the job at hand. If you need a new event—for example, in a custom component—you can create it just by triggering it at the desired place in the program. If you believe that you need a new event added in a core class, ask about it on one of the development lists. If others agree, the event can be added to the core.
Summary
In this chapter, we learned about plugins. We started by looking in detail at some core plugins. Then we created some plugins of our own, including one that allows us easily to customize the user registration process in Joomla.
Along the way, we saw how plugins allow us to do a lot with a little well-placed code and how they provide the site administrator with a high degree of flexibility. We even saw how we can use plugins, if needed, to override most core classes in Joomla.
In the next chapter, we discuss another important type of Joomla extension: modules.