
6. Extending Joomla! with Modules
In this chapter, we look at how modules work in Joomla!. We start by discussing how modules relate to components. Then we look at a core module to see how it works. Then we create a new module, which includes pulling information from the Joomla database. We add some parameters to the module and package it for easy installation. We end with some recommendations for making the most of modules.
What Is a Module?
A typical page in a Joomla website shows one component and multiple modules. For example, the home page of Joomla version 2.5 with the sample data installed shows the Featured Articles component and five modules (Search, three menus, and Login). Modules typically are small, simple, and “lightweight” (meaning that they don’t require a lot of computer time to process). They provide information and navigation options to the user.
Modules versus Components
Modules often rely on components. For example, the Menu module (mod_menu) pulls information from the Menu component (com_menus) and all the article modules (for example, Archived Articles, Articles - Newsflash, and so on) pull information from the Articles component (com_content).
Many modules only display information and perhaps links. Some modules, such as the login and search modules, show simple forms. Modules typically do not allow user interaction, such as navigating to the next or previous page.
There are some nice things about modules in Joomla:
• The same module can be shown on all or selected pages in the site. This is assigned in the Module Manager when you create the module.
• A module can show information based on what is shown in the main component. For example, the Breadcrumbs module shows the menu hierarchy from the home page to the current menu item.
Unlike components, which are executed based on the URL, modules are called as part of the built-in Joomla processing cycle. After the component has been executed and rendered, Joomla finds all modules that are (a) assigned to the current menu item and (b) assigned to a module position that is defined in the template. These modules are executed in turn and the output of each one is injected into the template’s index.php file at the location of the jdoc:include element for each module’s position.
Although modules typically require a bit more code to write than plugins, they are generally easy to create and understand.
Tour of a Core Module
To begin our study of modules, let’s look at the Latest Users module. This module shows a list of new registered users for the site. Using the module’s parameters, you can limit the number of users that show, you can show a link to the user, and you can display information from the user’s profile or contact information.
First, let’s look at the folders and files for the module. Because this module is a front-end or site module, it is in a subfolder of the modules folder. If it were an administrator module, it would be under administrator/modules. The Latest Users module internal name is mod_users_latest, so that is the name of the folder.
If we look in this folder, we see files shown in Table 6.1 (excluding index.html files).
Table 6.1. Latest Users Files (Excludes index.html Files)
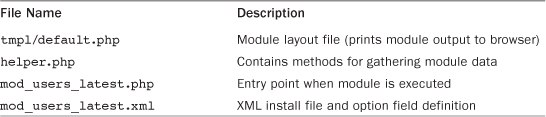
Let’s look in detail at how this module works.
Module XML File
The module’s XML file contains the file and folder information used to install and uninstall a module. It also contains the field definitions for any parameters for the module. The mod_users_latest.xml file is very similar to the XML files we saw in Chapter 5, except that the type attribute of the extension element is “module”.
The following code shows the files and languages elements for the mod_users_latest.xml file:
<files>
<filename
module="mod_users_latest">mod_users_latest.php</filename>
<folder>tmpl</folder>
<filename>helper.php</filename>
<filename>index.html</filename>
</files>
<languages>
<language tag="en-GB">en-GB.mod_users_latest.ini</language>
<language tag="en-GB">en-GB.mod_users_latest.sys.ini</language>
</languages>
This defines each file for the module except for the files in the tmpl subfolder. Note that we do not need to define a filename element for the XML file, but it doesn’t hurt to add that. Note also that this file defines the two language files inside a languages element. As discussed previously, this means that the two language files will be installed into the core language folder and not in the extension’s language folder.
The next element is as follows:
<help key="JHELP_EXTENSIONS_MODULE_MANAGER_LATEST_USERS" />
This finds the help article in the Joomla help system that applies to this module.
The rest of the file defines the fields for the module’s parameters. In this file, we define three fields in the “basic” fieldset element and five in the “advanced” fieldset element. These fields are defined the same way as the fields we have seen in previous chapters for templates and plugins.
Main Module File
When a module is executed, it loads a PHP file with the same name as the folder. In this case, this is the file modules/mod_users_latest/mod_users_latest.php. The code for this is shown in Listing 6.1.
Listing 6.1. mod_users_latest.php File
<?php
/**
* @package Joomla.Site
* @subpackage mod_users_latest
* @copyright Copyright (C) 2005 - 2012 Open Source Matters, Inc. All rights reserved.
* @license GNU General Public License version 2 or later; see LICENSE.txt
*/
// no direct access
defined('_JEXEC') or die;
// Include the latest functions only once
require_once dirname(__FILE__).'/helper.php';
$shownumber = $params->get('shownumber', 5);
$name = moduserslatestHelper::getUsers($params);
$linknames = $params->get('linknames', 0);
$moduleclass_sfx = htmlspecialchars($params->get('moduleclass_sfx'));
require JModuleHelper::getLayoutPath('mod_users_latest', $params-> get('layout', 'default'));
The first line after the “defined or die” line includes the module’s helper class. Most modules use a helper class that holds the methods needed to render the module. That is where most of the actual processing is done.
The next line calls the getUsers() method in the helper and stores the result in a variable called $linknames. Notice that we pass a variable called $params to this method. This variable is not declared anywhere in this file. Where does it come from?
To answer this, we have to look at where and how the current file is executed. In Chapter 3 we discuss how modules are executed one at a time, based on the template positions they are assigned to. The end result of that process is the following code snippet from the renderModule() method of the JModuleHelper class (libraries/joomla/application/module/helper.php):
$content = '';
ob_start();
require $path;
$module->content = ob_get_contents().$content;
In the line require $path, $path is the full name of the entry file of the module. In our example, it is requiring the file mod_users_latest.php. The PHP require command immediately inserts the required file into the current PHP program. The end result is just like copying and pasting the required file into the current program at that location.
Note that file mod_users_latest.php is a normal PHP script and does not declare a class. So the lines in this file get executed as soon as the file is included via the require command. Any variables that were in scope when the require statement was executed are still in scope during the execution of the required script. This means that, when we are inside the mod_users_latest.php program, we have the same variables in scope that we had in the renderModule() method of the JModuleHelper class where the require statement was executed.
We can see that the $params variable is set earlier in the renderModule() method, in the following code:
// Get module parameters
$params = new JRegistry;
$params->loadJSON($module->params);
So this is where $params comes from. This variable is a JRegistry object that contains the options entered when the module was created in the Module Manager. These options are available to us when we call the module helper method.
Getting back to Listing 6.1, the next line gets the linknames option from the parameters and saves it in a variable called $linknames. This variable will be used when we execute the layout for the module.
The next line gets the module class suffix option from the $params object. The module class suffix is a text field the site designer can enter when the module is created. It allows you to fine-tune the CSS styling for the module by assigning a unique CSS class to the module’s HTML elements. Notice that we use the built-in PHP function htmlspecialchars() to sanitize this value. This function converts characters that have a special meaning in HTML (for example, <, >, single- and double-quotes, and &) to special HTML symbols (for example, , >, ", and &). This ensures that we don’t introduce unintended or malicious HTML code into our module output.
The last line is a require statement:
require JModuleHelper::getLayoutPath('mod_users_latest', $params->get('layout', 'default'));
This line does several things. First, it gets the layout option from the module parameters. Recall from Chapter 4 that we can create alternative layouts for modules and select them in the Module Manager when we create a new instance of a module. It then calls the getLayoutPath() method of the JModuleHelper class using the name of the module and the name of the layout. This method returns the full file name of the desired layout. If we haven’t specified an alternative layout, this will be the default file modules/mod_users_latest/tmpl/default.php. The layout file again is a normal PHP script (it doesn’t declare a class), so it is executed immediately after it is included via the require command. Because of this, all variables in scope at this point in the program are still in scope in the layout script.
This is a bit tricky. We got to the mod_users_lastest.php file because of a require statement in the JModuleHelper class. Now we are in turn using the require statement to bring in the layout file. Although this can be confusing, the advantage of this design is that it allows us to work in smaller programming files and keep different parts of the program in different folders. These advantages outweigh the disadvantage of keeping track of where files are included inside other files.
To summarize, the mod_users_latest.php file
• Loads the helper class into working memory to make its methods available
• Calls the method from the helper class to get the data for the module
• Includes (via the require command) the layout file, which actually displays the module output
In short, it controls the entire process of executing the module.
Including Files versus Calling Methods
In Joomla, we often include files using the PHP commands require, require_once, include, or include_once. As we discuss in the previous chapter, if the included file is a class declaration, the class is loaded into memory but no code is actually executed. If the included file is a “normal” PHP script (that is, a series of statements other than a class or function definition), it is executed immediately and any variables that are in scope when the file is included are also in scope inside the included file.
This means that we have to be careful about variable names when we include files. The good news is that we can use variables that are defined earlier in the file that contains the include or require statement (for example, the variable $params in our module file mod_users_latest.php). The bad news is that if we accidentally use the same variable in the included file as in the including file, we can get an unexpected result. For example, we could accidentally change the value of a variable that is used later in the calling program. So we need to be careful about the variables we use inside included files that are not class declarations.
The situation is quite different when we work with classes and methods. Unless otherwise specified, all variables in classes and methods are local to the class or method. So when we call a method, the variables from the calling program are not in scope inside the method. If we need to pass information from the calling program to the method, we normally have to put variables in the method arguments. And if we want to return information from the called method back to the calling program, we normally have the method return this information. However, the benefit of this is that we are free to use any variable name we like inside methods. It doesn’t matter if it is the same as used in the calling program, since the scopes of the variables don’t overlap.
Module Helper Class
Next let’s look at the module helper class. This is where the information for the module is gathered. Listing 6.2 shows the code for the getUsers() method in this class.
Listing 6.2. getUsers() Method in modUsersLatestHelper Class
// get users sorted by activation date
static function getUsers($params)
{
$db = JFactory::getDbo();
$query = $db->getQuery(true);
$query->select('a.id, a.name, a.username, a.registerDate'),
$query->order('a.registerDate DESC'),
$query->from('#__users AS a'),
if (!$user->authorise('core.admin') && $params->get('filter_groups', 0) == 1)
{
$groups = $user->getAuthorisedGroups();
if (empty($groups))
{
return array();
}
$query->leftJoin('#__user_usergroup_map AS m ON m.user_id = a.id'),
$query->leftJoin('#__usergroups AS ug ON ug.id = m.group_id'),
$query->where('ug.id in (' . implode(',', $groups) . ')'),
$query->where('ug.id <> 1'),
}
$db->setQuery($query,0,$params->get('shownumber'));
$result = $db->loadObjectList();
return (array) $result;
}
This method is declared as static. As discussed earlier, this means that the method is called using the class name, not an object name. If you are familiar with procedural programming, a static method is just like a subroutine.
The first line creates a JDatabase object called $db. We use JDatabase objects in Joomla any time we need to extract data from the database. The next line creates a new JDatabaseQuery object called $query. Notice that we use our JDatabase object to create the query (with the $db->getQuery(true) method). The boolean true argument tells the JDatabase object to give us a new query (instead of the last query used, if any).
We discuss database queries in more detail in Chapter 11. For now, let’s look at how we create and run the query in this example. Databases are organized like a series of spreadsheet files, where each file holds one type of data. The files are organized in rows and columns, just like a spreadsheet. For example, the #__content table holds the data for articles. Each row holds all the data for one article. Each column holds one piece of data for all articles (for example, title or category).
To pull data from a database, we use a SELECT query. This query will return data in row-column format. A simple SELECT query has the following format:
SELECT <list of columns>
FROM <table name>
WHERE <where conditions>
ORDER BY <columns to sort the results by>
LIMIT <start at row number>, <number of rows to return>
In Joomla version 1.5, we would build a string in our program that contained the exact text for the query and then pass that query to the database. Starting with Joomla version 1.6, we have a class called JDatabaseQuery that makes it easier to build SQL queries in Joomla. This class also handles any differences between databases.
For example, Joomla version 2.5 supports Microsoft SQL Server as well as MySQL, and support for PostgreSQL is expected in the near future. If we use JDatabaseQuery to build all our queries, we can be confident that our code will run correctly on these new databases, since the query class can automatically account for differences in the SQL commands that each database uses.
The methods in JDatabaseQuery closely mirror the format of a SQL statement. Unlike a SQL statement, where the parts of the query must be written in the correct order, with JDatabaseQuery we can construct the commands in any order we like.
The $query->select() method
$query->select('a.id, a.name, a.username, a.registerDate'),
adds columns to the SELECT part of our query. Here we retrieve four columns: id, name, username, and activation. The “a.” in front of each column identifies a shortcut name for the table (in case we use more than one table in our query). The shortcut name is defined in the from() method.
The $query->order() method
query->order('a.registerDate DESC'),
adds the columns that the database will use to sort the query results. In this case, we will sort our query by the register date (a.registerDate). Notice that we have the word “DESC” after the column name. This is short for DESCENDING and tells the database to do a reverse sort. Recall that we want our new users ordered by the most recently activated first. Dates are stored as numbers in the database, and recent dates are higher numbers than older dates. So in order to get a list sorted by newest to oldest, we use a reverse sort.
The $query->from() method
$query->from('#__users AS a'),
specifies the table to use for the query. In this case, the table is called #__users and is followed by AS a. When you install a Joomla website, you can pick the letters you want to use as your database prefix. These letters are added to the front of every table name in your database. When we name tables in a SQL query, we don’t know what prefix a particular site might use. That is why we always use the prefix #__ (pound sign followed by two underscore characters). Just before the query is passed to the database, Joomla automatically changes #__ to the specific prefix for each Joomla website. In this book, we refer to tables using the #__ prefix, but the prefix for a given Joomla website will be different.
The AS a tells the database that the shortcut name for this table will be a. So we can use a. + <column name> to name any column in the #__users table.
After the $query->from() line, we get a user object and then start an if block. This block implements the feature of being able to filter the users based on the current user’s groups. If we have enabled that option (called filter_groups) and if the current user is not the “super user” (does not have core.admin permissions), then we process the code inside the if block.
Inside the if block, we first get the array of groups that the current user is a member of, using the getAuthorisedGroups() method of the JUser class. If this is an empty array, we are done and simply return an empty array. Otherwise, we add two joins, using the leftJoin() method, and two WHERE clauses, using the where() method. We discuss joins and WHERE clauses in Chapter 11. Here, the joins allow us to see what user groups each user is a member of, and the WHERE clauses limit the query to show only those users where we have at least one user group in common (other than Public, which is group 1).
After the if block, the next line in the method is as follows:
$db->setQuery($query,0,$params->get('shownumber'));
This is where we pass the query to the database and specify the starting row number and maximum row count for the query. The first argument in our example is $query, the query object.
If we look at the setQuery() method in the JDatabase class (libraries/joomla/database/database.php), we see that it expects the first argument to be a string. Recall from Chapter 4 that if we use an object where PHP expects a string, the object’s special __toString() method is called to convert the object to a string. If we look at the JDatabaseQuery class (libraries/joomla/database/databasequery.php), we see it has a __toString() method that converts the object to a valid SQL command. Also, because setQuery() expects the first argument to be a string, we can just pass a string that contains the exact text of the query if we prefer. However, it is recommended always to use the JDatabaseQuery methods to build queries for Joomla.
The next line is as follows:
$result = $db->loadObjectList();
This command actually runs the query and returns the results of the query to the $result variable. The loadObjectList() method returns the list of rows as an array of objects. Each returned row is a standard object with a field for each column in the query. In our example, we will have the fields id, name, username, and register date. The value for each of these fields will be the value from the database for that row. We will have a maximum number of rows equal to the shownumber parameter value. Depending on the data, we could have zero rows or any number of rows up to that value.
Default Layout File
The code for the default layout, default.php, is shown in Listing 6.3.
Listing 6.3. default.php Layout File
<?php
/**
* @package Joomla.Site
* @subpackage mod_users_latest
* @copyright Copyright (C) 2005 - 2012 Open Source Matters, Inc. All rights reserved.
* @license GNU General Public License version 2 or later; see LICENSE.txt
*/
// no direct access
defined('_JEXEC') or die;
?>
<?php if (!empty($names)) : ?>
<ul class="latestusers<?php echo $moduleclass_sfx ?>" >
<?php foreach($names as $name) : ?>
<li>
<?php echo $name->username; ?>
</li>
<?php endforeach; ?>
</ul>
<?php endif; ?>
This simple layout again demonstrates how we can mix PHP and HTML code in the same file.
After the defined() statement, we start the layout with an if statement. Note that the if statement is using the alternative PHP syntax. This is always recommended for layout files that mix HTML and PHP elements. The if statement checks that our $names array is not empty. We do this to avoid the possibility of showing an empty ul element.
Where does the $names variable come from? Recall that the current layout file was executed using a require command from the mod_users_latest.php file. As discussed earlier, because our script is included and is not called as a class method, all variables in scope at the point where it was included are still in scope. It is exactly as though the current layout file was pasted into the file where it was included (mod_users_latest.php). So the $names variable comes from this line of code in the mod_users_latest.php file:
$names = moduserslatestHelper::getUsers($params);
The next line creates an HTML ul element. Here we are inserting the variable $moduleclass_sfx as part of the class attribute of the ul. This line of code illustrates an important point about spaces in PHP files. Normally, spaces are not important in PHP files. The commands
$x = $y + $z;
and
$x=$y+$z;
are exactly equivalent. However, in the following line,
<ul class="latestusers<?php echo $moduleclass_sfx ?>" >
we are using the echo command to insert the variable inside an attribute. In this situation, spaces are important, just as they would be if we were typing in literal text. There are no spaces between the word latestusers and the value returned by the PHP echo command. So this value will be appended to latestusers with no space. For example, if the $moduleclass_sfx were "my_suffix", then the output of that line would be
<ul class="latestusersmy_suffix" >.
For this reason, if we want a module class suffix to create a second CSS class (which we often do), we need to type it into the form with a leading space. That way, the leading space creates a space between the standard class and the suffix. If we typed in <space>my_suffix for the class suffix, the element would be rendered as
<ul class="latestusers my_suffix" >
and you could style this element using the CSS class my_suffix.
The next section of code is a foreach loop over the $names variable. A foreach loop is a convenient way to loop through each element in an array. The code block inside the loop is executed once for each element in the array. Inside the code block, the variable $name (singular) is the current element in the array. If the array is empty, we skip the entire code block.
Once we are inside the foreach block, we create an li element. Here we just put the user’s name in, without the anchor element. We finish by closing the HTML elements in the same order we opened them. First we close the li element, then the foreach loop, then the ul element, and finally the if statement. Notice how the indentation makes the code easier to read, since the indentation indicates which lines are inside other code blocks or elements. Also notice that it is easy to see the structure of the HTML code when we mix PHP elements in with HTML elements.
Show Articles by the Current Author
Next let’s apply what we’ve learned and create our own module. Our module will be similar to the core Articles - Related Articles module. That module shows a list of articles that have one or more keywords in common with the current article shown on the page. Our module will show articles that are written by the same author as the article shown on the page. We will have parameters to allow the administrator to control how many articles show and the ordering of the articles.
When we write extensions that may be used by others, we want to name the extensions in such a way as to make the name unique within the Joomla community. One simple way to do that is to incorporate a company or organization name in the extension name. For example, we might call our company “Joomla Programming Book Examples,” or “joompro” for short. Given this, we’ll call our module mod_joompro_articles_author.
Module Structure
The files we need for our module are shown in Figure 6.1.
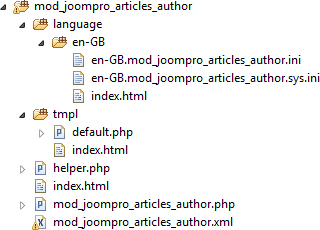
Figure 6.1. Files for example module
This is similar to the list of files for the Latest Users module we looked at earlier. However, in this case, we have included our language files inside the module folder instead of in the core language folder.
Logic was added in Joomla version 1.6 to allow extensions to use language files in their own language folders in addition to language files in the core language folders (language and administrator/language). If a file is not found in the core folder, Joomla will look in the extension folder. This allows us to keep our extension’s language files separated from the core language files.
Module XML File
Let’s start with the module’s XML file. This file does several things. The extension element has attributes for type, version, client (site or administrator), and method. These are used by the Joomla extension installer during the installation process. The files element provides a list of the files and folders (often called a manifest) that tells the Joomla extension installer what files or folders are part of the extension. This allows these files to be copied during installation and deleted if the module is uninstalled.
Inside the extension element we have elements that provide descriptive information for the module, such as name, author, copyright, and so on. Finally, the XML file may contain a config element. This element defines any parameters that will show for the module in the Module Manager.
Listing 6.4 shows the first part of our XML file.
Listing 6.4. mod_joompro_articles_author.xml File Part 1
<?xml version="1.0" encoding="utf-8"?>
<extension
type="module"
version="2.5.0"
client="site"
method="upgrade">
<name>mod_joompro_articles_author</name>
<author>Mark Dexter and Louis Landry</author>
<creationDate>January 2012</creationDate>
<copyright>Copyright (C) 2012 Mark Dexter and Louis Landry. All rights reserved.</copyright>
<license>GNU General Public License version 2 or later; see LICENSE.txt</license>
<authorEmail>[email protected]</authorEmail>
<authorUrl>www.joomla.org</authorUrl>
<version>2.5.0</version>
<description>MOD_JOOMPRO_ARTICLES_AUTHOR_DESCRIPTION</description>
<files>
<filename module="mod_joompro_articles_author"> mod_joompro_articles_author.php</filename>
<folder>tmpl</folder>
<filename>helper.php</filename>
<filename>index.html</filename>
<filename>mod_joompro_articles_author.xml</filename>
<folder>language</folder>
</files>
This code is similar to the code for the mod_users_latest module.xml, which we discussed earlier. The name is the module folder name and also the name of the main PHP file and XML file. We can optionally have a key in the .sys.ini language file to translate this name into something more descriptive when we show the module in the Module Manager. For example,
MOD_JOOMPRO_ARTICLES_AUTHOR="Articles by Current Author"
We also put a language key in the description element. This will provide a description for the module. We define the description key in both language files.
The files element is almost the same as for the mod_users_latest. The first filename element has a module attribute. This defines the name of the module and specifies the file to load when the module is executed. As with mod_users_latest, we list the tmpl folder, where we will put our layout file for the module. We then list the helper.php file, the index.html file, and this XML file. Recall that we don’t need to list this XML file, but it is good practice to do so.
The one difference from the earlier example is here we have added a folder element for our language folder. This folder will contain a subfolder with the two .ini files for each language we include with the module.
The next section of the XML file is shown in Listing 6.5.
Listing 6.5. mod_joompro_articles_author.xml File Part 2
<config>
<fields name="params">
<fieldset name="basic">
<field
name="count"
type="text"
default="5"
label="MOD_JOOMPRO_ARTICLES_AUTHOR_FIELD_NUMBER_LABEL"
description="MOD_JOOMPRO_ARTICLES_AUTHOR_FIELD_NUMBER_DESC">
</field>
field name="article_ordering" type="list"
validate="options"
default="a.title"
label="MOD_JOOMPRO_ARTICLES_AUTHOR_FIELD_ARTICLEORDERING_LABEL"
description= "MOD_JOOMPRO_ARTICLES_AUTHOR_FIELD_ARTICLEORDERING_DESC"
>
<option value="a.title">JGLOBAL_TITLE
</option>
<option value="a.hits">MOD_JOOMPRO_ARTICLES_AUTHOR_OPTION_HITS_VALUE
</option>
<option value="a.created"> MOD_JOOMPRO_ARTICLES_AUTHOR_OPTION_CREATED_VALUE
</option>
<option value="a.publish_up"> MOD_JOOMPRO_ARTICLES_AUTHOR_OPTION_STARTPUBLISHING_VALUE
</option>
</field>
<field name="article_ordering_direction" type="list"
validate="options"
default="ASC"
label="MOD_ARTICLES_CATEGORY_FIELD_ARTICLEORDERINGDIR_LABEL"
description="MOD_ARTICLES_CATEGORY_FIELD_ARTICLEORDERINGDIR_DESC"
>
<option value="DESC"> MOD_JOOMPRO_ARTICLES_AUTHOR_OPTION_DESCENDING_VALUE
</option>
<option value="ASC">MOD_JOOMPRO_ARTICLES_AUTHOR_OPTION_ASCENDING_VALUE
</option>
</field>
</fieldset>
This section of the XML file defines the custom parameters for our module. We have three parameters. The first one is called count and it is where we can enter in the number of articles we want to show. We default the number to 5, but we let the user enter any number they want. Note that the way we have this set up, we are not requiring the user to enter a valid integer. They could enter text, for example. Later in this chapter, we discuss some approaches for improving the validation for this field.
The next parameter, article_ordering, indicates the order for the article list. We have added four options: title, number of hits, date it was created, and the date it was published. Each option element contains a value attribute and text. The value attribute will be the value passed to the form when the option is selected. The text in this case is a language key that will be translated using the value in the language .ini file for the module. The language keys are somewhat long because we have included the module name as part of the key. Although a bit awkward, it helps to ensure that we will not have any naming conflicts with other language files that might be loaded at the same time.
In the value attribute we have the exact name of the database column that will be used in the ORDER BY clause of the SQL query to sort the list of articles. We also use the a. table identifier. We will need to make sure in our query that we create the FROM clause with AS a—for example,
$query->from('#__content AS a'),
This way, we can use the value of the article_ordering directly in our query.
The last parameter in Listing 6.5 defines the article_ordering_direction parameter. This allows two values, ASC or DESC. This will be added to the ORDER BY clause of the query to determine whether we use a normal low-to-high sort (ASC) or a reverse high-to-low sort (DESC).
Note that we include the attribute validate="options" for both the article_ordering and article_ordering_direction parameters. This checks that the actual value in the submitted form matches one of the options on the list. This is important to prevent a hacker from submitting invalid data in the form. We discuss this in more detail later in the chapter.
The last section of the XML file is shown in Listing 6.6.
Listing 6.6. mod_joompro_articles_author.xml Part 3
<fieldset
name="advanced">
<field
name="layout"
type="modulelayout"
label="JFIELD_ALT_LAYOUT_LABEL"
description="JFIELD_ALT_MODULE_LAYOUT_DESC" />
<field
name="moduleclass_sfx"
type="text"
label="COM_MODULES_FIELD_MODULECLASS_SFX_LABEL"
description="COM_MODULES_FIELD_MODULECLASS_SFX_DESC" />
<field
name="cache"
type="list"
default="1"
label="COM_MODULES_FIELD_CACHING_LABEL"
description="COM_MODULES_FIELD_CACHING_DESC">
<option
value="1">JGLOBAL_USE_GLOBAL</option>
<option
value="0">COM_MODULES_FIELD_VALUE_NOCACHING</option>
</field>
<field
name="cache_time"
type="text"
default="900"
label="COM_MODULES_FIELD_CACHE_TIME_LABEL"
description="COM_MODULES_FIELD_CACHE_TIME_DESC" />
<field
name="cachemode"
type="hidden"
default="static">
<option
value="static"></option>
</field>
</fieldset>
</fields>
</config>
</extension>
This is an exact copy of the advanced fieldset element from any of the other front-end modules (for example, mod_articles_archive.xml). It defines the standard module parameters in the advanced fieldset. These are
• Layout: The name of the optional alternative layout file (as discussed in Chapter 4)
• Module Class Suffix: Optional CSS class suffix to allow styling for individual instances or modules
• Caching: Whether or not to enable caching for this instance of the module
• Cache Time: The number of seconds to use a cached copy of the module
The fourth field, cachemode, illustrates an important feature for fields in JForm. This field has type="hidden". This means that the field will be stored just like any other field. However, because it is hidden, the user never sees the field and will not be allowed to alter it. It is rendered as an HTML input element with the attribute type set to hidden.
As discussed earlier, we need to remember that hidden form elements can still be manipulated by hackers—for example, by using a browser add-in like Firebug. So we cannot rely on a hidden field to always have the expected value. We should think of this as a user-interface convenience, but not as a way to ensure the form will always return the expected value. In other words, when we use that value in our code, we should guard against unexpected or malicious values in the field, just as we would for other form fields.
Entry File: mod_joompro_articles_author.php
Listing 6.7 shows the PHP file for our module.
Listing 6.7. mod_joompro_articles_author.php File
<?php
/**
* @copyright Copyright (C) 2012 Mark Dexter and Louis Landry. All rights reserved.
* @license GNU General Public License version 2 or later; see LICENSE.txt
*/
// no direct access
defined('_JEXEC') or die;
// Include the syndicate functions only once
JLoader::register('modJoomProArticlesAuthorHelper', dirname(__FILE__).'/helper.php'),
$list = modJoomProArticlesAuthorHelper::getList($params);
// Only show module if there is something to show
if (isset($list[0])) {
$moduleclass_sfx = htmlspecialchars($params->get('moduleclass_sfx'));
require JModuleHelper::getLayoutPath('mod_joompro_articles_author', $params->get('layout', 'default'));
}
In the first line after the defined statement, we use the JLoader::register() method to load the helper class. We could have used require_once. Either command works, but the JLoader::register() method uses the PHP autoload feature and executes faster than require_once. For this reason, whenever possible we should use JLoader::register() (or jimport, which in turns calls JLoader::register()) instead of require_once.
The next line calls the helper to get the list of articles. The next line checks to see if we have anything to show. We could have used
if (count($list)) {
instead of
if (isset($list[0])) {
to check if the $list array has some content. We use the isset command because it is faster. The count function loops through the entire array to get the number of items. In our case, we don’t care if the array has 1 or 100 elements; we just care that it has at least one. Since the array is an indexed array (and not an associative array), we know that if it has any elements, it must have a zero element ($list[0]). So this is a quick way to check that it has at least one element.
If we have something to display, we set the module class suffix from the parameter and then include the layout. We use the require command to include the layout because it is not a class. The JLoader::register() method discussed earlier is only for loading classes. Also, we don’t need to use require_once, because we know that this is the only place in the code where this layout file is being included. The purpose of require_once is to ensure that we don’t try to declare the same class or function twice, which would cause a PHP error. Because require_once has to check whether a file has already been included, it is slower than the require command. So we don’t want to use require_once unless we need to.
We use the method JModuleHelper::getLayoutPath() to get the name of the layout file. This allows the user to create and use alternative layouts and template override layouts for the module.
We have made a subtle but important design choice by testing that the $list variable has content before calling the layout. This means that nothing will be output if there are no articles found by the current author. If we wanted the layout to be able to show a message when there are no articles by the author, we would want to call the layout even if the list were empty.
Helper File
Listing 6.8 shows the first part of the helper.php file with the modJoomProArticles-AuthorHelper class.
Listing 6.8. Helper File Part 1
<?php
/**
* @copyright Copyright (C) 2012 Mark Dexter and Louis Landry. All rights reserved.
* @license GNU General Public License version 2 or later; see LICENSE.txt
*/
// no direct access
defined('_JEXEC') or die;
JLoader::register('ContentHelperRoute', JPATH_SITE.'/components/com_content/helpers/route.php'),
abstract class modJoomProArticlesAuthorHelper
{
public static function getList(&$params)
{
// Initialize return variable
$items = array();
// Process only if this is a single-article view
$option = JRequest::getCmd('option'),
$view = JRequest::getCmd('view'),
if ($option == 'com_content' && $view == 'article')
{
This file registers the ContentHelperRoute method, which we will use later on. Then it declares the class as abstract. The ability to create abstract classes was added in PHP 5. You cannot create an object for an abstract class. Abstract classes are typically used for one of two purposes:
• To create a class to hold one or more static methods
• To create a class that will be used exclusively as a prototype for subclasses (see, for example, the JDatabase class in libraries/joomla/database/database.php)
In this case, this class will just have one static method, called getList(). It takes one argument, the $params variable that is a JRegistry object with the parameters entered for the module.
The next line initializes the $items as an empty array. PHP does not require that variables be initialized. However, if you try to use a variable that has never been set, PHP returns a message called a notice. If you have error reporting set to maximum, you will see the PHP notice message. It is strongly recommended to make sure all variables are set before you try to use them. If you always have your development system’s error reporting set to maximum, you will see PHP notices and will catch this very common mistake during development.
One frequent cause of PHP notices is setting a variable only inside an if/then block of code. If the block is skipped because the condition is not true, then the variable never gets set. If you use that variable later on, you get a PHP notice. For this reason, it is a good habit to initialize variables used in if/then blocks. This is also true for other code blocks, such as loops, that might be skipped during execution.
The next two lines set two variables from the request. We use the JRequest::getCmd() method to get the option and view elements from the request array. The getCmd() method filters the request to make sure it only contains letters, numbers, dashes, and underscores. This protects against someone trying to enter in malicious code (such as JavaScript or SQL commands) into the variable.
The next line is very important. Our module shows articles by the same author as the current article shown on the page. However, many pages on our site will not be showing an article. The page may be showing a different component (such as contacts or Weblinks) or it may be showing a list of articles. In this case, our module won’t have anything to show. So before we start working on getting our list, we want to make sure we are in a single-article view of the content component, and that is exactly what this line of code does. A single-article view is defined by the option of “com_content” and the view of “article.” If you set SEF URLs to no in Global Configuration, you will see these values in the URL of every single article page. In any case, these values are set in the $_REQUEST variable.
Now that we know we are in the right type of menu item, we are ready to start the work of getting our list. Listing 6.9 shows the next portion of the helper file.
Listing 6.9. Helper File Part 2
// Get the dbo
$db = JFactory::getDbo();
$app = JFactory::getApplication();
$user = JFactory::getUser();
$id = JRequest::getInt('id'),
// Get the levels as a comma-separated string
$levels = implode(',', $user->getAuthorisedViewLevels());
// Set the current and empty date fields
$date = JFactory::getDate();
$now = $date->toSql();
$nullDate = $db->getNullDate();
// Initialize the query object
$query = $db->getQuery(true);
// Query the database to get the author info for the current article
$query->select('id, created_by, created_by_alias'),
$query->from('#__content'),
$query->where('id = ' . (int) $id);
$db->setQuery($query);
$currentArticle = $db->loadObject();
The main thing we do in this method is to execute two queries. The first query gets the author for the current article. Then the second query searches the entire articles table for other articles by this same author.
The first three lines get the JDatabase, JApplication, and JUser objects, using the JFactory methods. Then we get the id from the request, using the getInt() method. This method ensures that we get an integer value, thereby filtering out any malicious or unexpected content in the request.
The next line gets a list of the access levels that the current user is allowed to see. It calls the getAuthorisedViewLevels() method, which returns an array of all the access levels for all the groups that this user belongs to. Using the PHP implode function, the array is then turned into a comma-delimited list.
One design decision we have to make is how to handle the case where there are either unpublished articles or articles to which the current user does not have access. The simplest approach is to write the query so that we only see published articles that the current user has access to. Another approach would be to include articles that the user doesn’t have access to and, for those articles, provide a link to allow the user to login before viewing the restricted articles. In our example, we will take the simple approach and limit our results to articles we know we can view.
The next section deals with date values that will be used in our queries. In Joomla, articles have a date range during which they are published. We want to include articles where the current date is between the publishing start and stop dates. However, life is a bit more complicated than this, because we also allow an empty date in either of these columns to mean “always start publishing” or “never stop publishing.” A final complication is that different databases can have different formats for either the current date or an empty or null date.
The first line in this section just gets the current date-time object from Joomla, again using the JFactory class. Then we create a variable $now, which is in the format that the database requires. To do this, we use the toSql() method in the JDate class. Finally, we create a variable called $nullDate, using the JDatabase getNullDate() method. Note that this is not really a null value. For example, for MySQL, getNullDate() returns a date-time field with all zeros (0000-00-00 00:00:00). The important thing is that we use the same value here as we used when the article was created.
Next, we build our first query, which will get the author information we need from the current article. Here we have another design decision to make. In Joomla, an article has a created_by column, which holds the id of the user that created the article. We also have a created_by_alias column. This is an optional text field that can be entered when the article is created or edited. Which column should we use to check if another article is by the same author?
There are several ways we could handle this. One way is to use the optional created_by_alias if it is present and use the created_by otherwise. A simpler way is to just look for a match on either field. Yet another way would be to use a parameter to let the user decide how to do it. For this example we will use the simpler approach and get a list of all articles that match on either column. So we need to get both of these columns for the current article so we can use them in our second query.
Our query is very simple. We create a new query object with the getQuery() method. The true argument means we will get a new empty query. Then we add our three columns using the select() method. We include the id column even though we technically don’t need it. It doesn’t cost anything to add this, and it makes it easier to debug and check that the query is returning what we expect.
In the from() method, we specify the #__content. Recall that we always use the #__ prefix in queries. This gets changed to the actual table prefix before the query is passed to the database. Next we add our WHERE clause by using the where() method:
$query->where('id = ' . (int) $id);
In this case, we don’t need to cast $id as an integer. We know from earlier that it is an integer, because we used the JRequest::getInt() method to set its value. However, it is a good habit to sanitize variables used in the WHERE clause of SQL queries. For text, you can use the JDatabase quote() method. This places quotes around the text and escapes any special characters (such as quotes) so that they will not allow a hacker to hijack your query. For integers, you can use the cast command, as in this example. See Chapter 11 for more information about protecting against SQL injection attacks.
The next line calls the setQuery() method of the $db object. This sets the query field in the database object but doesn’t actually execute the query. The next line,
$currentArticle = $db->loadObject();
actually executes the query and returns the value as an object.
It is important to understand the different methods we can use to get the results of queries. The most commonly used methods are as follows:
• loadObject() returns the first row of the query as an object, where each column for the row is a field in the object.
• loadObjectList() returns an array of all rows from the query where each array element is an object for that row.
• loadResult() returns the first column from the first row of the query.
Which method we use depends on the type of query we are using. In our current example, we know the query will return at most one row. This is because we are selecting the row where id is one value. Each id in the #__content table is unique, so we can’t get more than one row. This is why we use the loadObject() method, which returns the first row from the query.
If we only wanted the first column from the first row, we could use the loadResult() method. If we might get multiple rows from our query, we normally use the loadObjectList() method. There are also methods for loading query results into arrays instead of objects. You can see these in the JDatabase class (libraries/joomla/database/database.php).
At this point, we have the three columns for the current article in the $currentArticle variable. Listing 6.10 shows the next section of the helper file.
Listing 6.10. Helper File Part 3
// Query the database to get articles that match the current author
$query->clear();
$query->select('a.*'),
$query->select('c.access AS cat_access, c.published AS cat_state, c.alias AS cat_alias'),
$query->from('#__content AS a'),
// We need category information to make the link to the articles and to check access
$query->leftJoin('#__categories AS c ON c.id = a.catid'),
// Only show published articles
$query->where('a.state = 1'),
$query->where('c.published = 1'),
// Only show where we have access to article and category
$query->where('a.access IN (' . $levels . ')'),
$query->where('c.access IN (' . $levels . ')'),
// Only show where articles are currently published
$query->where('(a.publish_up = '.$db->Quote($nullDate).' OR a.publish_up <= '.$db->Quote($now).')'),
$query->where('(a.publish_down = '.$db->Quote($nullDate).' OR a.publish_down >= '.$db->Quote($now).')'),
// Check the author of the article
if ($currentArticle->created_by_alias) {
// If the current article has an author alias, check for matches in created_by or created_by_alias
$query->where('(a.created_by =' . (int) $currentArticle-> created_by . ' OR '
. 'a.created_by_alias =' . $db->quote($currentArticle ->created_by_alias) . ')'),
} else {
// If current article does not have author alias, only check the created_by column for matches
$query->where('a.created_by =' . (int) $currentArticle->created_by);
}
Here we start to build our main query. First we clear the old query with the clear() method. Then we create our select. The syntax “a.*” tells the database to include all the columns for table “a” in the query. We only need a few columns from the content table for our module: the article’s title, id, and category. Recall, however, that we allow users to create alternative layouts for our module. In these layouts, we don’t know what information about the article they might want to show.
It doesn’t take a significant amount of extra time for the database to retrieve all the columns from the content table, and this gives us maximum flexibility regarding future possible layouts.
In this query, we will also include the columns access, published, and alias from the #__categories table. These will use the table alias “c.”. The line of code is
$query->select('c.access AS cat_access, c.published AS cat_state, c.alias AS cat_alias'),
The same column name is often used in different tables. For example, both the #__content and #__categories table have columns called access and alias. Our query results will be returned to us in an object where the column name is the object’s field name. Consequently, when we have a duplicate column name, we need to change the column name for the query. This is done using a column alias (not to be confused with the alias column in many Joomla database tables). We do this using “AS,” just as we do with table aliases. For example, c.access AS cat_access means that the query will return the value of the access column for the #__categories table with the column name cat_access. That way we will know which access column is which (access is the article access, cat_access is the category access).
The next line names the #__content table as the first table in the query, with the table alias of “a”. We normally name the main table we are interested in as the first table in the query. In this case, we are mostly interested in information from the #__content table.
The next line of code is
$query->leftJoin('#__categories AS c ON c.id = a.catid'),
A join is the way we add information from a second table into our query. In this case, we will add the three columns from the #__categories table to every row in the query. How do we know which row from #__categories to use? This is specified in the ON clause. By saying “ON c.id = a.catid”, we tell the database to find the row in #__categories where the id matches the catid column in the #__content table.
Notice that we use the method called leftJoin(). There are different ways to join database tables together in a query. The two that are most frequently used are called left joins and inner joins. They both do the same thing in most cases. The difference is what happens if there is no row in the second table that matches the value in the ON clause. With a left join, any columns coming from the second table are set to NULL. With an inner join, the entire row from the first table is excluded from the query results. We discuss this in more detail in Chapter 11.
In our query, this shouldn’t make any difference. If our database is not corrupted, we expect to have a valid category for every article. However, if for some reason an article’s category got deleted, we are choosing to still show the article in the query. If we wanted to exclude articles where the category was not found, we would use the innerJoin() method instead.
Next we have a series of where() methods. Here we set the selection criteria for our query. The first two where() statements require that both the article and category are published. Note that the article table uses the column name state, whereas the category table uses the name published. These columns mean the same thing, and the value of “1” indicates that it is published.
Why do we care if the category is published? In Joomla, we can think of categories as a container for articles or other types of content, similar to a folder on a computer’s disk drive. If we set a category to unpublished, it should also have the effect of setting all the articles in that category to unpublished. We can enforce this by checking both places.
We use similar logic for access levels. If a category has restricted access, this has the effect of restricting the access of all the articles in the category. Recall that we set the variable $levels to be a comma-delimited list of the access levels that the current user has permission to see. The SQL command IN checks if a value is in a comma-delimited list. So the command
a.access IN (1,2,3)
would check that a.access was equal to 1, 2, or 3. So we build two IN statements: one for the article access and one for the category access.
Notice that we have to be careful about building the string inside the where() method and include the opening and closing parentheses. Perhaps in a future enhancement to the JDatabaseQuery class we could add methods to support different types of comparison operators, such as IN, BETWEEN, LIKE, =, and so on. Perhaps you could then use a command like
$query->whereIn('a.access', $levels);
This would make it easier to use IN comparisons, and we wouldn’t have to worry about adding the parentheses ourselves.
However, such a method doesn’t exist at the moment. One of the fun things about software is that we can always think about ways to make it better, and with an open-source project like Joomla, we can actually implement improvements to the package. Alternatively, we could create our own JDatabaseQuery subclass and add our own methods to it.
The next block of code is where we check the article’s start and stop publish dates (publish_up and publish_down) to see that our article is published as of the current date and time. This is where we use the $now and $nullDate variables we created earlier. We need to check that either
• The start or stop date is not entered, or
• The current date is between the start and stop dates.
So we add two WHERE clauses: one for the start date and one for the stop date. Inside each, we use the OR operator. Notice that we put the entire value inside a set of parentheses. For example, the result of the first method might look like the following:
WHERE (a.published_up = '0000-00-00 00:00:00' OR a.publish_up
<= '2012-12-31 23:30:00')
It is important to understand that, by default, the WHERE clauses created by the where() method are connected with the SQL AND operator. Using AND means that all the WHERE conditions must be true for the row to be selected in the query. By putting these two comparisons inside a single where() method connected with an OR operator, and by putting parentheses around it, this WHERE condition will be true if either of the conditions are true. This is exactly what we want.
Notice also that we use the method $db->quote() to put quotes around the $nullDate and $now variables. Even though we know that these values are valid, we need quotes because these values can contain spaces.
The logic for the stop publishing date is exactly the same, except that we check that the current date is less than the stop publishing date.
The next block of code is where we check that the article’s author matches our current author. We decided earlier that we would list all articles that match on either the created_by or the created_by_alias columns. However, what if the current article doesn’t have anything in the created_by_alias column? In this case, we don’t want to use this column for matching, because we don’t want to show all other articles where this column is empty.
The solution is to check the created_by_alias column in our current article and then build the WHERE clause in one of two ways, based on what we find. If we have something in the created_by_alias column, we use it in the WHERE clause as follows:
$query->where('(a.created_by =' . (int) $currentArticle->created_by . ' OR '
. 'a.created_by_alias =' . $db->quote($currentArticle ->created_by_alias) . ')'),
Again, we put the entire WHERE clause inside a set of parentheses.
The second part of the if statement is executed if the created_by_alias is empty. In this case, we just do the check for the created_by, without checking the created_by_alias column, as follows:
$query->where('a.created_by =' . (int) $currentArticle->created_by);
Notice that we use the (int) command to cast the created_by column to an integer. It should be an integer, but this is always good practice. It is very important to use the $db->quote() method for the created_by_alias. This field is entered by the user when an article is created, so it could contain anything, including malicious code. By putting it inside the $db->quote(), we make sure it can’t inject any harmful code into our query.
The last part of our helper method is shown in Listing 6.11.
Listing 6.11. Helper File Part 4
// We don't want to show the article we are currently viewing
$query->where('a.id !=' . (int) $currentArticle->id);
// If the language filter is enabled, only show articles that match the current language
if ($app->getLanguageFilter()) {
query->where('a.language IN (' . $db-> Quote(JFactory::getLanguage()->getTag()) . ',' . $db->Quote('*') . ')'),
}
// Set ordering based on parameter
// We know it is valid because of validate="options" in the form
$query->order($params->get('article_ordering', 'a.title') . ' ' . $params->get('article_ordering_direction', 'ASC'));
// Set query limit using count parameter (note that we have no pagination on the module)
$db->setQuery($query, 0, $params->get('count', 5));
// Get list of rows
$items = $db->loadObjectList();
// Create the link field for each item using the content router class
foreach ($items as &$item) {
$item->slug = $item->id.':'.$item->alias;
$item->catslug = $item->catid.':'.$item->cat_alias;
$item->link = JRoute::_(ContentHelperRoute::getArticleRoute($item-> slug, $item->catslug));
}
}
return $items;
}
The first line adds a condition to exclude our current article. We don’t want that to show in the list. We know it is by the current author.
The next section of code relates to a feature added in Joomla version 1.6 called the Language Switcher. This feature allows the user to tag articles for a specific language. We only want to add this WHERE clause if the feature is turned on, which we check with the $app->getLanguageFilter() method. If the feature is enabled, then we check that the article’s language (a.language) either matches the current language tag or matches the asterisk (“*”), which means match any language. If the Language Switcher feature is not enabled, we skip this code block and don’t add the WHERE clause.
The next section uses our ordering parameters to sort the query. The order() method adds an ORDER BY clause to the query. Recall that we designed our parameter values to plug directly into the ORDER BY clause and that we used the validate="options" to ensure that the entered value matches one of the options. Therefore we can use the parameter values directly in the query’s order() method as shown.
Note that we provide default values for each parameter. Normally, we will have valid parameter values. However, there are some cases where we might not. For example, say that we create a new version of our module and the new version adds a new parameter. If someone has created a module with the old version and upgrades to the new version, this parameter will not be defined for that instance of the module. If we have specified a valid default value for the new parameter, the module will work correctly even if the parameter isn’t defined.
The last thing we do before running the query is to use the count parameter to set the query limit. Most queries we write for Joomla will use the MySQL offset and limit values. These tell MySQL where to start and stop the query. In our case, we want to start at the beginning (row 0) and stop after the number from the count parameter (with a default value of 5). We pass the arguments to the setQuery() method.
The next line executes the query and returns the results as an array of objects, using the loadObjectList() method that we discussed earlier.
At this point, we have our array of objects, where each object contains the values for one row in our query. We want our list to include a link to each article. So the last thing we need to do (whew!) is create the link to each article.
Creating links in Joomla is easy, as long as we use the correct built-in methods. There are rules that we want to follow when we create links to articles. For example, we normally try to find a menu item in the site that is the “best fit” for this article. If we have a single article menu item for the article, we create the link so that it calls that menu item. If not, then we look for a menu item for the category the article is in. We try to use an existing URL for the article instead of creating a new URL. In this way, if we have links to the same article in multiple places on the site, they will all link to the same URL and page on the site.
How do we do this? Fortunately, we already have methods in Joomla for creating the article links.
Looking at the last block of code, we have a foreach loop that loops through the $items array. Inside the loop, each object in the array is available in the variable called $item.
The first two lines create the article and category slug fields. These are just the id, a colon (:), and the alias (for example, 23:my-article-alias). These are needed to create the URL for the article link.
The third line in the foreach loop is shown here:
$item->link = JRoute::_(ContentHelperRoute::getArticleRoute($item->slug, $item->catslug));
This is the line where the actual link to the article gets created. It does two things.
First, it builds the article routing using the getArticleRoute() method in the ContentHelperRoute class. This takes as its arguments the item and category “slugs” we created in the previous two lines and returns the query we need to build the URL. Recall that we mentioned earlier in this chapter that a module is normally tied to a component. In this case, our module is tied to the com_content component. As part of that, we want links to articles that we create inside the module to be consistent with links created in the component itself or in other modules that use com_content.
When we create a component, one of the options we have is to create special rules for routing. The com_content component does this with its getArticleRoute() method. This method looks for an existing menu item that is the “best fit” for this article. For example, if there is a single-article menu item, a URL pointing to that menu item will be created. If not, then it will look for a menu item that points to the article’s category. This is done because we normally want links to a given article to always take us to the same URL.
The key point here is that we want our article links to be the same as those created in the component or in other article modules. So we want to use the same methods to create the links. This ensures that our links will be consistent with other links and it also saves us work. Moreover, if a change is made to the way articles are routed, or if a bug is fixed, our module will pick up that change.
The output of getArticleRoute() is fairly simple—for example,
index.php?option=com_content&view=article&id=1:administrator-components&catid=21:components&Itemid=273
The first part will always be the same: index.php?option=com_content&view=article. The next two parts are the article and category slugs we created. So far, the getArticleRoute() hasn’t done much for us. The last part &Itemid=xxx is the important piece. This is the menu item that is the best fit for this article, based on the rules for this component, and this is what the getArticleRoute() provides.
Once we have the results of getArticleRoute(), we then need to turn it into a full URL. This is done by the JRoute::_() method. This method in turn calls the route function, if any, that is provided by the component. In this case, that is the function ContentBuildRoute() in the file components/com_content/router.php. If the Global Configuration option for SEF URLs is set to Yes, the URL is then converted to the SEF version, and the query is replaced with the aliases from the menu item and, in some cases, the category. In the previous example, the full SEF URL would be
<Joomla! root path>/index.php/using-joomla/extensions/components/administrator-components
This would then be converted by the SEF system plugin to the full URL, adding the host (for example, “http://www.mydomain”) to the start of the URL.
After we have processed each object in the $items array, we are done with the method. We exit out of the foreach loop and exit out of the “if/then” code block. Finally, we return the $items array.
Layout File: default.php
The next file in the process is the default.php layout. If we do not create and specify an alternative layout for the module, this is the file name that will be returned by the JModuleHelper::getLayoutPath() method we called in our module PHP file. Listing 6.12 shows the code for this file.
Listing 6.12. default.php Layout File
<?php
/**
* @copyright Copyright (C) 2012 Mark Dexter and Louis Landry. All rights reserved.
* @license GNU General Public License version 2 or later; see LICENSE.txt
*/
// no direct access
defined('_JEXEC') or die;
// Output as a list of links in a ul element
?>
<ul class="joompro<?php echo $moduleclass_sfx; ?>">
<?php foreach ($list as $item) : ?>
<li>
<a href="<?php echo $item->link; ?>">
<?php echo $item->title; ?></a>
</li>
<?php endforeach; ?>
</ul>
This simple layout creates an unordered HTML element (ul) and then does a foreach loop over the $list array. Recall that the $list variable received the array returned by the helper method in this line from the mod_joompro_articles_author.php file:
$list = modJoomProArticlesAuthorHelper::getList($params);
The variables in scope at the point where our layout was included (via the require command) are still in scope inside the layout. The layout just executes PHP commands; it does not declare a class or function. So it is executed immediately. The effect is exactly as if the layout were part of the program file that included it.
Inside the foreach loop, we create an HTML li element that includes the article’s link and its title. After we end the foreach loop, we close the file with the closing ul tag.
Notice that, as before, we use the alternative PHP syntax that allows us to easily mix HTML tags and PHP commands.
Language Files
We have two language files for our module. Listing 6.13 shows the .sys.ini file.
Listing 6.13. en-GB.mod_joompro_articles_author.sys.ini File
; sys language file for mod_joompro_articles_author module
; The .sys.ini files are used when listing the extensions in the extension manager or module manager
MOD_JOOMPRO_ARTICLES_AUTHOR="Articles by Current Author (sys file)"
MOD_JOOMPRO_ARTICLES_AUTHOR_DESCRIPTION="This module shows articles by the same author as the article in view. (sys file)"
As discussed earlier, this file is used to translate the name and description of the module when we are showing it in a list but don’t have the module open for edit. Two examples are when the module is installed and in the Module Manager list. We have added “(sys file)” to the text for illustration, to show us which language file is being used.
Listing 6.14 shows the .ini file for the module.
Listing 6.14. en-GB.mod_joompro_articles_author.ini File
; Language file for mod_joompro_articles_author
MOD_JOOMPRO_ARTICLES_AUTHOR="Articles by Current Author"
MOD_JOOMPRO_ARTICLES_AUTHOR_DESCRIPTION="This module shows articles by the same author as the article in view. (ini file)"
MOD_JOOMPRO_ARTICLES_AUTHOR_FIELD_NUMBER_LABEL="Number of Articles to Show"
MOD_JOOMPRO_ARTICLES_AUTHOR_FIELD_NUMBER_DESC="Enter the maximum number of articles to show in the module."
MOD_JOOMPRO_ARTICLES_AUTHOR_FIELD_ARTICLEORDERING_LABEL="Article Ordering"
MOD_JOOMPRO_ARTICLES_AUTHOR_FIELD_ARTICLEORDERING_DESC="Select the column that will be used to order the articles."
MOD_JOOMPRO_ARTICLES_AUTHOR_OPTION_HITS_VALUE="Hits"
MOD_JOOMPRO_ARTICLES_AUTHOR_OPTION_CREATED_VALUE="Date Created"
MOD_JOOMPRO_ARTICLES_AUTHOR_OPTION_STARTPUBLISHING_VALUE="Date Published"
MOD_ARTICLES_CATEGORY_FIELD_ARTICLEORDERINGDIR_LABEL="Ordering Direction"
MOD_ARTICLES_CATEGORY_FIELD_ARTICLEORDERINGDIR_DESC="Enter Low to High for normal alphabetical sort. Enter High to Low to order by most recent or most hits."
MOD_JOOMPRO_ARTICLES_AUTHOR_OPTION_DESCENDING_VALUE="High to Low"
MOD_JOOMPRO_ARTICLES_AUTHOR_OPTION_ASCENDING_VALUE="Low to High"
Note that we have the module name and description in this file as well. These keys are used to display the name and description when we are editing an instance of the module. We have added the text “(ini file)” for illustration purposes. All these keys come from the module’s XML file. This is because we are not displaying any text in the output of the actual module. If we were, this file would also include the language keys for that text.
Validating Parameters in JForm
The JForm class introduced in Joomla version 1.6 provides us with some great ways to validate the parameters entered in by users. Let’s look at two examples.
Check Values in Helper
Let’s return to the count field in our XML file, where we specify the maximum number of articles to show in the module. It currently has the following code:
<field
name="count"
type="text"
default="5"
label="MOD_JOOMPRO_ARTICLES_AUTHOR_FIELD_NUMBER_LABEL"
description="MOD_JOOMPRO_ARTICLES_AUTHOR_FIELD_NUMBER_DESC">
</field>
To be valid, this should be a positive integer. However, with the current code, the user can put in text, a negative number, or zero. If the user puts in anything other than a positive integer, the end result will be that there will be no limit when the query is executed. In this case, all articles with this author will be listed. On a large site, this could be dozens, hundreds, or more and would cause display problems and perhaps performance problems.
We have several options to improve our code to prevent this possibility. One option would be to check the value in our helper method and change it to a default value if it is outside the range. For example, we could add something like the following:
$count = (int) $params->get('count', 5);
$count = ($count <= 0 || $count > 10) ? 5 : $count;
$db->setQuery($query, 0, $count);
This way we know that the count will always be an integer between 1 and 10.
Integer Type in JForm
A limitation of this approach is that we don’t prevent the user from entering an invalid entry and we don’t alert them if they do. Using JForm, we have several options for improving the validation during data entry.
One option is to use the integer type. This limits the entry possibilities to a list of integers. Here is an example of how we might change the field definition in the XML file:
<field
name="count"
type="integer"
first="1"
last="10"
step="1"
default="5"
label="MOD_JOOMPRO_ARTICLES_AUTHOR_FIELD_NUMBER_LABEL"
description="MOD_JOOMPRO_ARTICLES_AUTHOR_FIELD_NUMBER_DESC">
</field>
Here we have changed the type from “text” to “integer.” When we load the module edit form, the field is presented as a list box, as shown in Figure 6.2.
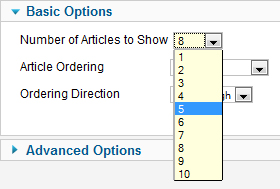
Figure 6.2. Integer field example
This has the advantage that it limits the user input to only valid entries. However, it does limit the user to a predefined range. In our example, that is not too limiting. However, we might have a case where any integer from 1–1,000 was valid. We wouldn’t want a list box with 1,000 lines.
One option in this scenario would be to use the step attribute to create a larger step, say 50 or 100. This would reduce the number of options and might be a good solution in some situations.
Using type="integer" also has the limitation that it does not prevent a hacker from entering an invalid number using a tool like Firebug. It makes life convenient for the user, but it doesn’t protect us from hackers.
Integer Filter in JForm
Another option we have with JForm is to use the filter attribute. This uses the predefined filters in Joomla to filter the form input when the module is saved. If we change the type back to text and add a filter attribute, the code looks like the following:
<field
name="count"
type="text"
filter="integer"
default="5"
label="MOD_JOOMPRO_ARTICLES_AUTHOR_FIELD_NUMBER_LABEL"
description="MOD_JOOMPRO_ARTICLES_AUTHOR_FIELD_NUMBER_DESC">
</field>
This method will automatically convert any noninteger entry in the field to zero. In our example, this doesn’t help us much, because we get this result without the filter. However, this is a useful method to know about.
One advantage of using the filter attribute is that it is secure. Because this processing happens during the save process, it cannot be tampered with by manipulating the HTML form in the browser. Possible values for filter include all the standard filter types in JFilterInput. These include integer, float, double, boolean, word, cmd, base64, string, html, array, path, and username. In addition, some new filter types were added for JForm. These include rules, unset, raw, int_array, safehtml, server_utc, and user_utc. See Appendix B for information about filtering options.
Custom JFormRule Class
Another option is to create a custom rule for the field. We access rules using the validate attribute. Joomla includes a number of standard rules, including boolean, email, equals, options, tel, url, and username. These correspond to classes in the folder libraries/joomla/form/rules.
If one of these predefined rules doesn’t do what we need, we can create our own customized rules with exactly the code we want.
To do this, we would modify the XML file as follows:
<fieldset name="basic" addrulepath="modules/mod_joompro_articles_author">
<field
name="count"
type="text"
validate="countinteger"
filter="integer"
default="5"
label="MOD_JOOMPRO_ARTICLES_AUTHOR_FIELD_NUMBER_LABEL"
description="MOD_JOOMPRO_ARTICLES_AUTHOR_FIELD_NUMBER_DESC">
</field>
In the fieldset, we include an addrulepath attribute with the path to our custom rule folder. We will just put it in the top-level folder of our module. Then, in the field, we put the name of the rule file in the validate attribute. In our example, this is called countinteger. We add the filter="integer" to force the system to save the input value as an integer. For example, if someone entered something like 15.5, we want the value to be saved as 15.
Then we add a file called countinteger.php in our module folder, with the following code:
<?php
/**
* @copyright Copyright (C) 2012 Mark Dexter & Louis Landry. All rights reserved.
* @license GNU General Public License version 2 or later; see LICENSE.txt
*/
defined('_JEXEC') or die;
jimport('joomla.form.formrule'),
class JFormRuleCountInteger extends JFormRule
{
public function test(& $element, $value, $group = null, & $input = null, & $form = null)
{
return ((int) $value > 0 && (int) $value <= 30);
}
}
The class is called JFormRuleCountInteger and it extends the JFormRule class. We only need one method, called test(). This method should have the arguments shown in the example. The variable called $value will contain the input from the form.
In this example, we are testing that the value is an integer between 1 and 30. Otherwise, we will get an error message saying “Invalid field: Number of Articles to Show” and the form will not save.
Notice that we have the minimum and maximum values hard-coded to 1 and 30. We could make the JFormRuleCountInteger class a lot more flexible if we allowed the minimum and maximum values to be set in the XML form field element. To do that, we add attributes called minimum and maximum to the XML file as follows:
<field
name="count"
type="text"
validate="countinteger"
minimum="1"
maximum="10"
filter="integer"
default="5"
label="MOD_JOOMPRO_ARTICLES_AUTHOR_FIELD_NUMBER_LABEL"
description="MOD_JOOMPRO_ARTICLES_AUTHOR_FIELD_NUMBER_DESC">
</field>
Then we modify the test() method of JFormRuleCountInteger to use the new attributes, as follows:
public function test(& $element, $value, $group = null, & $input = null, & $form = null)
{
$max = (int) $element->getAttribute('maximum') ? $element->getAttribute('maximum') : 30;
$min = (int) $element->getAttribute('minimum') ? $element->getAttribute('minimum') : 1;
return ((int) $value >= $min && (int) $value <= $max);
}
Here we use the PHP ternary operator to set the value of $max and $min. We want the method to work even if the maximum and minimum attributes have not been set correctly. So we check to see if they are set to a positive integer value. If so, we use that value. Otherwise, we use the default values of 30 and 1.
With this code, we can change the range of allowed values simply by setting the minimum and maximum attributes in the XML file, so our custom rule is much more flexible and more likely to be useful for other situations.
Validation Error Message
As we saw earlier, when the user enters an invalid value in the count parameter, the message “Invalid field: Number of Articles to Show” is displayed. This message tells the user that there is something wrong with the field, but it doesn’t say what is wrong. This is the default error message that displays if we don’t define one explicitly. However, we have two options for defining a different message.
One option is to add an attribute called message to the field element. For example, we could add the following line to the count field element in the XML file:
message="MOD_JOOMPRO_ARTICLES_AUTHOR_COUNTINTEGER_MESSAGE"
Then we could add a line in the language .ini file as follows:
MOD_JOOMPRO_ARTICLES_AUTHOR_COUNTINTEGER_MESSAGE="Article count must be between 1 and 10."
Now if we try to enter in a value outside the range, we get this error message from the language file, which gives the user more useful information.
The other option we have is to return a JException object with a message from the rule’s test() method when the value is invalid. We can do this as follows.
First, we remove the message attribute from the XML file. Then we modify the test() method as follows:
public function test(& $element, $value, $group = null, & $input = null, & $form = null)
{
$max = (int) $element->getAttribute('maximum') ? $element->getAttribute('maximum') : 30;
$min = (int) $element->getAttribute('minimum') ? $element->getAttribute('minimum') : 1;
$result = ((int) $value >= $min && (int) $value <= $max);
// Build JException object
if ($result === false) {
$result = new JException(JText::sprintf( 'MOD_JOOMPRO_ARTICLES_AUTHOR_COUNTINTEGER_MESSAGE', $min, $max));
}
return $result;
We set $max and $min as before. Then we save the boolean true or false value in a variable called $result. If this is false, we set $result equal to a new JException object with our error message. Note that we use the JText::sprintf() method so we can show the values $min and $max in the message.
Then we return $result, which will either be a boolean true, if the field is valid, or the JException object with our message.
Finally, we need to change the .ini language file as follows:
MOD_JOOMPRO_ARTICLES_AUTHOR_COUNTINTEGER_MESSAGE="Article count must be between %1$d and %2$d."
We use the values %1$d and %2$d to hold the places of the $min and $max values. These will be inserted into the message by the JText::sprintf() method. In this case, the error message to the user will be the same as the previous example. However, if we change the minimum or maximum attributes in the XML file, the message will change automatically.
List Validation
Recall in our module’s XML file we included the attribute validate="options" for the article_ordering and article_ordering_direction parameters. This was to make sure that a hacker did not bypass the form validation and enter in some malicious SQL code. Let’s look at how this validation works.
As in the previous example, when we define a validate attribute in a JForm field, a JFormRule class will be called when the JForm is saved, inside the form’s validate() method. The value of the attribute must match the name of the class and file. In our case, the name of the attribute is “options,” so the name of the file is options.php and the name of the class is JFormRuleOptions. The core rule classes are stored in the folder libraries/joomla/form/rules. Because this is a core rule, we don’t have to include this path in the XML file with the addrulepath attribute.
Listing 6.15 shows the code for this file.
Listing 6.15. libraries/joomla/form/rule/options.php File
<?php
/**
* @package Joomla.Platform
* @subpackage Form
* @copyright Copyright (C) 2005 - 2012 Open Source Matters, Inc. All rights reserved.
* @license GNU General Public License version 2 or later; see LICENSE.txt
*/
defined('_JEXEC') or die;
jimport('joomla.form.formrule'),
/**
* Form Rule class for the Joomla! Platform.
* Requires the value entered be one of the options in a field of type="list"
*
* @package Joomla.Platform
* @subpackage Form
* @since 11.1
*/
class JFormRuleOptions extends JFormRule
{
/**
* Method to test the value.
*
* @param object $element The JXMLElement object representing the <field /> tag for the
* form field object.
* @param mixed $value The form field value to validate.
* @param string $group The field name group control value. This acts as as an array
* container for the field. For example if the field has name="foo"
* and the group value is set to "bar" then the full field name
* would end up being "bar[foo]".
* @param object $input An optional JRegistry object with the entire data set to validate
* against the entire form.
* @param object $form The form object for which the field is being tested.
*
* @return boolean True if the value is valid, false otherwise.
*
* @since 11.1
* @throws JException on invalid rule.
*/
public function test(& $element, $value, $group = null, & $input = null, & $form = null)
{
// Check each value and return true if we get a match
foreach ($element->option as $option) {
if ($value == $option->getAttribute('value')) {
return true;
}
}
return false;
}
}
This file is very simple. As before, this class extends the JFormRule class and has only one method, test(). The $element variable contains the field element and the $value variable contains the value entered by the user.
Inside the test() method, the expression $element->option returns an array of JXMLElement objects, one for each option element in the field element. We loop through each of these options and check whether $value (the value entered by the user) is equal to the value attribute of the option element. As soon as we find a match, we exit and return a boolean true. If the entered value doesn’t match any of the values in the array, we return a boolean false.
To try this out, change the form (for example, using Firebug) to enter an invalid value for the Article Ordering (for example, “xxx” instead of “a.title”). When you try to save the form, you should get the message Invalid Field: Article Ordering and the form will not save. If you remove the validate="options" from the XML file and try this again, the form will save.
We can see that JForm gives us a number of options for fine-tuning the validation of our data entry fields. We can use field types to limit the possible entries, filters to fix invalid data during the save process, and validation with rules to prevent the user from saving with invalid data. We can use standard rules or create our own rules. These methods can be mixed, matched, and customized to make the form work the way you want it to.
Help File
If we are planning to distribute our module, we will want to provide an on-screen help file. One option for doing this is to include a help URL in the XML file, as follows:
<help url="HELP_EXTENSIONS_MODULE_JOOMPRO_ARTICLES_AUTHOR_URL"/>
The help element needs to be directly under the extension element. By convention, we put it after the files and languages elements. (In our example, we don’t have a languages element, so it goes just after the files element.)
In the language .ini file, we include a line that translates the language key to the URL. For example, if we had a file called
mod_joompro_articles_author_help.html
that contained our help screen text, we would have a line like the following in our language .ini file:
HELP_EXTENSIONS_MODULE_JOOMPRO_ARTICLES_AUTHOR_URL= "http://joomlaprogrammingbook.com/mod_joompro_articles_author_help.html"
With this setup, when the user clicks on the Help icon in the toolbar when editing the module, the designated URL will load in the help window. By putting the URL in the language file, we allow for the possibility of different help screens based on the user’s language.
Packaging the Module
At this point, we have a working module. Now we want to make it available to the Joomla universe. This is easy to do and is the same procedure we followed with the plugin extension. Here are the steps:
1. Update the module XML file (mod_joompro_articles_author.xml) to include the countinteger.php file we added earlier by adding the following filename element inside the files element:
<filename>countinteger.php</filename>
2. Copy the contents of the folder modules/mod_joompro_articles_author to a temporary folder on your computer.
3. Use an archive program to create a zip archive of the files in this temporary folder. The contents of the archive should be the same as the contents of the modules/mod_joompro_articles_author folder. By convention, the archive file would be called something like mod_joompro_articles_author_1.0.0.zip. The last numbers allow for version numbers, since you might be releasing updates to the module.
Test that the archive file can be installed successfully by uninstalling the existing module and then installing it from the archive file.
Review of Our Module
Let’s take a moment to review what we have accomplished with our module:
• It seamlessly integrates with the rest of the Joomla site. To the user, it appears as if it is part of Joomla.
• It fully supports multiple languages. We can create the two language files for any language and the module will show in that language.
• It fully supports alternative layouts and template layout overrides. Just by using the getLayoutPath() method to get the name of the layout file, we provide this powerful feature for our module.
• It allows the user to enter options (parameters) that control how the module works.
• It is secure and protects against SQL injection and other possible attacks to the site. By using the field types, filtering, and validation, we control the data entered by the user and keep out malicious data.
• It provides on-screen help.
• It can be installed and uninstalled on any site running Joomla version 1.6 or later.
That is an impressive list of features! We got these features simply by taking advantage of the capabilities offered by Joomla and by designing our module to follow standard Joomla practices.
Module Best Practices
Here are some best practices for modules:
• Don’t return an error if the module has a database error. The module is normally not the main content on the page, so we don’t need to halt processing or scare the user. In the future, a good approach will be to log the error and continue processing. That way, the issue can be fixed without disrupting the user’s experience.
• Modules generally should be small and relatively quick (or lightweight). Keep in mind that your module is one of many that might be processing for a given page.
Summary
In this chapter, we looked in detail at a core module and then created our own module. Along the way, we saw how modules can be related to components and how the different types of files in a module work together. We also demonstrated some different possible techniques for validating and filtering data entered in forms.
In creating our own module, we took advantage of many aspects of the Joomla platform. The end result is a module that integrates seamlessly with the rest of Joomla.