
Chapter 8: Authorization Strategies
In the previous chapter, you learned about the options for integrating with Keycloak using different programming languages, frameworks, and libraries. You learned how to obtain tokens from Keycloak and use these tokens to authenticate users.
This chapter will focus on the different authorization strategies you can choose from and how to leverage them to enable authorization to your applications using different access control mechanisms such as role-based access control (RBAC), group-based access control (GBAC), OAuth2 scopes, and attribute-based access control (ABAC), as well as learning how to leverage Keycloak as a centralized authorization server to externalize authorization from your applications. You will also learn about the differences between these options and how to choose the best strategy for you.
By the end of this chapter, you will have a good understanding of how you can leverage Keycloak authorization capabilities and choose the right authorization strategy for your applications.
We will be covering the following topics in this chapter:
- Understanding authorization
- Using RBAC
- Using GBAC
- Using OAuth2 scopes
- Using ABAC
- Using Keycloak as a centralized authorization server
Understanding authorization
Any authorization system will try to help you to answer the question of whether a user can access a resource and perform actions on it.
The answer to this question usually involves questions such as the following:
- Who is the user?
- What data is associated with the user?
- What are the constraints for accessing the resource?
By having the answers to these three questions, we can then decide if access should be granted based on the data associated with the user, and the constraints that govern access to the resource.
As an identity provider, Keycloak issues tokens to your applications. As such, applications should expect authorization data from these tokens. Tokens issued by Keycloak carry information about the user and the context in which the user was authenticated; the context may contain information about the client the user is using or any other information gathered during the authentication process.
The constraints, however, may involve evaluating different types of data, from a single attribute the user has, to a set of one or more roles, or even data associated with the current transaction. By relying on the information carried by tokens, applications can opt for different access control mechanisms, depending on how they interpret the claims within a token when enforcing access to protected resources.
There are two main authorization patterns for implementing and enforcing the access constraints imposed on protected resources. The first, and probably the most common, is to enforce access control at the application level, either declaratively – using some metadata and configuration – or programmatically. On the other hand, applications can also delegate access decisions to an external service and enforce access control based on the decisions taken by this service, a strategy also known as centralized authorization. These two patterns are not mutually exclusive, though, and it is perfectly fine to use both in your applications. We are going to cover that in more detail later when understanding how to use Keycloak as a centralized authorization server.
As we will see in the following sections, Keycloak is very flexible and allows you to exchange any information you might need to protect resources at the application level using different access control mechanisms. It also allows you to choose from different authorization patterns for managing and enforcing access constraints.
In the next sections, we will be looking at how Keycloak can be used to enable different authorization strategies for your applications.
Using RBAC
Probably one of the most-used access control mechanisms, RBAC allows you to protect resources depending on whether the user is granted a role. As you learned in previous chapters, Keycloak has built-in support for managing roles, as well as for propagating those roles to your applications using tokens.
Roles usually represent a role a user has in either your organization or in the context of your application. As an example, users can be granted an administrator role to indicate they act as someone allowed to access and perform actions on any resource in your application. Or, they can be granted a people-manager role to indicate that they act as someone allowed to access and perform actions on resources related to their subordinates.
As you learned from previous chapters, Keycloak has two categories of roles: realm and client roles. Roles defined at the realm level are called realm roles. These roles usually represent the user's role within an organization, regardless of the different clients that co-exist in a realm.
On the other hand, client roles are specific to a client, and their meaning depends on the semantics used by the client.
The decision of when to define a role as a realm or client role depends on the scope the role has. If it spans multiple clients in a realm while keeping the same meaning, then a realm role makes sense. Otherwise, if only a specific client is supposed to interpret the role, having it as a client role makes more sense.
When using roles, you should also avoid role explosion. In other words, too many roles in your system makes things hard to manage. One way to avoid this is to create roles very carefully, having in mind the scope they are related to (realm- or client-wide) and the granularity of the permissions associated with them in your applications. The more fine-grained the scope of a role is, the more roles you will have in your system. As a rule of thumb, do not use roles for fine-grained authorization in your system. They are just not meant for that.
In Keycloak, you can grant roles to groups. That is a powerful capability where members of a group are automatically granted roles for the group they belong to. By leveraging this capability, you should be able to overcome some of the role management issues by avoiding granting privileges individually to many users.
Keycloak also provides the concept of composite roles, a special type of role that chains other roles, where a user granted a composite role is automatically granted any role in this chain (a regular role or even another composite role). Although it is a powerful and unique feature that Keycloak has, you should use it carefully to avoid performance issues – such as when chaining multiple composite roles – as well as manageability issues due to the proliferation of roles in your system and the granularity of the permissions associated with them. As a recommendation, if you need to grant multiple roles to your users, you should consider using groups and assigning roles to these groups. This is a more natural permission model than using composite roles.
The way you model your system roles also has an impact on the size of tokens issued by Keycloak. Ideally, tokens should contain the minimum set of roles the client needs to authorize their users either locally or when accessing another service that consumes these tokens.
Tip
Keep in mind that the more roles your system has, the more complex it will become to maintain and manage.
In this topic, you learned about the main concepts when using RBAC in Keycloak. You also learned about some recommendations and considerations when using roles that may impact your applications in terms of maintainability and performance.
In the next topic, we will be looking at how Keycloak helps you to implement GBAC and recommendations when using it in applications.
Using GBAC
Keycloak allows you to manage groups for your realms, where users are put into groups to represent their relationship with a specific business unit in your organization (mapping your organization tree) or just group users together according to their role in your applications, as when you want to have a specific group for users that can perform administrative operations.
Usually, groups and roles are usually used interchangeably, and this causes some confusion when defining a permission model. In Keycloak, there is a clear separation between these two concepts where, different than roles, groups are meant to organize your users and to grant permissions according to the roles associated with a group.
By allowing assigning roles to groups, Keycloak makes it a lot easier to manage roles for multiple users without forcing you to grant and revoke roles for each individual user in your realm.
Groups in Keycloak are hierarchical, and when tokens are issued, you can traverse the hierarchy by looking at the path of the group. For instance, suppose you have a human resource group. As a child of this group, you have a manager group. When Keycloak is including information about groups into tokens, you should expect this information in the following format: /human resource/manager. This information should be available for every token issued by the server where the subject (the user) is a member of the group.
Different from roles, group information is not automatically included in tokens. For that, you should associate a specific protocol mapper with your client (or a client scope with the same mapper).
In the next sections, you will learn how to include group information about users into tokens.
Mapping group membership into tokens
Different from roles, there is no default protocol mapper that automatically includes group information in tokens. To do that, we need to create a protocol mapper to your client.
Tip
Alternatively, you can also create a client scope and assign it to any client in your realm.
Let's start by creating the myclient client:
- Client ID: myclient
Now, create a user in Keycloak:
- Username : alice
Navigate to the myclient settings and click on the Mappers tab. In this tab, click on the Create button to create a new mapper:
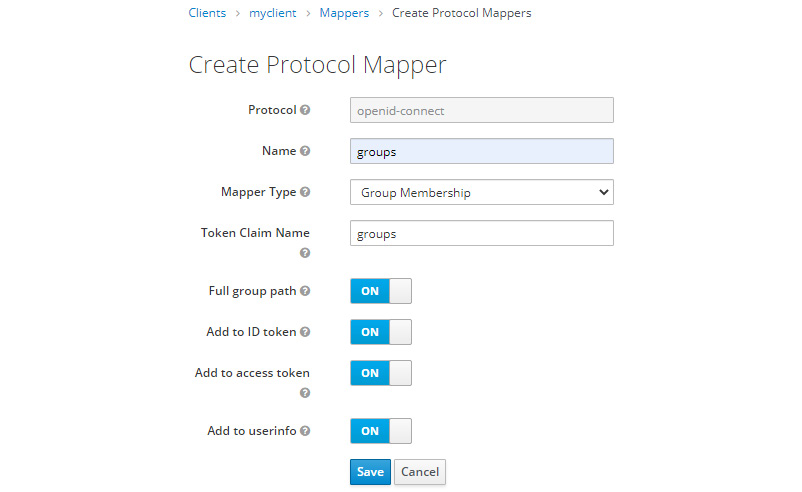
Figure 8.1 – Creating a group membership protocol mapper
On this page, create a new mapper with the following information:
- Name: groups
- Mapper Type: Group Membership
- Token Claim Name: groups
Now, click on the Save button to create the mapper. You should see the following:
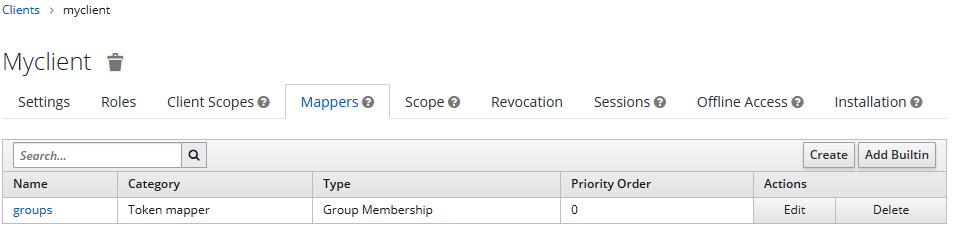
Figure 8.2 – Listing the mappers associated with a client
Let's now create a group for this user. For that, click on the Groups link in the left-hand menu:

Figure 8.3 – Listing groups
To create a new group, click on the New button:

Figure 8.4 – Creating a new group
Let's create a group named Project Management Office. Type this name in the Name field and then click on the Save button.
Now, let's add the alice user as a member of this group. For that, navigate to the alice user details page and click on the Groups tab:
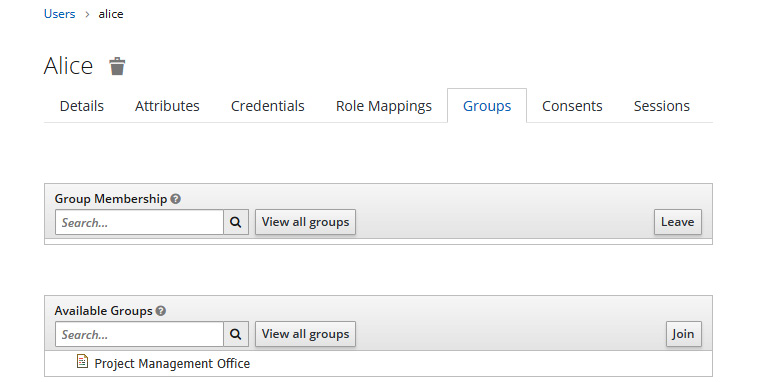
Figure 8.5 – Managing group membership for a user
From this page, you can look at the group hierarchy created for a realm and select the group that the user should be a member of. Let's choose the Project Management Office group from the Available Groups list and then click on the Join button to associate the user as a member of the group:
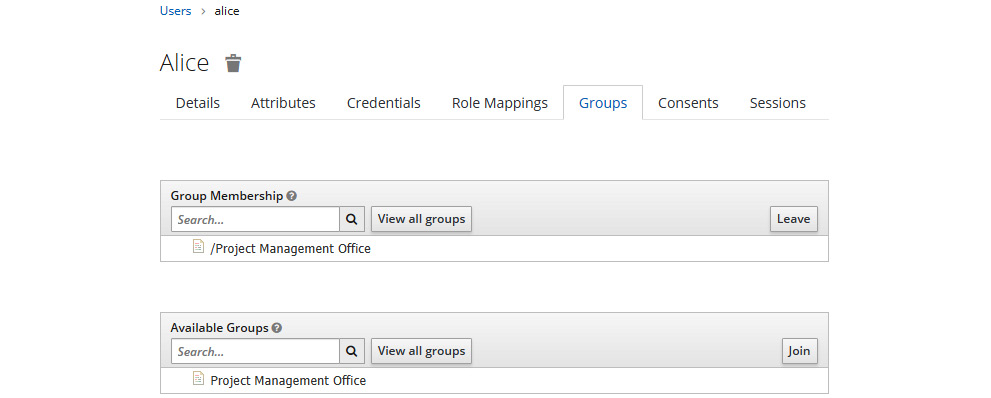
Figure 8.6 – Assigning users as a member of a group
The alice user is now a member of Project Management Office.
Let's now go back to the myclient details page and use the evaluation tool to see how group information will be added to tokens. Click on the Client Scopes tab. In this tab, click on the Evaluate sub-tab:
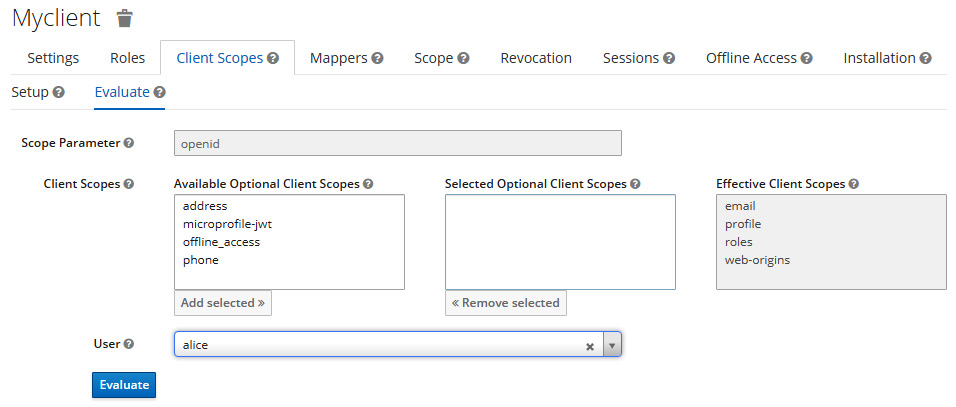
Figure 8.7 – Using the evaluation tool to check group information
Search for the alice user in the User field and then click Evaluate; once done, you should see the following:
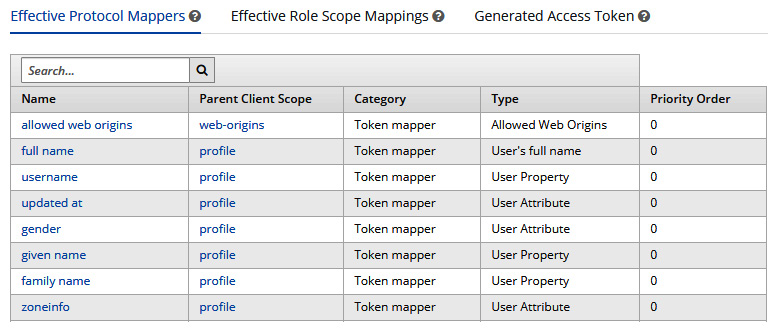
Figure 8.8 – Evaluation result
Click on the Generated Access Token tab at the bottom of the page to see if the generated token includes information about the groups that the user belongs to:
{
...
"groups": [
"/Project Management Office"
],
...
}
As you can see, the generated token now includes a groups claim with a list of groups the user is a member of. In this case, the user alice is a member of a single Project Management Office group.
In this section, you learned how to manage groups and how to make a user a member of a group. You also learned how to use a protocol mapper to include group information into tokens so that your application can use this information to enforce access control using the groups that a user belongs to.
In the next section, we are going to look at how your applications can use custom claims to enforce access to their resources.
Using OAuth2 scopes
At its core, Keycloak is an OAuth2 authorization server. In pure OAuth2, there are two main types of applications: clients and resource servers.
As you learned from previous chapters about OAuth2, access tokens are issued to clients so that they can act on behalf of a user, where these tokens are limited to a set of scopes based on the user consent.
On the other hand, resource servers are the consumers of access tokens, which they need to introspect to decide whether the client can access a protected resource on the resource server accordingly to the scopes granted by the user.
As you can see, authorization using OAuth2 scopes is solely based on user consent. It is the best strategy when you want third parties integrating with your APIs so that you delegate to your users the decision on whether a third-party application can access their resources. In this strategy, the main point is to protect user information rather than regular resources at the resource server. There is a fundamental difference between using OAuth2 scopes and the other authorization strategies you learned so far, mainly in terms of the entity you are protecting your system from. By using OAuth2 scopes, you are protecting your system from clients, whereas when using RBAC, for instance, you are protecting your system from users. In a nutshell, you are basically checking whether a client is allowed to perform some action or access a resource on behalf of the user, the usual delegation use case solved by OAuth2.
By default, clients in Keycloak are configured to not ask for user consent. The reason for that is that Keycloak is usually used in enterprise use cases. Different from the delegation use case, there is no need for user consent because clients are within the enterprise boundaries and the resources they need to access do not depend on any consent from users but on the permissions granted to them by a system administrator. Here, clients are more interested in authenticating users, where the scope of access is defined according to the roles, groups, or even specific attributes associated with a user.
In this topic, you learned about the concepts of authorizing access using OAuth2 scopes. You also learned that this authorization strategy is more suitable for allowing access from third parties to information about your users through your APIs.
In the next topic, we will look at how to authorize access based on claims mapped to tokens.
Using ABAC
When users authenticate through Keycloak, tokens issued by the server contain important information about the authentication context. Tokens contain information about the authenticated user and the client to which tokens were issued, as well as any other information that can be gathered during the authentication process. With that in mind, any information carried by a token can be used to authorize access to your applications. They are just claims mapped to tokens.
ABAC involves using the different attributes associated with an identity (represented by a token), as well as information about the authentication context, to enforce access to resources. It is probably the most flexible access control mechanism you can choose, with natural support for fine-grained authorization. Together with token-based authorization, applications using Keycloak can easily enable ABAC to protect their resources.
Token-based authorization is based on introspecting tokens and using the information there to decide whether access should be granted. This information is represented as a set of attributes, or claims, where their values can be used to enforce access.
Let's take as an example how roles are used to enforce access in your application. As you learned from the previous chapters and topics, roles are mapped to tokens using a specific set of claims. To enforce access using roles, your application only needs to use these claims to calculate what roles were granted to the user and then decide whether access should be granted to a particular resource.
This is no different from any other claim within a token, where your applications can use any claim and use it to enforce access. For each client, you can tailor what claims and assertions are stored in tokens. For that, Keycloak provides a functionality called protocol mappers. For more details, check out the Keycloak documentation at https://www.keycloak.org/docs/latest/server_admin/#_protocol-mappers.
In this topic, you learned about how to leverage claims mapped into tokens to perform ABAC. You also learned that Keycloak allows you to map any information you want to tokens so that they can be used to enforce access at the application level. Although ABAC is flexible enough to support multiple access control mechanisms, it is not easy to implement and manage.
In the next topic, we are going to look at how to leverage ABAC using Keycloak as a centralized authorization server.
Using Keycloak as a centralized authorization server
So far, you have been presented with authorization strategies that rely on a specific access control mechanism. Except for ABAC, these strategies rely on a specific set of data about the user to enforce access in applications. In addition to that, those strategies are tightly coupled with your applications, where changes to your security requirements would require changes in your application code.
As an example, suppose you have the following pseudo-code in your application:
If (User.hasRole("manager") {
// can access the protected resource
}
In the preceding code, we have a quite simple check using RBAC where only users granted a manager role can access a protected resource. What would happen if your requirements changed and you also needed to give access to that same resource to a specific user? Or even grant access to that resource for users granted some other role? Or perhaps leverage ABAC to look at the different information about the context where a resource is being accessed?
At the very least, you would need to change your code and re-deploy your application, not to mention going through your continuous integration and delivery process to make sure the change is ready for production.
Centralized authorization allows you to externalize access management and decisions from your applications using an external authorization service. It allows you to use multiple access control mechanisms without coupling your application to them, and enforce access using the same semantics used by your applications to refer to the different resources that should be protected.
Let's take a look at the following code, which provides the same access check as the previous example:
If (User.canAccess("Manager Resource") {
// can access the protected resource
}
As you can see from the preceding code snippet, there is no reference to a specific access control mechanism; access control is based on the resource you are protecting, and your application is only concerned with the permissions granted by an external authorization service. Changes to how Manager Resource can be accessed should not impact your application code, but changing the policies that govern access to that resource through the authorization service should.
Keycloak can act as a centralized authorization service through a functionality called Authorization Services. This functionality is based on a set of policies representing different access control mechanisms that you associate with the resources you want to protect. All this is managed through the Keycloak administration console and REST API.
The Keycloak Authorization Services functionality leverages ABAC to enable fine-grained authorization to your applications. By default, a set of policies representing different access control mechanisms are provided out of the box, with the possibility to aggregate these policies to easily support multiple authorization strategies when protecting resources. The Keycloak Authorization Services functionality also allows you to control access to specific actions and attributes associated with the resources you are protecting.
A common issue when using a centralized authorization server is the need for additional round trips to obtain access decisions. By leveraging token-based authorization, the Keycloak Authorization Services functionality allows you to overcome this issue by issuing tokens with all the permissions granted by the server, so that applications consuming these tokens do not need to perform additional network calls but introspect the token locally. It also supports incremental authorization, where tokens are issued a narrow set of permissions with the possibility to obtain new permissions as needed.
For more details about Keycloak Authorization Services, check the documentation at https://www.keycloak.org/docs/latest/authorization_services/.
In this section, you learned about centralized authorization and that Keycloak Authorization Services can be used to implement this form of authorization. You also learned that together with token-based authorization, Keycloak Authorization Services helps applications to enable fine-grained authorization to applications.
Summary
In this chapter, you learned about the different strategies you can choose from to authorize access to protected resources in your applications. By leveraging token-based authorization, applications should be able to introspect tokens – either locally or through the introspection endpoint – and use their claims to support different access control mechanisms such as RBAC, GBAC, and ABAC, or use the scopes granted by users to the client application acting on their behalf. You also learned that Keycloak can be used as a centralized authorization service to decouple authorization from applications, where access decisions are taken by Keycloak based on the resources and policies managed through the server.
In the next chapter, we are going to look at the main steps for running Keycloak in production.
Questions
- How do you prevent tokens from becoming too big while still providing the necessary data to enforce access to resources at the application level?
- How do you decide whether a role should be a realm or client role?
- Is it possible to enforce access based on information gathered during authentication?
- Is it possible to change how Keycloak maps roles into tokens?
- Are those strategies mutually exclusive?
Further reading
For more information on the topics covered in this chapter, refer to the following links:
- Keycloak roles: https://www.keycloak.org/docs/latest/server_admin/#roles
- Keycloak groups: https://www.keycloak.org/docs/latest/server_admin/#groups
- Keycloak protocol mappers: https://www.keycloak.org/docs/latest/server_admin/#_protocol-mappers
- Keycloak client scopes: https://www.keycloak.org/docs/latest/server_admin/#_client_scopes
- Keycloak Authorization Services: https://www.keycloak.org/docs/latest/authorization_services