
Chapter 9: Configuring Keycloak for Production
So far, you have learned how to use Keycloak, the key concepts, and how to start using it to secure your applications. In this chapter, you will be creating a pre-production Keycloak cluster to understand all the different aspects and steps when configuring it for production, such as if you were deploying it in bare metal or in a VM.
You should consider the same configuration aspects when running Keycloak as a container. Although, in this case, most of the configuration is done transparently by the container image, the concepts from this chapter are still useful to understand how containers are configured and what you should consider when deploying Keycloak on OpenShift or Kubernetes.
In the next sections, you will be introduced to each of these aspects and how they fit into a real production deployment of Keycloak. At the end of this chapter, you should be able to apply the same steps and recommendations provided herein to deploy Keycloak into your own production environment using a high-availability profile, and considering different non-functional aspects such as availability, performance, and failover.
For that, we will be covering the following topics:
- Setting the hostname for Keycloak
- Enabling TLS
- Configuring a database
- Enabling clustering
- Configuring a reverse proxy
- Testing your environment
Technical requirements
For this chapter, you need to have a local copy of the GitHub repository associated with the book. If you have Git installed, you can clone the repository by running this command in a terminal:
$ cd $KC_HOME
$ git clone https://github.com/PacktPublishing/Keycloak-Identity-and-Access-Management-for-Modern-Applications.git
Alternatively, you can download a ZIP of the repository from the following URL:
https://github.com/PacktPublishing/Keycloak-Identity-and-Access-Management-for-Modern-Applications/archive/master.zip
Note
Make sure to either clone or extract the repository into the Keycloak distribution directory.
To configure a reverse proxy, we are going to use a local domain name other than localhost. This domain name will be used as the public domain name where Keycloak is exposed for your users and applications.
If you are using Linux, you should be able to do that by changing your /etc/hosts file and including the following line:
127.0.0.1 mykeycloak
We are also going to need to run some CLI scripts to configure the server. For that, we are going to run the jboss-cli.sh script. This script is located in the bin directory of the Keycloak installation and can be executed as follows:
$ cd $KC_HOME
$ bin/jboss-cli.sh
Lastly, we are going to use HAProxy as a reverse proxy in front of multiple Keycloak instances. If you are using CentOS or Fedora Linux, you should be able to install HAProxy as follows:
$ sudo dnf -y install haproxy
Check out the following link to see the Code in Action video:
Setting the hostname for Keycloak
Keycloak exposes different endpoints to talk with applications as well as to allow managing the server itself. These endpoints can be categorized into three main groups:
- Frontend
- Backend
- Administration
The base URL for each group has an important impact on how tokens are issued and validated, on how links are created for actions that require the user to be redirected to Keycloak (for example, when resetting passwords through email links), and, most importantly, how applications will discover these endpoints when fetching the OpenID Connect Discovery document from /auth/realms/{realm-name}/.well-known/openid-configuration.
In the next topics, we will be looking into each of these groups, how to define a base URL for each one, and the impact it has on users and applications using Keycloak.
Setting the frontend URL
The frontend URL is used to infer the URL used by users and applications to access Keycloak, where the main goal is to logically group all instances of Keycloak in a cluster under a single domain and issuer using a public domain name.
Examples of endpoints in the frontend group include the following:
- An authorization endpoint
- A logout endpoint and others related to session management
By default, Keycloak infers the frontend URL from incoming requests. For example, if you have two Keycloak instances, each one listening on http://10.0.0.5/auth and http://10.0.0.6/auth, Keycloak is going to issue tokens and create links for actions depending on the URL of the instance that is processing the request.
There are several reasons why this default behavior does not work in a production environment.
The most important one is related to the issuer claim in tokens and documents issued by Keycloak. The different instances should be grouped under a single issuer name, otherwise, users and clients will not be able to use them interchangeably because tokens and cookies set by Keycloak will be only valid on the instance where they were created.
Another important aspect is that instances are usually running in a private network. Without setting the frontend URL to match the public domain where Keycloak is exposed, links that redirect users back to Keycloak will be broken, and clients might not be able to make requests based on the endpoints exposed through the OpenID discovery document.
Last but not least, without a frontend URL set, all the benefits you will get from a reverse proxy and clustering are lost.
The expected behavior, however, is that regardless of the node processing the request, the base URL should be the same and aligned with the public domain name where Keycloak is being exposed. By doing that, instances are going to work as if they were one so that users and applications can benefit from all the improvements we will cover later to the general availability, performance, scalability, and failover aspects of Keycloak.
Let's set a frontend URL by running the following CLI script available from the GitHub repository of the book at Keycloak-Identity-and-Access-Management-for-Modern-Applications/ch9/configure-hostname.cli:
embed-server --server-config=standalone-ha.xml --std-out=discard
/subsystem=keycloak-server/spi=hostname/provider=default:write-attribute(name=properties.frontendUrl,value=https://mykeycloak/auth)
stop-embedded-server
To run the script execute the following command:
$ cd $KC_HOME
$ bin/jboss-cli.sh --file=./Keycloak-Identity-and-Access-Management-for-Modern-Applications/ch9/configure-hostname.cli
By setting the frontendUrl property, as shown previously, you are explicitly saying that any Keycloak instance should advertise its endpoints and issue tokens using the https://mykeycloak/auth base URL.
In this section, you learned that setting frontendUrl allows you to define the base URL where Keycloak is publicly accessible. You also learned that setting this configuration is crucial to group all instances of Keycloak under a single and logical domain and issuer.
In the next topic, we will be looking at how to configure the URL for backend endpoints.
Setting the backend URL
The backend endpoints are those related to direct communication between Keycloak and applications.
Examples of endpoints in the backend group include the following:
- Token introspection
- User info
- Token endpoint
- JWKS
By default, the backend base URL is also calculated based on the request URL. Usually, you want this URL to be based on a public domain name, so that applications can reach Keycloak from outside its internal network. For that, we configure Keycloak to use the frontend URL as the base URL for backend endpoints.
If you look at the Keycloak-Identity-and-Access-Management-for-Modern-Applications/ch9/configure-hostname.cli file, you should see the following configuration:
/subsystem=keycloak-server/spi=hostname/provider=default:write-attribute(name=properties.forceBackendUrlToFrontendUrl, value=true)
When the forceBackendUrlToFrontendUrl property is set, Keycloak will advertise backend endpoints using whatever you defined as a frontend URL, thus giving applications an accessible URL and not something else based on the internal hostname used by Keycloak.
In this topic, you learned how to configure the base URL for backend endpoints and how they influence applications when they need to talk directly to Keycloak using the backend endpoints.
In the next topic, you will learn how to set the base URL for the administration endpoints.
Setting the admin URL
You usually do not want to make the Keycloak Administration Console publicly available. For that, you can set the adminUrl property to force Keycloak to use a specific, private URL:
/subsystem=keycloak-server/spi=hostname/provider=default:write-attribute(name=properties.adminUrl, value=https://myprivatekeycloak/auth)
By setting the adminUrl property, any URL used by the Admin Console will be based on the value you provided. That said, links and static resources used to render the console will only be accessible using the URL you defined.
Although it makes it difficult to access the console from a network that cannot resolve the domain name or reach the server, you still want to enforce specific rules in your reverse proxy so that the /auth/admin path is fully protected.
In the next topic, we will be looking at how to enable TLS so that Keycloak is only accessible through a secure channel.
Enabling TLS
Any request to and from Keycloak should be done through a secure channel. For that, you must enable HTTP over TLS, also known as HTTPS. In a nutshell, you should never expose Keycloak endpoints through HTTP.
Keycloak exchanges sensitive data all the time with user agents and applications. Enabling HTTPS is crucial to prevent several forms of attacks, as well as to benefit from different forms of authentication that rely on a TLS session established with the server.
Tip
The current best practice is to select a key size of at least 2,048 bits. In terms of protocol, Keycloak advertises the most secure protocols, such as TLS v1.2 and TLS v1.3. You should also be able to restrict the list of protocols to only advertise those you want.
The first step to enable HTTPS is to create or reuse a Java KeyStore where the server's private key and certificates are stored. If you are planning to deploy Keycloak in production, you probably have all the key material to enable TLS, as well as your certificates signed by a trusted Certificate Authority (CA).
The next step is to configure the HTTPS listener to use the key material from your Java KeyStore. For that, look at the following script available from the GitHub repository of the book at Keycloak-Identity-and-Access-Management-for-Modern-Applications/ch9/configure-https.cli:
embed-server --server-config=standalone-ha.xml --std-out=discard
/subsystem=elytron/key-store=kcKeyStore:add(path=${jboss.home.dir}/Keycloak-Identity-and-Access-Management-for-Modern-Applications/ch9/mykeycloak.keystore,type=JKS,credential-reference={clear-text=password})
/subsystem=elytron/key-manager=kcKeyManager:add(key-store=kcKeyStore,credential-reference={clear-text=password})
/subsystem=elytron/server-ssl-context=kcSSLContext:add(key-manager=kcKeyManager)
batch
/subsystem=undertow/server=default-server/https-listener=https:undefine-attribute(name=security-realm)
/subsystem=undertow/server=default-server/https-listener=https:write-attribute(name=ssl-context,value=kcSSLContext)
run-batch
stop-embedded-server
In this file, we are using a Java KeyStore available from the GitHub repository of the book at $KC_HOME/Keycloak-Identity-and-Access-Management-for-Modern-Applications/ch9/mykeycloak.keystore. This KeyStore was built for example purposes using a self-signed certificate and you should not use it in production. Instead, you should replace it with a KeyStore using your own private key and certificate.
Then run the jboss-cli.sh tool to apply the configuration:
$ cd $KC_HOME
$ bin/jboss-cli.sh --file=./Keycloak-Identity-and-Access-Management-for-Modern-Applications/ch9/configure-https.cli
Now, let's start Keycloak by running the following command:
$ cd $KC_HOME
bin/standalone.sh -c standalone-ha.xml
If everything is OK, you should be able to access Keycloak at https://localhost:8443, and you should be able to see that the certificate being used comes from your Java KeyStore.
In addition to enabling HTTPS, Keycloak also allows you to define TLS constraints on a per-realm basis. Basically, for each realm, you can set whether Keycloak should require HTTPS for incoming requests:

Figure 9.1 – Enforcing HTTPS on a per-realm basis
By default, Keycloak is going to enforce TLS for any external requests. That means clients using the public network can only access Keycloak through HTTPS.
Ideally, you should set the Require SSL setting to all requests, so that any request to Keycloak is guaranteed to be using a secure protocol.
In this topic, you learned how to enable HTTPS and the importance of doing so. You also learned that Keycloak allows you to define HTTPS constraints on a per-realm basis.
In the next topic, we will be looking at how to configure a production-grade database.
Configuring a database
Keycloak relies on a single database to store all its data. Even when running multiple instances of Keycloak, all of them will be talking to the same database. A database is crucial for the overall performance, availability, scalability, reliability, and integrity of Keycloak. Although Keycloak provides a cache layer to avoid database hits as much as possible, a good database will help to make the system behave better when data needs to be loaded from the database.
By default, Keycloak is configured with a very simple H2 database that should not be used in production, by any means. Instead, you should configure a more robust database such as the following:
- MariaDB 10.1.19
- MariaDB Galera 10.1.19
- MySQL 8.0
- Oracle 19c RAC
- Microsoft SQL Server 2017
- PostgreSQL 11.5
The preceding list is the official list of supported databases and their versions.
Note
At the time this book was written, the Keycloak version was 13.0.0. The list of supported databases might change in future versions.
In this topic, you are going to configure a PostgreSQL database. The same steps should work for any other database you choose.
To configure a database, a few steps are needed:
- Installing a module on the Keycloak server with the Java Database Connectivity (JDBC) driver for the database
- Configuring the JDBC driver so that it can be used by Keycloak
- Configuring Keycloak to connect to the database using a valid URL, username, and password
We are going to perform all the preceding steps using the following script available from the GitHub repository of the book at Keycloak-Identity-and-Access-Management-for-Modern-Applications/ch9/configure-database.cli:
embed-server --server-config=standalone-ha.xml --std-out=discard
module add --name=org.postgres --resources=<PATH_TO_JDBC_DRIVER_JAR> --dependencies=javax.api,javax.transaction.api
/subsystem=datasources/jdbc-driver=postgres:add(driver-name=postgres, driver-module-name=org.postgres, xa-datasource-class=org.postgresql.xa.PGXADataSource)
/subsystem=datasources/data-source=KeycloakDS:write-attribute(name=connection-url,value=<JDBC_URL>)
/subsystem=datasources/data-source=KeycloakDS:write-attribute(name=driver-name, value=postgres)
/subsystem=datasources/data-source=KeycloakDS:write-attribute(name=user-name, value=<USERNAME>)
/subsystem=datasources/data-source=KeycloakDS:write-attribute(name=password,value=<PASSWORD>)
stop-embedded-server
In this file, you should replace the following references with their real values:
- PATH_TO_JDBC_DRIVER_JAR should be replaced with the absolute path where the JDBC driver JAR file is located.
- JDBC_URL should be replaced with the URL that should be used to connect to the database. For instance, jdbc:postgresql://mypostgresql/keycloak.
- USERNAME should be replaced with the username that will be used to connect to the database.
- PASSWORD should be replaced with the password of the user connecting to the database.
Then run the jboss-cli.sh tool to apply the configuration:
$ cd $KC_HOME
$ bin/jboss-cli.sh --file=./Keycloak-Identity-and-Access-Management-for-Modern-Applications/ch9/configure-database.cli
If everything is OK, the next time you start the server you should connect to the database you have configured.
In addition to these basic settings to connect to an external database, there are other settings you should consider before going to production. Probably one of the most important ones, the size of the connection pool should be sized according to the load you expect in your system, and how many concurrent requests should be allowed at a given point in time.
By default, the pool is configured with a max of 20 connections. This value should be enough for most deployments, but if you are facing errors in logs due to connections not available in the pool when under an unexpected load, you may change the pool size by running the following CLI command:
/subsystem=datasources/data-source=KeycloakDS:write-attribute(name=max-pool-size, value=30)
/subsystem=datasources/data-source=KeycloakDS:write-attribute(name=min-pool-size, value=30)
In the preceding example, we are increasing the pool size to a maximum (max-pool-size) of 30 connections. We are also defining the minimum size (min-pool-size) with the same value. The reason for that is that creating new connections is expensive and keeping a minimum value of 30 connections helps to make sure connections are always available during the server's lifetime.
In this section, you learned about the basic steps to configure a production-grade database in Keycloak. You also learned about the different databases you can use based on the list of supported databases.
In the next section, you will learn about how to configure Keycloak for high availability, starting with the necessary configuration to configure a reverse proxy or load balancer.
Enabling clustering
Most of the time, you will be running a Keycloak cluster when going for production. To respect some key non-functional aspects, as well as the Service-Level Agreements (SLAs) defined for your services, enabling clustering is crucial.
In terms of availability, clustering allows you to run multiple Keycloak instances, possibly in different availability zones, so that uptime is not impacted if nodes go down.
From a scalability perspective, clustering allows you to scale your nodes up and down according to the load on your system, helping to keep a consistent response time and throughput.
In terms of failover, a cluster helps you to survive failures when nodes are failing, therefore preventing data loss (mainly that kept in caches) as well as avoiding impacts on general availability.
Keycloak is designed for high availability, where, in addition to the persistent data kept in the database, it also uses a cache layer to replicate and keep state in-memory for fast data access. This cache layer is built on top of Infinispan, a high-performance key-value in-memory data store.
To enable clustering and full high availability, you should do the following:
- Run the server using a high-availability configuration profile.
- Make sure the reverse proxy is configured to distribute load across the different instances.
Let's start by understanding the different configuration profiles that Keycloak provides. Consider that you run the server as follows:
$ cd $KC_HOME
$ bin/standalone.sh
Keycloak is going to run using a specific configuration profile defined in the $KC_HOME/standalone/conf/standalone.xml file. The standalone.xml file is a configuration profile that is targeted for running a single Keycloak instance. Useful for testing and development purposes, but not for production.
On the other hand, there is an additional configuration profile defined in the $KC_HOME/standalone/conf/standalone-ha.xml file. This file is targeted for running Keycloak for high availability, where clustering is enabled by default.
To run multiple Keycloak instances and build a cluster, you basically need to run the server as follows:
$ cd $KC_HOME
$ bin/standalone.sh -c standalone-ha.xml -Djboss.node.name=kc1
Note
Note that we are also setting the jboss.node.name system property. This property sets the name of the instance in the cluster and it must be unique across all instances. If not set, the name will be inferred from the host where the instance is running. As we are going to run multiple instances within the same host, we must set this property for each instance.
This command will start the first instance in our cluster. The server will be listening on the default ports and you should be able to access it at http://localhost:8443.
Let's now start a second instance by specifying a different port offset using the jboss.socket.binding.port-offset system property. This property is going to allow us to run the second instance within the same host without conflicting with the first instance that is listening on the default ports. This is achieved by increasing by 100 the number of each port used by Keycloak so that instead of listening on the default HTTPS 8443 port, the server will be available at http://localhost:8543/auth:
$ cd $KC_HOME
$ bin/standalone.sh -Djboss.socket.binding.port-offset=100 -c standalone-ha.xml -Djboss.node.name=kc2
Now, perform the same steps to start the third node as follows:
$ cd $KC_HOME
$ bin/standalone.sh -Djboss.socket.binding.port-offset=200 -c standalone-ha.xml -Djboss.node.name=kc3
After executing this last command, you should now have three Keycloak instances running on ports 8443, 8543, and 8643, respectively.
Note
In production, you do not need to use the jboss.socket.binding.port-offset system property because instances will run either on different hosts or, if using containers, in separate containers.
Keycloak relies on specific caches for failover where state is shared across the different nodes in the cluster. One important configuration you should consider when enabling clustering is to configure how many replicas you need in your cluster and adjust it according to your failover requirements.
By looking at the $KC_HOME/standalone/configuration/standalone-ha.xml file, you should see the following cache definitions:
<distributed-cache name="sessions" owners="1"/>
<distributed-cache name="authenticationSessions" owners="1"/>
<distributed-cache name="clientSessions" owners="1"/>
<distributed-cache name="actionTokens" owners="2">
<object-memory size="-1"/>
<expiration interval="300000" max-idle="-1"/>
</distributed-cache>
Depending on your availability and failover requirements, you might want to increase the number of owners – the nodes where state is replicated – to at least 2 so that state is replicated to 2 nodes in the cluster. By increasing the number of owners, Keycloak can survive up to 1 node failure without losing any state.
Let's change the number of owners for each of those caches by running the configure-caches.cli script available from the GitHub repository of the book at $KC_HOME/Keycloak-Identity-and-Access-Management-for-Modern-Applications/ch9/configure-caches.cli:
$ cd $KC_HOME
$ bin/jboss-cli.sh --file=./Keycloak-Identity-and-Access-Management-for-Modern-Applications/ch9/configure-caches.cli
Tip
The number of owners has a direct impact on the overall performance of Keycloak in terms of network and CPU. As you add more owners, you should expect additional overhead to replicate state across nodes. You should take this into account when defining the number of owners to balance both performance and failover aspects of your deployment.
Another important characteristic of clustering is how Keycloak caches realms data to avoid unnecessary roundtrips to the database, therefore increasing the overall performance of the server. By looking at the $KC_HOME/standalone/configuration/standalone-ha.xml file, you should see the following cache definitions:
<local-cache name="realms">
<heap-memory size="10000"/>
</local-cache>
<local-cache name="users">
<heap-memory size="10000"/>
</local-cache>
Differently than the previous caches, the realms and users caches are local caches and their entries are not replicated but only kept in-memory on each node in the cluster. The realms cache is responsible for caching any kind of realm data such as clients, groups, roles, identity providers, and authentication flows. On the other hand, the users cache is responsible for caching any kind of user data such as credentials, attributes, and role and group mappings.
By default, Keycloak defines a maximum size of 10,000 entries for both caches. For most deployments, this limit should be enough to completely avoid roundtrips to the database when caches are hot without allocating too much memory. But depending on how much data you have in Keycloak, you might want to adjust this limit accordingly.
For more details about the cache configuration, look the Server Cache Configuration documentation available at https://www.keycloak.org/docs/latest/server_installation/#cache-configuration.
In this topic, you learned about the basic steps to enable clustering, where these instances will communicate with each other to share state and work together as if you were running a single instance. You also learned about the importance of clustering in terms of availability and scalability.
In the next topic, you will learn about the main configuration aspects when setting up a reverse proxy in front of a Keycloak cluster so that users can access your cluster through a public domain name.
Configuring a reverse proxy
When running in production, a reverse proxy is a key component to enable high availability. A reverse proxy provides a single and public access point for the different Keycloak instances, distributing the load across them using a set of policies. These instances are usually running in a private network so that they are only reachable through the proxy.
By distributing the load across instances, a reverse proxy helps you to scale your deployment by adding or removing more instances as needed, as well as helping to survive failures when specific nodes are failing to serve requests.
Keycloak can be used with any reverse proxy implementation so you are free to use whatever you are comfortable with. Examples of widely used reverse proxies are Apache HTTP Server, Nginx, F5, and HAProxy.
Regardless of your preference, there is a set of basic requirements that you should be aware of to use your choice with Keycloak:
- TLS termination and re-encryption
- Load balancing
- Session affinity
- Forwarding headers
Some of these requirements are intrinsic to the concept of a reverse proxy and are supported by the different implementations.
Before moving on to the next topics, make sure to update your HAProxy installation with the haproxy.cfg file available from your local copy of the GitHub repository associated with the book at $KC_HOME/Keycloak-Identity-and-Access-Management-for-Modern-Applications/ch9/haproxy.cfg:
$ cd $KC_HOME
$ sudo cp Keycloak-Identity-and-Access-Management-for-Modern-Applications/ch9/haproxy.cfg /etc/haproxy/haproxy.cfg
$ sudo cp Keycloak-Identity-and-Access-Management-for-Modern-Applications/ch9/haproxy.crt.pem /etc/haproxy
In the next topics, we will be looking at each of the requirements mentioned herein and how to address them using HAProxy.
Distributing the load across nodes
One of the first things you usually do when configuring a reverse proxy is to configure the backend nodes that are going to serve requests from clients. That is one of the main problems solved by reverse proxies. Despite the implementation you choose, you should be able to configure load balancing so that requests are distributed across these nodes using a specific algorithm for optimal throughput, response time, and failover.
Load balancing does not require any specific configuration on the Keycloak side. But here are some things to keep in mind when configuring it:
- The number of backend nodes should respect the expected load, availability, and failover scenarios.
- There are several algorithms that you can choose from to distribute the load across nodes. You should choose what works best for you after running some load tests to make sure you can achieve the desired goals in terms of response time and throughput.
In our HAProxy configuration, the configuration related to load balancing is the following:
balance roundrobin
server kc1 127.0.0.1:8443 check ssl verify none cookie kc1
server kc2 127.0.0.1:8543 check ssl verify none cookie kc2
server kc3 127.0.0.1:8643 check ssl verify none cookie kc3
In this configuration, we are defining three Keycloak instances as backend nodes as well as using roundrobin to distribute the requests across these nodes. We are also using HAProxy to re-encrypt connections to the backend nodes.
Note
You might want to configure your proxy for TLS termination, in this case the communication with Keycloak does not need to be re-encrypted but in plain text using HTTP. While this might be useful to offload the task of performing TLS encryption from Keycloak and save some CPU, or perhaps for real-time analysis of the traffic to Keycloak, depending on your requirements you might need end-to-end encryption as well as have a different certificate for clients accessing the proxy. Keycloak can work with any TLS configuration you set to your proxy.
In this topic, you learned about the importance of load balancing and how it affects your deployment in terms of performance, availability, and failover.
In the next topic, we will be looking at how to configure your proxy to forward information about clients connecting to Keycloak.
Forwarding client information
When running behind a reverse proxy, Keycloak does not talk directly to the client that originated the request, but rather to the reverse proxy itself. This fact has an important consequence for how Keycloak obtains information about the client, such as the IP address.
To overcome this limitation, reverse proxies should be able to forward specific headers to provide Keycloak information about the client where the request originated from. The main headers Keycloak requires from proxies are the following:
- X-Forward-For: A header indicating the address of the client where the request originated from
- X-Forward-Proto: A header indicating the protocol (for example, HTTPS) that the client is using to communicate with the proxy
- Host: A header indicating the host and port number of the proxy
Tip
Special care should be taken when making sure the proxy is setting all these headers properly, and not just forwarding these headers to Keycloak if they are sent by clients.
On Keycloak, the configuration you need to integrate with a proxy is quite simple. Basically, you need to tell Keycloak that it should infer client and request information based on the headers we just discussed. For that, look at the configure-proxy.cli file available from your local copy of the GitHub repository associated with the book at $KC_HOME/Keycloak-Identity-and-Access-Management-for-Modern-Applications/ch9/configure-proxy.cli:
embed-server --server-config=standalone-ha.xml --std-out=discard
/subsystem=undertow/server=default-server/https-listener=https: write-attribute(name=proxy-address-forwarding, value=true)
stop-embedded-server
Then run the jboss-cli.sh tool to apply the configuration:
$ cd $KC_HOME
$ bin/jboss-cli.sh --file=./Keycloak-Identity-and-Access-Management-for-Modern-Applications/ch9/configure-proxy.cli
After running the preceding CLI command, Keycloak is ready to respect the information provided by the proxy through the mentioned headers.
On the reverse proxy side, we have the following configuration defined:
option forwardfor
http-request add-header X-Forwarded-Proto https
http-request add-header X-Forwarded-Port 443
This configuration will make sure that HAProxy sets the mentioned headers so that Keycloak can obtain information about clients making the requests.
In this section, you learned about the importance of configuring your proxy to forward client information to Keycloak through specific HTTP headers. You also learned how to configure Keycloak to respect these headers and use this information when processing requests.
In the next section, we will be looking at the importance of session affinity and its impact on the overall performance of Keycloak.
Keeping session affinity
Another important configuration you should consider is how the proxy is going to respect session affinity. Session affinity is about the proxy using the same backend node to serve requests to a particular client. This capability is especially useful when clients are using flows that require multiple interactions with Keycloak, such as when using the user agent to authenticate users through the authentication code flow.
As you learned in the Enabling clustering section, Keycloak tracks state about user and client interactions with the server. This state is kept in in-memory caches and shared across different nodes in the cluster. Session affinity helps to minimize the time taken by Keycloak to look up data on these caches, where clients connecting to these nodes do not need to look up data on other nodes in the cluster.
To configure session affinity, look at the configure-session-affinity.cli file available from your local copy of the GitHub repository associated with the book at $KC_HOME/Keycloak-Identity-and-Access-Management-for-Modern-Applications/ch9/configure-session-affinity.cli:
embed-server --server-config=standalone-ha.xml --std-out=discard
/subsystem=keycloak-server/spi=stickySessionEncoder:add
/subsystem=keycloak-server/spi=stickySessionEncoder/provider=infinispan:add(enabled=true, properties={shouldAttachRoute=false})
stop-embedded-server
Then run the jboss-cli.sh tool to apply the configuration:
$ cd $KC_HOME
$ bin/jboss-cli.sh --file=./Keycloak-Identity-and-Access-Management-for-Modern-Applications/ch9/configure-session-affinity.cli
By doing that, Keycloak is going to rely on the proxy to keep session affinity between clients and backend nodes.
Note
By default, Keycloak uses a different strategy for session affinity, indicating to the proxy the node to which a client should be tied. We recommend, though, to always rely on the session affinity provided by your proxy and set the shouldAttachRoute property to false.
Session affinity has a direct impact on the overall performance. As mentioned before, state is shared across the different nodes in the cluster, so keeping a client connected to a specific backend node is crucial to avoid additional network and CPU overhead.
Now, on the reverse proxy side, we have the following configuration to guarantee that clients are tied to a specific node:
cookie KC_ROUTE insert indirect nocache
With the preceding configuration, HAProxy is going to set a KC_ROUTE cookie where its value is the first node that the client made the request to. Subsequent requests from the same client will always be served by the same node.
In this topic, you learned about session affinity and the importance of configuring it properly in your proxy as well as in Keycloak.
In the next section, we are going to run some basic tests to make sure the configuration we've done so far is working as expected.
Testing your environment
If you are here, you should have a local environment very close to what will become your production environment.
In the previous topics in this chapter, we have covered the following:
- Setting up Keycloak to use a public domain name for frontend and backend endpoints, as well as logically grouping the different Keycloak instances under a single issuer
- Setting up Keycloak to listen on HTTPS so that all traffic to and from Keycloak is secure
- Setting up Keycloak to use a production-grade database using PostgreSQL
- Setting up clustering so that multiple instances of Keycloak can share the state kept by their caches
- Setting up a reverse proxy, using HAProxy, so that we can finally access all Keycloak instances through a single public domain name
In the following topics, you are going to perform some basic tests on the environment to make sure everything is working as expected.
Before we begin, make sure HAProxy is started by running the following command:
$ sudo systemctl restart haproxy
Testing load balancing and failover
Firstly, try to access Keycloak at https://mykeycloak and log in to the administration console.
Depending on the browser you are using, you should be able to see which backend node is serving your requests. In Firefox, you can open the development tools and look at the cookies sent by your browser when making requests to Keycloak:
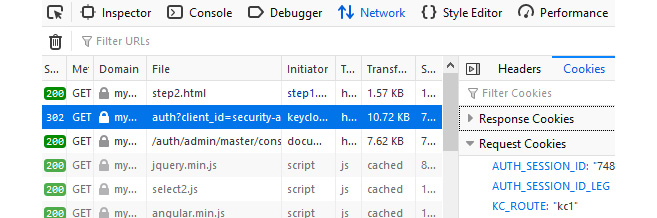
Figure 9.3 – Looking at the cookies sent by the browser
Your browser should be sending a KC_ROUTE cookie where its value is the node chosen by the reverse proxy to indicate which Keycloak instance should be serving that request. From the preceding screenshot, requests should be forwarded to kc1.
Now, try to shut down the Keycloak instance that was started using the jboss.node.name system property set to kc1. If you see a different value for the KC_ROUTE cookie, you need to shut down the corresponding node.
After shutting down the node, try to refresh the administration console page. If everything is properly configured, you should still be able to access the administration console without having to authenticate again. That is only possible due to teamwork between both the reverse proxy and Keycloak, where Keycloak makes sure data is replicated across instances, and the reverse proxy is able to transparently forward requests to another node.
Testing the frontend and backchannel URLs
Lastly, let's check the OpenID Discovery document and look at how Keycloak is exposing its endpoints. For that, open Keycloak at https://mykeycloak/auth/realms/master/.well-known/openid-configuration. As a result, you get a JSON document as follows:

Figure 9.4 – The OpenID Discovery document
If everything is set correctly, you should see that, regardless of the node serving the request, Keycloak will advertise all its endpoints using the https://mykeycloak/auth base URL.
Summary
In this chapter, we covered the main steps to configure Keycloak for production. With the information provided herein, you should now be aware of the main steps and configuration to successfully deploy Keycloak for high availability. You learned that when deploying Keycloak in production, you should always use a secure channel using HTTPS, as well as the importance of setting up the hostname provider to configure how Keycloak issues tokens and exposes its endpoints through the OpenID Connect Discovery document. You also learned about the importance of using a production-grade database and its impact on the overall performance and availability of Keycloak, as well as on data consistency and integrity. Lastly, you learned how to configure and run a cluster with multiple Keycloak instances and how to use a reverse proxy to distribute load across these instances.
In the next chapter, you will learn how to manage users in Keycloak, as well as integrating Keycloak with different identity stores.
Questions
- Is the database a single point of failure?
- Does the default clustering configuration work in whatever platform I choose to deploy Keycloak?
- What is the best way to deploy Keycloak in Kubernetes or OpenShift?
- How secure is the communication between nodes in a cluster?
- Do I need HTTPS when making requests from the reverse proxy?
- Keycloak nodes have a high CPU usage, is that normal?
- How much memory does Keycloak need?
- Is there a tool to perform load tests?
Further reading
For more information on the topics covered in this chapter, refer to the following links:
- Keycloak clustering documentation: https://www.keycloak.org/docs/latest/server_installation/#_clustering
- Keycloak proxy configuration: https://www.keycloak.org/docs/latest/server_installation/#_setting-up-a-load-balancer-or-proxy
- HAProxy documentation: https://www.haproxy.org/
- Keycloak Hostname documentation: https://www.keycloak.org/docs/latest/server_installation/#_hostname
- Keycloak Network documentation: https://www.keycloak.org/docs/latest/server_installation/#_network
- Keycloak Database documentation: https://www.keycloak.org/docs/latest/server_installation/#_database
- Keycloak Operator documentation: https://www.keycloak.org/docs/latest/server_installation/#_operator
- WildFly SSL/TLS documentation: https://docs.wildfly.org/22/WildFly_Elytron_Security.html#configure-ssltls