Chapter 5. Continuous Integration, Testing, and Deployment
In this chapter, we look at the key concepts of how to integrate a continuous integration/continuous deployment (CI/CD) pipeline to deliver your applications to Kubernetes. Building a well-integrated pipeline will enable you to deliver applications to production with confidence, so here we look at the methods, tools, and processes to enable CI/CD in your environment. The goal of CI/CD is to have a fully automated process, from a developer checking in code to rolling out the new code to production. You want to avoid manually rolling out updates to your apps deployed to Kubernetes because it can be very error prone. Manually managing application updates in Kubernetes leads to configuration drift and fragile deployment updates, and overall agility delivering an application is lost.
We cover the following topics in this chapter:
-
Version control
-
CI
-
Testing
-
Tagging images
-
CD
-
Deployment strategies
-
Testing Deployments
-
Chaos testing
We also go through an example CI/CD pipeline, which consists of the following tasks:
-
Pushing code changes to the Git repository
-
Running a build of the application code
-
Running test against the code
-
Building a container image on a successful test
-
Pushing the container image to a container registry
-
Deploying the application to Kubernetes
-
Running a test against a deployed application
-
Performing rolling upgrades on Deployments
Version Control
Every CI/CD pipeline starts with version control, which maintains a running history of application and configuration code changes. Git has become the industry standard as a source-control management platform, and every Git repository will contain a master branch. A master branch contains your production code. You will have other branches for feature and development work that eventually will also be merged to your master branch. There are many ways to set up a branching strategy, and the setup will be very dependent on the organization structure and separation of duties. We find that including both application code and configuration code, such as a Kubernetes manifest or Helm charts, helps promote good DevOps principles of communication and collaboration. Having both application developers and operation engineers collaborate in a single repository builds confidence in a team to deliver an application to production.
Continuous Integration
CI is the process of integrating code changes continuously into a version-control repository. Instead of committing large changes less often, you commit smaller changes more often. Each time a code change is committed to the repository, a build is kicked off. This allows you to have a quicker feedback loop into what might have broken the application if problems indeed arise. At this point you might be asking, “Why do I need to know about how the application is built, isn’t that the application developer’s role?” Traditionally, this might have been the case, but as companies move toward embracing a DevOps culture, the operations team comes closer to the application code and software development workflows.
There are many solutions that provide CI, with Jenkins being one of the more popular tools.
Testing
The goal of running tests in the pipeline is to quickly provide a
feedback loop for code changes that break the build. The language that you’re using will determine the testing framework you
use. For example, Go applications can use go test for running a suite of
unit tests against your code base. Having an extensive test suite helps to avoid delivering bad code into your production environment. You’ll
want to ensure that if tests fail in the pipeline, the build fails
after the test suite runs. You don’t want to build the container image
and push it to a registry if you have failing tests against your code
base.
Again, you might be asking, “Isn’t creating tests a developer’s job?” As
you begin automating the delivery of infrastructure and applications to
production, you need to think about running automated tests against all
of the pieces of the code base. For example, in Chapter 2, we talked
about using Helm to package applications for Kubernetes. Helm includes a
tool called helm lint, which runs a series of tests against a chart
to examine any potential issues with the chart provided. There are many different tests that need to be run in an end-to-end pipeline. Some are the developer’s responsibility, like unit testing for the application, but others, like smoke testing, will be a joint effort. Testing the code base and its delivery to production is a team effort and needs to be implemented end to end.
Container Builds
When building your images, you should optimize the size of the image. Having a smaller image decreases the time it takes to pull and deploy the image, and also increases the security of the image. There are multiple ways of optimizing the image size, but some do have trade-offs. The following strategies will help you build the smallest image possible for your application:
- Multistage builds
-
These allow you to remove the dependencies not needed for your applications to run. For example, with Golang, we don’t need all the build tools used to build the static binary, so multistage builds allow you in a single Dockerfile to run a build step with the final image containing only the static binary that’s needed to run the application.
- Distroless base images
-
These remove all the unneeded binaries and shells from the image. This really reduces the size of the image and increases the security. The trade-off with distroless images is you don’t have a shell, so you can’t attach a debugger to the image. You might think this is great, but it can be a pain to debug an application. Distroless images contain no package manager, shell, or other typical OS packages, so you might not have access to the debugging tools you are accustomed to with a typical OS.
- Optimized base images
-
These are images that focus on removing the cruft out of the OS layer and provide a slimmed-down image. For example, Alpine provides a base image that starts at just 10 MB, and it also allows you to attach a local debugger for local development. Other distros also typically offer an optimized base image, such as Debian’s Slim image. This might be a good option for you because its optimized images give you capabilities you expect for development while also optimizing for image size and lower security exposure.
Optimizing your images is extremely important and often overlooked by users. You might have reasons due to company standards for OSes that are approved for use in the enterprise, but push back on these so that you can maximize the value of containers.
We have found that companies starting out with Kubernetes tend to be successful with using their current OS but then choose a more optimized image, like Debian Slim. After you mature in operationalizing and developing against a container environment, you’ll be comfortable with distroless images.
Container Image Tagging
Another step in the CI pipeline is to build a Docker image so that you have an image artifact to deploy to an environment. It’s important to have an image tagging strategy so that you can easily identify the versioned images you have deployed to your environments. One of the most important things we can’t preach enough about is not to use “latest” as an image tag. Using that as an image tag is not a version and will lead to not having the ability to identify what code change belongs to the rolled-out image. Every image that is built in the CI pipeline should have a unique tag for the built image.
There are multiple strategies we’ve found to be effective when tagging images in the CI pipeline. The following strategies allow you to easily identify the code changes and the build with which they are associated:
- BuildID
-
When a CI build kicks off, it has a buildID associated with it. Using this part of the tag allows you to reference which build assembled the image.
- Build System-BuildID
-
This one is the same as BuildID but adds the Build System for users who have multiple build systems.
- Git Hash
-
On new code commits, a Git hash is generated, and using the hash for the tag allows you to easily reference which commit generated the image.
- githash-buildID
-
This allows you to reference both the code commit and the buildID that generated the image. The only caution here is that the tag can be kind of long.
Continuous Deployment
CD is the process by which changes that have passed successfully through the CI pipeline are deployed to production without human intervention. Containers provide a great advantage for deploying changes into production. Container images become an immutable object that can be promoted through dev and staging and into production. For example, one of the major issues we’ve always had has been maintaining consistent environments. Almost everyone has experienced a Deployment that works fine in staging, but when it gets promoted to production, it breaks. This is due to having configuration drift, with libraries and versioning of components differing in each environment. Kubernetes gives us a declarative way to describe our Deployment objects that can be versioned and deployed in a consistent manner.
One thing to keep in mind is that you need to have a solid CI pipeline set up before focusing on CD. If you don’t have a robust set of tests to catch issues early in the pipeline, you’ll end up rolling bad code to all your environments.
Deployment Strategies
Now that we learned the principles of CD, let’s take a look at the different rollout strategies that you can use. Kubernetes provides multiple strategies to roll out new versions of your application. And even though it has a built-in mechanism to provide rolling updates, you can also utilize some more advanced strategies. Here, we examine the following strategies to deliver updates to your application:
-
Rolling updates
-
Blue/green deployments
-
Canary deployments
Rolling updates are built into Kubernetes and allow you to trigger an update to the currently running application without downtime. For example, if you took your frontend app that is currently running frontend:v1 and updated the Deployment to frontend:v2, Kubernetes would update the replicas in a rolling fashion to frontend:v2. Figure 5-1 depicts a rolling update.

Figure 5-1. A Kubernetes rolling update
A Deployment object also lets you configure the maximum amount of replicas to be updated and the maximum unavailable pods during the rollout. The following manifest is an example of how you specify the rolling update strategy:
kind:DeploymentapiVersion:v1metadata:name:frontendspec:replicas:3template:spec:containers:-name:frontendimage:brendanburns/frontend:v1strategy:type:RollingUpdaterollingUpdate:maxSurge:1# Maximum amount of replicas to update at one timemaxUnavailable:1# Maximum amount of replicas unavailable during rollout
You need to be cautious with rolling updates because using this strategy can cause dropped connections. To deal with this issue, you can utilize readiness probes and preStop life cycle hooks. The readiness probe ensures that the new version deployed is ready to accept traffic, whereas the preStop hook can ensure that connections are drained on the current deployed application. The life cycle hook is called before the container exits and is synchronous, so it must complete before the final termination signal is given. The following example implements a readiness probe and life cycle hook:
kind:DeploymentapiVersion:v1metadata:name:frontendspec:replicas:3template:spec:containers:-name:frontendimage:brendanburns/frontend:v1livenessProbe:# ...readinessProbe:httpGet:path:/readiness# probe endpointport:8888lifecycle:preStop:exec:command:["/usr/sbin/nginx","-s","quit"]strategy:# ...
The preStop life cycle hook in this example will gracefully exit NGINX, whereas a SIGTERM conducts a nongraceful, quick exit.
Another concern with rolling updates is that you now have two versions of the application running at the same time during the rollover. Your database schema needs to support both versions of the application. You can also use a feature flag strategy in which your schema indicates the new columns created by the new app version. After the rolling update has completed, the old columns can be removed.
We have also defined a readiness and liveness probe in our Deployment manifest. A readiness probe will ensure that your application is ready to serve traffic before putting it behind the service as an endpoint. The liveness probe ensures that your application is healthy and running, and restarts the pod if it fails its liveness probe. Kubernetes can automatically restart a failed pod only if the pod exits on error. For example, the liveness probe can check its endpoint and restart it if we had a deadlock from which the pod did not exit.
Blue/green deployments allow you to release your application in a predictable manner. With blue/green deployments, you control when the traffic is shifted over to the new environment, so it gives you a lot of control over the rollout of a new version of your application. With blue/green deployments, you are required to have the capacity to deploy both the existing and new environment at the same time. These types of deployments have a lot of advantages, such as easily switching back to your previous version of the application. There are some things that you need to consider with this deployment strategy, however:
-
Database migrations can become difficult with this deployment option because you need to consider in-flight transactions and schema update compatibility.
-
There is the risk of accidental deletion of both environments.
-
You need extra capacity for both environments.
-
There are coordination issues for hybrid deployments in which legacy apps can’t handle the deployment.
Figure 5-2 depicts a blue/green deployment.

Figure 5-2. A blue/green deployment
Canary deployments are very similar to blue/green deployments, but they give you much more control over shifting traffic to the new release. Most modern ingress implementations will give you the ability to release a percentage of traffic to a new release, but you can also implement a service mesh technology, like Istio, Linkerd, or HashiCorp Consul, which give you a number of features that help implement this deployment strategy.
Canary deployments allow you to test new features for only a subset of users. For example, you might roll out a new version of an application and only want to test the deployment for 10% of your user base. This allows you to reduce the risk of a bad deployment or broken features to a much smaller subset of users. If there are no errors with the deployment or new features, you can begin shifting a greater percentage of traffic to the new version of the application. There are also some more advanced techniques that you can use with canary deployments in which you release to only a specific region of users or just target only users with a specific profile. These types of releases are often referred to as A/B or dark releases because users are unaware they are testing new feature deployments.
With canary deployments, you have some of the same considerations that you have with blue/green deployments, but there are some additional considerations as well. You must have:
-
The ability to shift traffic to a percentage of users
-
A firm knowledge of steady state to compare against a new release
-
Metrics to understand whether the new release is in a “good” or “bad” state
Figure 5-3 provides an example of a canary deployment.
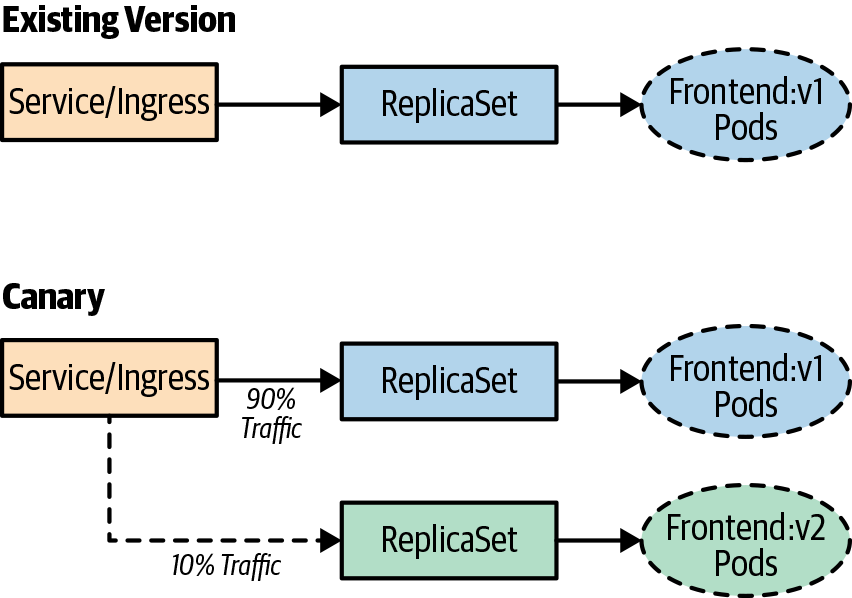
Figure 5-3. A canary deployment
Note
Canary releases also suffer from having multiple versions of the application running at the same time. Your database schema needs to support both versions of the application. When using these strategies, you’ll need to really focus on how to handle dependent services and having multiple versions running. This includes having strong API contracts and ensuring that your data services support the multiple versions you have deployed at the same time.
Testing in Production
Testing in production helps you to build confidence in the resiliency, scalability, and UX of your application. This comes with the caveat that testing in production doesn’t come without challenges and risk, but it’s worth the effort to ensure reliability in your systems. There are important aspects you need to address up front when embarking on the implementation. You need to ensure that you have an in-depth observability strategy in place, in which you have the ability to identify the effects of testing in production. Without being able to observe metrics that affect the end users’ experience of your applications, you won’t have a clear indication of what to focus on when trying to improve the resiliency of your system. You also need a high degree of automation in place to be able to automatically recover from failures that you inject into your systems.
There are many tools that you’ll need to implement to reduce risk and effectively test your systems when they’re in production. Some of the tools we have already discussed in this chapter, but there are a few new ones, like distributed tracing, instrumentation, chaos engineering, and traffic shadowing. To recap, here are the tools we have already mentioned:
-
Canary deployments
-
A/B testing
-
Traffic shifting
-
Feature flags
Chaos engineering was developed by Netflix. It is the practice of deploying experiments into live production systems to discover weaknesses within those systems. Chaos engineering allows you to learn about the behavior of your system by observing it during a controlled experiment. Following are the steps that you want to implement before doing a “game-day” experiment:
-
Build a hypothesis and learn about your steady state.
-
Have a varying degree of real-world events that can affect the system.
-
Build a control group and experiment to compare to steady state.
-
Perform experiments to form the hypothesis.
It’s extremely important that when you’re running experiments, you minimize the “blast radius” to ensure that the issues that might arise are minimal. You’ll also want to ensure that when you’re building experiments, you focus on automating them, given that running experiments can be labor intensive.
By this point, you might be asking, “Why wouldn’t I just test in staging?” We find there are some inherent problems when testing in staging, such as the following:
-
Nonidentical deployment of resources.
-
Configuration drift from production.
-
Traffic and user behavior tend to be generated synthetically.
-
The number of requests generated don’t mimic a real workload.
-
Lack of monitoring implemented in staging.
-
The data services deployed contain differing data and load than in production.
We can’t stress this enough: ensure that you have solid confidence in the monitoring you have in place for production, because this practice tends to fail users who don’t have adequate observability of their production systems. Also, starting with smaller experiments to first learn about your experiments and their effects will help build confidence.
Setting Up a Pipeline and Performing a Chaos Experiment
The first step in the process is to get a GitHub repository forked so that you can have your own repository to use through the chapter. You will need to use the GitHub interface to fork the repository.
Setting Up CI
Now that you have learned about CI, you will set up a build of the code that we cloned previously.
For this example, we use the hosted drone.io. You’ll need to sign up for a free account. Log in with your GitHub credentials (this registers your repositories in Drone and allows you to synchronize the repositories). After you’re logged in to Drone, select Activate on your forked repository. The first thing that you need to do is add some secrets to your settings so that you can push the app to your Docker Hub registry and also deploy the app to your Kubernetes cluster.
Under your repository in Drone, click Settings and add the following secrets (see Figure 5-4):
-
docker_username -
docker_password -
kubernetes_server -
kubernetes_cert -
kubernetes_token
The Docker username and password will be whatever you used to register on Docker Hub. The following steps show you how to create a Kubernetes service account and certificate and retrieve the token.
For the Kubernetes server, you will need a publicly available Kubernetes API endpoint.
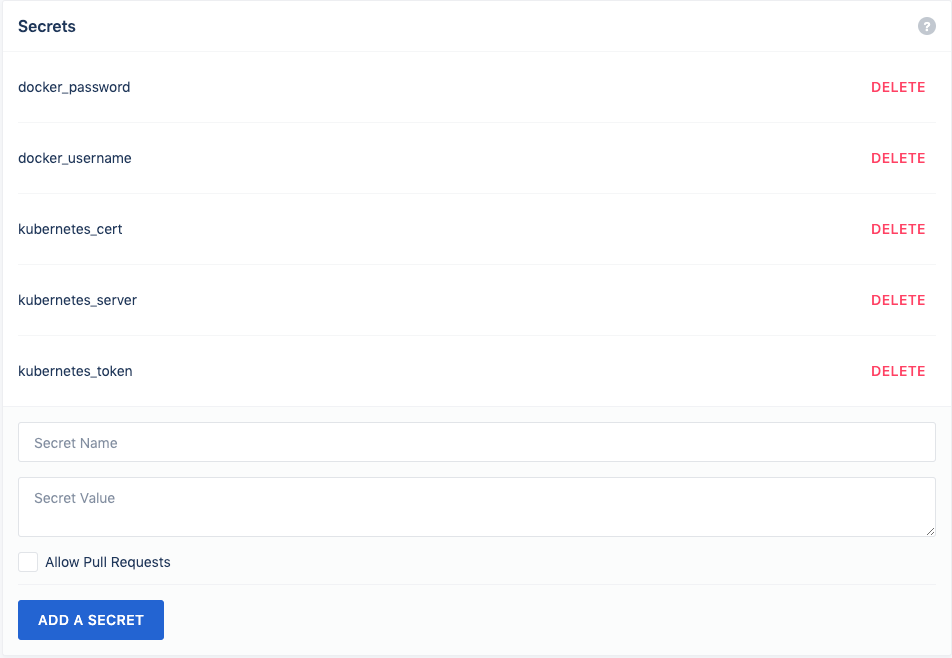
Figure 5-4. Drone secrets configuration
Note
You will need cluster-admin privileges on your Kubernetes cluster to perform the steps in this section.
You can retrieve your API endpoint by using the following command:
kubectl cluster-info
You should see something like the following: Kubernetes master is running
at https://kbp.centralus.azmk8s.io:443. You’ll store this in the kubernetes_server secret.
Now let’s create a service account that Drone will use to connect to the
cluster. Use the following command to create the serviceaccount:
kubectl create serviceaccount drone
Now use the following command to create a clusterrolebinding for the
serviceaccount:
kubectl create clusterrolebinding drone-admin
  --clusterrole=cluster-admin
  --serviceaccount=default:drone
Next, retrieve your serviceaccount token:
TOKENNAME=`kubectl -n default get serviceaccount/drone -o jsonpath='{.secrets[0].name}'`
TOKEN=`kubectl -n default get secret $TOKENNAME -o jsonpath='{.data.token}' | base64 -d`
echo $TOKEN
You’ll want to store the output of the token in the kubernetes_token secret.
You will also need the user certificate to authenticate to the cluster, so use
the following command and paste the ca.crt for the kubernetes_cert secret:
kubectl get secret $TOKENNAME -o yaml | grep 'ca.crt:'
Now, build your app in a Drone pipeline and then push it to Docker Hub.
The first step is the build step, which will build your Node.js frontend. Drone utilizes container images to run its steps, which gives you a lot of flexibility in what you can do with it. For the build step, use a Node.js image from Docker Hub:
pipeline:build:image:nodecommands:-cd frontend-npm i redis --save
When the build completes, you’ll want to test it, so we include a test step, which will run npm against the newly built app:
test:image:nodecommands:-cd frontend-npm i redis --save-npm test
Now that you have successfully built and tested your app, you next move on to a publish step to create a Docker image of the app and push it to Docker Hub.
In the .drone.yml file, make the following code change:
repo: <your-registry>/frontend
publish:image:plugins/dockerdockerfile:./frontend/Dockerfilecontext:./frontendrepo:dstrebel/frontendtags:[latest,v2]secrets:[docker_username,docker_password]
After the Docker build step finishes, it will push the image to your Docker registry.
Setting Up CD
For the deployment step in your pipeline, you will push your application to your Kubernetes cluster. You will use the deployment manifest that is under the frontend app folder in your repository:
kubectl:image:dstrebel/drone-kubectl-helmsecrets:[kubernetes_server,kubernetes_cert,kubernetes_token]kubectl:"apply-f./frontend/deployment.yaml"
After the pipeline finishes its deployment, you will see the pods running in your cluster. Run the following command to confirm that the pods are running:
kubectl get pods
You can also add a test step that will retrieve the status of the deployment by adding the following step in your Drone pipeline:
  test-deployment:
    image: dstrebel/drone-kubectl-helm
    secrets: [ kubernetes_server, kubernetes_cert, kubernetes_token ]
    kubectl: "get deployment frontend"
Performing a Rolling Upgrade
Let’s demonstrate a rolling upgrade by changing a line in the frontend code. In the server.js file, change the following line and then commit the change:
console.log('api server is running.');
You will see the deployment rolling out and rolling updates happening to the existing pods. After the rolling update finishes, you’ll have the new version of the application deployed.
A Simple Chaos Experiment
There are a variety of tools in the Kubernetes ecosystem that can help with performing chaos experiments in your environment. They range from sophisticated hosted Chaos as a Service solutions to basic chaos experiment tools that kill pods in your environment. Following are some of the tools with which we’ve seen users have success:
- Gremlin
-
Hosted chaos service that provides advanced features for running chaos experiments
- PowerfulSeal
-
Open source project that provides advanced chaos scenarios
- Chaos Toolkit
-
Open source project with a mission to provide a free, open, and community-driven toolkit and API to all the various forms of chaos engineering tools
- KubeMonkey
-
Open source tool that provides basic resiliency testing for pods in your cluster
Let’s set up a quick chaos experiment to test the resiliency of your application by automatically terminating pods. For this experiment, we’ll use Chaos Toolkit:
pip install -U chaostoolkit
pip install chaostoolkit-kubernetes
exportFRONTEND_URL="http://$(kubectl get svc frontend -ojsonpath="{.status.loadBalancer.ingress[*].ip}"):8080/api/"
chaos run experiment.json
Best Practices for CI/CD
Your CI/CD pipeline won’t be perfect on day one, but consider some of the following best practices to iteratively improve on the pipeline:
-
With CI, focus on automation and providing quick builds. Optimizing the build speed will provide developers quick feedback if their changes have broken the build.
-
Focus on providing reliable tests in your pipeline. This will give developers rapid feedback on issues with their code. The faster the feedback loop to developers, the more productive they’ll become in their workflow.
-
When deciding on CI/CD tools, ensure that the tools allow you to define the pipeline as code. This will allow you to version-control the pipeline with your application code.
-
Ensure that you optimize your images so that you can reduce the size of the image and also reduce the attack surface when running the image in production. Multistage Docker builds allow you to remove packages not needed for the application to run. For example, you might need Maven to build the application, but you don’t need it for the actual running image.
-
Avoid using “latest” as an image tag, and utilize a tag that can be referenced back to the buildID or Git commit.
-
If you are new to CD, utilize Kubernetes rolling upgrades to start out. They are easy to use and will get you comfortable with deployment. As you become more comfortable and confident with CD, look at utilizing blue/green and canary deployment strategies.
-
With CD, ensure that you test how client connections and database schema upgrades are handled in your application.
-
Testing in production will help you build reliability into your application, and ensure that you have good monitoring in place. With testing in production, also start at a small scale and limit the blast radius of the experiment.
Summary
In this chapter, we discussed the stages of building a CI/CD pipeline for your applications, which let you reliably deliver software with confidence. CI/CD pipelines help reduce risk and increase throughput of delivering applications to Kubernetes. We also discussed the different deployment strategies that can be utilized for delivering applications.