
Chapter 9: Image Scanning in DevOps Pipelines
It is a good practice to find defects and vulnerabilities in the early stages of the development life cycle. Identifying issues and fixing them in the early stages helps improve the robustness and stability of an application. It also helps to reduce the attack surface in the production environment. Securing Kubernetes clusters has to cover the entire DevOps flow. Similar to hardening container images and restricting powerful security attributes in the workload manifest, image scanning can help improve the security posture on the development side. However, image scanning can definitely go beyond that.
In this chapter, first, we will introduce the concept of image scanning and vulnerabilities, then we'll talk about a popular open source image scanning tool called Anchore Engine and show you how you can use it to do image scanning. Last but not least, we will show you how image scanning can be integrated into CI/CD pipelines.
After this chapter, you should be familiar with the concept of image scanning and feel comfortable using Anchore Engine to scan images. More importantly, you need to start thinking of a strategy for integrating image scanning into your CI/CD pipeline if you haven't so far.
We will cover the following topics in this chapter:
- Introducing container images and vulnerabilities
- Scanning images with Anchore Engine
- Integrating image scanning into the CI/CD pipeline
Introducing container images and vulnerabilities
Image scanning can be used to identify vulnerabilities or violations of best practices (depending on the image scanner's capability) inside an image. Vulnerabilities may come from application libraries or tools inside the image. Before we jump into image scanning, it would be good to know a little bit more about container images and vulnerabilities.
Container images
A container image is a file that bundles the microservice binary, its dependency, configurations of the microservice, and so on. Nowadays, application developers not only write code to build microservices but also need to build an image to containerize an application. Sometimes application developers may not follow the security best practices to write code or download libraries from uncertified sources. This means vulnerabilities could potentially exist in your own application or the dependent packages that your application relies on. Still, don't forget the base image you use, which might include another set of vulnerable binaries and packages. So first, let's look at what an image looks like:
$ docker history kaizheh/anchore-cli
IMAGE CREATED CREATED BY SIZE COMMENT
76b8613d39bc 8 hours ago /bin/sh -c #(nop) COPY file:92b27c0a57eddb63… 678B
38ea9049199d 10 hours ago /bin/sh -c #(nop) ENV PATH=/.local/bin/:/us… 0B
525287c1340a 10 hours ago /bin/sh -c pip install anchorecli 5.74MB
f0cbce9c40f4 10 hours ago /bin/sh -c apt-get update && apt-get install… 423MB
a2a15febcdf3 7 months ago /bin/sh -c #(nop) CMD ["/bin/bash"] 0B
<missing> 7 months ago /bin/sh -c mkdir -p /run/systemd && echo 'do… 7B
<missing> 7 months ago /bin/sh -c set -xe && echo '#!/bin/sh' > /… 745B
<missing> 7 months ago /bin/sh -c [ -z "$(apt-get indextargets)" ] 987kB
<missing> 7 months ago /bin/sh -c #(nop) ADD file:c477cb0e95c56b51e… 63.2MB
The preceding output shows the file layer of the image kaizheh/anchore-cli (show full commands with the --no-trunc flag). You may notice that each file layer has a corresponding command that creates it. After each command, a new file layer is created, which means the content of the image has been updated, layer by layer (basically, Docker works on copy-on-write), and you can still see the size of each file layer. This is easy to understand: when you install new packages or add files to the base, the image size increases. The missing image ID is a known issue because Docker Hub only stores the digest of the leaf layer and not the intermediate ones in the parent image. However, the preceding image history does tell how the image was in the Dockerfile, as follows:
FROM ubuntu
RUN apt-get update && apt-get install -y python-pip jq vim
RUN pip install anchorecli
ENV PATH="$HOME/.local/bin/:$PATH"
COPY ./demo.sh /demo.sh
The workings of the preceding Dockerfile are described as follows:
- To build the kaizheh/anchore-cli image, I chose to build from ubuntu.
- Then, I installed the packages python-pip, jq, and vim.
- Next, I installed anchore-cli using pip, which I installed in the previous step.
- Then I configured the environment variable path.
- Lastly, I copied a shell script, demo.sh, to the image.
The following figure shows the image file layers mapped to the Dockerfile instructions:

Figure 9.1 – Dockerfile instructions map to image file layers
You don't have to remember what has been added in each layer. Ultimately, a container image is a compressed file that contains all the binaries and packages required for your application. When a container is created from an image, the container runtime extracts the image and then creates a directory purposely for the extracted content of the image, then configures chroot, cgroup, Linux namespaces, Linux capabilities, and so on for the entry point application in the image before launching it.
Now you know the magic done by the container runtime to launch a container from an image. But you are still not sure whether your image is vulnerable so that it could easily be hacked. Let's look at what image scanning really does.
Detecting known vulnerabilities
People make mistakes and so do developers. If flaws in an application are exploitable, those flaws become security vulnerabilities. There are two types of vulnerability—one is those that have been discovered, while the other type remains unknown. Security researchers, penetration testers, and others work very hard to look for security vulnerabilities so that corresponding fixes reduce the potential for compromise. Once security vulnerabilities have been patched, developers apply patches as updates to the application. If these updates are not applied on time, there is a risk of the application getting compromised. It would cause huge damage to companies if these known security issues were exploited by malicious guys.
In this section, we're not going to talk about how to hunt for security vulnerabilities. Let the security researchers and ethical hackers do their job. Instead, we will talk about how to discover and manage those known vulnerabilities uncovered by image scanning tools by performing vulnerability management. In addition, we also need to know how vulnerabilities are tracked and shared in the community. So, let's talk about CVE and NVD.
Introduction to vulnerability databases
CVE stands for Common Vulnerability and Exposure. When a vulnerability is identified, there is a unique ID assigned to it with a description and a public reference. Usually, there is impacted version information inside the description. This is one CVE entry. Every day, there are hundreds of vulnerabilities that are identified and get a unique CVE ID assigned by MITRE.
NVD stands for National Vulnerability Database. It synchronizes the CVE list. Once there is a new update to the CVE list, the new CVE will show up in NVD immediately. Besides NVD, there are some other vulnerability databases available, such as Synk.
To explain the magic done by an image scanning tool in a simple way: the image scanning tool extracts the image file, then looks for all the available packages and libraries in the image and looks up their version within the vulnerability database. If there is any package whose version matches with any of the CVE's descriptions in the vulnerability database, the image scanning tool will report that there is a vulnerability in the image. You shouldn't be surprised if there are vulnerabilities found in a container image. So, what are you going to do about them? The first thing you need to do is stay calm and don't panic.
Managing vulnerabilities
When you have a vulnerability management strategy, you won't panic. In general, every vulnerability management strategy will start with understanding the exploitability and impact of the vulnerability based on the CVE detail. NVD provides a vulnerability scoring system also known as Common Vulnerability Scoring System (CVSS) to help you better understand how severe the vulnerability is.
The following information needs to be provided to calculate the vulnerability score based on your own understanding of the vulnerability:
- Attack vector: Whether the exploit is a network attack, local attack, or physical attack
- Attack complexity: How hard it is to exploit the vulnerability
- Privileges required: Whether the exploit requires any privileges, such as root or non-root
- User interaction: Whether the exploit requires any user interaction
- Scopes: Whether the exploit will lead to cross security domain
- Confidentiality impact: How much the exploit impacts the confidentiality of the software
- Integrity impact: How much the exploit impacts the integrity of the software
- Availability impact: How much the exploit impacts the availability of the software
The CVSS calculator is available at https://nvd.nist.gov/vuln-metrics/cvss/v3-calculator:
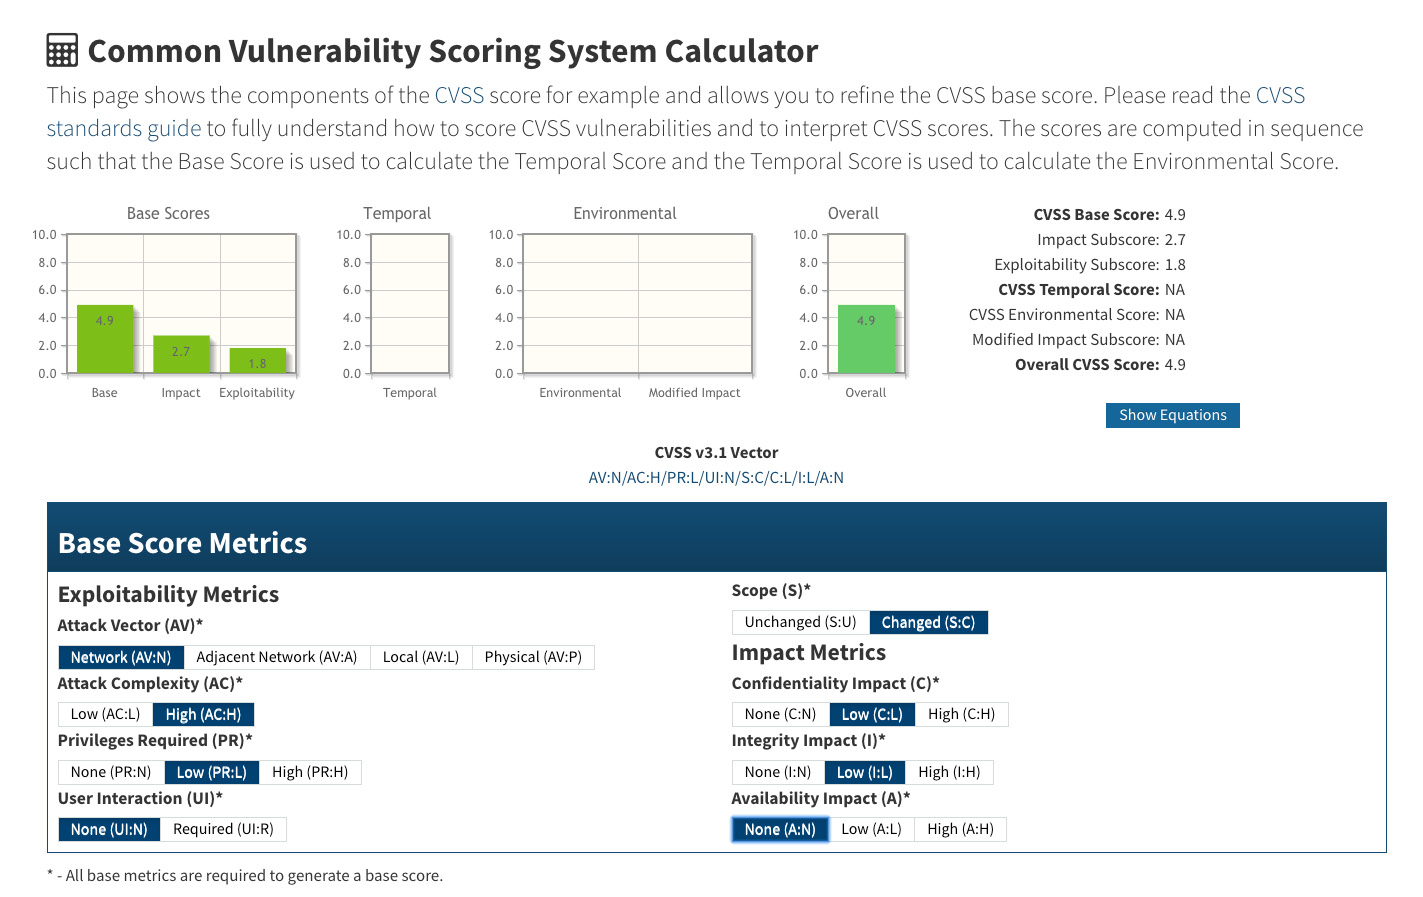
Figure 9.2 – CVSS calculator
Though the input fields in the preceding screenshot only cover the base score metrics, they serve as fundamental factors that decide how critical the vulnerability is. There are two other metrics that can be used to evaluate the criticalness of the vulnerability but we're not going to cover them in this section. According to CVSS (version 3), there are four ranges of score:
- Low: 0.1-3.9
- Medium: 4-6.9
- High: 7-8.9
- Critical: 9-10
Usually, image scanning tools will provide the CVSS score when they report any vulnerabilities in an image. There is at least one more step for the vulnerability analysis before you take any response action. You need to know that the severity of the vulnerability may be influenced by your own environment as well. Let me give you a few examples:
- The vulnerability is only exploitable in Windows, but the base OS image is not Windows.
- The vulnerability can be exploited from network access but the processes in the image only send outbound requests and never accept inbound requests.
The preceding scenarios show good examples that the CVSS score is not the only factor that matters. You should focus on the vulnerabilities that are both critical and relevant. However, our recommendation is still to prioritize vulnerabilities wisely and fix them as soon as possible.
If there is a vulnerability found in an image, it is always better to fix it early. If vulnerabilities are found in the development stage, then you should have enough time to respond. If vulnerabilities are found in a running production cluster, you should patch the images and redeploy as soon as a patch is available. If a patch is not available, having a mitigation strategy in place prevents compromise of the cluster.
This is why an image scanning tool is critical to your CI/CD pipeline. It's not realistic to cover vulnerability management in one section, but I think a basic understanding of vulnerability management will help you make the most use of any image scanning tool. There are a few popular open source image scanning tools available, such as Anchore, Clair, Trivvy, and so on. Let's look at one such image scanning tool with examples.
Scanning images with Anchore Engine
Anchore Engine is an open source image scanning tool. It not only analyzes Docker images but also allows users to define an acceptance image scanning policy. In this section, we will first give a high-level introduction to Anchore Engine, then we will show how to deploy Anchore Engine and the basic image scanning use case of Anchore Engine by using Anchore's own CLI tool, anchore-cli.
Introduction to Anchore Engine
When an image is submitted to Anchore Engine for analysis, Anchore Engine will first retrieve the image metadata from image registry, then download the image and queue the image for analysis. The following are the items that Anchore Engine will analyze:
- Image metadata
- Image layers
- Operating system packages such as deb, rpm, apkg, and so on
- File data
- Application dependency packages:
- Ruby gems
- Node.js NPMs
- Java archives
- Python packages
- File content
To deploy Anchore Engine in a Kubernetes cluster with Helm—CNCF project which is a package manage tool for the Kubernetes cluster, run the following command:
$ helm install anchore-demo stable/anchore-engine
Anchore Engine is composed of a few microservices. When deployed in a Kubernetes cluster, you will find the following workloads are running:
$ kubectl get deploy
NAME READY UP-TO-DATE AVAILABLE AGE
anchore-demo-anchore-engine-analyzer 1/1 1 1 3m37s
anchore-demo-anchore-engine-api 1/1 1 1 3m37s
anchore-demo-anchore-engine-catalog 1/1 1 1 3m37s
anchore-demo-anchore-engine-policy 1/1 1 1 3m37s
anchore-demo-anchore-engine-simplequeue 1/1 1 1 3m37s
anchore-demo-postgresql 1/1 1 1 3m37s
Anchore Engine decouples image scanning services into the microservices shown in the preceding log:
- API: Accepts the image scan request
- Catalog: Maintains the states of the image scan job
- Policy: Loads image analysis results and performs policy evaluation
- Analyzer: Pulls images from image registry and performs analysis
- Simplequeue: Queues image scanning tasks
- PostgreSQL: Stores image analysis results and state
Now Anchore Engine is successfully deployed in a Kubernetes cluster, let's see how we can do image scanning with anchore-cli.
Scanning images with anchore-cli
Anchore Engine supports access both from the RESTful API and anchore-cli. anchore-cli is handy to use in an iterative way. anchore-cli does not need to run in a Kubernetes cluster. You need to configure the following environment variables to enable CLI access to Anchore Engine:
- ANCHORE_CLI_URL: Anchore Engine API endpoint
- ANCHORE_CLI_USER: Username to access Anchore Engine
- ANCHORE_CLI_PASS: Password to access Anchore Engine
Once you've configured the environment variables successfully, you can verify the connectivity to Anchore Engine with the following command:
root@anchore-cli:/# anchore-cli system status
And the output should be like the following:
Service analyzer (anchore-demo-anchore-engine-analyzer-5fd777cfb5-jtqp2, http://anchore-demo-anchore-engine-analyzer:8084): up
Service apiext (anchore-demo-anchore-engine-api-6dd475cf-n24xb, http://anchore-demo-anchore-engine-api:8228): up
Service policy_engine (anchore-demo-anchore-engine-policy-7b8f68fbc-q2dm2, http://anchore-demo-anchore-engine-policy:8087): up
Service simplequeue (anchore-demo-anchore-engine-simplequeue-6d4567c7f4-7sll5, http://anchore-demo-anchore-engine-simplequeue:8083): up
Service catalog (anchore-demo-anchore-engine-catalog-949bc68c9-np2pc, http://anchore-demo-anchore-engine-catalog:8082): up
Engine DB Version: 0.0.12
Engine Code Version: 0.6.1
anchore-cli is able to talk to Anchore Engine in a Kubernetes cluster. Now let's scan an image with the following command:
root@anchore-cli:/# anchore-cli image add kaizheh/nginx-docker
And the output should be like the following:
Image Digest: sha256:416b695b09a79995b3f25501bf0c9b9620e82984132060bf7d66d877 6c1554b7
Parent Digest: sha256:416b695b09a79995b3f25501bf0c9b9620e82984132060bf7d66d877 6c1554b7
Analysis Status: analyzed
Image Type: docker
Analyzed At: 2020-03-22T05:48:14Z
Image ID: bcf644d78ccd89f36f5cce91d205643a47c8a5277742c5b311c9d9 6699a3af82
Dockerfile Mode: Guessed
Distro: debian
Distro Version: 10
Size: 1172316160
Architecture: amd64
Layer Count: 16
Full Tag: docker.io/kaizheh/nginx-docker:latest
Tag Detected At: 2020-03-22T05:44:38Z
You will get the image digest, full tag, and more from the image. It may take some time for Anchore Engine to analyze the image depending on the image size. Once it is analyzed, you will see the Analysis Status field has been updated to analyzed. Use the following command to check the image scanning status:
root@anchore-cli:/# anchore-cli image get kaizheh/nginx-docker
And the output should be like the following:
Image Digest: sha256:416b695b09a79995b3f25501bf0c9b9620e82984132060bf7d66d877 6c1554b7
Parent Digest: sha256:416b695b09a79995b3f25501bf0c9b9620e82984132060bf7d66d877 6c1554b7
Analysis Status: analyzed
Image Type: docker
Analyzed At: 2020-03-22T05:48:14Z
Image ID: bcf644d78ccd89f36f5cce91d205643a47c8a5277742c5b311c9d96699a3a f82
Dockerfile Mode: Guessed
Distro: debian
Distro Version: 10
Size: 1172316160
Architecture: amd64
Layer Count: 16
Full Tag: docker.io/kaizheh/nginx-docker:latest
Tag Detected At: 2020-03-22T05:44:38Z
We briefly mentioned Anchore Engine policies earlier; Anchore Engine policies allow you to define rules to handle vulnerabilities differently based on their severity. In the default Anchore Engine policy, you will find the following rules in the default policy with two rules. The first rule is as follows:
{
"action": "WARN",
"gate": "vulnerabilities",
"id": "6063fdde-b1c5-46af-973a-915739451ac4",
"params": [{
"name": "package_type",
"value": "all"
},
{
"name": "severity_comparison",
"value": "="
},
{
"name": "severity",
"value": "medium"
}
],
"trigger": "package"
},
The first rule defines that any package that has medium-level vulnerability will still set the policy evaluation result to pass. The second rule is as follows:
{
"action": "STOP",
"gate": "vulnerabilities",
"id": "b30e8abc-444f-45b1-8a37-55be1b8c8bb5",
"params": [{
"name": "package_type",
"value": "all"
},
{
"name": "severity_comparison",
"value": ">"
},
{
"name": "severity",
"value": "medium"
}
],
"trigger": "package"
},
The second rule defines that any package that has high or critical vulnerability will set the policy evaluation result to fail. After the image is analyzed, use the following command to check with the policy:
root@anchore-cli:/# anchore-cli --json evaluate check sha256:416b695b09a79995b3f25501bf0c9b9620e82984132060bf7d66d877 6c1554b7 --tag docker.io/kaizheh/nginx-docker:latest
And the output should be like the following:
[
{
"sha256:416b695b09a79995b3f25501bf0c9b9620e82984132060 bf7d66d8776c1554b7": {
"docker.io/kaizheh/nginx-docker:latest": [
{
"detail": {},
"last_evaluation": "2020-03-22T06:19:44Z",
"policyId": "2c53a13c-1765-11e8-82ef-235277 61d060",
"status": "fail"
}
]
}
}
]
So the image docker.io/kaizheh/nginx-docker:latest failed the default policy evaluation. This means that there must be some vulnerabilities at a high or critical level. Use the following command to list all the vulnerabilities in the image:
root@anchore-cli:/# anchore-cli image vuln docker.io/kaizheh/nginx-docker:latest all
And the output should be like the following:
Vulnerability ID Package Severity Fix CVE Refs Vulnerability URL
CVE-2019-9636 Python-2.7.16 Critical None CVE-2019-9636 https://nvd.nist.gov/vuln/detail/CVE-2019-9636
CVE-2020-7598 minimist-0.0.8 Critical None CVE-2020-7598 https://nvd.nist.gov/vuln/detail/CVE-2020-7598
CVE-2020-7598 minimist-1.2.0 Critical None CVE-2020-7598 https://nvd.nist.gov/vuln/detail/CVE-2020-7598
CVE-2020-8116 dot-prop-4.2.0 Critical None CVE-2020-8116 https://nvd.nist.gov/vuln/detail/CVE-2020-8116
CVE-2013-1753 Python-2.7.16 High None CVE-2013-1753 https://nvd.nist.gov/vuln/detail/CVE-2013-1753
CVE-2015-5652 Python-2.7.16 High None CVE-2015-5652 https://nvd.nist.gov/vuln/detail/CVE-2015-5652
CVE-2019-13404 Python-2.7.16 High None CVE-2019-13404 https://nvd.nist.gov/vuln/detail/CVE-2019-13404
CVE-2016-8660 linux-compiler-gcc-8-x86-4.19.67-2+deb10u1 Low None CVE-2016-8660 https://security-tracker.debian.org/tracker/CVE-2016-8660
CVE-2016-8660 linux-headers-4.19.0-6-amd64-4.19.67-2+deb10u1 Low None CVE-2016-8660 https://security-tracker.debian.org/tracker/CVE-2016-8660
The preceding list shows all the vulnerabilities in the image with information including CVE ID, package name, severity, whether a fix is available, and references. Anchore Engine policies essentially help you filter out less severe vulnerabilities so that you can focus on the more severe ones. Then you can start engaging with the security team for vulnerability analysis.
Note
Sometimes, if a fix is not available for a high-level or critical-level vulnerability in a package or library, you should find an alternative instead of continuing to use the vulnerable one.
In the next section, we are going to talk about how to integrate image scanning into the CI/CD pipeline.
Integrating image scanning into the CI/CD pipeline
Image scanning can be triggered at multiple stages in the DevOps pipeline and we've already talked about the advantages of scanning an image in an early stage of the pipeline. However, new vulnerabilities will be discovered, and your vulnerability database should be updated constantly. This indicates that passing an image scan in the build stage doesn't mean it will pass at the runtime stage if there is a new critical vulnerability found that also exists in the image. You should stop the workload deployment when it happens and apply mitigation strategies accordingly. Before we dive into integration, let's look at a rough definition of the DevOps stages that are applicable for image scanning:
- Build: When the image is built in the CI/CD pipeline
- Deployment: When the image is about to be deployed in a Kubernetes cluster
- Runtime: After the image is deployed to a Kubernetes cluster and the containers are up and running
Though there are many different CI/CD pipelines and many different image scanning tools for you to choose from, the notion is that integrating image scanning into the CI/CD pipeline secures Kubernetes workloads as well as Kubernetes clusters.
Scanning at the build stage
There are so many CI/CD tools, such as Jenkins, Spinnaker, and Screwdriver, for you to use. In this section, we're going to show how image scanning can be integrated into a GitHub workflow. A workflow in GitHub is a configurable automated process that contains multiple jobs. It is a similar concept to the Jenkins pipeline but defined in YAML format. A simple workflow with image scanning is like defining a trigger. Usually done when a pull request or commit is pushed, setting up the build environment, for example, Ubuntu.
Then define the steps in the workflow:
- Check out the PR branch.
- Build the image from the branch.
- Push the image to the registry – this is optional. You should be able to launch the image scanner to scan the image when the image is built locally.
- Scan the newly built or pushed image.
- Fail the workflow if policy violations occur.
The following is a sample workflow defined in GitHub:
name: CI
...
build:
runs-on: ubuntu-latest
steps:
# Checks-out your repository under $GITHUB_WORKSPACE, so your job can access it
- uses: actions/checkout@v2
# Runs a set of commands using the runners shell
- name: Build and Push
env:
DOCKER_SECRET: ${{ secrets.DOCKER_SECRET }}
run: |
cd master/chapter9 && echo "Build Docker Image"
docker login -u kaizheh -p ${DOCKER_SECRET}
docker build -t kaizheh/anchore-cli . && docker push kaizheh/anchore-cli
- name: Scan
env:
ANCHORE_CLI_URL: ${{ secrets.ANCHORE_CLI_URL }}
ANCHORE_CLI_USER: ${{ secrets.ANCHORE_CLI_USER }}
ANCHORE_CLI_PASS: ${{ secrets.ANCHORE_CLI_PASS }}
run: |
pip install anchorecli # install anchore-cli
export PATH="$HOME/.local/bin/:$PATH"
img="kaizheh/anchore-cli"
anchore-cli image add $img # add image
sha=$(anchore-cli --json --api-version=0.2.4 image get $img | jq .[0].imageDigest -r) # get sha value
anchore-cli image wait $img # wait for image analyzed
anchore-cli --json evaluate check $sha --tag $img # evaluate
- name: Post Scan
run: |
# Slack to notify developers scan result or invite new reviewer if failed
exit 1 # purposely ends here
In the first step of the build pipeline, I used the checkout GitHub action to check out the branch. A GitHub action to a workflow is like a function to a programming language. It encapsulates the details you don't need to know but performs tasks for you. It may take input parameters and return results. In the second step, we ran a few commands to build the image kaizheh/anchore-cli and push the image to the registry. In the third step, we used anchore-cli to scan the image (yes, we use Anchore Engine to scan our own anchore-cli image).
Note that I configured the GitHub secrets to store sensitive information such as the Docker Hub access token, Anchore username, and password. In the last step, we failed purposely for demo purposes. But usually, the last step comes with a notification and response to the image scanning result as the comments suggest. And you will find the result details of the workflow in GitHub, as follows:
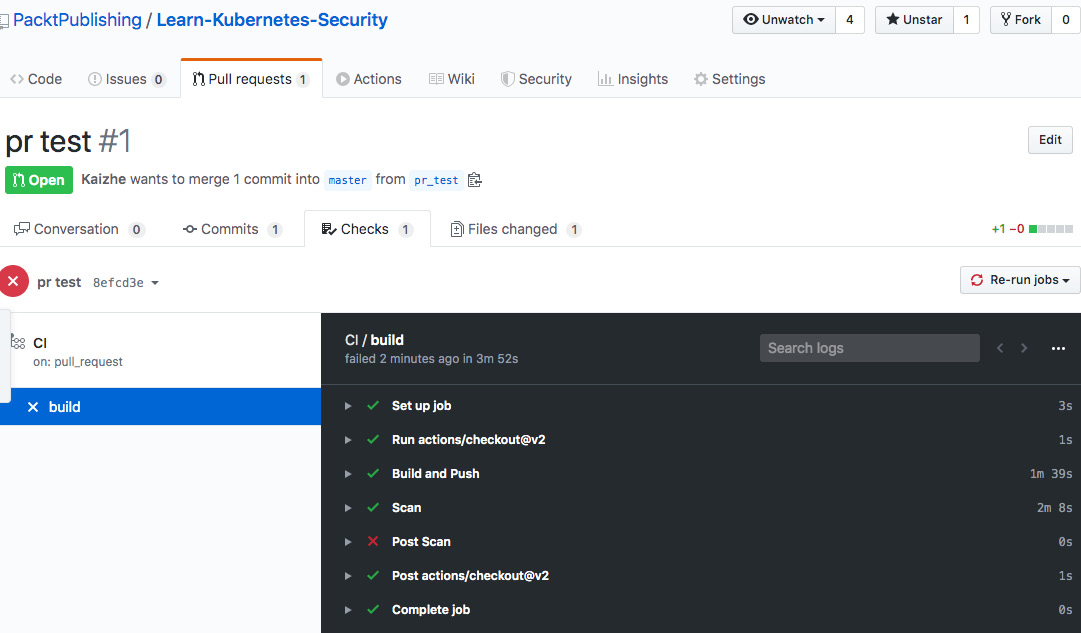
Figure 9.3 – GitHub image scanning workflow
The preceding screenshot shows the status of each step in the workflow, and you will find the detail of each step when you click into it. Anchore also offers an image scan GitHub action called Anchore Container Scan. It launches the Anchore Engine scanner on the newly built image and returns the vulnerabilities, manifests, and a pass/fail policy evaluation that can be used to fail the build if desired.
Scanning at the deployment stage
Though deployment is a seamless process, I want to bring it up in a separate section about conducting image scanning at the deployment stage for two reasons:
- New vulnerabilities may be found when you deploy applications to a Kubernetes cluster, even though they passed the image scanning check when they were built. It is better to block them before you find the vulnerabilities when they are running in a Kubernetes cluster.
- Image scanning can be part of the validation admission process in Kubernetes.
We've already introduced the concept of ValidatingAdmissionWebhook in Chapter 7, Authentication, Authorization, and Admission Control. Now, let's see how image scanning can help validate the workload by scanning its images before the workload is admitted to run in the Kubernetes cluster. Image scanning admission controller is an open source project from Sysdig. It scans images from the workload that is about to be deployed. If an image fails the image scanning policy, the workload will be rejected. The following is the workflow diagram:
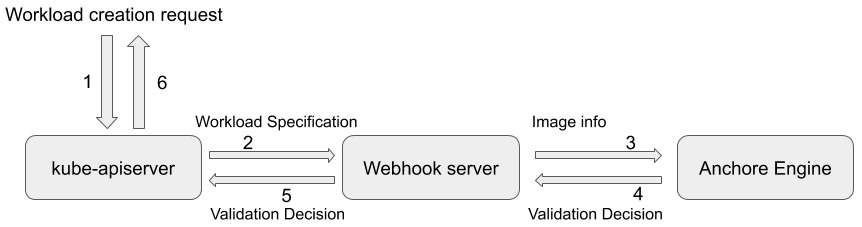
Figure 9.4 – Image scanning admission workflow
The preceding diagram shows the workload admission process validated based on image scanning:
- There is a workload creation request sent to kube-apiserver.
- kube-apiserver forwards the request to the registered validating webhook server based on the validating webhook configurations.
- The validating webhook server extracts image information from the workload's specification and sends it to the Anchore Engine API server.
- Based on the image scanning policy, Anchore Engine will return the policy evaluation result as a validation decision back to the server.
- The validating webhook server forwards the validation decision to kube-apiserver.
- kube-apiserver either admits or rejects the workload based on the validation decision from the image scan policy evaluation result.
To deploy the image scanning admission controller, first check out the GitHub repository (https://github.com/sysdiglabs/image-scanning-admission-controller) and then run the following command:
$ make deploy
And you should find the webhook servers and services are created:
NAME READY STATUS RESTARTS AGE
pod/image-scan-k8s-webhook-controller-manager-0 1/1 Running 1 16s
NAME TYPE CLUSTER-IP EXTERNAL-IP PORT(S) AGE
service/image-scan-k8s-webhook-controller-manager-service ClusterIP 100.69.225.172 <none> 443/TCP 16s
service/webhook-server-service ClusterIP 100.68.111.117 <none> 443/TCP 8s
NAME READY AGE
statefulset.apps/image-scan-k8s-webhook-controller-manager 1/1 16s
Besides the webhook server deployment, the script also creates a ValidatingWebhookConfiguration object to register the image scan admission webhook server, which is defined in generic-validatingewebhookconfig.yaml to the kube-apiserver:
apiVersion: admissionregistration.k8s.io/v1beta1
kind: ValidatingWebhookConfiguration
metadata:
name: validating-webhook-configuration
webhooks:
- name: validating-create-pods.k8s.io
clientConfig:
service:
namespace: image-scan-k8s-webhook-system
name: webhook-server-service
path: /validating-create-pods
caBundle: {{CA_BUNDLE}}
rules:
- operations:
- CREATE
apiGroups:
- ""
apiVersions:
- "v1"
resources:
- pods
failurePolicy: Fail
The validating webhook configuration object basically tells kube-apiserver to forward any pod creation request to webhook-server-service in the image-scan-webhook-system namespace using the /validating-create-pod URL path.
You can use the test cases provided by image scanning admission controller to verify your setup as follows:
$ make test
In the test, three different pods will be deployed in the Kubernetes cluster. One of them has a critical vulnerability that violates the image scanning policy. So, the workload with the critical vulnerability is rejected as follows:
+ kubectl run --image=bitnami/nginx --restart=Never nginx
pod/nginx created
+ kubectl run --image=kaizheh/apache-struts2-cve-2017-5638 --restart=Never apache-struts2
Error from server (Image failed policy check: kaizheh/apache-struts2-cve-2017-5638): admission webhook "validating-create-pods.k8s.io" denied the request: Image failed policy check: kaizheh/apache-struts2-cve-2017-5638
+ kubectl run --image=alpine:3.2 --restart=Never alpine
pod/alpine created
The preceding output shows that the workload with image kaizheh/apache-struts2-cve-2017-5638 is rejected. The image runs the Apache Struts 2 service, which contains a critical vulnerability with a CVSS score of 10 (https://nvd.nist.gov/vuln/detail/CVE-2017-5638). Though the CVE in the test is old, you should be able to discover it at an earlier stage. However, new vulnerabilities will be found, and the vulnerability database keeps updating. It's critical to set a gatekeeper for any workload that is going to be deployed in a Kubernetes cluster. Image scanning as validating admission is a good security practice for Kubernetes deployment. Now, let's talk about image scanning at the runtime stage in a Kubernetes cluster.
Scanning at the runtime stage
Good job! The workload's image passed the image scanning policy evaluation in the build and deployment stages. But it still doesn't mean the image is vulnerability free. Remember, new vulnerabilities will be discovered. Usually, the vulnerability database that the image scanner uses will update every few hours. Once the vulnerability database is updated, you should trigger the image scanner to scan images that are actively running in the Kubernetes cluster. There are a couple of ways to do it:
- Scan images pulled on each worker node directly. To scan images on the worker nodes, you can use tools such as secure-inline-scan from Sysdig (https://github.com/sysdiglabs/secure-inline-scan).
- Scan images in the registry regularly, directly after the vulnerability database has been updated.
Again, once you identify impactful vulnerabilities in the images in use, you should patch vulnerable images and redeploy them to reduce the attack surface.
Summary
In this chapter, we first briefly talked about container images and vulnerabilities. Then we introduced an open source image scanning tool, Anchore Engine, and showed how to use anchore-cli to do image scanning. Last but not least, we talked about how to integrate image scanning into a CI/CD pipeline at three different stages: build, deployment, and runtime. Image scanning showed great value in securing the DevOps flow. A secure Kubernetes cluster requires securing the entire DevOps flow.
You should now feel comfortable deploying Anchore Engine and using anchore-cli to trigger image scanning. Once you find any vulnerabilities in an image, filter them out by using an Anchore Engine policy and understand their real impact. I know it's going to take time, but it is necessary and awesome to set up image scanning as gatekeepers in your CI/CD pipeline. By doing so, you'll make your Kubernetes cluster more secure.
In the next chapter, we will talk about resource management and real-time monitoring in a Kubernetes cluster.
Questions
Let's use some questions to help you understand this chapter better:
- Which Docker command can be used to list image file layers?
- According to the CVSS3 standard, what vulnerability score range is considered high?
- What is the anchore-cli command to start scanning an image?
- What is the anchore-cli command to list an image's vulnerabilities?
- What is the anchore-cli command to evaluate an image with an Anchore Engine policy?
- Why is it so important to integrate image scanning into CI/CD pipelines?
Further references
- To learn more about Anchore Engine, read: https://docs.anchore.com/current/docs/engine/general/
- To learn more about the Anchore scan action: https://github.com/marketplace/actions/anchore-container-scan
- To learn more about Sysdig's image scanning admission controller: https://github.com/sysdiglabs/image-scanning-admission-controller
- To learn more about GitHub actions: https://help.github.com/en/actions