
Salesforce is committed to running the most secure cloud platform. Protecting data integrity and privacy is at the forefront of Salesforce’s business model. Salesforce approaches security with a multitiered architecture, which supports greater flexibility and protection. System administrators have complete control over the level of access delivered to end users. You can protect sensitive information and manage end user accessibility with profiles, permission sets, field-level security, sharing rules, and more. Visit the Salesforce Trust web site at
http://trust.salesforce.com
(Figure 9-1) for transparent access to security threats and advisories.
Figure 9-1
Salesforce Trust web site
Salesforce Security Model
Controlling the level of access to your Salesforce organization is vital to ensuring client and data protection. While Salesforce is committed to the highest levels of data protection, your system administrator should configure the security settings to make the system as secure as possible. Design a security plan by considering what the primary risks to your data are and then learn about the Salesforce sharing architecture and its components to properly configure your security settings.
Fundamentals Data can be secured and layered at different levels in Salesforce. Access is secured in three ways: at the object level, at the field level, and at the record level. In database terms, an object is a table.
Objects
hold groupings of information that may be related. This includes the records that live in them.
Records
are the rows of information that are found within a table.
Accounts, contacts, and opportunities are just a few examples of standard Salesforce objects. Figure 9-2 shows a list view of account records in the account object. Cloud Creations HQ is an example of an account record in the Account object, as shown in Figure 9-2.
Each record stores key pieces of information. These are called fields. In database terms, fields
are the columns found within a table. In Figure 9-2, Account Name, Account Site, and Phone are all examples of fields in an account record. Refer to Figure 9-2 to identify the difference between objects, records, and fields.
Figure 9-2
Identifying objects, records, and fields
Profiles and Permission Sets
Profiles contain a collection of settings for determining what a user or group of users can see and do in Salesforce. A permission set contains the same collection of administrative settings but can be assigned to an individual user or groups of users as an extra layer of permission.
Note
Rather than create countless profiles to assign the appropriate settings and permissions for an individual user, it is best practice to assign a permission set.
Profiles
All users must be assigned a profile, and profiles can be assigned to multiple users. However, users can be assigned only one profile. Typically, profiles are assigned to users by their job function. This is usually because those with the same job description often require similar levels of access.
For example, you may have different security requirements for your marketing users, service agents, sales reps, and developers. It’s recommended that you create or modify profiles to meet their specific requirements.
Profile Home Page
We suggest familiarizing yourself with the different profile settings on the profile home page. This page is broken down into the following permissions and settings.
Console Settings
Click Edit to control the console settings
for each profile (shown in Figure 9-3).
Figure 9-3
Console Settings
Page Layouts
Page layouts can be configured for each profile. Click View Assignment next to each desired object to configure a different page layout
for a profile (shown in Figure 9-4).
Figure 9-4
You can control page layouts for each object at the profile level
.
Field-Level Security
Once object-level access and record-level access are granted, you can control what fields are visible at the profile level. Navigate to the field level and click View next to the desired object to control the level of access that a profile should have to a field. Once you click View, you will see a list of all fields related to that object and the current field-level permissions. Click Edit to make changes to the appropriate field (shown in Figure 9-5).
Click Read Access to make a field visible. Select Edit Access to allow users to view and edit a field. Deselect Read Access and Edit Access to make a field hidden.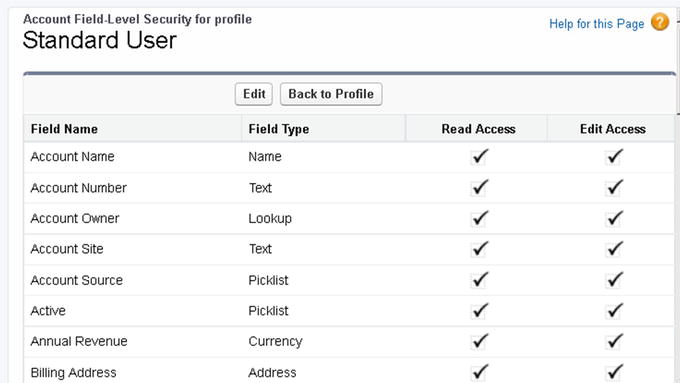
Figure 9-5
Field-level security at the account level
Let’s look at an example. Say Michael Scott Paper Co. uses Salesforce to track sales and accounting information. However, the CEO, Michael Scott, does not want sales representatives to see sensitive financial information such as credit card and Social Security numbers.
To solve this, create a profile for sales representatives and another profile for accounting. For each profile, click View Assignment next to the account and edit the field security. For the sales representatives profile
, deselect Read Access and Edit Access in the Credit Card and Social Security fields. This will hide both fields from users assigned to the sales representative profile. Log in as a user assigned to the sales representative profile to test your work.
App and Tab Settings
Specify what apps are visible and set the default in the Custom App Settings
section of the profile (shown in Figure 9-6).
Figure 9-6
Custom App Settings area in a profile
Record Type Settings
Record types can be assigned at the profile level. For objects with record types, add the record type next to the appropriate object.
Administrative and General User Permissions
Profiles have two types of permissions: Administrative and General, as shown in Figures 9-7 and 9-8. Familiarize yourself with the granular types of permissions so you can better administer a secure organization.

Figure 9-7
Administrative Permissions
section located in a profile
Figure 9-8
General User Permissions
section at the profile level
Object-Level Security
Object-level security is stored at the profile level in the Object Permissions section. As a starting point, a user must have the appropriate level of access to an object to see the object and the records inside of it. You can control object-level security in profiles, as shown in Figure 9-3.
The following are different permission types used to set the level of access users have with each object:
- Read: Users can view records.
- Create: Users can create records.
- Edit: Users can read and edit records stored in this object.
- Delete: Users have permission to read, edit, and delete records.
- View All: Users can view all records stored within this object.
- Modify All: Users can modify all records stored within this object.
Set the object-level security for standard and custom objects. Define whether a profile should have Read, Create, Edit, Delete
, View All, or Modify All, as shown in Figure 9-9.
Figure 9-9
Setting object-level security
Password Policies, Login Hours, and IP Ranges
You can specify when passwords should expire, password requirements, session timeouts, and much more. You can also control the login hours and acceptable IP ranges for each profile.
Assigning a Profile
There are six different types of standard profiles
:
- System Administrator: Assign this profile to a user who needs access to all functionality within license. This profile has access to view and modify all data.
- Standard User: This profile has core platform functionality. They can view, edit, and delete records they have access to.
- Solution Manager: This is the same functionality as a Standard User plus additional permissions to manage published solutions.
- Marketing User: This is the same functionality as a Standard User plus permission to import leads, manage campaigns, and manage communication templates.
- Contract Manager: This is the same functionality as a Standard User plus permission to manage and approve contracts.
- Read Only: This profile can only view records they have access to and run reports and export.
Create a Custom Profile
Create custom profiles to build a unique set of permissions for different groups of users. Follow these steps to create a custom profile:
- 1.Search for and select Profiles from the Setup menu (shown in Figure 9-10).
 Figure 9-10Navigating to Profiles in Salesforce
 - 2.To create a new profile , click New Profile, as shown in Figure 9-11.
 Figure 9-11New Profile button on the Profiles home page
 - 3.To create a custom profile, you must clone one from an existing standard profile. Choose a standard profile to clone from and click Clone.
- 4.Enter the name of the new profile and click Save, as shown in Figure 9-12.
 Figure 9-12Naming your new custom profile
To complete changes to what this profile has access to see and do, click Edit next to the profile
name. Modify the appropriate permissions to your new profile, as shown in Figure 9-13.
Figure 9-13
Home page of a profile
Note
All users must have an assigned profile, and profiles can be assigned to multiple users. However, users can be assigned only one profile.
So, what do you do when you need to give additional permissions to an individual user?
For example, let’s say you want to extend the permission Create Reports to an individual user
. Rather than creating a new profile or editing permissions on an existing profile, we suggest creating a permission set.
Permission Sets
Permission sets
are a collection of permissions and settings that can be assigned to the users who need it.
Follow these steps to create a permission set:
- 1.Search Permission in Setup and click Permission Set.
- 2.Click the New button to create a new permission set, as shown in Figure 9-14.
 Figure 9-14Permission Sets home page
 - 3.Enter the name of your permission set in the Label field and provide a detailed description, as shown in Figure 9-15.
 Figure 9-15Steps to create a permission step
 - 4.Choose the type of user who will use this permission set .
Tip
It is best practice to give your permission set a description. This makes it easier to find when many permission sets exist.
Record-Level Security
Record-level security specifies what records a user has access to view and edit in each object
.
Record Ownership
Each record in Salesforce
must have an owner. This can be either a user or a queue. By default, the owner of a record has full access capabilities. This means they can view, edit, delete, transfer, and share the record.
Organization-wide Defaults
By default, your Salesforce organization operates in a public sharing model. We refer to this as the organization-wide defaults (OWDs). This means that all users have access to see and edit all data on a per-object basis, provided they have the appropriate object-level security. To limit visibility for certain records, consider operating in a private sharing model for that object.
Private or Public?
When considering to go private or public on an object
, consider this: are there any elements of your data that should be restricted to any particular user?
If the answer is yes, you should be operating in a private sharing model for that object.
As shown earlier in Figure 9-2, the organization-wide default has the highest level of restriction. This is the only security component that restricts access.
All other security components are designed to share access. Record access can be opened up to specific users or groups of users through roles, manual sharing, and sharing rules.
Change Sharing Settings
To modify your organization-wide defaults
, navigate to Sharing Settings in Setup.
To control the sharing settings for external users, you must first enable external sharing. Select Sharing Settings in the Setup area’s Quick Find, and click Enable External Sharing.
From here, you can view the level of access both internally and externally by object, as shown in Figure 9-16.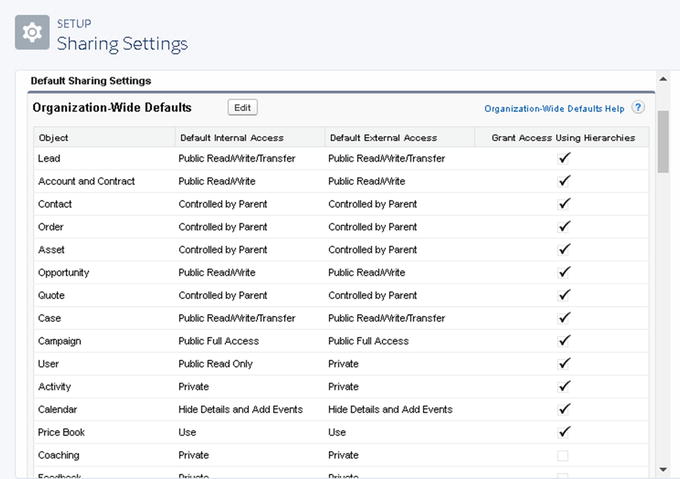
Figure 9-16
Default organization-wide settings
External users include community users, guest users, web site users, Chatter external users, and portal users
. You can split the sharing settings for each object for internal and external users.
Select Edit to change the settings to any of these options:
- Private: All records in this object are private and can be visible only to the record owner, role, or sharing rule.
- Public Read Only: All records in this object are visible as read-only records.
- Public Read/Write Only: All records in this object are visible and can be modified by all users.
- Public Read/Write/Transfer: All records in this object are visible and can be modified and transferred by all users.
- Controlled by Parent: Users have the same level of access on the detail of a master-detail relationship.
Select Standard Report Visibility to enable visibility to data in reports that may not be accessible because of organization-wide defaults.
Select Manual User Record Sharing
to allow users to manually share a record to additional users.
Select Manager Groups to allow users to share records with their manager groups, as shown in Figure 9-17.
Figure 9-17
Additional security settings
Role Hierarchies
Once OWDs are in place to restrict data, you can use role hierarchies to open up visibility and share record access. Roles define the level of access a user or groups of users have from the top down. Record access rolls up through the hierarchy.
As an example, create a branch under Sales Managers called Sales Reps to give sales managers access to the sales reps beneath them, as shown in Figure 9-18.
Figure 9-18
Understanding the roles home page
Note
When considering your role chart, keep in mind that role hierarchies aren’t necessarily the same as your executive organizational chart. Typically you create roles for every level in the hierarchy, not for every position.
If a role sits above someone else in the role hierarchy tree, that role is granted the same level of access to all records that fall beneath that branch. So if the access is read-only, that same level of record access is granted.
Creating a New Role
Use roles to define how users view and share records. The correct role structure depends on your organization’s culture.
To create a role
, follow these steps:
- 1.Search for Roles in the Quick Find box and click to navigate.
- 2.Select Set Up Roles .
- 3.Select Expand All to see Salesforce’s default setup.
- 4.Click Add Role under the appropriate branch to add a branch below (refer to Figure 9-19).
 Figure 9-19Tree branch view expanded
 - 5.Fill in the following details to successfully save a new role, as shown in Figure 9-20:
- a.Label: This is the name used to title the role. Examples can include VP of Sales, Regional Managers, and so on. Press Tab to autopopulate the role name.
- b.Role Name: This is the unique API name. This role reports to the name of the role above this role.
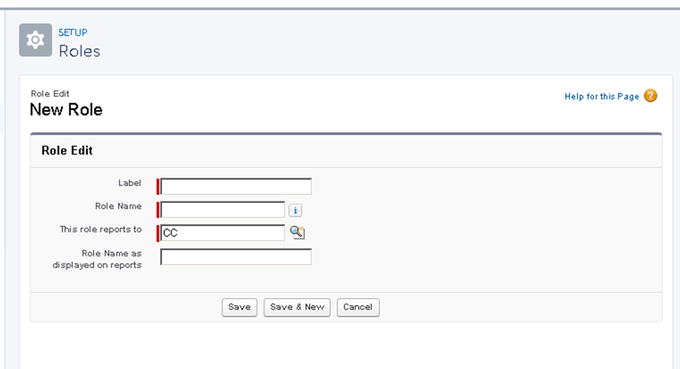 Figure 9-20Steps to creating a new role
 - a.
- 6.Assign users to specified roles .
By selecting to assign, you can search for unassigned users to connect them to a proper role. You can also navigate to a user’s profile and select Edit to assign a role.
Sharing Rules
You can use sharing rules
to give roles, groups, or individual users access to data that they may be excluded from. Sharing rules can be used to override the existing security restrictions.
Public Groups
Groups can be created to simplify sharing and security. This can include a combination of individuals, users with specific roles
, or members of other public groups.
Creating a Public Group
Before creating a sharing rule, you must create a public group. Follow these steps to create a public group
:
- 1.Search for Public Groups in the Quick Find box.
- 2.Click New or set View to All to see a list of existing groups (Figure 9-21).
 Figure 9-21Setting up public groups
 - 3.Fill in the following details, as shown in Figure 9-22.
- Enter the name of the public group in Label .
- Enter the unique API name in Group Name.
- To add members to a public group, move them from Available Members to Selected Members.
 Figure 9-22Adding members to a public group
 - 4.Click Save. Now you have a new public group with members .
Manual Sharing
Manual sharing
can be used to provide individual access to records through a sharing button.
There are four prerequisites needed to give access to another record. These prerequisites require the following:
- You are the record owner.
- You are in a role higher than the record owner.
- You have “full access” permission to the record.
- You are a system administrator .
Summary
In this chapter, you learned how Salesforce approaches security in a multitiered architecture, which supports greater flexibility and protection. Be sure to visit
http://trust.salesforce.com
for transparent access to security threats and advisories.