
Salesforce Service Cloud allows your customer service representatives and support representatives (users) to manage, track, and resolve customer inquiries and issues. The Service Cloud application uses the Case object to capture all the details needed to help them to resolve the inquiries and issues. Your users can manually create cases for requests via phone and in person or accept cases from multiple channels (e.g., web forms, email, real-time web chat, online communities, and social media outlets). You can allow your users to efficiently manage these channels by setting up case assignment rules. The Salesforce Service Cloud application also allows you to create case escalation rules when an issue needs to be escalated to management. Tracking the various customer inquiries your company brings in could even help you to establish new procedures. It also will help you to understand any weak points within your company. Figure 3-1 shows the internal communication that can take place in Service Cloud. In short, the application can help to resolve issues with customers faster.
Figure 3-1
Internal communication
Overview of Salesforce Case Management
Salesforce case management allows users to capture the necessary details of the Case object to manage and successfully resolve their case. Users can see important case details in 29 standard fields as well as create their own custom fields. They can keep track of the status of a case with a drop-down field with values such as New, Working, Escalated, and Closed. Users can also access all the necessary connected objects such as the account, contact detail, and product information. Giving users access to the account and contact details will allow them to get a full view of the customer submitting the case. They can assign the case to a High, Medium, or Low priority based on the case submission as well as set up their page layout to best fit their needs and the needs of the company.
Introduction to Standard Case Fields and Related Lists
Salesforce offers a number of standard fields via its Case object that are displayed in Figure 3-2. Before you decide to create a custom field, we recommend that you leverage an existing standard field instead. The majority of Salesforce standard fields have back-end automation applied to them. Because every business is different, you will most likely need custom fields, but why re-create the wheel if it’s not necessary?
Figure 3-2
Case information fields
You will find the following fields in the Case Information section (as shown in Figure 3-2):
- Parent Case: Attach a case that currently exists and was the reason for the new case.Note If you use this function, it is essential to add the related list “Related Cases” to the case layout to get a full view of all the cases attached to a parent case.
- Case Owner: Assign the user who is primarily responsible for managing the case.
- Case Number: This is an automatically generated number used to reference a case both internally and externally.Tip Use this case number to allow your users and customers to reference it when addressing the case. Apply it to automated emails.
- Status: Use this field to track the current status of a case. Utilize the existing values (New, Escalated, and Closed) or add your own.
- Contact Name: Attach the point of contact who submitted the case.
- Escalated: Use this check box to apply workflow rules (discussed later in the chapter) to automated escalations. Additionally, select this box and see the newly added red arrow next to the case number indicating that the case has been escalated. Utilize this field in reports and dashboards to keep an eye on your most important cases.
- Account Name: After attaching the contact, watch the account get autopopulated with the account details of the contact. If the case belongs to an account other than the attached contact, overwrite the field with the necessary account.
- Priority: Apply the necessary priority to the case using the standard values of High, Medium, or Low. Utilize this field in reports and dashboards to keep an eye on your most important cases.
- Type: Use this field to track the types of cases your teams are managing. Use this field to help determine what FAQs should be developed or updated.
- Case Reason: Use this field to track the reasons why a client contacted you. You can also use this field to help update FAQs, internal process, and so much more.
- Case Origin: Use this field to track where your cases are coming from, whether it be an online form, email, phone, or in person.
- Date/Time Opened: This field is automatically populated with the date and time the case was created.
- Date/Time Closed: This field is automatically populated with the date and time the case was closed. Cases can be closed by changing the case status to a closed status or via many other ways (e.g., API, import update, automation rules, etc.).Note Salesforce reports come with an Age field that tracks the duration in days. However, this field is not a field that you can put on your case layout. You can create a formula field if you would like your users to see the duration a case has been (or was open for) on the case page layout.
- Closed When Created : Users are able to create a new case and close it right away. When this happens the checkbox is marked true for this field and can be used in reports.
Under Contact Information
in Figure 3-3, you’ll find the following fields:
- Contact Phone, Contact Mobile, Contact Fax, and Contact Email: These fields pertain to the contact attached to the case. They are all formula fields that are used to map fields from one object to another. Since these are formula fields, they are locked fields that can’t be updated from the Case object. Instead, you’ll need to go to the contact record and update the information there.
Under Web Information
in Figure 3-3, you’ll find the following fields:
- Web Email, Web Company, Web Name, and Web Phone: When the web-to-case function is configured (we’ll cover this later in the chapter), cases will be automatically created in Salesforce. These fields will be populated with the corresponding data from your web form.
Under Description Information
in Figure 3-3, you’ll find the following fields:
- Subject: Use this field as the incoming subject line of an email when the email-to-case feature is configured or as a quick reference to what the case is about. Notice that this field’s data is replicated at the top the page layout as well.
- Description: Use this field as the incoming body of an email when the email-to-case feature is configured or as a long description of the case.
- Internal Comments: Use this field to create case comments while you are on a call with a client.
- Created By: This field is found on every record in Salesforce. It captures who and at what date and time the case was created.
- Last Modified By : This field is also found on every record in Salesforce. It captures who and at what date and time the case was last updated or modified.
Tip
Don’t worry if these fields aren’t enough or don’t work for your company. The default positions of some of these fields are easily modified. Salesforce allows up to 500 custom fields on the Case object. You can create fields for text, dates and time, numbers, currency, percents, picklists, multiselect picklists, check boxes, emails, phones, and URLs.

Figure 3-3
More case fields
Next, we’ll discuss the standard related list found on the Case object.
Figure 3-4 shows the standard Case object related list. A related list is another object within your Salesforce organization that is connected to the current object you are viewing. The related list you’ll find on the Case object
includes the following:
- Solutions: This related list houses articles created in another Salesforce object called Solutions. Solutions are used to house content that either can be used to help you user close a case faster or can be used to provide information to the case contact. This object works with another Salesforce product called Knowledge. Solutions and Knowledge are important products because they provide resources to your users that help them move a case forward.
- Open Activities: These records are outstanding or future tasks or events that your user created. Any task or event that hasn’t been completed will show up here.
- Activity History : These records are tasks, emails, call logs, and events that your user has completed.
- Case Comments: These records provide information pertaining to the case. Your user will add important case comments to this area.
- Attachments: These records reflect outside documents that pertain to the case. This could be current client contracts or screenshots provided by the client about an error they are experiencing.
- Case History: This content includes all the field-level changes made to the Case object. You can set field tracking and choose what fields are most important (we’ll cover this later in the book).
Note
Salesforce also offers other related lists. Although not on a standard page layout, these can be easily added to your page layout. One that is worth noting is Contact Roles, which allows you to add multiple contacts to one case record. Another is the related list called Emails, which is used when you have enabled the email-to-case function (explained later in this chapter). If set up in your email account properly, your users can stay in Salesforce and never have to bounce between the two (also covered later).
Tip
Salesforce allows you to relate objects to one another. Should your Case object need multiple records of another, you can create a junction object. For instance, if you would like to relate multiple products that are involved in one case, you can do so. Creating custom objects is simpler than you may think.

Figure 3-4
Case layout
with standard related lists
Creating a New Case Record
You can manually enter a case by first navigating to the Case object (see Figure 3-5) and then clicking the New button. Once a record has opened, you can begin filling in the case details by adding the contact name, account name, priority, case origin, type, and case reason (see Figure 3-6). Make sure to capture the client’s explanation or reasoning for reaching out in the Subject and Description fields (Figure 3-6). While you are adding these details, utilize the Internal Comments field if necessary. If you have created custom fields for your Case object, make sure to train your users on filling in these details as well.
Figure 3-5
If you are not already on the Cases tab, use the down-facing arrow next to the object title to navigate to the Cases tab
The following steps are recommended to create a new case record (Figures 3-6 and 3-7):
- 1.Type the contact name and click the magnifying glass next to the field to attach a contact to the case.
- 2.The account name will automatically be assigned to the account of the contact you attached in the contact field.
Tip
Accounts and contacts can be disabled as required fields.
- 3.Change the priority of the case by clicking in the field. Select the appropriate value from the provided values.
- 4.Select the case origin by clicking into the field and select the appropriate value. Notice the * next to this field. This means that it is required.
- 5.Select the type and case reason by clicking into the field and selecting the appropriate value.
- 6.Fill out any custom fields appropriately if necessary at this time.
 Figure 3-6Creating a case, steps 1 to 6
 - 7.Type in the subject of the case.
- 8.Type in the description of the case.
 Figure 3-7Creating a case, steps 7 and 8Note The Subject and Description fields are used in the email-to-case functions.
 - 9.Once complete, click Save.
Tip
Utilize the case Date/Time Opened and Date/Time Closed fields to generate reports about case duration. Also, the case type and reason fields can help define client and internal FAQs.
Collaborating with Your Team on a Case Record
Managing and efficiently closing cases can take more than one person being involved from your team. Users can utilize the case feed found in their case record to quickly communicate with others on your team. They can also direct a message to any Salesforce user who has access to the case record.
To mention a comment to a user, you use the @ symbol followed by the user’s name and, once the name populates below the text area, click the hyperlinked name. You’ll also see that every action is tracked in the case feed for a complete view of the case and what happened throughout its duration. The feed filters on the left side of the case record help you to quickly navigate to case’s feed-related items. Feed details will display from the oldest at the bottom to the newest created at the top. This gives you a quick view of the latest conversations or work done on the case. Figure 3-8 shows the functions of the case feed.
Figure 3-8
Case feed
To collaborate with your team, follow these steps:
- 1.Access the case feed by clicking the tab Feed.
- 2.Utilize the post area to communicate with your team on the case.
- 3.Utilize the case feed to track all conversations throughout the case duration.
- 4.The case feed captures changes made to the case status.
- 5.The case feed also tracks activities such as the Log a Call activity and other general tasks (see Figure 3-9).
 Figure 3-9Utilizing feed filters to quickly navigate to the all call logs, case notes, status changes, and task and events
Case Automation
Salesforce offers the ability to automate functions such as automatically assigning a case to a queue or to a specific user. Salesforce also allows you to create rules to auto-respond to your clients related to a case based on specific criteria. You can also configure case escalation rules based on criteria that will automatically assign the case to an escalated case. Along with this case escalation, you can apply automated notifications to be sent when this criterion is met. You can also route cases from your email or from a web form. You are also able to adjust some support settings that allow you to further customize your case automation. Figure 3-10 shows a case queue.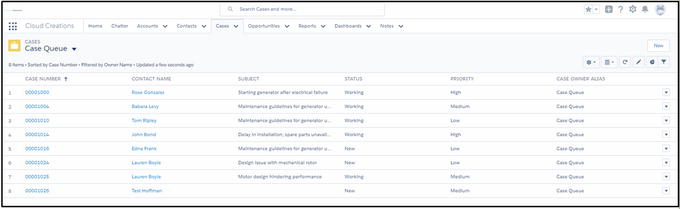
Figure 3-10
Case queue
Creating Case Queues
A case can be sent to a queue in many ways. You can automatically assign a case to a queue when it created or throughout the life of the case because a change to the case record can send it to a queue. You can think of a queue as a holding tank. This holding tank will allow you to give multiple users access to it and give them the option of accepting new cases. Instead of assigning a case to a specific owner, you can assign it to a queue using the case assignment rules. In Figures 3-11 through 3-14, you’ll learn how to create a queue in Salesforce. The steps are as follows:
- 1.Navigate to the Setup menu by clicking the settings cog icon in the upper-right corner of the Salesforce window.
- 2.Using your search area, enter Queue. Click Queues under Users.
- 3.Click the New button.
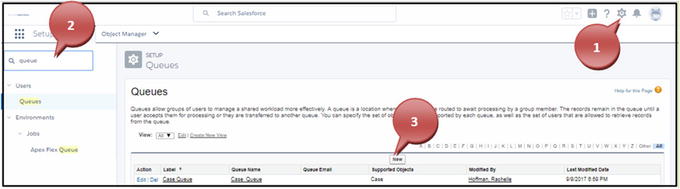 Figure 3-11Creating a case queue
 - 4.Create a user-facing label for the queue and hit your Tab key. Salesforce will create the queue name.
- 5.Put an email address in the Queue Email field if you want to receive a notification that a new case was added to the queue.
- 6.Select the box Send Email to Members if you want the users assigned to that queue to receive an email when a new case arrives in the queue.
 Figure 3-12Naming your queue and setting notification options
 - 7.Select the Case object and click the arrow to move it to the Selected Objects section.
 Figure 3-13Selecting the object for your queue
 - 8.Using the search area, select in the drop-down whether you want to search for a specific user, public group, role, or role and subordinates.Note Selecting the option Roles and Subordinates gives access to the specific queue to a specific role and all that fall under the role. For instance, if your CEO sits at the top of your role hierarchy and you give the CEO access using this function, it gives all below the CEO role access as well.
- 9.Select the specific user, public group, role, or role and subordinates and use the right-facing arrow to move it into the Selected Members area.
- 10.Click Save.
 Figure 3-14Select the users, groups, roles , or roles that need to have access to this queue.
Tip
Queues can be used for more than just cases. You can set up lead queues and set up lead assignment rules just like you can on cases.
Creating Case Assignment Rules
Now that you have created your first queue, it’s time to automatically assign cases to that queue or to a specific owner. You can create case assignment rules based on specific criteria in the case and related records to the case. For instance, you can create an assignment rule to automatically assign all cases that came in for a specific account or contact to a specific user. Or you can assign a case to a queue based on the case origin, case reason, case type, or any other field found in the case record. Some companies create queues for VIP or platinum clients and only allow their most experienced users to handle these cases. Figures 3-15 through 3-20 show you this process. The step-by-step process is as follows:
- 1.Navigate to the Setup menu by clicking the settings cog icon in the upper-right corner of the Salesforce window.
- 2.Using your search area, enter Case Assignment. Click Case Assignment under Service.
- 3.Click New to start the case assignment rule.
 Figure 3-15Accessing case assignment rules
 - 4.Name the rule and click Save. You can activate the rule now by checking the Active check box or hold off and activate it later.
- 5.Click Save.
 Figure 3-16Creating a case assignment name and activating itAfter saving the rule name, it will return you to the case assignment area. Click the rule name you just created.
 Figure 3-17Retrieving your case assignment rule
 - 6.Click the New button.Note In Figure 3-18 notice the Active box above Modified By. This is where you will activate the rule after you have completed it using the Active check box.
 Figure 3-18Creating the rule criteria for your case assignment
 - 7.If this is your first case rule assignment, type the number 1 into the Sort Order field. If you have configured many rules, the Sort Order field tells Salesforce which rules to run first. Once a rule runs and assigns the case, it will not run other rules on the same case. Assign the sorting to all your rules according to importance.
- 8.In step 2 you create the rule criteria. The rule criteria tells Salesforce that if the criteria you enter here is true, then it assigns the case to the specified location (steps 9 and 10).
- a.To start this process, you’ll first need to click None in the field column. Here you will select the field that Salesforce should evaluate for the rule. This can be the case type, case reason, case origin, account, contact information, or any field criteria found in the case, account, or contact.
- b.Choose the appropriate operator. For instance, if you want every case type that equals a specific value to be auto-assigned to specific users, you would choose the operator “equals” and select those values.
- c.Choose or enter the appropriate value or outcome in which the case will auto-assign.
- d.You can also configure your filter logic by clicking Add Filter Logic. This allows you to change the logic from being “all” the field criteria (using “and”) to “or.” For example, you can say if the case type is Problem OR the case origin is Email. The standard setup would make that logic sentence be “If the case type is Problem AND the case origin is Email.”
 Figure 3-19Setting up the field criteria for the case assignment rule
 - a.
- 9.Choose to assign the case to a specific user or to the queue you set up in the previous section.
- 10.Select an email template that you would like to autosend to the user or queue.
- 11.Click Save or click Save and New to set up another case assignment.
 Figure 3-20Assigning the specific user or queue and send them a notification
Note
Step 4 provides a functionality that is not a Lightning component and would have to be set up in Classic.
Creating Case Auto-Response Rules
Case auto-response rules allow you automate communication with your client based on field-level change. For instance, if you want an email sent to your client when the status of the case changes from one value to another, you can do that. Any field-level change from a value to another can activate this email send or another automation. Figures 3-21 through 3-26 will walk you through creating case auto-response rules.
- 1.Navigate to the Setup menu by clicking the settings cog icon in the upper-right corner of the Salesforce window.
- 2.Using your search area, enter Case Auto-Response. Click Case Auto-Response Rules under Service.
- 3.Click New to start the Case Auto-Response rule.
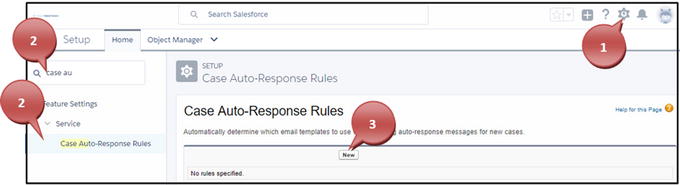 Figure 3-21Accessing case auto-response rules
 - 4.Name the rule and click Save. You can activate the rule now by checking the Active check box or hold off and activate it later.
- 5.Click Save.
 Figure 3-22Naming your case auto-response rule
 - 6.After saving the rule name, it will return you to the case assignment area. Click the rule name you just created.
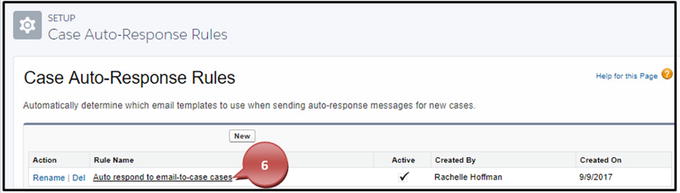 Figure 3-23Retrieving your case auto-response rule
 - 7.Click the New button.Note In Figure 3-24, notice the Active check box above the Modified By field. This is where you can activate the rule after you have completed it using the Active check box.
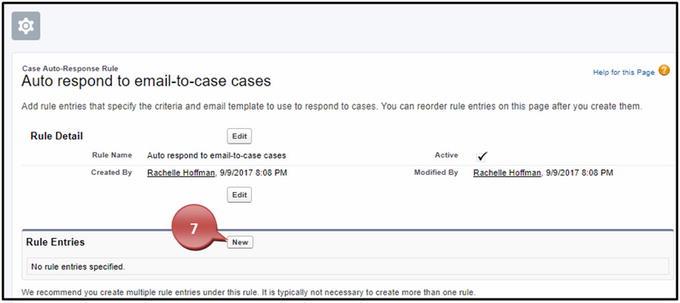 Figure 3-24Creating your new rule criteria for the case auto-response rule
 - 8.If this is your first case auto-response rule, type the number 1 into the Sort Order field.
- 9.In step 2 you create the rule criteria . The rule criteria tells Salesforce that if the criteria you enter here is true on the case, then send the email (steps 9 and 10).
- a.To start this process, you’ll first need to click None in the field column. Here you will select the field that Salesforce should evaluate for the rule. This can be the case type, case reason, case organ, account, contact information, or any field criteria found in the case, account, or contact.
- b.Choose the appropriate operator. For instance, if you want every case type that equals a specific value to automate the email, you would choose the operator “equals” and select those values.
- c.Choose or enter the appropriate value or outcome in which the case will auto send the email.
- d.You can also configure your filter logic by clicking Add Filter Logic. This allows you to change the logic from being “all” the field criteria (using “and”) to “or.” For example, you can say if the case type is Problem OR the case origin is Email. The standard setup would make that logic sentence be “If the case type is Problem AND the case origin is Email.”
 Figure 3-25Creating the criteria for your case auto-response rule
 - a.
- 10.In step 3, you’ll need to provide the name of who the email is coming from.
- 11.Enter the sender’s email address in the Email Address field.
- 12.Provide a reply-to address should the client want to respond to the email.Note You can only use one of your user’s emails or an email that you set up as an organization-wide email.
- 13.Assign the email template that you want to be sent for this auto-response rule.
- 14.Once steps 1 through 4 are complete, click Save.
 Figure 3-26Setting up who the email is coming from and your email template
Creating Case Escalation Rules
Case escalation rules allow you to create automation for when a case will get escalated and what actions will take place thereafter. Like the other rules that you have created in the previous section, you’ll be able to determine when the case gets escalated based on field-level criteria of the case. Once the field-level criteria are met, then you can set actions such as sending a notification email, reassigning the case to another user, and notifying that user. Figures 3-27 through 3-34 show the setup. The steps include the following:
- 1.Navigate to the Setup menu by clicking the settings cog icon in the upper-right corner of the Salesforce window.
- 2.Using your search area, enter Escalation Rules. Click Escalation Rules under Service.
- 3.Click New to start the escalation rule.
 Figure 3-27Navigating to the case escalation rules
 - 4.Name the rule and click Save. You can activate the rule now by selecting the Active check box or hold off and activate it later.
- 5.Click Save.
 Figure 3-28Creating your name for your case escalation rule
 - 6.After saving the rule name, it will return you to the case assignment area. Click the rule name you just created.
 Figure 3-29Retrieving your case escalation rule
 - 7.Click the New button.
 Figure 3-30Creating the criteria for your case escalation ruleNote In Figure 3-30, notice the Active check box; this is where you will activate the rule after you have completed it using the Active check box.
 - 8.If this is your first case escalation rule, type the number 1 into the Sort Order field. If you have configured many, the Sort Order field tells Salesforce which rule to run first. Once a rule runs and executes the action, it will not run other rules on the same case. Assign the sorting to all your rules according to importance.
- 9.In step 2 you create the rule criteria . The rule criteria tells Salesforce that if the criteria you enter here is true on the case, then it will send the email (steps 9 and 10).
- a.To start this process, you’ll first need to click None in the field column. Here you will select the field that Salesforce should evaluate for the rule. This can be the case type, case reason, case organ, account, contact information, or any field criteria found in the case, account, or contact.
- b.Choose the appropriate operator. For instance, if you want every case type that equals a specific value to automate the email, you would choose the operator “equals” and select those values.
- c.Choose or enter the appropriate value or outcome in which the case will autosend the email.
- d.You can also configure your filter logic by clicking Add Filter Logic. This allows you to change the logic from being “all” the field criteria (using “and”) to “or.” For example, you can say if the case type is Problem OR the case origin is Email. The standard setup would make that logic sentence be “ If the case type is Problem AND the case origin is Email.
 Figure 3-31Creating your rule criteria for the case escalation rule
 - a.
- 10.In step 3 you can choose a business hour to set for this escalation.Note To choose business hours to set, you to need to have created this in Salesforce. In the Setup menu, search for business hours for more information. By default, the business hours are set for 24 hours 7 days a week.
- 11.In step 4 you select how escalation times will be determined.
- a.You can select when the case is created, which will evaluate the criteria only once when the case is created.
- b.You can select when the case is created and disable it after the case is first modified. This option will check your case’s criteria after the first time the case is modified (usually this is after a user has started to handle it).
- c.You can select the last modification time of the case. This will check the criteria of the case every time a change is made to it. This will allow the escalation rule to be applied when the case is modified.
- a.
- 12.Click Save.
 Figure 3-32Selecting the business hours and when the case escalation rule should run
 - 13.Click the New button to start the creation of your actions.
 Figure 3-33Creating your escalation rule action
 - 14.For the Age Over field, you determine the number of hours that a case with matching criteria can be open before it escalates. You can change the drop-down to show single minutes or adjust it for 30-minute increments.
- 15.Under “Choose one or more of the following actions,” you can do the following:
- a.Choose to have the case reassigned to another user or a queue. In the field next to “Auto-reassign cases to,” choose an email template that will get sent to that user or the users belonging to that queue.
- b.Choose who will get notified that a case has escalated and select the template that should notify the user. Usually, this is an individual in management.
- c.If you are not choosing to reassign the case, you can at this time notify the current owner of the case that it has escalated.
- d.In the Additional Emails field, choose in addition to the previous setting if anyone else should receive a notice of the case escalating.
- a.
- 16.When you have completed your action, click the Save button.
 Figure 3-34Setting up the actions on your case escalation rule
Tip
You can create one escalation rule with multiple actions, such as if you want a particular case to be escalated after two hours of meeting the rule criteria. Then if the case still isn’t closed four hours after that and you want to escalate it again, you could set this up. All you would need to do is create another action.
Setting Up Email-to-Case
Email-to-case is a function that allows you to automatically have a case created based on an email being sent to a specific email address. For instance, if you have a support group that manages tech questions about your products, you can publicize an email and allow clients to submit requests that will automatically be routed to Salesforce and create a case for you. Figures 3-35 through 3-42 will walk you through this setup.
- 1.Navigate to the Setup menu by clicking the settings cog icon in the upper-right corner of the Salesforce window.
- 2.Using your search area, enter Email-. Click Email-to-Case under Service.
- 3.Click the Edit button.
 Figure 3-35Navigating to the email-to-case setup
 - 4.Select the boxes Enable Email-to-Case and Enable HTML Email.
- 5.Click the Save button.
 Figure 3-36Enabling the email-to-case function
 - 6.Click the New button.
 Figure 3-37Creating a new routing address for the email-to-case setup
 - 7.Enter the email’s routing name. Usually, this is the name of the email.
- 8.Enter the actual routing email address.
- 9.You can choose to save an email’s header and set who you will accept them from. However, because these are usually images, it will take up 15KB of your organization’s storage. Most users do not enable this option.
- 10.Under Task Settings, you can create a task along with the case being created when it comes in.
- 11.Under Case Setting, set the priority of the case and the case origin.
- 12.Click Save or click Save & New to set up more email routing addresses.
 Figure 3-38Setting up your routing address for the email-to-case function
 - 13.An email will be sent automatically to the routing address that you entered in step 8. If you don’t receive an email within a couple hours, make sure to check your spam or other firewall settings your company may have or click the Resend link shown in Figure 3-39.
 Figure 3-39If you don’t receive the verification email, you can use this Resend link to resend the email
 - 14.The email you receive should look like the example in Figure 3-40. You’ll need to click the link within the email to verify that this is a working email address. After clicking the link, you’ll be taken to another Salesforce screen; click the Continue button, as shown in Figure 3-41.
 Figure 3-40Email verification sent
 Figure 3-41Click Continue, and you’ll be taken to the Salesforce login page
 - 15.Lastly, you’ll need to apply some email forwarding rules on your email inbox to forward emails to the e-mail service address that Salesforce provides.
Creating the email forwarding rule is what utilizes the on-demand email-to-case functions supported by Salesforce. By forwarding all your emails to the email service address provided by Salesforce, you can give your users a one-stop application with Salesforce. When an email is sent into Salesforce, the client receives a reply with a unique case thread found in the body and the subject line of the email. This case thread allows an email that comes back into the same email account and per your forwarding rules gets sent into Salesforce to be attached to the existing case. This allows your users to stay in Salesforce while they address support case inquiries. Figure 3-42 shows a case thread.
Figure 3-42
This case thread
allows your client email to get attached to the appropriate case.
Note
The email-to-case function has some limitations. First, you can only receive attachments up to 10MB. Second, this option only allows up to 5,000 email messages a day. For workarounds, see the Setup area to have Salesforce deal with bounced messages. Finally, if the case thread is not included in an email, a new case will be created.
Tip
You would want to use the email-to-case option if your case inquiries are generally over 25MB. Also, the email-to-case setup will automatically identify contacts and replies to the case. The on-demand feature allows for a much more custom solution. It allows for custom field mapping, and its setup is fairly simple.
Setting Up Web-to-Case
The web-to-case function in Salesforce allows you to embed HTML code into your preexisting web site or web form. The majority of clients that have used this function embed the HTML code into a Contact Us form found on support-related web pages on their web sites. This function, like that of the email-to-case function, allows automatically generated cases to make it into Salesforce. Follow the steps shown in Figures 3-43 through 3-48.
- 1.Navigate to the Setup menu by clicking the settings cog icon in the upper-right corner of the Salesforce window.
- 2.Using your search area, enter Web-to-case. Click Web-to-Case under Service.
- 3.The check box Enable Web-to-Case should be select, as shown in Figure 3-43.
- 4.Set the default Case Origin option to Web or any other option that describes where this case is coming from.
- 5.Attach a response template that you want your client to receive upon submitting their case.
- 6.Hide Record Information will hide the record information in the email that is sent.Note If you want to create an email template for this, go to Setup, search for Email Template, and under the Email section you’ll find Email Template.
- 7.Add an email signature if you choose to otherwise create it in the email template.
- 8.Click Save.
 Figure 3-43Creating the web-to-case function
Now that you have enabled the function, you can generate the HTML code to embed on your web site. Figures 3-44 through 3-45 show you how it’s done.
- 1.On the left side in the Setup menu you should see Web-to-Case HTML Genera…. If not, you can search for web-to-case HTML. Click the phrase.
- 2.In the Available Fields area, select fields to be included on your web form.
- 3.Move the field from Available Fields to Selected.
- 4.In the URL field, enter the URL that you want your client to be returned to after submitting their web form.
- 5.The Enable Spam Filtering option will require the Captcha API key to be created (this requires developer work and will not be explained in this book). To set this up, you’ll need to navigate to Salesforce Classic.
- 6.Click the Generate button.
 Figure 3-44Setting up the web-to-case HTML generator
 - 7.Copy this HTML code and send it to your web site manager.
- 8.Click Finished when done.
 Figure 3-45The HTML that is generated
Summary
With Salesforce Service Cloud, you can tailor the experience to your organization’s needs or utilize the great standard functionalities that come with your purchase. Whichever path you choose, you can assure yourself that setup is the least of your worries.