
7
Security Services
Any company that has moved some or a portion of its on-premise IT services to the cloud is worried about security breaches happening to its hosted stuff—and more specifically, how and when these security breaches occur, and how to prevent them from happening again. After all, security breaches happen regularly. Regardless of where you live, security issues are a reoccurring news item. Although many of the breaches that were publicized in the past 5 years were related to on-premise point-of-sale systems having security issues, by 2018, many of the data breaches focused on compromised payment systems that affected both debit cards and credit cards of millions of customers, and of course, we are some of those customers.
It’s only natural to think that the same security issues and concerns could happen and possibly be more widespread when you are operating in the AWS cloud. The latest security bulletins published by AWS at https://aws.amazon.com/security/security-bulletins/ show that there were various Xen security advisories that Amazon needed to keep on top of on behalf of all AWS customers. There are other security bulletins that potentially can affect your compute operations at AWS if you are using specific versions of Docker, Kubernetes, and several other AWS services. Amazon’s job of patching its infrastructure, managed services, and many other integral system components never ends.
Amazon is responsible for maintaining security for the infrastructure being used; that’s the job security of the cloud. Our job is maintaining our stuff—what’s hosted and stored in the cloud.
Certainly, the job of securing our resources hosted in the AWS cloud never ends, whether it’s patching Web and application servers or the operating systems or properly configuring AWS services. For example, in 2014, security vulnerabilities with the Bash shell were discovered. These security issues weren’t new; they just weren’t discovered until 2014.
Operating in the AWS cloud, customers require absolute security. Fortunately, the toolbox of AWS services in the cloud-hosted operating system includes a decent global security service called identity and access management (IAM). Like the moniker says, the management of access to AWS resources to users that we know or identify with is the job of the IAM service.
At the end of this chapter, hopefully you will feel comfortable with the concept of how to secure your AWS resources; create security policy for users, groups, servers, and AWS managed services; and have a better understanding of the additional security and auditing tools available at AWS for your use in maintaining a decent level of security.
The topics for this chapter include the following:
IAM
Authorization and authentication
IAM users and groups
The concept of temporary authorization with IAM roles
Creating security policy
Policy options
AWS Organizations
AWS RAM (Resource Access Manager)
AWS Secrets
AWS Inspector
GuardDuty
Terra Firma is interested in maintaining security for its hosted applications and the administrators who work with its AWS accounts and services. The company also wants to control access for users who will be using a federated logon process—that is, single sign-on (SSO). Terra Firma also must work with third-party consultants who need access to AWS resources. The internal auditing team wants to know what tools are available to help maintain and manage Terra Firma’s overall AWS security and existing compliance levels. Upper management also has specific questions and concerns about the following items:
Creating users and groups for administrative duties at AWS
Defining an appropriate password policy
Setting limits on what administrators can do
Managing the company’s multiple AWS accounts centrally
Using AWS security services to monitor existing AWS resources
Analyzing EC2 instances for proper security levels
Protecting credentials for Web and application servers
In a nutshell, deploying and maintaining security at AWS revolves around a framework of security policies and integrated management services. Security policies define what users, groups, servers, and services can and can’t do. There are also different types of users at AWS. There are administrator types, and then there are AWS users who may not be aware that they actually have anything to do with AWS. For an example of the latter, a mobile user using mobile applications on her phone very possibly has no idea that the back end to an important application is hosted at AWS. Let’s start off with IAM.
Identity and Access Management
IAM was introduced to AWS accounts on September 1, 2010. The simplest definition of IAM is that it can provide controlled access to resources hosted in each AWS account to IAM users, groups of users, and the AWS applications and services, as shown in Figure 7-1. Can is used here because you must deploy IAM security policies to select IAM users and groups before IAM has power to control anything.

Note
IAM checks and confirms that the API calls requested by an authenticated user are allowed to be carried out.
IAM lives its electronic life as a paranoid security service, and we want it to be paranoid. IAM’s default mind-set is no access to anything. Explicit deny is the initial mind-set of IAM. Maintaining and enforcing security is the number-one duty that Amazon can’t mess up and we don’t want to mess up either. Even though it’s our responsibility to secure our own applications and data and access to AWS services, AWS also is responsible for providing us the toolset to do so. After all, it’s Amazon’s cloud.
Note
Creating your first IAM user account, you must add all the required permissions; there are no default permissions assigned to a new IAM user account.
IAM allows us to control access to our resources hosted at AWS from users, groups of users, computer instances, and AWS management services. Access to our AWS resources could be from end users using a mobile device, administrators who need to perform administrative tasks, or developers who may need to share AWS resources among themselves, possibly from different AWS accounts. Amazon services that need access to resources in your account to do their job, such as AWS Config and GuardDuty, also rely on IAM policies assigned to a role that defines a level of access for a temporary period of time. Before we dive under the hood of IAM, here are some of its main features:
Full integration with AWS’s services—Every AWS service can be controlled to some degree using IAM security. One of your jobs as an AWS account administrator is to review the current and ever-expanding documentation on each AWS service you want to deploy to keep up with the breadth of support IAM provides. The features of IAM continually change and increase in power every couple of months.
Bundled in the price—You are not charged anything for setting up and using IAM; however, you are charged for accessing AWS resources as an IAM user. As previously mentioned, with IAM, you get to control the access to AWS resources. IAM potentially saves you money by controlling what users can and can’t do. For example, you can restrict which EC2 instances developers are allowed to spin up; therefore, properly deployed IAM policies provide the required security and save you money.
Controlled access to your AWS account resources in all regions—Each IAM user can be assigned security policies that control the access to AWS resources in any AWS account in any AWS region. Therefore, you can mandate which AWS regions accessed within an AWS account IAM users can’t access.
Granular permission control—Completely control access to any AWS resource or resources at a granular level. Be as detailed and concise as you have to be. For example, if you want to define that an IAM user can describe a load balancer’s attributes and that’s it, you can do so.
Define the level of access an AWS service has to resources hosted in your AWS account—AWS Config monitors your AWS account for acceptable levels of compliance based on Config rules that you define. When you sign up for an AWS management service, such as AWS Config, it is granted access only to your AWS account resources through a mandated IAM security policy assigned to the requesting AWS management service, as shown in Figure 7-2.

Figure 7-2 AWS management services require IAM security roles to be assigned before operation is approved Multifactor authentication (MFA)—Using a variety of multifactor devices—both hardware and software—you can implement an additional level of authentication security to any IAM user or to the root user of the AWS account. In simple terms, MFA provides an additional security code—from a software or hardware device that is linked to your AWS account—that must be entered and verified before authentication to AWS is successful.
Identity Federation/SSO access to AWS services—Allows externally authenticated users temporary access to AWS services. This might involve externally authenticating from your corporate network or from a third-party identity provider such as Google or Facebook.
IAM is a global AWS service protecting AWS resources that are located around the world in the 20 AWS regions. To control access, the IAM security service operates outside of the AWS regions; if you don’t get access through IAM, you are denied access. The IAM service has a single global endpoint located at https://sts.amazonaws.com. All API requests must also use Hypertext Transfer Protocol Secure (HTTPS) due to the security nature of all IAM requests.
Note
Because it’s a global service, security changes and additions to the IAM service take time to replicate worldwide.
IAM Policy Defined
Each IAM policy is ultimately a set of rules that, under the right conditions, define the actions of the AWS entity that the IAM policy is attached to and can perform on specific AWS resources. The first sentence is full of terms used by IAM that need additional explanation. Plus, there are additional related terms used that we need to understand to make sense of IAM.
Note
Who is allowed to do what is the job of IAM.
Entities—There are two entities that IAM authenticates: a user account, which is assigned permanent credentials; and a role, which does not have credentials (no password or access keys). Instead, temporary authentication credentials and a session token are assigned only after verification that the identity can assume the role.
Identity—This means the AWS identification of the entity—the IAM user, group, or role. Each identity is where an IAM security policy is attached.
Roles—A role provides temporary access to AWS resources, but only after the role is linked to an IAM user account.
Users—Only local IAM users and externally authenticated users can authenticate to AWS. An example of an externally authenticated user could be a corporate user who first authenticates to the corporate Active Directory network. Then, after AWS verifies the user’s credentials, temporary credentials are assigned using an IAM role, allowing the external authenticated user access to AWS resources as required. Other external user examples supported by AWS are Google and Facebook.
Groups—A group of IAM users who share the IAM policies assigned to the group, but only after each member of the group has successfully first authenticated to AWS.
Policy objects—Each AWS service is broken down into many granular policy objects that can be crafted into a security policy.
Statement—Policy statements define who can do what to the listed AWS resource.
Principal—The principal is a user, or role, or a software application hosted on an Elastic Compute Cloud (EC2) instance or managed AWS service that the policy is attached to for performing the listed task or tasks on the defined AWS service. When policies are attached to resources or to AWS users from other AWS accounts, the principals needing access are defined in the policy by using their Amazon resource number (ARN). If the principal is a defined role for an application carrying out a task on an AWS resource, the principal will be the AWS service that the application needs access to. The defined tasks can be broadly defined as creating, reading, writing, modifying, or deleting AWS resources. If the IAM Management console is used to create IAM policy for a user or role, the IAM Management console carries out the task of linking a trust policy to the specified user or role automatically.
Resources—These are always defined as AWS resources.
Condition—The conditions that need to be present for this policy to work. Does a specific principal, IP address, date, or even tag need to be present for this policy to be approved? Conditions are optional.
IAM Authentication
Before you can make a request to carry out a task on an AWS resource, you should be authenticated as an IAM user or as an externally authenticated user with a IAM role. You could also use the root user account of your AWS account to carry out any task; however, using the root user for daily AWS administration is not recommended. We will discuss the root user and its role in a few pages. The other IAM option—authenticating as an external user—means the user has first authenticated to a third-party security system, such as Active Directory or Facebook. Externally authenticated users use IAM roles, which provide a set of access keys and temporary credentials that can be used for a defined period of access time. The default is set for one hour of allowed access before the temporary credentials are discarded.
An IAM user wanting to use the AWS Management console to perform administration can do so after signing in with a recognized IAM username and password and having the required IAM policies assigned to his user or group account. If multifactor authentication has also been enabled on an IAM account that is authenticating, a numerical code has to be entered before authentication is successful.
Authentication requests can also be carried out when running commands or scripts from the AWS command-line interface (CLI) or from software development kit (SDK) calls; however, a pair of access keys also has to be provided for these types of requests to be successful. Other than AWS Management console logons, a valid access key and secret access key assigned to the IAM user account making the request must be provided and validated before authentication succeeds. Logon to the AWS Management console logon requires only a username and a password; additional access keys are not required.
When an IAM user account is created, the option is available to create additional access keys. The first access key is the ID key, which is an uppercase alphabetic string of characters starting with AKIAXXXXXXXXXXXX, as shown in Figure 7-3. The second access key is called the secret access key, which is a base64 string, 40 characters in length. Temporary access keys are issued from the AWS service that issues temporary keys and tokens: the security token service (STS). Temporary access keys issued from STS start with an alphanumeric string such as ASIAXXXXXX.

Note
IAM is protecting AWS resources at the infrastructure and service level. Therefore, IAM users and groups are administrators at some level because there is some administrative task that the user or groups of users need to carry out at AWS. IAM does not provide credentials to log on to a client service, locally to a Windows or Linux server, or to a database server. IAM users can only utilize AWS services.
Before creating an IAM user, you must understand the different types of access available and what IAM does and doesn’t do.
If you need to log on locally to a Linux or Windows operating system instance, note that IAM does not control operating system logons.
If you need to log on locally to a database server, note that IAM does not control database logons.
If you’re using SSO, you very well could be using a federated identity using Active Directory or a supported SAML 2.0 product. IAM supports this type of external authentication using IAM roles, which are attached to the externally authenticated user after verification of their identity using STS.
If you’re developing mobile applications that run on AWS, the authentication of end users into the applications is not what a full IAM user account is for. Because mobile applications are running typically on phones, AWS supports authenticating from a mobile application using one of the popular public identity providers such as Facebook, Google, Login with Amazon, or any other provider that supports OpenID Connect. Signing in successfully using one of the well-known external identity providers (IdPS) generates an authentication token that can be presented to AWS’s secure token service. Verification of the external authentication token by STS results in temporary security credentials being provided for access to the desired AWS resources. Again, the access is provided by the linking of an IAM role to the externally authenticated user. You can also use AWS Cognito, which helps you manage the multiple identity providers in one place and allows you to add user sign-in and access control to your applications for authenticated mobile.
If you need to log on as an administrator or developer and work with AWS services, this type of authentication and access control is what a full IAM user account is designed for.
Requesting Access to AWS Resources
Only after AWS has successfully authenticated you are you authorized to make a request to access AWS resources. When the principal (IAM user or role) requests permission to perform an action, the request is sent to either IAM for the IAM user or to IAM and then STS for the issuing of temporary credentials if the IAM user has an assigned role attached to her user account. Several IAM components work together when a request is made for access to AWS resources:
The Principal—Defines what IAM user or IAM user with an assigned role has sent the request.
Operation—The operation is always an API call being executed. The request is for an API operation from the Management console through a script, a CLI manual command, or an application defined using one of the AWS SDKs utilizing RESTful calls across HTTP with JavaScript Object Notation (JSON) as the data exchange format.
Action—This lists the specific action the principal wants to perform. Actions might be for information (List or Get requests) or to make changes (creating, deleting, or modifying).
Resource—Every created AWS resource has a unique ARN for identification purposes, as shown in Figure 7-4.
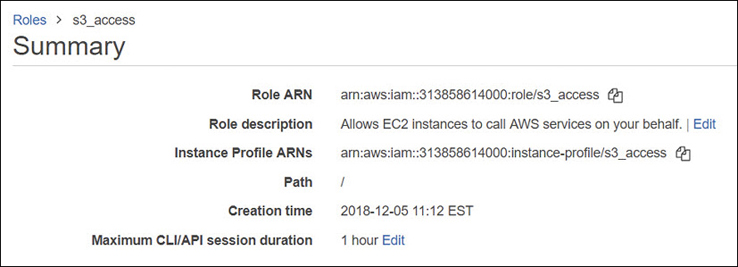
Figure 7-4 Every AWS resource has a resource number (ARN) Environmental data—Lists where the request is originating from, such as from a specific IP address range; additional required security information; and the time of day.
Resource data—Provides additional details about the resource being accessed, such as a specific Simple Storage Service (S3) bucket, a DynamoDB table, or a specific tag on the AWS resource being accessed.
Note
Authorized requests are only allowed to authenticated users.
The Authorization Process
IAM reviews each request against the associated policies of the principal that was requesting authorization and determines whether the request will be allowed or denied, as shown in Figure 7-5. Note that the principal may also be a member of one or more IAM groups, which may increase the number of assigned policies needed to be evaluated before authorization is approved. The mind-set of IAM is this: when in doubt, deny. The evaluation logic of IAM policies follows three strict rules:
By default, all requests are implicitly denied.
An explicit allow can override the default deny.
An explicit deny overrides any allows forever.

Figure 7-5 The IAM authorization request
When a principal makes a request to AWS, the IAM service checks whether the principal is authenticated, signed in, authorized, and has the necessary permissions assigned.
Note
You have probably lived this type of authorization process as a teenager. “Hey, Dad. Can I go to the movies?” “Nope. All requests are denied.” So, you wait until Mom gets home. “Hey, Mom. Can I go to the movies?” “I think so, but let me see whether you cleaned your room. Nope. You can’t go to the movie because you didn’t clean your room.” Mom was sneaky because she threw in a condition; that’s what IAM policies can use for additional leverage.
Behind the scenes, the IAM security system takes all the provided information, checks out the policies assigned to the user or group of users, and either approves or denies the request. It takes but a single denied action for the request to be denied. As I’ve mentioned, IAM functions with a high level of paranoia, starting off by implicitly denying everything by default. Your request will only be authorized if every part of the request is allowed, as shown in Figure 7-6:
The evaluation logic follows some exact rules that can’t be bent for anyone, not even Jeff Bezos.
All requests are implicitly denied by default for IAM users.
A default deny can only be overruled and allowed by an explicit permission allow.
Each permission allow can also be controlled by a defined permission boundary.
An explicit deny in any policy overrides any allows.

Figure 7-6 Policy evaluation logic
Actions
Assuming your request has been authorized, IAM approves the actions or operations requested to the AWS resources in your AWS account, or optionally, to resources in another AWS account. Actions are the tasks you can perform on an AWS resource, such as creating, editing, and deleting the resource. There can be a number of choices when looking at the available actions for each resource; for example, the user resource has more than 40 different actions that can be allowed or denied, including create user, delete user, get user, or update user, as shown in Figure 7-7. Once specific actions have been approved, only these actions listed in the policy can be performed on the defined resource.
Each AWS resource will have several or many actions that can be carried out; the initial access level choices are typically List, Read (typically Get or List), and Write (typically Create, Put, Delete, Update) or other options. The type of AWS resource determines the action choices available. A handy resource has been created by cloudonaut.io referencing all IAM actions for all AWS services. You can find this online resource at https://iam.cloudonaut.io/.
IAM Users
AWS didn’t always have an integrated security system, but as mentioned earlier, it got serious about cloud security starting back in 2010 when it wanted to attract government and corporate clients. Without having a security framework such as IAM in place, AWS never would have been audited successfully against a compliance standard and therefore would not have been accepted by major corporations and government institutions.
It may help to think of our AWS account as a complete hosted cloud operating system with comparable security features similar to the Red Hat Enterprise Linux operating system or Microsoft Active Directory Domain Services. At AWS, our cloud operating system and all its features and tools are available the moment we log in to an AWS account.
Usually when we think of the word account, it relates to a user account, or a group account in the context of an operating system. At AWS, the “account” that you initially signed up for was probably designed for a company, but instead it is used by individuals for their company. And larger companies typically have many accounts—perhaps one or more per developer. Within each AWS account, all available AWS resources can be deployed; the end result is that your company will probably have, or does have, multiple AWS accounts, and it’s potentially a mess. We will talk about some of the options available for managing multiple AWS accounts for easier management of account and user security later in this chapter, when we discuss AWS Organizations, and Resource Access Manager (AWS RAM). For now, within a single AWS account, IAM user identities come in four flavors:
The common first scenario is the user (think administrator-type) who needs access to the AWS Management console.
The second flavor is the administrator or developer who needs additional access to the AWS APIs, whether the APIs are fired using the Management console, at the AWS CLI prompt, or through development of applications using AWS SDKs, such as JavaScript or .NET.
The third is a corporate user who is first authenticated at work, perhaps through Active Directory. This user requires access to a hosted AWS resource. Through the process of external identity federation, temporary AWS credentials and access are provided to the requested AWS resource.
The fourth type of user is the mobile user who has no idea that the mobile application is even accessing AWS back-end resources.
Terra Firma certainly needs to consider the number of administrators and developer user accounts that need to be created, and the number of AWS accounts that need to be managed.
The Root User
Every AWS account has a root user; that’s the very first user, and the owner of your AWS account. The root user credentials are the email address and password that you entered when you created your AWS account; perhaps you’re still using that account.
If you want to, although it’s not recommended, you can continue to log on using the root account in your AWS account; however, the reason this is a bad idea is because the root user from your AWS account is not controlled by IAM. Ever. Think of the root account as your backdoor account that carries out a few specific tasks that primarily deal with the AWS account; however, the root user is not meant for daily administration duties. The root account was used the first time you logged into your AWS account; after all, there weren’t any other accounts available. If the root account is the only available user account that you have, your next job should be creating IAM users and groups to safeguard access to your AWS account resources.
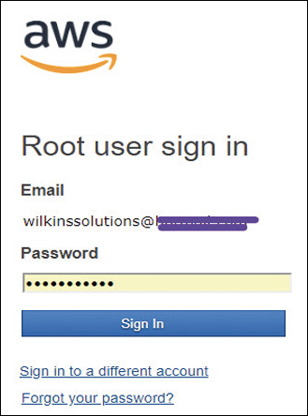
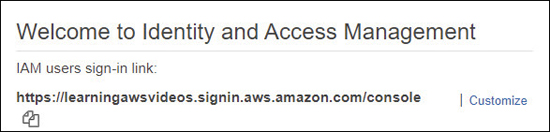
Here’s a quick way to see if you’re using the root account. What are your security credentials to log into your AWS account? If your answer is “an email address” as shown in Figure 7-8, well, congratulations. You are accessing your AWS account as the root user; you cannot be controlled, and you cannot be locked down. Now think about how many people could potentially be using that same account logon; one of those people could potentially delete everything in your AWS account. If that happens, there’s no way to stop it because there are no controls on the root account.
Why would Amazon start with a user account with unlimited power? It’s not like Amazon didn’t warn us. There certainly have been a few notifications from AWS alerting you to create additional users to protect your AWS account. However, the first account in any operating system must have the most power, just like an Active Directory domain controller enterprise administrator or the root user for the Linux operating system. Like any other networking operating system, the root credentials need to be protected.
The root account doesn’t have many tasks that must be carried out as the AWS account root user; however, there are some, including these:
Modifying the root user account details, including changing the password
Closing an AWS account forever
Changing your AWS support plan from free to Developer, Small business, or Enterprise
Enabling billing for the account or changing your payment options or billing information
Creating a CloudFront key pair
Enabling MFA on an S3 bucket in your AWS account
Requesting permission to perform a penetration test
Restore IAM user permissions that have been revoked
Terra Firma needs to do some detailed inventory about how many AWS accounts it currently has and how many root accounts are being used.
Note
After you sign in for the first time using the root user for your account, best practice is to create an IAM user for yourself, add the required administrative privileges to your new IAM user, and stop using the root account unless it is necessary to do so.
The IAM User
An IAM user is either a person or an AWS service that uses specific IAM user account authentication components (username/password combination, or a validated access key and secret key pair) before being able to interact with AWS resources. Every IAM user can access AWS resources using the Management console with a username/password, or optionally has been provided programmatic access using an associated access key ID and secret access key, or both types of access: Management console access and programmatic access. When you are running a script or command from an AWS CLI prompt, the script or command does not execute unless an IAM user’s account access ID and secret access key are provided. The access keys need to be validated before the execution of any CLI command or script.
Note
Remember, an IAM user is not a typical user account; instead, an IAM user is a user within an AWS account.
There are two quick ways to identify an IAM user:
The most common way is using the name of the user account that is listed in the IAM Management console when the user account was created. The common username will also show up in each IAM group listings of associated IAM users.
Every entity that is created at AWS also has a unique resource name: the ARN. The ARN can uniquely identify an IAM user across all AWS user accounts; for example, creating an IAM policy and needing to specify a user as a principal would follow the format of arn:aws:iam::account ID:user/mark.
Creating an IAM User
Creating a user, regardless of the procedure used, is carried out by calling the AWS API. The easiest way to start creating IAM users is to use the IAM service in the AWS Management console and click Add User, as shown in Figure 7-9.
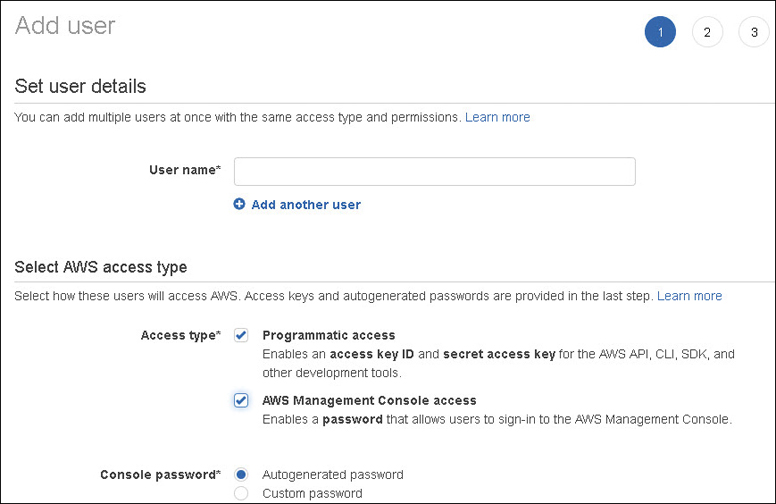
The first decision you must make is the type of access you want to allow your new IAM user to have: Management console, programmatic access, or both types of access.
Management console—Access to the console requires a username and password. If console access is all that is required, access keys (an access key ID and secret access key) are not required.
Programmatic access—This involves working from a command prompt using the AWS CLI, by using the Tools for Windows PowerShell, or through an application/API call.
Note
If you’re taking over an existing AWS environment, you may find that IAM users have access keys assigned to their accounts, but they don’t actually need the assigned access keys, as they’re not carrying out programmatic tasks. If this is the case, the access keys should be deleted. In the future, if you decide the users need access keys, you can add new ones. The root account access keys should also be removed for safekeeping; this certainly is a best practice to follow.
IAM User Access Keys
You can use access keys as credentials when they’re linked to an IAM user or to the AWS account root user. As we have discussed, access keys are required when using the AWS CLI, as shown in Figure 7-10, running scripts, running PowerShell scripts, or calling the AWS API directly or through an application. Each user account can have two access keys: the access key ID that can be viewed through the console, and a secret access key that is not viewable after creation. Think of the integration of the two access keys like the combination of a username/password for logging into the Management console; the access keys must also be used when requesting authentication.

Once an IAM user account has been created successfully, you are prompted to save the access keys (access key ID and secret access key). The option to save a copy of the secret access key is a one-shot deal; if you don’t download a copy of the secret access key at the completion of the user account creation process, you cannot view the secret access key again. Of course, you can always request a new set of access keys for an already created IAM user (access ID and secret access key) again.
Creating a new IAM user without adding additional permissions or groups creates an extremely limited IAM user. There are no security policies assigned by default; a new IAM user can’t even change her own password. You can add a number of pre-created IAM policies, group accounts, and security options to a new IAM account, as shown in Figure 7-11:
Existing IAM policies—Policy options created by AWS or by you
Copying permissions from existing IAM users to the user being created
Adding the user to an IAM group or multiple groups with attached IAM policies
Adding a permissions boundary—A permission boundary defines the maximum amount of permission that can be assigned to an IAM user.
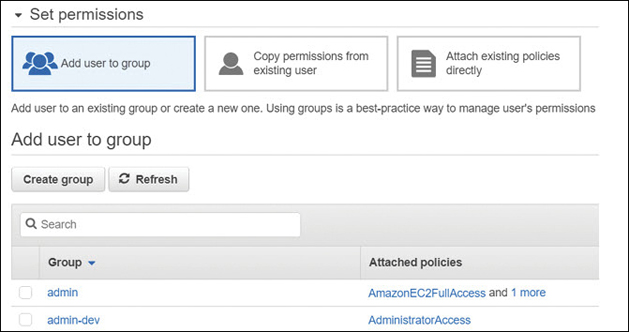
Figure 7-11 IAM user account creation options
During creation of an IAM user account using the Management console, Amazon gives you plenty of options to add permissions to the user account you’re creating. If you don’t follow Amazon’s suggestions, as mentioned, you are creating a user with no permissions. The best practice is to add your new user to an existing IAM group, which has the defined necessary permissions that match the IAM user accounts tasks. Even if you are creating an IAM user for a specific AWS task that only this user will carry out, you may want to think about adding this person to an IAM group if there’s the possibility of multiple IAM users carrying out the same task. Or you may want to create a single IAM user for a single specified AWS task. That’s perfectly okay; just make sure that this use case is well documented; obviously, it’s easier to manage by groups.
To access the companion videos, register your book at informit.com/register.
Note
What an IAM user can and can’t do at AWS is defined by either an explicit allow permission to carry out a task against an AWS resource or by an explicit deny permission, which denies the user from being able to carry out the requested task. Note that an explicit deny in any policy assigned to an IAM user account overrides any other allows.
IAM Groups
An IAM group is a collection of IAM users. IAM users in an IAM group have their own authentication credentials and possible membership in additional IAM groups. Each IAM group that IAM users are members of is assigned the permissions assigned to the IAM groups they belong to only after they have successfully authenticated to AWS. IAM groups are to be used to delegate security policies for a specific group of IAM users. As mentioned previously, IAM groups make assigning permissions for IAM users much easier than having to modify multiple individual IAM user accounts. The characteristics of IAM groups follow:
Each IAM group can contain multiple IAM users from the same AWS account.
IAM users can belong to multiple IAM groups in the same AWS account.
IAM groups can’t be nested; IAM groups can only contain IAM users, but not additional IAM groups.
There are no default IAM groups that include All Users like Microsoft Windows.
There are initial soft limits as to the number of IAM groups you can have in your AWS account, and a limit to how many IAM groups an IAM user can be in. You can be a member of 10 IAM groups, and the maximum number of IAM users in an IAM group is 5,000.
Terra Firma needs to consider what group strategy to use for developers, administrators, and auditors. It next needs to create the IAM groups and associate the desired IAM policies before creating IAM users.
Signing In as an IAM User
After IAM users have been created, to make it easier for your IAM users to sign into the Management console, you can create a custom URL that contains your AWS account ID, as shown in Figure 7-12.
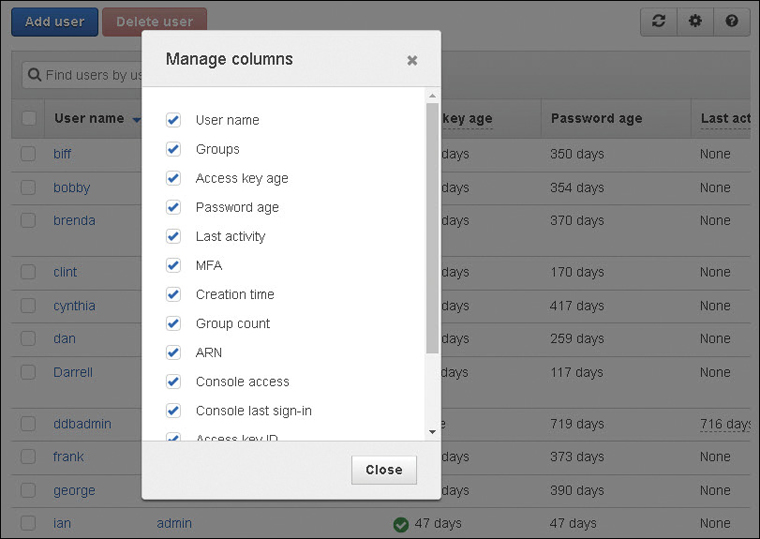
IAM Account Details
Each IAM user account displayed in the IAM console shows some useful information about each IAM account listing the IAM groups that the IAM user belongs to, the age of the access keys assigned to the IAM user account, the age of the current password, the last activity of the IAM account, and whether MFA has been enabled. Clicking the gear icon in the IAM user account console provides several additional account options that can be displayed, including listing the ARN of the account, the access key ID, the access key last used, and any assigned certificates, as shown in Figure 7-13.
IAM User Account Summary
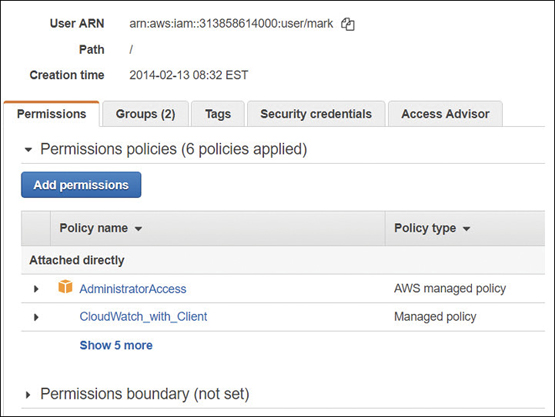
The summary of each IAM user account provides a wealth of useful information, as shown in Figure 7-14, including the following options:
Permissions attached directly—A listing of applied policies and the policy type
IAM groups attached—Attached policies due to group membership
Tags—Key/value pairs (up to 50) that can be added for additional information
Security credentials
Manage console password: enable or disable console access and manage password
Assigned MFA device: manage MFA virtual or hardware device
Signing certificates
Access keys
Access Advisor—The service permissions that have been granted to the IAM user and when the AWS services were last accessed within the calendar year
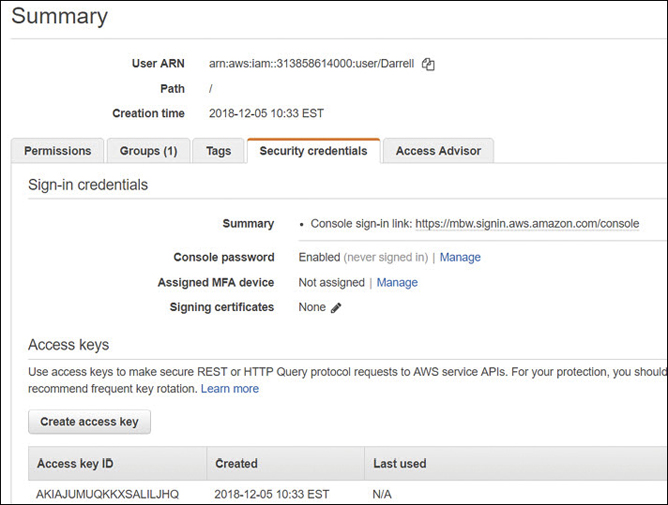
Figure 7-14 User account summary information
Creating a Password Policy
Password policies can be defined per AWS account for all IAM user accounts by selecting Account settings in the IAM console. The password options are the familiar options such as password complexity, password expiration and reuse, and whether IAM users can change their own password, as shown in Figure 7-15.
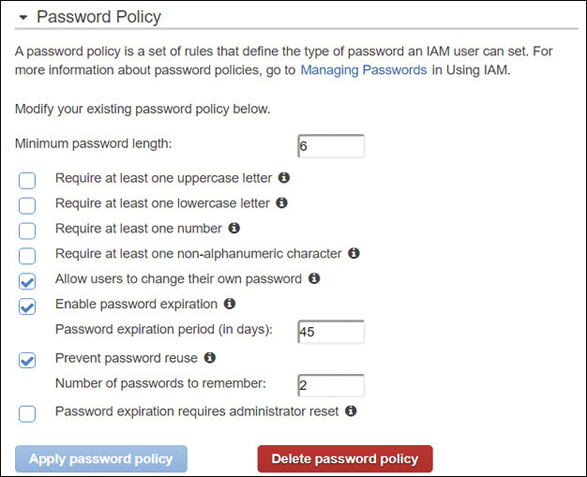
Terra Firma needs to review what its corporate policy currently is for passwords and consider whether more stringent rules need to be followed for working in the AWS cloud. If rules need to be tightened around password policy, perhaps the rules for the current on-premise password policy and the password policy defined in the AWS cloud need to be analyzed and possibly unified.
Rotating Access Keys
Once an IAM user account has been created with assigned access keys, the access keys are not changed unless they are manually rotated or you use an automated process such as a script or a custom Lambda function. The best practice is to rotate a user’s access keys, preferably at the same time the IAM user password is changed to maintain a higher level of security and avoid issues that can arise from stolen access keys. Access keys can be viewed in the properties of the IAM user account on the Security credentials tab. Each IAM user account can have two active access keys. When a request is received to create a new access key, an associated secret access key is created along with the new access key ID, as shown in Figure 7-16.

Obviously, the IAM administrator who is given the ability to create and rotate access keys must be a trusted individual. Permissions to rotate access keys can be accomplished by assigning the policy shown in Figure 7-17 to the trusted IAM administrator account that will be carrying out the task of key rotation. Note that the actions of Get, Create, List, Update, and Delete are required to rotate access keys successfully.
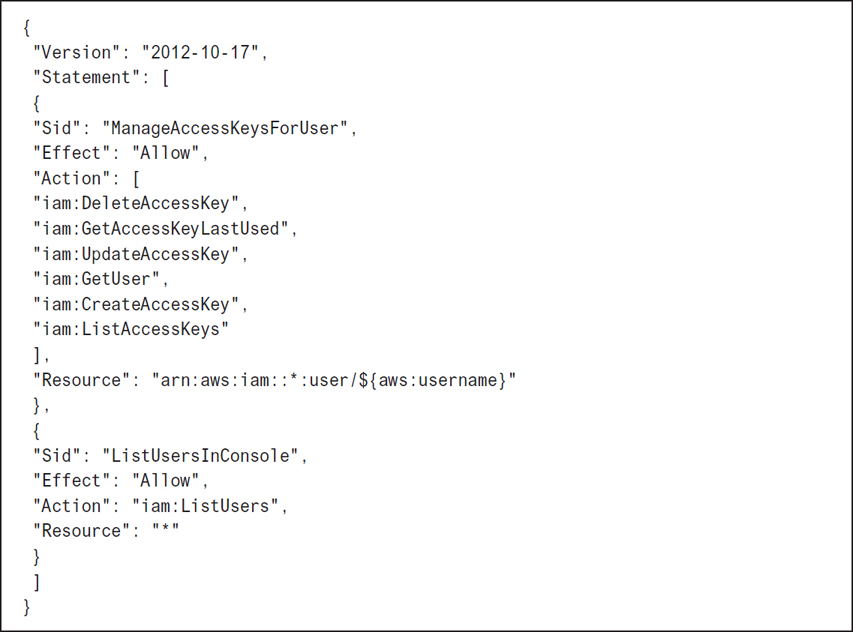
Note
Rotating access keys without a great deal of thought can be disastrous. After all, if scripts and applications depend on a specific set of access keys, the applications and scripts have to be changed and updated as well. Don’t forget this part of the equation.
Using Multifactor Authentication (MFA)
Every AWS user account—both the root account and the IAM user account—supports the addition of MFA, which forces each user during the authentication process to AWS to provide an additional security code, in addition to the user’s username and password credentials to access AWS resources. There are several options available at AWS for deploying MFA:
Virtual MFA device—A software app such as Google Authenticator or Gemalto MP-1 software tokens that typically is installed on the user’s phone can generate a 6-digit code that can be entered during authentication.
U2F security key—A USB device that generates a security code when tapped. These devices are part of the fast identity online (FIDO) alliance and are supported by many industry leaders, including Microsoft, Google, AWS, VMware, Intel, and others.
Hardware MFA device—A hardware device such as a Gemalto SafeNet security appliance that generates the MFA security code. Gemalto devices can provide end-to-end management of the entire encryption process.
IAM Policy Types
The IAM policies that we create or assign to control access to AWS resources and products have certain features and powers that depend on the associated AWS service and the IAM actions available. The choices for controlling AWS services with IAM policies are forever increasing in choices; features for most AWS services are added frequently. Make sure to check the exact documentation of each AWS service for the up-to-date choices. Let’s look at the policy types that can be attached to IAM identities (users, groups, or roles).
Identity-Based Policies
Identity-based policies are categorized as permission policies; each policy contains permissions controlled by actions that can be attached to IAM users, groups, or as a role defining what actions the user, group, or role can carry out. The listed permissions are either allowing or denying access and, optionally, which additional conditions must be met before access is allowed to the listed AWS service or services defined in each policy.
There are three identity-based policy types:
A managed policy created by AWS
A job function policy created by AWS
A custom policy that you create
Managed policies—These are read-only stand-alone identity-based policies that you can select and attach to a single IAM user or multiple users, IAM groups, or roles created within an AWS account, as shown in Figure 7-18. AWS creates and manages managed policies internally. These policies look similar in scope to the available security options you would find when you’re setting up users and groups for Microsoft Active Directory Domain Services. Here are some definitions to understand when working with managed policies:
Managed policies can be attached and detached from any identity (user, group, role).
Managed policies can be customized after being imported and saved as a custom policy.
Managed policies cannot be deleted. When we detach a managed policy, we remove it from the selected identity, user, group, or role; however, a managed policy is still available in the library of managed AWS policies for reuse.
Custom policies can be attached, detached, and deleted.
Each managed policy can be applied to multiple users, groups, and roles.

Figure 7-18 Managed policy choices
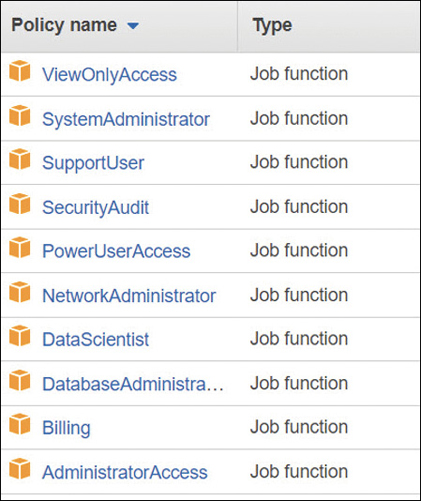
Job function policies—These are specialized managed policies based on a generic job description, as shown in Figure 7-19, that are also created and maintained by AWS. Job function policy choices include Administrator, Billing, Database Administrator, Security Auditor, System Administrator, and more. Job function policies might seem like an excellent idea. However, you need to be careful when assigning job function policies because you may be inadvertently assigning more permissions than you expected or need. For example, the System Administrator policy allows the creation and maintenance of resources across a wide swath of AWS services, including CloudTrail, CloudWatch, CodeCommit, CodeDeploy, Config, Directory Service, EC2, IAM, Lambda, relational database service (RDS), Route 53, Trusted Advisor, virtual private cloud (VPC), and more. Job function policies can be useful as a starting policy template that’s imported as a custom policy and then making modifications to suit your needs.
Custom policies—Each managed policy can be selected as a starting point, modified for your use, and then saved as a custom policy in your AWS account. You can also elect to start with a blank page when creating a custom policy document and create the entire policy from scratch. Each custom policy created by you is defined as a customer-managed policy; you’ve either authored the policy from scratch or started by importing a managed service policy and then making and saving changes to the original security policy document under a new policy name. Once you’ve created a custom policy, it’s your responsibility to manage and maintain each policy document.
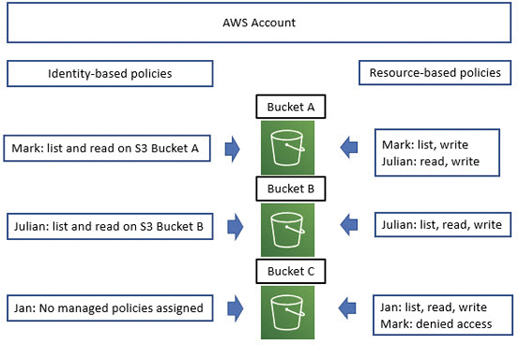
Resource-Based Policies
As we know, identity-based policies are attached to an IAM user, group, or role, defining what each identity is allowed or not allowed to do. Resource-based policies are a little different in functionality because they are attached directly to the AWS resource. Resource policies are supported by several AWS resources; the most common examples are S3 buckets, but there are other AWS services that support resource-based policies, including S3 Glacier vaults, simple notification service (SNS), AWS Simple Queue Service (SQS), AWS ElastiSearch records, and AWS Lambda functions. Because resource policies are attached directly to the AWS resource, each policy needs to define the access rules for the AWS resource regardless of the user or group that accesses the resource. Resource-based policies are also sometimes called in-line policies due to the direct attaching of the policy to the resource; if the resource is deleted, the security policy is unattached and discarded. Resource-based policies are always a custom action; there are no examples of managed resource-based policies that AWS creates. Within a single AWS account, an IAM user can be assigned a managed IAM policy and a resource-based policy for the same AWS resource, as shown in Figure 7-20. Mark has an identity-based policy that allows him to list and read an S3 bucket A. The resource—in this case, the S3 bucket—has an attached resource-based policy that identifies that Mark can list and write on S3 bucket A. On S3 bucket C, a resource policy is attached that has denied access to Mark. Note that Julian also has a combination of identity- and resource-based policies, but Jan has no managed policies assigned. She does, however, have access to S3 bucket C because she is specifically listed in the resource policy using her IAM user ARN.
In-Line Policies
Another method of attaching policies is through the process of what is called in-line or embedded. Policies attached in-line help you maintain a strict one-to-one relationship between the attached policy and the entity the policy is attached to. When the entity is deleted, so are the attached policies. In comparison, using a managed policy allows you to reapply the policy to multiple entities, and all updates to a managed policy apply automatically to all entities that have the managed policy assigned. Each in-line policy must be managed individually; therefore, an in-line policy should be a custom policy that has been designed for your custom needs. For example, let’s say a specific user with high security clearance within your company has been assigned the task of managing AWS CloudHSM, a security service that uses single-tenant hardware security modules (HSMs) for storing your company’s symmetric and asymmetric keys. You’ve decided to manage the security for this service by using in-line policies to ensure that only this person can carry out the specific task. Perhaps you have two security administrators to be safe, and you use in-line policies to ensure that the policies are only assigned to these two individuals. Once their IAM user accounts are deleted, the in-line policies, because they have been embedded with the user accounts, are removed as well.
IAM Policy Creation
The format of an IAM policy is crafted in JSON format and linked to your AWS account. We can create and view the existing IAM policies using the IAM Management console or by using the AWS CLI. Assuming you are just starting with AWS, it’s probably best to start with the IAM Management console view where the users, groups, policies, and rules can be viewed easily.
Each policy can define just one permission or multiple permissions. Multiple policies can also be attached to a user, group, or role. When creating custom policies, keep them as simple as possible to start; don’t mix resource types in a single policy just because you can. Separate policies by resource type for easier deployment and troubleshooting. Policies can be created in several methods:
Policies can be created and added to by importing policy settings in JSON format into your account using standard copy and paste techniques.
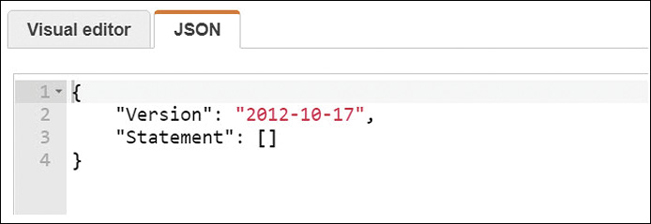
Policies can be created using the visual editor found in the IAM console and shown in Figure 7-21.
Policies can be created using the JSON editor found in the IAM console and shown in Figure 7-21.
Policies can be created by using a third-party IAM tool that has been installed and properly configured, like the process that initially sets up the AWI CLI software. After authenticating to AWS using a recognized IAM user with valid access keys, you can create your users, groups, and roles with any third-party tool, such as OneLogon or Ping Identity, instead of using the IAM Management console.
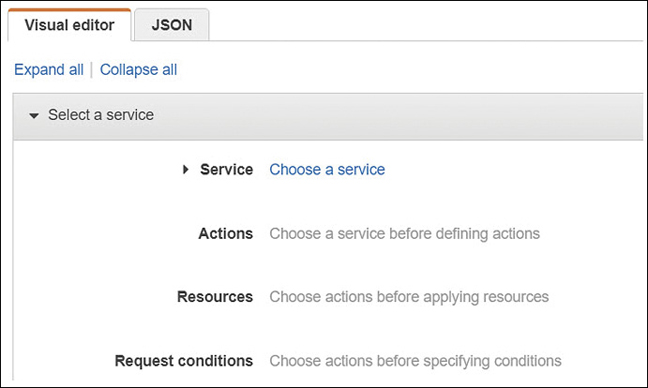
Figure 7-21 The Visual Editor and JSON tabs
Policy Elements
Each policy contains mandatory and optional elements that need to be understood.
Version—This element is the version of the policy language, as shown in Figure 7-22, that the policy is using. The date/time version number is added automatically when you are manually creating a policy document in the Management console. It is best practice to add the latest version to your custom policies if they are created outside the IAM Management console to ensure that any new IAM features you are using in your policy are supported by the version number. If no version number is listed, the oldest version number is used, which can cause problems. For example, if you were using tags for determining access or permission boundaries in a custom policy with no listed version number, these newer features would not work without the latest version number present.
Statement—(Mandatory) Each policy has at least a single statement; multiple statements in a policy are allowed. It might be cleaner or simpler to limit each statement to a single policy when beginning to craft custom policies.
Sid—(Optional) This element is a unique ID statement for additional identification purposes.
Effect—(Mandatory) The effect of any listed action is Allow or Deny.
Action—(Mandatory) Each action lists the type of access that is allowed or denied.
Principal—(Optional) The account, user, role, or federated user the policy allows or denies access to a resource.
Resource—(Mandatory) The AWS resource that the actions in the statement apply to.
Condition—(Optional) This element defines the absolute circumstances that must be met before the policy is applied.
Reading a Simple JSON Policy
There are syntax and grammar rules to follow when creating IAM policies. One missing brace (that’s a curly bracket { ), or missed comma or colon can cause lots of pain when creating or troubleshooting IAM policy. First, the rules:
Text values—that is, string values—are always encased in double quotes.
String values are followed with a colon.
The data parts in a policy are defined as name-value pairs.
The name and the value are separated with a colon. Example: “Effect”: “Allow”
When data in a policy has multiple name-value pairs, each name-value pair is separated using commas.
Curly brackets, also called braces, contain objects.
Each object can hold multiple name-value pairs.
If square brackets are used, there are multiple name-value pairs, separated by commas.
1.{
2. "Version": "2012-10-17",
3. "Statement": {
4. "Effect": "Allow",
5. "Action": "s3:ListBucket",
6. "Resource": "arn:aws:s3:::graphic_bucket"
7. }
8. }
Each policy starts with a curly left bracket that defines the start of the policy statement block. Once the policy statement block finishes, a curly right bracket denotes the finish.
The current version of IAM policies is next; both “Version” and the version number are in quotation marks because the values within the quotes are string values. Treat the version line in an IAM policy as a mandatory policy element. The version number is a name-value pair; therefore, the name and the value are separated by a colon. Because there are multiple name-value pairs in this policy, there is a comma at the end of lines that have name-values: lines 2, 4, and 5.
The first statement in the policy is defined as a “Statement” in quotes followed by a colon (:) and another inner left curly bracket ({) that denotes the start of the statement block—namely, Effect—Action—Resource.
The “Effect” in quotation marks followed by a colon (:) is “Allow,” also in quotation marks: a name-value pair with a comma at the end. The effect is either Allow or Deny.
The “Action” in this policy is to allow the listing of an S3 bucket: a name-value pair with a comma at the end.
The “Resource” being controlled by this policy is the S3 bucket: graphic_bucket. The resource references the ARN—the unique Amazon name that is assigned to each resource at creation. Resource lines in policies don’t have commas because a resource is a name-resource listing, not a name-value pair.
The right curly bracket indicates that the statement block is complete.
The final right curly bracket indicates that the policy statement block is complete.
Policy Actions
When creating custom policies, you may have to provide more actions than you first thought for the user to be able to carry out the task. Take, for example, creating a policy for a user whom you want to be able to create, change, or remove her own IAM user account password. The actions that need to be listed in the policy have to include the following:
CreateLoginProfile—The user needs the ability to create a login profile.
DeleteLoginProfile—The user must be able to delete her login profile if she wants to make changes.
GetLoginProfile—The user has to be able to access the login profile.
UpdateLoginProfile—After making changes, the user has to be able to update her login information.
If you want an IAM user to be able to perform administration tasks for a group of IAM users, the actions required would include creation, deletion, listing users and groups, removing policies, and renaming or changing information. To be able to make changes to an AWS resource, you must be able to modify and delete. The policy listed in Figure 7-23 provides the details for this policy.

Additional Policy Control Options
You can add a variety of additional control options to a security policy. These optional policy options give you great power in how you manage security options for users and groups. Terra Firma wants to use permission boundaries to control the maximum tasks that junior administrators can carry out at AWS—in particular, AWS accounts.
Permission boundaries—You can apply a permission boundary policy for both the IAM user and the role. A managed policy can define the maximum permissions that an identity-based policy can grant to a particular IAM user or role. Adding an additional permission boundary provides another level of control. The user or role can only carry out the actions that are allowed by both the assigned identity-based policy and the permission boundary policy. Therefore, the permission settings defined in a management policy can be controlled by a permission boundary policy that establishes the maximum permissions the management policy is allowed to use.
The first step is to create a policy that defines the permission boundary for the user or role. Let’s suppose you want your administrator Mark to be able to fully manage S3 buckets and EC2 instances, and that’s all. The next step is to create the policy shown in Figure 7-24 that defines the permissions boundary for Mark—namely, that he can fully administrate S3 buckets and EC2 instances.
![A program shows Mark's permission boundary. CLI program: {"Version": "2012-10-17", "Statement": [ {"Effect": "Allow", "Action": [ "s3:*", "ec2:*" "Resource": "*"}]}](http://images-20200215.ebookreading.net/5/4/4/9780135301104/9780135301104__learning-amazon-web__9780135301104__graphics__07fig24.jpg)
Once this permission boundary has been added to Mark’s IAM account, as shown in Figure 7-25, the only two AWS services that Mark will have full administrative control over are the two listed AWS services S3 and EC2 instances. In the future, if a policy is added to Mark’s account that allows him to work with AWS CloudTrail and create alerts and alarms, when Mark goes to carry out any of these actions using CloudTrail, he would be denied because the permission boundary does not define that Mark can use CloudTrail. Remember: the permission boundary policy settings must match up with the additional policy settings that are applied to Mark’s IAM user account.
The permission boundary shown in Figure 7-24 could be much more stringent; instead of listing full control, the permission boundary could spell out a specific listing of tasks that Mark could carry out for both S3 and EC2 instances.
Organizations SCPs—AWS has a management service, called AWS Organizations and discussed at the end of this chapter, that allows you to manage security settings across multiple AWS accounts. One of the features of AWS Organizations is an option called service control policy (SCP) that acts like a permission boundary at the organizational level for AWS accounts included in an AWS Organization that define the maximum permissions allowed. The types of permission policies that can be mandated by an SCP are a little more flexible because they support both identity-based policies and resource-based policies for IAM users and roles and the root user in any AWS accounts that the SCP is applied against. The organizational service control policies act just like permission boundaries. They don’t grant permissions; instead, they limit the permissions that can be granted to IAM users, the root user, and roles. Both the SCP and the controlled policy must have matching permissions in the SCP and the identity-based or resource-based policy for the desired permissions to be allowed, as shown in Figure 7-26. With AWS Organizations, AWS provides centralized services and procedures to help you avoid making security mistakes. One last time: permissions are allowed only if the IAM user or role policy and the SCP policy list the identical permissions in both policies.

Access control lists (ACLs)—ACLs are present for defining simple permission controls on S3 buckets for cross-account permission access only. They cannot be used to grant permissions to entities in the same AWS account. ACLs are only present because of backward compatibility; it’s a much better idea to use roles to control cross-account access.
Session policies—Session policies are another version of a permission boundary to help limit what permissions can be assigned to federated users using roles, or IAM users and groups with assigned roles, as shown in Figure 7-27. Developers can create session policies when they are creating a temporary session using a role with a custom application. When session policies are deployed, the effective permissions for the session are either the ones that are granted by the resource-based policy settings or the identity-based policy settings that match the session policy permission settings.

Reviewing the Policy Permissions Applied
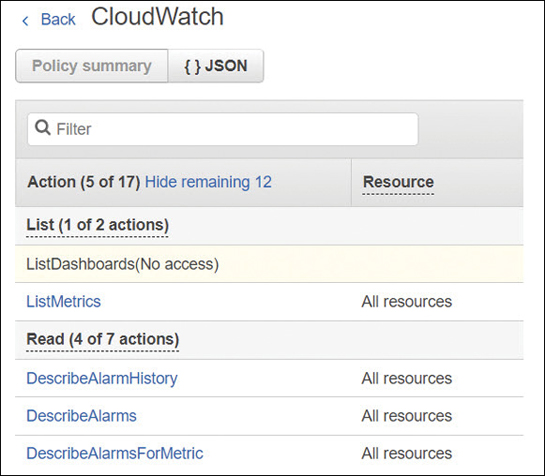
Trying to figure out the assigned access levels, the available resources, and any additional conditions that have been allowed or denied within each policy can be tough to troubleshoot. Thankfully, AWS provides these details in policy summary tables, as shown in Figure 7-28, making it easier to troubleshoot or analyze what an IAM user, group, or role combined with a select IAM policy can do. Policy summaries can be found on both IAM users and roles for all attached policies. You can view policy summaries by first selecting the individual policy, and from its summary page clicking Policy Summary. Information is displayed for the different types of policies: both custom and AWS-managed policies and the newer AWS-managed job function policies.

The information is contained in three tables:
Policy summary (Services)—Information is grouped into explicit deny, allow, and uncategorized services when IAM can’t figure out the service name due to a typo or its being a custom third-party service. Recognized services are listed based on whether the policy allows or explicitly denies the use of the service.
Service summary (Actions)—Information displayed includes a list of the actions and permissions (list, read, write) that have been defined in the policy for a particular service.
Action summary (Resources)—Information includes a list of resources and the conditions that control each action. Details include the resources, the region where the resources have been defined, and what IAM accounts the actions are associated with.
IAM Policy Versions
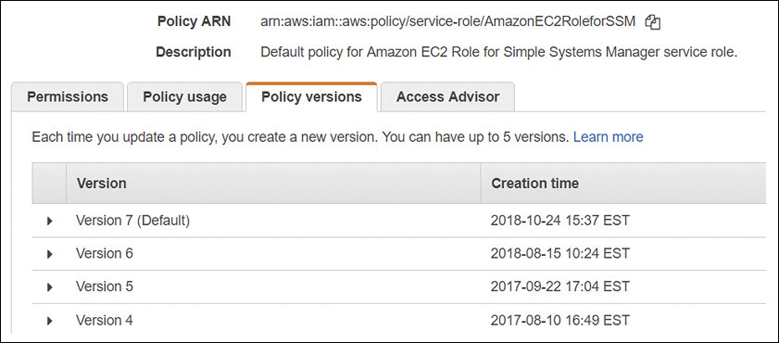
After you’ve created an IAM policy, you may want to make additions, deletions, or both. Regardless of whether the policy is a customer-managed policy that you have created or an AWS managed policy that Amazon has made changes to, any changes to the newer policy don’t overwrite the older version of the policy as a new version of the policy is created.
Amazon stores up to five versions of a managed policy. To define the default version of a customer-managed policy to be used, after selecting the policy, select the Policy Versions tab, and from the displayed versions, select the version of the policy that you want to define as the default version to be used. From this point forward, the selected version of the policy becomes the default version, as shown in Figure 7-29. If you want to roll back changes later, you can change the current version of the policy to another older version of the policy.
Using Conditional Elements
The conditional elements of a JSON policy allow you to provide optional parameters that must be met before the policy is approved. Conditional elements are typically global, as shown in the examples in Table 7-1. Terra Firma is looking to use the aws:SourceIP to control the range of IP addresses from which their administrators can log on to AWS.
Table 7-1 Conditional Elements
Conditional Elements: Global |
Details |
|---|---|
aws:CurrentTime |
Check for date/time conditions |
aws:SecureTransport |
The request must use the secure sockets layer (SSL) |
aws:UserAgent |
Use to allow certain client applications to make requests |
aws:MultiFactorAuthPresent |
Use the BoolIfExists operator to deny requests that do not include MFA |
Bool |
Value must be true |
StringEquals |
The request must contain a specific value |
Conditional Elements: Service Specific |
Details |
aws:PrincipalOrgID |
Must be a member of a specific AWS Organization |
aws:PrincipalTag/tag-key |
Check for specific tags |
aws:RequestTag/tag-key |
Check for a tag and a specific value |
aws:PrincipalType |
Check for a specific user or role |
aws:SourceVpce |
Restrict access to a specific endpoint |
aws:RequestedRegion |
Control the regions that API calls can be made to |
aws:SourceIp |
IPv4 or IPv6 address, or range of addresses |
aws:userid |
Check the user’s ID |
Using Tags with IAM Identities
Most AWS resources allow you to define a number of tags for the resource you are creating or using. You can add custom attributes using tags to both the IAM user and the role. For example, you can define the key location and the tag value Toronto. Note that you can tag IAM users or roles, but not IAM groups or IAM policies.
Once you have tagged your IAM users and roles, you can use the tags to control these IAM users and roles and their access to AWS resources. Tags are added as a conditional element of each policy mandating what tags need to be attached before the permission request is allowed. The following logic can be controlled by conditional tags:
Resources—Tags can be used for IAM users and roles to determine whether access is allowed or denied to the requested resource based on the attached tags.
Requests—Text can be used to control the tags that can be added, changed, or removed from an IAM user or role.
Principles—Tags with boolean logic can be used to control what the IAM user is allowed to do.
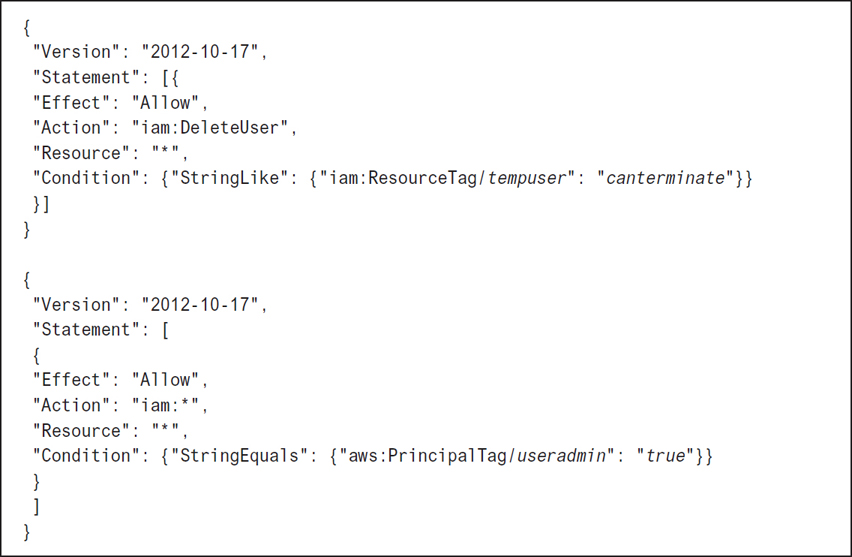
In the example shown in Figure 7-30, administrators can only delete users who have the tempuser=canterminate tag and a Principal tag attached to useradmin = true.
IAM Roles
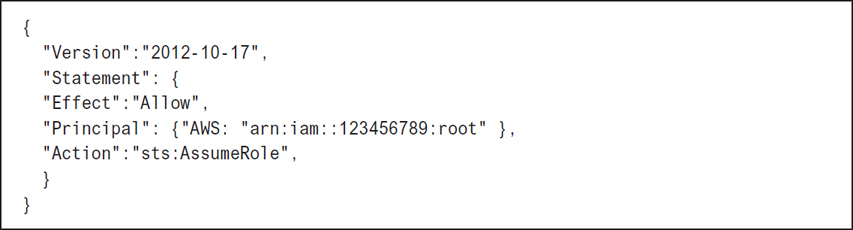
Roles are used to provide temporary access to AWS resources. An IAM role is a security policy defining a set of permissions, without an assigned identity. Only after a role is assigned to an AWS identity (user or group) is the policy attached to the role able to be assumed by the principal. There is also an additional policy required when roles are used, called a trust policy. The trust policy is assigned to the identity who can assume the role as shown in Figure 7-31. A role does not have credentials (no password or access keys); temporary authentication credentials and a session token are only assigned to an IAM user or federated user after verification that the identity can assume the role. If a role is set up using the IAM console, the trust policy document is created and applied automatically. If the role is assigned to a user in the same AWS account, no trust policy is required, as the user is already known. If the role is assigned to an IAM user residing in another AWS account, a trust policy must be assigned to the IAM user to gain access. If the AWS CLI is used instead of the Management console, both the trust policy and the permissions policy must be created.
When to Use Roles
AWS services that need to perform actions in your AWS account on your behalf—These roles, called service-linked roles, make it easier to assign the required permissions that allow the service to carry out its job. AWS Config, AWS Inspector, CloudWatch logs, and the elastic file system (EFS) are examples of AWS services that require a role with the required permissions attached so the service can carry out its prescribed job. With temporary credentials, the service-linked role is granted access to carry out requested tasks as required, rather than allowing access all the time.
AWS service roles for EC2 instances hosting applications that need access to AWS resources—This is one of the best examples of roles being used to control access to AWS resources by a hosted application. For the application to function properly, it needs valid AWS credentials to make its API requests to AWS resources. You could (but this a bad idea!) store a set of IAM users’ credentials on the local hard disk of the application or Web server and allow the application to use these credentials.
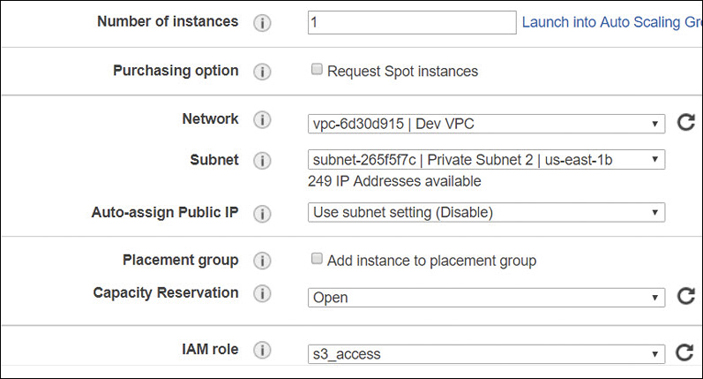
Or (and this is a really good idea, and the recommended best practice) you could create an IAM role that provides temporary credentials for the application hosted on the EC2 instance. Because you are using a role, you don’t have to worry about managing credentials; Amazon handles that. When the IAM role is used, temporary credentials are supplied that the application can use to make calls to the required AWS resources. Each instance can have a single role assigned; all applications hosted on the instance can use the role. However, the single role can be assigned to multiple instances, and changes made to the role are propagated to all instances that are using that role. The addition of a role to an instance is carried out by creating an instance profile that is attached to the instance either during creation, as shown in Figure 7-32, or after creation.
Each role assigned to an EC2 instance contains a permissions policy that lists the permissions to be used, plus a trust policy that allows the EC2 instance to be able to assume the assigned role and retrieve the temporary credentials. This allows access for a defined period of time; one hour is the default. The temporary credentials are stored in the memory of the running instance and are part of the instances metadata store under iam/security-credentials/role-name.
Using temporary security credentials for the EC2 instance provides an additional advantage; the security credentials are automatically rotated just before their temporary session expires, ensuring that a valid set of credentials is always at hand for the application. Terra Firma uses roles to control Web and application server access to S3 buckets.
Mobile applications—For mobile applications that require authentication, Amazon has a service called Cognito, discussed previously in this chapter. Cognito is designed for scalable and secure mobile authentication for hundreds or thousands of users, as shown in Figure 7-33. Your choices for authentication can also be through social media providers such as Google and Facebook, or even Logon Amazon. In addition, there is support for enterprise federation using Microsoft Active Directory and SAML 2.0, and newer protocols such as Oauth 2.0 and OpenID Connect. Cognito also supports creating user pools of email addresses or phone numbers that can be linked to the desired application along with the type of authentication needed: through the user pool, or by federating through a third-party identity provider. The beauty of using Cognito is that it manages multiple identity providers—both identity federation and Web-based federation options that mobile applications use for authentication and access to AWS resources.

Cross-Account Access to AWS Resources
Perhaps you want to allow access to resources in your AWS account from users in other AWS accounts. Rather than creating an IAM user account within your AWS account for this type of access, you can instead provide temporary access by using an IAM role. This feature is called cross-account access. Let’s assume a developer’s group account in another AWS account needs access to the S3 bucket corpdocs in the production AWS account.
Create an IAM policy called access-s3 in the production account controlling access to the S3 resource. The policy created is merely a custom policy allowing access to the specific S3 resource, as shown in Figure 7-34.

Figure 7-34 Security policy for corpdocs bucket access Create an IAM role called get-access, which is assigned to the developers IAM group that is linked to the policy access-s3. Now the policy has been linked to a specific role in the production account.
Get the ARN of the get-access role. We need this information to be able to populate the custom IAM policy that allows the developers IAM group to successfully switch accounts and access the get-access role.
Grant access to the role to the developers IAM group by creating an in-line custom policy allowing members of the group to access the get-access role, as shown in Figure 7-35.
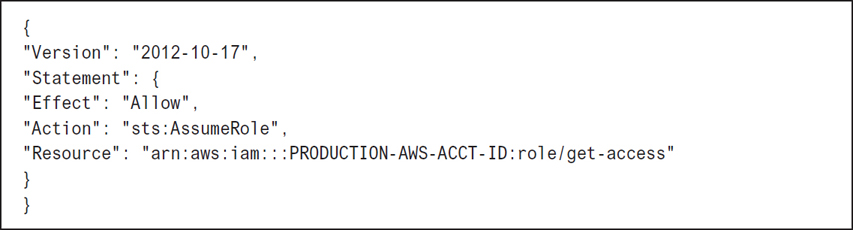
Figure 7-35 Custom policy allowing developers to assume the get-access role Any member of the developers group can now switch roles using the Management console by clicking the Switch Role menu below the username listing, as shown in Figure 7-36.

Figure 7-36 Using the Switch Role option for cross-account access
The AWS Security Token Service (STS)
Running in the background at AWS is a global AWS service that provides temporary credentials upon request for IAM users or roles. STS uses a default global endpoint located in the US East, North Virginia region at https://sts.amazon.com; you can also choose to make STS API calls to other AWS regions if faster responses are needed. Temporary security credentials are just as defined; they’re temporary rather than permanent when compared to access credentials linked to an IAM user. Temporary credentials are provided only on request. The advantages of using the security token service to provide temporary credentials at AWS follow:
There’s no need to rotate security credentials; STS performs credential rotation when temporary credentials are renewed.
Applications use temporary credentials when they’re hosted on EC2 instances with assigned roles, removing the need for IM User account credentials and passwords.
The STS manages and secures temporary credentials.
Access to AWS resources can be defined without requiring a full IAM user account.
Here are a few valid scenarios for using temporary credentials and the STS:
Federation—SSO federation with SAML 2.0, Web-based federation (Amazon, Google, Facebook), or by using OpenID Connect. The action in the policy will be AssumeRoleWithSAML or AssumeRoleWithWebIdentity. For both of these actions, STS is called. After verification, STS returns temporary credentials (access key, secret access key, and security token) that are valid for one hour by default. Editing the maximum CLI/API session duration as shown in Figure 7-37 allows you to control the exact length of validity for the assigned security credentials from 1 to 36 hours, or by defining a custom length of time.

Figure 7-37 Changing the temporary credentials’ validity timeframe Roles for cross-account access—IAM user identities in one AWS account use IAM roles to assume access to AWS resources in other AWS accounts using defined roles and policies allowing authentication using STS. The action in the policy is AssumeRole.
Roles for controlling access to AWS services—Only AWS RoboMaker, AWS QuickSight, AWS Amplify, and AWS Rekognition can’t use temporary credentials. The action in the policy is AssumeRole.
Identity Federation
If your users already authenticate to a corporate network such as Active Directory, you don’t have to start over by creating separate IAM users. Instead, your user corporate identities can be federated, or stored in AWS. If your corporate network is compatible with SAML 2.0 (Security Association Markup Language), it can be configured to provide an SSO process to gain access to the AWS Management console. There are many options available for SSO in the industry, including Cognito, STS, Web Identity, SAML 2.0, and Open ID Connect. The choices available are due to the changes in authentication over the past 20 years. Most companies have Active Directory Domain Services (AD DS), which has supported the security association markup language (SAML) for many years. SAML is a protocol that needs to be supported by the cloud providers in order to support most major corporations’ ability to authenticate using SSO to the cloud.
Ever since Steve Jobs popularized the mobile phone, mobile applications have come to the forefront, requiring a different type of authentication. No longer were we just linking a corporate computer/user account to an application hosted in the cloud. We also needed to link our phones running the application to the cloud provider. The first so-called identity provider to gain market share was OpenID, which is best described as an authorized nation protocol. OpenID typically allowed you to gain access to a website without providing a full set of credentials, instead using an identity provider such as Google or Facebook to vouch for or authorize your identity.
The next popular method for authorization was the OAuth protocol, which used access tokens and was used with many hosted service providers. Neither Open ID nor OAuth is as secure as SAML 2.0, which uses a set of claims for identification.
Amazon provides several services to handle the different levels of federation used in the industry today. Cognito allows you to manage the variety of authentication providers in the industry, including Facebook, Google, Twitter, OpenID, SAML, and even custom authentication providers that can be created from scratch. The odds are that you will use several of these methods for controlling authentication and access to applications hosted in AWS. Active Directory networks with Active Directory Federated Services installed can take advantage of the AWS Directory Services to build a trust relationship between your corporate Active Directory network and an AWS account.
Register your identity provider used at work, such as Active Directory with AWS. You must create and provide a metadata XML file, as shown in Figure 7-38, that lists your identity provider and authentication keys used by AWS to validate the authentication requests from your organization.
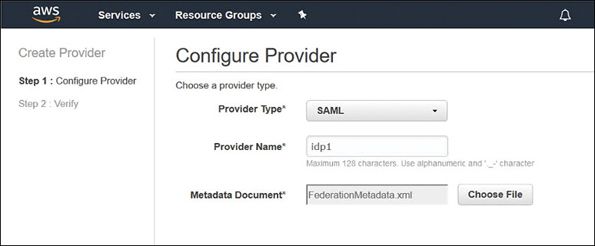
Figure 7-38 Adding a metadata xml file Create IAM roles that provide access to the AWS resources. For the trust policy of the role, list your identity provider as the principal. This ensures that users from your organization will be allowed to access AWS resources.
Define what users or groups to map to the IAM roles, as shown in Figure 7-39, that provide access to the required AWS resources.

Figure 7-39 Select policies for IAM role
Note
Setting up SSO and creating identity and user pools using AWS Cognito is a procedure that is outside the scope of this book. The good news is that the deployment of AWS Cognito and Identity Federation is well documented at https://docs.aws.amazon.com.
IAM Best Practices
There are several best practices you should follow when dealing with IAM.
Managing the root account—Don’t forget the password for an AWS root account by creating such a complicated password you can’t remember it. And don’t write it down! When you need access to the root account, reset the password. In addition, always enable MFA on a root account. Make sure your access keys for the root account have been deleted. You can check whether you have active access keys for your root account by logging on as the root user, opening the IAM console, and checking the graphics, as shown in Figure 7-40. The goal should be shiny green check boxes for all options.
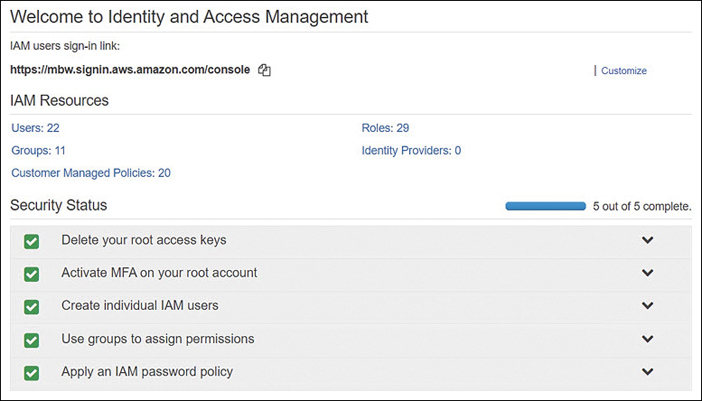
Figure 7-40 A properly set up root account Create individual IAM users and groups for administration—Even single users that you create should first be placed in an IAM group. At some point, each single user’s duties need to be assumed by someone else due to holidays or illness. It’s much easier to add a new IAM user to an existing IAM group.
Permissions—Grant least privileges when assigning IAM permissions, and take the time to get proficient at deploying management policies and, if necessary, creating custom IAM policies for specific administrative access. Remember: most IAM accounts are administrator accounts if they have a fully fledged IAM user account. The goal should be to use IAM roles wherever possible because roles use temporary credentials that STS assigns and manages.
Groups—Don’t manage by IAM users; instead, manage with delegating access using IAM groups.
Conditions—Consider restricting access with additional conditions. Consider adding a mandatory IP address range for administrators who need to perform administration; force authentication from a specific location.
Use CloudTrail logs—By default, CloudTrail tracks all API calls to every AWS account and stores them for 90 days. You can extend the length of storage to permanent storage by creating a trail that saves all logs of all API calls from all AWS regions to a defined S3 bucket.
Passwords—Make sure to create a strong password policy that aligns with your corporate policies.
Rotate security credentials—Consider rotating the security credentials on a timeline that matches the password change for each account. Even better, redesign your IAM security to use roles for administrative tasks to ensure temporary credentials are used and managed by STS/AWS.
MFA—Enable MFA for IAM users, including the root user of your AWS account. At the very least, use a software-based security code generator such as Google Authenticator or Authy.
Use IAM roles for application servers—Use IAM roles to share temporary access to AWS resources for applications hosted on EC2 instances. Let AWS manage the credentials rather than us humans.
IAM Security Tools
Various security utilities and tools are available to make your job of managing IAM security easier.
Credential report—From the IAM console or by using the AWS CLI, you can request and download a comma-separated values (CSV) report, as shown in Figure 7-41, listing the current status of IAM users in an AWS account. Details include the status of the access keys (usage, last used, last used service), key rotation, passwords (enabled/disabled, last time used, last changed), and MFA information. The information provided by the report is within the last four-hour timeframe.

Access Advisor—Reports can be generated to display the last time an IAM user or role accessed an AWS service. This is called service last accessed data in official AWS jargon. Reports can be viewed for each IAM entity by first selecting the IAM user, group, or role; selecting the Access Advisor tab; and then viewing the contents of the Access Advisor tab, as shown in Figure 7-42.
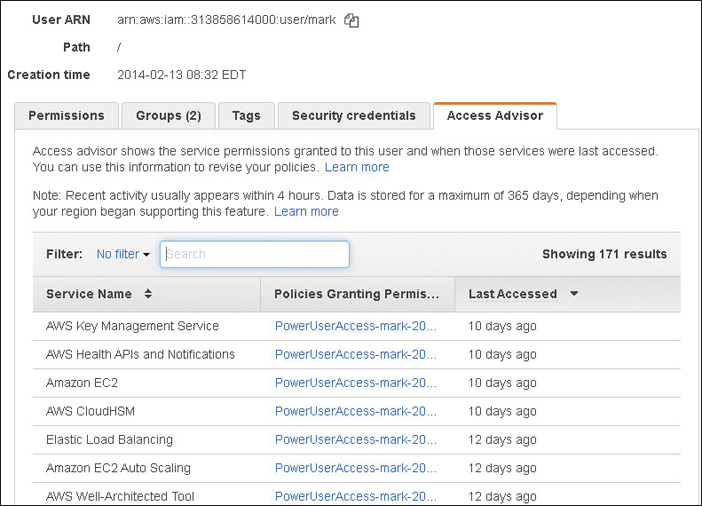
User—The last time an authenticated user tried to access the listed AWS service.
Group—The last time an authenticated group member attempted to access a listed AWS service.
Role—The last time a role was used by an authenticated user.
Policy—The last time an authenticated user or role attempted to access a particular service using a particular policy.
Policy Simulator—After you’ve created your first policy, you might get lucky and have it work right off the bat. If you are using the pre-created managed policies provided by AWS, they will work. Creating a custom policy, however, might cause additional levels of stress when it doesn’t work as expected. Fortunately, Amazon has a simulator called the IAM Policy Simulator that you can used to test your policies, as shown in Figure 7-43. The simulator evaluates your policy using the same policy evaluation engine that would be used if real IAM policy requests were being carried out.

With the Policy Simulator, you can test IAM policies that are attached to users, groups, or roles within an AWS account. You can select one or all security policies that are attached, and you can test all actions for what is being allowed or denied by the selected IAM policies. You can even add in conditions such as the IP address that the request must come from. Both identity-based and resource policies can be tested with the Policy Simulator. To use the Policy Simulator to test policies attached to IAM users, groups, or roles, it stands to reason that you need the appropriate permissions to be able to retrieve IAM policy. For example, to be able to simulate policies for IAM users and groups, the following actions must be included in your IAM policy:
iam:GetGroupPolicy and iam:ListGroupsPolicy
iam:GetPolicy and iam:ListPolicy
iam:GetPolicyVersion and iam:ListPolicyVersion
iam:GetUser and iam:ListUser
iam:ListAtachedUserPolicies and iam:ListGroupsForUser
iam:GetUserPolicy
AWS CloudTrail—All API authentication requests involving IAM users’ roles and the STS are logged to CloudTrail logs. You can search the event history held in CloudTrail for information on both successful and unsuccessful authentication requests. Logon failures using the STS actions AssumeRoleWithSAML and AssumeRoleWithWebIdentity are logged along with any additional identity provider details. In addition, the API requests made to other AWS services are logged with details about which user made the request, as shown in Table 7-2.
Table 7-2 API Requests Used for Requesting Authentication
User Type |
IAM API |
STS API |
User Identity |
|---|---|---|---|
AWS account root user |
GetSessionToken |
|
Root identity |
IAM user |
GetSessionToken |
|
IAM user |
IAM user |
|
GetFederationToken |
IAM user |
IAM user |
|
AssumeRole |
Role identity |
From the CloudWatch console, you can use a dashboard view of all API calls to your AWS account. Clicking View Event allows you to view the details of each call. In Figure 7-44, a successful console login by IAM user Mark is displayed, including the AWS account ID, username, time, source, and region.
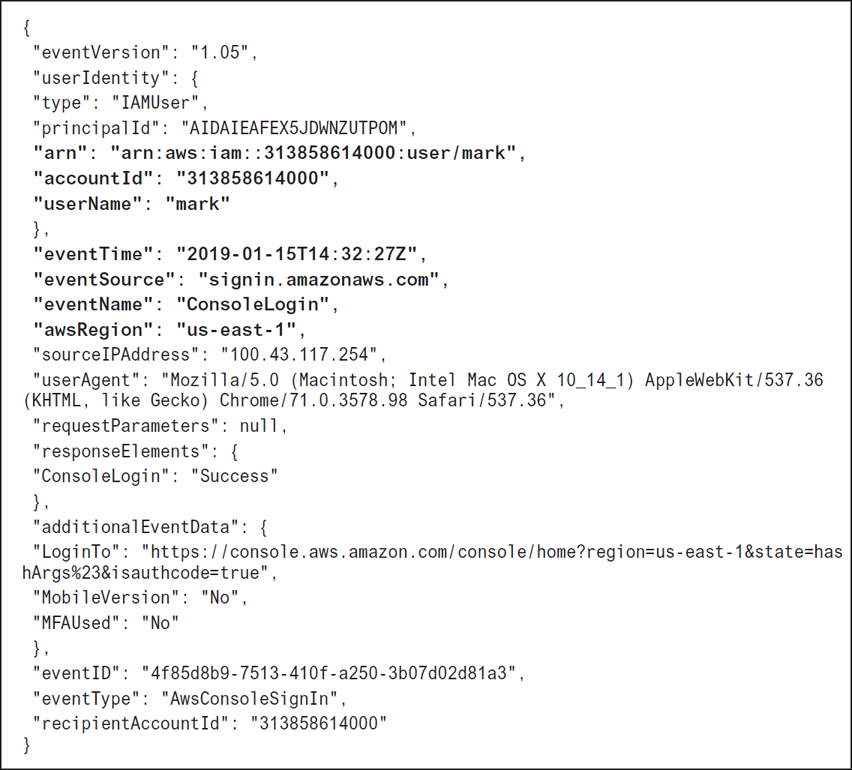
Creating a CloudWatch Trail Event
To store CloudTrail events longer than the default 90-day timeframe, you can create a trail that then stores all CloudTrail event information in an S3 bucket, or a CloudWatch log. Trails, by default, capture information from all AWS regions. You can choose to record all management read/write events or just read-only or write-only events to your trail, as shown in Figure 7-45.
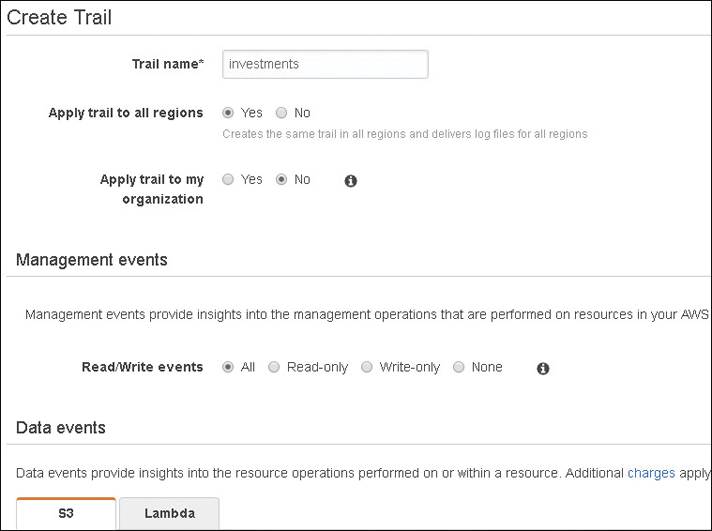
Once data has been logged in a trail, you can analyze it using three methods.
S3 bucket—If your CloudTrail is stored in an S3 bucket, then API activity for the S3 bucket can trigger activities. For example, the PutObject API can generate an event to send notification to an SNS topic or an SQS queue or trigger a Lambda function.
Lambda function—You can also choose to invoke one or many Lambda functions directly on your trail data.
CloudWatch logs—Storing authentication data in CloudWatch logs allows you to define an event rule that can be triggered if an AWS API call is received from IAM. The rule that is defined for the CloudWatch event watches for a specific pattern, such as an AWS API call from IAM, as shown in Figure 7-46. It can alert you when a data pattern is matched.
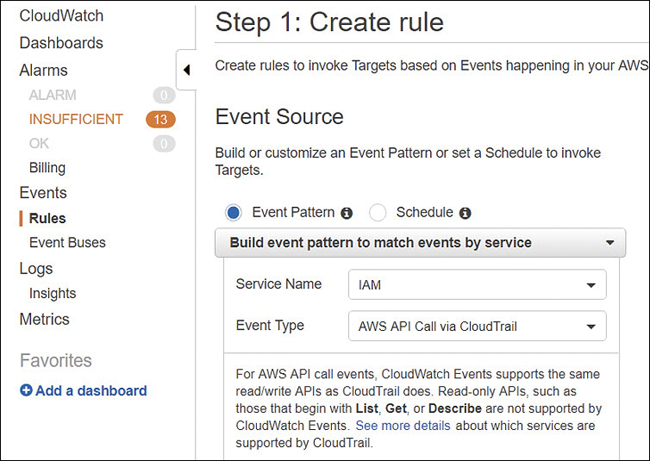
Figure 7-46 Creating a CloudTrail trail
Other AWS Security Services
Amazon has a variety of services to help you with the management of securing users and AWS resources. Depending on the size of your company or how much time you have available to manage AWS security, one or more of these management services might be just what you are looking for to manage your compliance and overall security settings.
AWS Organizations
Centralized policy-based management for multiple AWS accounts is the goal of AWS Organizations. If you’re lucky enough to not yet have AWS accounts, look at AWS Organizations as a great starting point for working your AWS accounts, especially if you know you’re going to have several AWS accounts to manage.
The first step to carry out with AWS Organizations is to create your initial organization with a specific AWS account; this account will henceforth be known as the master account, as shown in Figure 7-47. The master account sits at the root of your AWS Organization tree. Note that the master account is also defined as the payer account, which means it’s responsible for all the charges carried out by all the AWS accounts that are nested within AWS Organizations.
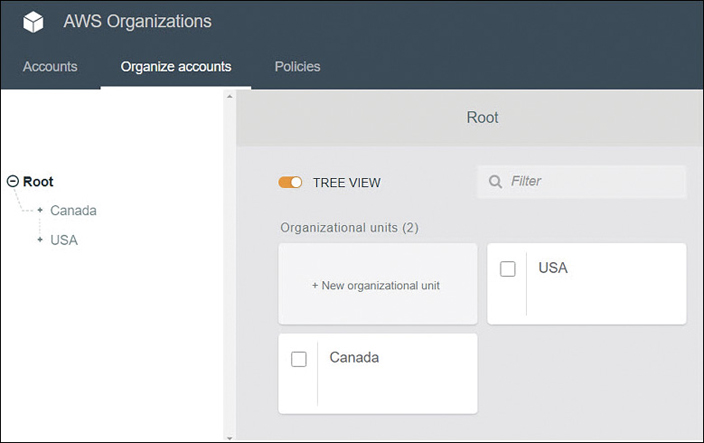
The feature of consolidated billing is also included in AWS Organizations. Using AWS Organizations, at the root, you can create new AWS accounts or add existing AWS accounts. All additional AWS accounts added to AWS Organizations are defined as member accounts. After grouping your AWS accounts, you can then apply security control policies to them. The policies that can be applied to AWS Organizations are SCPs; these are permission boundaries that help define the effective permissions of applied IAM policies. If the SCP policy and the IAM policy allow the same AWS service actions in both policy documents—that is, the settings match—then the actions are allowed.
Within AWS Organizations, the AWS accounts can be organized into groupings called organizational units (OUs), as shown in Figure 7-47. These OUs are not the same as Microsoft Active Directory OUs, but they have some of the same organizational concepts. OUs can be nested so that you can create a tree-like hierarchy that meets your business needs. Nested OUs inherit SCP policy from the parent OU and specific policy controls that can be applied directly to any OU. SCP policies can be defined for the entire AWS Organization, for specific OUs, or for specific AWS accounts. Terra Firma wants to explore the creation of a master account using AWS Organizations. This allows Terra Firma to plan properly for future AWS growth and central control.
Resource Access Manager (AWS RAM)
We know we can control access to AWS resources with IAM users, groups, and roles by assigning the appropriate security policy. However, you may have many AWS accounts, and the prospect of managing resource access hosted in separate AWS accounts may not be possible. Amazon knows that corporations have hundreds if not thousands of AWS accounts and resources, and they need and want to manage these resources centrally. A fairly new service called the Resource Access Manager allows you to centrally manage AWS accounts, IAM policies, and AWS resources.
AWS RAM allows you to share your AWS resources hosted within a single AWS account with other AWS accounts. If you are using AWS Organizations, you can also use AWS RAM to share your AWS resources between the AWS accounts within your organization.
Perhaps you have application servers or even database servers that would be handy to share centrally between different AWS accounts instead of having to create duplicate resources. Ultimately, any EC2 resource hosted on a subnet within the VPC can be shared. Therefore, you can create a central VPC and share the subnets within the VPC with other AWS accounts that belong to the same organization hosted by AWS Organizations.
As the owner of the VPC, you’re responsible for the creation and management of all standard VPC resources, including subnets, route tables, VPC endpoints, PrivateLink endpoints, Internet gateways, virtual private gateways, network address translation (NAT) gateways, and transit gateways.
Once the subnet is shared with you, as shown in Figure 7-48, you can use any resources hosted by the subnet, including EC2 instances, RDS databases, and even Redshift clusters.
Once a subnet has been shared, you can use the shared subnet to create, modify, and delete your own resources.
You can share resources within any AWS region that supports resource sharing using AWS RAM.

Figure 7-48 Sharing subnets with AWS RAM
The first task to consider is to decide the level of sharing you want to carry out. Which resources that you own would you like to share?
Next, decide which principals you would like to share the resource with. Resource principals can be AWS accounts, OUs, or an entire organization from AWS Organizations.
If your AWS account is part of an organization within AWS Organizations, and sharing within your organization is enabled, any principal in your organization will automatically be granted access to any shared resources. If you are not using AWS Organizations, you will receive an invitation to join the resource share, and after accepting the invitation, you will have access to the shared resource.
After a resource has been shared with an AWS Organization, any new accounts that are added to the organization immediately have access to the shared resources. Even though a resource has been shared with you, you can’t turn around and share the resource with somebody else because you’re not the owner of the resource. Resource sharing is the responsibility of the resource owner.
Once an owner has shared a resource with your AWS account, you can begin to use the resource. What you can do with the resource depends on the type of resource that’s being shared and the IAM security policies and service control policies that have been applied.
Resources can be shared by default with any AWS account; if you want to, you can restrict resource sharing to an organization within your AWS Organizations, specific AWS accounts, or OUs within the AWS Organization.
Secrets Manager
Secrets Manager allows you to secure and manage secrets for your RDS databases, as shown in Figure 7-49. This includes MySQL, PostgreSQL, and Amazon Aurora, and secrets for Oracle databases hosted on EC2 instances, and OAuth refresh tokens that are used when accessing AWS resources on third-party services and on-premise resources. The rotation of database credentials is automatically configured when secrets are stored in Secrets Manager. Secrets are encrypted at rest using encryption keys stored in the AWS Key Management service. You can specify customer master keys (CMKs) used to encrypt secrets or choose to use the default KMS encryption keys provided for your AWS account.
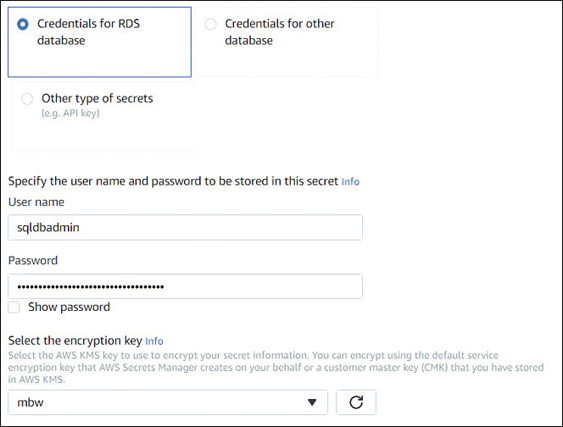
Developers can replace any hard-coded secrets used in their applications with secrets retrieved from Secrets Manager using the secrets manager APIs. Access to secrets is controlled by the IAM policy that defines the access permissions of both users and applications when retrieving secrets.
GuardDuty
GuardDuty is a built-in threat detection service hosted at AWS that you can subscribe to, allowing the continual monitoring and protection of your AWS accounts and services, as shown in Figure 7-50. GuardDuty works within these categories monitoring these security issues:
Reconnaissance—Unusual API activity, failed logons, suspicious network traffic
EC2 instance compromise—Analysis of network protocols, inbound and outbound communication, temporary theft of EC2 credentials
Account compromise—Attempts to disable CloudWatch, suspicious API calls, or infrastructure deployment anomalies
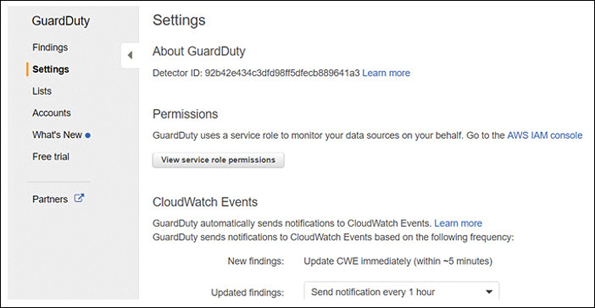
Figure 7-50 GuardDuty settings
GuardDuty relies on machine learning and continual analysis from other integrated AWS security services, including CloudTrail events, VPC flow logs, and DNS logs. GuardDuty performs analysis in near-real-time and does not retain log information it has finished its after its analysis Of course, you can still use the individual AWS services and create and manage your own alerts, but perhaps you don’t have the time or skill set necessary to protect your AWS resources adequately.
AWS Inspector
AWS Inspector performs security checks and assessments against the operating systems and applications hosted on Linux and EC2 instances by using an optional inspector agent that is installed in the operating system associated with the EC2 instance. After you define the assessment target for AWS Inspector, which is a group of tagged EC2 instances, AWS Inspector evaluates the state of each instance using several rule packages.
There are two types of rules: network accessibility tests that don’t require the inspector agent to be installed, and host assessment rules that do require the inspector agent to be installed, as shown in Figure 7-51. Assessments check for security issues on each EC2 instance. The choices for rule packages comply within industry standards and include the Common Vulnerabilities and Exposures (CVE) checks, the Center for Internet Security (CIS) checks, Operating System configuration benchmarks, and other security best practices.
AWS Inspector rules are assigned severity levels of medium and high based on levels of confidentiality, integrity, and availability of the defined assessment target. AWS Inspector also integrates with Amazon SNS, which sends notifications when failures occur. Remember that SNS notifications can in turn call a Lambda function, which can carry out any AWS task you would like, as Lambda can use all AWS APIs. Terra Firma is exploring the use of AWS Inspector to make sure that there are no missed security holes on its Web and application server EC2 instances.

In Conclusion
Kudos for hanging in what could be a difficult chapter to grasp with just one read. There are a lot of moving parts and a lot of documentation to wade through. In fact, there are well over 3,000 pages of AWS documents dealing just with IAM. If you’re like I am, the first time I am exposed to a new security system, it takes a while to absorb all the details.
Amazon certainly does things in its way, and we mostly looked at dealing with security using the AWS Management console. You can use the AWS CLI tools as well, but you need to look at security settings graphically to get a grasp on the scope of what you want to do. Once the concepts in this chapter make sense, perhaps it’s time to try crafting some IAM policies if you’re up for it. Look at the companion videos that are an extension of this book. After you watch the videos, if you feel you need some customized policies, remember to test them with the Policy Simulator.
It’s probably best to create an AWS account to use as a sandbox or two to play with IAM policies so you can test them before you move them into production. After all, it’s easy to cut-and-paste policies from one account to another.
Top 10 Big-Picture Security Discussion Points
Deploying and managing security for your company resources that are hosted in the AWS cloud is the job that never ends. Here are a few more discussion points to consider. Gather everybody into a conference room with a couple of whiteboards, and start discussing and planning. The more you plan, the safer you’ll be, and the more you prototype ideas, the more you’ll learn.
Are you using the root account daily? Why?
Do your IAM users currently use MFA? Why not?
Do you have your IAM users and groups defined?
Are applications hosted on EC2 instances using IAM roles to access AWS services?
Does the sharing of VPCs and subnets with AWS RAM simplify your deployments at AWS?
Can IAM roles replace current IAM user identities for accessing AWS resources?
What permission boundaries should be enforced? At what level? Per user, or per organization?
Can AWS Organizations help you manage multiple AWS accounts?
Will GuardDuty help you manage the overall protection and compliance of your AWS resources that are hosted in your AWS accounts?
Would AWS Inspector help you to further protect your hosted applications on EC2 instances?