Chapter 12. Content Providers
Content providers are Android building blocks that can expose data across the boundaries between application sandboxes. As you recall, each application in Android runs in its own process with its own permissions. This means that an application cannot see another app’s data. But sometimes you want to share data across applications. This is where content providers become very useful.
Take your contacts, for example. You might have a large database of contacts on your device, which you can view via the Contacts app as well as via the Dialer app. Some devices, such as HTC Android models, might even have multiple versions of the Contacts and Dialer apps. It would not make a lot of sense to have similar data live in multiple databases.
Content providers let you
centralize content in one place and have many different applications
access it as needed. In the case of the contacts on your phone, there is
actually a ContactProvider application that contains a content provider,
and other applications access the data via this interface. The interface
itself is fairly simple: it has the same insert(), update(), delete(), and query() methods we saw in Chapter 9.
Android uses content providers quite a bit internally. In addition to contacts, your settings represent another example, as do all your bookmarks. All the media in the system is also registered with MediaStore, a content provider that dispenses images, music, and videos in your device.
Creating a Content Provider
We are going to start by
creating a brand-new Java class in the same package as all other
classes. Its name will be StatusProvider. This class, like any of
Android’s main building blocks, will subclass an Android framework
class, in this case ContentProvider.
In Eclipse, select your
package, click on File→New→Java Class, and enter “StatusProvider”. Then,
update the class to subclass ContentProvider, and organize the imports
(Ctrl-Shift-O) to import the appropriate Java packages. The result
should look like this:
package com.marakana.yamba7;

import android.content.ContentProvider;

public class StatusProvider extends ContentProvider {

}
Of course, this code is now broken because we need to provide implementations for many of its methods. The easiest way to do that is to click on the class name and choose “Add unimplemented methods” from the list of quick fixes. Eclipse will then create stubs, or templates, of the missing methods.
Defining the URI
Objects within a single app share an address space, so they can refer to each other simply by variable names. But objects in different apps don’t recognize the different address spaces, so they need some other mechanism to find each other. Android uses a Uniform Resource Identifier, a string that identifies a specific resource, to locate a content provider. A URI has three or four parts, shown in Example 12-1.
Part A,
content://, is always set to this value. This is written in stone.Part B,
com.marakana.yamba.statusprovider, is the so-called authority. It is typically the name of the class, all in lowercase. This authority must match the authority that we specify for this provider when we later declare it in the manifest file.Part C,
status, indicates the type of data that this particular provider provides. It could contain any number of segments separated with a slash, including none at all.Part D,
47, is an optional ID for the specific item that we are referencing. If not set, the URI will represent the entire set. Number 47 is an arbitrary number picked for this example.
Sometimes you need to refer to the content provider in its entirety, and sometimes to only one of the items of data it contains. If you refer to it in its entirety, you leave off Part D; otherwise, you include that part to identify one item within the content provider. Actually, since we have only one table, we do not need Part C of the URI.
One way to define the constants for our example is like this:
public static final Uri CONTENT_URI = Uri
    .parse("content://com.marakana.yamba7.statusprovider");
public static final String SINGLE_RECORD_MIME_TYPE =
    "vnd.android.cursor.item/vnd.marakana.yamba.status";
public static final String MULTIPLE_RECORDS_MIME_TYPE =
    "vnd.android.cursor.dir/vnd.marakana.yamba.mstatus";
In Getting the Data Type, we’ll explore the reason for two MIME types. We are also going to define the status data object in a class-global variable so that we can refer to it:
// initialization
@Override
public boolean onCreate(){
   statusData = new StatusData(getContext());
   return false;
}
StatusData statusData;
We’ll be using the
status data object all over our app because all our database
connectivity is centralized in that class. So now the StatusProvider class has a reference to an
object of class StatusData.
Inserting Data
To insert a record into
a database via the content provider interface, we need to override the
insert() method. The
caller provides the URI of this content provider (without an ID) and
the values to be inserted. A successful call to insert the new record
returns the ID for that record. We end by returning a new URI
concatenating the provider’s URI with the ID we just got back:
@Override
public Uri insert(Uri uri, ContentValues values) {
SQLiteDatabase db = statusData.dbHelper.getWritableDatabase(); //  try {
long id = db.insertOrThrow(StatusData.TABLE, null, values); //
try {
long id = db.insertOrThrow(StatusData.TABLE, null, values); //  if (id == -1) {
throw new RuntimeException(String.format(
"%s: Failed to insert [%s] to [%s] for unknown reasons.", TAG,
values, uri)); //
if (id == -1) {
throw new RuntimeException(String.format(
"%s: Failed to insert [%s] to [%s] for unknown reasons.", TAG,
values, uri)); //  } else {
return ContentUris.withAppendedId(uri, id); //
} else {
return ContentUris.withAppendedId(uri, id); //  }
} finally {
db.close(); //
}
} finally {
db.close(); //  }
}
}
}-
We need to open the database for writing.
-
We attempt to insert the values into the database and, upon a successful insert, receive the ID of the new record from the database.
-
If anything fails during the insert, the database will return
-1. We can than throw a runtime exception because this is an error that should never have happened.-
If the insert was successful, we use the
ContentUris.withAppendedId()helper method to craft a new URI containing the ID of the new record appended to the standard provider’s URI.-
We need to close the database no matter what, so a
finallyblock is a good place to do that.
Updating Data
To update the data via the Content Provider API, we need:
- The URI of the provider
This may or may not contain an ID. If it does, the ID indicates the specific record that needs to be updated, and we can ignore the selection. If the ID is not specified, it means that we are updating many records and need the selection to indicate which are to be changed.
- The values to be updated
The format of this parameter is a set of name/value pairs that represent column names and new values.
- Any selection and arguments that go with it
These together make up a
WHEREclause in SQL, selecting the records that will change. The selection and its arguments are omitted when there is an ID, because the ID is enough to select the record that is being updated.
The code that handles both types of update—by ID and by selection—can be as follows:
@Override
public int update(Uri uri, ContentValues values, String selection,
    String[] selectionArgs) {
  long id = this.getId(uri); //
  SQLiteDatabase db = statusData.dbHelper.getWritableDatabase(); //
  try {
    if (id < 0) {
      return db.update(StatusData.TABLE, values, selection, selectionArgs); //
    } else {
      return db.update(StatusData.TABLE, values,
                       StatusData.C_ID + "=" + id, null); //
    }
  } finally {
    db.close(); //
  }
}-
We use the local helper method
getId()to extract the ID from the URI. If no ID is present, this method returns-1.getId()will be defined later in this chapter.-
We need to open the database for writing the updates.
-
If there’s no ID, that means we’re simply updating all the database records that match the
selectionandselectionArgsconstraints.-
If an ID is present, we are using that ID as the only part of the
WHEREclause to limit the single record that we’re updating.-
Don’t forget to close the database.
Deleting Data
Deleting data is similar to updating data. The URI may or may not contain the ID of the particular record to delete:
@Override
public int delete(Uri uri, String selection, String[] selectionArgs) {
  long id = this.getId(uri); //
  SQLiteDatabase db = statusData.dbHelper.getWritableDatabase(); //
  try {
    if (id < 0) {
      return db.delete(StatusData.TABLE, selection, selectionArgs); //
    } else {
      return db.delete(StatusData.TABLE, StatusData.C_ID + "=" + id, null); //
    }

  } finally {
    db.close(); //
  }
}-
The
getId()helper method extracts the ID from the URI that we get. If no ID is present, this method returns-1.-
We need to open the database for writing the updates.
-
If there’s no ID, we simply delete all the database records that match the
selectionandselectionArgsconstraints.-
If an ID is present, we use that ID as the only part of the
WHEREclause to limit the operation to the single record the user wants to delete.-
Don’t forget to close the database.
Querying Data
To query the data via a
content provider, we override the query() method. This
method has a long list of parameters, but usually we just forward most
of them to the database call with the same name:
@Override
public Cursor query(Uri uri, String[] projection, String selection,
    String[] selectionArgs, String sortOrder) {
  long id = this.getId(uri); //
  SQLiteDatabase db = statusData.dbHelper.getReadableDatabase(); //
  if (id < 0) {
    return db.query(StatusData.TABLE, projection, selection, selectionArgs, null,
        null, sortOrder); //
  } else {
    return db.query(StatusData.TABLE, projection,
        StatusData.C_ID + "=" + id, null, null, null, null); //
  }
}-
The
getId()helper method extracts the ID from the URI that we get.-
We need to open the database, in this case just for reading.
-
If there’s no ID, we simply forward what we got for the content provider to the equivalent database call. Note that the database call has two additional parameters that correspond to the SQL
GROUPINGandHAVINGcomponents. Because content providers do not support this feature, we simply pass innull.-
If an ID is present, we use that ID as the
WHEREclause to limit what record to return.
Note
We do not close the database here, because closing the
database will destroy the cursor and we still need it on the
receiving end to go over the data returned by the query. One way to
handle the cursor is to have the receiver manage it. Activities have
a simple startManagingCursor() method for this
purpose.
Getting the Data Type
A content provider must
return the MIME
type of the data it is returning. The MIME type indicates
either a single item or all the records for the given URI. Earlier in
this chapter we defined the single-record MIME type as vnd.android.cursor.item/vnd.marakana.yamba.status
and the directory of all statuses as vnd.android.cursor.dir/vnd.marakana.yamba.status.
To let others retrieve the MIME type, we must define the call
getType().
The first part of the MIME type is either
vnd.android.cursor.item or vnd.android.cursor.dir,
depending on whether the type represents a specific item or all items
for the given URI. The second
part, vnd.marakana.yamba.status or
vnd.marakana.yamba.mstatus
for our app, is a combination of the constant vnd followed by your company or app
name and the actual content type.
As you may recall, the URI can end with a number. If it does, that number is the ID of the specific record. If it doesn’t, the URI refers to the entire collection.
The following source
shows the implementation of getType() as well as the getId() helper method that we’ve already
used several times:
@Override
public String getType(Uri uri) {
  return this.getId(uri) < 0 ? MULTIPLE_RECORDS_MIME_TYPE
      : SINGLE_RECORD_MIME_TYPE;  //
}

private long getId(Uri uri) {
  String lastPathSegment = uri.getLastPathSegment();  //
  if (lastPathSegment != null) {
    try {
      return Long.parseLong(lastPathSegment); //
    } catch (NumberFormatException e) { //
      // at least we tried
    }
  }
  return -1;   //
}-
getType()uses the helper methodgetId()to determine whether the URI has an ID part. If it does not—as indicated by a negative return value—we returnvnd.android.cursor.dir/vnd.marakana.yamba.mstatusfor the MIME type. Otherwise, we’re referring to a single record and the MIME type isvnd.android.cursor.item/vnd.marakana.yamba.status. Of course, we previously defined these values as class constants.-
To extract the ID in our implementation of
getId(), we take the last part of the URI.-
If that last part is not null, we try to parse it as a
longand return it.-
It could be that the last part is not a number at all, in which case the parse will fail.
-
We return
-1to indicate that the given URI doesn’t contain a valid ID.
Updating the Android Manifest File
As with any major building block, we want to define our
content provider in the Android manifest XML file. Notice that in this case the android:authorities property specifies the
URI authority permitted to access this content provider. Typically,
this authority would be your content provider class—which we use
here—or your package:
<application>
  ...
  <provider android:name=".StatusProvider"
    android:authorities="com.marakana.yamba7.statusprovider" />
  ...
</application>
At this point our
content provider is complete, and we are ready to use it in other
building blocks of Yamba. But since our application already
centralizes all data access in a StatusData object that is readily accessible
via YambaApplication, we don’t
really have a good use for this content provider within the same
application. Besides, content providers mostly make sense when we want
to expose the data to another application.
Using Content Providers Through Widgets
As mentioned before, content providers make the most sense when you want to expose the data to other applications. It is a good practice to always think of your application as part of a larger Android ecosystem and, as such, a potential provider of useful data to other applications.
To demonstrate how
content providers can be useful, we’ll create a Home screen widget.
We’re not using the term widget here as a synonym
for Android’s View class, but as a
useful embedded service offered by the Home screen.
Android typically ships with a few Home screen widgets. You can access them by going to your Home screen, long-pressing on it to pull up an Add to Home Screen dialog, and choosing Widgets. Widgets that come with Android include Alarm Clock, Picture Frame, Power Controls, Music, and Search. Our goal is to create our own Yamba widget that the user will be able to add to the Home screen.
The Yamba widget will be
simple, displaying just the latest status update. To create it, we’ll
make a new YambaWidget class that
subclasses AppWidgetProviderInfo.
We’ll also have to register the widget with the manifest file.
Implementing the YambaWidget class
YambaWidget is the main class for our widget. It is a subclass of
AppWidgetProvider, a special system class that makes widgets. This
class itself is a subclass of BroadcastReceiver, so
our Yamba widget is a broadcast receiver automatically.
Basically, whenever our widget is updated, deleted, enabled,
or disabled, we’ll get a broadcast intent with that information. So
this class inherits the onUpdate(),
onDeleted(), onEnabled(), onDisabled(), and onReceive()
callbacks. We can override any of these, but typically we care mostly
about the updates and general broadcasts we receive.
Now that we understand the overall design of the widget framework, Example 12-2 shows how we implement it.
package com.marakana.yamba7; import android.app.PendingIntent; import android.appwidget.AppWidgetManager; import android.appwidget.AppWidgetProvider; import android.content.ComponentName; import android.content.Context; import android.content.Intent; import android.database.Cursor; import android.text.format.DateUtils; import android.util.Log; import android.widget.RemoteViews; public class YambaWidget extends AppWidgetProvider { //Log.d(TAG, "Updating widget " + appWidgetId); RemoteViews views = new RemoteViews(context.getPackageName(), R.layout.yamba_widget); //
views.setTextViewText(R.id.textUser, user); //
views.setTextViewText(R.id.textCreatedAt, createdAt); views.setTextViewText(R.id.textText, message); views.setOnClickPendingIntent(R.id.yamba_icon, PendingIntent .getActivity(context, 0, new Intent(context, TimelineActivity.class), 0)); appWidgetManager.updateAppWidget(appWidgetId, views); //
} } else { Log.d(TAG, "No data to update"); } } finally { c.close(); //
} Log.d(TAG, "onUpdated"); } @Override public void onReceive(Context context, Intent intent) { //
super.onReceive(context, intent); if (intent.getAction().equals(UpdaterService.NEW_STATUS_INTENT)) { //
Log.d(TAG, "onReceived detected new status update"); AppWidgetManager appWidgetManager = AppWidgetManager.getInstance(context); //
this.onUpdate(context, appWidgetManager, appWidgetManager .getAppWidgetIds(new ComponentName(context, YambaWidget.class))); //
} } }
-
As mentioned before, our widget is a subclass of
AppWidgetProvider, which itself is aBroadcastReceiver.-
This method is called whenever our widget is to be updated, so it’s where we’ll implement the main functionality of the widget. When we register the widget with the system in the manifest file later, we’ll specify the update frequency we’d like. In our case, this method will be called about every 30 minutes.
-
We finally get to use our content provider. The whole purpose of this widget in this chapter is to illustrate how to use the
StatusProviderthat we created earlier. As you saw earlier when we implemented the content provider, its API is quite similar to the SQLite database API. The main difference is that instead of passing a table name to a database object, we’re passing a content URI to theContentResolver. We still get back the very sameCursorobject as we did with databases in Chapter 9.-
In this particular example, we care only about the very latest status update from the online service. So we position the cursor to the first element. If one exists, it’s our latest status update.
-
In the next few of lines of code, we extract data from the cursor object and store it in local variables.
-
Since the user could have multiple Yamba widgets installed, we need to loop through them and update them all. We don’t particularly care about the specific
appWidgetIdbecause we’re doing identical work to update every instance of the Yamba widget. TheappWidgetIdbecomes an opaque handle we use to access each widget in turn.-
The actual view representing our widget is in another process. To be precise, our widget is running inside the Home application, which acts as its host and is the process we are updating. Hence the
RemoteViewsconstructor. TheRemoteViewsframework is a special shared memory system designed specifically for widgets.-
Once we have the reference to our widget views’ Java memory space in another process, we can update those views. In this case, we’re setting the status data in the row that represents our widget.
-
Once we update the remote views, the
AppWidgetManagercall toupdateAppWidget()actually posts a message telling the system to update our widget. This will happen asynchronously, but shortly afteronUpdate()completes.-
Regardless of whether the
StatusProviderfound a new status, we release the data that we might have gotten from the content provider. This is just a good practice.-
The call to
onReceive()is not necessary in a typical widget. But since a widget is a broadcast receiver, and since our Updater service does send a broadcast when we get a new status update, this method is a good opportunity to invokeonUpdate()and get the latest status data updated on the widget.-
We check whether the intent was for the new status broadcast.
-
If it was, we get the instance of
AppWidgetManagerfor this context.-
We then invoke
onUpdate().
At this point, we have coded the Yamba widget, and as a receiver, it will be notified periodically or when there are new updates, and it will loop through all instances of this widget on the Home screen and update them.
Creating the XML Layout
The layout for the widget is fairly straightforward. Note that we’re reusing our existing row.xml file that displays status data properly in the Timeline activity. In Example 12-3, we just include it along with a little title and an icon to make it look good on the Home screen.
<?xml version="1.0" encoding="utf-8"?> <!--
-
We’re using
LinearLayoutto hold our widget together. It runs horizontally, with the icon on the left and the status data on the right.-
This is our standard Yamba icon.
-
Notice the use of the
<include>element. This is how we include our existing row.xml into this layout so we don’t have to duplicate the code.
This layout is simple enough, but it does the job for our particular needs. Next, we need to define some basic information about this widget and its behavior.
Creating the AppWidgetProviderInfo File
The XML file shown in Example 12-4 is responsible for describing the widget. It typically specifies which layout this widget uses, how frequently it should be updated by the system, and its size.
In this case we specify that we’d like to have our widget updated every 30 minutes or so (1,800,000 milliseconds). Here, we also specify the layout to use, the title of this widget, and its size.
Updating the Manifest File
Finally, we need to update the manifest file and register the widget:
  ...
  <application .../>
    ...
    <receiver android:name=".YambaWidget"
              android:label="@string/msgLastTimelineUpdate">
      <intent-filter>
        <action android:name="android.appwidget.action.APPWIDGET_UPDATE" />
      </intent-filter>
      <intent-filter>
        <action android:name="com.marakana.yamba.NEW_STATUS" />
      </intent-filter>
      <meta-data android:name="android.appwidget.provider"
        android:resource="@xml/yamba_widget_info" />
    </receiver>
    ...
  </application>
  ...
Notice that the widget
is a receiver, as we mentioned before. So, just like other broadcast
receivers, we declare it within a <receiver> tag inside an <application> element. It is important
to register this receiver to receive ACTION_APPWIDGET_UPDATE updates. We do that
via the <intent-filter>. The
<meta-data> specifies the
meta information for this widget in the yamba_widget_info XML file described in the
previous section.
Testing the Widget
To test this widget, install your latest application on the device. Next, go to the Home screen, long-press it, and click on the Widgets choice. You should be able to navigate to the Yamba widget at this point. After adding it to the Home screen, the widget should display the latest status update.
If your Updater service is running, the latest updates should show up on the Home screen. This means your widget is running properly.
Summary
At this point, the Yamba app is complete. Congratulations! You are ready to fine-tune it, customize it, and publish it to the market.
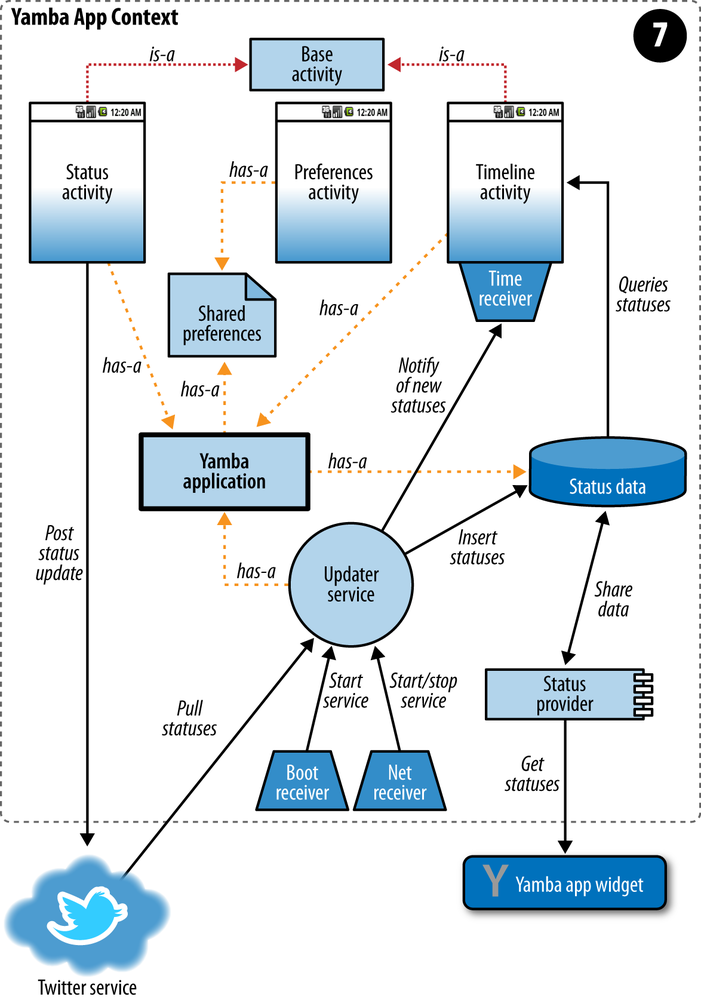
Figure 12-1 illustrates what we have done so far as part of the design outlined earlier in Figure 5-4.