As Impala is designed and developed to run on the Cloudera Hadoop distribution, there are two different ways Impala can be installed on supported Cloudera Hadoop distributions. Both installation methods are described in a nutshell, as follows.
Cloudera Manager is only available for the Cloudera Hadoop distribution. The biggest advantage of installing Impala using Cloudera Manager is that most of the complex configuration is taken care of by Cloudera Manager, and applies to all depending applications, if applicable. Cloudera Manager has various versions available; however, to support specific Impala versions, the user must have a proper Cloudera Manager for successful installation.
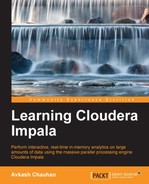
Once previously described requirements are met, using Cloudera Manager can help you install Impala. Depending on the Cloudera Manager version, you can install specific Impala versions. For example, to install Impala version 1.1.1 you would need Cloudera Manager 4.7 or a higher version, which supports all the features and the auditing feature introduced in Impala 1.1.1. Just use the Cloudera Manager UI to install Impala from the list and follow the instructions as they appear. As shown in the following Cloudera Manager UI screenshot, I have Impala 1.1.1 installed; however, I can upgrade to Impala 1.2.1 just using Cloudera Manager.
If you decide to install Impala on your own in your Cloudera Hadoop cluster, you must make sure that basic Impala requirements are met and necessary components are already installed. First you must have the correct version of the Cloudera Hadoop cluster ready depending on your Impala version, and have the Hive metastore installed either using MySQL or PostgreSQL.
Once you have made sure that the Hive metastore is available in your Cloudera Hadoop cluster, you can start the Impala installation to all DataNodes as follows:
- Make sure that you have Cloudera public repo set in your OS, so Impala specific packages can be downloaded and installed on your machine. If you do not have the Cloudera specific public repo set, please visit the Cloudera website to get your OS specific information.
- After that, you will need to install the following three packages on your machine:
- Impala
- Impala-server
- Impala-state-store
- Then, copy
hive-site.xml,core-site.xml, andhdfs-site.xmlHadoop configuration files to the/etc/impala/conffolder, which is the Impala configuration folder. - As per Cloudera advice, it is not a good choice to install Impala in Namenode, so please do not do so, because any problem caused by Impala may bring your Hadoop cluster down.
- Finally, install Impala shell to a single DataNode or a network-connected external machine on which you have decided to run queries.