By now you will have a good idea of how Impala works and how different components interact with each other to support query requests. In the previous chapter we have learned how the Impala shell interacts with an Impala daemon running either on the same node or some other DataNode, and how users can use certain shell commands to perform their tasks through the Impala shell. Now in this chapter, we will learn how to make great use of the Impala shell to interact with data by using the Impala Query Language. Along with the Impala Query Language, we will also learn various Impala built-in functions along with great examples.
Once again, we would like to repeat that each statement must end with a semicolon in the Impala shell, and you can use multiple statements using copy and paste in the Impala shell. The Impala interpreter parses each statement by recognizing the semicolon and considering it as the end of the current statement, and this way it can parse multiple statements.
In this chapter you will find detailed descriptions of the Impala Query Language, and to extend the knowledge gained from this chapter, you can refer to another chapter that explains most of the Impala query sentences with an example. Chapter 4, Impala Walkthrough with an Example complements this chapter. Now let's start learning the Impala Query Language.
The Impala Query Language is based on SQL while providing a great degree of compatibility with HiveQL. Hive statements are based on SQL statements, and because Impala statements are based on SQL, several statements in both Hive and Impala are identical; however, some of the statements do show differences. Let's check the key points regarding how Impala statements are based on SQLs:
- Hive as well as Impala uses the Data Definition Language (DDL).
- To store table structures and their properties, Hive uses metastore, and Impala uses the same metastore to record the information. For example, Impala can access the tables created using Hive statements or directly by using the
CREATE TABLEcommand. - Data types, that is
int,tinyint,smallint,bigint,float,double,boolean,string, andtimestamp, in Impala share the same name and semantics as Hive for the supported data types.
Now, let's take a quick look at how the Impala Query Language supports HiveQL; note the following key points:
- Impala statements and clauses are similar to those of HiveQL, such as
JOIN,UNION ALL,ORDERBY,LIMIT,DISTINCT, andAGGREGATE - Impala statements support data manipulation statements similar to the Data Manipulation Language (DML)
SELECTandINSERTstatements in Impala function the same as in HiveQL- Impala also supports
INSERT INTOandINSERT OVERWRITEstatements - Several built-in functions in various categories such as mathematical, conditional, or string are the same in Impala and HiveQL and use the same name and parameter types
We must understand that not every SQL statement is supported in Impala. To make it simple, a list of unsupported SQL statements is at the end of this chapter. Now, let's get to know the most useful SQL language statements, which are commonly used in Impala.
With Impala, users can work on various types of data through databases, tables, and views. Impala uses these SQL statements to process data stored in databases and tables, and in the next several sections we will study Impala statements using some examples. Databases and the table metadata is modified differently in both Hive and Impala. In Hive, you can use ALTER, CREATE, DROP, or INSERT operations to modify the data; however, in Impala, you will have to use CREATE TABLE, ALTER TABLE, and INSERT operations to achieve the same objective. Let's start with Database-specific SQL statements:
Let's first understand what a database is:
- A database is a logical entity to group related tables into one single namespace.
- With Impala running on a DataNode, physically, a database in Impala is represented as a directory on HDFS. All internal tables, partitions, and data files are saved inside the parent directory.
- An Impala database is created inside the Impala directory on HDFS with the name
database_name.db. - The database directory on HDFS is the same as any other directory on HDFS and supports all directory operations like any other directory.
Now let's learn a few database-specific statements in Impala.
When there is a need to create a database, you can use the CREATE DATABASE statement to create a new database as follows:
CREATE (DATABASE|SCHEMA)
  [IF NOT EXISTS] database_name [COMMENT 'database_comment']
  [LOCATION hdfs_path];
To remove a database from Impala, you can use the DROP DATABASE
statement. Once the DROP DATABASE statement is executed, the corresponding database_name.db directory from HDFS is removed. The syntax of the DROP DATABASE statement is as follows:
DROP (DATABASE|SCHEMA) [IF EXISTS] database_name;
There is no protection to the DROP DATABASE statement. If the DROP DATABASE statement is executed on a database that has tables and data files, all the content will be removed from the HDFS, and the database directory will be deleted. So, it is recommended that you must empty the database yourself before calling the DROP statement.
To get the list of databases available for Impala, use the SHOW DATABASE statement with the following syntax:
SHOW DATABASES;
Now, let's see an example of database-specific statements to understand everything together. If you have just installed Impala, started it, and run SHOW DATABASE, you will see only one database name, default, as shown in the following example:
[Hadoop.testdomain:21000] > show databases;
Query: show databases
Query finished, fetching results ...
+---------+
| name    |
+---------+
| default |
+---------+
Returned 1 row(s) in 0.12s
[Hadoop.testdomain:21000] > create database items;
Query: create database items
[Hadoop.testdomain:21000] > use items;
Query: use items
[Hadoop.testdomain:21000] > create table list (item string, total int);
Query: create table list (item string, total int)
[Hadoop.testdomain:21000] > show databases;
Query: show databases
Query finished, fetching results ...
+---------+
| name    |
+---------+
| default |
| items   |
+---------+
Returned 2 row(s) in 0.13s
[Hadoop.testdomain:21000] > drop database items;
Query: drop database items
ERROR: AnalysisException: Cannot drop current default database: items
[Hadoop.testdomain:21000] > use default;
Query: use default
[Hadoop.testdomain:21000] > drop database items;
Query: drop database itemsAfter looking at database-specific commands, we will now dig deeper to understand some table-specific commands. Some of these commands also apply to the partitions in the table, and when applicable I have used partitions and tables together in my description and the examples in the following sections.
Because files are stored in a DataNode on the HDFS, tables in Impala work a little differently. When you use the
CREATE TABLE statement, Impala creates an internal table where Impala manages the underlying data file for the table. When DROP TABLE is called, the underlying file is physically deleted. The full create table statement is as follows:
CREATE [EXTERNAL] TABLE [IF NOT EXISTS] [db_name.]table_name
[(col_namedata_type [COMMENT 'col_comment'], ...)]
[COMMENT 'table_comment']
[PARTITIONED BY
(col_namedata_type [COMMENT 'col_comment'], ...)
]
  [  [ROW FORMAT row_format] [STORED AS file_format]   ]
[LOCATION 'hdfs_path']
data_type
: primitive_type
primitive_type
  :TINYINT   | SMALLINT   | INT   | BIGINT   | BOOLEAN
 | FLOAT   | DOUBLE   | STRING   | TIMESTAMP
row_format
: DELIMITED [FIELDS TERMINATED BY 'char' [ESCAPED BY 'char']]
  [LINES TERMINATED BY 'char']
file_format:
: PARQUETFILE   | SEQUENCEFILE   | TEXTFILE   | RCFILE
When a new table is created based on some other table, the LIKE clause is used. There are many places on the internet to learn about the CREATE TABLE SQL statement.
While using the CREATE
EXTERNAL TABLE syntax, the newly created table points to an existing data file on HDFS. Using this statement, the file data is not imported from the existing data file on HDFS to the new table; instead the new table points to the data file on HDFS while the new table is empty. When external is not defined, the data is copied to the new table so the table itself has the data. The process to query the data does not change and still remains the same.
When EXTERNAL is used to create a table, Impala treats the table as an external mean. The data files are produced outside Impala, and when DROP TABLE is called on that table, the table is removed; however, the underlying data is kept as is.
Because the data file is read directly from HDFS, if there are any changes to the data file, you must use the REFRESH statement impala-shell so that Impala can recognize the changes and can use the updated data file. The statement to create a table with the EXTERNAL clause is the same as CREATE TABLE, and the only difference is that it starts with CREATE EXTERNAL TABLE as shown in the following line of code:
CREATE EXTERNAL TABLE table_name;
Sometimes, you may need to modify the structure or properties of the table, and to achieve this objective the ALTER TABLE statement is used. As Impala shares the table metastore with Hive, the table metadata is updated using ALTER TABLE, which is available to any other application using the same metadata. It is important to know that ALTER TABLE does not actually perform any operation on the actual data; instead, the alteration is done on metadata. So, to achieve full transformation of the data, you will need to make those necessary modifications in the data stored in HDFS.
Here is the statement using ALTER TABLE to rename a table:
ALTER TABLE old_table_name RENAME new_table_name;
To change the physical location of the directory in HDFS where Impala looks for table-specific data files, use the following line of code:
ALTER TABLE table_name SET LOCATION 'directory_name_on_HDFS';
You can use the following syntax to change the table data file format to meet Impala file format requirements:
ALTER TABLE table_name
SET FILEFORMAT { PARQUETFILE | RCFILE | SEQUENCEFILE | TEXTFILE }
Note
Chapter 7, Advanced Impala Concepts, has detailed information on various file formats supported in Impala.
Creating an empty table along with the partitioning scheme definition and altering the table partition can be done using the following code:
CREATE TABLE table_name (def data_type)
PARTITIONED BY (partiton_name partition_type);
ALTER TABLE table_name ADD PARTITION (partition_type='definition'),
When there is a need to remove the table from the database, you can use the DROP TABLE command. The DROP command deletes the table and associated files underneath in the HDFS directory, unless the table was created with the EXTERNAL clause. Because the table and data cannot be recovered after deletion, it is suggested that you ensure you have the correct database in use before issuing the DROP statement. The syntax for using DROP TABLE is as follows:
DROP TABLE [IF EXISTS] table_name;
When you want to see a list of all tables in a database, use the SHOW TABLE statement with the following syntax:
SHOW TABLES;
SHOW TABLES [IN database_name];
Using the DESCRIBE statement, you can learn more about the table metadata with the following syntax:
DESCRIBE table_name;
Alternatively, you can use the FORMATTED clause with the DESCRIBE statement, which will provide various other information about the table, as follows:
DESCRIBE [FORMATTED] table_name;
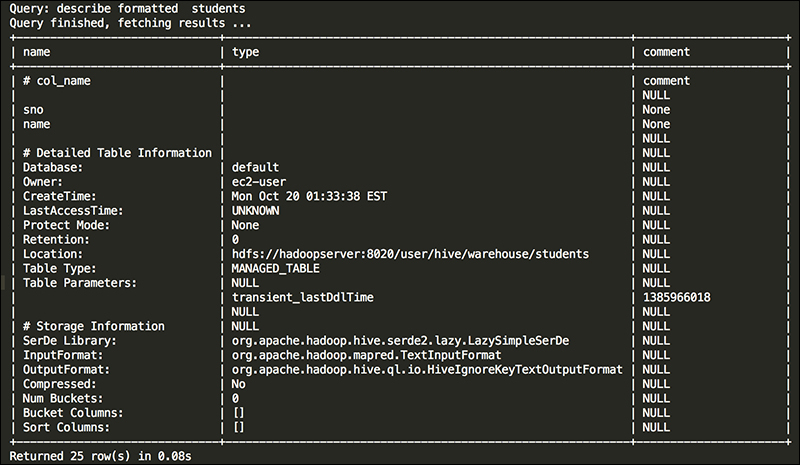
Here is an example of using DESCRIBE and DESCRIBE FORMATTED to help you understand the difference between the two.
The following code shows how DESCRIBE displays the output:
[Hadoop.testdomain:21000] > create table students (sno int, name string);
Query: create table students (sno int, name string)
[Hadoop.testdomain:21000] > describe students;
Query: describe students
Query finished, fetching results ...
+------+--------+---------+
| name | type   | comment |
+------+--------+---------+
| sno  | int    |         |
| name | string |         |
+------+--------+---------+
Returned 2 row(s) in 1.66s
The following screenshot shows how
DESCRIBE FORMATTED displays the results to show the difference:
The INSERT statement is use to insert data into tables and partitions, which are already created using the CREATE TABLE statement. Impala can also use the INSERT statement with the tables that are created in Hive as they both share the same metastore. The INSERT statement can use various clauses, such as INTO or OVERWRITE, which change the INSERT statement behavior; so, let's learn more about the key features of the INSERT statement:
To insert data into a table, you will use the INSERT statement with the SELECT statement, as shown in the following line of code:
INSERT [INTO | OVERWRITE] TABLE table_name SELECT ….
Each INSERT statement creates new data files in HDFS with unique names, and this way multiple INSERT INTO statements can be executed simultaneously. It is possible that INSERT commands were executed on a different Impala daemon (impalad); then, using the REFRESH table_name command on other nodes will help in syncing the data into a single table effectively. In general, the INSERT statement is very detailed, and to learn the various functions that come with it, my suggestion would be to look at the SQL statements documentation for INSERT.
The SELECT statement is used to select data from a table, which is part of the database currently in use. To use the database, you start the USE statement first and then use the SELECT statement. Here are some features of the SELECT clause in Impala:
- The
DISCTINCTclause can also be used but it is applied per query - The
SELECTclause also uses theWHERE,GROUP BY, andHAVINGclauses - You can also use
LIMITwhile usingORDER BYwithSELECT
I have written several examples by using SELECT with other clauses in this chapter, so here is the syntax of using the SELECT clause in SQL statements for reference purposes:
SELECT column_name,column_name FROM table_name;
SELECT * FROM table_name;
It is good that we can have a little discussion on internal and external tables while learning about table-specific statements. When using CREATE TABLE, the newly created table is considered as the internal table, whereas while using the CREATE EXTERNAL TABLE statement the tables created are considered as external tables. The properties of internal tables in Impala are as follows: