
This project is also hosted on GitHub. To get a local copy, open your Git bash terminal, go to the folder where you want to store the code, and issue the following command:
git clone git://github.com/dzenanr/model_concepts.git
After a few seconds, the model_concepts folder is created. It contains the whole project. Open the folder in Dart Editor to get a feel of how it is constructed. It is a web app containing the <script type="application/dart" src="model_concepts.dart"></script> script tag, and it starts the Dart VM with model_concepts.dart. When you run the app, the graphical designer appears in Chrome (Dartium). If you want to run it in another browser without Dart VM, first generate the JavaScript version through Tools | Pub Build – Debug and then paste the URL in the address window of your favorite browser (something like http://127.0.0.1:3030/F:/git/model_concepts/web/model_concepts.html) or simply run it with pub serve. The web folder contains the HTML file and the model_concepts.dart start up script, which contains the following code snippet:
import 'dart:html';
import 'package:model_concepts/model_concepts.dart';          (1)

void main() {
  // Get a reference to the canvas.
  CanvasElement canvas = document.querySelector('#canvas'),   (2)
  Board board = new Board(canvas);                            (3)
}
Line (1) loads the model_concepts library from the packages folder; the original source code of the library resides in the lib directory. The library header file, also called model_concepts.dart, shows the dart libraries that we need (html, async, and convert) as well as all the part files:
library model_concepts;

import 'dart:html';
import 'dart:async';
import 'dart:convert';


part 'board.dart';
part 'box.dart';
part 'item.dart';
part 'json_panel.dart';
part 'line.dart';
part 'menu_bar.dart';
part 'png_panel.dart';
part 'tool_bar.dart';
This app uses canvas painting in HTML5 (we'll explore that bottom up in the coming chapters). In line (2), the <canvas> tag with the canvas ID is bound to a canvas object of the CanvasElement class. Then, in line (3), an object of the Board class (the board.dart file) is instantiated with a reference to this canvas to start up the program.
Tip
We shall not provide further explanation on how the code works here. The app was built up in versions (called spirals, so far there are 14). On the On Dart blog (http://dzenanr.github.com/), under the Magic Boxes posts, you can find a detailed description of how the code evolved from Spirals 00 to the current app (magic boxes grew into model concepts), along with a summary of the development on http://goo.gl/DqF7d. This is a truly great way to learn Dart!
When the app starts up, we will see the following screen:

Model concepts start screen
The purpose of this tool is to graphically design a domain model of your app. Concepts or entities are drawn as rectangular boxes; these contain items that represent the attributes. The boxes are connected with the lines that represent the relationships between the entities; their multiplicity (that is, how many entities of kind B are associated with an entity of kind A, for example, many employees working in one department) can be indicated by 0..N or 1..1. The tool itself contains a (tiny) user guide, which is revealed by scrolling down the screen.
We will learn how to work with this tool by designing the model for our next app: the category links application. This app is all about subjects (called categories here) such as HTML5; Dart; Apple; Google; Programming, the economic crisis; and the hyperlinks (called links here) to the web postings about these subjects. Here are some examples of the links for HTML5: www.html5rocks.com, http://diveintohtml5.info/ and http://animateyourhtml5.appspot.com/. Clearly, a category can have multiple links, but it may also have none; so, the relationship from category to link will be 0..N.
Our app (that will be developed in Chapter 8, Developing Business Applications with Polymer Web Components) will show all the categories and the corresponding links for each category. Furthermore, we will be able to edit, remove, and add categories as well as links. However, first we will draw a model with two concepts (Category/Link) and one relationship (links). It will look like the following figure:
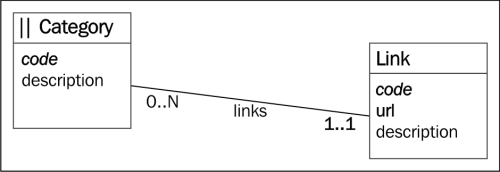
The graphical model of category-links
The category concept has two attributes: a code (name) like Dart and a description like Web programming language, tools, and how to. The code attribute is drawn in italics because it is an identifier, and in bold because its value is required. The link concept has the code identifier, the required URL attribute, and an optional description attribute. For example, the URL for Dart could be http://www.dartlang.org/ and the description could be Official Google site for Dart. In our model, a link has exactly one category, so a 1..1 relation is applied (this is, a simplification of a more realistic situation, where a link could belong to many categories). A relationship between two concepts has two directions (neighbors). The category link direction, where Link is a neighbor of Category, has a min cardinality of 0 (a category need not have any link) and a max cardinality of N (many). In addition, it has the link's name. The link category direction has no name. Hence, it will not be represented explicitly in Dart; its min and max cardinalities are in bold and italics. Together with the code, it is the identifier of the link (note that 1..1 is in italics and bold). Within the same category, all the links must have a unique code value. Category is the only entry (|| as a door) into the model. This means that the model will have a collection of categories and each category will have a collection of links.
The steps to draw a model are given as follows:
- Click on the box tool icon in the tool bar (brown background, refer to the model concepts' start screen) and create a box for the category concept by clicking on the empty space in the board.
- Click on the box to select it (four squares appear in the corners) and click again to deselect it. The selected box is displayed in the tool bar and you can enter the name
Categoryfor it in the concept field of the tool bar. The name will not appear in the selected box until you use the Enter key. - Check the entry checkbox; Category is marked with
||. To move a box, select it and keep the mouse down while moving it. If there are connecting lines, they will follow.The size of selected boxes may be changed by the menu items in the View menu. If you want to create several boxes, double-click on the box tool to stay active. To return to the Select mode, double-click on the Select tool.
A box item (an attribute of a concept) may be created by entering its name in the attribute field of the toolbar and using the Enter key.
- Select the identifier from the drop-down list; the default
Stringtype is ok. Entercodeand the item will appear in the Category box. Repeat the steps for thedescriptionitem, but select an attribute from the list. - Now, design the link concept with its attributes and mark the URL attribute from the list as per your requirements.
- Click on the line tool to create a line between the last two clicked boxes by clicking on the empty space in the board.
The first box is a parent and the second box is a child. By default, the parent box has 0..N cardinalities. The min is 0 and the max is N. By default, the child box has 1..1 cardinalities. For more details, see the tiny user guide in the program screen beneath the brown toolbar.
- To make a PNG image from our model, scroll down to the To Image button above the PNG panel and click on the button. The created image will become visible in the panel. Right-click to save it as a file (Save Image as), or copy (Copy Image) and paste it into another file (for example, as documentation).
- Name the current model in the Model menu as
Category_Linksand save it in the local storage of your browser. In a later session, simply enter the model name (it is case-sensitive!) and open it.
Drawing the model clarifies our thoughts about it, but it wouldn't be of much use if we can't get to code from it. We can export the semantics of a model (only the nonhidden boxes and lines) in the JSON format by clicking on the From model to json button above the JSON panel. After doing this, the JSON text will appear in the JSON panel; copy and save it into a local category_links.json text file. It will also work the other way around: the JSON text may be used to recreate the graphical model in magic boxes. Paste the JSON text from a previous model into the JSON panel and click on the From json to model button to visualize the model. For a pretty JSON version of the model, click on the Pretty json button, but only after you click on the From model to json button. Then, open the .json file in a text editor to see how the information about our model is contained in it:
{
    "width":990,
    "lines":[
        {
            "box2box1Max":"1",
            "box1Name":"Category",
            "box1box2Min":"0",
            "box2Name":"Link",
            "box1box2Id":false,
            "box2box1Id":false,
            "box2box1Name":"",
            "box1box2Max":"N",
            "box1box2Name":"",
            "box2box1Min":"1",
            "category":"relationship",
            "internal":true
        }
    ],
    "height":580,
    "boxes":[
        {
            "width":120,
            "entry":true,
            "name":"Category",
            "x":125,
            "height":80,
            "y":63,
            "items":[
                {
                    "sequence":10,
                    "name":"code",
                    "category":"identifier",
                    "type":"String",
                    "init":""
                },
                {
                    "sequence":20,
                    "name":"description",
                    "category":"attribute",
                    "type":"String",
                    "init":""
                }
            ]
        },
// omitted analogous entry for link
    ]
}
JavaScript Object Notation (JSON) is a simple text format (easy to be read and written by humans and machines) to represent structured objects and collections, and exchange data between applications or computers. For example, when a client sends data to or receives data from a server through a web service, it is often in the JSON format. It arose from the open source world, more or less as a competitor to the heavier XML format; but it is used everywhere now. Any production language has special functions (in the dart:convert library) to make it easy to use, Dart being no exception. Let's examine a simple JSON example and see how it connects to List and Map: look at the BankAccount object from banking_v3.dart (Chapter 2, Getting to Work with Dart):
var ba1 = new BankAccount("John Gates","075-0623456-72", 1000.0);It contains three data items: the owner, the number, and the balance of the account. The JSON representation of this data (object) is:
{
    "owner": "John Gates",
    "number": "075-0623456-72",
    "balance": 1000.0
}
In a Dart app, this could be typed as a multiline string (see line (1) in json.dart at codechapter_3). Looking at it from the Dart perspective, it is a Map where the names of the object's properties are the keys and the values are the Map's values; there is a close relationship between the objects and JSON (hence, the name). This object notation can be nested (for example, the owner could be an object in itself with a name, an address, and a telephone number). To express that there are many of these objects, you can use the [ ] notation, as in the following code snippet:
[
  {
      "owner": "John Gates",
      "number": "075-0623456-72",
      "balance": 1000.0
  },
  {
      "owner": "Bill O'Connor",
      "number": "081-0731645-91",
      "balance": 2500.0
  }
]
This effectively corresponds to a List of Maps in Dart.
You can encode a Dart object into a JSON string with the JSON.encode() function from the dart:convert library, for example, the bankAccounts variable in line (2). The resulting JSON can be sent over the network or it could be the return value of a call to a web service. The Dart object to encode needs to be of the null, bool, int, double, String, List, or Map type; any other object needs to have a toJson() method that is called while encoding. The other way around, decoding a JSON string into a Dart object, is done with the JSON.decode method (see line (3) in json.dart):
import 'dart:convert';

var jsonStr1 = '''                                             (1)
{
    "owner": "John Gates",
    "number": "075-0623456-72",
    "balance": 1000.0
}
''';
var jsonStr2 = '''
[
  {
      "owner": "John Gates",
      "number": "075-0623456-72",
      "balance": 1000.0
  },
  {
      "owner": "Bill O'Connor",
      "number": "081-0731645-91",
      "balance": 2500.0
  }
]
''';
var bankAccounts = [{ "owner": "John Gates","number": "075-0623456-       72",
                      "balance": 1000.0 },
                    { "owner": "Bill O'Connor", "number": "081-       0731645-91",
                      "balance": 2500.0 }];
main() {
  // encoding a Dart object (here a List of Maps) to a JSON
  // string:
  var jsonText = JSON.encode(bankAccounts);                    (2)
  print('$jsonText'), // all white space is removed
  // decoding a JSON string into a Dart object:
  var obj = JSON.decode(jsonText);                             (3)
  assert(obj is List);
  assert(obj[0] is Map);
  assert(obj[0]['number']=="075-0623456-72");

  var ba1 = new BankAccount("John Gates","075-0623456-72", 1000.0);
  var json = JSON.encode(ba1);
}

class BankAccount {
  // other properties and methods ...
  String toJson() {
    return '{"owner":"$owner", "number":"$number", "balance: "$balance"}';
}
In the previous section, data were exported from model concepts in the JSON format. This data can be imported in the domain model framework, dartling (see Chapter 9, Modeling More Complex Applications with dartling), to generate the code for it. We will use JSON again as the format to store data in or to send data to the server in some of the forthcoming projects. In the dartlero_tasks project of Chapter 11, Data-Driven Web Applications with MySQL and MongoDB, we will read and write the JSON files. For an in-depth look, refer to http://en.wikipedia.org/wiki/JSON.