
A one-table project is quite unrealistic; let us now revisit the dartlero_project_tasks application in Chapter 8, Developing Business Applications with Polymer Web Components. This has a many-to-many relationship between the concepts Project and Employee, Task being the intermediate concept; data is stored only in the browser's local storage. In the dartlero_tasks project (code can be cloned from https://github.com/dzenanr/dartlero_tasks), we have the same model built on Dartlero, but the data can be stored on the server either in the JSON format or in a MySQL database. The startup script for both the options is bin/dartlero_tasks.dart. The model and the data access layer are defined in library dartlero_tasks lib/model/darlero_tasks.dart.
If you want to use the JSON file storage, you have to create a command-line launch for the bin/dartlero_tasks.dart script. In Run | Manage Launches of Dart Editor, enter two script arguments (--dir and path), for example:
--dir C:/Users/"username"/git/dartlero/dartlero_tasks/json_data (on Windows)
--dir /home/username/git/dartlero/dartlero_tasks/json_data (on Linux)
By running the main function in the bin/dartlero_tasks.dart file, a model, with two entry points, will be initialized and saved in the given directory. For each entry concept, a file with the concept name and the .json extension will be created. The next time the program is run, data from the two files will be loaded. View the data in the JSON documents with a text editor, or use a JSON pretty printer. Let's dig into the code; first, let's examine bin/dartlero_tasks.dart:
import 'package:dartlero_tasks/dartlero_tasks.dart';          (1)

void main(List<String> arguments) {
  var model = TasksModel.one();

  try {
    if (arguments.length == 2 && (arguments s[0] == '--dir')) {
      model.persistence = 'json';
      model.jsonDirPath = args[1];
      if (!model.loadFromJson()) {                          (3)
        model.init();
        model.saveToJson();
      }
      model.display();
    }
  } else if (arguments s.length == 1 && (arguments s[0] == '--mysql')) {
         // code for MySQL storage
    } else {
      print('No arguments: consult README'),
    }
  } catch (e) {
    print('consult README: $e'),
  }
}
The arguments are passed to main as a List<String> property with the same name, on an object from this class, constructed in line (3). The loadFromJson method from lib/model/model.dart reads in the JSON files with:
  File employeesFile = getFile(employeesFilePath);
  // ... code left out
  String employeesFileText = readTextFromFile(employeesFile);
The getFile and readTextFromFile variables are defined in lib/model/file_persistence.dart; this file contains all the methods from the project that directly use dart:io:
part of dartlero_tasks;

Directory getDir(String path) {
  var dir = new Directory(path);
  if (dir.existsSync()) {
    print('directory ${path} exists already'),
  } else {
    dir.createSync();
    print('directory created: ${path}'),
  }
  return dir;
}

File getFile(String path) {
  File file = new File(path);
  if (file.existsSync()) {
    print('file ${path} exists already'),
  } else {
    file.createSync();
    print('file created: ${path}'),
  }
  return file;
}

addTextToFile(File file, String text) {
  IOSink writeSink = file.openWrite();
  writeSink.write(text);
  writeSink.close();
}

String readTextFromFile(File file) {
  return file.readAsStringSync();
}
The methods in dart:io work asynchronously by default; for example, the create, exists, open, read, and write methods all return a Future. These should be used in the real production apps. To simplify the code in our case, we used their synchronous counterparts, createSync and existsSync, for the directory, reading the entire content of the file as a string with readAsStringSync. Writing the files is done when the model saves itself with the saveToJson method in model.dart. This calls addTextToFile, and here we see that openWrite is called on the file object, returning an object of the class IOSink, a helper class that is used to write to a file. It contains a buffer, which must be closed explicitly when the writing is completed. Take some time to explore the API for dart:io, especially the file methods and properties. (http://api.dartlang.org/docs/releases/latest/dart_io.html)
For using the MySQL storage, use the script argument --mysql in Run | Manage Launches of Dart Editor. There is no need to create a new database (the default database test will be used), but do not forget to start the MySQL server. Before running a Dart file with main, put a path to the project folder dartlero_tasks in the working directory field in Run | Manage Launches, in order to have access to the connection.options file.
Run example/mysql/example.dart to drop and create all the tables; the following output appears (every script produces some output to monitor its execution):
opening connection
connection open
running example
dropping tables
dropped tables
creating tables
executing queries
created tables
prepared query 1
executed query 1
prepared query 2
executed query 2
prepared query 3
executed query 3
querying
got results
bye
In the following screenshot, you see the project table contents in SQL Workbench after execution:
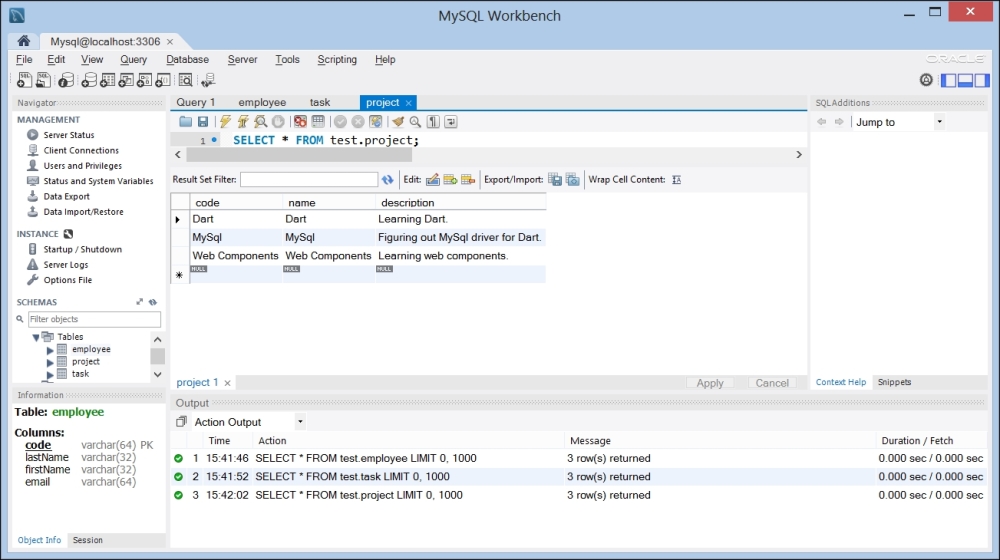
Data in the project table
The following is the main method:
void main() {
  try {
    OptionsFile options = new OptionsFile('connection.options'),
    String user = options.getString('user'),
    String password = options.getString('password'),
    int port = options.getInt('port', 3306);
    String db = options.getString('db'),
    String host = options.getString('host', 'localhost'),
    // create a connection
    print('opening connection'),
    var pool = new ConnectionPool(host: host, port: port, user: user, password: password, db: db);
    print('connection open'),
    // create an example class
    var example = new Example(pool);
    // run the example
    print('running example'),
    example.run().then((_) {
      // finally, close the connection
      print('bye'),
      pool.close();
    });
  } catch(e) {
    print('consult README: $e'),
  }
}
Note the try/catch exception handling; reading the options file and opening a connection with the database can both generate an exception.
The script itself contains some new interesting ways to work with sqljocky. It reads the options file and makes a ConnectionPool object based on this info. It then makes an example object and calls run on it:
Future run() {
    var completer = new Completer();
    dropTables()
      .then((_) => createTables())
      .then((_) => addData())
      .then((_) => readData())
      .then((_) => completer.complete())
      .catchError( (e) => print(e) );
    return completer.future;
}
This is a good example of how methods that return a Future can be chained in a succession of the then calls. This produces elegant and readable code. The dropTables method uses a TableDropper object to drop a list of tables:
Future dropTables() {
    print("dropping tables");
    var dropper = new TableDropper(pool, ['task', 'employee', 'project']);
    return dropper.dropTables();
}
The createTables Future uses a QueryRunner object. Its executeQueries method can execute a list of SQL statements:
Future createTables() {
    print("creating tables");
    var querier = new QueryRunner(pool,
        [
         'create table employee (code varchar(64) not null, '
         'lastName varchar(32) not null, '
         'firstName varchar(32) not null, '
         'email varchar(64) not null, '
         'primary key (code))',

         'create table project (code varchar(64) not null, '
         'name varchar(64) not null, '
         'description varchar(256), '
         'primary key (code))',

         'create table task (code varchar(128) not null, '
         'projectCode varchar(64), '
         'employeeCode varchar(64), '
         'description varchar(256), '
         'primary key (code), '
         'foreign key (projectCode) references project (code), '
         'foreign key (employeeCode) references employee (code))'
        ]);
    print("executing queries");
    return querier.executeQueries();
  }
The addData Future shows how a prepared SQL statement with parameters (as before each ? is a parameter that needs a value) can be given a list of Lists, where each inner list contains all the parameter values for one statement. The executeMulti method on the query executes the statements in succession:
Future addData() {
    var completer = new Completer();
    pool.prepare(
        "insert into employee (code, lastName, firstName, email) values (?, ?, ?, ?)"
        ).then((query) {
      print("prepared query 1");
      var parameters = [
          ["[email protected]", "Ridjanovic", "Dzenan", "[email protected]"],
          ["[email protected]", "Ridjanovic", "Timur", "[email protected]"],
          ["[email protected]", "Seyer", "Marc-Antoine", "[email protected]"]
        ];
      return query.executeMulti(parameters);
    }).then((results) {
      print("executed query 1");
    // code left out
The other scripts in the example/mysql folder use the same techniques to populate each table separately.
The project also contains test scripts exercising the Dart unittest; for example, test/mysql/employee_test.dart for employee data; the following is the main code:
main() {
  try {
    var pool = getPool(new OptionsFile('connection.options'));
    dropTables(pool)
      .then((_) => createTable(pool))
      .then((_) => initData(pool))
      .then((_) => testProjects(pool));
  } catch(e) {
    print('consult README: $e'),
}
The testing output is:
PASS: Testing employees Select all employees
PASS: Testing employees Select Ridjanovic employees
PASS: Testing employees Select all employees, then select Ridjanovic employees

All 3 tests passed.
unittest-suite-success
selected all employees
count: 1 - code: [email protected], last name: Ridjanovic, first name: Dzenan, email: [email protected]
 // other data.
The following is the code of the testing method:
testEmployees(ConnectionPool pool) {
    group("Testing employees", () {
    test("Select all employees", () {
      var count = 0
      pool.query(
          'select e.code, e.lastName, e.firstName, e.email '
          'from employee e '
      ).then((rows) {
        print("selected all employees");
        rows.stream.listen((row) {
             count++;
          print(
                'count: $count - '
              'code: ${row[0]}, '
              'last name: ${row[1]}, '
              'first name: ${row[2]}, '
              'email: ${row[3]}'
          );
        }).onDone(() => expect(count, equals(3)));
      });
    });

    test("Select Ridjanovic employees", () {
      pool.query(
          'select e.code, e.lastName, e.firstName, e.email '
          'from employee e '
          'where e.lastName = "Ridjanovic" '
      ).then((rows) {
        print("selected Ridjanovic employees");
        rows.stream.listen((row) {
            expect(row[1], equals('Ridjanovic'));
          print(
              'code: ${row[0]}, '
              'last name: ${row[1]}, '
              'first name: ${row[2]}, '
              'email: ${row[3]}'
          );
        });
      });
    });

    test("Select all employees, then select Ridjanovic employees", 	 () {
      var futures = new List<Future>();                        (1)
      var completer = new Completer();
      futures.add(completer.future);                           (2)
         var count = 0;
      pool.query(
          'select e.code, e.lastName, e.firstName, e.email '
          'from employee e '
      ).then((rows) {
        print("selected all employees");
        rows.stream.listen((row) {
		count++;
          print(
                'count: $count - '
              'code: ${row[0]}, '
              'last name: ${row[1]}, '
              'first name: ${row[2]}, '
              'email: ${row[3]}'
          );
           }).onDone(() {
               expect(count, equals(3));
               completer.complete();
          });
     });

      Future.wait(futures).then((futures) {                   (3)
        pool.query(
            'select e.code, e.lastName, e.firstName, e.email '
            'from employee e '
            'where e.lastName = "Ridjanovic" '
        ).then((rows) {
          print("selected Ridjanovic employees");
          rows.stream.listen((row) {
               expect(row[1], equals('Ridjanovic'));
            print(
                'code: ${row[0]}, '
                'last name: ${row[1]}, '
                'first name: ${row[2]}, '
                'email: ${row[3]}'
            );
          });
        });
      });
    });
  });
}
In the test ("Select all employees, then select Ridjanovic employees"), we see how we can wait for the execution of the code until all Futures contained in a list have terminated. In line (1), List<Future> is defined, and in line (2), a Future object is added to the list. In line (3), the static method wait is called on Future: it waits until all the methods in its List argument (here only one) have returned their Future value. Run test/mysql/project_test.dart to test the projects table:
dropping tables
creating project table
initializing project data
prepared query insert into project
executed query insert into project
unittest-suite-wait-for-done
PASS: Select all projects

All 1 tests passed.
unittest-suite-success
selected all projects
count: 1 - code: Dart, name: Dart, description: Learning Dart.
count: 2 - code: MySql, name: MySql, description: Figuring out MySql driver for Dart.
count: 3 - code: Web Components, name: Web Components, description: Learning web components.