
A Dart web application runs inside the browser (HTML) page that hosts the app; a single-page web app is more and more common. This page may already contain some HTML elements or nodes, such as <div> and <input>, and your Dart code will manipulate and change them, but it can also create new elements. The user interface may even be entirely built up through code. Besides that, Dart is responsible for implementing interactivity with the user (the handling of events, such as button-clicks) and the dynamic behavior of the program, for example, fetching data from a server and showing it on the screen. In previous chapters, we explored some simple examples of these techniques. Compared to JavaScript, Dart has simplified the way in which code interacts with the collection of elements on a web page (called the DOM tree). This chapter teaches you this new method using a number of simple examples, culminating with a Ping Pong game. The following are the topics:
- Finding elements and changing their attributes
- Creating and removing elements
- Handling events
- Manipulating the style of page elements
- Animating a game
- Ping Pong using style(s)
- How to draw on a canvas – Ping Pong revisited
All web apps import the Dart library
dart:html; this is a huge collection of functions and classes needed to program the DOM (look it up at api.dartlang.org). Let's discuss the base classes, which are as follows:
- The
Navigatorclass contains info about the browser running the app, such as the product (the name of the browser), its vendor, the MIME types supported by the installed plugins, and also the geolocation object. - Every browser window corresponds to an object of the
Windowclass, which contains, amongst many others, anavigatorobject, theclose,print,scrollandmoveTomethods, and a whole bunch of event handlers, such asonLoad,onClick,onKeyUp,onMouseOver,onTouchStart, andonSubmit. Use an alert to get a pop-up message in the web page, such as intodo_v2.dart:window.onLoad.listen( (e) => window.alert("I am at your disposal") ); - If your browser has tabs, each tab opens in a separate window. From the
Windowclass, you can access local storage or IndexedDB to store app data on the client (see Chapter 10, MVC Web and UI Frameworks in Dart – An Overview). - The
Windowobject also contains an object document of theDocumentclass, which corresponds to the HTML document. It is used to query for, create, and manipulate elements within the document. The document also has a list of stylesheets (objects of theStyleSheetclass)—we will use this in our first version of the Ping Pong game. - Everything that appears on a web page can be represented by an object of the
Nodeclass; so, not only are tags and their attributes nodes, but also text, comments, and so on. TheDocumentobject in aWindowclass contains aList<Node>element of the nodes in the document tree (DOM) calledchildNodes. - The
Elementclass, being a subclass ofNode, represents web page elements (tags, such as<p>,<div>, and so on); it has subclasses, such asButtonElement,InputElement,TableElement, and so on, each corresponding to a specific HTML tag, such as<button>,<input>,<table>, and so on. (For example, seeprorabbits_v3.dartandtodo_v1.dartin Chapter 1, Dart – A Modern Web Programming Language). Every element can have embedded tags, so it contains aList<Element>element called children.
Let us make this more concrete by looking at todo_v2.dart, (a modified version of todo_v1.dart from Chapter 1, Dart – A Modern Web Programming Language; see the next screenshot) solely for didactic purposes—the HTML file contains an <input> tag with the id value task, and a <ul> tag with the id value list:
<div><input id="task" type="text" placeholder="What do you want to do?"/>
     <p id="para">Initial paragraph text</p>
</div>
<div id="btns">
     <button class="backgr">Toggle background color of header</button>
     <button class="backgr">Change text of paragraph</button>
     <button class="backgr">Change text of placeholder in input   field and the background color of the buttons</button>
</div>
<div><ul id="list"/>
</div>
In our Dart code, we declare the following objects representing them:
  InputElement task;
  UListElement list;
The following list object contains objects of the LIElement class, which are made in addItem():
var newTask = new LIElement();You can see the different elements and their layout in the following screenshot:
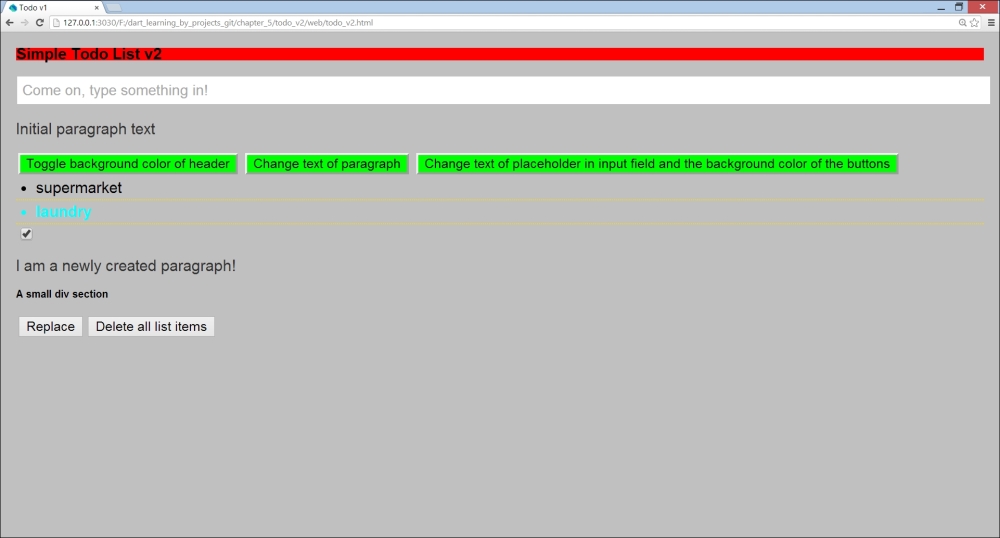
The screen of todo_v2
Now we must bind these objects to the corresponding HTML elements. For that, we use the top-level functions querySelector and querySelectorAll; for example, the InputElement task is bound to the <input> tag with the id value task using: task = querySelector('#task'),.
Both functions take a string (a CSS selector) that identifies the element, where the id value task will be preceded by #. CSS selectors are patterns that are used in .css files to select elements that you want to style. There are a number of them, but, generally, we only need a few basic selectors (for an overview visit http://www.w3schools.com/cssref/css_selectors.asp).
- If the element has an
idattribute with the valueabc, usequerySelector('#abc') - If the element has a
classattribute with valueabc, usequerySelector('.abc') - To get a list of all elements with the tag
<button>, usequerySelectorAll('button') - To get a list of all text elements, use
querySelectorAll('input[type="text"]')and all sorts of combinations of selectors; for example,querySelectorAll('#btns .backgr')will get a list of all elements with thebackgrclass that are inside a tag with theidvaluebtns
These functions are defined on the document object of the web page, so in code you will also see document.querySelector() and document.querySelectorAll().
All objects of the Element class have properties in common, such as classes, hidden, id, innerHtml, style, text, and title; specialized subclasses have additional properties, such as value for a ProgressElement method. Changing the value of a property in an element makes the browser re-render the page to show the changed user interface. Experiment with todo_v2.dart:
import 'dart:html';
InputElement task;
UListElement list;
Element header;
List<ButtonElement> btns;
main() {
  task = querySelector('#task'),
  list = querySelector('#list'),
  task.onChange.listen( (e) => addItem() );
  // find the h2 header element:
  header = querySelector('.header'),                        (1)
  // find the buttons:
  btns = querySelectorAll('button'),                        (2)
  // attach event handler to 1st and 2nd buttons:
  btns[0].onClick.listen( (e) => changeColorHeader() );     (3)
  btns[1].onDoubleClick.listen( (e) => changeTextPara() );  (4)
  // another way to get the same buttons with class backgr:
  var btns2 = querySelectorAll('#btns .backgr'),            (5)
  btns2[2].onMouseOver.listen( (e) => changePlaceHolder() );(6)
  btns2[2].onClick.listen((e) => changeBtnsBackColor() );   (7)
  addElements();
}
changeColorHeader() => header.classes.toggle('header2'),  (8)
changeTextPara() => querySelector('#para').text = "You changed my text!";    (9)
changePlaceHolder() => task.placeholder = 'Come on, type something in!';              (10)
changeBtnsBackColor() => btns.forEach( (b) => b.classes.add('btns_backgr'));  (11)
void addItem() {
  var newTask = new LIElement();          (12)
  newTask.text = task.value;              (13)
  newTask.onClick.listen( (e) => newTask.remove());
  task.value = '';
  list.children.add(newTask);             (14)
}
addElements() {
  var ch1 = new CheckboxInputElement();   (15)
  ch1.checked = true;
  document.body.children.add(ch1);        (16)
  var par = new Element.tag('p'),         (17)
  par.text = 'I am a newly created paragraph!';
  document.body.children.add(par);
  var el = new Element.html('<div><h4><b>A small div section</b></h4></div>'),               (18)
  document.body.children.add(el);
  var btn = new ButtonElement();
  btn.text = 'Replace';
  btn.onClick.listen(replacePar);
  document.body.children.add(btn);
  var btn2 = new ButtonElement();
  btn2.text = 'Delete all list items';
  btn2.onClick.listen( (e) => list.children.clear() );  (19)
  document.body.children.add(btn2);
}
replacePar(Event e) {
  var el2 = new Element.html('<div><h4><b>I replaced this div!</b></h4></div>'),
  el.replaceWith(el2);              (20)
}
Comments for the numbered lines are as follows:
- We find the
<h2>element via its class. - We get a list of all the buttons via their tags.
- We attach an event handler to the
Clickevent of the first button, which toggles the class of the<h2>element, changing its background color at each click (line(8)). - We attach an event handler to the
DoubleClickevent of the second button, which changes the text in the<p>element (line(9)). - We get the same list of buttons via a combination of CSS selectors.
- We attach an event handler to the
MouseOverevent of the third button, which changes the placeholder in the input field (line(10)). - We attach a second event handler to the third button; clicking on it changes the background color of all buttons by adding a new CSS class to their classes collection (line
(11)).
Every HTML element also has an attribute Map where the keys are the attribute names; you can use this Map to change an attribute, for example:
btn.attributes['disabled'] = 'true';
Please refer to the following document to see which attributes apply to which element: