
Model Driven View (MDV) is a set of techniques to help you bind data to your views, in a more direct way than we did in Chapter 6, Combining HTML5 Forms with Dart. The idea here is simple:
Data binding can be a one-way (model to view) with or without observing (monitoring) changes in the model: this means data from our model (a variable or a method that returns a value) is shown (read-only) on the page and we do this by writing {{var}} in the web page and marking the variable var in code as: @observable var. When its value changes, the altered value is shown in the web page. In general, you can show any Dart expression with the notation {{ expression }}, but be careful that the expression doesn't cause any unwanted side effects by changing variables. Use @published var when var is also an attribute in a tag. Data binding can also be two-way (model to view and view to model): meaning data can be shown, but input from the web page also changes Dart variables. In other words, the data and the web page are then synchronized.
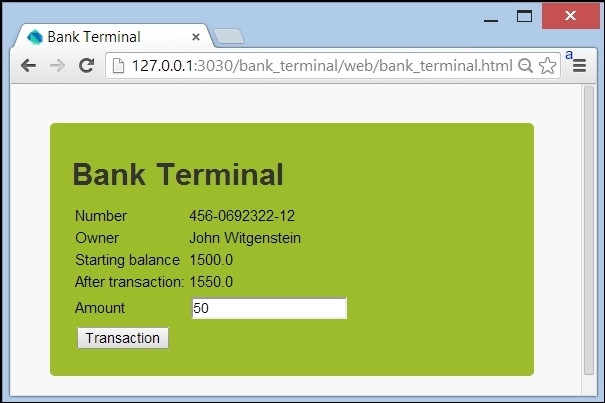
Data binding combined with event listeners allows us to create simple and sophisticated views for our model in a declarative way, thereby reducing the need for manually creating controller objects that do these bindings. They can be exploited fully only as part of web components, that is to say, polymer elements, and that's what we will do in the following projects in this chapter. Let's apply this first to our bank terminal project; we now build a form that also takes an input amount that is deposited on our account, changing the balance on the screen as shown in the following screenshot:
Two-way data binding
The startup page bank_terminal.html shows a web component <bank-app> through:
    <h1>Bank Terminal</h1>
    <bank-app></bank-app>
This web component is linked in with: <link rel="import" href="bank_app.html">. Our component uses the following markup in bank_app.html file to show the data:
<polymer-element name="bank-app">
 <link rel="import" href="bank_account.html">
 <template>
   <bank-account bac="{{bac}}"></bank-account>      (1)
 </template>
 <script type="application/dart" src="bank_app.dart"></script>    (2)
</polymer-element>
In the template in line (1), a second polymer element named <bank-account> is instantiated. The script bank_app.dart publishes and initializes the BankAccount object bac in lines (3) and (4) respectively:
import 'package:polymer/polymer.dart';
import 'package:bank_terminal/bank_terminal.dart';
@CustomTag('bank-app')
class BankApp extends PolymerElement {
  @published BankAccount bac;                                (3)
  BankApp.created() : super.created()  {  }
  enteredView() {
    super.enteredView();
    var jw = new Person("John Witgenstein");
    bac = new BankAccount(jw, "456-0692322-12", 1500.0);     (4)
  }
}
To do this, we have to override the enteredView method of the PolymerElement class, and is called when the element is inserted into the document. The bac object is passed to web component <bank-account> in line (1)in the preceding code. The markup of this component is found in the bank_account.html file:
  <polymer-element name="bank-account">
  <style> // left out
  <template>
  <table class="auto-style1" on-keypress="{{enter}}>
        <tr>
         <td class="auto-style2">Number</td>
         <td> {{ bac.number }} </td>                         (1)
        </tr>
        <tr>
         <td class="auto-style2">Owner</td>
         <td> {{ bac.owner.name}} </td>                      (2)
         <td></td>
        </tr>
        <tr>
         <td class="auto-style2">Starting balance</td>
         <td> {{bac.balance}}</td>
        </tr>
        <tr>
         <td class="auto-style2"> After transaction:</td>
         <td> {{balance}}</td>                               (3)
        </tr>
        <tr>
          <td class="auto-style2">Amount transaction</td>
          <td><input id="amount" type="text"/></td>           (4)
          <td></td>
        </tr>
        <tr>
         <td><button class="btns" on-click="{{transact}}">    (5)Transaction</button></td>
        </tr></table></template>
<script type="application/dart"  src="bank_account.dart"></script>
Because the bac object is bound to the component, its properties can be shown like bac.number in line (1), or even nested properties like in line (2). In line (4), we take in a money amount, which is bound to a variable with the same name in line (13) in the accompanying script bank_account.dart (see the following code). A click on the button in line (5) starts the transact event handler in line (11), which changes the balance in line (12). To show balance in line (3), we need to mark it as @published in line (9). In lines (6) to (8), we see the required code to define a Polymer web component. Line (10) shows the BankAccount.created constructor, which our web component has to override from the PolymerElement class:
import 'dart:html';
import 'package:polymer/polymer.dart';                      (6)
@CustomTag('bank-account')                                  (7)
class BankAccount extends PolymerElement {                  (8)
  @published var bac;
  @published double balance;                                (9)
  double amount = 0.0;
  BankAccount.created() : super.created() {  }              (10)
  enteredView() {
    super.enteredView();
    balance = bac.balance;
  }
  transact(Event e, var detail, Node target) {              (11)
    InputElement amountInput =        shadowRoot.querySelector("#amount");
    if (!checkAmount(amountInput.value)) return;
    bac.transact(amount);
    balance = bac.balance;                                  (12)
  }
  enter(KeyboardEvent  e, var detail, Node target) {
    if (e.keyCode == KeyCode.ENTER) {
      transact(e, detail, target);
    }
  }
  checkAmount(String in_amount) {
    try {
      amount = double.parse(in_amount);                       (13)
    } on FormatException catch(ex) {
      return false;
    }
    return true;
  }
}