
(Developed by Sergey Akopkokhyants, Dart Web Toolkit can be found at http://dartwebtoolkit.com/.)
You have probably heard of Google Web Toolkit (GWT)—a framework by Google to develop web applications in Java and compile them to JavaScript, in many ways a precursor project to Dart. So it will come as no surprise that this project has been ported to Dart not only to build Dart web apps, but also to facilitate the migration from an existing Java web application to Dart, leveraging your existing GWT skills and themes in DWT. It has a rich set of widgets (for example, button, checkbox, listbox, textarea, and menus), panels, and utility classes that are compatible with GWT, and it provides you, at this moment (June 2013, Version 0.3.16), with the most complete toolbox for Dart UI controls, which can be viewed at http://akserg.github.io/dart_web_toolkit_showcase/. Moreover, it has been tested on Chrome and FireFox. To start using this framework and create a new web application (say dwt1), remove the example code and add the following dependency to the project's pubspec.yaml:
dart_web_toolkit: '>=0.3.0'
Then run pub install (this happens automatically while saving the file). To make it available to your code add the import statement:
import 'package:dart_web_toolkit/ui.dart' as ui;
Add the following code to main() of dwt1.dart and run the page:
ui.Label label = new ui.Label("Hello from Dart Web Tookit!");
ui.RootLayoutPanel.get().add(label);
and a nice label appears with the text.
It will be clear from this and the following example, that in DWT, everything is constructed from code. Let's now build a more complete example in the dwt_bank project, mimicking our bank application bank_terminal_s5 from Chapter 6, Combining HTML5 Forms with Dart.
Here, follow the code from dwt_bank.dart needed to draw the screen and hook up the event handling (the rest of the code is identical to that in bank_terminal_s5):
library bank_terminal;

import 'dart:html';
import 'package:dart_web_toolkit/ui.dart' as ui;               (1)
import 'package:dart_web_toolkit/i18n.dart' as i18n;           (2)
import 'package:dart_web_toolkit/event.dart' as event;         (3)
import 'dart:convert';

part '../model/bank_account.dart';
part '../model/person.dart';

ui.TextBox number;
ui.Label owner, balance;
ui.IntegerBox amount;
ui.Button btn_deposit, btn_interest;
BankAccount bac;

void main() {
ui.CaptionPanel panel = new ui.CaptionPanel("BANK APP");      (4)
  panel.getElement().style.border = "3px solid #00c";

  ui.FlexTable layout = new ui.FlexTable();                     (5)
  layout.setCellSpacing(6);
  ui.FlexCellFormatter cellFormatter = layout.getFlexCellFormatter();

// Add a title to the form
  layout.setHtml(0, 0, "Enter your account number<br> and transaction amount");
// Add some standard form options
  cellFormatter.setColSpan(0, 0, 2);
  cellFormatter.setHorizontalAlignment(0, 0, 	i18n.HasHorizontalAlignment.ALIGN_LEFT);

  layout.setHtml(1, 0, "Number:");
  number = new ui.TextBox();                                  (6)
  number.addValueChangeHandler(new                            (7)event.ValueChangeHandlerAdapter((event.ValueChangeEvent event) {
    readData();
   }));
  layout.setWidget(1, 1, number);
  layout.setHtml(2, 0, "Owner:");
  owner = new ui.Label("");
  layout.setWidget(2, 1, owner);

  layout.setHtml(3, 0, "Balance:");
  balance = new ui.Label("");
  layout.setWidget(3, 1, balance);

  layout.setHtml(4, 0, "Amount:");
  amount = new ui.IntegerBox();
  layout.setWidget(4, 1, amount);

  btn_deposit = new ui.Button(                                 (8)
      "Deposit - Withdrawal", new event.ClickHandlerAdapter((event.ClickEvent event) {
       deposit(event);
      }));

  layout.setWidget(5, 0, btn_deposit);
  btn_interest = new ui.Button(
      "Add Interest", new event.ClickHandlerAdapter((event.ClickEvent event) {
        interest(event);
      }));
  layout.setWidget(5, 1, btn_interest);

  panel.setContentWidget(layout);
  ui.RootLayoutPanel.get().add(panel);
}
In lines (1), (2), and (3), the necessary parts from DWT are imported (UI for the controls and event for event handling). We use CaptionPanel in line (4) (this wraps its contents in a border with a caption that appears in the upper-left corner) and FlexTable in line (5) to lay out our labels and controls in cells; these are created starting from line (6). Labels are positioned in a cell indicated by its row and column using the setHtml (row, col, "Text") method and controlled using the setWidget(row, col, widgetName) method. Event handlers are registered through a specialized adapter in a very Java-like syntax in lines (7) or (8); separating both makes them more readable:
btn_deposit = new ui.Button("Deposit - Withdrawal"); btn_deposit.addClickHandler(new event.ClickHandlerAdapter((event.ClickEvent event) {
       deposit(event);
   }));
The screenshot is shown as follows:
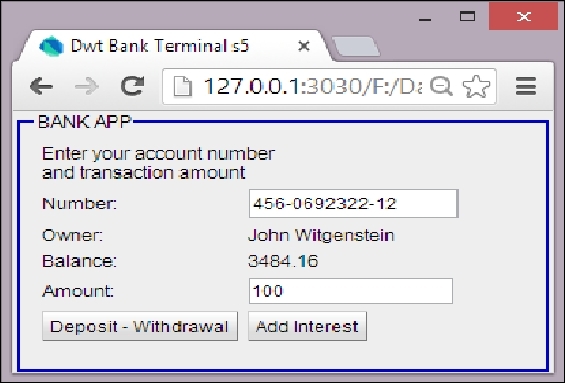
The DWT bank terminal screen
(The code can be cloned from https://github.com/dzenanr/dartling_dwt_todo_mvc_spirals.)
To illustrate DWT with a more elaborate and well-known example, here is our todo-mvc project from the last chapter, with DWT used for the UI part. We sum what is implemented in each spiral (besides testing the model):
- Spiral 1: Add a new todo and display a list of todos
- Spiral 2: Load tasks from and save tasks to local storage
ActionReactionApi - Spiral 3: Undo and redo functionality—
PastReactionApi - Spiral 4: Complete todo, remove todo, and start using TodoMVC CSS
- Spiral 5: Add specific code to
TaskandTasks, enable and disable theundoandredobuttons, clear completed todos, add count of the remaining todos, continue using TodoMVC CSS - Spiral 6: Add specific code to
Task, complete all todos, display all remaining or completed todos - Spiral 7: Change the model in the model concepts (
titleis nowid,completedis nowessential) and generate JSON from the model; generate the code usingtest/todo/mvc/todo_mvc_gen.dart - Spiral 8: Add links to Dartling, DWT, and TodoMVC, edit todo
- Spiral 9: Implement standard TodoMVC layout
- Spiral 10: Make a page that looks as similar as possible to the page in the standard TodoMVC application; for example, the
undoandredobuttons are gone
The following is a screenshot of the end result:
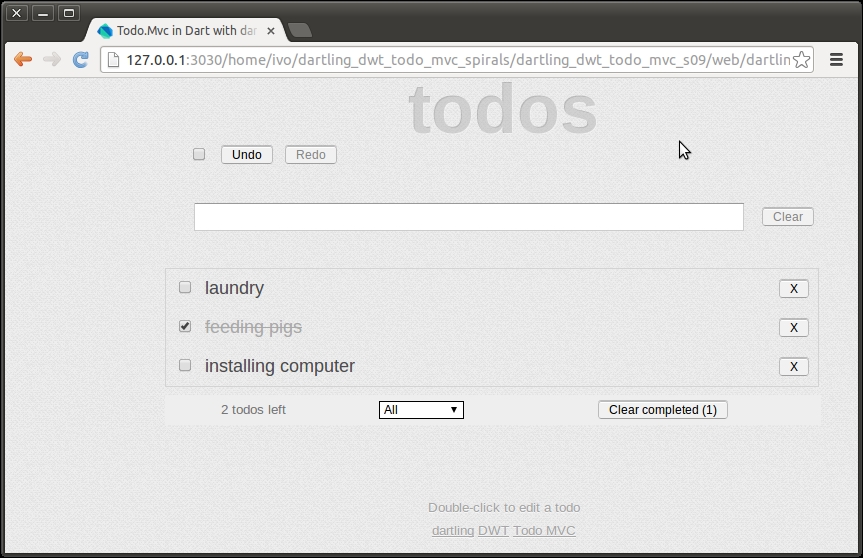
Spiral 9 of DWT_TodoMVC
The DWT-related code is written in lib/app. In order to better understand the code, start with Spiral 1 and work your way up. The app is started by instantiating an instance of TodoApp (in main() from web/todo/dartling_dwt_todo_mvc.dart):
new TodoApp(domain);In its constructor (in lib/app/todo_app.dart), the layout of the screen is coded: a vertical panel with a header and a footer (code from last spiral, doesn't change much from Spiral 1 to 9):
    var root = ui.RootPanel.get();
    var todoApp = new ui.VerticalPanel();
    todoApp.spacing = 8;
    root.add(todoApp);
    header = new Header(this);
    todoApp.add(header);
    var todos = new Todos(this);                              (1)
    todoApp.add(todos);
    footer = new Footer(this, todos);
    todoApp.add(footer);
The info text and links at the bottom of the screen are also constructed by a horizontal panel with anchor controls inside a vertical panel:
    var infoPanel = new ui.VerticalPanel();
    infoPanel.addStyleName('info'),
    todoApp.add(infoPanel);
    var todo_edit_info = new ui.Label('Double-click to edit a todo'),

    infoPanel.add(todo_edit_info);
    var linkPanel = new ui.HorizontalPanel();
    linkPanel.spacing = 4;
    infoPanel.add(linkPanel);

    var dartling = new ui.Anchor()
      ..text="dartling"
      ..href="https://github.com/dzenanr/dartling";
    linkPanel.add(dartling);

    var dwt = new ui.Anchor()
      ..text="DWT"
      ..href="http://dartwebtoolkit.com";
    linkPanel.add(dwt);
    var todoMvc = new ui.Anchor()
      ..text="Todo MVC"
      ..href="http://todomvc.com";
    linkPanel.add(todoMvc);
In line (1), a Todos object is made, which is a vertical panel itself; this happens in todo.dart (this code is from Spiral 1):
class Todos extends ui.VerticalPanel {
  var _listPanel = new ui.VerticalPanel();

  Todos(Tasks tasks) {
    spacing = 10;
    var newTodo = new ui.TextBox();                            (2)
    newTodo.addKeyPressHandler(new                             (3)
        event.KeyPressHandlerAdapter((event.KeyPressEvent e) {
          if (e.getNativeKeyCode() == event.KeyCodes.KEY_ENTER) {
            var title = newTodo.text.trim();
            if (title != '') {
              var task = new Task(tasks.concept);              (4)
              task.title = title;
              tasks.add(task);
              _add(task);
              newTodo.text = '';
            }
          }
        }));
    add(newTodo);

    _listPanel.spacing = 4;
    add(_listPanel);
  }

  _add(Task task) {
    var title = new ui.Label(task.title);
    _listPanel.add(title);
  }
In line (2), an input field for a new todo is created, and in line (3) we see the event handler that kicks in when the user enters a todo: a new task is made with this todo, and it is added to the tasks collection; moreover, it is added to the list panel at the bottom. The class Todos starts reacting to changes in the model by implementing ActionReactionApi in Spiral 2:
class Todos extends ui.VerticalPanel implements ActionReactionApi { ... }In Spiral 3, a Header class is added that inherits from HorizontalPanel (see header.dart). At this stage, it only comprises the undo/redo buttons; it implements this functionality through PastReactionApi from Dartling. The DWT click event handlers are coded in its constructor (lines (5) and (6)):
class Header extends ui.HorizontalPanel implements PastReactionApi {
  ui.Button _undo;
  ui.Button _redo;

  Header(TodoApp todoApp) {
   // ...
    _undo = new ui.Button(                                    (5)
        'undo', new event.ClickHandlerAdapter((event.ClickEvent e)  {
          session.past.undo();
    }));

    _redo = new ui.Button(                                     (6)
        'redo', new event.ClickHandlerAdapter((event.ClickEvent e)    	  {
          session.past.redo();
     }));
  }
  // code left out
}
In later spirals, the input functionality is moved from the Todos class to the Header class. In Spiral 4, a Todo class is introduced as a horizontal panel that comprises the UI so that the Todos class has to now construct only a Todo object. In Spiral 5, the Footer class also appears as a horizontal panel; it shows the count of todos left, the drop-down box to show all, active or completed todos, and a button to remove the completed todos. In later spirals, Todo as well as Footer become subclasses of the DWT Composite class using the
Grid class to define their internal layout:
class Todo extends ui.Composite {
  ui.CheckBox _completed;
  ui.Label _todo;
  ui.TextBox _todo_retitle;

  Todo(TodoApp todoApp, this.task) {
    // ...
    ui.Grid grid = new ui.Grid(1, 3);
    grid.setCellSpacing(8);
    grid.addStyleName('todo'),
    grid.getRowFormatter().setVerticalAlign(
        0, i18n.HasVerticalAlignment.ALIGN_MIDDLE);
    initWidget(grid);

    _completed = new ui.CheckBox();
    // ...
    grid.setWidget(0, 0, _completed);

    _todo = new ui.Label();
    // ...
   grid.setWidget(0, 1, _todo);

    ui.Button remove = new ui.Button(
      'X', new event.ClickHandlerAdapter((event.ClickEvent e) {
        new RemoveAction(session, tasks, task).doit();
      })
    );
    remove.addStyleName('todo-button'),
    grid.setWidget(0, 2, remove);
  }
 }
To conclude our discussion, the following are some notes from an experienced GWT developer: http://blog.hackingthought.com/2013/05/notes-from-my-first-real-dart-web-app.html.
Tip
If you want make a project allow Dart to work along with GWT, take a look at this video and project packed with tips: http://architects.dzone.com/articles/dart-google-web-toolkit.