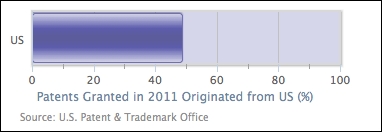
A gauge chart is generally used as an indicator for the current threshold level, meaning the extreme values in the y axis are fixed. Another characteristic is the single value (one dimension) in the x axis that is the current time.
Next, we are going to learn how to turn a chart with a single bar into a gauge-level chart. The basic idea is to diminish the plot area to the same size as the bar. This means we have to fix the size of both the plot area and the bar, disregarding the dimensions of the container. To do that, we set chart.width and chart.height to some values. Then, we decorate the plot area with a border and background color to make it resemble a container for the gauge:
            chart: {
                renderTo: 'container',
                type: 'bar',
                plotBorderWidth: 2,
                plotBackgroundColor: '#D6D6EB',
                plotBorderColor: '#D8D8D8',
                plotShadow: true,
                spacingBottom: 43,
                width: 350,
                height: 120
            },
We then switch off the y-axis title and set up a regular interval within the percentage, as follows:
            xAxis: {
                categories: [ 'US' ],
                tickLength: 0
            },
            yAxis: {
                title: {
                    text: null
                },
                labels: {
                    y: 20
                },
                min: 0,
                max: 100,
                tickInterval: 20,
                minorTickInterval: 10,
                tickWidth: 1,
                tickLength: 8,
                minorTickLength: 5,
                minorTickWidth: 1,
                minorGridLineWidth: 0
            },
The final part is to configure the bar series, so that the bar width fits perfectly within the plot area. The rest of the series configuration is to brush up the bar with an SVG gradient effect, as follows:
            series: [{
               borderColor: '#7070B8',
               borderRadius: 3,
               borderWidth: 1,
               color: {
                   linearGradient:
                       { x1: 0, y1: 0, x2: 1, y2: 0 },
                   stops: [ [ 0, '#D6D6EB' ],
                            [ 0.3, '#5C5CAD' ],
                            [ 0.45, '#5C5C9C' ],
                            [ 0.55, '#5C5C9C' ],
                            [ 0.7, '#5C5CAD' ],
                            [ 1, '#D6D6EB'] ]
               },
               pointWidth: 50,
               data: [ 48.9 ]
}]The following is the final polished look of the gauge chart: