
18
Creating a Single-Page App in React Using React Router
Now that you’ve familiarized yourself with the basics of how to work with React, let’s kick things up a few notches. Here we’re going to use React to build a simple single-page app (also referred to as SPA by the cool kids and people living in Scandinavia). As we talked about in our React introduction forever ago, single-page apps are different from the more traditional multipage apps that you see everywhere. The biggest difference is that navigating a single-page app doesn’t involve going to an entirely new page. Instead, your pages (commonly known as views in this context) typically load inline within the same page itself:

When you’re loading content inline, things get a little challenging. The hard part isn’t loading the content itself. That’s relatively easy. The hard part is making sure that single-page apps behave in a way that is consistent with what your users are accustomed to. More specifically, when users navigate your app, they have some expectations:
1. The URL displayed in the address bar should always reflect the thing users are viewing.
2. Users expect to be able to use the browser’s back and forward buttons successfully.
3. Users should be able to navigate to a particular view (a.k.a. deep link) directly using the appropriate URL.
With multipage apps, these three things come for free. You don’t have to do anything extra for any of it. With single-page apps, because you aren’t navigating to an entirely new page, you have to do real work to deal with these three things that your users expect to just work. You need to ensure that navigating within your app adjusts the URL appropriately. You need to ensure that your browser’s history is properly synchronized with each navigation to allow users to use the back and forward buttons. If users bookmark a particular view or copy/paste a URL to access later, you need to ensure that your single-page app takes them to the correct place.
To deal with all of this, you have a bucket full of techniques commonly known as routing. With routing, you try to map URLs to destinations that aren’t physical pages, such as the individual views in your single-page app. That sounds complicated, but fortunately, a bunch of JavaScript libraries can help with this. One such JavaScript library is the star of this tutorial, React Router(https://github.com/reactjs/react-router). React Router provides routing capabilities to single-page apps built in React. What makes it nice is that it extends what you already know about React in familiar ways to give you all of this routing awesomeness. In this tutorial, you’ll learn all about how it does that…and hopefully more.
Onward!
The Example
Before we go further, take a look at the following example in your browser: https://www.kirupa.com/react/examples/react_router/index.html.
Here, you have a simple React app that uses React Router to provide all the navigation and view-loading goodness:
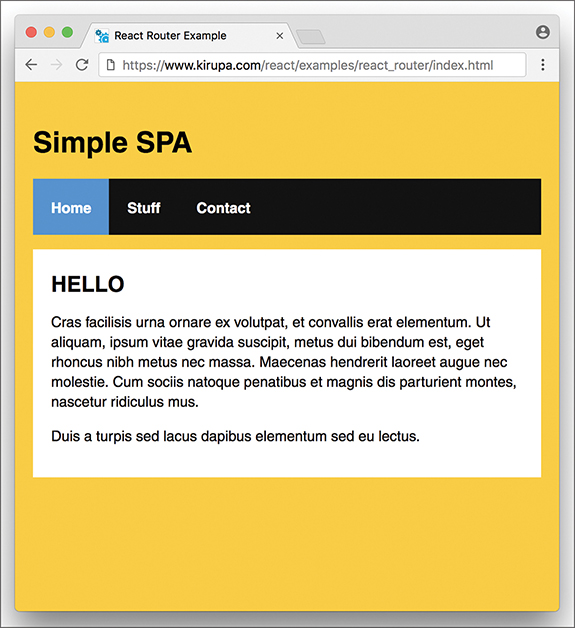
Click the various links to load the relevant content, and feel free to open this page in its own browser window (https://www.kirupa.com/react/examples/react_router/index.html) to use the back and forward buttons and see them working.
In the following sections, we’re going to be building this app in pieces. By the end, not only will you have re-created this app, but hopefully you’ll have learned enough about React Router to build cooler and even more awesome things.
Getting Started
First we need to get our project set up. We’ll use our trusty create-react-app command to do this. From your favorite terminal, navigate to the folder where you want to create your app and type the following:
This creates our new project inside a folder called react_spa. Go ahead and navigate into this folder:
Normally, this is where we start messing around with deleting the existing content to start from a blank slate. We’ll do that, but first, we’re going to install React Router. To do that, run the following command:
This copies the appropriate React Router files and registers it in our package.json so that our app is aware of its existence. That’s good stuff, right?
It’s time to clean up the project to start from a clean slate. From inside your react_spa folder, delete everything inside your public and src folders. Now, let’s create the index.html file that will serve as our app’s starting point. In your public folder, create a file called index.html and add the following contents into it:
<html>
<head>
<meta charset="utf-8">
<meta name="viewport"
content="width=device-width, initial-scale=1, shrink-to-fit=no">
<title>React Router Example</title>
</head>
<body>
<div id="root"></div>
</body>
</html>
Take a quick glance at the HTML. You shouldn’t see anything surprising here. Next, we’ll create our JavaScript entry point. Inside the src folder, create a file called index.js and add the following contents into it:
import ReactDOM from "react-dom";
import Main from "./Main";
ReactDOM.render(
<Main/>,
document.getElementById("root")
);
Our ReactDOM.render call lives here, and we’re rendering our Main component…which doesn’t exist yet. The Main component will be the starting point for our SPA expedition using React Router, and you’ll see how beginning with the next section.
Building Our Single-Page App
The way we build our app is no different than the way we’ve been building all the apps so far. We’ll have a main parent component. Each individual “page” of our app will be a separate component that feeds into the main component. The magic React Router brings to the table is basically choosing which components to show and which to hide. To make this feel natural and seamless, all of this navigating is tied in with our browser’s address bar and back/forward buttons.
Displaying the Initial Frame
When building an SPA, a part of your page will always remain static. This static part, also referred to as an app frame, could be one invisible HTML element that acts as the container for all of your content, or it could include some additional visual things such as a header, a footer, or navigation. In our case, our app frame will be a component that contains UI elements for our navigation header and an empty area for content to load in.
Inside our src folder, create a new file called Main.js and add the following content into it:
class Main extends Component {
render() {
return (
<div>
<h1>Simple SPA</h1>
<ul className="header">
<li><a href="/">Home</a></li>
<li><a href="/stuff">Stuff</a></li>
<li><a href="/contact">Contact</a></li>
</ul>
<div className="content">
</div>
</div>
);
}
}
export default Main;
Take a look at what we have here. We have a component called Main that returns some HTML. That’s it. To see what we have so far in action, type npm start and see what’s going on in your browser.
You should see an unstyled version of an app title and some list items:

This doesn’t look all fancy and styled, but that’s okay for now; we’ll deal with that later. The important thing to call out is that there’s nothing React Router specific here—absolutely nothing!
Creating Our Content Pages
Our app will have three pages of content. This content will be just a simple component that prints out some JSX. Let’s get that created and out of the way. First, create a file called Home.js in the src directory and add the following content:
class Home extends Component {
render() {
return (
<div>
<h2>HELLO</h2>
<p>Cras facilisis urna ornare ex volutpat, et
convallis erat elementum. Ut aliquam, ipsum vitae
gravida suscipit, metus dui bibendum est, eget rhoncus nibh
metus nec massa. Maecenas hendrerit laoreet augue
nec molestie. Cum sociis natoque penatibus et magnis
dis parturient montes, nascetur ridiculus mus.</p>
<p>Duis a turpis sed lacus dapibus elementum sed eu lectus.</p>
</div>
);
}
}
export default Home;
Next, create a file called Stuff.js in the same location and add in the following:
class Stuff extends Component {
render() {
return (
<div>
<h2>STUFF</h2>
<p>Mauris sem velit, vehicula eget sodales vitae,
rhoncus eget sapien:</p>
<ol>
<li>Nulla pulvinar diam</li>
<li>Facilisis bibendum</li>
<li>Vestibulum vulputate</li>
<li>Eget erat</li>
<li>Id porttitor</li>
</ol>
</div>
);
}
}
export default Stuff;
We have just one more page left. Create a file called Contact.js in the src folder and make sure its contents are the following:
class Contact extends Component {
render() {
return (
<div>
<h2>GOT QUESTIONS?</h2>
<p>The easiest thing to do is post on
our <a href="http://forum.kirupa.com">forums</a>.
</p>
</div>
);
}
}
export default Contact;
That’s the last of the content we’re going to add. If you take a look at what you’re adding, you’ll see that these components can’t get any simpler. They just return some boilerplate JSX content. Be sure to save all your changes to these three files. We’ll look at how to make them useful shortly.
Using React Router
We have our app frame in the form of our Main component. We have our content pages represented by the Home, Stuff, and Contact components. Now we need to tie all of these together to create our app. This is where React Router comes in. To start using it, go back to Main.js and ensure that your import statements look as follows:
import {
Route,
NavLink,
HashRouter
} from "react-router-dom";
import Home from "./Home";
import Stuff from "./Stuff";
import Contact from "./Contact";
We are importing Route, NavLink, and HashRouter from the react-router-dom NPM package installed earlier. In addition, we’re importing our Home, Stuff, and Contact components because we’ll be referencing them as part of loading our content.
React Router works by defining what I call a routing region. Inside this region are two things:
1. Your navigation links
2. The container to load your content into
There’s a close correlation between the URL your navigation links specify and the content that ultimately gets loaded. There’s no way to easily explain this without first getting our hands dirty and implementing what you just read about.
The first thing to do is define the routing region. Inside our Main component’s render method, add the following highlighted lines:
render() {
return (
<h1>Simple SPA</h1>
<ul className="header">
<li><a href="/">Home</a></li>
<li><a href="/stuff">Stuff</a></li>
<li><a href="/contact">Contact</a></li>
</ul>
<div className="content">
</div>
</div>
}
}
The HashRouter component provides the foundation for the navigation and browser history handling that routing is made up of. Next we need to define our navigation links. We already have list elements with the a element defined. We need to replace them with the more specialized NavLink component, so go ahead and make the following highlighted changes:
render() {
return (
<HashRouter>
<div>
<h1>Simple SPA</h1>
<ul className="header">
<li><NavLink to="/stuff">Stuff</NavLink></li>
<li><NavLink to="/contact">Contact</NavLink></li>
<div className="content">
</div>
</div>
</HashRouter>
);
}
}
For each link, pay attention to the URL we’re telling our router to navigate to. This URL value (defined by the to prop) acts as an identifier to ensure that the right content gets loaded. We match the URL with the content by using a Route component. Go ahead and add the following highlighted lines:
render() {
return (
<HashRouter>
<div>
<h1>Simple SPA</h1>
<ul className="header">
<li><NavLink to="/">Home</NavLink></li>
<li><NavLink to="/stuff">Stuff</NavLink></li>
<li><NavLink to="/contact">Contact</NavLink></li>
</ul>
<div className="content">
<Route path="/stuff" component={Stuff}/>
<Route path="/contact" component={Contact}/>
</div>
</HashRouter>
);
}
}
As you can see, the Route component contains a path prop. The value you specify for the path determines when this route is going to be active. When a route is active, the component specified by the component prop gets rendered. For example, when we click on the Stuff link (whose path is /stuff as set by the NavLink component’s to prop), the route whose path value is also /stuff becomes active. This means the contents of our Stuff component get rendered.
You can see all of this for yourself. Jump back to your browser to see the live updates or run npm start again. Click around on the links to see the content loading in and out. Something seems off, though, right? The content for our home page seems to always display even if we’re clicking on the Stuff or Contact links:

That seems problematic. We’ll look at how to fix that and do many more little housekeeping tasks in the next section when we go one level deeper into using React Router.
It’s the Little Things
In the previous section, we got our SPA mostly up and running. We just wrapped our entire routing region inside a HashRouter component, and we separated our links and the place our links load by using the NavLink and Route components, respectively. Getting our example mostly up and running and fully up and running are two different things. In the following sections, we’ll close those differences.
Fixing Our Routing
We ended the previous section by determining that our routing has a bug in it. The contents of our Home component are always displaying because the path for loading our Home component is /. Our Stuff and Contact components have the / character as part of their paths as well. This means our Home component always matches whatever path we are trying to navigate to. The fix for that is simple. In the Route component representing our Home content, add the exact prop as shown here:
<Route path="/contact" component={Contact}/>
</div>
This prop ensures that the Route is active only if the path is an exact match for what is being loaded. If you preview your app now, you’ll see that the content loads correctly, with the Home content displaying only when our app is in the Home view.
Adding Some CSS
Right now, our app is completely unstyled. The fix for that is easy. In your src folder, create a file called index.css and add the following style rules into it:
background-color: #FFCC00;
padding: 20px;
margin: 0;
}
h1, h2, p, ul, li {
font-family: sans-serif;
}
ul.header li {
display: inline;
list-style-type: none;
margin: 0;
}
ul.header {
background-color: #111;
padding: 0;
}
ul.header li a {
color: #FFF;
font-weight: bold;
text-decoration: none;
padding: 20px;
display: inline-block;
}
.content {
background-color: #FFF;
padding: 20px;
}
.content h2 {
padding: 0;
margin: 0;
}
.content li {
margin-bottom: 10px;
}
Now, we need to reference this stylesheet in our app. At the top of index.js, add the import statement to do just that:
import ReactDOM from "react-dom";
import Main from "./Main";
ReactDOM.render(
<Main/>,
document.getElementById("root")
);
Save all your changes if you haven’t done so yet. If you preview the app now, you’ll notice that it’s starting to look a bit more like the example we started with:

We’re almost done here! We just need to do a few more things.
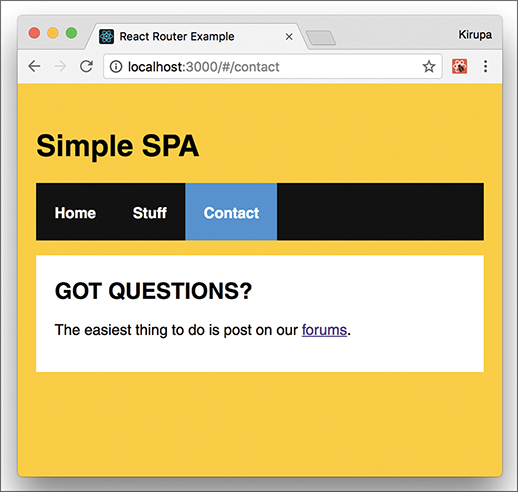
Highlighting the Active Link
Right now, it’s hard to tell which link corresponds to content that is currently loaded. Having some sort of a visual cue would be useful. The creators of React Router have already thought of that. When you click a link, a class value of active is automatically assigned to it.
For example, this is what the HTML for clicking on the Stuff link looks like:
All we really have to do, then, is add the appropriate CSS that lights up when an element has a class value of active set on it. To make this happen, go back to index.css and add the following style rule toward the bottom of your document:
background-color: #0099FF;
}
After you have added this rule and saved your document, go back to your browser and click around on the links in our example. You’ll see that the active link whose content is displayed is highlighted with blue. Notice also that our Home link is always highlighted. That isn’t correct. The fix is simple: Just add the exact prop to the NavLink component representing our Home content:
<li><NavLink to="/contact">Contact</NavLink></li>
Now go back to the browser. You’ll see that our Home link gets the active color treatment only when the Home content is displayed:
At this point, we’re done with the code changes to build our SPA using React Router. Yay!
Conclusion
By now, we’ve covered a good chunk of the cool functionality React Router has in helping you build your SPA. This doesn’t mean there aren’t more interesting things for you to take advantage of. Our app was pretty simple, with very modest demands on the routing functionality we needed to implement. React Router provides a whole lot more (including variations of APIs for what you’ve seen here), so if you’re building a more complex single-page app than what we’ve looked at so far, you should totally spend an afternoon taking a look the full React Router documentation(https://github.com/reactjs/react-router/) and examples.
Note: If you run into any issues, ask!
If you have any questions or your code isn’t running like you expect, don’t hesitate to ask! Post on the forums at https://forum.kirupa.com and get help from some of the friendliest and most knowledgeable people the Internet has ever brought together!