
Appendix A. Development Environment Setup
Setting up your development environment is a prerequisite to writing any code. Fortunately, setting up a reliable “dev env” is easier today than it used to be. And it keeps getting easier.
By the time you read this book, there are possibly (perhaps likely) better alternatives to what I suggest below. If there is an easier mechanism to set up your dev env, do it. Also, share it with other readers of this book. (You may send an email to [email protected].)
This appendix is not an exhaustive list of all the ways you can set up a dev env. Nor does it offer step by step instructions on how to install each language, Integrated Development Environment, plugin, extension, or manage multiple versions of any of these. Such details would be both tediously verbose and hopelessly susceptible to obsolescence: almost all of these tools are updated regularly (every few months or even weeks). Instead of providing detailed instructions that will become stale faster than a loaf of bread, I’ve opted to provide a general overview of how to set up your dev env. There are references with hyperlinks should guide you to more details, when you need them.
Online REPLs
REPL stands for “Read-Eval-Print Loop”. It is an interactive top level shell that allows you to short programs directly and easily. Any code you write in a REPL is read, then evaluated (i.e. parsed, then compiled and/or interpreted, depending on the language, and then executed), its results are printed. The whole thing runs in a loop so you can keep editing your program and running it for as long as you wish. The interactive nature of a REPL, coupled with its quick and detailed feedback, makes it an ideal environment in which to learn a new programming language.
As if that wasn’t good enough, there are now several online REPLs for a variety of languages, and many of these REPLs are free to use. All you need is a computer with a web browser and a steady (not necessarily blazing fast) Internet connection.
With all these benefits, there are caveats to using an online REPL to write substantial amounts of code, including the code examples in this book. In particular, here are some challenges you may face if you write a lot of code in an online REPL.
-
Difficulty in organizing your code as you want. You may find it difficult (or impossible) to organize your source files in folders (e.g. LeetCode free edition). You may find it difficult to name your files as you want (e.g. when writing Go in Repl.it, you can neither delete nor rename the file called
main.go). -
Difficulty in importing external packages. LeetCode, for example, allows you to import Go packages in the standard library, but it is non-trivial (perhaps impossible) to import external packages.
-
Limitation on the amount of code you can write. Online REPLs — especially in their free versions — often limit the amount of code you can write and store online. If you write a lot of code — which I encourage you to do! — it’s likely you’ll soon run into these limits.
-
Limitation on keeping your code private. Remember that any code you write using an online REPL is stored somewhere on their web servers (“in the cloud”). Oftentimes, you are compelled to make these code repositories public, especially in the free versions of online REPLs. Privacy of code is possibly unimportant to you if you’re learning to write code, and perhaps even undesirable if you are actively looking to collaborate with other. However, as your programs grow in size and especially if you start writing proprietary code; you may want or need to control access to your code repositories. Online REPLs may make this more difficult to achieve.
-
Risk of losing code because of browsers crashes, etc. Have you ever typed a bunch of text in a browser text field and then witnessed — in mild horror — your browser crash and lose all the text you typed? It’s bad enough when you’re typing a wall of text in a natural language (e.g. responding to a post on a social media website). It’s downright distressing if the “text” you just lost was code that you had painstakingly written, tested, and refactored. With online REPLs, code loss is always possible. (Of course, you could always spill coffee on your computer and lose code that way; however, I’m assuming that like most developers, you experience browser crashes more frequently than coffee spills!)
In summary, it’s ok to start writing the code in this book in an online REPL, however, I would not recommend that you write all of it in this manner. Sooner rather than later, you’ll feel the need to set up a proper dev env on your computer.
Here are some online REPLs that can help you get started with minimal prerequisites.
Repl.it
Repl.it is the online REPL I use most frequently, especially when I am trying out a new language or feature and don’t want to spend time and effort in setting up my local dev environment. It supports dozens of languages — including all three used in this book. The free version is feature rich, so you can try things out before you decide if you need a paid subscription.
To run Go code in Repl.it, you need to do a few tricks:
. You cannot delete the file named main.go. Leave this file empty: simply ignore it.
. Create your test files following the Go naming convention, e.g. money_test.go.
. If you want to run tests, do not click on the Run button with the green arrow. Instead, switch to the Shell tab on the right side, type go test -v <name_of_test_file>.go, and hit enter.
Figure A-1 shows a Repl.it window with Go code from Chapter 1.
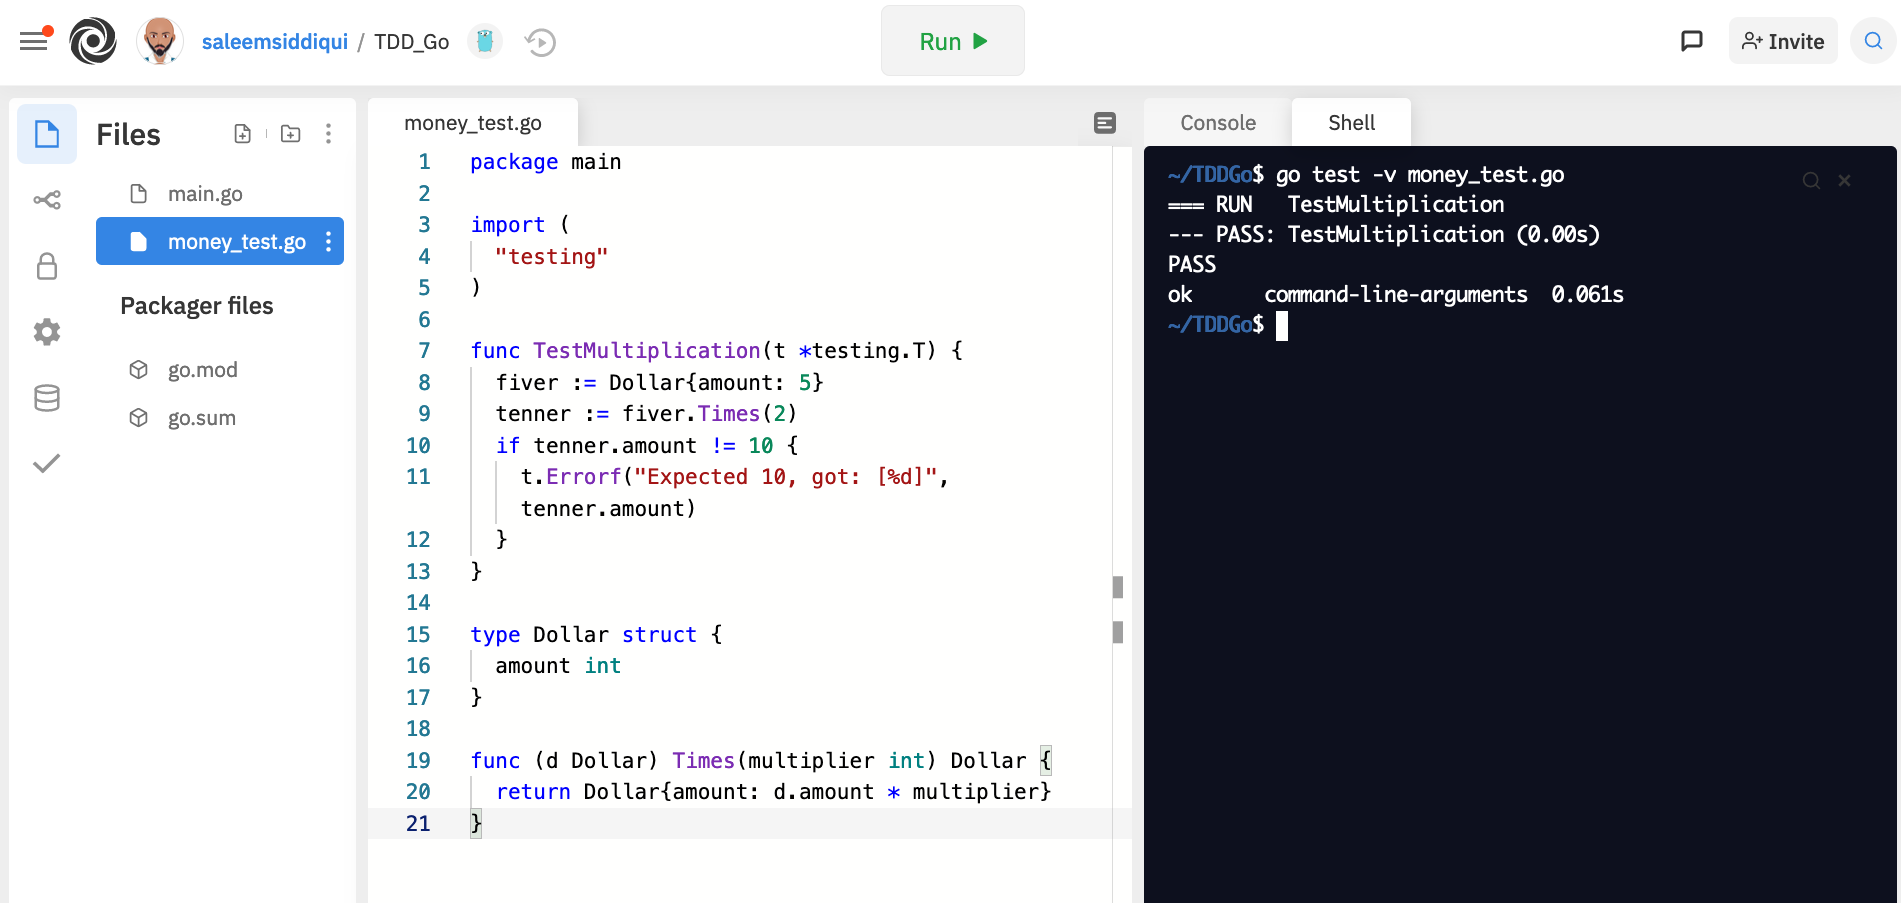
Figure A-1. Repl.it with with Go code from Chapter 1
Figure A-2 shows a Repl.it window with the JavaScript code we wrote in Chapter 1. Recall that there is no output on successful tests in the code we wrote at that point; that’s why the code in figure A-2 is modified with a deliberately failing test to illustrate how failures show up in Repl.it. To run the file, we switch to the Shell tab on the right and type node <name_of_test_file>.js and hit enter.

Figure A-2. Repl.it with with JavaScript code from Chapter 1
Figure A-3 shows Python code from Chapter 1 in a Repl.it window. To run the file, we switch to the Shell tab on the right and type python <name_of_test_file>.py and hit enter.
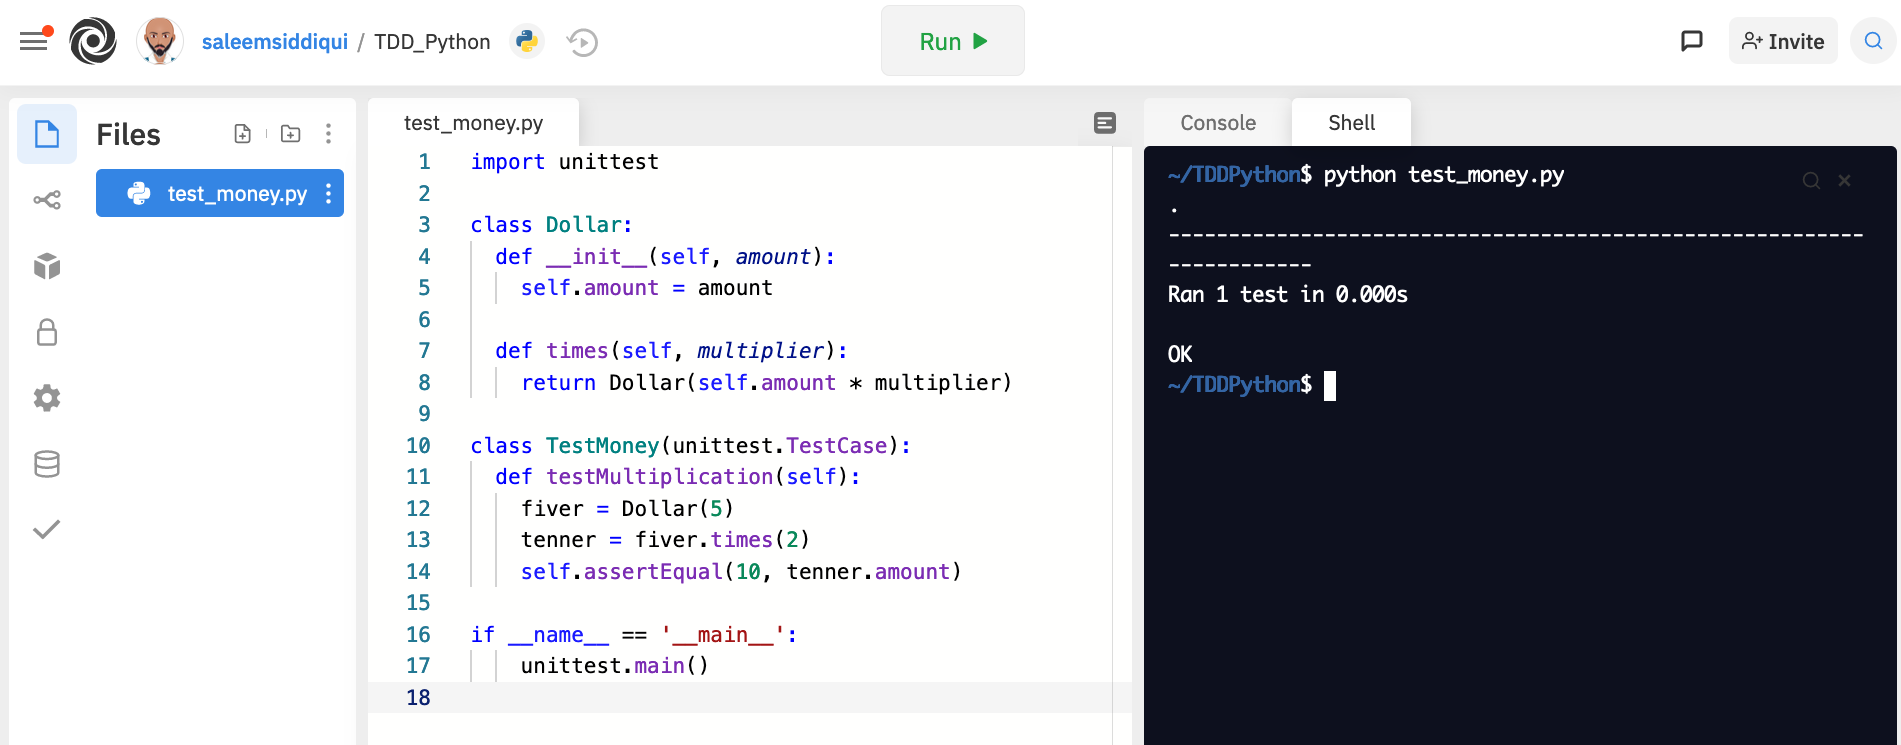
Figure A-3. Repl.it with with Python code from Chapter 1
LeetCode
LeetCode encourages social interaction with other developers with coding contests, challenges, and discussions. The “Playground” feature allows you to write code in several languages, including Go, JavaScript, and Python. However, there are some limitations. With Go, it is not trivial to import packages outside the standard library or to run tests via go test. With Python, it’s not obvious how to run tests using the unittest package.
The free version restricts the number of Playgrounds (currently 10); the paid subscription removes this restriction and offers a host of other features, such as debugging and autocompletion.
Figure A-4 shows a LeetCode window with JavaScript code from Chapter 1. The test in the code has been deliberately broken test to illustrate how test failures appear in LeetCode.
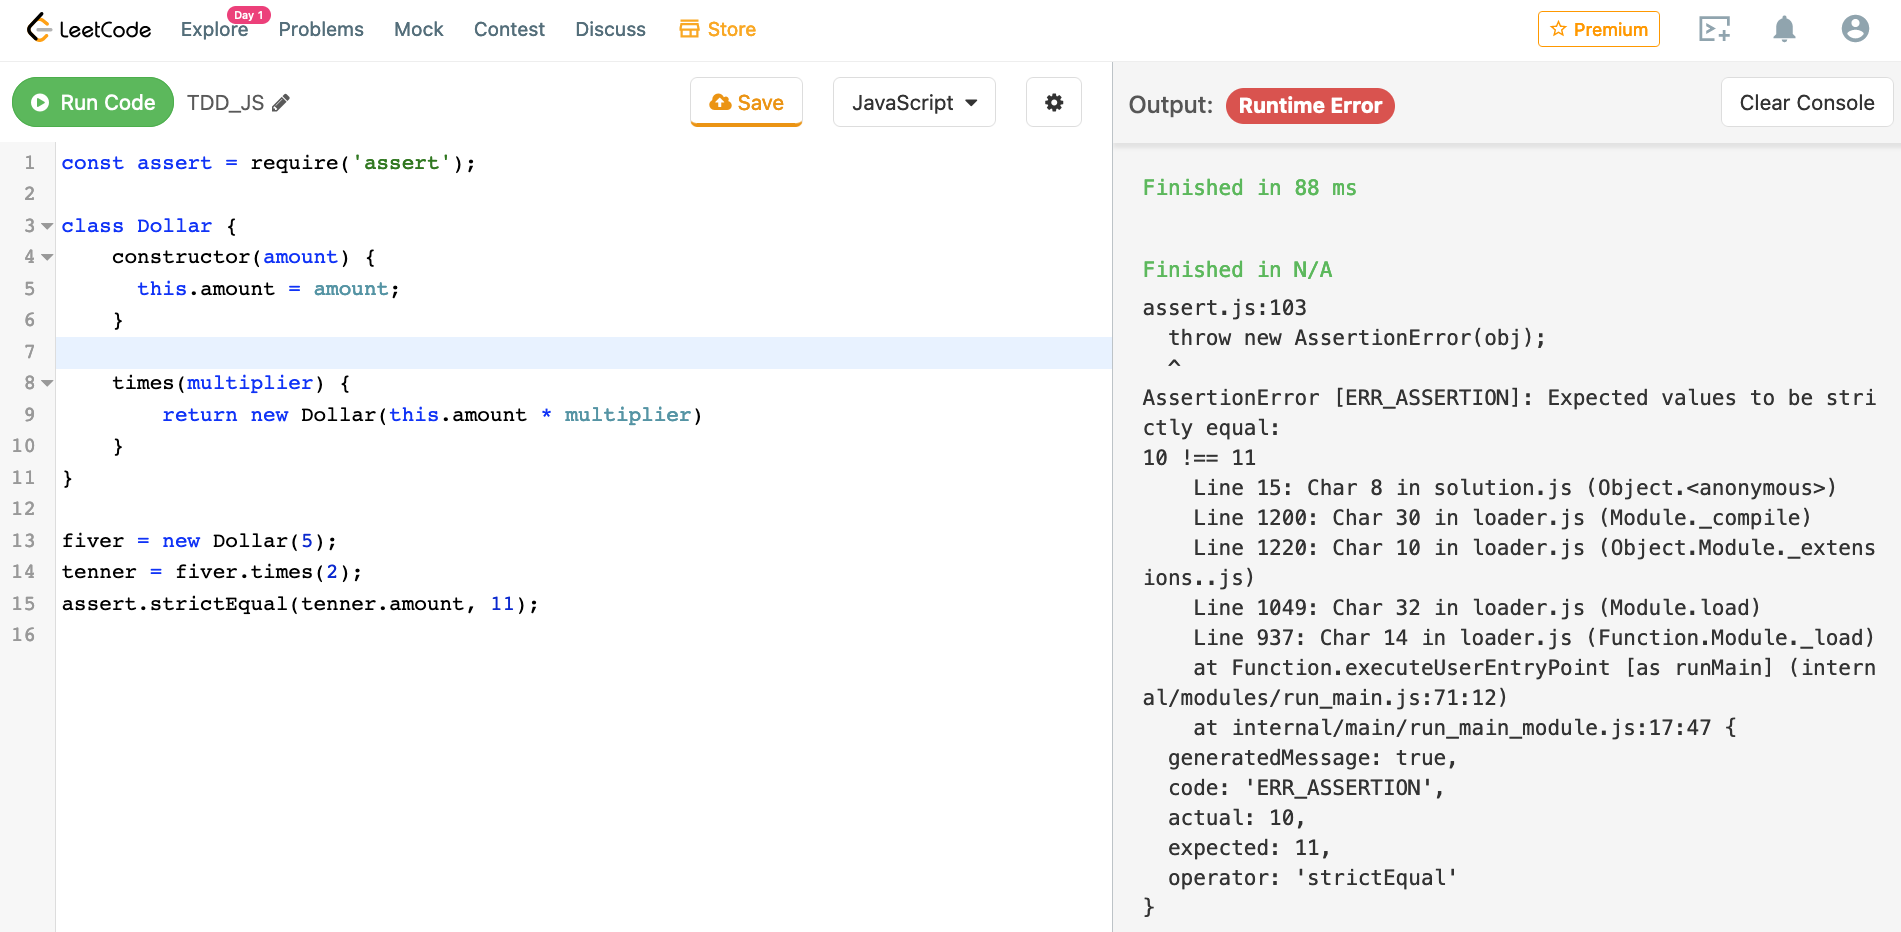
Figure A-4. LeetCode with JavaScript code from Chapter 1
CoderPad
CoderPad is good for real-time collaboration on code — such as pair or mob programming. This can be particularly useful if you are learning a new language as part of a group or cohort. For this reason, CoderPad is often used during technical interviews — so becoming familiar with it may also be good for your career!
CoderPad supports a variety of languages, including the three used in this book. However, like LeetCode, it is not trivial to import Go packages outside the standard library.
Figure A-5 shows CoderPad with the JavaScript code from Chapter 1. Again, the code is purposefully shown with a broken test to illustrate how assertion failures appear in CoderPad.
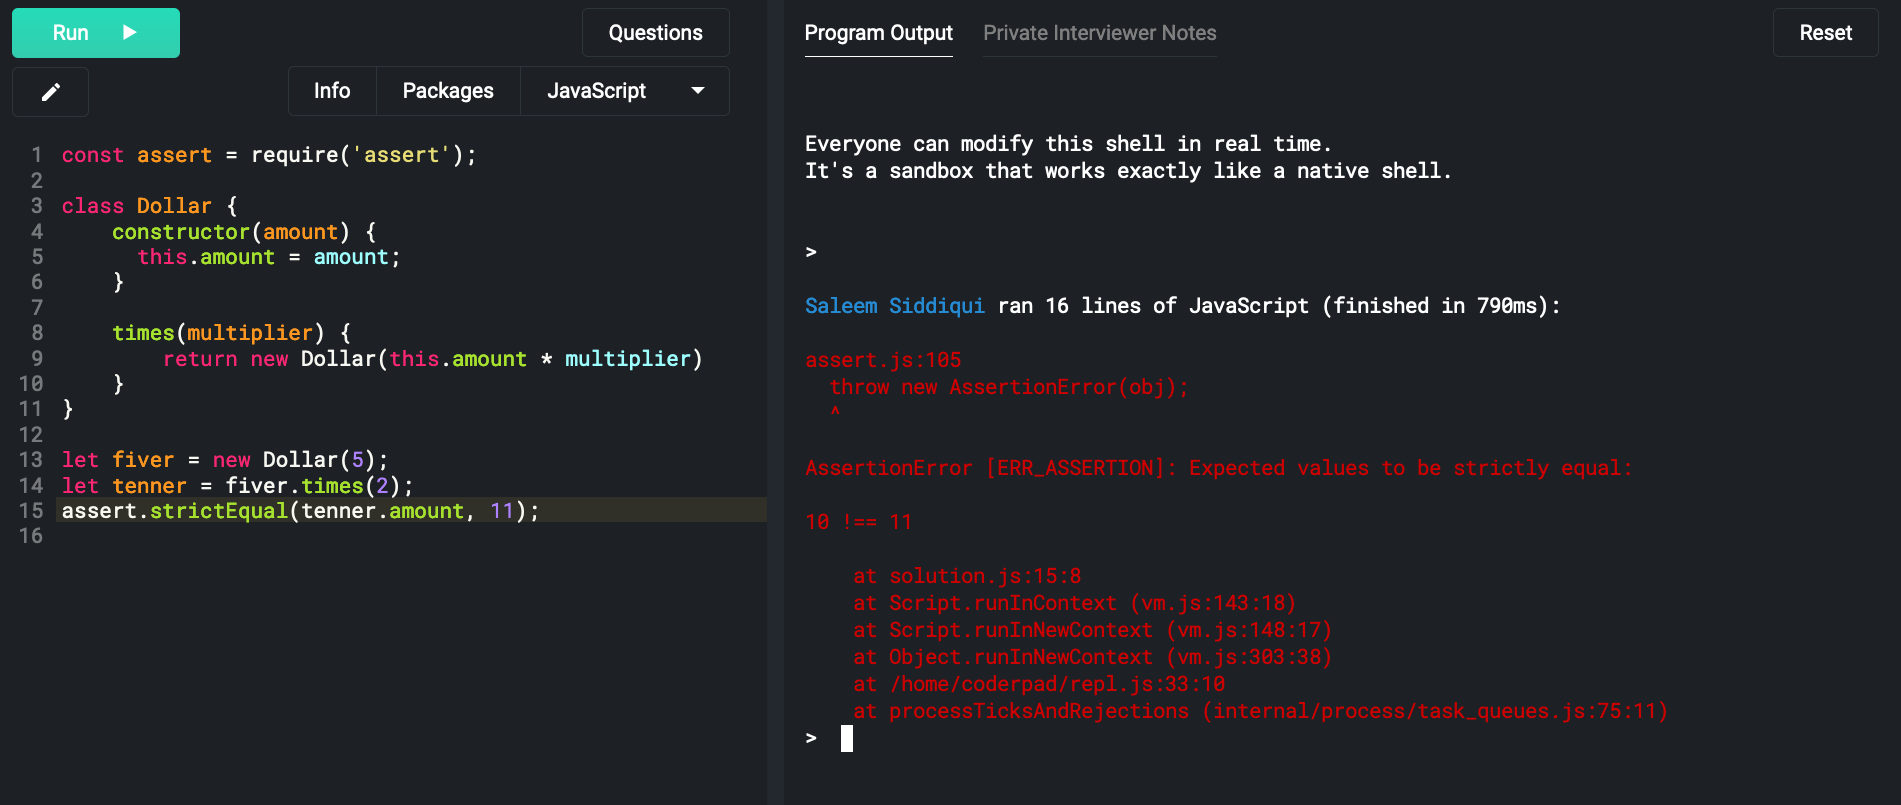
Figure A-5. CoderPad with JavaScript code from Chapter 1
Figure A-6 shows CoderPad with the Python code from Chapter 1.

Figure A-6. CoderPad with Python code from Chapter 1
The Go Playground
The Go Playground provides a REPL tailored for the Go programming language. This is particularly useful given the limitations of some other online REPLs for Go, as described in the previous sections.
Under Go Playground’s minimalist user interface lies a powerful REPL engine. One useful feature is the ability to create a permalink for any code snippet you write. This makes sharing code easy. Best of all, the Go Playground is completely free.
You can write unit tests and production code and run tests directly from the Go Playground. You can even organize your code in multiple files. This can help you get started quickly in Go, if you so decide.
With Go Playground, you can import packages from publicly available repositories (e.g. GitHub.com) in the same way you’d do in an IDE. Figure A-6 shows code from Chapter 2 with an external package imported from github.com/stretchr/testify/assert.

Figure A-7. Go Playground with code similar to what we developed in Chapter 2, with an external assertion library
The comprehensive list of online REPLs
Joël Franusic maintains a list of online REPLs. I haven’t tried all of them: there are just too many! However, if you find something you like, use it and share your experience with others.
Integrated Development Environments (IDEs)
Online REPLs are good to get started. However, you’ll find that to do any amount of serious coding, you need a proper development environment on your computer.
IDEs are a reliable way to set up a dev env. Here are a few choices. While you may want to set up more than one, I’d recommend starting with one and getting familiar with it before you try another one. Being adept at using one IDE — including its keyboard shortcuts so you can minimize the use of a mouse or pointing device — is better than superficially knowing several IDEs.
Note that even if you use an IDE, you’ll still have to install the runtime environment (RTE) for each language you use. You can then configure your IDE so that you can easily use each of these languages.
Visual Studio Code
Visual Studio Code is the IDE I used to develop the examples in this book. It has plugins that allow you to configure multiple languages simultaneously (including all three used in this book). It is available on Windows, MacOS, and Unix operating systems. Microsoft has released Visual Studio Code as an open source product under the MIT License. This has proliferated the number of extensions that developers like you have written and shared publicly. These reasons make a compelling case to choose Visual Studio Code as your “go to” IDE.
According to some surveys, Visual Studio Code is the most popular IDEs amongst developers. As they say: there’s wisdom in crowds!
IntelliJ IDEA
IntelliJ IDEA is one amongst a family of IDEs developed by the Czech software company JetBrains. The Ultimate Edition — for which you must purchase a license — supports Go, JavaScript, and Python (either natively or through plugins that you can install). The free Community Edition supports several languages, too. However, it does not support Go or JavaScript out of the box.
JetBrains offer a Community Editions of another product that support Python: PyCharm for Python. However, for Go development, there is only a commercial edition of their IDE at the time this writing (mid 2021): GoLand.
Eclipse
Eclipse is a free and open source IDE from the Eclipse Foundation, Eclipse runs on a JDK (Java Development Kit) and supports many languages. There are plugins for the languages used in this book: GoClipse for Go, Enide for JavaScript and PyDev for Python.
Installing Language Tools
If you’re using one of the IDEs described earlier in this chapter, you will need to install the language compile and runtime tools. The IDEs cannot function without these tools. After you install the language tools, you can configure the IDE to use these tools (to compile, run, test, and debug your code, for example).
Go
Go is an open source programming language from Google. Binary distributions for it are available for Windows, MacOS, and Unix operating systems. This book uses version 1.16 of Go.
You’ll need to install Go if you want to use an IDE like Visual Studio Code or GoLand.
JavaScript / ES6
Of the three languages used in this book, JavaScript is unique in that you don’t need to install a specific compiler, interpreter, or runtime environment for it. If you’re interested in the minutiae of why this is the case, see the sidebar.
Example A-1.
The reason you don’t have to install JavaScript tools to write simple JavaScript programs is that JavaScript is supported by all modern web browsers. So a browser is, in effect, a runtime environment for JavaScript. That is: you can write JavaScript code directly in a web browser and run it locally. This is different from running it using an online REPL, as described earlier, because the “JavaScript engine” runs within your browser.
However, you do need a runtime “JavaScript engine” for this to work. Popular JS engines include “V8” (used by Chrome browser and Node.js), WebKit (used by Safari browser) and Gecko (used by Firefox browser). Early on in its history, different JS engines had significant variations in their support for JavaScript. If you had the good fortune of building JavaScript-enhanced web applications in the early part of this millennium, you probably remember how you had to write browser-specific code. (Or perhaps you’ve chosen to forget that stage of your career — I do not blame you at all!) Fortunately, with the standardization of JavaScript as ECMAScript, the different JS engines are much more aligned (and demonstrably so) in their support of named EcmaScript versions. The most recent version of ECMAScript is ES 2020. The V8 JS engine, included in Node.js, has an excellent track record of supporting the latest ECMAScript specification by issuing an almost constant stream of updates. Any information I provide in print here is guaranteed to become obsolete before the book reaches your hands! I recommend you check the online documentation for an up-to-date reference.
The simplest way to install a JavaScript engine — the thing that compiles and runs JS code — is to install Node.js. When you install Node (including Node Package Manager, or NPM) and add its location to the PATH variable, your IDE (such as VS Code or IntelliJ IDEA) should be able to find and use it.
For more advanced configuration options for JavaScript, consult your IDE’s documentation (e.g. for VS Code and IntelliJ IDEA).
Python
Python is an interpreted programming language created by Guido von Rossum. It is distributed under its own (i.e. Python Software Foundation’s) open source license. It is available for Windows, MacOS, Unix and other operating systems. Look at the Python website for instructions on how to install the language and its tools for your particular OS.
The code in this book requires Python 3. The older version, Python 2, was sunsetted on New Year’s day, 2020. You can probably still find software the uses Python 2. 1 The differences between Python 2 and Python 3 are several and significant. 2
1 On several versions of macOS, including BigSur, the python command is aliased to a Python 2 installation. You must explicitly type python3 on the shell if you want to use Python 3.
2 This article by Sebastian Raschka enumerates several differences between Python 2 and 3, with examples. https://sebastianraschka.com/Articles/2014_python_2_3_key_diff.html