
3. Responding to User Actions
If you haven’t found it yet, keep looking. Don’t settle. As with all matters of the heart, you’ll know when you find it. And like any great relationship, it just gets better and better as the years roll on.
Steve Jobs
Designing the user interface (UI) for your Apple Watch application is similar to designing for the iPhone. However, space is at a premium on the Apple Watch, and every millimeter on the screen must be put to good use in order to convey the exact intention of your app.
The UI of an Apple Watch application is represented by various controls (commonly known as views in iOS programming), and they are divided into two main categories:
![]() Responding to user actions: Users directly interact with these controls to perform some actions. Examples of such controls are Button, Switch, Slider, Picker, and Table.
Responding to user actions: Users directly interact with these controls to perform some actions. Examples of such controls are Button, Switch, Slider, Picker, and Table.
![]() Displaying information: These controls mainly display information to the user. Examples of such controls are Label, Image, and Table.
Displaying information: These controls mainly display information to the user. Examples of such controls are Label, Image, and Table.
In this and the next chapter, you learn how to use these various controls to build the UI of your application.
Using the Tap Gesture to Interact with Controls
One key way to interact with the Apple Watch is to use the tap gesture. You can tap the following controls:
![]() Button
Button
![]() Switch
Switch
![]() Slider
Slider
![]() Table
Table
Let’s take a more detailed look at these objects!
Note
I cover the Table control in the next chapter where we discuss controls that display information.
Button
The Button control is the most direct way of interacting with an Apple Watch application. A button can display text as well as a background image. Tapping a button triggers an action on the Interface Controller where you can write the code to perform the appropriate action.
Adding a Button to an Interface Controller
In this section, you create a project that uses a Button control. Subsequent sections show you how to customize the button by creating an action for it and then displaying its title using custom fonts.
1. Using Xcode, create a new iOS App with WatchKit App project and name it Buttons. Uncheck the option Include Notification Scene so that we can keep the WatchKit project to a bare minimum.
2. Select the Interface.storyboard file to edit it in the Storyboard Editor.
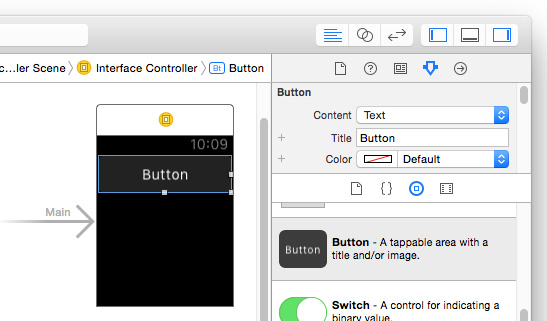
3. Drag and drop a Button control onto the storyboard, as shown in Figure 3.1.
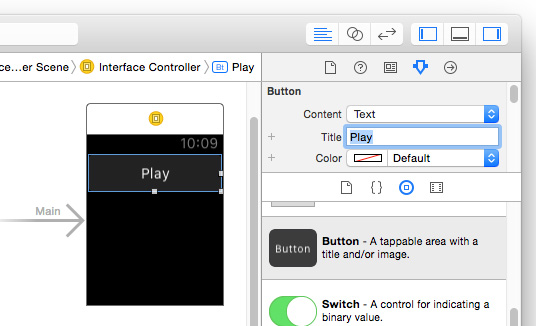
4. In the Attributes Inspector window, set the Title attribute to Play (see Figure 3.2).
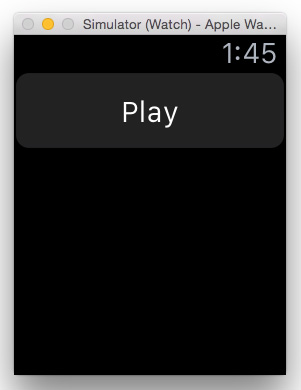
5. Select the WatchKit App scheme and run the project on the Apple Watch Simulator. You should see the button on the Apple Watch Simulator (see Figure 3.3). You can click it (or tap it on a real Apple Watch).
Creating an Action for a Button
For the Button control to do anything useful, you need to create an action for it so that when the user taps it, your application performs some actions. To create this action, follow these steps:
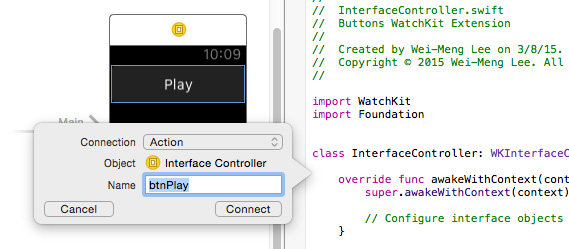
1. In the Storyboard Editor, select the View | Assistant Editor | Show Assistant Editor menu item to show the InterfaceController.swift file.
2. Control-click the Button control in the Interface Controller and drag it over the InterfaceController class (see Figure 3.4).
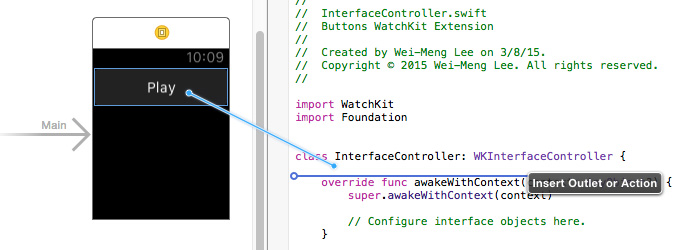
3. Create an action for the button and name it btnPlay (see Figure 3.5). Click Connect.
4. You now see the action created in the InterfaceController.swift file:
import WatchKit
import Foundation
class InterfaceController: WKInterfaceController {
@IBAction func btnPlay() {
}
5. Add the following statement in bold to the InterfaceController.swift file:
@IBAction func btnPlay() {
print("The button was tapped!")
}
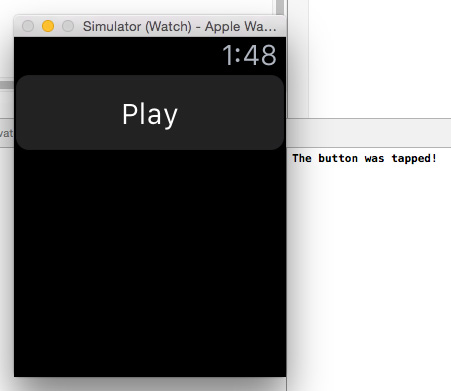
6. Select the WatchKit App scheme and run the project on the Apple Watch Simulator. Click the Play button and observe the statement printed in the Output window (see Figure 3.6).
Creating an Outlet for a Button
You can also programmatically change the title of the Button control during runtime. To do so, you need to create an outlet for the button:
1. With the Assistant Editor shown, control-click the button and drag it over the InterfaceController.swift file. Name the outlet button1 (see Figure 3.7) and click Connect.
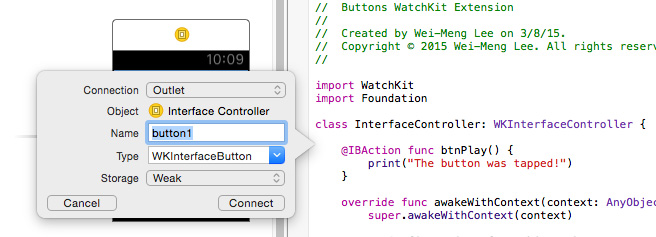
2. This creates an outlet in the InterfaceController.swift file:
import WatchKit
import Foundation
class InterfaceController: WKInterfaceController {
@IBOutlet var button1: WKInterfaceButton!
@IBAction func btnPlay() {
print("The button was tapped!")
}
3. Add the following statements in bold to the InterfaceController.swift file:
override func awakeWithContext(context: AnyObject?) {
super.awakeWithContext(context)
// Configure interface objects here.
button1.setTitle("Play Video")
}
Note
Observe that, while you can change the title of a button, you cannot get the title of the button programmatically.
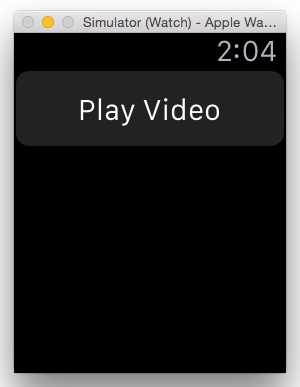
4. Select the WatchKit App scheme and run the project on the Apple Watch Simulator. You should now see the title of the button changed to “Play Video” (see Figure 3.8).
Displaying Attributed Strings
The Button control supports attributed strings. Attributed strings allow you to specify different attributes (such as color, font, size, etc.) for different parts of a string. In the following steps, you display the title of the button using different colors:
1. Add the following statements in bold to the InterfaceController.swift file:
override func awakeWithContext(context: AnyObject?) {
super.awakeWithContext(context)
// Configure interface objects here.
// button1.setTitle("Play Video")
let str = NSMutableAttributedString(
string: "Hello, Apple Watch!")
//------display the Hello in yellow---
str.addAttribute(NSForegroundColorAttributeName,
value: UIColor.yellowColor(),
range: NSMakeRange(0, 5))
//---display the , in red---
str.addAttribute(NSForegroundColorAttributeName,
value: UIColor.redColor(),
range: NSMakeRange(5, 1))
//---display Apple Watch! in green---
str.addAttribute(NSForegroundColorAttributeName,
value: UIColor.greenColor(),
range: NSMakeRange(7, 12))
button1.setAttributedTitle(str)
}
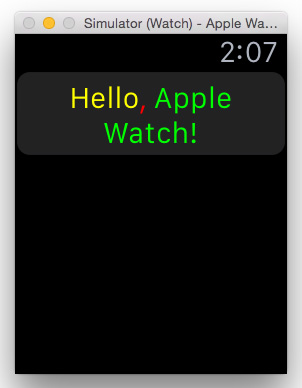
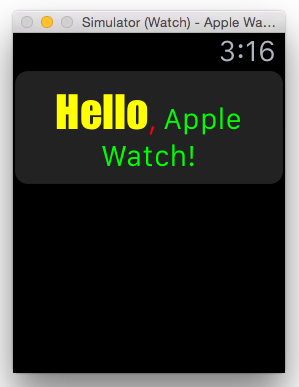
2. Select the WatchKit App scheme and run the project on the Apple Watch Simulator. You should see the title of the button displayed in multiple colors, as shown in Figure 3.9 (readers of the print book will not see the colors in the figure).
Using Custom Fonts
Using attributed strings, you can also use different fonts for parts of a string. To illustrate this, let’s modify the example in the previous section to display part of the button’s title using a custom font.
For this example, use the Impact font that is installed on your Mac. The Impact font is represented using the Impact.ttf file located in the /Library/Fonts/ folder.
1. Drag and drop a copy of the Impact.ttf file onto the Extension project in Xcode.
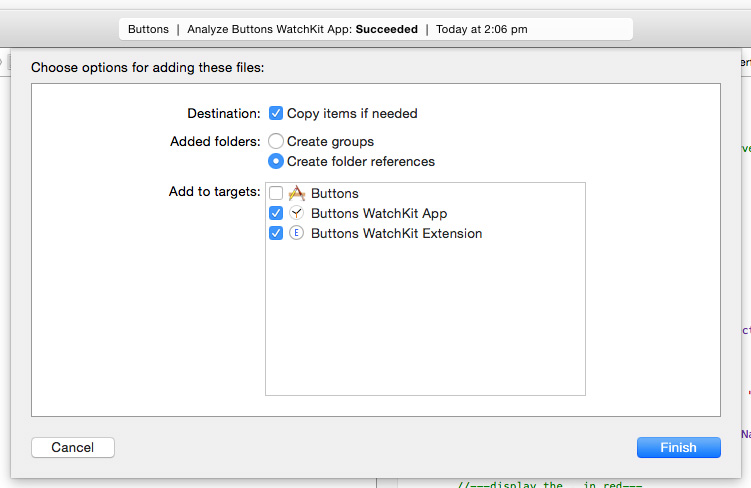
2. You are asked to choose a few options. Select the options shown in Figure 3.10. This adds the Impact.ttf file onto the Extension and WatchKit App projects.
Note
Remember to add the font file to both the WatchKit Extension and WatchKit App. Also, be aware that adding custom fonts to the project adds considerable size and memory usage to your watch app. So, try to use the system font unless you have a very good reason not to.
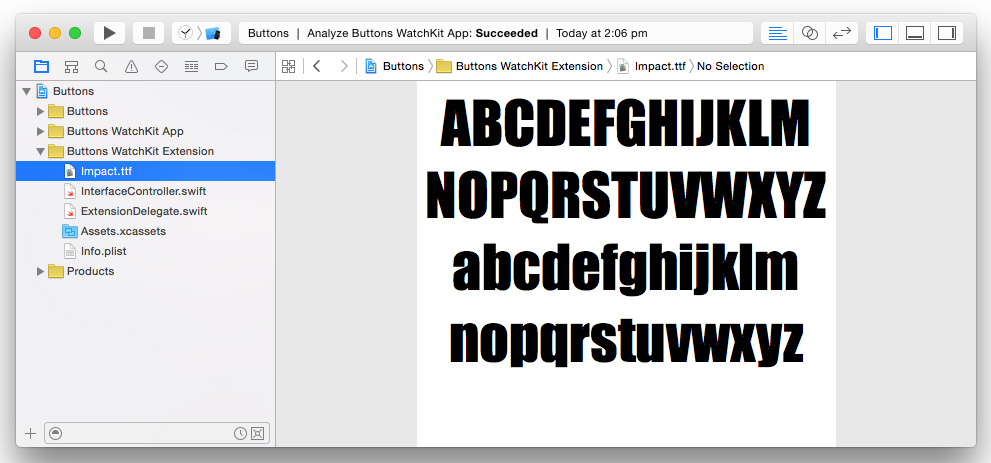
3. Figure 3.11 shows the Impact.ttf file in the project.
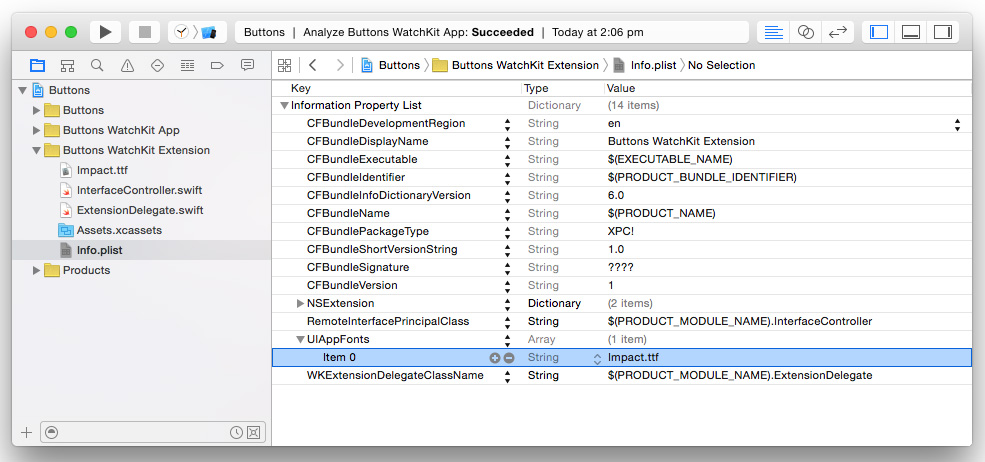
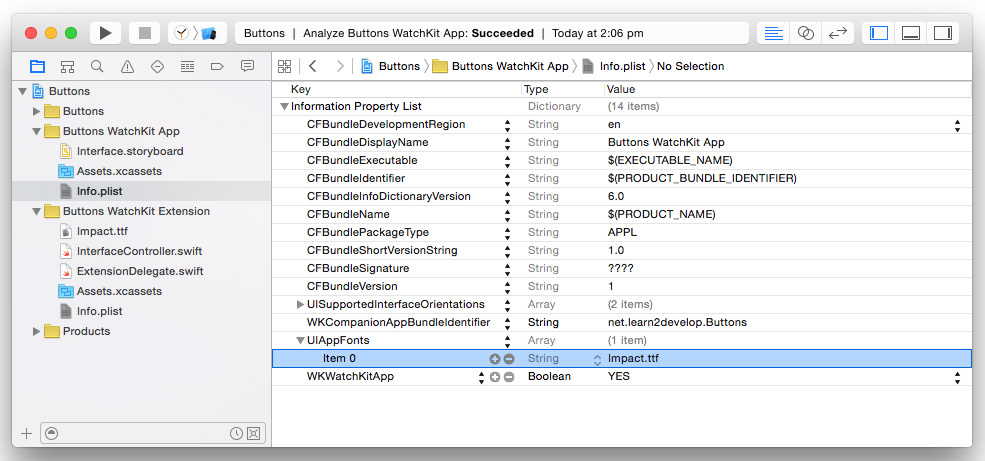
4. Add a new key named UIAppFonts to the Info.plist file located in the Extension and set its Item 0 to Impact.ttf (see Figure 3.12).
Note
If your Info.plist file does not show the items as shown in Figure 3.12, simply right-click any of the items in it and select Show Raw Keys/Values.
5. Likewise, add a new key named UIAppFonts to the Info.plist file located in the WatchKit App and set its Item 0 to Impact.ttf (see Figure 3.13).
6. Add the following statements in bold to the InterfaceController.swift file:
override func awakeWithContext(context: AnyObject?) {
super.awakeWithContext(context)
// Configure interface objects here.
// button1.setTitle("Play Video")
let str = NSMutableAttributedString(
string: "Hello, Apple Watch!")
//---display the Hello in yellow---
str.addAttribute(NSForegroundColorAttributeName,
value: UIColor.yellowColor(),
range: NSMakeRange(0, 5))
//---display Hello using the Impact font, size 22---
str.addAttribute(NSFontAttributeName,
value: UIFont(name: "Impact", size: 22.0)!,
range: NSMakeRange(0, 5))
//---display the , in red---
str.addAttribute(NSForegroundColorAttributeName,
value: UIColor.redColor(),
range: NSMakeRange(5, 1))
//---display Apple Watch! in green---
str.addAttribute(NSForegroundColorAttributeName,
value: UIColor.greenColor(),
range: NSMakeRange(7, 12))
button1.setAttributedTitle(str)
}
7. Select the WatchKit App scheme and run the project on the Apple Watch Simulator. You should now see “Hello” displayed using the Impact font (see Figure 3.14).
Once you have added a custom font to your project, you can use the font directly in Interface Builder by setting the Font attribute of a control to Custom and then selecting the font that you want to use in the Family attribute.
Getting the Font Name
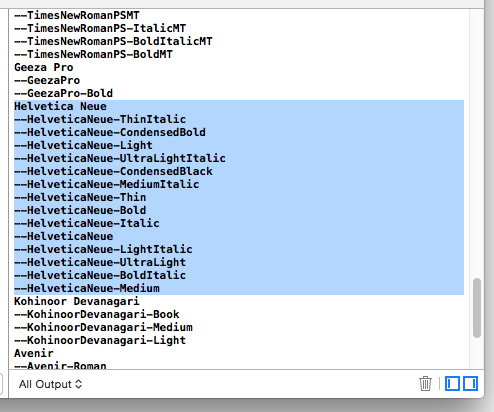
One common problem in dealing with fonts is that the filename of the custom font that you are using is not always the same as the font name. The following code snippet allows you to print out the name of each font family and its corresponding font name:
for family in UIFont.familyNames() {
print(family)
for name in UIFont.fontNamesForFamilyName(family as String) {
print("--(name)")
}
}
This code snippet prints the output as shown in Figure 3.15. For example, if you want to use the Helvetica Neue font, you have to specify in your code one of the font names printed: HelveticaNeue-Italic, HelveticaNeue-Bold, etc.
Changing the Background Image of Button
Besides displaying text, the Button control can also display a background image. The following exercise shows you how to add an image to the project and use it as the background of a button:
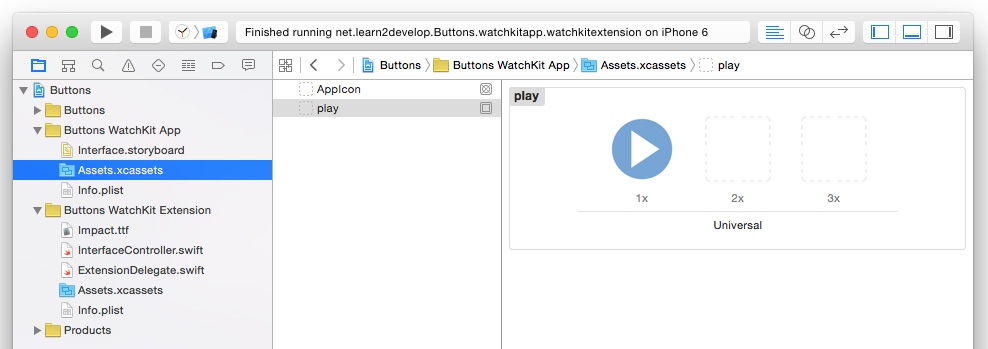
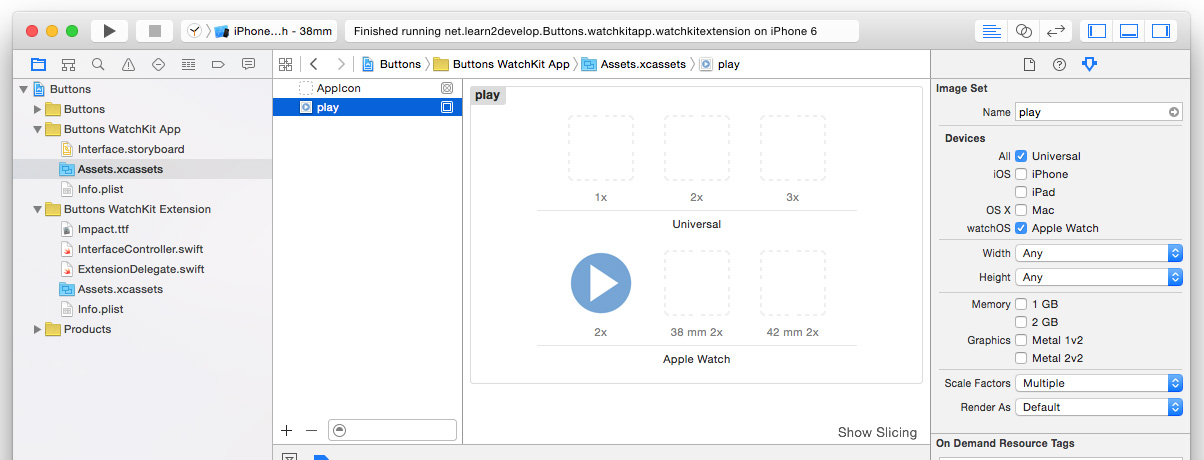
1. Drag and drop the image named play.png onto the Assets.xcassets item in the WatchKit App (see Figure 3.16).
Note
You can find a copy of this image in the source code download for this book.
2. In the Attributes Inspector window for the play.png image, check the watchOS checkbox (see Figure 3.17, right). Then, move the play.png into the box labeled 2× (see Figure 3.17, middle). This signifies that this image will be displayed for all sizes of Apple Watch. If you want to use different images for the 38mm Apple Watch and the 42mm Apple Watch, you can drag and drop different images onto the boxes labeled “38 mm 2×” and “42 mm 2×.” For this example, you will use the same image for the two different watch sizes.
3. In the InterfaceController.swift file, add the following statements in bold:
override func awakeWithContext(context: AnyObject?) {
super.awakeWithContext(context)
// Configure interface objects here.
// button1.setTitle("Play Video")
/*
let str = NSMutableAttributedString(
string: "Hello, Apple Watch!")
//---display the Hello in yellow---
str.addAttribute(NSForegroundColorAttributeName,
value: UIColor.yellowColor(),
range: NSMakeRange(0, 5))
//---display Hello using the Impact font, size 22---
str.addAttribute(NSFontAttributeName,
value: UIFont(name: "Impact", size: 22.0)!,
range: NSMakeRange(0, 5))
//---display the , in red---
str.addAttribute(NSForegroundColorAttributeName,
value: UIColor.redColor(),
range: NSMakeRange(5, 1))
//---display Apple Watch! in green---
str.addAttribute(NSForegroundColorAttributeName,
value: UIColor.greenColor(),
range: NSMakeRange(7, 12))
button1.setAttributedTitle(str)
*/
button1.setBackgroundImageNamed("play")
}
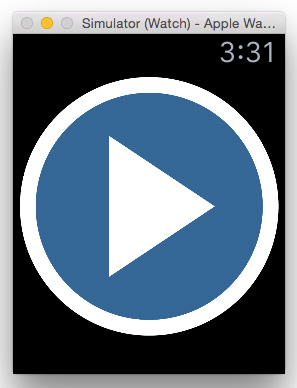
4. Select the WatchKit App scheme and run the project on the Apple Watch Simulator. You should now see the image on the button (see Figure 3.18).
Do not use the setBackgroundImage: method by passing it a UIImage instance, like this:
button1.setBackgroundImage(UIImage(named: "play"))
This is because the UIImage class looks for the specified image (“play”) in the main bundle (the Extension). And because the play.png file is in the WatchKit App, the image cannot be found and, therefore, the image will not be set successfully.
5. You can also set the background image of the button in the storyboard via the Background attribute in the Attributes Inspector window.
Switch
The Switch control allows the user to toggle between the ON and OFF states. It is commonly used in cases where you allow users to enable or disable a particular setting. In the following example, you will create a project and see how the Switch control works:
1. Using Xcode, create a new iOS App with WatchKit App project and name it Switches. Uncheck the option Include Notification Scene so that we can keep the WatchKit project to a bare minimum.
2. Select the Interface.storyboard file to edit it in the Storyboard Editor.
3. Drag and drop a Switch control onto the default Interface Controller (see Figure 3.19).
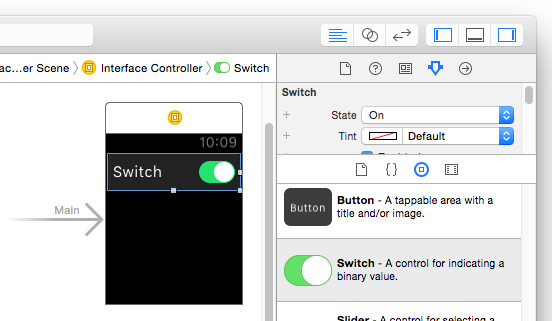
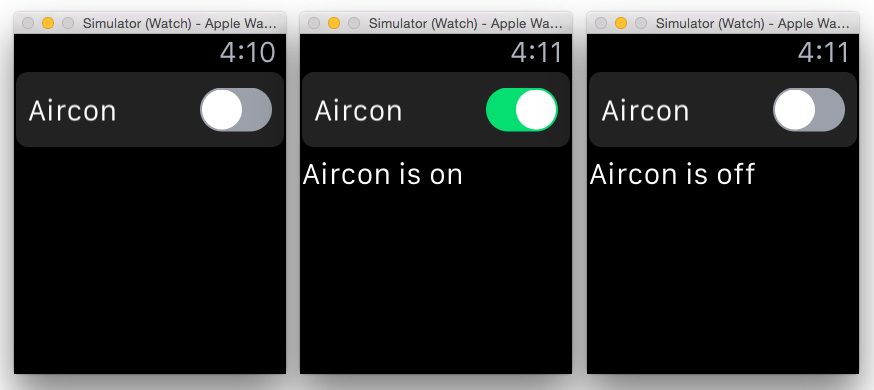
4. In the Attributes Inspector window, set the Title attribute of the Switch control to Aircon (see Figure 3.20).

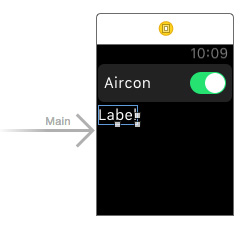
5. Add a Label control to the Interface Controller (see Figure 3.21).
6. Create an outlet for the Switch control and name it switch. Likewise, create an outlet for the Label control and name it label. Then, create an action for the Switch control and name it switchAction. The InterfaceController.swift file should now look like this:
import WatchKit
import Foundation
class InterfaceController: WKInterfaceController {
@IBOutlet var `switch`: WKInterfaceSwitch!
@IBOutlet var label: WKInterfaceLabel!
@IBAction func switchAction(value: Bool) {
}
Note
Because switch is a reserved word in the Swift programming language, if you try to use it as the name of an outlet, you have to enclose it with a pair of back quotes (``).
8. Add the following statements in bold to the InterfaceController.swift file:
@IBAction func switchAction(value: Bool) {
value ? label.setText("Aircon is on") :
label.setText("Aircon is off")
}
override func awakeWithContext(context: AnyObject?) {
super.awakeWithContext(context)
// Configure interface objects here.
`switch`.setOn(false)
label.setText("")
}
Note
You can programmatically set the value of a Switch control, but you will not be able to get its value. To know its value, you need to implement the action of the Switch control and save its value whenever its state changes.
9. Select the WatchKit App scheme and run the project on the Apple Watch Simulator. On the Apple Watch Simulator, click the Switch control to turn it on and off and observe the message printed in the Label control (see Figure 3.22).
Slider
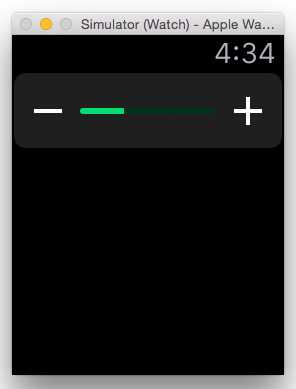
The Slider control is a visual control with two buttons (– and +) that allow the user to decrement or increment a floating-point value. It is usually used in situations where you want the user to select from a range of values, such as the temperature settings in a thermostat or the volume of the iPhone.
1. Using Xcode, create a new iOS App with WatchKit App project and name it Sliders. Uncheck the option Include Notification Scene so that we can keep the WatchKit project to a bare minimum.
2. Select the Interface.storyboard file to edit it in the Storyboard Editor.
3. Drag and drop a Slider control onto the default Interface Controller (see Figure 3.23).
4. Select the WatchKit App scheme and run the project on the Apple Watch Simulator. On the Apple Watch Simulator, click the + and – buttons (see Figure 3.24) and observe the slider.
5. Add a Label control to the Interface Controller (see Figure 3.25).
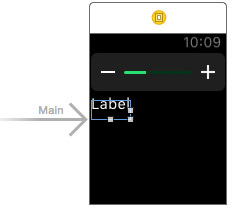
6. Create an outlet for the Slider control and name it slider. Likewise, create an outlet for the Label control and name it label. Then, create an action for the Slider control and name it sliderAction. The InterfaceController.swift file should now look like this:
import WatchKit
import Foundation
class InterfaceController: WKInterfaceController {
@IBOutlet var slider: WKInterfaceSlider!
@IBOutlet var label: WKInterfaceLabel!
@IBAction func sliderAction(value: Float) {
}
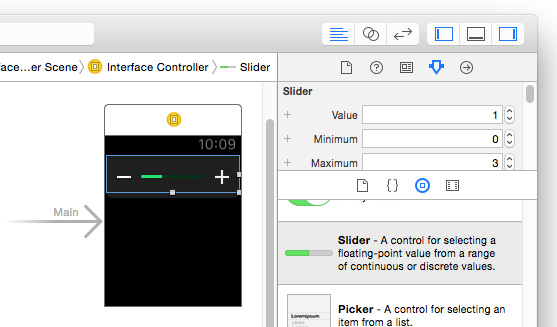
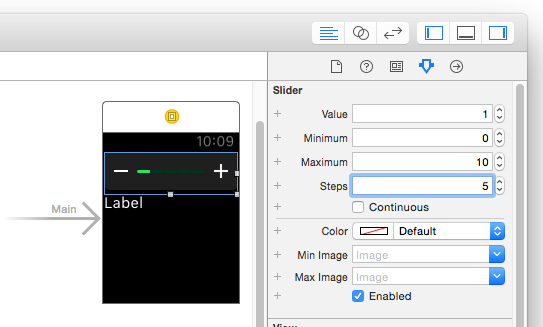
7. Set the attributes for the Slider control as follows (see Figure 3.26):
Maximum: 10
Steps: 5
8. Add the following statements in bold to the InterfaceController.swift file:
@IBAction func sliderAction(value: Float) {
label.setText("(value)")
}
override func awakeWithContext(context: AnyObject?) {
super.awakeWithContext(context)
// Configure interface objects here.
slider.setValue(0.0)
label.setText("0.0")
}
Note
You can programmatically set the value of a Slider control, but you will not be able to get its value. To know its value, you need to implement the action of the Slider control and save its value whenever the value changes.
9. Select the WatchKit App scheme and run the project on the Apple Watch Simulator. Click the – and + buttons and observe the value printed on the Label control (see Figure 3.27).
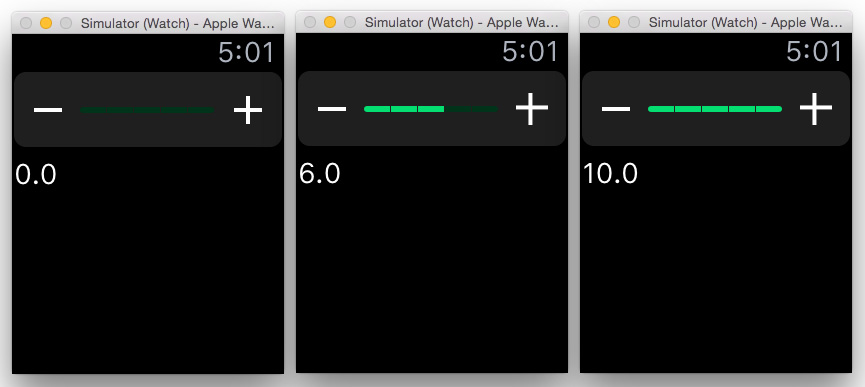
The Steps attribute specifies how many times you can click the slider to reach its maximum value. The increment or decrement value of the slider at any point is dependent on the length of the slider (Maximum value minus Minimum value) divided by the value of Steps. In this example, the length of the slider is 10 (maximum of 10 minus minimum of 0) and the value of Steps is 5; hence, the slider increments or decrements by 2 whenever the + or – button is clicked.
Alerts and Action Sheets
In watchOS 2, Apple now allows developers to display alerts and actions just like they did in iPhone and iPad:
1. Using Xcode, create a new iOS App with WatchKit App project and name it UsingAlerts. Uncheck the option Include Notification Scene so that we can keep the WatchKit project to a bare minimum.
2. Select the Interface.storyboard file to edit it in the Storyboard Editor.
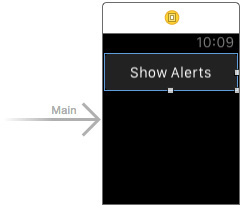
3. Drag and drop a Button control onto the default Interface Controller (see Figure 3.28) and set its title to Show Alerts.
4. Create an action for the Button control and name it btnShowAlerts. The InterfaceController.swift file should now look like this:
import WatchKit
import Foundation
class InterfaceController: WKInterfaceController {
@IBAction func btnShowAlerts() {
}
5. Add the following statements in bold to the InterfaceController.swift file:
import WatchKit
import Foundation
class InterfaceController: WKInterfaceController {
func performAction(actionStyle: WKAlertActionStyle) {
switch actionStyle {
case .Default:
print("OK")
case .Cancel:
print("Cancel")
case .Destructive:
print("Destructive")
}
}
@IBAction func btnShowAlerts() {
let okAction = WKAlertAction(title: "OK",
style: WKAlertActionStyle.Default) { () -> Void in
self.performAction(WKAlertActionStyle.Default)
}
let cancelAction = WKAlertAction(title: "Cancel",
style: WKAlertActionStyle.Cancel) { () -> Void in
self.performAction(WKAlertActionStyle.Cancel)
}
let abortAction = WKAlertAction(title: "Abort",
style: WKAlertActionStyle.Destructive) { () -> Void in
self.performAction(WKAlertActionStyle.Destructive)
}
presentAlertControllerWithTitle("Title",
message: "Message",
preferredStyle: WKAlertControllerStyle.Alert,
actions: [okAction, cancelAction, abortAction])
}
Here, you first defined a function named performAction: that prints out a message depending on the style that is passed in as the argument. Next, in the btnShowAlerts action, you created three WKAlertAction instances, each with a specific style (Default, Cancel, and Destructive). Within each instance, you have a closure that is fired when the user clicks on the action buttons. When each button is clicked, you simply call the performAction: function to print out a message so that you know which button was clicked. Finally, you called the presentAlertControllerWithTitle:message:preferredStyle:actions: method to display an alert, together with the three action buttons.
6. Select the WatchKit App scheme and run the project on the Apple Watch Simulator. Clicking the button displays an alert (see Figure 3.29).
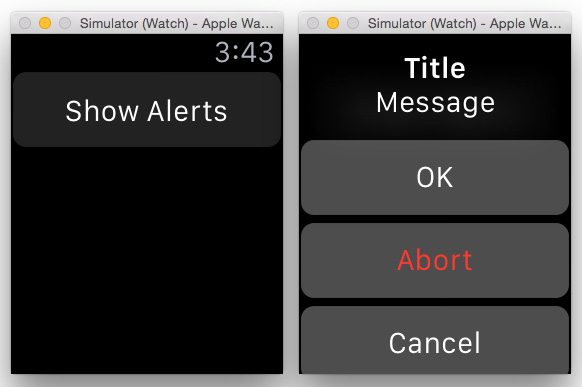
Note
Note that the Abort button in the alert is displayed in red as its style is set to Destructive.
7. Modify the presentAlertControllerWithTitle:message:preferredStyle:actions: method, as follows:
//---SideBySideButtonsAlert supports exactly two actions---
presentAlertControllerWithTitle("Title",
message: "Message",
preferredStyle:
WKAlertControllerStyle.SideBySideButtonsAlert,
actions: [okAction, cancelAction])
8. Select the WatchKit App scheme and run the project on the Apple Watch Simulator. Clicking the button displays an alert with the two buttons displayed side by side (see Figure 3.30).
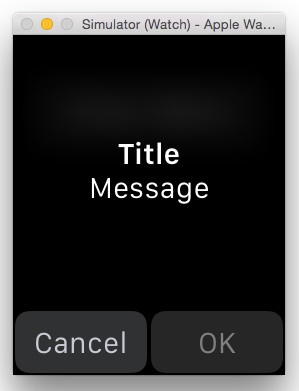
Note
For the SideBySideButtonsAlert style, you need to specify exactly two action buttons.
9. Modify the presentAlertControllerWithTitle:message:preferredStyle:actions: method as follows:
presentAlertControllerWithTitle("Title",
message: "Message",
preferredStyle: WKAlertControllerStyle.ActionSheet,
actions: [okAction, cancelAction, abortAction])
10. Select the WatchKit App scheme and run the project on the Apple Watch Simulator. Clicking the button displays an alert, as shown in Figure 3.31.
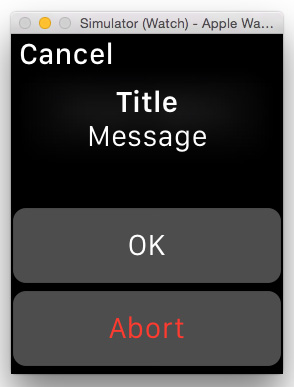
Note
When using the ActionSheet style, the action button that is set to the Cancel style is displayed at the top-left corner of the screen. Even if you do not specify the cancel action button, a default Cancel button is still displayed to close the action sheet (though in this case you cannot handle the event that is fired when the user taps the Cancel button).
Summary
In this chapter, you looked at the various controls that you can use to build the UI of your Apple Watch application. In particular, you saw the various controls that you can interact with by using the tap gesture, such as the Button, Switch, and Slider controls. In addition, you learned about the new alerts and action sheets that you can use to display information in watchOS 2. In the next chapter, you learn more about the other controls that primarily display information to the user.