
3. The Journey Begins
We have covered a lot in the first two chapters, and you should be starting to feel a little more comfortable with the terminology, technology, and tools we are going to use to create Sir Lamorak’s Quest. Although the information we have covered has been important to understand before we start to dive into the code, diving into the code is fun and something I’m not going to keep you from any longer.
This chapter shows you how to create the Xcode project for Sir Lamorak’s Quest, which you’ll use throughout this book. We take a brief look at how you create things like projects in Xcode and take a walkthrough of the OpenGL ES template we will be using to get things started.
By the end of this chapter, you will have created a project and actually be rendering something to the screen. I think you will be surprised at how quickly you can get something rendered to the screen using the OpenGL ES Application template that is shipped with Xcode.
Creating the Project in Xcode
Before you go any further, you need to make sure that you have downloaded the iPhone SDK from the iPhone Dev Center. All the example projects in this book have been developed in the iPhone 3.1.3 SDK, using Xcode 3.2.3. All the code in this book has also been tested using the iPhone 4 SDK. After that has been done, you need to start the Xcode application, which can be found in /Developer/Applications. I use Xcode a lot, so rather than having to hunt it down each time you want to use it, I recommend placing Xcode in your dock. Simply dragging the Xcode application icon to the dock will make it easily accessible from now on.
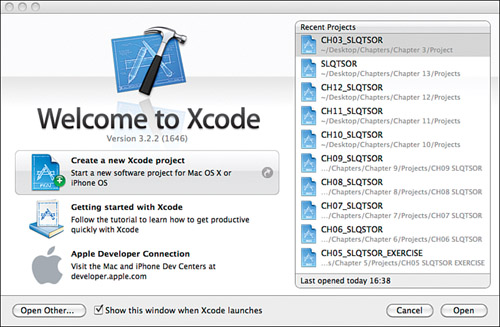
If this is the first time you have started Xcode, you will be shown a welcome screen, as shown in Figure 3.1.
Xcode’s launch window (shown in Figure 3.1) gives you access to useful information such as the reference library and all the projects on which you are working. If you don’t want this screen to appear when you start Xcode, simply uncheck Show this window when Xcode launches at the bottom of the window.
Figure 3.1 Xcode’s welcome screen.
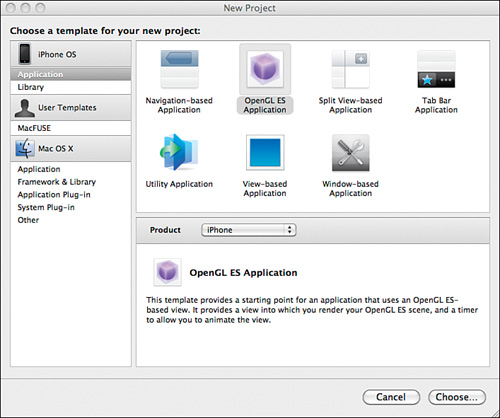
The next step is to create a new project. After closing the welcome window, go to File > New Project. A window appears, asking you to choose a template for your new project (see Figure 3.2).
Figure 3.2 Xcode’s New Project window.
Hint
Make sure that Application is selected under the iPhone OS section on the left side of the window, or you will not see the OpenGL ES Application template.
Once you have selected the OpenGL ES Application template and have made sure that the correct product is selected (that is, iPhone), click Choose. You will be presented with a panel in which you can choose where you want to create your project and what you want your project to be called.
Select a location and call the project Chap03. It is normal for project names to start with a capital letter. If there are a number of separate words in your title, mark the start of each word with a capital letter rather than a space.
Once you have pressed the Save button, you will be taken to the main Xcode window and presented with a number of files, as shown in Figure 3.3.
Figure 3.3 Xcode provides a detailed view of the files for your project.
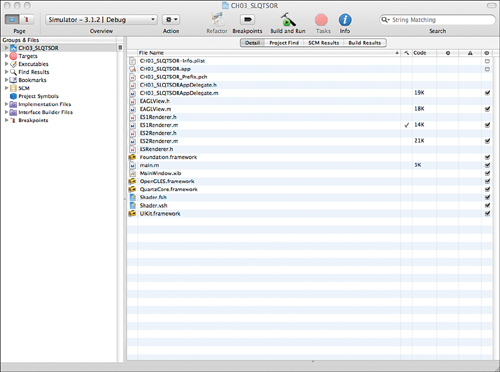
Within the Xcode GUI, you will see a tree view on the left side. This is an outline of your project and enables you to see not only the groups and files you have created as part of your project, but also useful information such as errors and warnings that have been generated by the compiler, as well as breakpoints that have been set.
If not already selected, select the first entry in the tree view, called Chap03 (if that is what you named your project). Once selected, you will notice that the large pane on the right side of the GUI shows you a number of files. This is the detail view and enables you to see all the files that currently exist within your project.
Note
To be honest, this is not a view that I use very much. I prefer to see the files in the tree view outline on the left and have the editor pane open on the right. Clicking a file in the detail pane causes the editor pane to open. This is personal preference, so find what works for you and go with it.
Running the Project
What we have created is a fully functional OpenGL ES application for the iPhone. We have not written a single line of code and yet we have a functioning application. To check out what it does, make sure that Simulator for the active iPhone SDK (for example, Simulator – 4.0) has been selected in the drop-down menu at the top left of the Xcode GUI (refer to Figure 3.3), and then hit the Build and Run button at the top of the GUI.
After a few seconds, the iPhone Simulator appears and the application we have just created runs. The application renders a multicolored square on the iPhone screen (as shown in Figure 3.4) that moves up and down. So there you have it—your first OpenGL ES application on the iPhone.
Figure 3.4 The iPhone Simulator running the OpenGL ES template application.
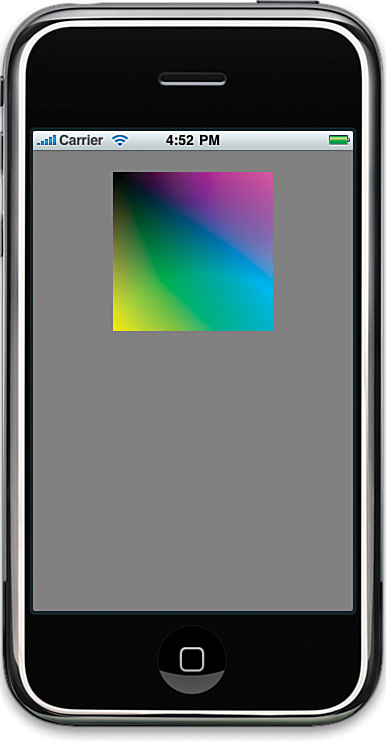
Although we have not done anything yet other than create the project and give it a name, the application already contains the key elements needed to render to the screen using OpenGL, which is all that’s needed to start working on the game.
Under the Hood
Now that we have our project created and running, let’s look at the code that has been created. It’s a good idea to understand what is there now before we start making changes. I will be covering the basics of Objective-C as we run through the code, but if there is anything you don’t understand, it’s worth checking out The Objective-C Programming Language from Apple.1 In addition to the Objective-C documentation, the developer documentation available through Xcode is a valuable resource that provides a great deal of information on the SDK’s APIs. This can also be accessed through Help > Developer Documentation within Xcode.
Application Delegate
The best place to start is the application delegate. This is an object to which the UIApplication class delegates some of its responsibilities. Using a delegate enables you to extend or customize the behavior of a class without needing to subclass it. For classes such as UIApplication, it is possible to specify a class that will receive notifications from the parent class (that is, UIApplication). The class that has been specified to receive these notifications is called a delegate.
Within CH03_SLQTSORAppDelegate, the following methods are delegate methods from UIApplication:
• applicationDidFinishLaunching: Sent by the default notification center after the application has been launched and initialized but before it has received its first event.
• applicationWillResignActive: Sent by the default notification center immediately before the application is deactivated. This occurs when an iPhone application is stopped when the user presses the Home button on his phone.
• applicationDidBecomeActive: Sent by the default notification center immediately after the application becomes active.
• applicationWillTerminate: Sent by the default notification center immediately before the application terminates.
In Xcode, expand the tree view for CH03_SLQTSOR and then the Classes group. In here are the main files that have been created within our project in which we are interested. Select the CH03_SLQTSORAppDelegate.h file.
Once selected, you see an editor panel appear on the right side, containing the file’s contents (also shown in Listing 3.1). Because the filename ends with .h, this particular file contains the interface definition for the class and is where you will find the following:
• Instance variable declarations
• Methods the class will respond to
• Properties that are going to be exposed by the class
Objective-C requires that you define the interface and implementation of a class in separate code blocks. Although it is perfectly fine to place both of these blocks in a single file, it is normal to create a .h (header) file for the interface definition, and a .m (method) file for the implementation definition.
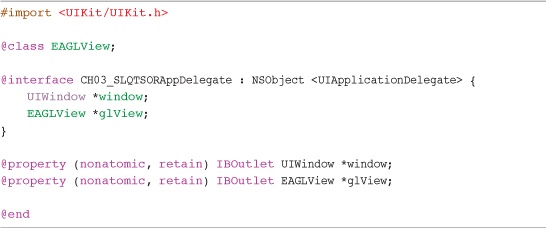
Listing 3.1 CH03_SLQTSORAppDelegate.h
Examining the Header File
Let’s take a closer look at what is inside the CH03_SLQTSORAppDelegate.h file:
![]()
First, the header file is importing the headers for all the classes found in the UIKit framework. This UIKit framework provides you with the classes you need to create and manage your application’s user interface on the iPhone. UIKit includes all the objects, event handling, windows, views, and controls specifically designed for the touch interface. The classes include the UIView class, which we see later:
![]()
@class defines a forward declaration in the header file. It tells the compiler that even though we are not importing the header for a class called EAGLView, it exists, and we will be importing it later. It’s good practice to use a forward declaration like this in the header files and then do the actual import in the implementation file. It reduces the chances of circular references, which can become a real headache when you have a lot of source files all referring to one another.
Note
If you are wondering what the EAGL prefix to EAGLView stands for, it is “Embedded Apple OpenGL”.

This interface declaration is where the actual interface for the class is defined. The first line of the declaration provides the name of the class, CH03_SLQTSORAppDelegate, and links it to its superclass, NSObject (that is, it is going to inherit from NSObject). It also tells the class that it must adhere to the UIApplicationDelegate protocol.
A protocol is a great way to define a list of method declarations that are not attached to a specific class definition. By placing <UIApplicationDelegate> as part of the interface declaration, you are indicating to your class that it must implement the methods defined within the protocol so that the class can react correctly when it is sent delegate messages.
Having named the class and declared its parent along with any protocols, instance variables (ivars) are then defined in between the curly brackets ({…}).
The header file has two instance variables (or ivars), as follows:
![]()
This defines an ivar called window that is going to hold a pointer to an instance of the UIWindow class and glView that is going to hold a pointer to an instance of the EAGLView class. The * in front of the ivar names specifies that the instance variable is a pointer.
Outside the curly brackets, you’ll see the property definitions followed by the @end class keyword:

@property is a convenient way of declaring the getter and setter accessor methods that are normally used to provide encapsulation (that is, you can tightly control the behavior of the getter and setter code and underlying management, while hiding that complexity from clients using your API). Although getter and setter accessor methods are really useful, they can also be a real pain to keep writing.
Objective-C helps us by giving us the @property declaration. By declaring a property in this way and then using the @synthesize declaration in the implementation code block, you don’t have to write any code—the compiler will do the coding for you. If you declare a property in this way and don’t use @synthesize in the implementation, you are still responsible for creating the getter and setter methods yourself. If you don’t create those methods, you will be given a compiler error.
Examining the Implementation File
Now that we have covered the header file, we can look at the implementation file where the actual methods for this class are defined. Back in Xcode, select the CH03_SLQTSORAppDelegate.m file from the tree view. The contents of the file (also shown in Listing 3.2) appear in the editor screen on the right.
Listing 3.2 CH03_SLQTSORAppDelegate.m
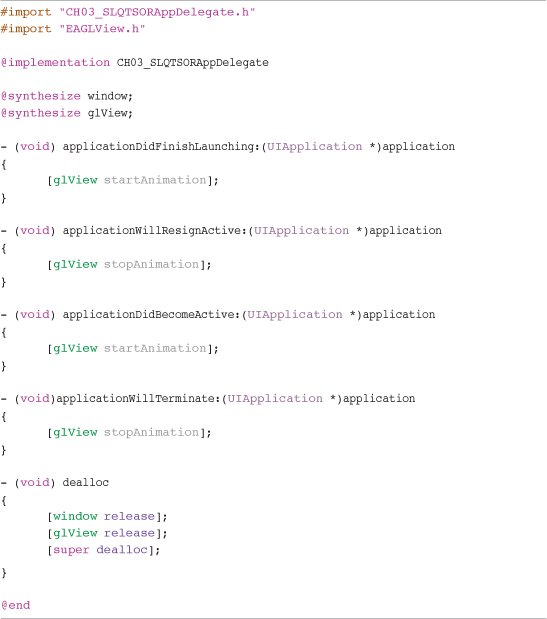
To start, we import the header file (CH03_SLQTSORAppDelegate.h), along with EAGLView.h:
![]()
These two lines notify the compiler to load the definition from the class’s header file along with the definition of the EAGLView class. If you recall, there was a forward declaration of EAGLView earlier in the header file. This means that we were interested in using this class, but didn’t require the class’s definition. As we are accessing the class’s properties and methods, we now have to notify the compiler to actually load the definition from the header file.
![]()
Next, we synthesize the properties that were defined in the header file. This is really just telling the compiler that we want to have the getter and setter methods written for us rather than do it ourselves. As we saw earlier, if you define properties in the header but do not synthesize them or create your own getter and setter methods, you will get compilation errors.

We are now defining the methods within our class. The method declaration syntax is different from C or Java, but it is close enough to make it familiar very quickly. On the first line, we are declaring that the return type for this method is void, which means nothing is returned. This is followed by the name of the method and then any arguments that are required.
It is normal practice for method names to start with a lowercase letter, with each subsequent word being capitalized.2 This is known as CamelCase. Following the name are any arguments that the method requires. This is an aspect of Objective-C that I really like. For example, rather than the method just telling you it needs three parameters and that one is an int, the next is a float, and the last is a double, you actually define names for the arguments, which are then displayed to you when you use this method in your code.
Inside the preceding method, we are then sending a message to (calling a method on) the glView instance variable. You will remember from the header file that glView was declared with a type of EAGLView, so glView is a pointer to an instance of EAGLView. You may be wondering where we are actually creating the instance of EAGLView and linking it with glView. That’s a good question, and I’ll cover that in a moment.
The next sends a message to glView, telling it to run the method called startAnimation. Message expressions are enclosed in square brackets, with the object specified first and then followed by the name of the method to be run:
![]()
Why don’t we see glView being allocated and initialized inside CH03_SLQTSORAppDelegate? Declaring an object of type EAGLView is not enough to actually create the new object to which glView will point. To allocate the memory needed to store an instance of EAGLView, it is necessary to send the class the alloc message. This causes the class to create the storage space necessary in memory to hold an instance of the class; for example:
![]()
If a class requires some kind of initialization, as most classes do, it is also necessary to make sure that the object created is initialized correctly. This is achieved by calling init on the object. init is by default the method name used to initialize an object, but it does not stop you from creating your own initializer method that could be called when creating an instance of your own classes (for example, initWithMyName). It is common practice to have init at the start of your initializer method name and to clearly mark your designated initializer method in the header file using comments. To initialize glView, you would use the following:
![]()
Rather than perform these operations separately, they are normally placed together:
![]()
Note
Message nesting, as shown in the previous example, is valid because the alloc method returns the instance it just created, and the init method is sent to whatever was returned by [EAGLView alloc]. It should also be noted that alloc is a class method and not an instance method.
Knowing this, you are most likely wondering why this command cannot be seen in the application delegate methods we have been looking at. The reason is because the application’s window and glView objects have been linked to objects inside an Interface Builder file. These files have the .xib extension, and are created using Interface Builder.
Interface Builder enables you to create GUI’s for the iPhone and Mac. By default, the OpenGL ES template application has one of these files that contains the configuration of the applications window and glView objects. We will not need to touch this file to create the game, so for now it’s enough to know this file exists and can be seen in the Resource group in the project outline. The file that contains your app’s user interface is called MainWindow.xib. If you want to have a look at this file, simply double-click the MainWindow.xib file to open it in Interface Builder.
Inside this file, a UIWindow object has been linked to the window ivar in our application delegate, and a UIView object has been given a class identify of EAGLView and linked to the glView ivar in the app delegate. This means that when the MainWindow.xib file is unarchived, it creates a new instance of EAGLView to which glView points. When MainWindow.xib is unarchived, EAGLView is sent the initWithCoder message. This method inside EAGLView performs the necessary initialization, and therefore no code is necessary for this object to be allocated and initialized in the application delegate.
EAGLView
Having covered the app delegate, we should move onto EAGLView. This has been mentioned a lot in the previous section, and it contains the core of our current application. EAGLView is responsible for creating the OpenGL context that the application will be using to render to the screen. Select EAGLView.h in Xcode, and let’s work through the code.
EAGLView.h
The header starts by importing the UIKit and QuartzCore3 headers and also the ESRenderer.h header that defines a protocol.
![]()
Next is the interface that specifies the name of the class, EAGLView, and inherits from a superclass of UIView. This means that EAGLView will have all the same abilities as UIView, plus whatever is added to EAGLView’s implementation:
![]()
Instance variables are defined next, within the interface definition code block, as shown here:
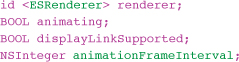
Although we have already discussed the creation of ivars in an interface, it is worth running through the id type used previously for the renderer ivar.
The id type can point to any Objective-C object. It provides no information about an object other than it is an object. This allows Objective-C to support dynamic typing, which allows a program to identify information about an object at runtime rather than compile time. The preceding declaration basically states that renderer will be an object of some type, as yet unknown, but that the object will support the ESRenderer protocol.
After the interface code block, two properties are defined. The first property is exposing the animating ivar that is a BOOL, which holds the current animating state of EAGLView. This property is defined as read only, and the getter accessor method that is created is given the name isAnimating. Notice in the following line of code that the name of the getter is specified using the getter= property attribute:
![]()
The nonatomic property causes the getter/setter code generated to simply return the value and does not generate robust access to properties in a multi-threaded environment. If you are not using multiple threads, the nonatomic property is the best and fastest option.
animating in the context of the EAGLView class is when the class is regularly rendering to the screen (that is, animating = YES). If the class is not currently rendering to the screen, animating = NO.
The next property is exposing the animationFrameInterval ivar. This is used within the calculation that defines how many times (that is, frames) per second the screen should be rendered:
![]()
The header file is completed with the declaration of the following three methods:
![]()
Notice the hyphen (-) at the beginning of each method declaration. This defines the methods to be instance methods so they can be used by instances of the class. If the method declaration began with a plus sign (+), that method can be used only by class objects.
EAGLView.m
Now let’s look at the EAGLView.m file to see what it’s doing.
The implementation starts off by importing the EAGLView header and two header files, called ES1Renderer and ES2Renderer:
![]()
ES1Renderer and ES2Renderer are classes that have been created by the OpenGL ES template and are used to provide access to OpenGL rendering based on the version of OpenGL ES that the device supports. These classes will be covered later in more detail.
Next is the declaration of a class method called layerClass. This method is overriding the layerClass method within the UIView class that EAGLView inherits from. This enables us to return the class we want to use as the backing layer for our view. Because we want to render using OpenGL, we need to return the CAEAGLLayer class that is a wrapper for a Core Animation surface, which is fully compatible with OpenGL ES functional calls:
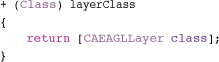
Following the layerClass method declaration is the designated initializer for the EAGLView class. As described earlier, Interface Builder’s configuration was used to associate a UIWindow with the app delegate’s window ivar and also to associate a View with the EAGLView class and the glView ivar. Because glView was linked in the xib file, and it was using the EAGLView class, when the application runs and the MainWindow.xib file is unarchived, the initWithCoder method will be called within EAGLView:
![]()
This initializer first calls the parent class initWithCoder method. If a matching object is returned, it’s then assigned to the “self” property and processing continues grabbing a pointer to the object’s CAEAGLLayer. This is where we call the class method, layerClass, which we just defined.
![]()
The eaglLayer pointer is then used to set properties on CAEAGLLayer:
![]()
This defines if the CAEAGLLayer to which we will be rendering should be transparent or not. In some applications, being able to see through the CAEAGLLayer could be useful, but it has a huge impact on performance. It’s not a good idea to allow this within a game. Instead, the layer should be set to opaque.
Note
Allowing a CAEAGLLayer to be transparent requires a great deal of blending to the content behind the layer to show through. Blending is an expensive process that is likely to result in performance problems.

After the opaque property has been set, it defines the drawableProperties. drawableProperties enables you to provide a dictionary of objects and keys that specify if the drawable surface retains its contents after displaying them, and also the internal color buffer format to be used for the drawable surface.
By default, the backing is not retained, which is good for games. Retaining the backing means that the contents of the render buffer that was used to render the screen are kept intact in case you want to reference that information before the next screen is rendered. This has a big impact on performance, and best practice states that it should be set to FALSE for games; FALSE is its default setting.
The color format RGBA8 specifies a 32-bit format that corresponds to the OpenGL ES GL_RGBA8888 format. Although using a 32-bit color format for your images gives you the maximum number of colors to use when rendering to the screen, it also takes up more memory and bandwidth on the iPhone. To maximize on performance, it is good practice to use the 16-bit format, RGB565, instead. This can have a positive impact on performance and should be used if the restrictions of using a 16-bit color format do not affect the quality of your images.
Once the layer properties have been set, the class then creates an instance of ES2Renderer:
![]()
ES2Renderer is a class that creates an EAGLContext to be used when rendering in OpenGL. It also creates and binds a framebuffer, renderbuffer and contains the actual OpenGL ES rendering commands. When renderer has been allocated and initialized, a check is performed to see if an instance of ES2Renderer was successfully created:
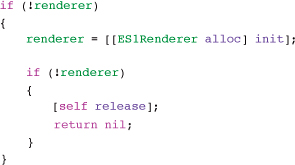
If renderer was not successfully created, an instance if ES1Renderer is created and again checked for success. If renderer is still nil, EAGLView is released and nil is returned to the calling class. If the creation of either an ES1Renderer or ES2Renderer instance was successful, the initialization continues.
As mentioned in Chapter 2, “The Three Ts: Terminology, Technology, and Tools,” there are currently two versions of OpenGL ES: 1.1 and 2.0. Although all iPhones support version OpenGL ES 1.1, only the iPhone 3GS, iPhone 4, iPod Touch 3rd Gen and iPad support OpenGL ES 2.0. The default behavior of the EAGLView class, created by the OpenGL ES template, is to configure an OpenGL ES 2.0 context using the ES2Renderer class—thus, the “2” in the class name. If that fails, it then attempts to create an instance of the ES1Renderer that creates a context using the 1.1 API—thus, the “1” in the class name. How logical is that?
If you are planning to develop your game to support both OpenGL ES 1.1 and 2.0, this is the approach to use. Having two distinct classes that handle either OpenGL ES 1.1 or 2.0 keeps the code clean and easy to maintain.
So, continuing with the initialization of the EAGLView class, once renderer has been assigned to an instance of either ES1Renderer or ES2Renderer, the ivars of the class are given default values, as follows:
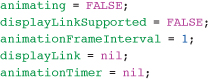
Because we have not started to animate yet, animating is set to FALSE. displayLinkSupported is also set to FALSE. A check is performed last to set the final value for this ivar.
Version 3.1 of iPhone OS introduced a new API, CADisplayLink. When writing a game, it is often desirable to be notified of the vsync5 state of the screen. CADisplayLink does this and enables you to call a method when the screen has physically finished being drawn. On the iPhone, the screen is physically redrawn 60 times per second, which means our game can render a maximum of 60 frames per second (FPS). Knowing when the screen has been rendered allows you to synchronize graphics rendering with the screen’s refresh rate, which makes the game graphics render smoothly.
Note
Because CADisplayLink was added to iPhone OS version 3.1, it won’t be available on iPhones that run an older version of the OS. Although it would be great if everyone could upgrade to the latest version of the iOS so we only had to worry about the latest version, that never happens. There will always be someone who is running the previous or even the previous, previous, previous version of iOS, Unless something critical in your game is not available on those older versions, it’s always a good idea to make sure your game will run on an older version of the OS to get maximum reach.
Other factors can impact how smooth a game renders, and we discuss this in more detail when we create the game loop in Chapter 4, “The Game Loop.”
That is exactly what the next check in the code is doing:

This code retrieves the current version of the system running on the device and compares that against the reqSysVer string. If the current version is less than “3.1”, displayLinkSupported stays at FALSE; otherwise, it is set to TRUE. This value is used later in the class when the animation is started.
The return self command in the initializer then marks the end of this method. At this stage, we now have an allocated and initialized instance of EAGLView to which glView is pointing.
The next method is used to draw the contents of the view to the screen:
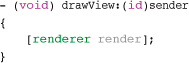
When this class was initialized, renderer became a pointer to an instance of either ES1Renderer or ES2Renderer. Remember that this class imports the ESRenderer.h header file that defines a protocol. This protocol defines render as a method that must be supported by any class that uses that protocol. As you will see, both the ES1Renderer and ES2Renderer classes use that protocol, which means that renderer will respond to the render method. We will see what the render method does when we review the ES1Renderer class.
Straight after the drawView method is the layoutSubviews method, as follows:

This method overrides a method inside UIView. The default implementation of the method inside UIView does nothing. The method inside the EAGLView calls the resizeFromLayer method inside the renderer object passing in the CAEAGLLayer, which is used for this view. The resizeFromLayer method inside the renderer object then binds a renderBuffer to the EAGLContext and gets the width and height of that buffer. Don’t worry if this is not making much sense at the moment—this will be covered in more detail when we run through the ES1Renderer class.
The next two methods are defining the getters and setters necessary for the animationTimeInterval ivar:
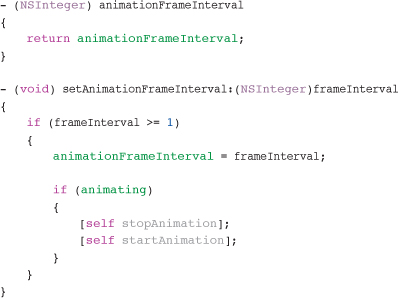
The first method, animationFrameInterval, is a getter and basically returns the current value of the animationFrameInterval ivar as an NSInteger. The second method is the setter and takes an NSInteger as the first argument. If the frameInterval value passed in is greater than or equal to 1, animationFrameInterval is updated. If the value of frameInterval were to be less than 1, nothing would be changed.
When the animationFrameInterval has been changed, the method then checks the state of the animating ivar. If it is YES (that is, the class is rendering to the screen a defined number of times per second), the animation is stopped and then started again. This is necessary because the method that starts the animation uses the animationFrameInterval value to calculate how many times per second the screen should be drawn. If the animationTimeInterval value changes, the FPS needs to be changed as well.
We are almost done reviewing EAGLView, with just three more methods to run through. We have just been discussing the stopAnimation and startAnimation methods that are called when setting the animationFrameInterval ivar, and these are the next two methods in the class:
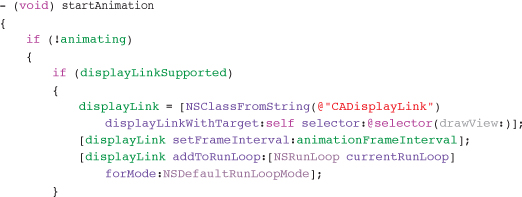
startAnimation is called when you want to start rendering to the screen. Nothing will be drawn to the screen until this method is called; until then, the app is going to be a little plain. When this method is called, it first checks to see if the class is already animating by checking the animating ivar. If it isn’t, it checks the displayLinkSupported ivar. Remember that this is set within the initializer of this class and is set to TRUE if the OS version on the iPhone is “3.1” or greater.
If the app is running on an iPhone with iPhone OS 3.1 or greater, it moves on to configure the CADisplayLink class. It does this by pointing the displayLink ivar at an instance of the CADisplayLink class and also specifying that the target for the display link is self and that the method (selector) that should be run is drawView.
Setting the target to self means that the drawView selector,6 which is called when CADisplayLink fires, will run inside this class. You could have a method run inside another class instance if you want; in that case, you would specify that class instance as the target rather than self.
Once an instance of CADisplayLink has been created, its frameInterval is set to the animationFrameInterval, and it is added to the current run loop (thread). As mentioned earlier, the iPhone draws its screen 60 times per second. With a frameInterval of 1, the drawView method will be called 60 times per second. If you set the frameInterval to 2, the drawView method would be called just 30 times per second.
If CADisplayLink is not supported in the current version of iPhone OS, the method configures an NSTimer to call the drawView method:
This code shows an instance of NSTimer being created: animationTimer. This timer fires on a scheduled basis calculated by dividing 1.0 by 60.0, which is the maximum number of frames the iPhone can display per second, and multiplying that by the animationFrameInterval. As with drawView, this causes the animationTimer to fire 60 times per second if the animationFrameInterval is 1, and 30 times per second if it’s 2. This is basically mimicking the behavior of the CADisplayLink.
The key difference here is that animationTimer has no idea what the state of the screen refresh is, so it fires even if the screen is only halfway through being redrawn. This isn’t normally a problem for simple 2D games, but when the complexity of the game increases, and the game updates and renders start to take longer, game play will become choppy.
Note
There are other factors to consider in terms of timing with game rendering and updates. These are covered in Chapter 4 when we talk about the game loop.
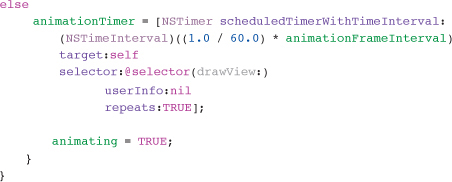
The final action of the startAnimation method is to set the animating ivar to YES.
stopAnimation is a simple method that reverses what has been performed in the startAnimation method:

The method checks to see if the class is animating, and if so, it then checks to see if displayLinkSupported is set. If it is supported, displayLink is invalidated, which stops it from firing and also removes it from the run loop, and the displayLink ivar is set to nil. In Objective-C, it is valid to send messages to nil. Sending a message to nil simply has no effect at runtime.
If displayLinkSupported is FALSE, the animationTimer is invalidated, which again stops it from firing and removes it from the run loop. animationTimer is also set to nil and the animating ivar is set to FALSE, as we have stopped animating the view.
The very last method that is defined is dealloc. This standard method is called when a class is no longer needed and its retain count has reached zero. The contents of this method should release all objects that the class created and basically clean up after itself:
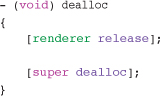
dealloc is actually overriding the dealloc method inside UIView, which in turn is overriding the dealloc method inside NSObject. NSObject is the root class of almost all Objective-C class hierarchies through which objects inherit a basic interface to the runtime system and the ability to behave as Objective-C objects (for example, allocation and initialization).
One thing that should be remembered is that as you are overriding the dealloc method, you need to call your superclass’s dealloc method as well, allowing the superclass to perform its own cleanup and move up the class hierarchy as necessary.
ES1Renderer
We have now been through the EAGLView class and covered in some detail what is happening. You will also remember that we mentioned the ES1Renderer and ES2Renderer classes, as instances of these were being created and used inside the EAGLView class.
As described earlier in this chapter, ES1Renderer deals with creating an OpenGL ES context that supports the OpenGL ES 1.1 API, and ES2Renderer deals with the 2.0 version of the API. Because we are only using OpenGL ES 1.1 in this book, and because OpenGL ES 2.0 is very different, I will only review the ES1Renderer class, and not ES2Renderer. OpenGL ES 2.0 is beyond the scope of this book.
Examining ES1Renderer.h
In Xcode, select the ES1Renderer.h file. Let’s take a closer look.
First, we have the usual imports, and in this class, we are importing the header files we need when dealing with OpenGL:
![]()
Importing these headers enables us to use the OpenGL ES commands available as part of OpenGL ES 1.1—thus, the ES1 in the path of the header files.
Next, the interface is declared that is inheriting from NSObject and implementing the ESRenderer protocol. This is important—it makes sure that the ES1Renderer class is going to contain the methods defined in the protocol, such as render. Remember from earlier that we call the render method from inside the EAGLView class.
Next, the interface is declared with a number of ivars:

The most important ivar being declared is context. This is an instance of EAGLContext, and it’s that context into which all drawing will be done. The context is responsible for managing state information, commands, and resources needed to draw using OpenGL ES. Before drawing to the context, a complete framebuffer needs to be bound to the context. That may not make any sense at the moment, and I’ll cover framebuffers later, but basically, the framebuffer is a chunk of memory that needs to be associated to the context.
The backingWidth and backingHeight ivars are going to hold the pixel dimensions of the CAEAGLLayer that is being used within EAGLView. Notice that the types being used are not just int or uint as you would normally use in Objective-C or C. Although you could easily just use Objective-C or C types, when dealing with the OpenGL API, it is standard practice to use the OpenGL types. This is because it makes porting OpenGL code to other platforms much easier since the OpenGL types are designed to be consistent between platforms, as opposed to programming language types.
Having defined the necessary ivars, the class then declares two public methods, as follows:
![]()
The render method is used to render to the screen, as the name would imply. The resizeFromLayer, as described earlier, binds a render buffer to the context and gets the width and height of the layer that is passed in.
Examining ES1Renderer.m
Now let’s look at the implementation of the ES1Renderer class, so open up the ES1Renderer.m file in Xcode.
The ES1Renderer class has a standard initializer that doesn’t take any arguments:
The first action of the initializer is to assign the value of [super init] to self and is a standard pattern when initializing a class.
Now that self is correctly assigned to our instance of the class, we assign a new instance of the EAGLContext: the context:
![]()
As we saw earlier, EAGLContext is responsible for managing the state information, commands, and resources when drawing with OpenGL ES. You’ll notice that, when initializing the context using initWithAPI, we are passing in kEAGLRenderingAPIOpenGLES1 that tells the context that it needs to support the OpenGL ES 1.1 API. If we were setting up a context to support the 2.0 version, you would use the kEAGLRenderingAPIOpenGLES2 constant instead.
Next, check to make sure that the context has been created correctly:

If context is nil or NO when setting the context, self is released, which is important because it has been allocated and is taking up memory. Second, nil is returned to the calling class, signifying that the class instantiation has failed. This tells the calling class, EAGLView in our case, that there was a problem creating and setting the OpenGL ES context and the necessary action can be taken.
Creating the Framebuffer and Renderbuffer
The initializer has now created and set the context for our view to an EAGLContext that supports OpenGL ES 1.1, so it’s now time to create and bind the framebuffer and renderbuffer that are going to be used with our context. Remember from earlier that a context cannot be used without a framebuffer.
The terms framebuffer and renderbuffer are new, so it’s worth running through what they are and how they are used at a high level before we look at the code to create them.
When using OpenGL ES, the platform on which you are developing needs to provide a platform-specific library that provides functions to create and manipulate a rendering context. It is the rendering context that maintains a copy of all the OpenGL ES state variables and executes the OpenGL ES commands. On the iPhone, the EAGLContext class provides this by executing the OpenGL ES commands and interacting with Core Animation that ultimately presents the final image to the user via the CAEAGLLayer.
Although the context we have created processes OpenGL commands, it is not the final destination for those commands. On the iPhone, all images are rendered into framebuffer objects. Framebuffer objects are able to very precisely control the creation of color, depth, and stencil targets. These targets are commonly known as renderbuffers and are where pixels are finally created. Renderbuffers are normally 2D images with a height, width, and color format.
As part of the initialization of OpenGL ES, it is necessary to create the framebuffer and renderbuffer and assign the renderbuffer to the context we have as storage for the final image that is going to be rendered to the screen.
Now that you know what framebuffers and renderbuffers are, let’s look at how they are generated.
All OpenGL commands start with a gl prefix (such as glRotate), which makes them easy to spot in your code. You will also notice some OpenGL ES commands that end in OES. These commands are specific to OpenGL ES and are not found in the full OpenGL API:7
![]()
These commands are actually reasonably easy to identify. You can see that we are creating a framebuffer (using glGenFramebufferOES) and a renderbuffer (using glGenRenderbufferOES). In OpenGL, everything you generate has a name. This name is normally a GLuint value that can be used to reference that object later.
The glGenFramebufferOES command places the GLuint name for the framebuffer that is created into the defaultFramebuffer ivar. The same is done for the colorRenderBuffer.
It is possible to generate more than one buffer at a time. Replacing the number 1 in the current commands with a larger number will cause OpenGL ES to generate the specified number of buffers. If more than one buffer is required, the second argument would need to be an array able to hold all the buffer names returned. For now, only one renderbuffer and framebuffer is required, so 1 is specified:
![]()
Having created the buffers, they are then bound to GL_FRAMEBUFFER_OES and GL_RENDERBUFFER_OES. Because it is possible to generate a number of framebuffers or renderbuffers, it’s important to make sure you bind to the ones you want to use, which is what the previous commands are doing:
![]()
Finally, the renderbuffer is attached to the framebuffer as GL_COLOR_ATTACHMENT0_OES. It is possible to have multiple renderbuffers associated to a single framebuffer. Here, glFramebufferRenderbufferOES is used to attach the render buffer to the framebuffer as a specific attachment.
That’s it for the initializer. All that is left is to return the object to the caller:
![]()
What we have just reviewed is the tip of the iceberg with regard to the initialization of OpenGL ES. To gain a deeper understanding of how to work with OpenGL ES on the iPhone, you should review Apple’s documentation, OpenGL ES Programming Guide for iPhone OS.8 The next method in the source file is render, but I’m going to come back to that method in a moment and actually look at the resizeFromLayer method next. This method is important because it completes the setup of OpenGL ES. Once an instance of ES1Renderer has been created, the resizeFromLayer method is called, and it carries out some important steps:
![]()
The actual method declaration specifies that the method returns a BOOL. This is used to see if the methods actions were successful or not. The only argument is an CAEAGLLayer object. The layer is passed in from the calling method—EAGLView, in this case—and is the CAEAGLLayer that has been associated with the EAGLView instance.
To make sure that the correct renderbuffer is currently bound, this method uses the colorRenderbuffer ivar that has been populated with the renderbuffer name generated earlier:
![]()
When the renderbuffer has been bound, it’s then time to allocate storage to the EAGLContext that was created earlier. The context receives OpenGL ES commands, but it’s not the final destination for those commands. The Core Animation layer that was defined within EAGLView will ultimately place pixels onto the screen, and it needs somewhere to store these pixels. That storage location is the renderbuffer, previously created during the class initialization. The following command binds the layer drawable object to the OpenGL ES renderbuffer that has just been bound:
![]()
Now that the necessary storage has been assigned for our CAEAGLLayer, the dimensions are taken from the renderbuffer. These dimensions are used later when setting up the glViewport:

The dimensions of the renderbuffer are placed in the backingWidth and backingHeight ivars ready for use later; then the framebuffer is checked to make sure all components have been set up correctly:
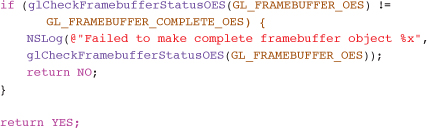
If the check fails, a message is logged and NO is returned; otherwise, YES is returned.
The render method
Now it’s time to tackle the most interesting method in this class: the render method. The render method is called on a regular basis from the EAGLView class, and is responsible for rendering the multi-colored box on the iPhone screen and moving it up and down, as shown earlier in Figure 3.4. It’s where we actually start to create some pixels after all the setup has been done.
Because we are going to be rendering something to the screen, a number of new concepts around OpenGL need to be covered. I cover them briefly in this chapter and then go into more detail when we start to create our own class for rendering sprites to the screen.
To start off, the render method is very simple, and it takes no arguments:
![]()
The next line, which is a comment, tells us that this is the place for us to insert our own rendering code. As mentioned earlier, the template has created a full application, and there is nothing to stop us from changing the code in the render method and rendering something other than the colored square shown in Figure 3.4. We could drop in some code that rendered an entire 2D scene, but we’re not quite there yet.
After the comment, you will see a couple of arrays:
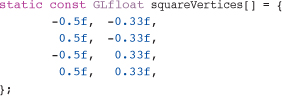
The first array, squareVertices, is used to store the vertices to draw a square. Each corner of the square is defined using a vertex, which is a point in three-dimensional space. In OpenGL, a vertex normally has three elements: x, y, and z values. Although a vertex can have three elements, that doesn’t mean it has to have all three. As you can see in this example, there are only the x and y values, since the square is in 2D. Each line represents just the x and y coordinates of each vertex.
Figure 3.5 shows how the x-, y-, and z-axis are arranged in OpenGL.
Figure 3.5 OpenGL axis configuration.
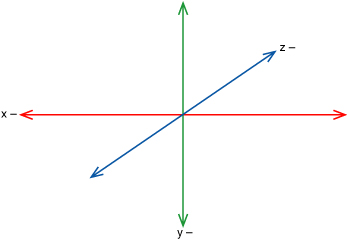
By default, the origin (that is, the point at 0, 0, 0) in OpenGL ES on the iPhone is in the middle of the screen. OpenGL ES also uses it own units (that is, each unit in OpenGL does not represent a single pixel on the screen by default). It is up to you to define what an OpenGL unit represents, such as a pixel, a meter, a mile, and so on.
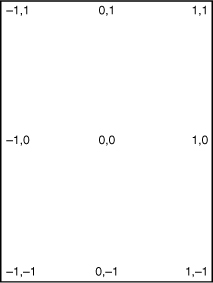
Figure 3.6 provides you with a template for the default OpenGL units used, which is why the values defining the vertices of the square may look a bit odd. If you were expecting the units to be in pixels, we would be defining vertices that create a square that is only fractions of a pixel wide, which is not so useful. As you saw when you ran the application earlier, the square is bigger than the values shown in the earlier code. The reason for this is because, by default, an OpenGL unit is half the width and height of the iPhone screen.
To get a better understanding of this, let’s make a change to the application and see what happens.
If you are running the application through the iPhone Simulator, iPhone 3GS, iPhone 4, or iPad, you can make changes to the ES2Renderer.m file. If you are running the application on an earlier iPhone model, make your changes in the ES1Renderer.m file. The changes needed are the same in both files.
Open up the appropriate file and locate the render method. Replace the current definition of the squareVertices with the following:
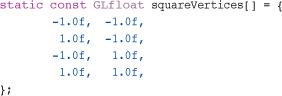
Figure 3.6 Mapping the iPhone’s default OpenGL coordinates.
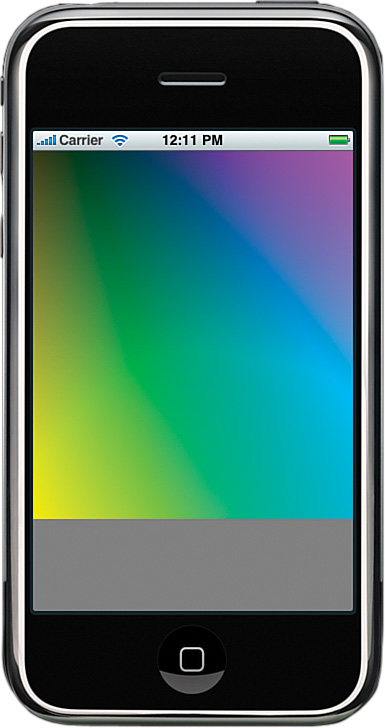
Now run the application by pressing Build and Run. The application should run and show a colored square moving up and down the screen as before, but this time, the rectangle will be the full size of the iPhone screen, as shown in Figure 3.7.
Note
The gray bar you see at the bottom of Figure 3.7 is due to the fact that the colored square was moving when the screenshot was taken. The colored rectangle really does fill the entire screen, and OpenGL ES moves this block up and down, as with the earlier example (thus, the gray bar shown here).
This demonstrates that the x and y dimensions of the screen in OpenGL units are -1.0 to 1.0, even though the x and y aspect ratios are different. If you change those values, you see that you can make it draw shapes other than a square just by changing the vertices. You also notice that the colors displayed within the shape you draw also change.
Figure 3.7 Chap03 application with changed vertices.
Defining the Color Values
Now let’s look at the next array, which defines the colors used within the shape being drawn:
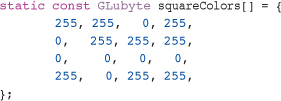
By defining a separate color for each individual vertex, OpenGL will blend the color from that vertex into the colors from the other vertices in the shape. If the color were the same for each vertex, you would then end up with a shape being filled with only one color. If any of the vertices have different colors, the shape will be filled with the colors blending into each other.
Each vertex color in the squareColors array is represented by four values. Looking at the array, you’ll notice that the numbers are grouped into fours. Each group of four represents values for Red, Green, Blue, and Alpha, respectively. There are four groups in total, defining a separate color for each vertex in the shape. Most colors in OpenGL are defined using these four elements.
Positioning
The next variable created is going to be used when calculating the position to render the square:
![]()
The following method makes sure that the current EAGLContext is the context that was created earlier:
![]()
We have actually already set this in the init method, and because we only have one context, this line is redundant. It does no harm being included and would be necessary if you were using more than one context. The same goes for the next line of code:
![]()
As with the context, we have already bound defaultFramebuffer. If you had more than one frame buffer, you would be able to select and bind the required one at this point.
Now that we have things set up as we need, it’s time to define the glViewport. The point of computer graphics is to be able to take a 3D image and project it onto a 2D surface (i.e., the screen) and still have it look three-dimensional. Within OpenGL, converting a 2D or 3D object coordinates into pixels on a screen is performed through three operations, as follows:
• Transformations
• Clipping
• Viewport
Transformation is the process of rotating, scaling, and translating a model, view, or projection. Transformations are represented by matrices, which can be multiplied together to perform a number of transformations on a single vertex for example. Although you don’t need to be completely up to speed on your matrix mathematics, it is worth just refreshing a little so that the terminology being used is at least familiar. I ended up looking through my children’s school textbooks to refresh my knowledge of matrix math.
Clipping is the process of discarding those pixels that lie outside of a defined clipping plane (rectangular window).
Viewport is the final stage where our transformed 3D models are rendered onto a 2D screen. This is also known as the viewport transformation.
Based on this short explanation, you can see that you will need to define the size of the viewport onto which the rendered scene is displayed. This is really simple for Sir Lamorak’s Quest, since we are defining a viewport that matches the full size of the iPhone’s screen. This is exactly the setup used within the OpenGL ES template:
![]()
Remember that the backingHeight and backingWidth were set from reading the dimensions of the renderbuffer associated with the context. Here, we are defining the Viewport to match the dimensions of the iPhone’s screen.
Now that you have defined the viewport, you need to make sure that the matrices associated with GL_PROJECTION and GL_MODELVIEW are reset. Within OpenGL, there are different matrix modes: GL_PROJECTION and GL_MODELVIEW, for example. Each mode has its own 4 × 4 matrix that can be transformed.
The GL_PROJECTION mode is used while rendering the 2D representation of the rendered scene within the viewport. Most of the time, especially in a 2D game, the matrix for this mode does not need to be changed. The more useful matrix mode to use is GL_MODELVIEW. This mode is used to apply transformations to the vertices (that is, translation, rotation, and scaling):
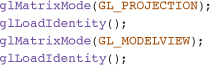
These commands are used to reset the matrix being used by each of the matrix modes. An identity matrix, shown in Figure 3.8, is a square matrix of any dimension whose elements are 1 from the top-left to bottom-right of the matrix, with zeros everywhere else. Any other square matrix that is multiplied by this matrix will equal itself (that is, no transformation will be made).
Figure 3.8 An identity matrix.

The glLoadIdentity() command loads this default matrix and resets any transformations that have occurred on the current active matrix mode.
How OpenGL Works
Now is a good time to talk about how OpenGL works. OpenGL is literally a state machine. You put OpenGL into various states, and it stays that way until you change it. The commands that were just discussed, such as glMatrixMode, are state commands. This means that the last glMatrixMode command we used took GL_MODELVIEW as its parameter, and that the current matrix mode is now GL_MODELVIEW.
Any OpenGL transformation we perform now will effect how the vertices (model) are represented in 2D space. There are many other state commands in OpenGL, and we will see a couple of them shortly.
Applying Transformations on the Model
Now that we know that the matrix mode is GL_MODELVIEW and the identity matrix has been loaded, we can start to perform some transformations on the model. If you think back to when we ran the application, you’ll remember that the colored square box was moving up and down on the screen. Given that the vertices defining the shape are fixed in an array, you may be wondering how the square is able to move. This is accomplished using the following OpenGL command:
![]()
glTranslatef multiplies the current matrix by a matrix that moves (that is, translates) the local coordinate system by the x, y, and z amount provided. In the previous command, the x and z values are always 0.0f, which makes it so no translation happens along these axis. For the y-axis, a simple calculation is performed using the transY value, as defined earlier. Each time this method is called, the command translates the origin along the y-axis and draws the shape. This is how the shape moves along the vertices without changing the shape of the object.
This is a simple way of changing where rendering should take place within a scene. As you see in later chapters, it is sometimes necessary to actually perform matrix calculations on the models vertices themselves rather than use the built-in OpenGL transformations.
After the translation takes place, the transY variable is incremented, which causes the shape to continuously move as each frame is rendered:
![]()
As part of this transformation, the application needs to clear the screen between each frame. To accomplish this task, the application requires the two following commands:
![]()
The first command, glClearColor, sets the color to be used when clearing the screen, and the second, glClear, actually does the clearing.
The clear color is defined with the standard four elements for a color (red, green, blue, and alpha). One difference you will notice from the colors defined in the squareColors array (described earlier in the section, “Defining the Color Values”) is that the numbers are all floats. It is normal in OpenGL to use floats in the range of 0.0 and 1.0 for things like colors and even texture coordinates, which we will see later. When defining the clear color, each element can only have a value between 0.0 and 1.0, which is zero (0.0 = 0%) to full intensity (1.0 = 100%).
The glClear command takes a bitwise OR of masks that indicate the buffers that are to be cleared. The possible options are as follows:
• GL_COLOR_BUFFER_BIT
• GL_DEPTH_BUFFER_BIT
These commands are used only for clearing the color buffer; however, if you wanted to clear both the color buffer and the depth buffer, you would structure the command as follows:
glClear(GL_COLOR_BUFFER_BIT || GL_DEPTH_BUFFER_BIT);
Rendering to the Screen
Once the screen is cleared, you can get down to the business of actually getting something rendered to the screen.
So far, we have an array of vertices and an array of colors for each vertex. Now we want to feed that data into OpenGL, which renders the information to the screen. To do this, we make use of OpenGL pointers: namely, the glVertexPointer and ColorPointer:
![]()
glVertexPointer enables you to specify the location and size of an array of vertex coordinates to use when rendering. glVertextPointer takes the following four parameters:
• Size: The number of coordinates per vertex—in this case, 2, as we are only using x and y coordinates.
• Type: The data type of the coordinates in the array—in this case, the data type is GL_FLOAT.
• Stride: The number of bytes to stride (jump) between each vertex.
• Data: The first coordinate element of the data array to read.
We will go into these in more detail in Chapter 5, “Image Rendering,” but for now, we are telling OpenGL that we have an array called squareVertices that contains vertex coordinates made up of two GL_FLOATS (that is, x and y), and that there is no stride (or jump) between them.
Having told OpenGL what data we want to use for our vertices, we need to tell OpenGL to actually use this data. This is accomplished using the following OpenGL ES command:
![]()
glEnableClientState enables individual client-side capabilities, such as GL_VERTEX_ARRAY, which tells OpenGL that we will use an array of vertices defined by glVertexPointer.
Note
All client-side capabilities are disabled by default, so you need to switch them on and off as necessary. To disable a client-side capability, use glDisableClientState.
Having defined the vertices, we can now do the same for the colors array using almost identical commands, as follows:
![]()
After setting all this up, the following command is used to have OpenGL render to the screen:
![]()
That’s it—just one command (sort of anticlimactic, really). Having set up the arrays to hold the vertices and colors, and then configured OpenGL to use those arrays, we basically just issue the glDrawArrays command, and off it goes.
The glDrawArrays command uses just three parameters. The first parameter is the mode used to draw the vertices; possible values are as follows:
• GL_POINTS
• GL_LINE_STRIP
• GL_LINE_LOOP
• GL_LINES
• GL_TRIANGLE_STRIP
• GL_TRIANGLE_FAN
• GL_TRIANGLES
Each of these constants defines the primitives OpenGL should render with the given vertices. For our purposes, we are using GL_TRIANGLE_STRIP, which enables us to define two triangles using just four vertices. Whereas OpenGL supports quads, OpenGL ES does not; it only renders triangles (see the section, “What OpenGL ES Can (And Can’t) Do,” in Chapter 2). Because almost everything we will render is going to be a quad (rectangle) with an image attached, we need to use two triangles to define that quad.
The second parameter defines the start index within the array of vertices that has been passed in, and the third parameter defines how many vertices are to be read from the array.
As you can imagine, this means we could load an array of vertices and then pick and choose where we start within that array and how many vertices we use. With glDrawArrays, one limitation is that the vertices must be sequential once you start rendering them. glDrawElements is the command to use if you want to jump around inside an array without using sequential vertices.
Having issued the glDrawArrays command, we now have an image in the renderbuffer that is ready to be displayed. All that is left is to present that image to the screen. The final two commands in this method responsible for doing this are the following:
![]()
The first command that binds the renderbuffer isn’t necessary in this example. As you saw earlier, the renderbuffer has already been bound, so you don’t need to bind it here, but the template includes it for completeness.
The second command actually does all the work by asking the context to present the renderbuffer to the screen. You may remember from earlier that it’s actually the context using Core Animation that finally places the pixels in the renderbuffer onto the screen. However, it is the presentRenderbuffer command that actually makes it happen.
Note
Something we discuss in later chapters is performance. It’s worth noting that we should reduce the number of these draw commands as much as possible throughout the code. There is CPU overhead when you call the OpenGL draw commands because data is moved to the GPU and so forth. If you have hundreds of draw commands per frame, you quickly run into performance problems. We cover how to overcome this performance issue when we create the Image class in Chapter 5.
Summary
This has been a long journey into the code of the OpenGL ES template. Although I’m not attempting to teach you in detail about the technologies that are necessary to write a game in OpenGL on the iPhone, I think it was important to explain in some depth how the OpenGL ES template works.
You have seen how to set up an OpenGL ES view capable of rendering using a framebuffer and renderbuffer, and how to decide which version of OpenGL ES you want to use. You have walked through the steps to configure OpenGL ES before you actually render something to screen (such as the matrix mode). You have also seen how you can perform transformations, such as translations on the models you are rendering.
Finally, you saw how you take the data that defines your model and, along with color information, feed it into OpenGL ES so it renders those elements to the renderbuffer before it can render the image to the screen.
If there is anything you didn’t understand, you might want to go back and re-read this chapter. There are also some excellent resources on the Internet that you can refer to if you need to refresh your memory about things, such as matrix mathematics and OpenGL.
The next chapter deals specifically with the game loop. In Chapter 4, you take the OpenGL ES template app created in this chapter and make changes so that it is better-suited to handling a game. After that’s set up, we run through the concept of a game loop in more detail.