
10. The Particle Emitter
This chapter focuses on what has to be my favorite part of the game engine: the particle system. As mentioned in Chapter 2, “The Three Ts: Terminology, Technology, and Tools,” a particle system in the world of games does not involve expensive particle accelerators or the collision of exotic particles at the speed of light. Particle systems are actually used in games to generate very dynamic, and almost organic, visual effects for things such as the following:
• Fire
• Smoke
• Rain
• Snow
• Sparks
• Explosions
Each of these visual effects is made up from a number of individual particles (images) moving independently of each other but following the same set of basic rules. This is the basis for any particle system.
The particle system we review in this chapter for Sir Lamorak’s Quest is actually a relatively basic system compared to some of the highly sophisticated systems used in many modern games, such as Halo or World of Warcraft. That said, even this basic system can be used to generate some pretty impressive visual effects.
I spent a great deal of time researching particle systems for Sir Lamorak’s Quest. Having reviewed many articles and code examples, I eventually created the class we will run through in this chapter based on the particle system in the Cocos2D (www.cocos2d.org) game engine. Cocos2D is an open source iPhone game engine, written in Objective-C. Although it isn’t a complex engine, Cocos2D provided everything I needed and was simple to understand.
Note
To learn more about Cocos2D, look for Learning Cocos2D: A Hands-on Guide to Building iPhone & iPad Games with Cocos2D, Box2d, and Chipmunk by Rod Strougo. This book is currently in development and will be available in early 2011 from Addison-Wesley. Keep an eye on www.informit.com/learnmac for more news about upcoming Mac/iPhone developer titles from Addison-Wesley.
Particle Emitter Project
Open and run the project that accompanies this chapter called CH10_SLQTSOR in the iPhone Simulator. When the project starts, you see a colorful particle fountain erupting onscreen, as shown in Figure 10.1.
Figure 10.1 iPhone simulator running the CH10_SLQTSOR project.

What you are looking at is a particle system generating 750 particles that have been configured to move up the screen at a specified speed and also to be affected by gravity over time. These particles have also been configured to change color and size during their four-second life span.
This chapter explores the ParticleEmitter class inside Sir Lamorak’s Quest. By the end of this chapter, you will be familiar with what a particle system is, have reviewed in detail the ParticleEmitter class we are using, and also learned how to configure the particle emitter using XML configuration files.
Introduction to Particle Systems
Particle systems have become more and more popular over the years. As both CPUs and GPUs have increased in speed, it has been possible for game designers and programmers to come up with more and more clever uses of particle systems.
It is unlikely that you will play any game today that does not use a simple particle system somewhere. In space shooters, these particle systems can be used to generate explosions, engine trails, star fields, and galaxies, to name a few.
In Sir Lamorak’s Quest, we also have a number of areas where we can use a particle system. Rather than create a fixed animation to show when a baddie is appearing or dying, we could use a particle system to dynamically produce the effect we are after, as shown in Figure 10.2.
Figure 10.2 Particle emitter configured to show a strange flame as baddies appear in Sir Lamorak’s Quest.
![]()
Note
Particle systems are all about their organic look and movement. Unfortunately, a static picture does not do a particle system justice. If you want to see this particle configuration in action, you can edit the CH10_SLQTSOR project.
Open the CH10_SLQTSOR project and then open the GameScene.m file. Within the init method, you see the following lines of code:

Comment out the three lines of code under the particle fountain configuration comment and then uncomment the three lines of code under the Appearing emitter configuration comment. When you then run the project again, you will see the particle emitter shown in Figure 10.2 in action.
Although the particle fountain and appearing emitter look very different, they are all using exactly the same particle system. It is only the configuration details for each that are different. Being able to produce different effects by simply changing configuration files is a very handy tool when making a game.
Warning
Particle systems can be addictive. It is easy to spend hours just changing the settings and watching the pretty particles move around the screen. I personally enjoy configuring particle systems, although I’ve wasted many hours in the process. Be warned.
Particle System Parameters
I’ve talked about the fact that particle systems are normally very configurable, so we should look at the parameters we will implement inside our ParticleEmitter class:
• Texture: Texture to be used to render each particle.
• Source Position: Position from which particles will be emitted.
• Source Position Variance: Variance that should be applied to each particle’s source position on creation.
• Particle Life Span: Time in seconds the particle should live for.
• Particle Life Span Variance: Variance applied to a particle’s life span on creation.
• Speed: Speed at which the particle should move.
• Speed Variance: Variance applied to a particle’s speed on creation.
• Angle: Angle at which the particle should be emitted from the source position.
• Angle Variance: Variance applied to a particle’s angle at creation.
• Gravity: Amount of gravity in the x and y planes that should be applied to a particle.
• Start Color: Particle’s color at the start of its life span.
• Start Color Variance: Variance to be applied to a particle’s start color at creation.
• Finish Color: Particle’s color at the end of its life span.
• Start Particle Size: Particle’s size at the start of its life span.
• Start Particle Size Variance: Variance applied to a particle’s start size at creation.
• Finish Particle Size: Particle’s size at the end of its life span.
• Finish Particle Size Variance: Variance applied to a particle’s end size at creation.
• Max Particles: Maximum number of particles the particle emitter will control.
• Max Radius: Maximum radius from the source position for a particle.
• Max Radius Variance: Variance applied to a particle’s radius at creation.
• Min Radius: Minimum radius a particle can be from the source position.
• Radius Speed: Speed at which a particle moves from Max Radius to Min Radius.
• Rotate Per Second: Number of degrees per second a particle will rotate around the source position.
• Rotate Per Second Variance: Variance applied to a particle’s Rotate Per Second at creation.
• Duration: Amount of time in seconds that the particle emitter should emit particles.
There are a lot of parameters we can change that affect how particles are rendered from a particle emitter. Remember that this is only a simple particle system. More complex systems not only handle many more rendering parameters, but also physical interaction of the particles and their surroundings. This allows you to generate particles for sparks. As each spark (particle) hits a floor or wall, it can bounce to really give the impression of hot sparks bouncing around a room.
For Sir Lamorak’s Quest, we don’t need the particles to be that advanced. We are sticking with the previous list of parameters, which will make it easier to understand what the particle system is doing and how it works.
Life Cycle of a Particle
At this point, we should look at the life cycle of a particle and at how the parameters we have just reviewed are actually used.
At a basic level, a particle is born, lives for a specified period of time, and then dies.
A Particle Is Born
When a particle is born, its properties are given their initial values based on the parameters that have been set. These values have been defined in the parameters for the particle emitter that are adjusted by the specified variance.
As an example of a parameter with a variance, we’ll look at a particle’s life span. We will look at a particle that has a lifeSpan of 4 seconds and a lifeSpanVariance of 2. When a particle is born or added to a particle emitter, a calculation is performed using the lifeSpan and lifeSpanVariance; for example:
timeToLive = lifespan + lifeSpanVariance * RANDOM_MINUS_1_TO_1
This calculation first multiplies the lifeSpanVariance by RANDOM_MINUS_1_TO_1. RANDOM_MINUS_1_TO_1 is a macro we see later that randomly returns a number between 1 and -1, oddly enough.
After we have our variance calculated, we than add it to the lifeSpan. With a lifeSpan of 4, a lifeSpanVariance of 2 and -1 returned from our macro, timeToLive would be equal to 2. The next time that calculation is performed, we may get 6 as the answer if the macro returned 1.
This technique is applied whenever there is a variance in our particle emitter, so that we can create randomness to the particle’s properties within bounds we have control over.
That handles the situation where we want to randomly create a single value at the start of a particle’s life, but what about when we know both the start value of a particle’s property and its end value? This is the case when we look at the color properties of a particle. We can specify both the start and end color, which means we need to make sure the particle will transition smoothly from the start color to the end color during its lifetime.
For this, we need to calculate a delta. This delta will tell us how much we need to change the red, green, blue, and alpha values over the lifetime of the particle. As with the life span example, the initial red, green, blue, and alpha values can be specified for both the start and end colors, along with a variance. The same calculation would be used on each of these color elements as was used for the life span.
The difference is that once we have the start and end color, we need to calculate a delta value that can be applied to the particle over its lifetime. The easiest approach for this is to calculate a delta value that will be added to the start color each time a particle is updated. We look at the update method in a moment.
For calculating the delta, we can perform the following calculation:
deltaRed = ((end.red – start.red) / timeToLive) * delta
delta is the number of milliseconds since the last update of this particle and would normally be provided by the game loop.
Note
Calculating the delta to be used each time a particle is updated will only work if your game loop is using a fixed delta value. If you remember from Chapter 4, “The Game Loop,” our game loop is using a fixed delta value rather than a variable delta value. If you were using a variable delta value, you would need to perform the calculation to work out the color of a particle during its lifetime inside the update method of a particle.
This approach to setting up a particle’s initial properties can equally be applied to the location parameters, which we see when we review the ParticleEmitter class later in this chapter.
A Particle Lives
We have looked at what happens when we create a particle; we now need to consider what will happen when we update particles. Just like any other entity within our game, we need to update particle emitters during the game loop. The ParticleEmitter class itself will be responsible for updating all the particles it owns; we just need to tell each emitter we have that it should perform an update and pass in the delta value to be used.
The update function will carry out a couple of functions. The first one creates new particles to be emitted based on an emission rate. The emission rate in the particle system is calculated when a particle emitter is created as follows:
emissionRate = maxParticles / particleLifeSpan;
This value is then used to work out how many particles are going to be added to this emitter during this update. We will see the code that performs this when we review the ParticleEmitter code later in this chapter.
The update method ensures that the particle emitter itself should still be running. One of the parameters we mentioned earlier was duration. The duration tells the particle emitter how long it should emit particles for. For the particle fountain example in this chapter’s project, the duration is set to -1, which causes it to run continuously. Providing a positive number causes the emitter to emit particles for that number of seconds. When that time is up, the emitter will stop emitting.
Having performed these initial checks, the update method will then need to loop through all particles that still have a life span and update their properties. Each particle’s properties will be updated based on the rules defined when the particle emitter was created.
We review the rules and calculations performed in our ParticleEmitter class later in this chapter, but to give you an idea of what’s involved, the update method will calculate a new direction for the particle using the particle’s current position and applying a direction vector along with a gravity vector. It also includes the calculations necessary to change the particle’s color based on the particle’s current time left to live.
A Particle Dies
As with all things, a particle will eventually die. In this context, that means that it has been alive for longer than its defined life span and now needs to be removed from the active list of particles being processed. Each particle has a state that is simply set to identify that it should no longer be included in the particle update routine or rendered to the screen.
This doesn’t mean, however, that we will not see that particle again.
A Particle Is Reborn
An important aspect of a particle system is speed. As you can imagine, you could end up with many particle emitters, each controlling many tens or even hundreds of particles. One performance hog is the initial creation of an object. This could be the creation of a new class instance or just the initialization of memory to be used for a structure. We want to reduce the number of new allocations performed during game play as much as possible, and this includes the creation of particles in our particle emitter as well.
To help with this in our particle emitter, we actually create all the particles our emitter will ever need up front, when the emitter is first created. These particles are placed into an array that is looped through during each update, and the state of the particle is used to see if it should be updated or not. We also make sure that the array is packed so that all active particles (that is, those with a positive lifespan) are held together at the start of the array. We’ll see how this is done later in this chapter.
Because of this, a particle never really dies; it is simply set to inactive. When we then need to emit a new particle, we simply grab an inactive particle from our array and set it up to be emitted again, kind of like being reincarnated. It’s still a particle, but it will have a completely new set of properties the next time it is used.
Particle Emitter Configuration
We have seen that a number of properties are needed to configure a particle emitter. These could all be defined in code, of course, but for Sir Lamorak’s Quest, I decided to use an external XML file to hold the configuration. For me, having configuration of the emitters outside of the code made the code easier to read, as well as making configuration changes to the emitters very simple.
Listing 10.1 shows a complete particle configuration file containing all the configurable parameters for an emitter.
Listing 10.1 Particle Emitter XML Configuration File
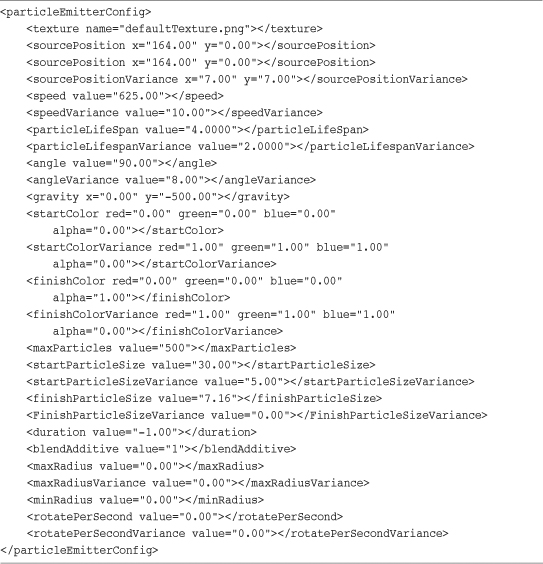
The root element for the file is called particleEmitterConfig and this contains elements representing all the parameters that need to be set up for a particle emitter. These parameters relate directly to the list of parameters we saw earlier in this chapter.
The element name represents the parameter being defined and the attributes for each element hold the values that should be used for that parameter in the particle emitter.
This is a simple XML file that makes editing a particle emitter’s configuration very easy.
There are no real rules about how to configure a particle emitter. Just play with the values in the configuration file until you get the result you want. The configuration files included with the Chapter 10 sample project should help you get started.
The key message here is to have fun. When you have your particle emitter up and running, simply play with the values. I’ve been surprised at what you can produce with simple value changes. It must be said, though, that many hours can be wasted playing with these settings, so be warned.
Particle Emitter Classes
Let’s now review the ParticleEmitter classes we are going to use for Sir Lamorak’s Quest. The two classes we’ll use are as follows:
• ParticleEmitter
• TBXMLParticleAdditions
ParticleEmitter contains all the code necessary to create and control our particle emitter. TBXMLParticleAdditions is a class that adds a category to the TBXML class we saw back in Chapter 9, “Tile Maps.”
TBXMLParticleAdditions Class
TBXML is a lightweight XML parsing class that we used in Chapter 9 to process tile map XML files. To make the particle emitters easier to configure, the ParticleEmitter class also uses an XML file to hold the configuration for a particle emitter. Although we could simply use TBXML as we did inside the tile map class, it is sometimes cleaner to extend a class by adding your own methods. We are going to add our own methods to TBXML using Objective-C categories.
Listing 10.2 shows the header file for the TBXMLParticleAdditions.h file. You see that we are importing the TBXML.h file and also creating an interface that has the same name as TBXML class along with a category name in parenthesis.
Listing 10.2 TBXMLParticleAdditions Header File
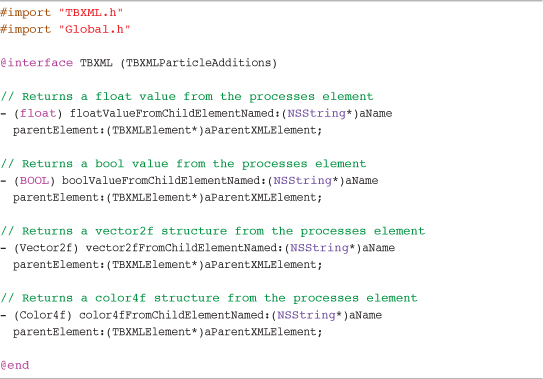
The category name in parenthesis is really the only change to what is a normal interface declaration. The rest of the header file deals with defining the methods this class is going to contain. By using a category, these methods will become available to anything using the TBXML class, even though you have not physically altered that class at all.
Note
A category name must be unique throughout your application, just like class names.
The methods that have been defined are basically specialist methods for dealing with the kind of data that will be found in a particle emitter configuration file. Each method is responsible for reading an element from the XML file and returning the data read in a specific format. This enables us to reduce the amount of code duplication within our ParticleEmitter class that we will be reviewing in the next section of this chapter.
Listing 10.3 shows the code for the color4fFromChildElementNamed:parentElement method.
Listing 10.3 TXMLParticleAdditions color4fFromChildElementNamed:parentElement Method

This method can be used to retrieve an XML element that contains color information. It retrieves four attributes from the element—called red, green, blue, and alpha—and then returns those values inside a color4f structure. This could be done when reading the data from the XML file, but it would need to be repeated many times, which can be messy and easily allow for the introduction of awkward bugs.
The other methods inside the TBXMLParticleAdditions class all work in the same way by returning a specific element’s attribute in a defined structure (for example, BOOL, float, vector2f, and color4f).
ParticleEmitter Class
Having seen the XML configuration file and reviewed the TBXMLParticleAdditions class that we will be using to parse this file, it’s time to review the ParticleEmitter class itself. As mentioned earlier, the ParticleEmitter class is responsible for the creation, update, and rendering of particles that belong to this emitter.
Structures
Before we look at the contents of the ParticleEmitter implementation, we need to review the key structures we will be using to manage our particles. We are using structures for performance reasons. It would be simple enough to create a class that holds all the information we are placing into these structures, but there is a performance penalty for doing that.
As mentioned in Chapter 8, “Bitmap Fonts,” messaging between Objective-C objects carries an overhead. When handling many hundreds of particles per second, using Objective-C classes and messaging can introduce a significant overhead.
To reduce the overhead, we use structures in memory that we can simply reference or look up. It may not have the flexibility of classes and objects, but it’s quick.
The first structure is shown in Listing 10.4 and is called PointSprite.
Listing 10.4 PointSprite Structure
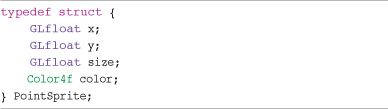
You may wonder why we have called the structure PointSprite. We are going to be using something called point sprites to render the particles for each particle emitter. We cover these in more detail when we cover rendering of particles later in this chapter.
A single PointSprite structure will be created for each particle in an emitter. It stores the particle’s x and y location along with the size of the particle. This information is used when the particles are rendered with OpenGL ES.
The second structure can be seen in Listing 10.5 and is called Particle.
Listing 10.5 Particle Structure
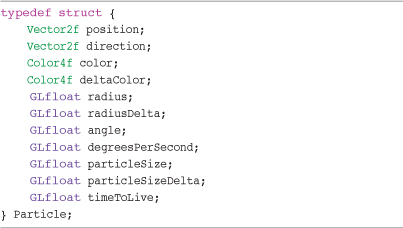
The Particle structure stores all information related to a particle during its lifetime. Whereas the PointSprite structure is simply the location and size of a particle that will be sent to OpenGL ES, the Particle structure stores the other details required to manage a particle during its lifetime. It stores elements such as the particle’s current position, direction of travel, color, and time left to live. Each particle will have its own Particle structure that stores that particle’s detail.
Initialization
The first stage of using our particle emitter is to initialize it. The initParticleEmitterWithFile: method shown in Listing 10.6 is the designated initializer for the ParticleEmitter class.
Listing 10.6 ParticleEmitter initParticleEmitterWithFile: Method
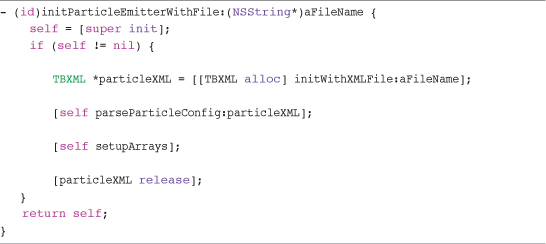
Inside our initializer, we first create a new instance of TBXML using the name of the passed-in configuration file. These details relate to an XML particle configuration file.
Having created a new instance of TBXML, we then parse the particle configuration file. This populates all the properties needed by the particle emitter based on what is in the configuration file. It also performs some initial calculations that we see shortly.
After the configuration file has successfully been passed, the arrays that are needed to hold the particle details are configured, as well as the information needed by OpenGL ES. Having completed these steps, the method then releases the TBXML instance we were using, particleXML, and returns self.
Parsing Particle Configuration
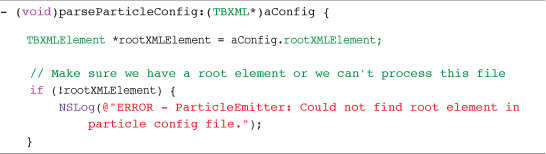
The parseParticleConfig method is responsible for parsing the XML configuration file. It starts out by making sure that there is a root element inside the configuration file of the type we expect. Listing 10.7 shows the start of the parseParticleConfig method and the check performed on the root element.
Listing 10.7 ParticleEmitter parseParticleConfig: Partial Method (Part 1)
Having made sure that we at least have a configuration file with a valid root element, we then start to process the other elements we need. Listing 10.8 shows the texture element being processed, along with a number of other configuration elements.
Listing 10.8 ParticleEmitter parseParticleConfig Method (Part 2)
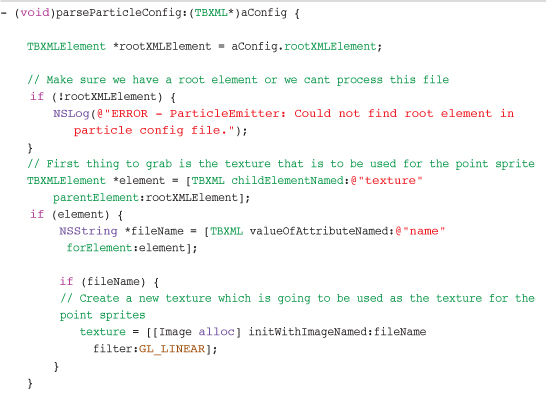
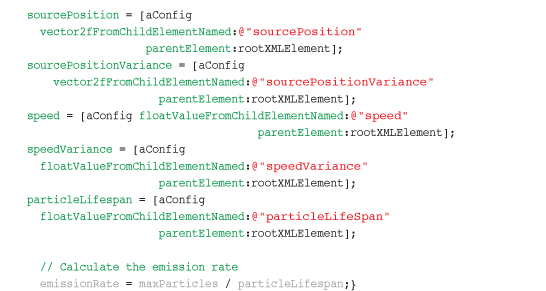
This method simply populates each property by using the appropriate method inside our TBXMLParticleAdditions class. Using methods such as vector2fFromChildElement saves us from repeating the code we have actually placed inside the TBXMLParticleAdditions category.
The last line of this method is something we should also understand, as follows:
emissionRate = maxParticles / particleLifespan;
This line is responsible for calculating the emission rate that our particle emitter is going to use. The emission rate allows us to make sure we are emitting the correct number of particles per update. It is a simple calculation but an important one.
Setting Up Particle and Render Arrays
Having now loaded all the properties we need from the configuration file, we need to set up the arrays needed to hold our particle’s information for both updating the particles as well as rendering them. Listing 10.9 shows the setupArrays method that is used to perform this setup.
Listing 10.9 ParticleEmitter setupArrays Method
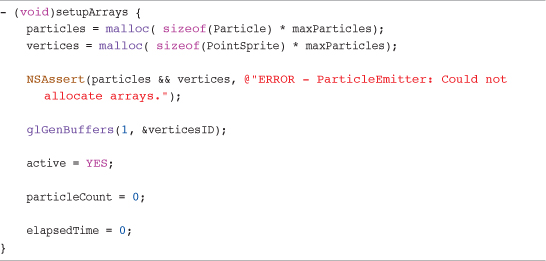
The first couple of lines in this method allocate the memory needed for two arrays: particles and vertices. The particles array holds a Particle structure for every particle required by the particle emitter. The vertices array holds a PointSprite structure for the same number of particles, and it’s this information that will be used to tell OpenGL ES where each point sprite needs to be rendered and at what size.
Point Sprites
I’ve already mentioned point sprites a couple of times in this chapter, so it would be helpful to run through what they are. Up until now, when we want to render something to the screen, we create a quad using four vertices and then map a texture into that quad. This works well, and we could easily use the same approach for our particle system.
We could define a quad for each particle and then update that quad’s properties during the update method, as well as create a vertex array of those quads when we render to the screen. This method does have some benefits in that you can control the vertices yourself, enabling you to scale and rotate each particles quad as you wish, just as we do in the Image class. If you need to rotate your particles, this is the method you would need to use.
Another approach is to use point sprites. A point sprite enables you to render an axis-aligned (not rotated) textured quad to the screen using just a single vertex. This single vertex is used as the center point of the texture to be rendered. Therefore, point sprites enable you to render a quad using only 25 percent of the information you would need to provide if you were rendering quads manually. This is important because in most cases, the biggest bottleneck for performance is actually copying this information to the GPU’s memory.
Point sprites are regularly used in high-performance particle systems because of this saving and the ease with which they can be rendered.
There are some rules around using point sprites in OpenGL ES 1.1. The first is that the texture you specify to be used with a point sprite must have dimensions that are power of 2. The second rule is that point sprites must have a maximum size of 64 pixels. If you need your particles to render larger than 64×64, you would need to use normal quads rather than point sprites.
Apart from a point sprites texture needing to have dimensions that are power of 2, and having a maximum size of 64 pixels if using OpenGL ES 1.1, the texture can be anything you want. The texture being used inside this chapter’s example project is a white radial gradient that moves from fully opaque in the center to fully transparent at the edges.
Having allocated the memory, we then need to check to make sure that the allocation was successful. If either of the arrays was not allocated, the method throws an assertion. If we can’t allocate the memory needed for the arrays, our particle emitter will not work. This is not a good thing, so we throw the assertion.
After the arrays have been allocated, we then create a Vertex Buffer Object (VBO) that holds the vertex and point size data when we render the particles. There is no real reason why we could not have used a vertex array rather than a VBO. Using VBOs on devices other than the iPhone 3GS, iPhone 4 and iPad doesn’t really give us much of a benefit from a performance perspective. That said, there is no harm in using them for the particle system, with the added benefit that if a player is using an iPhone 3GS, iPhone 4 or iPad, he should benefit from improved performance.
The last few lines of the method simply make the particle system active by default, and set up the particle count and the elapsed time. The active property of the ParticleEmitter specifies whether the emitter should update when its update method is called.
Updating Particles
With our particle configuration having been parsed and the storage setup, we can now deal with how to update the particles. Listing 10.10 shows the start of the ParticleEmitter updateWithDelta method.
Listing 10.10 ParticleEmitter updateWithDelta Method (Part 1)
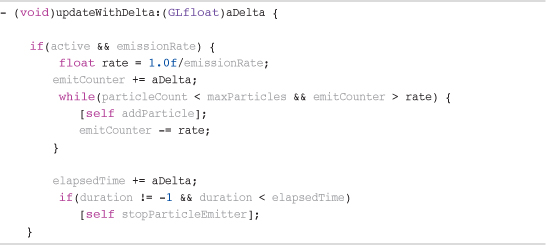
This method is called whenever we need to update all the particles within a ParticleEmitter instance. The first check to perform is to see whether the particle emitter is active. We also ensure that we have a positive emissionRate. The emissionRate controls how many particles are emitted each time we update the particle emitter. Remember that the emissionRate was calculated at the end of the ParticleEmitter parseParticleConfig method.
If both of these checks are positive, we calculate a rate and update the emitCounter by the delta value passed into the method. The while loop then checks to make sure we have not exceeded the maximum number of particles we have said this emitter should handle and also check that the emitCounter is greater than the rate we calculated. Although these are true, we add a new particle to the emitter and reduce the emitCounter by the rate. This loop is how we add new particles to the particle emitter, and it enables us to have a nice constant flow of particles being emitted.
Having added as many particles as necessary for this update, we then increase the elapsedTime by aDelta. This is used in the next check to see if the emitter has run out of time. You may remember that within the XML configuration file, there was a duration property. This specifies how long the particle emitter will emit particles. If the value is -1, the emitter continues to emit particles until told to stop. Any other value represents the number of seconds the emitter should run for.
If the emitter has been running for longer than the defined duration, we call the stopParticleEmitter method.
The code so far has made sure the particle emitter is active and within its defined duration and also that particles have been emitted based on the emitter’s configuration. The next task is to run through all active particles and update their location, size, and color.
Listing 10.11 shows the start of the while loop that updates all active particles.
Listing 10.11 ParticleEmitter updateWithDelta Method (Part 2)
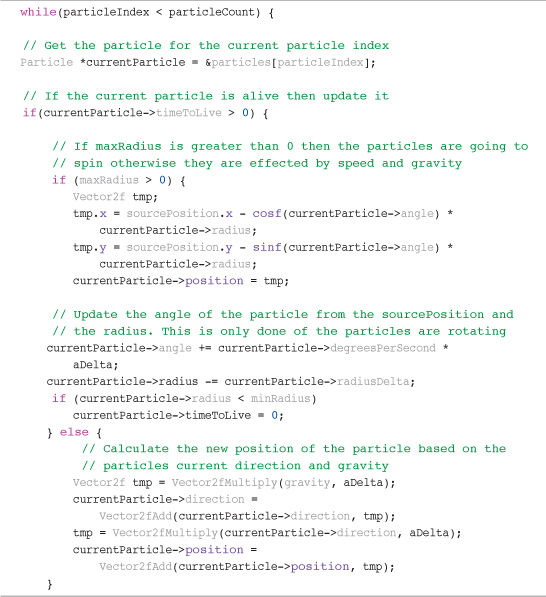
The while loop continues while the particleIndex ivar is less than the particleCount. particleCount is updated whenever a new particle is added to the particle emitter. Inside the while loop, the particle at particleIndex within the particle’s array is referenced, and we check to see if that particle’s timeToLive value is greater than 0. If this is the case, we move onto updating that particle’s position and color. If it is not greater than 0, we move that particle to the end of the particle array. We see how this is done later at the end of the updateWithDelta method.
The particle emitter has two ways of updating a particle’s position. If within the particle configuration file we specified a radius, this tells the emitter that we are going to rotate the particles around the source position. With this update, the configuration of the emitter specifies how the particles orbit around the source position and if they should decay over time. This functionality was added specifically to support the portals we are going to be using in Sir Lamorak’s Quest. Figure 10.3 shows the effect used in the game.
![]()
Note
As before, it’s hard to imagine how this looks with a static image. Go back to the CH10_SLQTSOR and uncomment the lines beneath the Portal emitter configuration comment. This can be found in the init method inside the GameScene.m file, as shown here:
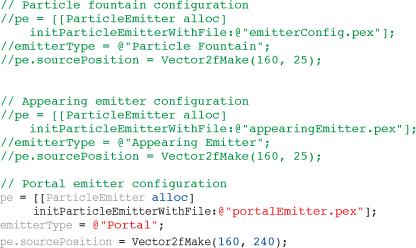
Run the project, and you will see a green swirling mist, which is what the portals in Sir Lamorak’s Quest are going to look like.
The code to support this effect is specific to the needs of the portal, but it is still possible to generate effects that could be used in other situations by changing the configuration file of the emitter.
If the emitter was not configured with a radius value, the emitter will be updated using the particle’s current position and direction along with the configured gravity and speed.
You will notice that we are using some new functions when updating the particles (for example, Vector2fAdd and Vector2fMultiply). These functions have been defined inside the Global.h file. They are defined as static inline functions to help with performance.
A number of other functions have been defined in Global.h that we are not using at the moment (for example, Vector2fDot, Vector2fNormalize, and Vector2fSub). These are useful functions to have when you start moving into more advance functions when dealing with your geometry. These functions are not restricted to the ParticleEmitter class and can be used anywhere that has imported the Global.h file.
Having updated the position of the particle, we can now finish off performing the updates. Listing 10.12 shows the final part of the updateWithDelta method.
Listing 10.12 ParticleEmitter updateWithDelta Method (Part 3)
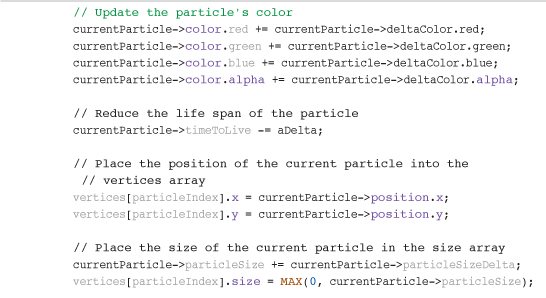
The first update is done to the color of the particle. Each component of the particle’s color is updated by the delta value we calculated for that particle when it was created. If you were using a particle engine that was not using a fixed delta, this calculation would need to be done based on the delta value being passed in to get the best results. Not doing this could cause timing issues with the particles being rendered.
Having updated the color, the particle’s timeToLive is reduced and is followed by updates to the particle’s position and size. Notice that the particle’s position and size information is placed inside the vertices array at the particle’s index. The reason is that the information inside the vertices array is going to be passed to OpenGL ES as part of the rendering method and therefore needs to contain all the information necessary to render the particle (that is, the particle’s x, y, size, and color).
You will also notice that we are making sure that the particle’s size is between 0 and the particle’s current size. During the development process, I found that if the particle size became negative for some reason, odd effects (random flashes of light, for example) would appear onscreen when using the iPhone 3GS. Other devices were not affected.
With all updates done, we increment the particle index and move onto the next particle.
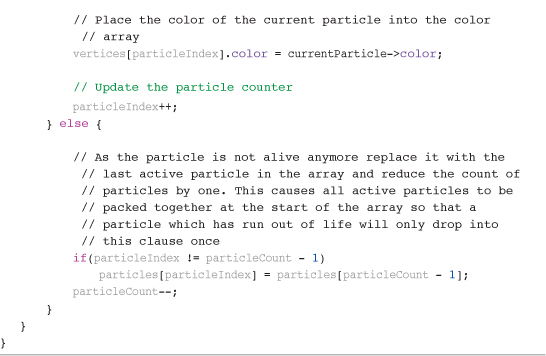
The end of this method deals with particles that are no longer alive. It basically replaces the dead particle in the array with the last active particle. This keeps all active particles grouped together at the start of the particles array to help performance.
Adding Particles
Particles are added during the updateWithDelta method inside the ParticleEmitter class. Adding a particle basically means we are configuring a particle within the particle’s array ready to be used. This involves setting up the particle’s position, direction, color, and size. These properties are configured based on the information in the configuration file.
Listing 10.13 shows the code inside the addParticle method that is used to set up a particle’s position and start color.
Listing 10.13 ParticleEmitter addParticle Method Exert
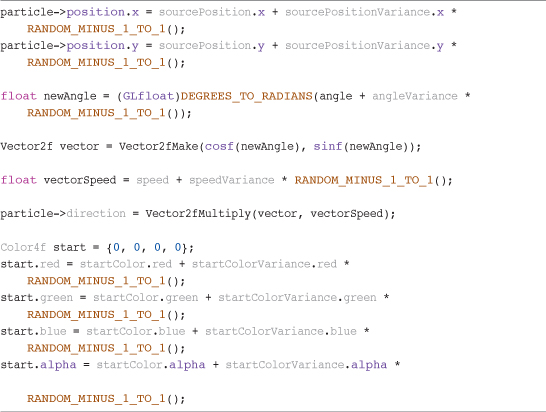
You see that we are performing some basic calculations using the information from the configuration file to set up the particle. Remember that this is not actually creating a new particle in the particles array; it is simply setting up the next available particle to be ready for use. Physically creating an object or allocating memory in the middle of an intensive operation (that is, it’s not a good idea to update the particles in the particle emitter because doing so would have a negative impact on performance).
Rendering Particles
With all the updates done to the emitter particles, we have come to the point where they need to be rendered. Nothing in this method should be new to you if you have read Chapter 5, “Image Rendering.”
Listing 10.14 shows the first part of the renderParticles method.
Listing 10.14 ParticleEmitter renderParticles Method (Part 1)
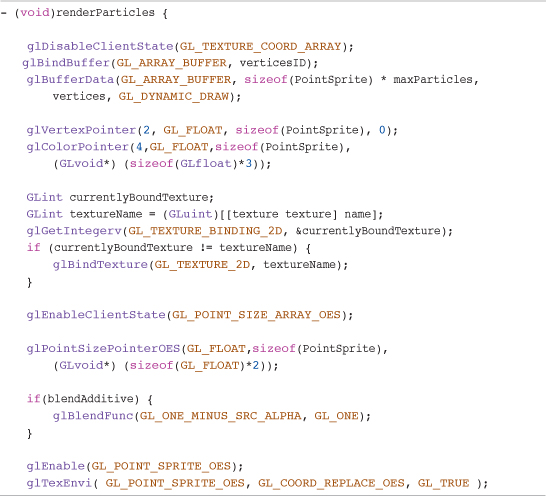
The one area you will not have seen before is how we set up and use point sprites. Having bound to the right VBO and set up the vertex and color pointers, we then enable a client state called GL_POINT_SIZE_ARRAY_OES. This tells OpenGL ES that we are going to be providing the point sizes for each particle in an array configured using glPointSizePointerOES. This works in the same was as glVertexPointer or glColorPointer.
Note
The OES means this is an optional part of the OpenGL ES 1.1 specification and that it’s not guaranteed to be implemented on all devices that support OpenGL ES 1.1. That said, I personally don’t know of any devices that support OpenGL ES without the OES extensions.
You will also see that we are enabling GL_POINT_SPRITE_OES and setting up glTexEnvi for GL_POINT_SPRITE_OES so that OpenGL ES knows how to render the particles themselves. Having set up the rendering, we then simply ask OpenGL ES to perform the render and then tidy up, as shown in Listing 10.15.
Listing 10.15 ParticleEmitter renderParticles Method (Part 2)

You’ll see that we are using glDrawArrays to render the particles. Having loaded all the data into a VBO and not needing to jump around in the VBO to render, glDrawArrays is an efficient way to render the array’s contents. Once the rendering has been set off, we then unbind the VBO, disable the states we no longer need, and then re-enable the GL_TEXTURE_COORD_ARRAY state. The blend function is also set back to our default mode if the blend additive blend mode was used for the particles.
Note
The rendering of this particle system is done separately from the rendering that is used for images. There is no real reason why they cannot be merged into a single render engine, and this is in fact what some people do. The main reason for keeping this separate was to allow this class to be implemented on its own and to be re-usable and also to keep things simple. Because we are using point sprites and need to set up the state of OpenGL ES before we use them, keeping their rendering separate from the rendering of images has simplified our rendering engine. This approach also means that the particles need to be rendered last and, therefore, on top.
Stopping the Particle Emitter
The smallest method in the ParticleEmitter class is stopParticleEmitter. This method is called if we wanted to stop a particle emitter that was set up with duration of -1. Listing 10.16 shows the stopParticleEmitter method.
Listing 10.16 ParticleEmitter stopParticleEmitter Method
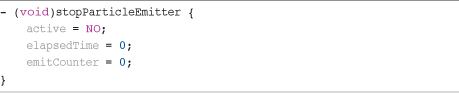
This is certainly the most straightforward method in the ParticleEmitter class. It simply sets active to NO and resets the elapsedTime and emitCounter ivars. With this done, the particle emitter stops emitting or rendering particles and is ready to be started again if needed in the future.
Have a Play
In this book, the last section of a chapter is normally called “Exercise.” However, there aren’t any exercises for this chapter. Instead, you get to play with the particle emitter. (Lucky you!)
See what different effects you can generate (for example, smoke or fire). Figure 10.4 shows you a flame emitter created by changing the configuration file to give you something to aim for.
Figure 10.4 Flame particle system.

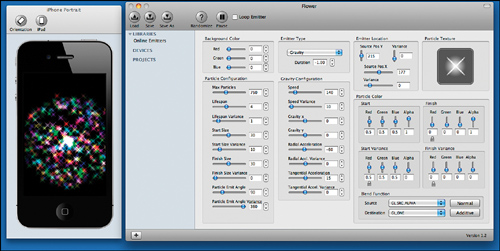
While creating particle effects was great fun, I soon realized that it was also time consuming and fiddly. Trying to get the effect you are after by changing numbers in an XML file is actually hard and it can take come time to get the effect you are after. Because of this, I decided that it would be great to build a visual designer that would allow me to tweak the parameters for a particle emitter and see the effect on the emitter in real time.
The result is a product called Particle Designer, available from http://particledesigner.71squared.com. This is a Mac OS X application that I developed with Tom Bradley that lets you load and save particle configurations and edit them visually. This really does speed up the process of creating particle effects and makes the whole process even more fun than it already was.
Particle Designer actually uses a slightly more advanced version of the ParticleEmitter class I used in SLQ. This class is provided with Particle Designer and can simply be swapped with the ParticleEmitter class already in the SLQ engine. This will then allow you to use the extra features of this particle engine inside SLQ or your own games.
Figure 10.5 shows a screen shot of a particle emitter being edited using Particle Designer.
Figure 10.5 Particle Designer GUI.
Summary
As I said at the start of this chapter, particle systems are great fun to play with. The amazing effects you can get by simply changing a few parameters are both a blessing and a curse. On the one hand, you can easily change settings to get the effect you are after without needing to change the code, unless you are doing something very different. On the other hand, the simple fact that they are so simple to change means you can spend hours tweaking the settings until you get something you want, or simply have fun seeing what you can create—if you’re anything like me, that is.
This is by no means a complex particle engine. Plenty of other features could be added, such as using images rather than point sprites so that particles can be rotated. Also, collision detection between particles could be added. This would need to be done carefully, of course, as collision detection for a high number of objects can be very processor intensive.
Using images rather than point sprites would also allow other features to be added, such as the ability to change the shape of the particle in flight. An example of this would be when creating sparks. Sparks normally appear as long trails of light, so with stretching the quad between its last position and next position, and using the right kind of texture, you could get a pretty good spark effect.
As you can imagine, particle systems could be used for many different effects and are only limited by your imagination. Well, that is not completely true, as we have the limitations of the device to consider, but you get the idea.
In the next chapter, we will finish off the last of the classes that make up our core engine: the SoundManager class. This class enables you to play background music and sound effects within your game. The SoundManager class implements both the AVAudio-Player for playing background music as well as OpenAL for shorter sound effects and positional sound.