
Linux Boot Loaders
The boot loader program helps bridge the gap between the system firmware and the full Linux operating system kernel. In Linux there are several choices of boot loaders to use. However, the most popular ones that you’ll run across are the following:
In the original versions of Linux the LILO boot loader was the only boot loader program available. It was extremely limited in what it could do, but it accomplished its purpose—loading the Linux kernel from the BIOS startup. LILO became the default boot loader used by Linux distributions in the 1990s. Unfortunately, LILO doesn’t work with GPT disks, so it has limited use on modern systems and is quickly fading into history.
The first version of the GRUB boot loader (now called GRUB Legacy) was created in 1999 to provide a more robust and configurable boot loader to replace LILO. GRUB quickly became the default boot loader for all Linux distributions, whether they were run on BIOS or UEFI systems.
GRUB2 was created in 2005 as a total rewrite of the GRUB Legacy system. It supports advanced features, such as the ability to load hardware driver modules and using logic statements to dynamically alter the boot menu options, depending on conditions detected on the system (such as if an external hard drive is connected).
This section walks through the basics of both the GRUB Legacy and GRUB2 boot loaders, which should cover just about every Linux distribution that you’ll run into these days.
GRUB Legacy
The GRUB Legacy boot loader was designed to simplify the process of creating boot menus and passing options to kernels. GRUB Legacy allows you to select multiple kernels and/or operating systems using both a menu interface as well as an interactive shell. You configure the menu interface to provide options for each kernel or operating system you want to boot with. The interactive shell provides a way for you to customize boot commands on the fly.
Both methods utilize a set of commands that control features of the boot loader. This section walks through how to configure the GRUB Legacy bootloader, how to install it, and how to interact with it at boot time.
Configuring GRUB Legacy
When you use the GRUB Legacy interactive menu, you need to tell it just what options to show. You do that using special GRUB commands.
The GRUB Legacy system stores the menu commands in a standard text file. The configuration file used by GRUB Legacy is called menu.lst and is stored in the /boot/grub folder (while not a requirement, some Linux distributions create a separate /boot partition on the hard drive). Red Hat–derived Linux distributions (such as CentOS and Fedora) use grub.conf instead of menu.lst for the configuration file.
The GRUB Legacy configuration file consists of two sections:
Global definitions
Operating system boot definitions
The global definitions section defines commands that control the overall operation of the GRUB Legacy boot menu. The global definitions must appear first in the configuration file. There are only a handful of global settings that you can make; TABLE 4-1 shows these settings.
TABLE 4-1 GRUB Legacy global commands.
| Setting | Description |
|---|---|
| color | Specifies the foreground and background colors to use in the boot menu |
| default | Defines the default menu option to select |
| fallback | A secondary menu selection to use if the default menu option fails |
| hiddenmeu | Don’t display the menu selection options |
| splashimage | Points to an image file to use as the background for the boot menu |
| timeout | Specifies the amount of time to wait for a menu selection before using the default |
For GRUB Legacy, to define a value for a command you just list the value as a command line parameter:
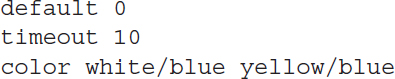
The color command defines the color scheme for the menu. The first pair define the foreground/background pair for normal menu entries, while the second pair define the foreground/background pair for the selected menu entry.
After the global definitions, you place definitions for the individual operating systems that are installed on the system. Each operating system should have its own definition section. There are a lot of boot definition settings that you can use to customize how the boot loader finds the operating system kernel file. Fortunately, just a few commands are required to define the operating system. The ones to remember are the following:
title—the first line for each boot definition section, this is what appears in the boot menu
root—defines the disk and partition where the GRUB /boot folder partition is on the system
kernel—defines the kernel image file stored in the /boot folder to load
initrd—defines the initial RAM Disk file, which contains hardware drivers necessary for the kernel to interact with the system hardware
rootnoverify—defines non-Linux boot partitions, such as Windows
The root command defines the hard drive and partition that contains the /boot folder for GRUB Legacy. Unfortunately, GRUB Legacy uses a somewhat odd way of referencing those values:
![]()
GRUB Legacy doesn’t refer to hard drives the way Linux does; it uses a number system to reference both disks and partitions, starting at 0 instead of 1. For example, to reference the first partition on the first hard drive on the system, you’d use (hd0,0). To reference the second partition on the first hard drive, you’d use (hd0,1).
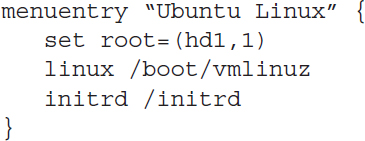
Here’s a sample GRUB configuration file that defines both a Windows and a Linux partition for booting:

This example shows two boot options—one for an Ubuntu Linux system and one for a Windows system. The Ubuntu system is installed on the first partition of the second hard drive, while the Windows system is installed on the first partition of the first hard drive.
Installing GRUB Legacy
Once you build the GRUB Legacy configuration file (as either menu.lst or grub.conf, depending on your Linux distribution), you must install GRUB in the MBR. The command to do this is grub-install.
The grub-install command uses a single parameter—the partition to install GRUB on. You can specify the partition using either Linux or GRUB Legacy format. For example, to use Linux format you’d use
![]()
to install GRUB on the MBR of the first hard drive. To use GRUB Legacy format, you must enclose the hard drive format in quotes:
![]()
If you’re using the chainloading method and prefer to install a copy of GRUB Legacy on the boot sector of a partition instead of to the MBR of a hard drive, you must specify the partition, again using either Linux or GRUB format:

You don’t need to reinstall GRUB Legacy in the MBR after making changes to the configuration file — GRUB Legacy reads the configuration file each time it runs.
Interacting with GRUB Legacy
When you boot a system that uses the GRUB Legacy boot loader you’ll see a menu that shows the boot options you defined in the configuration file. If you wait for the timeout to expire, the default boot option will process. Alternatively, you can use the arrow keys to select one of the boot options, then press the ENTER key to select it.
You can also edit boot options on the fly from the GRUB menu. First, arrow to the boot option you want to modify, then press the E key. A new screen will appear, showing the currently configured options for that entry. Use the arrow key to move the cursor to the line you need to modify, then press the E key to edit it. Press the B key to boot the system using the new values. You can also press the C key at any time to enter an interactive shell mode, allowing you to submit commands on the fly.
GRUB2
Since the GRUB2 system was intended to be an improvement over GRUB Legacy, many of the features are the same, with just a few twists. For example, the GRUB2 system changes the configuration file name to grub.cfg, and stores it in the /boot/grub/ folder. (This allows you to have both GRUB Legacy and GRUB2 installed at the same time.)
Configuring GRUB2
There are also a few changes to the commands used in GRUB2. For example, instead of the title command, GRUB uses the menuentry command, and you must also enclose each individual boot section with braces immediately following the menuentry command. Here’s an example of a sample GRUB2 configuration file:
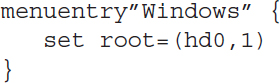
Notice that GRUB2 uses the set command to assign values to the root keyword as well as uses an equal sign to assign the device. GRUB2 utilizes environment variables to configure settings instead of commands.
To make things more confusing, GRUB2 changes the numbering system for partitions. While it still uses 0 for the first hard drive, the first partition is set to 1. So to define the /boot folder on the first partition of the first hard drive, you now need to use:
![]()
Also, notice that the rootnoverify and kernel commands are not used in GRUB2. Non-Linux boot options are now defined the same as Linux boot options using the root environment variable, and you define the kernel location using the linux command.
The configuration process for GRUB2 is also somewhat different. While the /boot/grub/grub.cfg file is the configuration file that GRUB2 uses, you should never modify that file. Instead, separate configuration files are stored in the /etc/grub.d folder. This allows you (or the system) to create individual configuration files for each boot option installed on your system (for example, one configuration file for booting Linux, and another for booting Windows).
For global commands, use the /etc/default/grub configuration file. You’ll notice that the format for some of the global commands has changed from the GRUB Legacy commands, such as GRUB_TIMEOUT instead of just timeout.
Most Linux distributions generate the new grub.cfg configuration file automatically after certain events, such as upgrading the kernel.
Installing GRUB2
Unlike GRUB Legacy, you don’t need to install GRUB2; all you need to do is rebuild the main installation file. This is done by running the grub-mkconfig program.
The grub-mkconfig program reads configuration files stored in the /etc/grub.d folder and assembles the commands into the single grub.cfg configuration file.
You can update the configuration file manually by running the grub-mkconfig command:
![]()
Notice that you must manually redirect the output of the grub-mkconfig program to the grub.cfg configuration file. By default the grub-mkconfig program outputs the new configuration file commands to standard output.
Interacting with GRUB2
The GRUB2 boot loader produces a boot menu similar to the GRUB Legacy method. You can use arrow keys to switch between boot options, the E key to edit a boot entry, or the C key to bring up the GRUB2 command line to submit interactive boot commands.
Alternative Bootloaders
While GRUB Legacy and GRUB2 are the most popular Linux bootloader programs in use, there are still a few others that you may run into, depending on which Linux distributions you use.
The Syslinux project includes five separate bootloader programs that have special uses in Linux:
SYSLINUX—a bootloader for systems that use the Microsoft FAT filesystem (popular for booting from USB memory sticks)
EXTLINUX—a mini bootloader for booting from an ext2, ext3, ext4, or btrfs filesystem
ISOLINUX—a bootloader for booting from a LiveCD or LiveDVD
PXELINUX—a bootloader for booting from a network server
MEMDISK—a utility to boot older DOS operating systems from the other Syslinux bootloaders
The ISOLINUX bootloader is popular for use in distributions that release a LiveDVD version. The bootloader requires two files: isolinux.bin, which contains the bootloader program image, and isolinux.cfg, which contains the configuration settings.
The PXELINUX bootloader is somewhat complicated. It uses the Pre-boot eXecution Environment (PXE) standard, which defines how a network workstation can boot and load an operating system from a central network server. PXE uses DHCP to assign a network address to the workstation and BOOTP and TFTP to load the bootloader image from the server.
To utilize PXELINUX the TFTP server needs to have the PXELINUX bootloader program, commonly stored as /tftpboot/pxelinux.0, available for the workstations to download. Each workstation must also have a configuration file available in the /tftpboot/pxelinux.cfg folder. The files are named based on the MAC address of the workstation and contain specific configuration settings required for that workstation.