User Management
The Linux operating system was designed to be a multi-user operating system. That means it can support multiple users logged into the system at the same time, all doing different things. The problem with having multiple users though is that you need to keep track of who’s doing what and who’s allowed to do what!
This is where user accounts come into play. Linux uses user accounts to uniquely identify individual users and control their access to the devices, files, and folders on the system. Linux also uses the user accounts as identifiers when logging activity on the system. That way you can track just who deleted that important file! As the system administrator, you can control what all of the Linux users are allowed to do and then monitor what they’re doing from the system log files.
This section discussed the types of user account used in Linux, how to use them, and how to manage them.
Examining User Accounts
There are three types of user accounts available on Linux systems:
Normal user accounts
Service accounts (sometimes called pseudo users)
Administration user accounts
Normal user accounts are assigned to each person who uses the Linux system. By default, normal user accounts don’t have any special privileges on the Linux system. Normal users only have access to run applications and access files and folders contained in their own home folder. Typically, one user account won’t have access to files and folders owned by another user account (although as you’ll see in a bit, you can change to enable groups of users to share files and folders).
Service accounts are used by applications that must run continually in the background, such as email servers, database servers, and web servers. This type of account is often referred to as a pseudo user account because these applications must run continually, require access to files and folders on the system, and it’s not possible to have a normal user account logged in to run the programs.
For security reasons, service accounts can’t log into an interactive desktop or command-line prompt, they can only run in background on the system. It’s common to assign a unique system account to each application, and that account would only have access to the files and folders required for that specific application. In this way the application is isolated so that if one application is compromised by an attacker (such as if someone breaks into the web server application), the attacker can’t get to other parts of the Linux system, only the files related to that application.
Administration user accounts are used by system administrators who need complete control of the system. These accounts have access to all files and folders on the Linux system and can modify permissions on any file and folder. In Linux, the main administration user account is assigned the special name root.
Since the root user account has full permissions to all files, folders, and devices on the Linux system, you must use the root user account when performing most system-related work, such as adding new devices, partitioning new filesystems, or creating new user accounts.
Because of the complete power that the root user account possesses, logging in as the root user account is a very dangerous thing. A small typo in the wrong place in a command can result in a completely unusable Linux system! Usually, Linux system administrators only log in as the root user account when absolutely necessary. They will use a normal user account to do their normal activities such as checking email and browsing the web.
Accessing Administrator Privileges
Because of the importance of the administration user account, there are three ways for a Linux system administrator to become the root user account:
Log in as the root user account directly from a login prompt
Use the su command as a normal user account
Use the sudo command as a normal user account
In the previous section you learned about the dangers of logging in directly as the root user account. It’s generally not a good idea to log in directly as the root user account unless you absolutely must. In fact, some Linux distributions even prevent you from logging in directly as the root user account.
The su Linux command is a great alternative. It allows us to change the user account that we’re logged in as to any other user account on the system, including the root user account. To switch to another user account, you specify that user name on the su command line. For example, if I’m currently logged in with my user account rich and want to switch to the user account barbara, you’d enter the command:
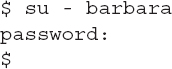
The su command prompts you for the password for the user account you’re trying to switch to. The dash in the command tells Bash to emulate an actual login, running any login shell scripts created for the user account, including changing the home directory. If you don’t use the dash, you’ll be logged in as the user account but still be accessing your own user account’s shell environment.
When you type the su command by itself, Linux will assume you want to switch to be the root user account. When you enter the su command, the Linux system will prompt you for the root user account’s password, ensuring that you have authorization to act as the root user account.
Knowing the capabilities of the root user account, you may be wondering how you will remember which account you are logged in as. Most Linux systems use the command prompt to indicate your permission level. When you’re logged in as a normal user account, the command prompt is a dollar sign ($); when you use the su command to gain root privileges, the command prompt changes to a pound sign (#), as in this example:
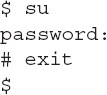
After you enter the password for the root user account, the command prompt changes to the pound sign, indicating that you’re now the root user account. While at the pound sign command prompt, any command you enter has root privileges. When you’ve completed your administrator tasks, just use the exit command to exit the root user account and switch back to your normal user account (and the dollar sign prompt).
The sudo command gives you yet another alternative to logging in as the root user account. Instead of gaining access to the root user account directly to enter multiple commands, the sudo command allows you to run individual commands as the root user account, essentially granting you temporary user of the accounts privileges. Just enter the command you need to run as the parameter of the sudo command:

Notice that the command prompt didn’t change at all. The example began as a normal user account, submitted the sudo command with a system command, then when that command completed, it reverted back to the normal user account dollar sign prompt.
Also notice that the sudo command prompted me for my password, not the password of the root user account. This is not a mistake; it’s a security feature. Only specific user accounts are allowed to use the sudo command. You must validate who you are to be able to use the command. The system will maintain your authentication for a period of time, so any subsequent use of the sudo command within that timespan (which you can configure) won’t require the password.
The /etc/sudoers file lists the user accounts that have privileges to run the sudo command, along with restricting just what commands they can run with root privileges. You must use the visudo program (a special version of the vi editor program) to edit the /etc/sudoers file.
Working with Groups
Often in a multi-user environment you’ll run into a situation where you want multiple user accounts to have access to the same files and folders (such as a sales team working on the same project). In a Linux environment, file permissions set to individual user accounts won’t work when trying to share files.
To solve that problem, Linux supports groups. A group is a collection of user accounts that are treated as a single account for permissions. You can assign file and folder permissions to a group, granting all of the user accounts in that group access to the shared files and folders.
Linux stores information about the group accounts in the /etc/groups file. Each group is defined on a separate line in the file, which includes the group name, a unique group ID value, and the list of user accounts that are members of the group. To add a new group, use the groupadd command.
By default, when you create a new user account in Linux, the system assigns that user to a default user group. Most Linux distributions create separate user groups for each user account, that way you can’t unintentionally create shared files or folders
Managing User Accounts
You’ll use five basic commands to manage user accounts in Linux:
useradd—Create a new user account
userdel—Delete an existing user account
usermod—Modify the settings of an existing user account
passwd—Change the password of an existing user account
chage—Change the password aging properties of an existing user account
The useradd command has lots of parameters that you can use to customize just how Linux creates the new user account. These are shown in TABLE 10-1.
TABLE 10-1 The useradd command parameters.
| Parameter | Description |
|---|---|
| -c comment | The user account comment field value |
| -d home | The location of the user’s Home folder (the default is /home/username) |
| -e date | The date the account will expire automatically |
| -g group | The default group for the user account |
| -m | Create a Home folder and copy the contents of the /etc/skel folder into it |
| -s shell | The shell for the user account |
| -u UID | Use a specific UID value instead of allowing Linux to assign one |
For example, to create a new user account named test1, and give it a home folder for the account, use this command:
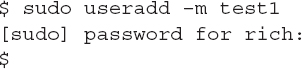
After you create the user account, use the passwd command to assign a default password for the account:
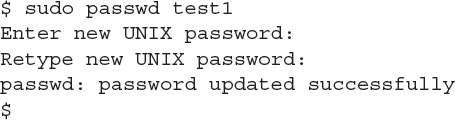
Now you can log into either the command line or the desktop environment using the test1 user account and password you just created!
You can use the usermod command to change any of these settings for an existing user account. For example, to change the comment field for the user account, just use:

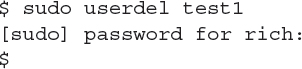
When you want to remove a user account, just use the userdel command: