Let’s face it, you work all day on a computer, but sooner or later, you’re going to have to get your one-of-a-kind project, text document, or photograph off the computer. Computer data finds itself in the most unlikely places. For example, you could save a text document onto a CD or DVD, and then store the CD or DVD away; never to be seen again. Probably the most common place you find computer data is on paper. It might be nice to talk of a paperless society, however, most people prefer the satisfying feel of paper in their hands, as opposed to a cold computer monitor. That’s where Mac OS X steps in and makes your life easy. Not only does Mac OS X give you all the standard ways to print to paper or fax, it also gives you hundreds of printer drives; supporting the vast majority of printers in the market. In addition, you can save paper by previewing your jobs—using Leopard’s print preview feature—which shows you a color-accurate on-screen version of your print job.
If you fax documents, then Leopard is an operating system tailor-made expressly for your needs. Mac OS X integrates its faxing features with a state-of-the-art printing system. Just open the Print & Fax pane in System Preferences, and you can set up your computer to receive faxes. Then, when you go to print a document from virtually any application, you’ll see a Fax button in the Print dialog. In addition, if you have a large print job that you would rather print after work, or a fax that has to be sent at a specific time; Mac OS X lets you schedule a time to print a document, or fax with the click of a button.
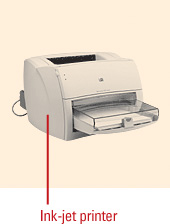
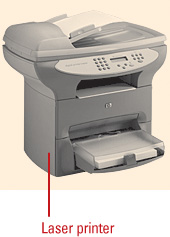
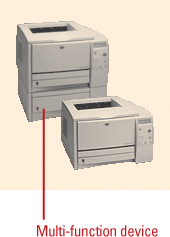
Although there are many different kinds of printers, there are two main categories: ink-jet and laser. An ink-jet printer works by spraying ionized ink on a sheet of paper. Ink-jet printers are less expensive and considerably slower than laser printers, but they still produce a good quality output. A laser printer utilizes a laser beam to produce an image on a drum, which is rolled through a reservoir of toner and transferred to the paper through a combination of heat and pressure. Laser printers are faster and produce a higher quality output than ink-jets, but they are also more expensive. Ink-jet and laser printers are combined with other hardware devices, such as a copier and scanner, into a multi-function device. A multi-function device provides common device functionality at a lower cost than purchasing each device separately. Printers are classified by two main characteristics: resolution and speed. Printer resolution refers to the sharpness and clarity of a printed page. For printers, the resolution indicates the number of dots per inch (dpi). For example, a 300-dpi printer is one that is capable of printing 300 distinct dots in a line one-inch long, or 90,000 dots per square inch. The higher the dpi, the sharper the print quality. Printer speed is measured in pages per minute (ppm). The speed of printers varies widely. In general, ink-jet printers range from about 4 to 10 ppm, while laser printers range from about 10 to 30 ppm. The speed depends on the amount of printer memory (the more the better) and the page’s contents: if there is just text or the page has only one color, the ppm is in the high range, but when a page contains graphics and/or has multiple colors, the ppm rate falls to the low range.
Printer drivers are lines of code designed to help an operating system communicate with a specific printer. No two printer models are created equal: Some have two paper trays, while others have one; some are ink-jet, while others are laser; some are color and some black and white. Although there are generic printer drivers available, most printers have a driver program, designed specifically for that make and model. Mac OS X installs all of the printer drivers onto your hard drive when you run the Mac OS X installation program.
The drivers become available when you attach your printer and run the Printer Setup Utility. The good news is that with the release of Snow Leopard, the process of hooking up your printer, and being able to print, just became a lot easier. Mac OS X comes bundled with almost every conceivable printer driver; however, new printers and updates are being released all the time. When you plug in a new printer, Snow Leopard downloads the appropriate driver. Periodically, Snow Leopard checks to make sure it has the lastest driver using Software Update as needed (New!). It’s always a good idea to keep the CD or DVD that came with your printer handy; it contains a driver for that particular model of printer. In addition, the Web sites for the printer companies such as www.epson.com or www.hp.com, contain the latest updates and patches for their printers. You can visit them to see if any updates are available.
Since you’ll only need one or two printer drivers, you can delete the others. All those unused drivers take up over a gigabyte of space on your hard drive. Once you’ve installed the necessary printers, select the Library folder (located on the main hard drive), click Printers folder, and then delete the unused drivers. If necessary, you can always reinstall them from the OS X install disks.
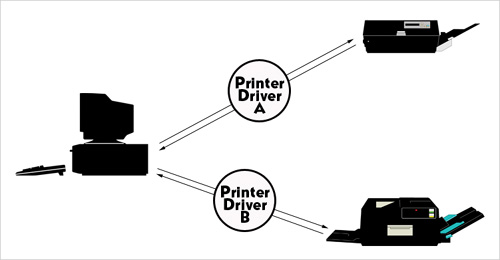
Setting up a printer use to be a difficult and time-consuming process. There were all kinds of questions to answer, driver files to find, and after all that time, you might still have problems. With Mac OS X, setting up a printer is easy. Adding a printer can be as simple as plugging it into your computer. In most cases that’s all you need to do. Mac OS X automatically tries to autoconfigure almost any USB, FireWire, or Bluetooth connection. If you want to install a network printer, such as Bonjour, or your printer doesn’t appear in the printer list, you can add it manually in the Print & Fax pane in System Preferences. If you no longer use a printer, you can quickly remove it while your in Print & Fax preferences.
 To add a printer, follow the printer setup instructions to install any necessary software, and then connect it to your computer using a USB or FireWire connection.
Mac OS X automatically tries to install the printer. In most cases, the printer is available in any Print dialog box.
If the printer is not available, continue.
 Click the System Preferences icon in the Dock, and then click the Print & Fax icon.
The printer appears in the left column. If your printer doesn’t appears in the list, follow the instructions to add a printer manually on the next page.
 To remove a printer, select the printer you want to remove, click the Remove (-) button, and then click OK.
 Click the Close button.
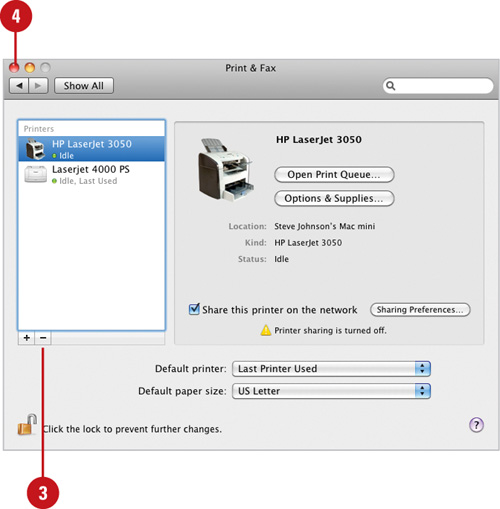
- Click the System Preferences icon in the Dock, and then click the Print & Fax icon.
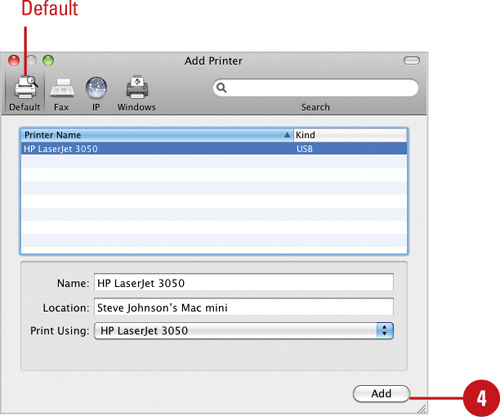
- Click the Add (+) button.
- Use the toolbar buttons to specify the information required to display (if necessary) and select the printer you want to add:
Default. Displays available autoconfigured printers
Fax. Displays available autoconfigured faxes.
IP. Provides options to setup a network printer using an IP (Internet Protocol) address, such as 192.160.1.170.
Also can provide options to setup special-case printers, such as Canon IJ Network, Epson FireWire or TCP/IP, or HP IP Printing.
Windows. Displays network printers using Windows and an Ethernet connection.
- Click Add, and then click Continue, if necessary.
 Click the Close button in the Print & Fax Browser window.
 Click the Close button.
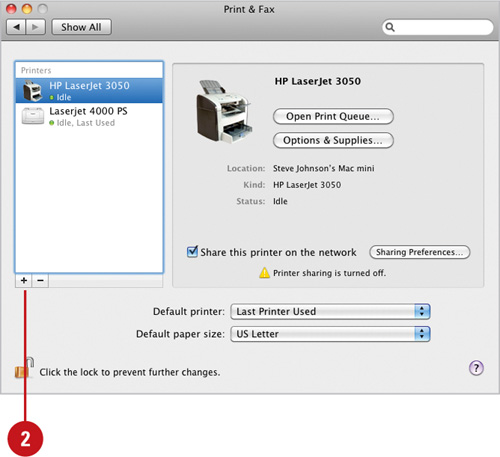
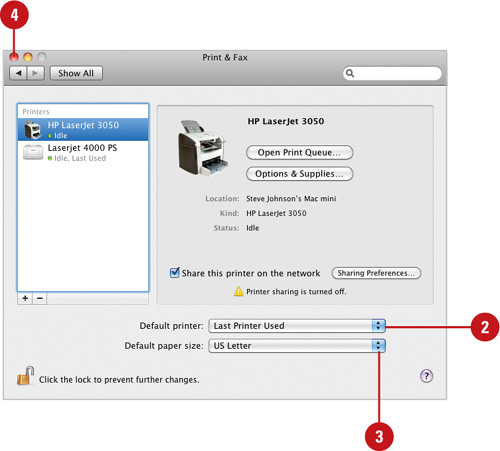
Using your Macintosh to print and fax is an obvious extension of the normal, everyday computing process. You write and create documents, and send them to paper; you take a photograph using a digital camera and send it to a photo-quality printer. You can use the Print & Fax pane in System Preferences to modify many of the aspects of printing. For example, you can set the default printer, the one that automatically appears when you want to print, and the default paper size. If you want to find out the available options for a specific printer, you can use Options and Supplies, where you can find printer information, change a printer name, select a different driver, and check out printer supplies available online, such as ink and toner.
- Click the System Preferences icon in the Dock, and then click the Print & Fax icon.
- Click the Default Printer pop-up, and then click Last Printer Used or select a default printer to appear first in the Print dialogs of all your applications.
- Click the Default Paper Size in Page Setup pop-up, and then select a paper size to be used as a default in the Print dialogs of all your applications.
- Click the Close button.
- Click the System Preferences icon in the Dock, and then click the Print & Fax icon.
- Select the printer you want to change print settings.
- Click Options & Supplies.
- Click the tab for the area in which you want to change settings, such as General, Driver, or Supply Levels. The tabs vary depending on the printer.
General. Displays printer information (queue and host name, and driver version). You can change the name and location of the printer.
Driver. Allows you to select a different driver.
Supply Levels. Allows you to access a Web site that lets you order more supplies, such as ink or toner. Click Supplies to open the Web site.
- Click OK.
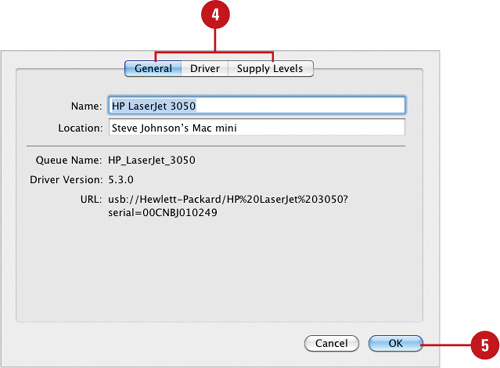
- Click the Close button.
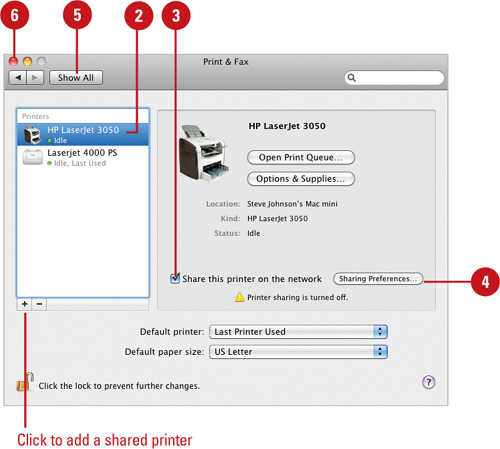
If you have a printer connected to your computer and your computer is connected to a network, you can share your printer with other network users. Before you can share a printer, you need to turn on printer sharing in the Sharing pane in System Preferences and then enable sharing for each printer in the Print & Fax pane. After you share a printer, other users—with Mac OS X, Mac OS 9, UNIX, or Windows computers—connected to your network can use your printer; you can also connect to other shared printers—including an AirPort base station—available on your network. For security purposes, if you want to share your printer with a Windows user via SMB/CIFS, you need to set Firewall options to allow all incoming connections on the Firewall tab of Security preferences. If a Windows user has Bonjour installed, the user can use the Bonjour wizard to connect to your printer on a Mac. After you share your printer, if a user connected to your network still cannot access your printer, you can provide them with your Mac IP address (available in Network preferences for the network connection, such as Built-in Ethernet) and queue name (available in Print & Fax preferences in Options & Supplies) to make the connection to the shared printer.
- Click the System Preferences icon in the Dock, and then click the Print & Fax icon.
- Select the printer you want to change print settings.
- Select the Share this printer on the network check box.
- If printer sharing is turned off, click Sharing Preferences, select the Printer Sharing check box, and then click the Close button.
You can also click the System Preferences icon in the Dock, and then click the Sharing icon.
- To share your printer with Windows users via SMB/CIFS, click Show All, click the Security icon, click Firewall, click Start, click Advanced (if you want to set other options), and then click the Back button.
- Click the Close button.
- Click the System Preferences icon in the Dock, and then click the Print & Fax icon.
- Click the Add (+) button.
- Use the toolbar buttons to specify the information required to display and select the printer you want:
IP. Provides options to setup a network printer using an IP (Internet Protocol) address, such as 192.160.1.170.
Also can provide options to setup special-case printers, such as Canon IJ Network, Epson FireWire or TCP/IP, or HP IP Printing.
Windows. Displays network printers using Windows and an Ethernet connection.
- Click Add.
- Click the Close button in the Print & Fax Browser window.
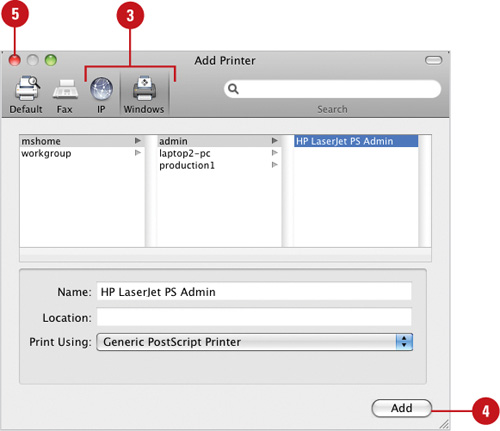
- Click the Close button.
With few exceptions, Macintosh applications give you the ability to print a document to paper. Programs such as: Microsoft Word, Corel WordPerfect; even TextEdit—Macintosh’s proprietary word processing application—give you the option to print what you have committed to type. When you select the Print option (located under the File menu), you’re instructing the application to use an output device (the printer) to place your words on paper. Since all printers have options, it’s important to be able to set those options before printing. You might be using a specific size paper or printing orientation. For this operation, you’ll use the Page Setup command, located within the File menu of most applications.
- Open a document, such as a text document.
- Click the File menu, and then click Page Setup.
- Click the Settings pop-up, and then select from the following options:
Page Attributes. This option lets you select a printer, specific paper size, orientation, and print scale.
Custom Paper Size. Click New to create a customized paper size by entering height, width, and margin values into the appropriate input fields.
Document Specific Option. This option gives you specific options for the current application.
Summary. Click Summary to see an outline of your options.
Save As Default. Click this option to save your current settings as default for future printing operations.
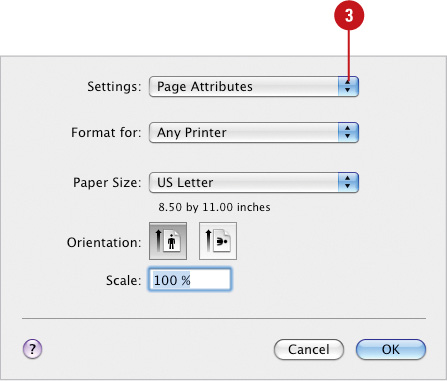
- Click the Format for pop-up, and then select a printer from the available options.
- Click the Paper Size pop-up, and then select a paper size from the available options.
- Click the Orientation buttons, and then select from the following:
Portrait
Landscape
 Enter in a printing scale percentage.
 Click OK.
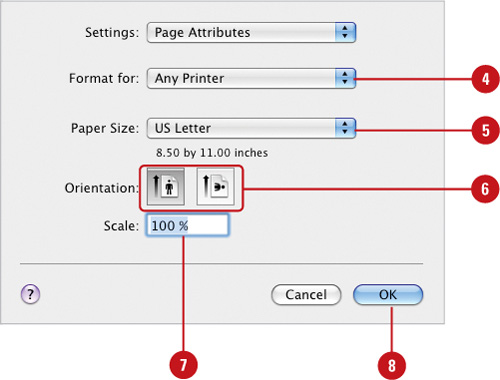
 If necessary, save the file and close the application.
Did You Know?
You can send two different print jobs to two different printers. Suppose you’re printing a large job (50 pages), and you need another job (2 pages) printed right away. Just open the second job, click the File menu, and then click Print. Click the Printer pop-up, select another printer for the second job, and then click Print. Mac OS X processes both jobs on both printers at the same time.
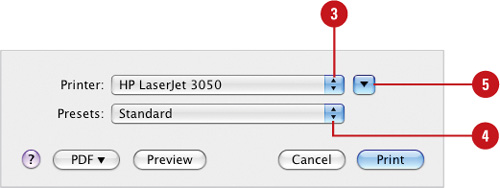
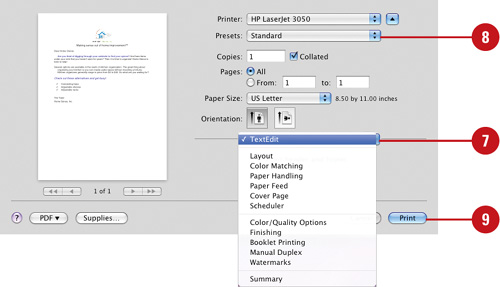
All applications that allow you to send a document to a printer, give you the ability to set up specific printing parameters. Some print options are generic, such as how many pages to print, and some are more specific, such as what paper tray to use (in a multi-tray printer). Regardless of the options, they’re all located in one specific location, the Print command of the opened application. When you select the Print command, a dialog opens with all the options associated with the default printer; including the ability to change the default printer, and any other printing values.
- Open a document.
- Click the File menu, and then click Print.
- Click the Printer pop-up, and then select a printer from the available options.
- Click the Presets pop-up, and then select a user-defined print setting.
- Click the Expand/Collapse arrow, if necessary, to expand the Print dialog box.
- Specify the following standard print options:
Preview Image. Click the arrows below the preview image to view the document.
Copies. Type the number of copies you want. Select or clear the Collated check box. Selected prints 1, 2, 3, 1, 2, 3. Cleared prints 1, 1, 2, 2, 3, 3.
Pages. Click the All option or the From option, and then enter the print range you want.
Paper Size. Select the paper size you want.
Orientation. Select the portrait or landscape option you want.
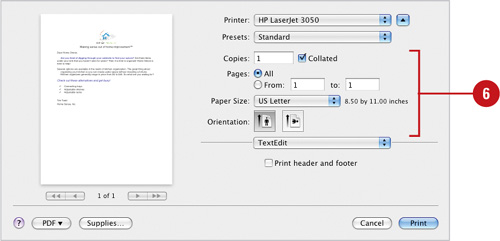
- Click the Options pop-up, and then select from the available options:
Application Specific Options. If you’re using Microsoft Word, this option lists specific options for that specific application.
Layout. When printing large documents, allows you to select how many pages per sheet, the layout direction, border options, and two-sided printing.
Color Matching. Gives you access to Macintosh’s ColorSync management system, and the ability to apply the new Quartz Filters to the printed document.
Paper Handling. Select to print in reverse order (page 1 prints last), whether to print all, odd, or even pages, and scale a document to fit the paper.
Paper Feed. Select the paper tray for all pages or a different paper tray for the first and remaining pages.
Cover Page. Lets you select options to print a cover page, such as standard, classified, unclassified, or confidential.
Scheduler. Lets you schedule a time for printing the document.
Summary. Shows a summary of all the printer options that have been selected.
- To save your print settings, click the Presets pop-up, click Save As, type a name, and then click OK.
- Click Print.
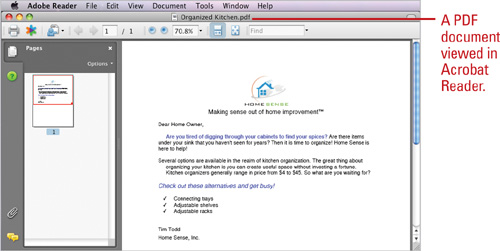
One of the most frustrating things is looking at a document on your monitor, clicking the Print command, and then deciding that what you see on the paper is not what you wanted. Unfortunately, a monitor is not a piece of paper, and the term What You See is What You Get (WYSIWYG), is a phrase that most computer users do not take very seriously. Once again, Macintosh comes to the rescue with a Preview utility that targets your default printer. If you see what you like, you can print a single copy directly from the Preview dialog, or you can close the preview, and then print using the standard Print option.
- Open or create a document in an application.
- Click the File menu, and then click Print.
- Click the Expand/Collapse arrow, if necessary, to collapse the Print dialog box and display the Preview button.
- Click Preview.
- In Preview, select from the following options:
Next/Previous. Click to move between pages.
Zoom In or Zoom Out. Click to increase or decrease the viewing size of the image.
Move. Click to move around the current page.
Text. Click to select text on the current page.
Select. Click to select a portion of the current page.
Annotate. Click to display the Annotation toolbar (New!).
Sidebar. Click to expand or collapse the thumbnail page view of the images.
- Click Cancel to close or Print to print the document.

- Quit Preview.
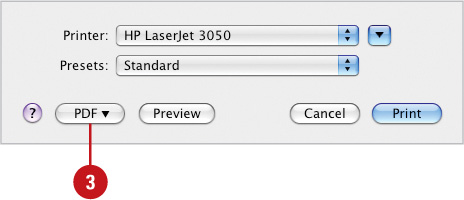
The PDF (Portable Document File) format is undoubtedly the most successful multi-platform format ever created by any company. Designed by Adobe, it has become the standard for transferring text and graphics documents, spreadsheets; even creating interactive forms, that can be filled out by a visitor, and then sent back to the owner for processing. The reason for the success of the PDF format is Adobe’s tight control over the Adobe Acrobat application (used to create PDF’s), and the Acrobat Reader application (used by visitors to read PDF’s). Once a PDF document is properly saved, it can be opened by virtually anyone that has Acrobat Reader, regardless of computer or operating system. And the good news is that the Reader application is a free download, just point your browser to http://www.acrobat.com, and then click Download Reader to obtain the latest version of the Acrobat Reader application, tailored for your specific operating system.
- Open or create a document in an application.
- Click the File menu, and then click Print.
- Click PDF, and then select the type of PDF you want to create:
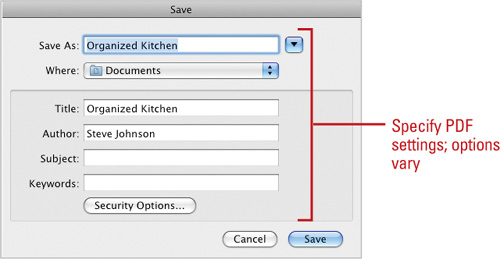
Save as PDF. Creates a PDF document. Enter a name, specify a location, and then click Save.
Fax PDF. Creates and faxes a PDF document.
Mail PDF. Creates and attaches a PDF document in an e-mail.
Save as PDF-X. Creates a compacted PDF document for the Print industry. Enter a name, specify a location, and then click Save.
Save PDF to iPhoto. Creates and exports a PDF document to iPhoto.
Save PDF to Web Receipts Folder. Creates and stores a PDF document in your Web Receipts folder; great for saving Web site receipts.
The typical method for printing a document goes something like this: You open an application, open a document, click the File menu, and then click Print. While the majority of the time that’s exactly what you want to do; especially if you need to make minor corrections to the document before printing, there is an easier way to go from document to printer: Desktop printers. Desktop printers give you the ability to create an icon of a printer, and with a drag and a drop, print a document using any connected printer. Not only is this method fast, it gives you the ability to print from two or more connected printers at a time. Printer icons can be located on the desktop, inside a folder, or even placed in the Dock.
- Click the System Preferences icon in the Dock, and then click the Print & Fax icon.
- Drag the printer you want to the desktop.
- Click the Close button.
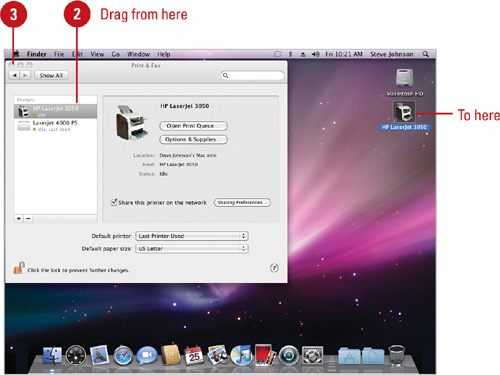
- To print a document, drag a file over the desktop printer icon.
- If the application opens, make any changes to your print options, and then click Print.
Did You Know?
You can instantly check on the status of a particular printer. Double-click a desktop print icon to check the status of the printer, including items waiting to print.
You can display all installed printers in the Printers folder. Open the Home folder, double-click the Library folder, and then double-click the Printers folder.
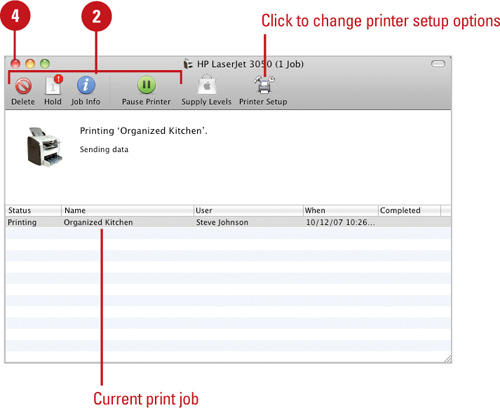
The definition of a queue is a line. In Great Britain the term is used to describe a line of people waiting to get into a movie or restaurant. In printing terms a queue is a group of documents all waiting to be printed on the same printer. Mac OS X handles the queue like a master conductor; keeping everything in order, as it smoothly instructs the printer to print each document in turn. However, sometimes problems can occur that the Print Queue utility doesn’t quite know how to handle. For example, it’s possible that you want to place a job on hold while other jobs print (preferably yours), or you many want to delete a job. In fact, you can even instruct the printer to stop printing altogether.
- Open the Printer window with the print jobs you want to manage:
Click the System Preferences icon in the Dock, click the Print & Fax icon, select the printer, and then click Open Print Queue.
Double-click the printer’s icon in the Dock while the document is printing.
Double-click the printer’s icon as a desktop printer.
- Select a job, and then click one of the following:
Delete. Deletes the job from the queue.
Hold/Resume. Stops or resumes the printing of the selected job.
Info. Opens the Options & Supplies dialog box.
Pause/Resume Printer. Pauses or resumes the printer.
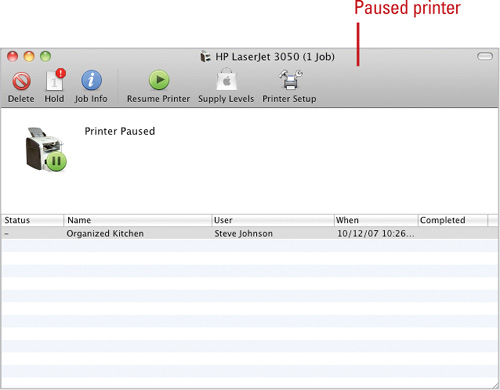
- To view information about completed print jobs, including the print time and date, click the Jobs menu, and then click Show Completed Jobs.
- Click the Close button.
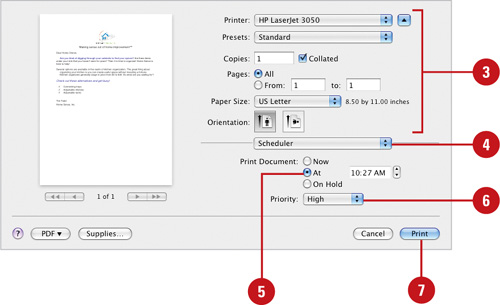
Sometimes it’s just not the best time to print a document. For example, it’s 10:00 AM and the network printer is jammed with jobs being printed by fellow office workers, who are attempting to get their documents out before lunchtime. You know that by 12:15 PM everyone is out to lunch, and the printers are free, but you don’t want to lose a quarter of your lunch break just to click the Print button. The solution is to instruct the sending application to click the Print button for you, while you enjoy your much-deserved break.
- Open the document that you want to schedule for printing at a later time.
- Click the File menu, and then click Print.
- Click the Printer pop-up, select a printer from the available options, and then specify the specifics for the print job (copies, pages, paper size, and orientation).
- Click the Options pop-up, and then click Scheduler.
- Click the At option, and then select a time for printing the document.
- Click the Priority pop-up, and then select the importance of this job, over other jobs that may be scheduled to print at the same time.
- Click Print.
- Quit your application.
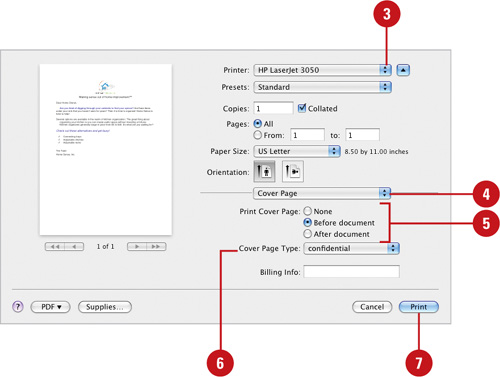
When you print a document, Mac OS X allows you to create a cover page. When you work with secure information, you can print a cover page that indicates the private nature of a document. For example, you can add a cover page with the following tags: classified, confidential, secret, top secret, and unclassified. Many companies require a cover page to be sent with sensitive documents. Since the decision to use a cover sheet is dependent on the document, Mac OS X gives you the choice to add a cover sheet each time you print a document.
- Open a document that you want to print a cover page.
- Click the File menu, and then click Print.
- Click the Printer pop-up, and then select a printer from the available options.
- Click the Options pop-up, and then click Cover Page.
- Click the print cover page option you want: None, Before document, or After document.
- Click the Cover Page Type pop-up, and then select the print cover page option you want.
- Click Print.
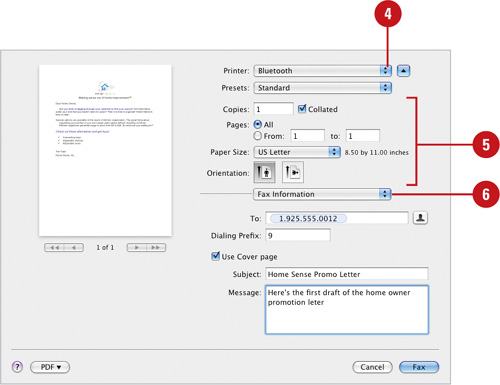
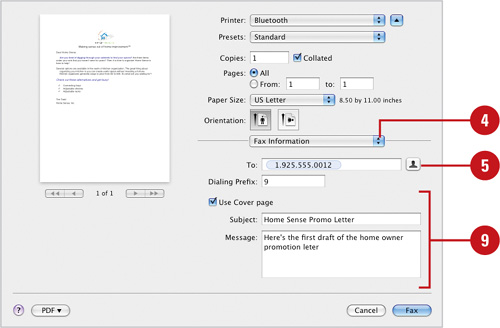
Using your Mac to print and fax is an obvious extension of the normal, everyday computing process. You have a document, and you need to fax it to a co-worker or friend. Once you’ve decided whom the fax is to be sent to, and what the fax number is, the next step is to send the fax. When you fax a document, Mac OS X allows you to create a cover page. A cover page indicates to the person receiving the fax, the number of pages in the fax, who is sending the fax, the date and time the fax was sent, and a short text paragraph. Since the decision to use a cover sheet is dependent on the document, Mac OS X gives you the choice to add a cover sheet each time you generate a fax.
- Open a document that you want to fax.
- Click the File menu, and then click Print.
- Click the PDF button, and then click Fax PDF.
- If necessary, click the Printer pop-up, and then select your fax modem.
- Specify the specifics for the fax job (copies, pages, paper size, and orientation).
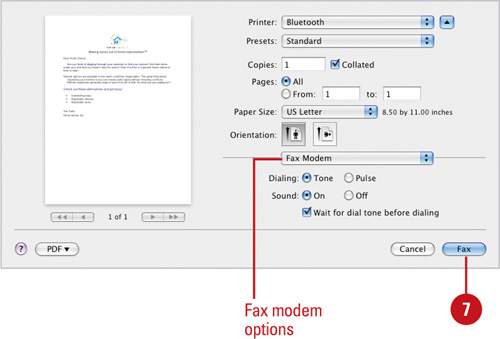
- Click the Options pop-up, and then select from the following options:
Fax Information. Type the fax number in the To field. Enter any prefixes into the Dialing Prefix field, such as 9 to get an outside line. Select the Use Cover page check box to add a fax cover sheet, and then type the subject and message text you want to display on the Cover Page.
Fax Modem. Select between tone or pulse phones, whether to hear the dialing through your computer speakers, and if you want the modem to wait for a dial tone before beginning the fax process.
Layout. When printing large documents, allows you to select how many pages per sheet, the layout direction, border options, and two-sided printing.
Color Matching. Gives you access to Macintosh’s ColorSync management system, and the ability to apply the new Quartz Filters to the printed document.
Paper Handling. Select to print in reverse order (page 1 prints last), and whether to print all, odd, or even pages.
Scheduler. Lets you schedule a time for faxing the document.
Printer Features. Select between low and high quality output.
Summary. Summarizes all of the current settings.
- Click Fax.
- Close your document.
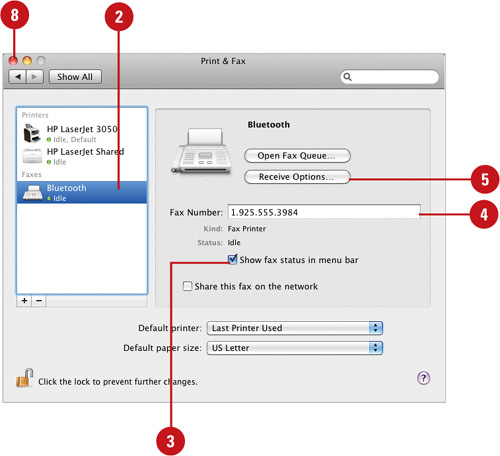
It’s actually pretty easy to set up your computer to receive faxes automatically. All you need is a phone line, and Leopard’s Fax utility. You can set up the Fax to answer after a certain number of rings, and you don’t have to be logged in; however, your Macintosh needs to be on and not in sleep mode. To make it easier to work with faxes, you can set the option to show the Fax status menu in the menu bar for easy access. After you send and receive some faxes, you can view information about the completed job. You can manage the fax queue just like the print queue.
- Click the System Preferences icon in the Dock, and then click the Print & Fax icon.
- Select the fax modem you want to use.
- To use the Fax status menu, select the Show fax status in menu bar check box.
- Enter your fax number into the field, exactly as you would dial the number.
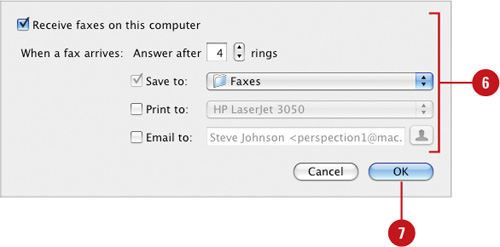
- Click Receive Options.
- Select from the following options:
Receive faxes on this computer. Select the check box to receive faxes.
When a fax arrives answer After. Enter how many rings are required before the Fax answers the phone.
Save to. Select the check box, and then select where to save the faxes.
Email to. Select the check box, and then select where to e-mail the faxes.
- Click OK.
- Click the Close button.
Did You Know?
You can check the status of a fax. Click the fax modem icon in the Dock while a document is being sent. To pause the printer, click the Pause Printer button; to resume the printer, click the Resume Printer button. To put a fax on hold, select it, and then click the Hold button; to resume the fax, select it, and then click the Resume button.
You can view fax information about completed jobs. Click the System Preferences icon in the Dock, click the Print & Fax icon, double-click the fax modem icon in the Fax list, click the Jobs menu, and then click Show Completed Jobs.
You can manually receive faxes. Wait for the phone to ring, click the Fax status menu, and then click Answer Now.
See Also
See “Managing the Print Queue” on page 211 for information on using the fax queue.
When you send a Fax, you need a document, and a fax number to send it. For example, you have a document that needs to be sent to your co-worker, and you remember that you added her fax number to her address card in the Address Book application (smart move). Do you need to open the Address Book, and write that number down, so that you have it when you send the Fax? No. Mac OS X gives you the ability to pull that information directly from the address card with the click of a button. Remember that in order for an address card to be used for faxing, it must first have a fax number entered into the card.
- Open a document that you want to fax.
- Click the File menu, and then click Print.
- Click the PDF button, and then click Fax PDF.
- Click the Options pop-up, and then click Fax Information.
- Click the Address Book button, and then select a name from your address list.
- Click the To button to add the name and fax number to the current fax request.
- Select a name.
- Click the Close button.
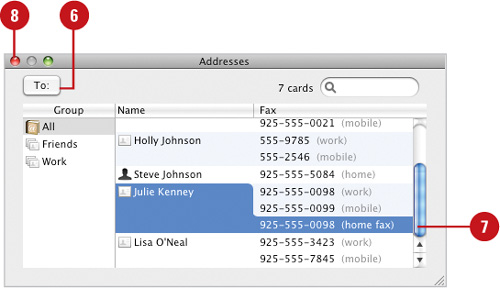
- Select the Use Cover page check box, and then type a subject and message for the fax.
Continue on with your fax requirements, and then send it.