Manage and Delete E-Mail
If you’re like many people today who are using the Internet to communicate with friends and business associates, you probably have piles of information (names, e-mail addresses, phone numbers, etc) that you need often. Unless this information is in one convenient place, and can be accessed immediately, the information becomes ineffective and you become unproductive. Apple’s Mail application solves these problems by integrating management and organization tools into one simple system. Mac OS X Snow Leopard includes Mail 4.0, a powerful application for managing electronic mail (known as e-mail), and contact information like names, and e-mail addresses.
Using Mail with an Internet connection allows you to accomplish several tasks:
Whether you want to exchange e-mail with colleagues and friends or join news feeds to access ideas and information, Mail provides you with all the tools you need. When you install Mac OS X, an icon for Mail appears in the Dock. The first time you start Mail, you need to set up an e-mail account by simply entering your e-mail address and password and letting Mail do the rest. If you are switching from another e-mail application to Mail, you can import your mailboxes and e-mail messages into Mail by answering a few questions. You can set Mail as your default e-mail application so that whenever you click an e-mail link on a Web page or select the mail command in your Web browser, Mail opens.
 Click the Mail icon in the Dock.
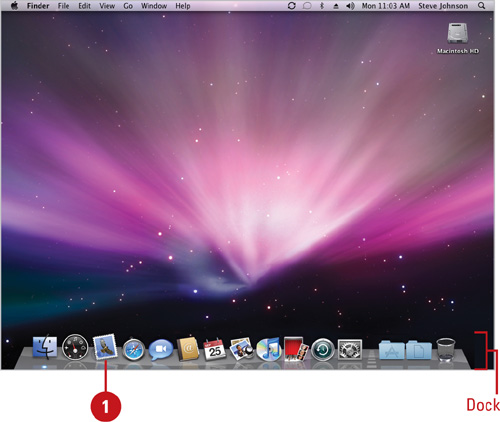
If you have a MobileMe account, Mail automatically creates an e-mail account using your MobileMe information.
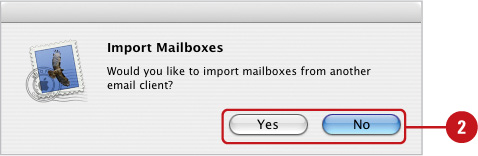
 When you start Mail for the first time, the application asks you:
If you want to import mailboxes from another e-mail client. If so, click Yes, and then follow the on-screen instructions (see details on the next page). Otherwise, click No.
If you want to view new features in this version of Mail. If so, click Yes to view a list. Otherwise, click No.
If you don’t have an e-mail account, follow the one step instruction, enter your e-mail address and password.
See Also
See “Setting Up an Account” on page 260 for information on creating an e-mail account.
- Click an option to select the importing application (use Other for Windows or UNIX), and then click Continue.
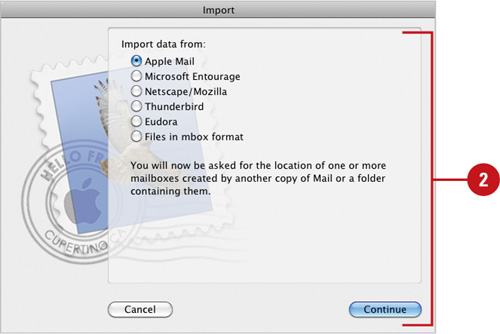
 Follow the on-screen instructions; the steps to import mailboxes and e-mail vary between applications.
Import from Apple Mail. Mailboxes are located in Library/Mail/Mailboxes in your home folder.
Import from Windows or UNIX. Use Standard mbox, except for Eudora or Netscape, which use their own. Microsoft Outlook, and Outlook Express for the PC are not supported.
Some options require that you have the importing application, such as Entourage, open.
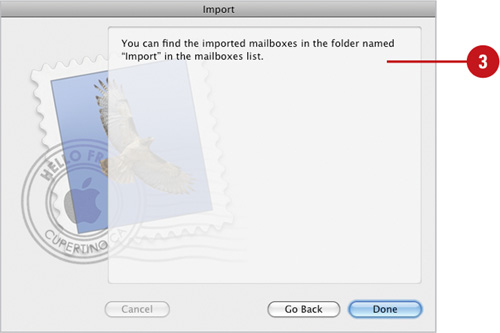
The imported mail appears in the new Import mailbox.
Before you can set up an e-mail account, you need your account name, password, e-mail server type, and the names of your incoming and outgoing e-mail servers from your ISP or network administrator. You can use Add Account to help you set up an e-mail account by answering a series of questions, which is available in the Accounts pane in Mail preferences. Mail allows you to send and retrieve e-mail from different types of e-mail servers (including MobileMe and Microsoft Exchange 2007 (New!)), which are the locations where e-mail is stored before you access it. MobileMe is an IMAP mail server type, while Microsoft Exchange is a POP or IMAP mail server type. MobileMe and Exchange allow you to have all your messages (in Mail), meetings (in iCal), and contacts (in Address Book) in one place. You can set up Mail to receive e-mail from multiple accounts where each one can have multiple e-mail addresses.
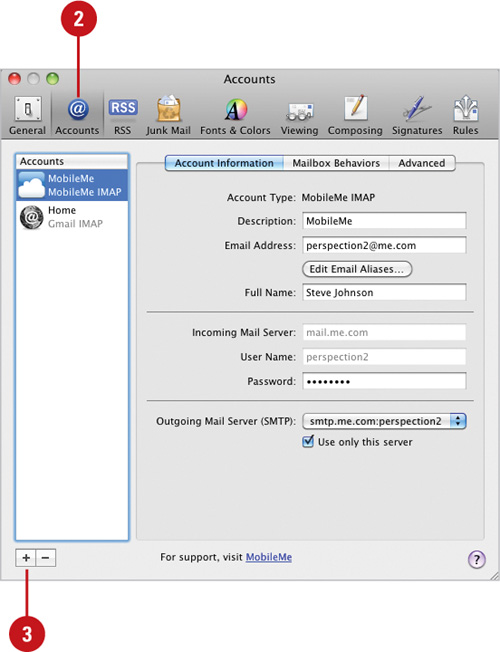
- Click the Mail menu, and then click Preferences.
- Click Accounts.
- Click the Add (+) button.
 Type the information requested (ask your ISP as needed), and then click Continue.
Full Name. The name used in outgoing e-mail.
E-mail Address. The From address in outgoing e-mail. You can type multiple addresses, each separated by a comma.
Password. The method that provides secure access to the mail server. If you prefer to type a password every time you check mail, leave this empty.
 Type the information requested (ask your ISP as needed), and then click Continue.
 Type the information requested (ask your ISP as needed), and then click Continue.
Incoming Mail Security. Select the Use Secure Sockets Layer (SSL) check box, and then select an authentication option.
 Type the information requested (ask your ISP as needed), and then click Continue.
Outgoing Mail Server. The SMTP name.
User Name and Password. The name and password that identifies you to the mail server.
 Upon completion, click the Create.
Review the account information in the Accounts pane in Mail preferences.

Did You Know?
You can create a new mail account using a mail script. Click the Scripts (S) menu, point to Mail Scripts, and then click Create New Mail Account. You can also start the script from the AppleScript Editor (in the Utilities folder). Click an account type, and then click OK. Type the information requested (ask your ISP as needed), and then click OK, or click Yes or No to the question.
You can set up Mail to receive e-mail from multiple e-mail accounts and from different computers. As you work with multiple accounts, you can use the Accounts pane in Mail preferences to change the order, rename, or delete accounts. Account order indicates the mailbox list order and helps determine which account (if not specified) Mail uses to send an e-mail message. If an account changes, or you no longer need it, you can rename or delete it. If you’re using an IMAP or a MobileMe account, mail stays on the mail server so you can access it from any computer. If you’re using a POP account, mail downloads to your computer unless you select an Accounts pane option to keep a copy on the mail server.
- Click the Mail menu, and then click Preferences.
- Click Accounts.
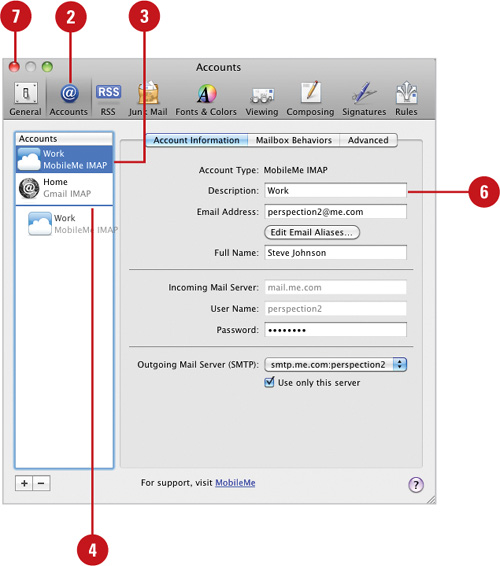
- Select the account you want to manage.
- To change the order in which accounts are listed in the Mailbox list, drag the account names.
- To delete an e-mail account, click the account name, click the Delete button (-), and then click OK.
- To rename an e-mail account, click the Account Information tab, and then change the name in the Description field.
- Click the Close button, and then click Save.
- Click Accounts.
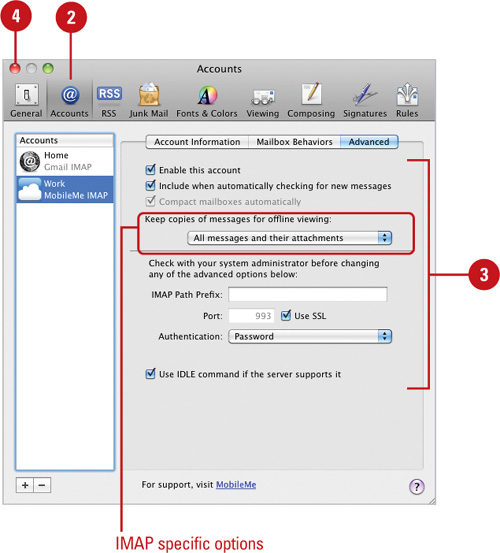
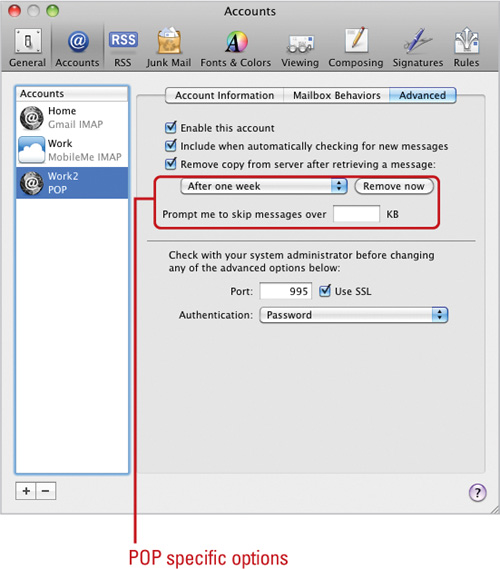
- Click the Advanced tab.
- Select from the following options:
Enable this account. Check or clear to turn this account on or off.
Include when automatically checking for new mail. Check or clear to check or exclude this account from automatic mail checking.
Keep copies of messages for offline viewing (IMAP only). Click the pop-up to download e-mail to your computer for offline viewing.
Remove copy from server after retrieving a message (POP only). Check to check e-mail from different computers, and then specify a removal duration.
Prompt me to skip messages Over __ KB (POP only). Check to skip retrieval of large e-mail.
Use SSL. If your mail provider supports Secure Sockets Layer (SSL), check for increased security.
Authentication. Click the pop-up to specify a security access method. Typically, Password.
- Click the Close button, and then click Save.

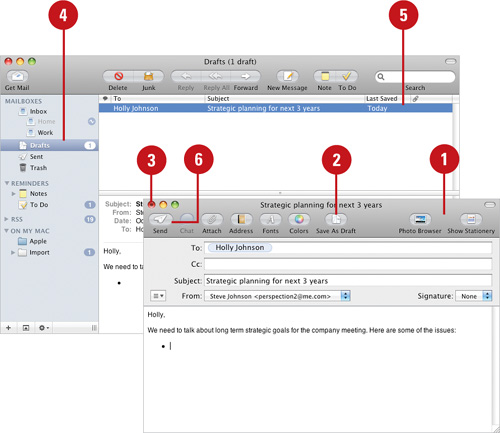
E-mail is becoming the primary form of written communication for many people. E-mail messages follow a standard memo format, with fields for the sender, recipient, date, and subject of the message. To send an e-mail message, you need to type the recipients e-mail address, type a subject, then type the message itself. You can send the same message to more than one individual, to a contact group, or to a combination of individuals and groups. If you type multiple addresses, you must separate the addresses with a comma (,). If you have multiple accounts, you can select which account you want to use to send the e-mail message.
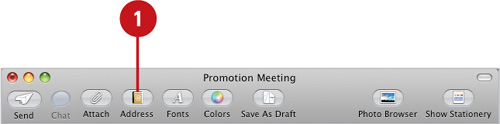
- Click the New Message button on the Mail toolbar.
- Type the e-mail addresses or names of each recipient or groups.
- Type the e-mail addresses or names for those recipients or groups who should receive a carbon copy of the message.
- Type a subject that indicates the purpose of the message.
- Select a From e-mail address and outgoing server (New!).
- To add custom mail options, click the Customize button, and then click an option.
Bcc Address Field. An address not included in recipients’ list.
Reply-To Address Field. An alternate address for replies.
Priority. Add mail priority.
Customize. Use to select from multiple accounts.
- Type the content of your message.
- If a red dotted line appears under a word, Control-click the word, and then click the correct spelling.
 Click the Send button on the toolbar.
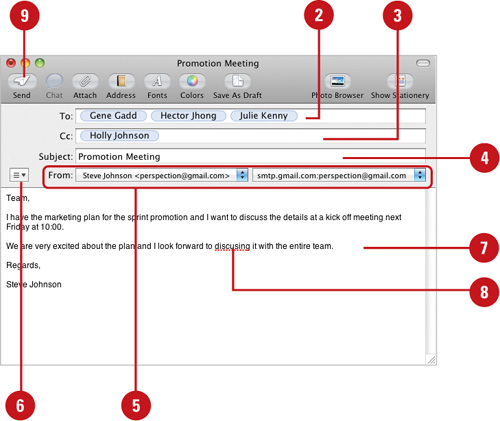
Messages are sent out, and then copies appear in the Sent mailbox.
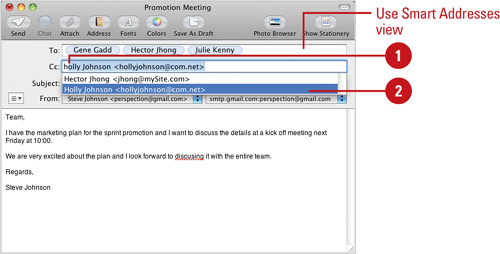
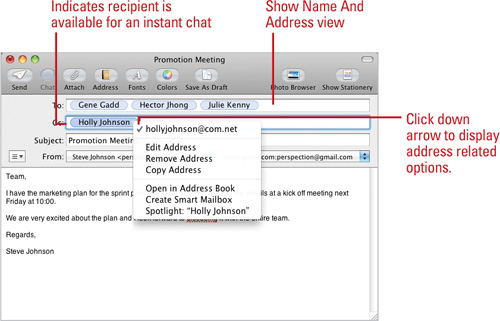
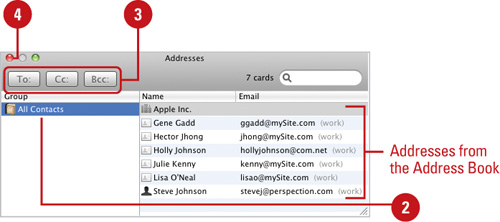
Mail gives you several ways to address an e-mail. You can type the address manually by typing it in the To or Cc field, or you can select or drag an address from your Address Book. When you begin to type an e-mail address, Mail looks up the name and address in your Address Book, followed by your Previous Recipients list, and then followed by names in the LDAP database (typically for corporate use if specified in the Composing pane of Mail preferences). If Mail finds a match, it automatically completes the recipients name. If you type multiple addresses, you must separate the addresses with a comma (,). You can make addressing easier to view by using Smart Addresses, which displays the recipient name only without the e-mail address for those in your Address Book and Previous Recipients list. You can display the Previous Recipients list to remove addresses you misspelled or don’t need anymore, or add addresses to your Address Book.
- In the New Message window, type the first few letters of a name, address, or group.
Mail suggests possible matches.
- Click the name you want to enter.
Did You Know?
You can use Smart Addresses to show names. Smart Address are names and addresses in your address book, Previous Recipients list, or any LDAP server. Any names not found in your Address Book or Previous Recipients list still appear in full. To enable it, click the Mail menu, click Preferences, click Viewing, select the Use Smart Addresses check box, and then click OK.
See Also
See “Creating an Address Book” on page 138 for information on creating a group of recipients.
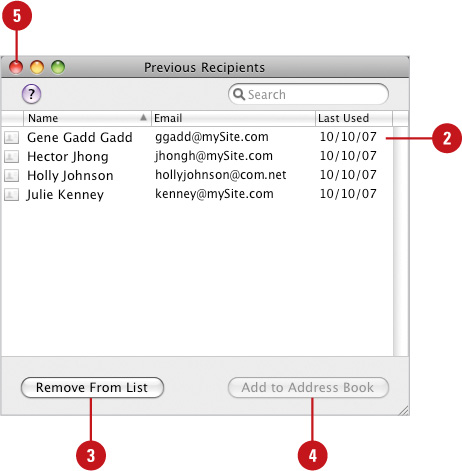
- Click the Window menu, and then click Previous Recipients.
- Select an address.
- To remove the address, click Remove From List.
- To add the address to the Address Book, click the Add To Address Book.
- Click the Close button.
Did You Know?
You can set addressing preferences. Click the Mail menu, click Preferences, click the Composing button, select or clear the following check boxes: Automatically Complete Addresses, When Sending To A Group, Show All Member Address, and Mark Addresses Not In This Domain, and then type a domain name such as apple.com to mark it as safe when using LDAP.
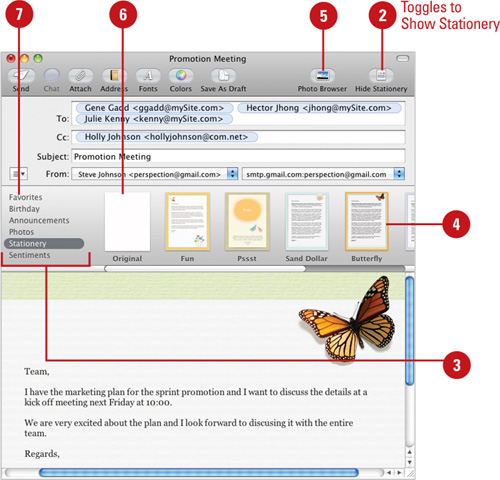
Instead of using a standard white background for your e-mail, you can spruce it up with some stationery. If you want to send an e-mail message for a special occasion, such as a birthday, thank you, get well, or just for fun, you can quickly create the look you want by applying stationery templates with professionally designed layouts, fonts, and colors. If you want to use your own photos, you can use the Photo Browser in Mail to find photos in your iPhoto library, Photo Booth or Aperture, and insert them into your e-mail messages.
- Open the message you want to apply a stationery.
- Click the Show Stationery button on the Mail toolbar.
- Click a category.
- Click the thumbnail of the template you want. To change the background for some templates, click the thumbnail again.
- To add images, use any of the following methods:
Photo Browser. Click the Photo Browser button, select/drag the images to the e-mail.
Finder. Drag an image file from the desktop or Finder window.
- To remove a template, click the Stationery category, and then click Original.
- To add a template to your favorites list, drag it to the Favorites category. To remove it, click the Delete (x) button in Favorites.
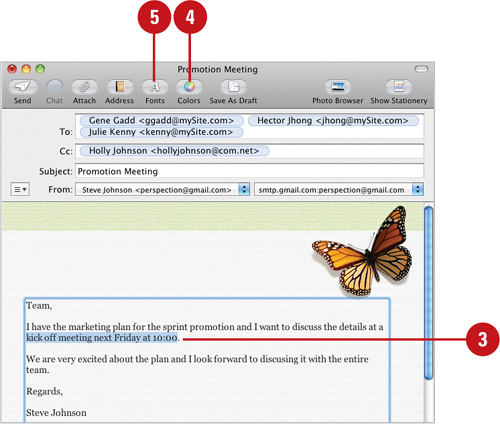
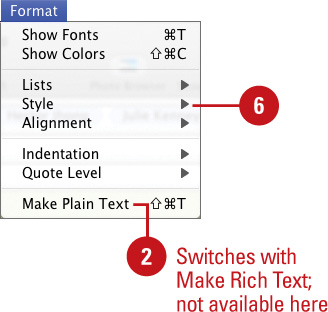
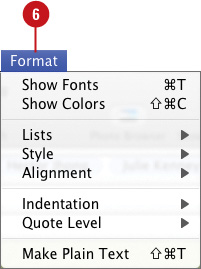
You can specify a file format for message text. The Plain Text format is one that all e-mail programs recognize, but it doesn’t support text formatting. The Rich Text format allows text formatting, but it’s not always supported. However, most programs that don’t recognize Rich Text, convert the message to plain text. When you use Rich Text, you can use formatting tools, such as bold, italicize, underline, numbered and bulleted lists, indentations, and color text and backgrounds, on the Format menu and in the Fonts and Color dialogs to help draw the reader’s attention to key words and emphasize the meaning of your message.
- Open the message you want to format.
- Click the Format menu, and then click Make Rich Text, if available.
- Select the text you want to format.
- Click the Colors button on the toolbar, use the dialog color wheel to select a color, and then click the Close button.
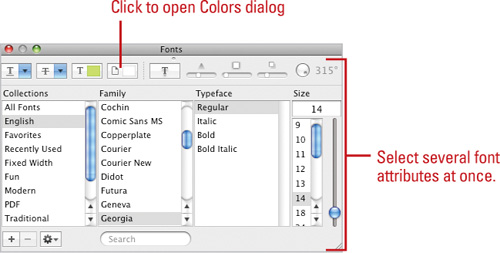
- Click the Fonts button on the toolbar, use the dialog settings (font type, size, style, and effects) to format the message text, and then click the Close button.
- Click the Format menu, point to Lists, Style, Alignment, or Indentation, and then select a font formatting option you want.
If you type the same information at the end of each e-mail message, such as Best Regards and your name, then you can automate that task by creating a signature. You can add one signature to all messages or create several and select one when you compose a message. You can customize your signature with a variety of formatting styles, such as font type, size, and color, and you can even include a picture or attach your virtual business card, known as a vCard, from your Address Book.
- Click the Mail menu, click Preferences, and then click Signatures.
- Select an account or All Signatures.
- Click the Add (+) button.
- Type a title for the signature.
- Type/modify the signature text.
- For a Rich Text signature, use the Format menu to change the text font, color, style, or alignment.
- If you want, drag a picture or vCard, and then click OK.
- Click the Choose Signature pop-up, and then select a signature, None, or an option.
- Select or clear the Place signature above quoted text check box to place the signature above or below the quoted text.
 To remove a signature, select it, and then click the Remove (-) button.
 Click the Close button.
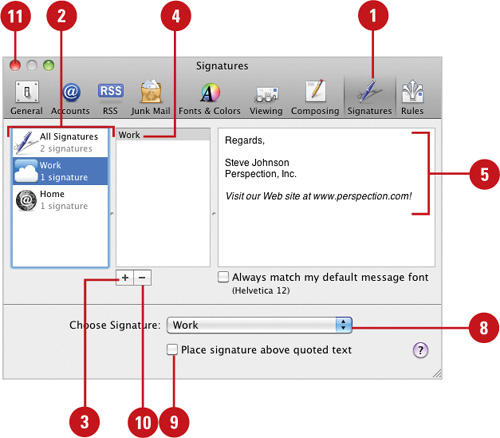
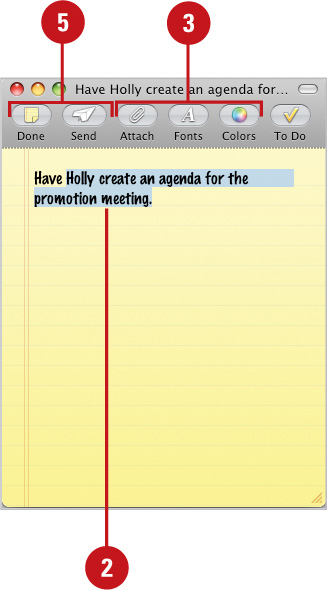
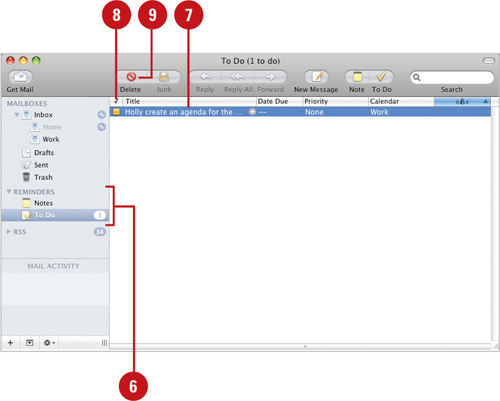
Instead of jotting notes down on paper, you can use Mail to create notes and then to help you organize and track them as to-do’s so the things you need done, get done. You can include formatted text, graphics, and attachments in a note. After you create a note, you create a to-do item or send the note to another person. You can select content in a note or message to create a to-do, which can include a due date, reminder alarm, and priorities. The to-do items are automatically added to your iCal calendar.
- Click the Note button on the Mail toolbar.
- Type the note text you want in the Note window.
Mail uses the first line of the note as the subject.
- To format the note, use the Attach, Fonts, and Colors buttons on the Note toolbar.
- To create a to-do item, select the text you want to use, and then click the To Do button on the Note toolbar.
To create a to-do item in a message, select the message or its content, click the To Do button, type a name if necessary, and then press Return.
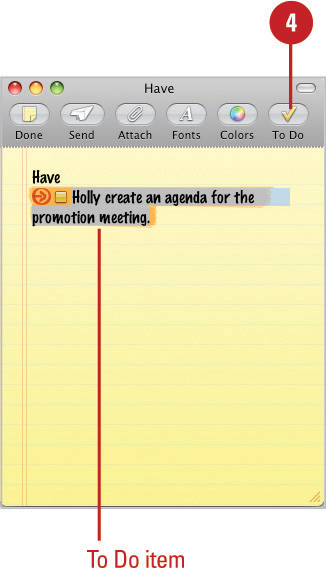
- Click the Done or Send button on the Note toolbar.
- To view notes and to-do’s, expand Reminders in the Mailbox list, and then click Notes or To Do.
- To modify a to-do item (title, date due, priority, iCal calendar, or alarm), point to the item, and then type in the field or use a pop-up.
- To mark an item complete, select the check box next to it.
- To delete an item from Mail and iCal, select it, and then click the Delete button.
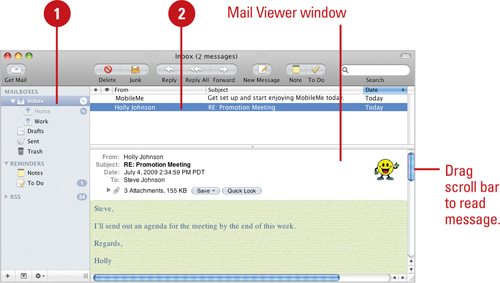
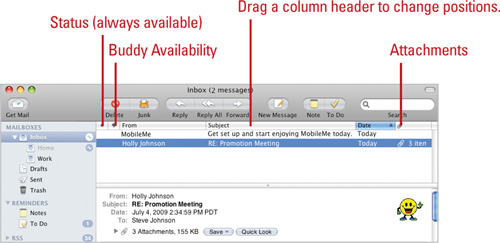
You can receive e-mail anytime day or night—even when your computer is turned off. You can retrieve your e-mail manually or set Mail to do so automatically by setting options in Mail preferences. When you start Mail, the application checks for new e-mail. It continues to check periodically while the application is open. New messages appear in the Inbox along with any messages you haven’t stored elsewhere or deleted. A blue dot appears next to unread messages in the Mail Viewer window. The Message list displays the subject line of a message and other information, such as date received, senders name, attachments, and priority flags, which you can customize to display the information you need.
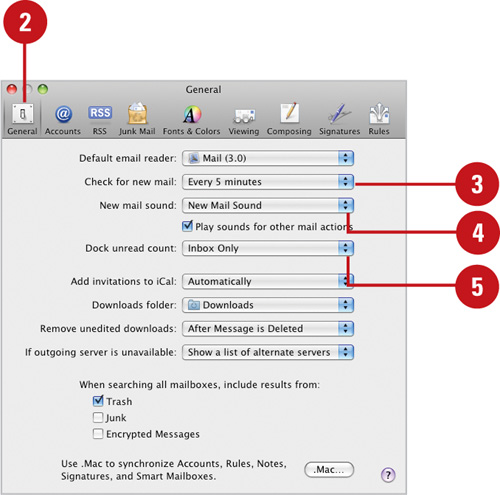
- Click the Mail menu, and then click Preferences.
- Click General.
- Click the Check for new mail pop-up, and then select a duration.
- Click the New mail sound pop-up, and then select a sound.
- Click the Dock unread count pop-up, and then select the mailboxes included in the unread mail count on the Mail icon in the Dock.
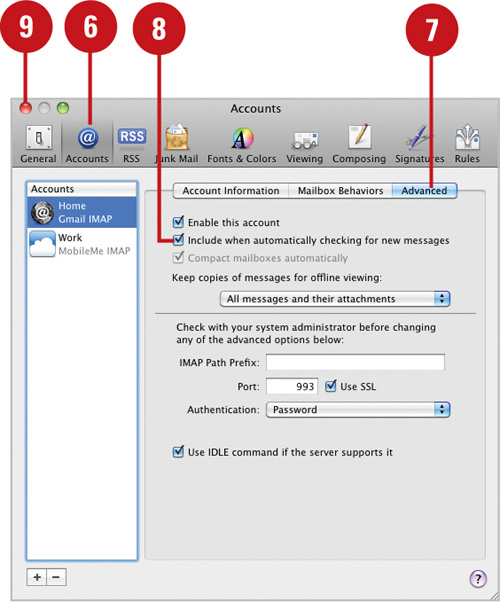
- Click Accounts.
- Select an account, and then click the Advanced tab.
- Select the Include when automatically checking for new mail check box.
- Click the Close button.
- To check for mail manually, click the Get Mail button on the Mail toolbar, or click the Mailbox menu, point to Get New Mail, and then click In All Accounts or an account name.

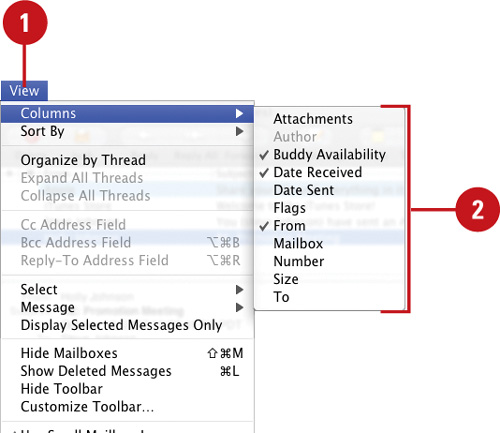
- Click the View menu, and then point to Columns.
- Select a column to display:
Attachments. Displays a paper clip for attachments.
Buddy Availability. Displays buddy status information.
Date Received. Displays date received.
Date Sent. Displays date sent.
Flags. Displays a priority flag.
From. Displays sender name.
Mailbox. Displays name/account.
Number. Displays sequential numbers next to the messages.
Size. Displays size of a message or mailbox.
To. Displays recipient name.
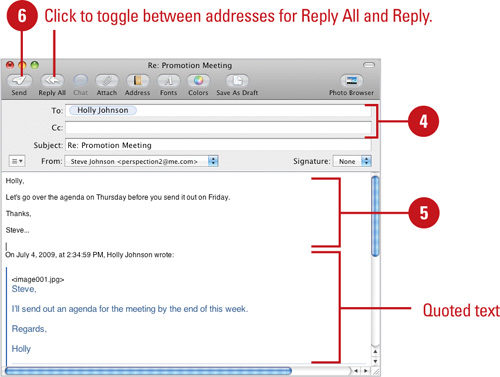
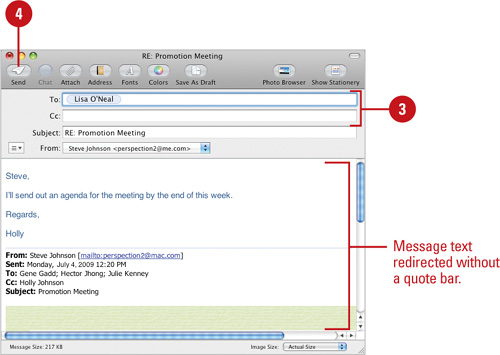
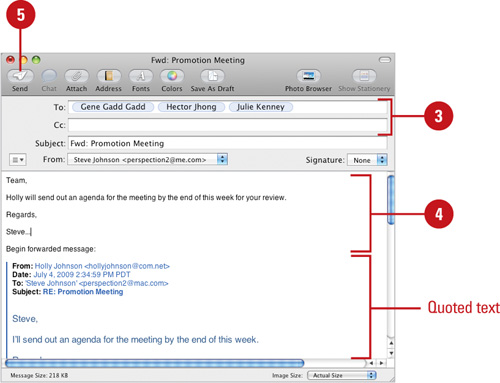
You can respond to a message in three ways: reply to it, which creates a new message addressed to the sender(s) and other recipients; forward it, which creates a new message you can send to someone else; or redirect it, which creates a new message from the original sender you can send to someone else (useful when you receive a message by mistake). When you reply or forward a message, the original message appears in the message response. You can reply to the sender only, or to all the people who received the original message.
- Select the e-mail message you want to reply to.
- If you want, select a portion of the text to include as quoted text.
- Click the Reply button to respond to the sender only, or click the Reply All button to respond to the sender and all recipients listed in the e-mail.
- Add or delete names from the To or the Cc field.
- Type your message.
- Click the Send button on the Message toolbar.
A curved arrow appears in the Status column next to messages you reply to.
Did You Know?
You can reply with an instant message. If you’re logged into iChat, Mail displays a green dot indicator next to messages from buddies who are online, or a yellow dot indicator when the person is idle. Click the Mail menu, click Preferences, click the Viewing button, select the Show Online Buddy Status check box, and then click the Close button. Select a message in the Message list, click the Message menu, and then click Reply With iChat.
You can easily share a file, such as a picture, document, vCard (virtual business card from your Address Book), sound, or movie by attaching it to an e-mail message. Some ISPs have trouble sending attachments between 2 and 10 megabytes MB, so it’s a good idea to check with your ISP for limits on file size. Upon receiving the e-mail, the recipient can view it with Quick Look, open the file in the application that created it, or save it on a disk for use in other applications directly from the Mail Viewer window. The Message list displays the number and size of the attachments. If you send an e-mail to a Windows user, the attachment is automatically compressed in a standard zipped (gzip) format so it can be read.
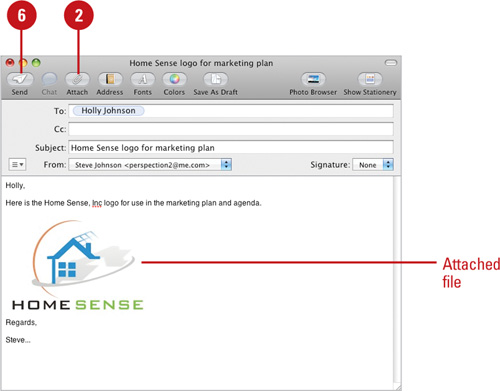
- Compose a new message or reply to an existing message.
- Click the Attach button on the Message toolbar.
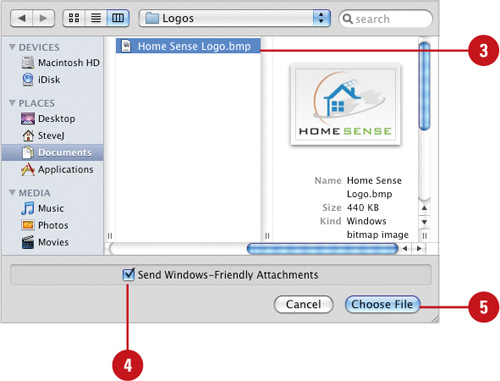
- Select the drive and folder that contains the file, and then select it.
- Select or clear the Send Windows-Friendly Attachments check box.
- Click Choose File.
- Click the Send button on the Message toolbar.
Did You Know?
You should compress large files before you send them. Select the file or files you want to compress in the Finder, click the File menu, and then click Archive. Rename the compressed file with a .zip extension as necessary.
You can send a Web link in an e-mail message. Type or paste the full URL, including “http://” in the body of the message. Your recipients can click the link to go directly to the Web page.
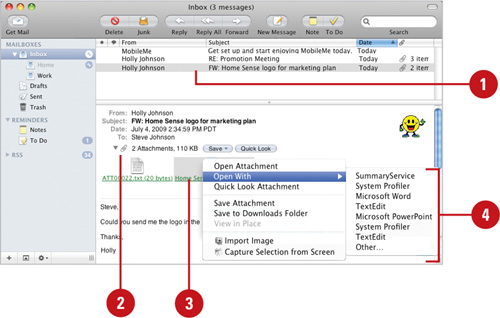
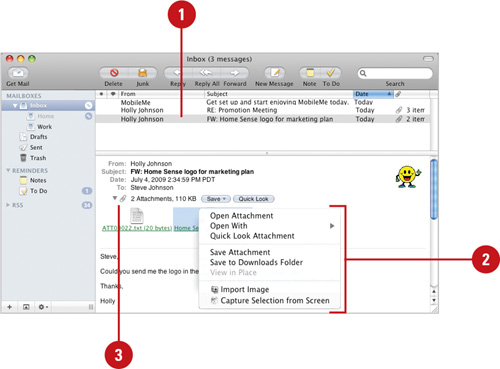
- Select the message with the attached file.
- Use one of the following methods:
Save All. Click the File menu, and then click Save Attachment, or click Save All.
Save Individual. Click the triangle in the header of the message to see the icons of each attached file. Control+ click an icon, and then click Save Attachment or Save to Downloads Folder (by passes Steps 3 and 4).
Quick Look. Click the view attachments in Quick Look.
- Select the drive and folder where you want to save the files.
- Click Save.
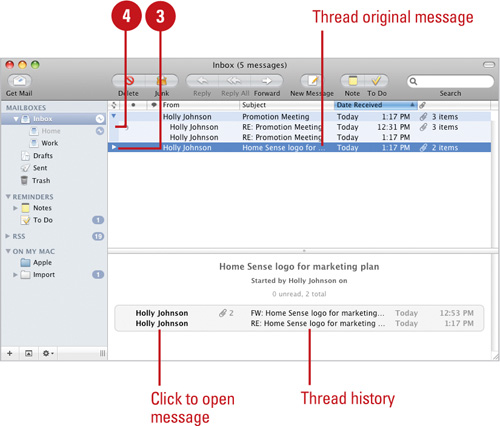
A common problem with using e-mail is an overcrowded Inbox. To keep your Inbox organized, you should move messages you want to save to other mailboxes and subfolders (a mailbox inside another mailbox), delete messages you no longer want, and create new mailboxes as you need them. A mailbox can store messages on your computer, within a specific account, or within an existing mailbox. When a mailbox contains both messages and other mailboxes, the mailbox icon appears in blue. You can also organize your e-mail by message threads, which is the chain of replies in an e-mail conversation. You can group threads together or highlight them by color to make them easier to see.
- To create a subfolder in a mailbox, select the existing mailbox.
- Click the Add (+) button at the bottom of the Mailbox list, and then click New Mailbox.
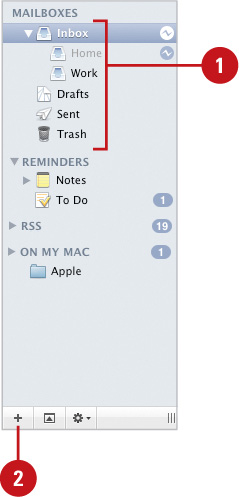
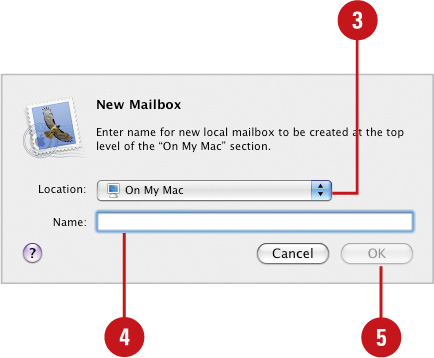
- Click the Location pop-up, and then select On My Mac (local computer) or an IMAP account (online mail server).
- Type a name for the new mailbox.
- Click OK.
Did You Know?
You can show and hide the Mailbox list. Click the View menu, and then click Show/Hide Mailboxes.
You can move items in the Mailbox list. Drag the sidebar item to a new location in the Mailbox list (New!).
You can delete a mailbox. Control+ click it, click Delete Mailbox, and then click Delete.
You can rename a mailbox. Control+ click the mailbox, click Rename Mailbox, change it, and then press Return.
You can change size of mailbox icons. Click the View menu, and then click Use Small Mailbox Icons.
- Open the mailbox with the e-mail you want to view as threads.
- Click the View menu, and then click Organize By Thread.
- To see all the messages in all threads, click the triangle next to the thread.
- To collapse a single thread, click the triangle next to the thread.
- To ungroup, click the View menu, and then click Organize By Thread.
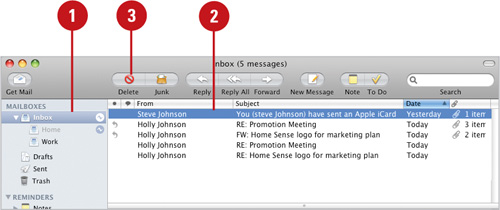
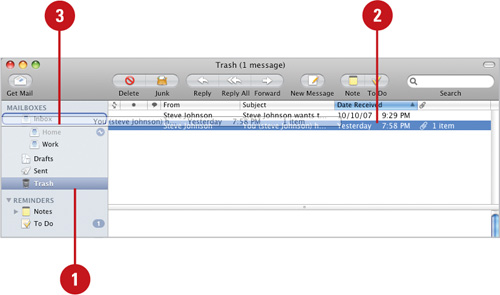
Deleting unwanted messages makes it easier to see the new messages you receive and to keep track of messages to which you have already responded. When you delete an e-mail message, Mail simply moves it into the Trash mailbox. If you want to recover a deleted message, you just have to retrieve it from the Trash mailbox. To get rid of a message permanently, you need to open the Trash mailbox, select the message, and then click Delete. Mail automatically places e-mail messages in the Sent mailbox every time you send them. You’ll want to periodically open the Sent mailbox and delete messages so your mail account doesn’t get too large. You can also set account options to help you delete messages.
- Click a mailbox icon in the Mailbox list with the e-mail you want to delete.
- Click the unwanted e-mail.
- Click the Delete button on the toolbar.
- To erase messages in the Trash mailbox, click the Mailbox menu, point to Erase Deleted Messages, click In All Accounts or a specific account, and then click OK.
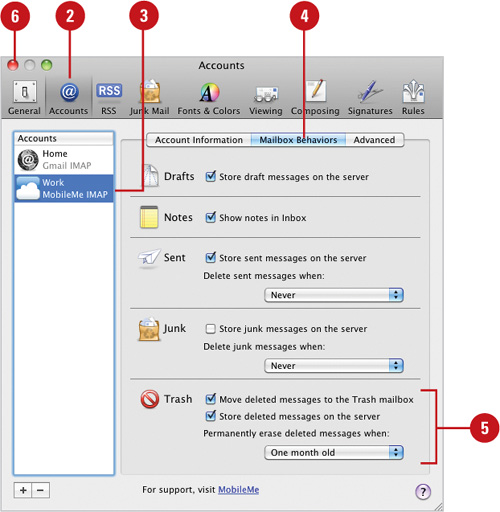
- Click Accounts.
- Select an account.
- Click the Mailbox Behaviors tab.
- Select any of the following:
Move deleted messages to the trash mailbox. Check to move deleted messages to the Trash.
Store deleted messages on the server. Check to keep deleted messages on the mail server for an IMAP account.
Permanently erase deleted messages when. Click the pop-up, and then select based on the duration you want.
- Click the Close button, and then click Save.
Did You Know?
You can save sent messages on the mail server. Click the Mail menu, click Preferences, click Accounts, click the Special Mailboxes tab, select the Store Sent Messages On The Server check box, and then click the Close button.
You can print e-mail messages. Select the message(s) you want to print, click the File menu, click Print, and then click Print. If you select multiple messages, the e-mails are combined into a single document in the order you selected them in the Message list.
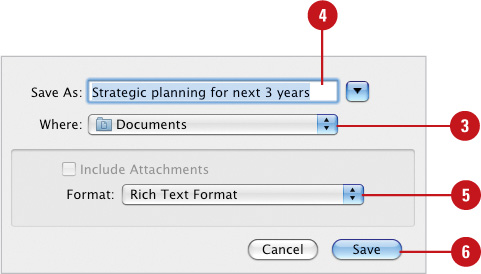
If you have not finished composing a message, you can save it in the Drafts mailbox and work on it later. If you quit Mail with an open message, Mail automatically saves it as a draft. If you want to use the text from a message in a word processing application, such as TextEdit, you can save a message as a separate file in the Rich Text or Plain Text format. You can also save one or more messages in the Raw Message Source (mbox) format, which is a standard mail message format; you can import mbox into other mail applications, including Mail.
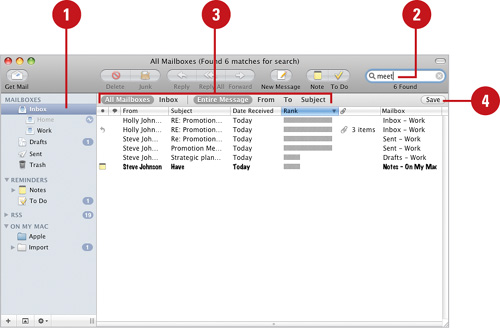
If you’re looking for an e-mail message with specific information, you can use the Mail search field to search for text in an open message, in all messages in a mailbox, in all messages for a specific account, or in all mailboxes. If you search in the From, To, or Subject fields, Mail finds messages that contain the entire search phrase as typed. If you search in mailboxes or the entire message, Mail only finds messages containing the same beginning letters you typed. To refine your search, use the words “and,” “or,” “not,” and parentheses in the Search field. The results appear in the Message list with rankings indicating the best matches. If you frequently search for the same text, you can create a Smart Mailbox to make it quick and easy to find in the future. In addition to the search field, you can also use Spotlight to find e-mails, as well as other text in Mail, such as to-dos and notes.
- To search in selected mailboxes, select the mailboxes or accounts.
- Click in the Search field, and then type the text you want to find.
As you type, Mail starts the search and displays the results.
- Click All Mailboxes, a specific mailbox, Entire Message, From, To, or Subject on the Search bar to narrow the results.
- To save the search as a Smart Mailbox, click the Save button on the Search bar, enter a name, and then click OK.
- To broaden the search, click the Spotlight icon on the menu bar, type the text you want, and then click the search result you want on the menu.
Table . Search Techniques
Technique | Example |
|---|---|
Use descriptive words | Home improvement |
Place phrases in quotes | “Home Sense” |
Use AND to find all words | “meeting and promotion” |
Use OR to find at least one word | “meeting or promotion” |
Use NOT to find the first one but not the second one | “meeting not promotion” |
Use ( ) to find combinations | “meeting and (promotion or fall)” |
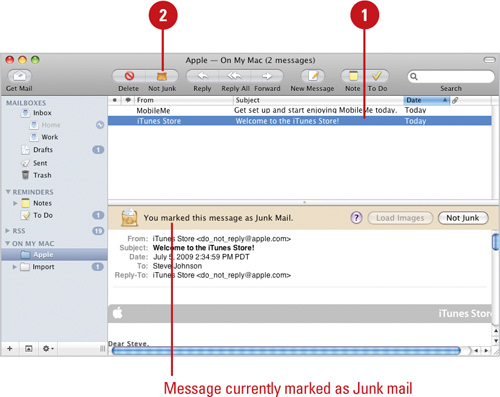
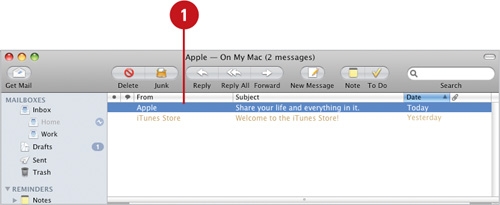
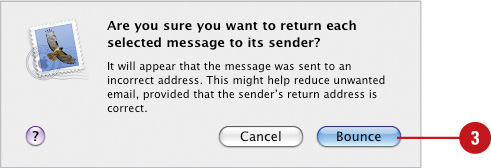
You can have Mail handle junk e-mail for you. You can specify what should be considered junk e-mail and how Mail should handle that e-mail. You can ensure that e-mail which might seem to be junk e-mail, but is actually from a person or site that you are interested in, gets to you. You can mark messages as junk mail to help train Mail (set rules) to more effectively distinguish between junk and non junk. If you receive annoying mass mailings, you can bounce, or reject, the message back to the sender (as long as their return address is valid, which isn’t usually the case with spam) and the message appears to the sender as if your address is invalid and the message could not be delivered. Mail also moves the message to the Trash.
- Click the Mail menu, and then click Preferences.
- Click Junk Mail.
- Select the Enable junk mail filtering check box.
- Click the option to leave it in my Inbox and change the text color or move it to the Junk mailbox.
- Select the check boxes to exempt e-mail from junk filtering:
Sender of message is in my Address Book
Sender of message is in my previous recipients
Message is addressed using my full name
Filter junk mail before applying my rules
- Click Advanced.
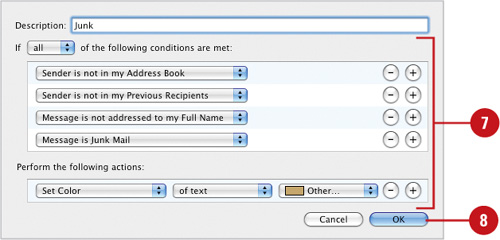
The default junk mail rule appears, which you can customize.
- Use the pop-ups, fields, and buttons to specify the criteria for the junk rule to apply to messages.
- Click OK.
- Click the Close button.

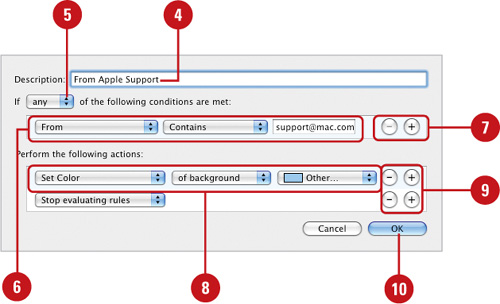
Mail can direct incoming messages that meet criteria to other mailboxes in the Mailbox list rather than to your Inbox. You can set message rules to store any messages you receive from a friend in a different folder so they won’t clutter your Inbox. When you are ready to read the messages, you simply open the mailbox and access the messages just as you would messages in the Inbox. You can also set rules to automatically reply to incoming messages, which is useful when you are out of the office, or forward incoming messages with additional message text. You can also color-code the messages that you send to or receive from particular people for quick and easy recognition.
- Click the Mail menu, and then click Preferences.
- Click Rules.
- Click Add Rule.
- Type a name for this rule.
- Click the pop-up, and then click Any or All to set initial criteria.
- Use the pop-ups and fields, to specify the criteria for the rule to apply to a message.
- Click the Add (+) button or Remove (-) button to add or remove criteria.
- Under the Perform The Following Actions area, use the pop-ups and fields to specify the actions you want to be taken if the criteria is met.
- Click the Add button (+) or Subtract button (-) to add or remove actions.
- Click OK, and then click Apply or Don’t Apply.
- To edit, duplicate, or remove a rule, select a rule, and then click Edit, Duplicate, or Remove.
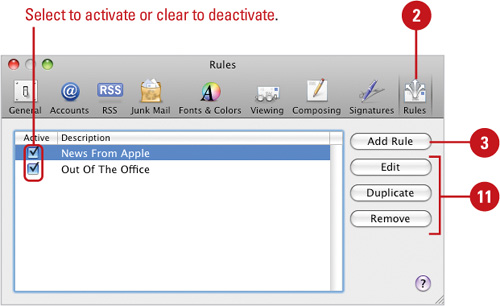
 Click the Close button.
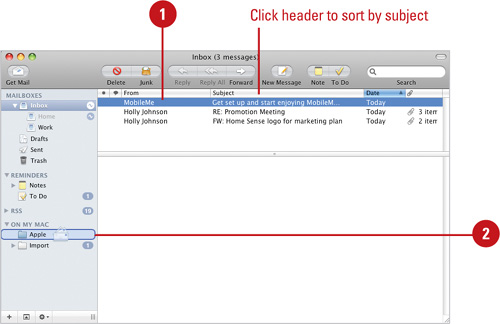
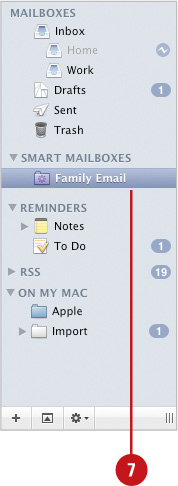
A Smart Mailbox displays e-mail messages or to-do items based on a search criteria in an easy to use folder in the Mailboxes list. The message or to-do items are not moved to the Smart Mailboxes. Each time you select a Smart Mailbox, Mail performs a search to create an up-to-date list of results. A Smart Mailbox is like a Smart Folder for Mail. You can create a Smart Mailbox for RSS articles, specific content, or from a specific sender.
- To create a subfolder in a mailbox, select the existing mailbox.
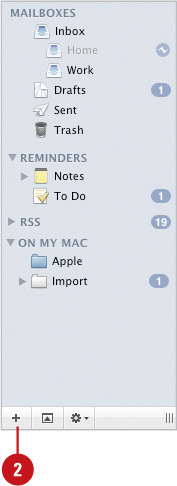
- Click the Add (+) button at the bottom of the Mailbox list, and then click New Smart Mailbox.
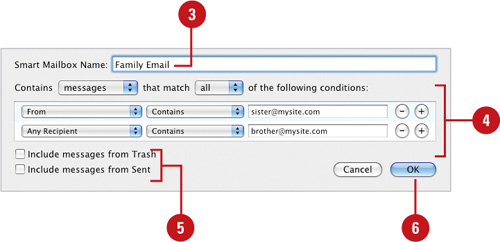
- Type a name for the new mailbox.
- Specify the criteria you want for the Smart Mailbox:
Contents. Select messages or to-do’s.
That Match. Select any or all.
Conditions. Use the pop-ups to specify the criteria you want for the Smart Mailbox.
Add or Remove Conditions. Click the Add (+) or Remove (-) buttons. You can add as many as you want.
- Select or clear the Include messages from trash or Include messages from sent check boxes.
- Click OK.
- To edit a Smart Mailbox, select the mailbox, click the Mailbox menu, and then click Edit Smart Mailbox.
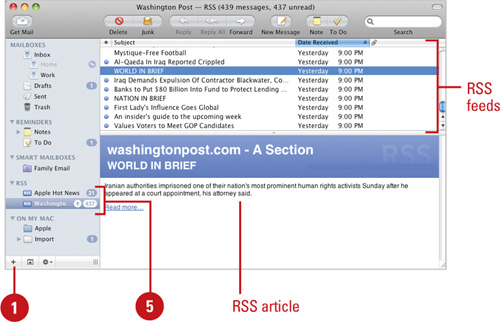
Since e-mail is an important form of communication, you can use Mail to subscribe to RSS (Really Simple Syndication) feeds and display them in your inbox. A feed delivers frequently updated Web content to your browser on a continuous basis. A feed, is usually offered on a subscription basis and typically free of charge. A feed can deliver text content in the form of news headlines or blogs, or digital content in the form of pictures, audio, and video. When you get feeds in e-mail, a line or two of each articles content and a link to the full article appears for you to quickly and easily view.
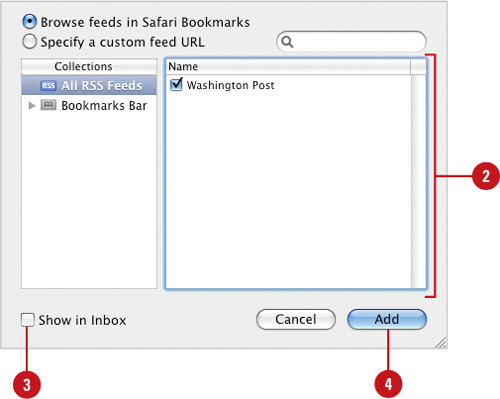
- Click the Add (+) button at the bottom of the Mailbox list, and then click Add RSS Articles.
- Browse and select a feed from the ones you bookmarked in Safari, or enter a Web address for a new feed.
Find Feeds. Use the Search field to locate the feeds you want.
Multiple Feed. Use Shift-click or Command-click to select multiple feeds.
- Select the Show in Inbox check box to include the feeds in your inbox.
- Click Add.
- Click the RSS feed you want to view in the Source pane.