Macs were born for multimedia, and even after 20 years, they’re still considered a front runner when it comes to images, movies, and music. Snow Leopard is bundled with several old friends, iTunes, and DVD and QuickTime Players, as well as some new ones, Photo Booth and Front Row.
The iTunes application is a software jukebox that comes with Snow Leopard, yet it’s also available on Microsoft Windows, so you can share music between Macintosh and Windows. iTunes allows you to sort through and organize your digital music collection, convert CD’s into the digital format, and even burn your favorite music onto a CD. If that’s not enough, iTunes come complete with a built-in link to the iTunes music store. So if you have an Internet connection, you’re one click away from a music store that contains the latest songs, as well as millions (yes, I said millions) of songs from the past. And for those of you that like to listen to the radio while you work, iTunes comes equipped with its own Internet Radio.
If you have an iSight or other camera attached to your computer, you can use Photo Booth to capture photos just like you were sitting in a photo booth at a carnival. You can capture individual photos or create a short movie and add a backdrop or visual effects.
If your Mac includes an Apple Remote, you can use it to control Front Row, where you can access and play iTunes music and playlists, iPhoto slide shows, and videos and DVDs on your Mac or TV. With the Apple Remote, you can navigate menus and lists, start and pause media, and change the volume in Front Row. You can also use the Apple Remote to deliver Keynote presentations and play music with the iPod Hi-Fi. The Apple Remote uses an infrared (IR) reception and works up to 30 feet within an unobstructed line of sight.
You can conveniently start iTunes from the Dock. Simply, click the iTunes icon in the Dock to start iTunes. The first time you start iTunes, the programs walks you through the process of setting up an Apple account (it’s easy if you have a MobileMe account) and iTunes Store, which helps you discover new music and videos from your iTunes library. When you sign in to iTunes, you authorize your computer to play iTunes store purchases. When you download a media item, Apple lets you copy and play that item on up to five authorized machines (Mac or Windows). If you want to use a sixth computer, you need to deauthorize one and then authorize the other.
 Click the iTunes icon in the Dock.
You can also click the Applications folder in the Dock, and then click the iTunes icon to start it.
 If you started iTunes for the first time, follow the iTunes Setup Assistant step by step instructions to set up iTunes.
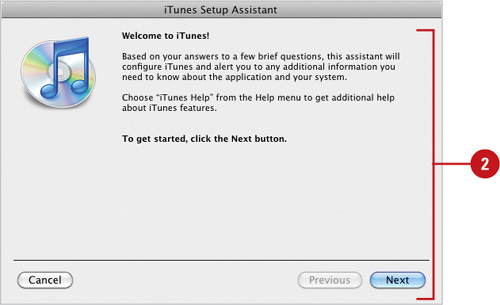
 To use the iTunes Store, click the Store menu, click Sign In or Create Account, and then follow the account review or setup process as requested.
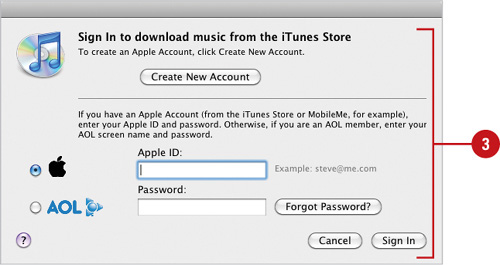
 To download album artwork, click the Advanced menu, and then click Get Album Artwork.
 To authorize or deauthorize a computer, click the Store menu, and then click Authorize or Deauthorize.
To deauthorize a computer to play items from the Audible Web site, click the Advanced menu, and then click Deauthorize Audible Account.
To deauthorize a computer you no longer own, you can deauthorize all your computers at once (only available once a year). Click the Store menu, and then click View My Account.
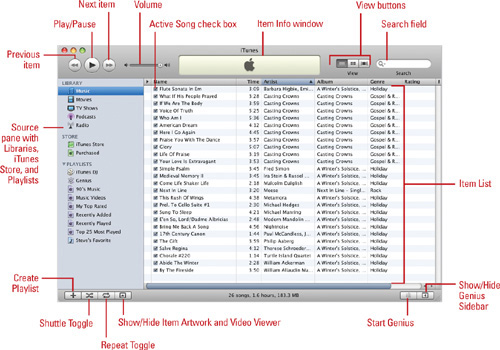
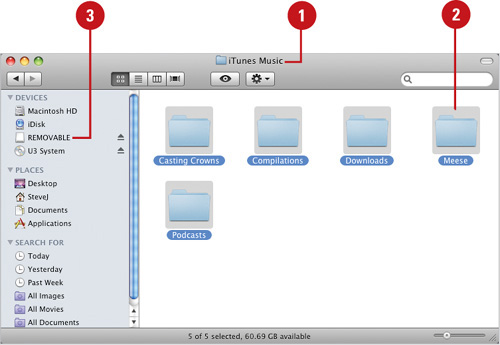
When you open iTunes, you’re working in an organized window that gives you access to your movie and music collections, creates new Playlists, organizes your music, converts existing CD’s into an iTunes collection, and burns selected media onto a CD or DVD (a writable CD or DVD drive is required). The same iTunes window that lets you listen and organize your music also lets you listen to Internet Radio and podcasts, or purchase music, movies, TV shows, and other media through the iTunes Music Store. In other words, once you open the iTunes application, everything you need to enhance your music experience, including listening to audio books, is right in front of your eyes.
When you open the iTunes application for the first time you’ll be asked a few preference questions. For example, you are asked if you want iTunes to be the application your Mac uses for playing music files from the Internet, whether you want iTunes to ask permission every time it connects to the Internet, and whether you want the program to scan your home folder for all of your music. If you select not to have iTunes automatically scan your home drive for music files, you can always drag a folder into the iTunes window. It will automatically scan the folder for any music files, and then place them within the active Playlist.
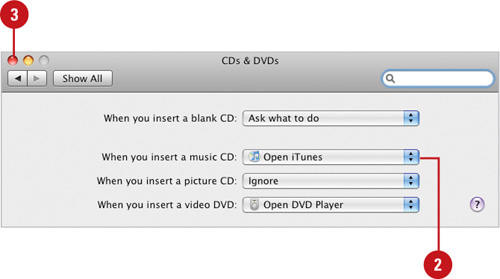
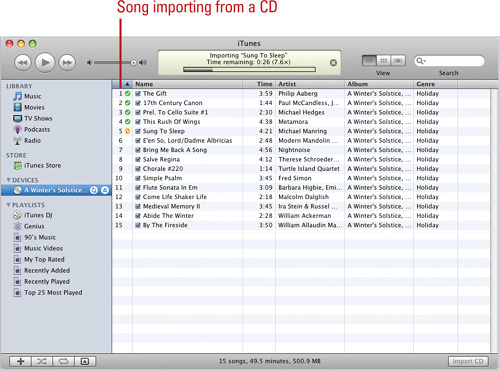
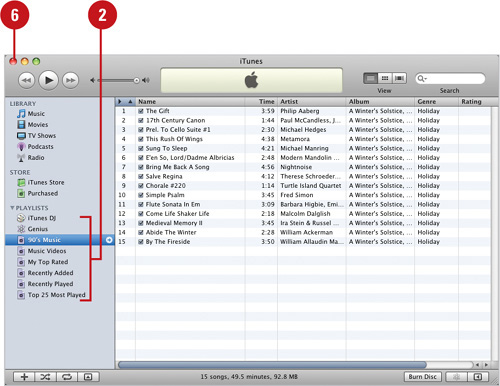
If you have music on CD, you can quickly import it into iTunes. If you have System Preferences for CDs & DVDs set to automatically open CDs in iTunes, all you need to do is insert the CD and iTunes does the rest. The music on your CD is copied to your computer in your iTunes music library. Importing music can also be accomplished through the iTunes menu system, or it can be as simple as a drag and drop. After you download music from your CD, you can view and work with music displayed in a list, grouped with artwork, or in Cover Flow, a 3D visual approach to flipping through your libraries. When you want to play a song, you can use the playback controls in the upper-left corner of the iTunes window or the ones in the full screen Cover Flow view.
- Insert the CD into your drive.
- If an alert message appears, asking for confirmation, click Yes.
The music automatically downloads to your iTunes Music Library.
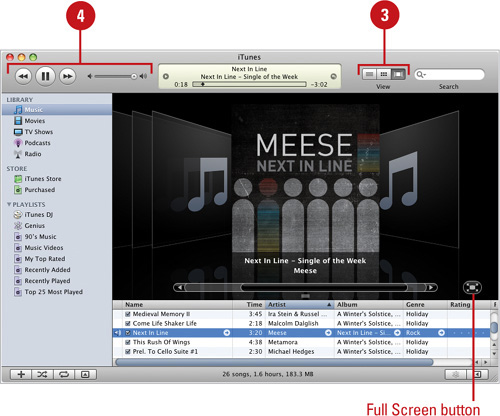
- To view the music in different ways, click one of the view buttons: List View, Album View, and Cover Flow View.
Cover Flow. Click the cover art Left and Right Arrows or drag the slider to view the music, or click the Full Screen button to view and playback music.
- To play the music, select the tracks you want to play, and then use the playback controls.
Did You Know?
You can set CD import options in iTunes. Click the iTunes menu, click Preferences, click Advanced, click the Importing tab, select the options you want, and then click the Close button.
You can create multiple libraries. Hold down the Option key and click the iTunes icon in the Dock, and then click Create Library.
The iTunes music store is a dream come true for all of us that love music, but don’t necessarily want to buy the whole album just to get our favorite song. The music store was born out the desire to help musicians get paid for their work (Internet piracy of music is affecting the entire music industry), and to help the end-user (you and me) get what we want. The iTunes music store was not the first to make the purchase of songs or albums and other media easy, but they are considered the best at doing it. All you have to do to get started is open the iTunes application, click the iTunes Store option, and that’s it (assuming you have an Internet connection). You’re ready to start hunting for the music, movies, TV shows, podcasts, and iPod games you love. Once you download a media item, Apple lets you copy and play that item on up to five authorized machines. When you move media to another computer, you are prompted to type in your Apple Account number, which authorizes that computer to play that media.
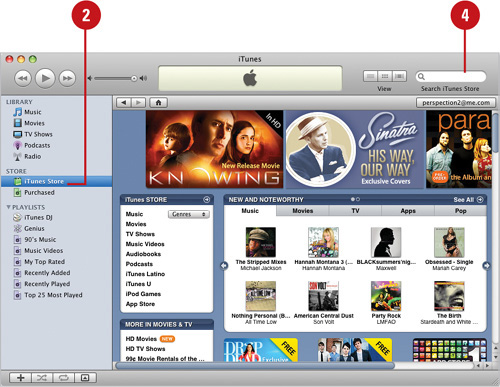
- Click the iTunes icon in the Dock.
- Click iTunes Store in the Source pane.
If promoted, setup your payment options (it’s easy if you have a MobileMe or Mac.com account).
- Click on any of the various links to access that particular title.
- Use the Search field and type a title, artist, or keyword to search, and then press Return.
- Click an item to open it, if needed.
Did You Know?
You can download songs for a buck. My favorite part of iTunes is the ability to download selected songs from an album, without having to download an entire album. You can download any song for a buck. In addition, the Music Store gives you the ability to download entire albums at a reduced rate over the individual songs.
 To navigate, click the Back, Next, Home, or category buttons below the toolbar.
 To preview an item, double-click the item or click the Preview button; availability varies depending on the media item.
 Click the purchase, download, or subscribe button for the type of item you want; the button name varies depending on the media item.
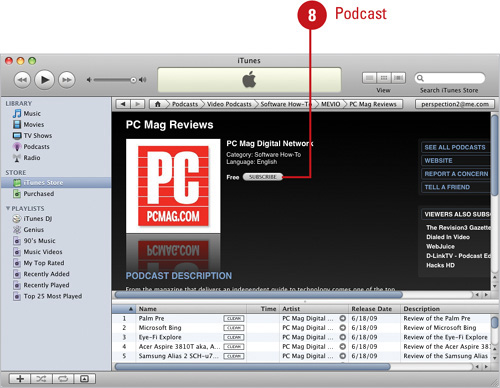
Important
If you haven’t set up your payment options (credit cards), Mac OS X prompts you to do so at this time.
The media item is downloaded to your iTunes library. Click Downloads in the Source pane to display progress or pause, resume, or stop the process.
 Quit iTunes.
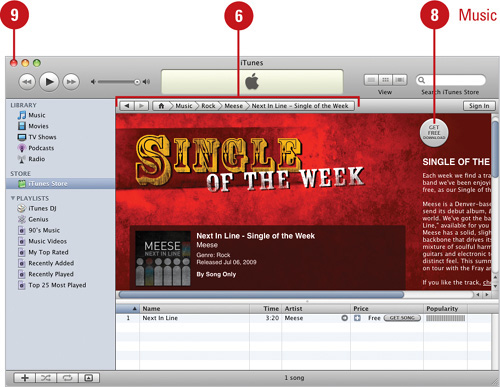
Did You Know?
You can shrink the iTunes window. Click the Window menu, and then click Zoom. Click the Zoom command again to enlarge the window.
You can view different aspects of iTunes. Click the View menu, and then click Show Browser, Show Genius Sidebar, or Show Artwork Column. Click the Window menu, and then click Show Equalizer. Show Browser displays a three column view to make it easier to find items and navigate. Show Genius Sidebar displays a pane to recommend music and make playlists. Show Artwork Column displays a column for artwork in the Item list. Show Equalizer displays a dialog where you can adjust sound levels.
The iTunes application lets you add media from several different sources. For example, you might have some MP3 songs on your hard drive, and you want them stored within the iTunes application, or you have a music CD that you want converted into MP3 format. Whatever method you select, you’ll first want to set up a Playlist to hold and organize your media. A playlist is a folder that holds media. For example, you could have a Playlist for all your Country & Western songs, one for your Rock & Roll; even one for audio books. iTunes comes with a set of playlists, or you can create your own. Playlists come in two flavors—Playlists and Smart Playlists. Playlists let you play the songs in the list again, play the songs in random order, or stop when the last song plays. Smart Playlists rebuild themselves according to the criteria you setup. For example, you might create a Smart Playlist that only plays the songs in the library you rate a 4-star or only Christmas songs.
- Click the iTunes icon in the Dock.
- To play all the songs in a Playlist, click the Playlist you want listen to, and then double-click the first song or click the Play button.
- Click the File menu, and then click New Playlist.
- Type a name for the Playlist, and then press Return.
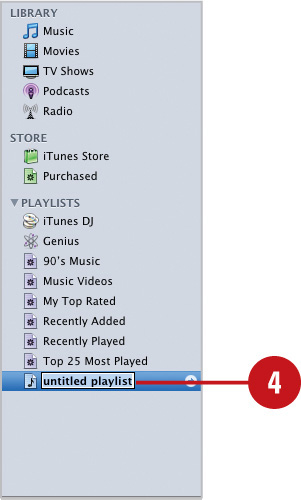
- To rename a playlist, click it once, click it again, type a new name, and then press Return.
- Quit iTunes.
Did You Know?
You can drag a music folder from an open window into the Source pane. iTunes automatically creates a Playlist for the songs, and names the Playlist with the name of the dragged folder.
You can import your playlists. Click the File menu, point to Library, and then click Import. Only songs and videos in your iTunes are included in the Playlist.
- Click the File menu, and then click New Smart Playlist.
- Click the Criteria pop-up, and then select the main selection criteria.
- Click the Operator pop-up, and then choose a selection method.
- Type a word or phrase to search.
- Click the Add Criteria (+) button to add an additional search option.
- Select the Limit To check box and pop-up to limit the number of songs, time played, or max size.
- Click the Selected By pop-up, and then select how to select songs.
- Select the Match only checked items check box to limit selection to songs that are checked.
 Select the Live updating check box to update the Smart Playlist as you add or subtract songs from the iTunes Library.
 Click OK.
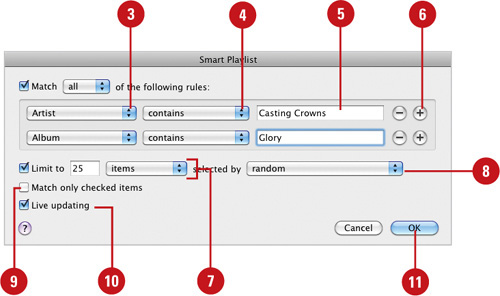
 Name your Smart Playlist.
 Quit iTunes.
See Also
See “Adding Media to Playlist” on page 322 for more information on creating a playlist using Genius.
Whenever you add media to the iTunes application, it stores the media in a Library, and then creates a link to the selected Playlist. As a matter of fact, Playlists simply create links to the media in the iTunes Library. If you delete a Playlist or a media within a Playlist, it does not remove the song from the iTunes Library, only the link created in the Playlist is removed. If you want help from iTunes, you can create a Genius playlist (New!), which sends music information about your libraries to iTunes Store, and creates a personalized playlist for you.
- Click the iTunes icon in the Dock.
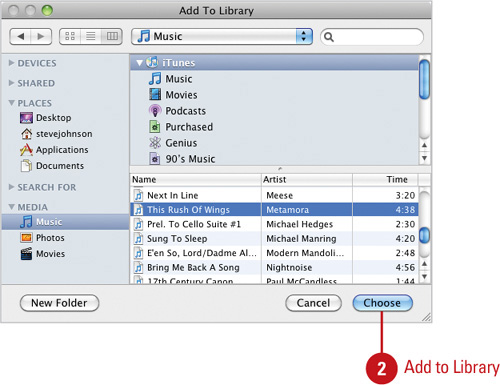
- Add media using any of the following options:
Drag media from other libraries in iTunes to the Playlist.
Click the File menu, and then click Add To Library. Locate the song or songs you want to add, and then click Open.
Drag media files from an open folder to the Playlist in the iTunes window.
Click the Store menu, and then click Turn On Genius. Follow the online steps to enable it. Select a song from a library, click the Show/Hide Genius Sidebar button, and then click the Start Genius button. Click Genius in the Source pane to view the Genius playlist. When you’re done, click the Store menu, and then click Turn Off Genius.
- Quit iTunes.

Listening to music is great, so is curling up with a cup of hot chocolate and your favorite audio book. However, sometimes you would just like to listen to a radio station. Maybe NPR (National Public Radio) is your thing, or possibly your looking for a radio station that just plays classical music. Whatever direction your tastes run, you are probably able to find it on the Internet radio, and iTunes makes the process of selecting and listening to a radio station as easy as turning on a traditional radio.
- Click the iTunes icon in the Dock.
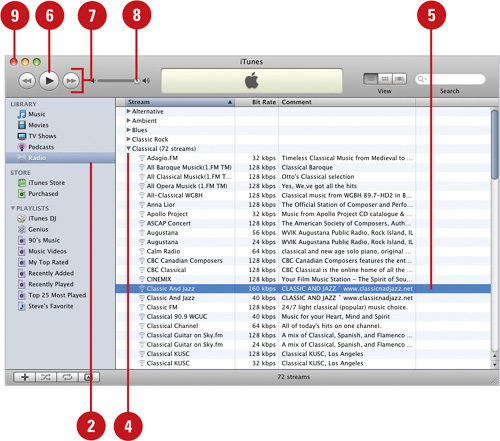
- Click Radio in the Source pane.
- Select a group from the available options.
- Click the expand button (triangle) to open the group.
- Double-click on a station to begin the broadcast.
- Use the Play/Pause button to turn the selected station on or off.
- Use the Previous and Next buttons to move up and down through the radio station list.
- Drag the volume slider in the upper left corner to adjust the volume.
- Quit iTunes.
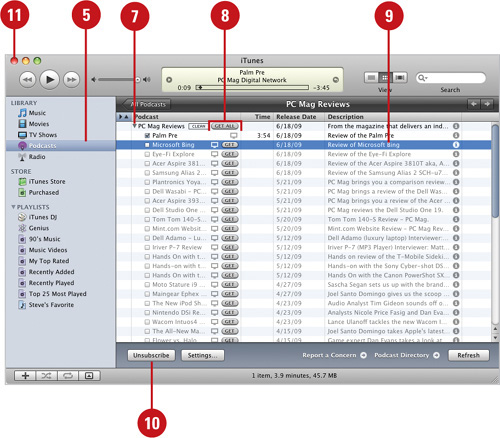
Podcasts are radio and TV shows you can download from the Internet to your iTunes library. The iTunes Store provides free podcasts you can download at any time. If you like a podcast, you can subscribe to it and have it automatically downloaded as it becomes available. If you have an iPod, you can add podcasts to your player and play them on the go when you’re not connected to the Internet.
- Click the iTunes icon in the Dock.
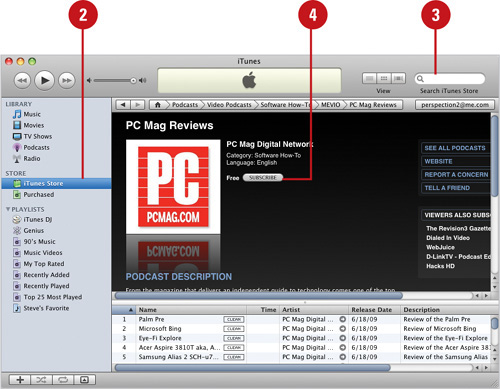
- Click iTunes Store in the Source pane.
- Search for the podcast you want.
- To subscribe to a podcast (only need to do once), display the podcast you want, click Subscribe, and then click Subscribe again if prompted.
The podcast is downloaded to your iTunes library. Click Downloads in the Source pane to display progress or pause, resume, or stop the process.
- Click Podcasts in the Source pane.
- Click Podcasts, Categories, or New to display the podcasts you want, and then double-click the thumbnail (not “Play Selected”).
- Click the expand/collapse button (triangle) to expand the podcast listing in the iTunes window.
- Click Get All to download all the podcasts or click Get to download an individual podcast.
- To play a podcast, double-click the podcast. Point to the player to display playback controls and Close button to exit.
- To unsubscribe to a podcast, select the podcast, and then click Unsubscribe.
- Quit iTunes.
The iPod digital MP3 music/video player is so unique, it deserves a class all of its own. The iPod is the most successful digital music/video player ever created. More iPod players are sold than any other player. Now you can also use the new iPhone with iTunes. They’re made for Macintosh and Windows computers, and it just so happens they work perfectly with the iTunes player. When you plug your iPod or iPhone cable into your computer, it automatically opens the iTunes application and synchronizes playlists, music, videos, podcasts, photos, contacts from your Address Book that you create on your iPod. The iTunes Store also includes games you can purchase and download. You can also manually make changes. It’s a simple matter of deleting media you no longer want or dragging media into your iPod or iPhone.
- Plug your iPod or iPhone into your computer (requires a FireWire or USB port). This also recharges your iPod or iPhone.
- Click the iPod or iPhone device name in the Source pane.
- Click the tabs to set sync options, and then click Sync.
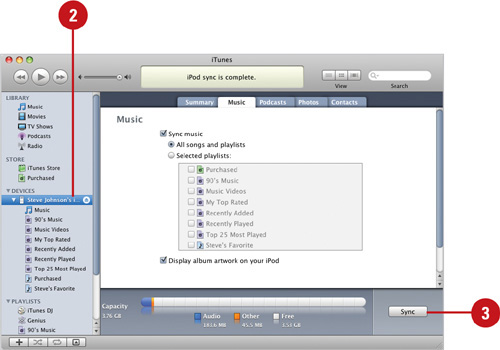
- Click the expand/collapse button (triangle) to expand the device in the Source pane, and then select a library or Playlist.
- To remove media, select an item in the iTunes window, and then press Delete.
- To add media, drag a media item or Playlist from the iTunes window to the device in the Source pane.
- Click the Eject button, to eject and remove the iPod.
- Quit iTunes.

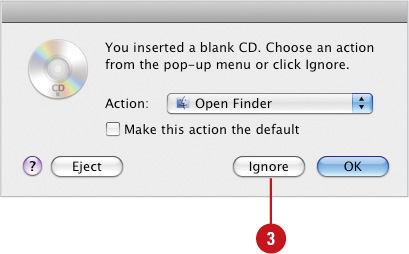
While CD’s are still around and popular, digital music players seem to be one of the "newer" technologies set to change how we listen to our tunes. iTunes gives us the option to use CDs and digital music players—we can burn our own customized music CDs or we can transfer the music files to any one of a number of digital music players. When you insert the CD, iTunes gives you the option of choosing the Playlist you want to use. If the playlist is too large to fit on a single CD or DVD, iTunes asks you for another disc. Digital music players, more commonly known as MP3 players, hold music files using the MP3 digital format. MP3 players can be thought of as a hard drive that holds music files, and then plays them back to you through a set of speakers or a headset. When you purchase your MP3 player, it comes with software designed to move music files from your computer hard drive to the drive located on the MP3 player. Some MP3 players, when connected to your computer, appear as an external hard drive.
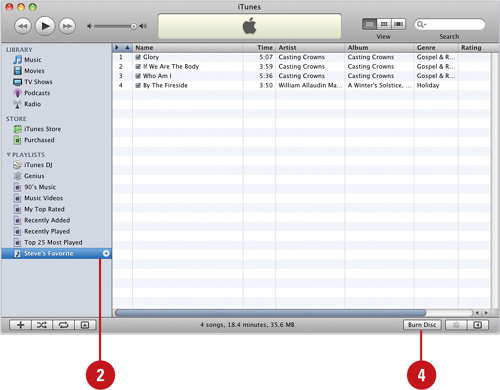
- Click the iTunes icon in the Dock.
- Create and select the Playlist you want to burn onto the CD.
iTunes uses the name of the Playlist as the name of the CD.
- Insert a blank CD into your drive, and then click Ignore, if prompted.
- Click Burn Disc once to open the button, and then click a second time to perform the burning operation.
- Quit iTunes.
Important
Not all MP3 music players allow you to drag music files between your hard drive and the player icon. When this occurs you’ll have to use the transfer software that came bundled with the player. Simply load the software and follow the onscreen instructions.
Did You Know?
You can backup your iTunes library to a CD or DVD. Click the File menu, click Back Up To Disc, select the options you want, insert a blank writable CD or DVD, and then click Back Up.
You can set CD burn options in iTunes. Click the iTunes menu, click Preferences, click Advanced, click the Burning tab, select the options you want, and then click the Close button.
You can access the names of your songs on the Internet. Insert a music CD, click the Advanced menu, and then click Get CD Track Names. The iTunes application accesses the Gracenote music title repository, and then changes the dull Track1 and Track2, with the names of the song.
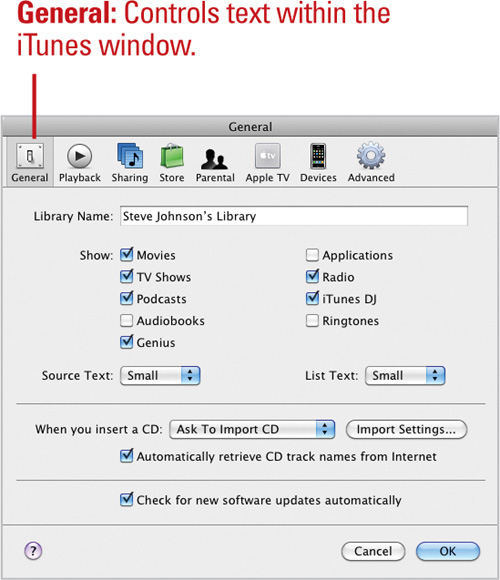
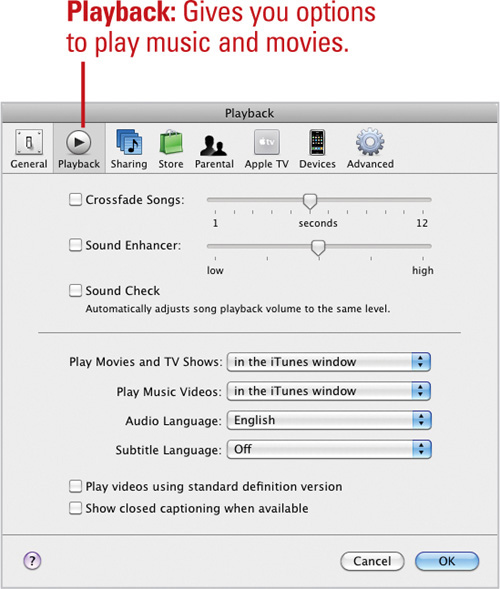
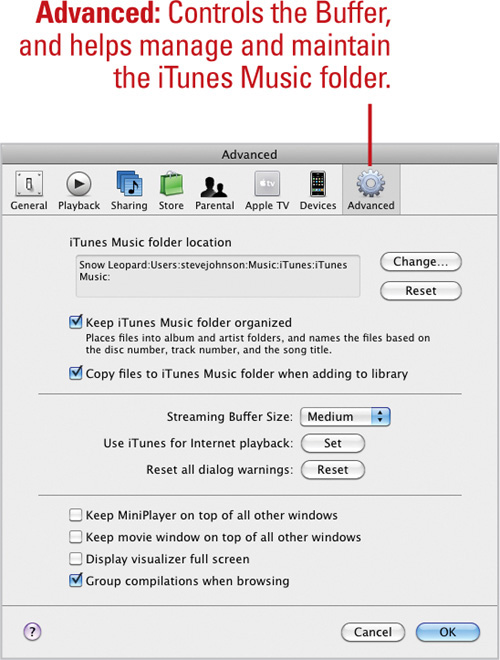
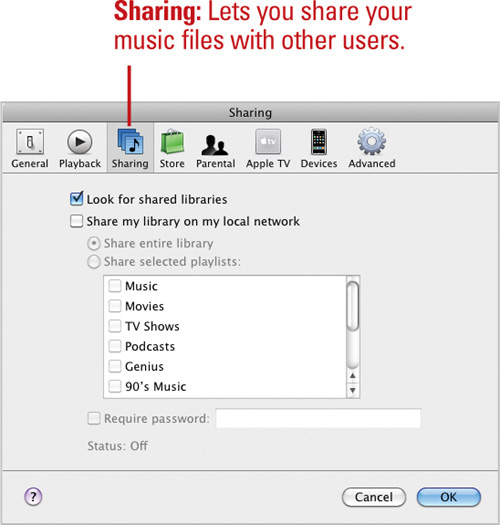
Like any application, iTunes gives you a Preferences panel that helps you adjust the software to fit your specific needs. For example, Podcasts preferences give you the option to specify when to check for and download new episodes. The iTunes preferences give you precise control over how the program operates on your computer.
To set your preferences, or to review the defaults that have been set in iTunes, simply open the Applications folder, and then double-click the iTunes application. Click the iTunes menu, and then click Preferences. There you’ll find almost every conceivable setting that is used in iTunes. For a summary view, we’ve shown you commonly used screens and what is contained on that Preference screen. After making any changes to the screens, simply click OK to change the setting or click Cancel to undo your change.
If you have an iSight or other camera attached to your computer, you can use Photo Booth to capture photos just like you were sitting in a photo booth at a carnival. You can capture individual photos or create a short movie. In addition, you can include a backdrop or visual effects to your photo snapshots and movie recordings. When you’re done capturing photos, you can use them as a user account or iChat buddy picture, send them as an attachment in an e-mail message, present them in a slide show or print them in a proof sheet. Photo Booth saves your photos and movies in a folder called Photo Booth, located in the Pictures folder in your Home folder. The still photos are saved as JPEG files.
- Attach an Apple iSight or other video camera to your computer.
- Click the Photo Booth icon in the Dock.
- Click the Take a still picture button.
- When you’re ready to take a still picture, click the Shutter button.
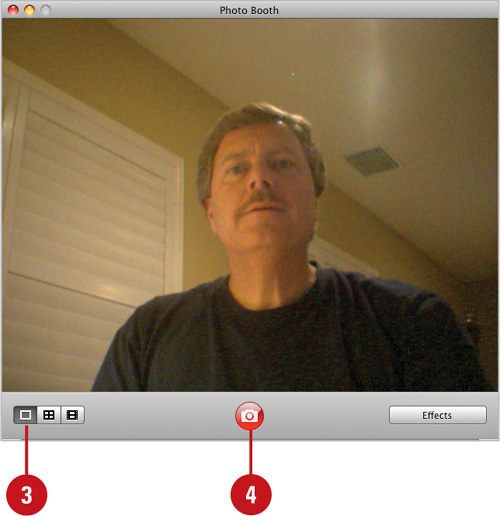
After a 3-second countdown, the screen flashes and Photo Booth takes a photo. The picture appears as a thumbnail in the bottom pane.
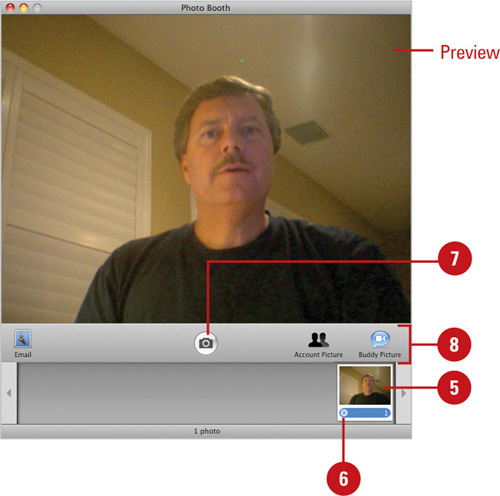
- To preview a photo, select the thumbnail in the bottom pane.
- To permanently delete a photo, select the thumbnail, and then click the Delete button in the bottom left corner of the thumbnail.
- Click the Shutter button again to go back to live images.
- To e-mail a photo or use a photo in a user account or buddy picture, use the buttons below the preview.
- To present a slide show, click the View menu, click Start Slideshow, and then use the toolbar to navigate through the slide show.
In addition to capturing individual still photos, you can also record a movie in Photo Booth. You can create two types of movies, either a movie clip or a 4-up movie. A movie clip is a continuous recording of frames, while a 4-up movie is four snapshots taken very quickly to simulate a movie. The 4-up movies are saved as four JPEG files, while movie clips are saved as QuickTime MOV files. However, you can export the movie clip or 4-up movie as an animated GIF, which you can also use as an iChat buddy icon.
- Attach an Apple iSight or other video camera to your computer.
- Click the Photo Booth icon in the Dock.
- Click the Take four quick pictures or Take a movie clip button.
- When you’re ready to take a still picture, click the Shutter button.

For a 4-up movie, a 3-second countdown and a flash occurs for each photo. The four images appear on the screen at the same time as individual images.
For a movie clip, the recording starts after a 3-second countdown.
- When you’re done recording a movie clip, click the Stop button.
- To preview a movie, select the thumbnail in the bottom pane, and then point to the bottom of the live image to display and use the slider and Pause/Play button to view a movie clip.
- To permanently delete a movie, select the thumbnail, and then click the Delete button in the bottom left corner of the thumbnail.
- Click the Shutter button again to go back to live images.
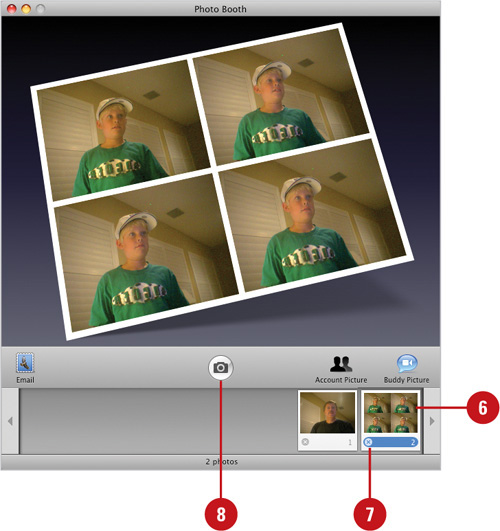
Photo Booth includes backdrops and visual effects you can add to visuals to have some fun and create more interesting photo effect. A backdrop is a background that appears behind the camera image. You can use one of the backdrops provided by Photo Booth, such as New York, Paris, or Yosemite, to make it seem like your in an another place, or add and use one of your own. In addition to backdrops, Photo Booth also includes a set of visual effects, such as Comic Book, Sepia, X-Ray, and Light Tunnel, that you can use to create a fun and unique effect.
- Attach an Apple iSight or other video camera to your computer.
- Click the Photo Booth icon in the Dock.
- Click the Effects button.
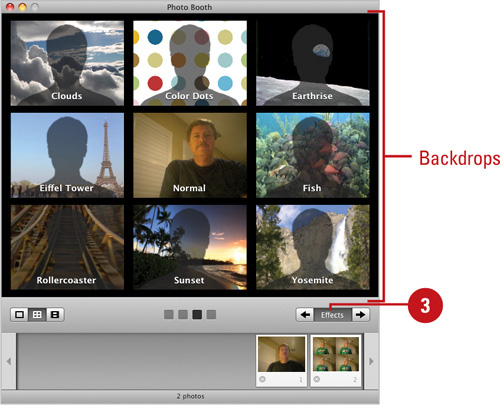
- Click the Left and Right Arrows to display more effects.
- Select the backdrop or visual effect you want to use.
- Point to the bottom of the live images. If a slide appears, drag it to adjust the visual effect level.
- To remove an effect, select the Normal effect in the middle.

- To add your own backdrop, drag it to a “Drag Backdrop Here” place holder.
- When you’re ready, select a picture button, and then click the Shutter button.
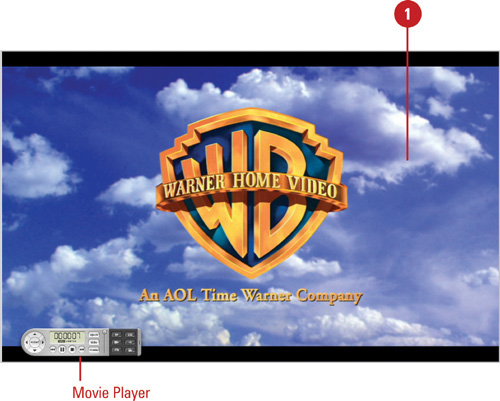
Okay, it’s time to break out the popcorn and soda, because the DVD player in Sow Leopard is here. Using the DVD player, you can access a movie chapter by chapter, freeze the action, move forward and backward through the movie, and even play a movie in slow motion frame-by-frame. You can even watch your video in full screen mode while you work on another display. In addition, the DVD Player offers closed captioning. All that translates into a great viewing experience—sounds like a winner to me. If you have an Apple Remote, you don’t even need to get up to control the DVD player.
- Insert a DVD into the DVD drive of your computer to start the movie.
You can also click the Application folder in the Dock, and then click the DVD Player icon to start it.
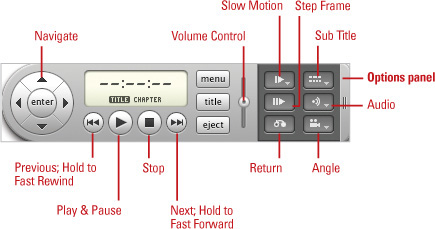
- Select from the following DVD Player options:
Click the Left, Right, Up, Down, or Return buttons to navigate.
Click the Previous or Next Chapter buttons to move between movie chapters.
Click the Play/Pause or the Stop button to play/pause or stop the movie.
Click the Eject button to stop the movie and eject the DVD.
Click the Title or Menu buttons to view the movie title or menu.
Drag the volume control to raise or lower the volume.
Open the Options panel, and then select between Slow Motion, Step Frame, Return, Sub Title, Audio, or Angle.
- At the top of the window, click the Video menu, and then select between the various viewing options.
- To exit the movie without using the controller, press
 +Q.
+Q.
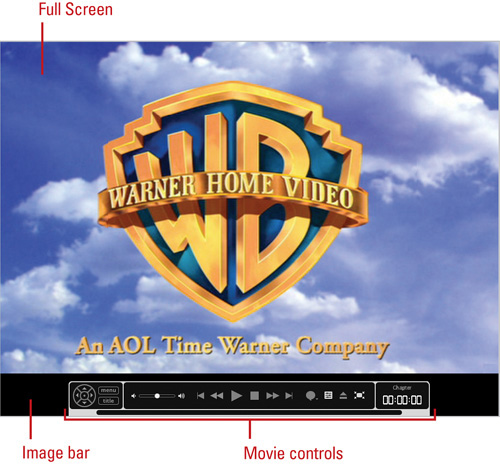
In addition to the main DVD player controls, you can also customize your playback experience. With the new full-screen interface and Image Bar, you can quickly access playback controls, subtitles, and audio tracks, change the screen view and scale, and browse DVD content. You can also create video snippets from any DVD and set bookmarks, also known as key points, you can view again later.
- Insert a DVD into the DVD drive of your computer to start the movie.
- Select from the following Movie Player options:
Show/Hide Full Screen. Press
+F.Image Bar. Point to the bottom of the screen in Full Screen.
Create Video Clip. Position the video, click the Controls menu, click New Video Clip, set the start and end frame, and then click Save.
Bookmark. Position the video, click the Controls menu, click New Bookmark, enter a name, and then click Add.
View Bookmarks, Video Clips, and Chapters. Click the Window menu, and then click Bookmarks, Video Clips, or Chapters.
Video Zoom or Color. Click the Window menu, and then click Video Zoom or Video Color, select the On check box, and then adjust the levels.
Keyboard Shortcuts. Play: Space bar, Stop:
+. (period), screen size: +0 thru +3, Switch to Finder: Option++F.
- To exit the movie without using the controller, press +Q.
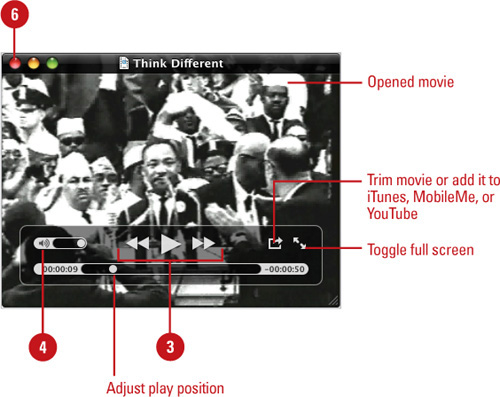
QuickTime Player supports H.264 video decoding capabilities using the GPU (Graphics Processing Unit) instead of the CPU (New!), which is considered the standard for creating, delivering, and playing multimedia at the lowest data rates possible with hindering quality. Now, you can share content with others via both computers and mobile devices all over the world. QuickTime works with the MPEG4 format and other common formats, giving you access to movie clips. In addition, QuickTime delivers several performance enhancements, including ColorSync management (New!), live resize, zero-configuration streaming at the best connection speed, surround sound in up to 24 channels, full screen playback, additional keyboard shortcuts to mirror Final Cut Pro, improved A/V controls, and closed captioning with up-to-date standards, and timecode or frame count display instead of movie time. QuickTime Player plays movies in a redesigned window with fade away playback controls (New!). If your movie contains chapter markers, QuickTime Player displays them in frame-based thumbnail images (New!).
- Click the Applications folder in the Dock, and then click the QuickTime Player icon.
- Click the File menu, and then click Open to load individual QuickTime (or other formatted) movies or click Open URL to load URLs.
To open a recent movie, click the File, point to Open Recent, and then select a movie.
- Point to the movie to display movie controls (if necessary), and then click the movie controls to Play/Pause and Rewind or Forward the movie.
You can also drag the slider to adjust the movie position.
- To adjust the volume, drag the Volume slider.
- Click the View menu, and then select from the available viewing options.
- Quit QuickTime Player.
- In the QuickTime Player, select from the following options:
Show/Hide Full Screen. Press
+F.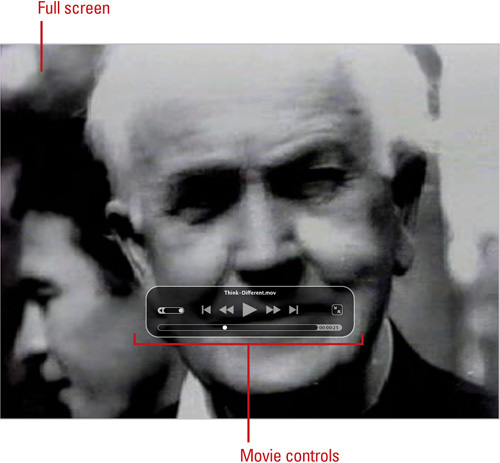
Change Screen View. Press
+1 for Actual Size; press +3 for Fit to Screen; press +4 for Fill Screen; press +5 for Panoramic; press ++ or +- for Increase Size or Decrease Size.Show/Hide Chapters. Click the View menu, and then click Show Chapters.
Closed Captioning. Click the View menu, and then click Show Closed Captioning.
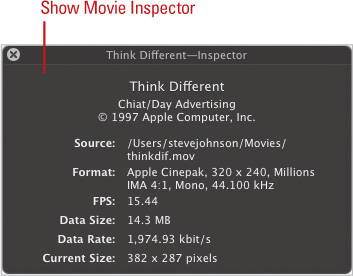
Show Movie Inspector. Click the Window menu, and then click Show Movie Inspector to display movie information (Source, Format, FPS, Data Size, Data Rate, and Current Size), and then click the Close button.
Show Export Progress. Click the Window menu, and then click Show Export Progress to display progress information, and then click the Close button.
Did You Know?
You can listen to a movie in a different language. Click the View menu, point to Languages, and then select a language. If the languages are grayed out, the movie doesn’t support it.
You can show movie subtitles while a movie plays. Click the View menu, point to Subtitles, and then select a language. If the languages are grayed out, the movie doesn’t have subtitles.
QuickTime 10 provides powerful commands (New!) to record live video and audio directly from an iSight camera, FireWire camcorder, or microphone or capture movement on your desktop to disk. After you create a QuickTime movie, you can edit the beginning or end of the movie, trim it shorter, or remove unwanted content, such as silence. QuickTime also allows you to convert and share your media in iTunes, iPhone, iPod, or Apple TV, and publish your media to YouTube (no longer than 10 minutes or larger than 1 GB in size), and MobileMe. QuickTime also provides HTTP live streaming to playback live video online using Web server and firewall technology for seamless use.
- Click the Applications folder in the Dock, and then click the QuickTime Player icon.
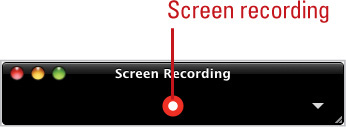
- Click the File menu, and then click New Movie Recording, New Audio Recording, or New Screen Recording.

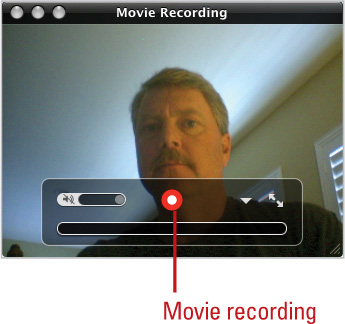
- Click the Down arrow to select commands to adjust recording devices, quality, and destination.
- Click the Record button.
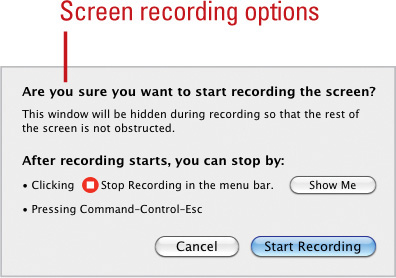
For a Screen Recording, click Start Recording.
- When you’re done, click the Stop button.
For a Screen Recording, click the Stop button on the menu bar. You can also press
+Control-Esc.
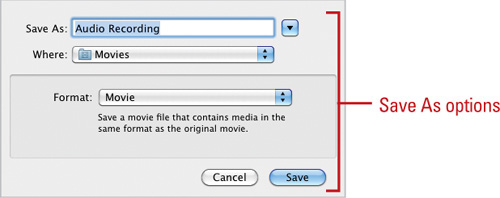
The media is automatically saved in the Movies folder.
- To save the movie is another format, click the File menu, click Save As, type a name, select a format and destination, and then click Save.
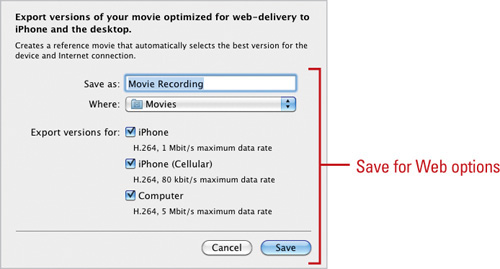
- To export the movie to the Web, click the File menu, click Save for Web (New!), type a name, select a destination and export format, and then click Save.
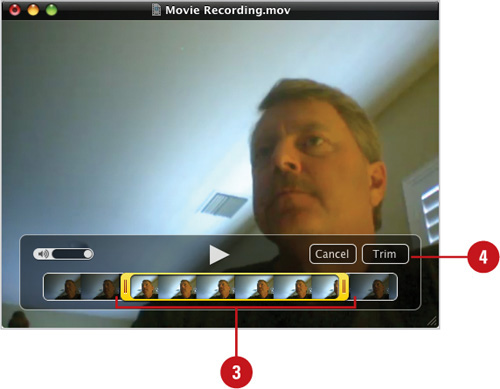
- In the QuickTime Player, click the File menu, and then click Open File, select the movie you want to edit, and then click Open.
- Click the Edit menu, and then click Trim.
- Edit the movie using any of the following commands:
Drag the play head (red vertical line) to locate the part of the movie you want to remove.
Drag the start and end of the trimming bar (yellow handles) to select the part of the movie you want to keep.
Click the Edit menu, and then click Select All Excluding Silence to exclude the silent part of the movie.
- Click Trim.
- In the QuickTime Player, click the File menu, and then click Open File, select the movie you want to edit, and then click Open.
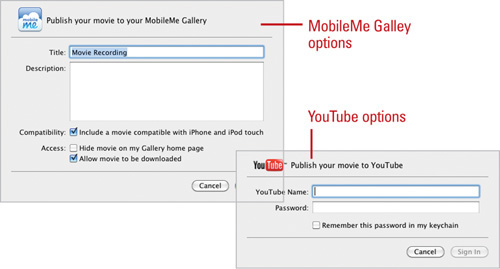
- Click the Share menu, and then select a sharing option:
iTunes. Converts the movie to the iTunes library format, which is compatible with iPod, iPhone, and Apple TV.

MobileMe Gallery. Optimizes and uploads the movie to your MobileMe account.
YouTube. Optimizes and uploads the movie to your YouTube account. The movie is limited to 10 minutes or larger than 1 GB in size.
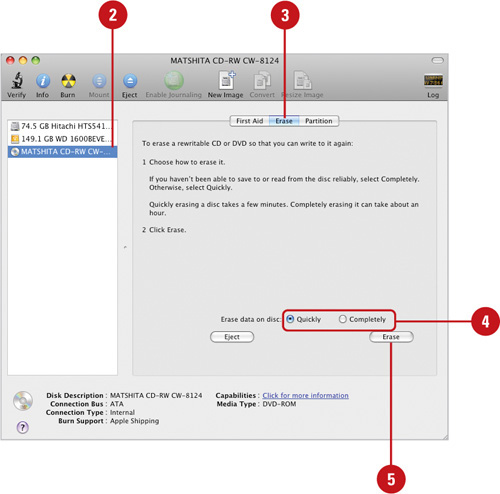
If you want to reuse a CD-RW or DVD-RW disc, you need to erase it first, which you can do with Disk Utility. Before you start, there is one thing you need to know. You can’t erase a standard CD or DVD that was a previously recorded CD-R or DVD-R disc. During the process, you have the option to select Quick Erase. When you select Quick Erase setting, the contents on the CD or DVD gets overwritten when new information is placed over it. If you don’t select Quick Erase setting, the contents is overwritten with zeros to completely erase the CD or DVD, which takes longer to finish.
- Click the Applications folder in the Dock, clck the Utilities folder, and then click the Disk Utility icon.
- Select the disc in the left column you want to erase.
- Click the Erase tab.
- Click the Quickly or Completely option.
- Click Erase.
- Click Erase to confirm you want to erase the CD.
- Click the Disk Utility menu, and then click Quit Disk Utility.
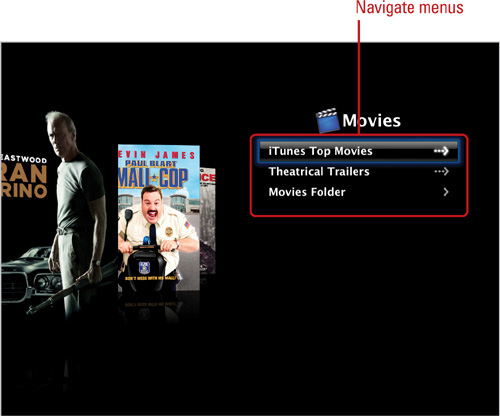
Front Row is an entertainment system integrated into your computer that lets you watch movies, TV shows, iPhoto slide shows, and listen to iTunes music and podcasts. Because Front Row is designed to be used as an entertainment system, the display and navigation are unlike any other program. When you start Front Row, the program uses the entire screen and doesn’t use standard Macintosh program menus or toolbars. You navigate by using the up and down arrows to specify a main category, and then the left and right arrows to specify a subcategory. You can use your keyboard or a Apple Remote to navigate the system.
Start and Quit Front Row. Hold down the Menu button on your Apple Remote or press
+Esc.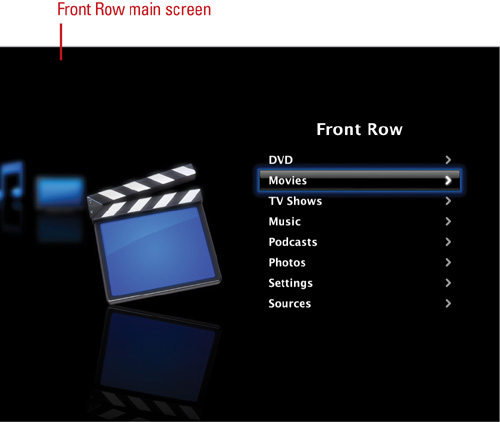
Navigate menus and lists. Press the Plus (+) or Minus (-) buttons on your Apple Remote or press Up or Down Arrows.
Return to previous menu. Press the Menu button on your Apple Remote or press Esc.
Select an item in a menu or list. Press the Play/Pause button on your Apple Remote or press Space bar or Return.
Play and pause audio or video. Press the Play/Pause button on your Apple Remote or press Space bar or Return.
Change volume. Press the Plus (+) or Minus (-) buttons on your Apple Remote or press Up or Down Arrows.
Go to next or previous song, photo, or DVD chapter. Press the Next/Fast-Forward or Previous/ Rewind buttons on your Apple Remote or press Right or Left Arrows. You can also hold down the buttons and keys to fast-forward or rewind a video or DVD.
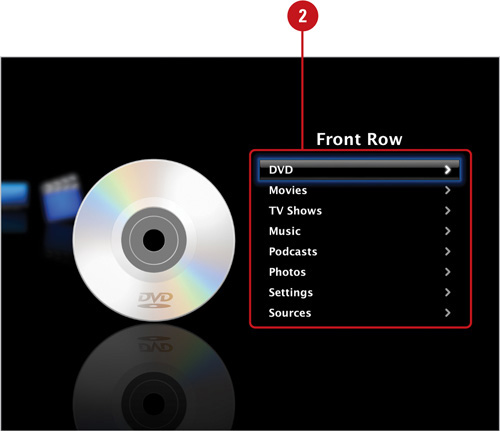
With Front Row, you can watch movies, TV shows, and iPhoto slide shows, and listen to iTunes music, and podcasts. From a music stand point, you can play music videos, audiobooks, and playlists, which is very convenient with the Apple Remote. If you like movies, you can watch movie trailers (provided by Front Row) or movies you have on your computer. If you want to deliver a slide show, you need access to iPhoto on your computer or a shared iPhoto library on a network. To make the most of Front Row, you need to populate your Mac with media. You can use iTunes to purchase and download media from the iTunes Store, or search the Web and download the compatible media you want. You can play DVDs with Front Row. However, the Main menu in Front Row doesn’t display the DVD menu until you insert a DVD in your disc drive.
- Hold down the Menu button on your Apple Remote or press +Esc.
- Press the Plus (+) or Minus (-) buttons on your Apple Remote or use the Up and Down Arrows to select the media type you want to play:
DVD.
Movies.
TV Shows.
Music.
Podcasts.
Photos.
- Press the Next/Fast-Forward or Previous/ Rewind buttons on your Apple Remote or press Right or Left Arrows.
- To play an audio or video, press the Play/Pause button on your Apple Remote or press Space bar or Return.
- To quit Front Row, hold down the Menu button on your Apple Remote or press +Esc.
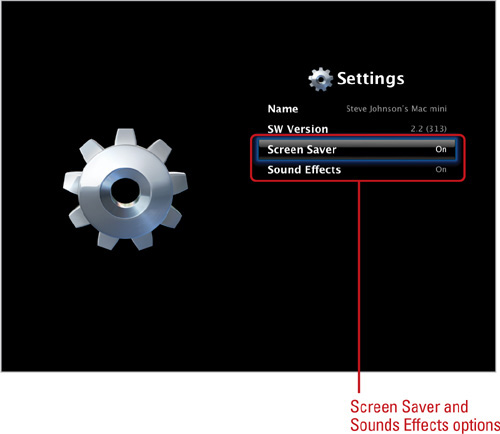
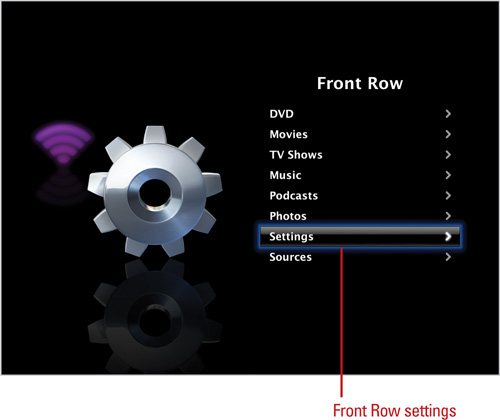
If you leave Front Row open for a while without any activity, your screen saver turns on like it does with any other program on your Mac. If you don’t want this to happen, you can turn off the screen saver just for Front Row. Front Row also provides sounds effects as you navigate around the program. If you don’t want to hear them, you can turn off the sound effects too. You can turn these options on or off using the Settings command on the Main menu. Front Row delivers media content from different sources, either your local computer or shared network, which you can change using the Sources command on the Main menu.
Turn on/off the screen saver. Select Settings, select Screen Saver, and then press the Space bar or Return key, or press Play/Pause on the remote to turn it on or off.
Turn on/off the sound effects. Select Settings, select Sound Effects, and then press the Space bar or Return key, or press Play/Pause on the remote to turn it on or off.
Stream from a shared iTunes or iPhoto library. Select Sources, select an shared iTunes or iPhoto library on your network using built-in Bonjour technologies.
Stream from a local iTunes or iPhoto library. Select Sources, select an iTunes or iPhoto library on your computer.
The iPhoto application lets you organize your images into user-defined folders, edit them, and even distribute them to your friends, by placing them on a CD or DVD, or directly over the Internet. iPhoto is part of the iLife suite of application, which is sold separately from Mac OS X.
When you open the iPhoto application, you’re treated to the ultimate in organization and simplicity. For example, you own a digital camera, and you want to move the images from the camera to your computer. Most digital cameras come with their own proprietary programs that let you hook your camera up (USB or FireWire port), and then organize and manage your files. Fortunately, iPhoto does away with camera-specific programs. When you plug your camera in, iPhoto recognizes the device and lets you move the image files from the camera to iPhoto.
The iMovie application lets you create high-quality, professional movies. Using footage from your digital camcorder (MiniDV or Digital 8 format), you can edit and combine different movie files, create transitions between scenes, even capture live video, and then add an audio track (voice or music). iMovie is part of the iLife suite of application, which is sold separately from Mac OS X.
The iMovie application is simple to operate, yet powerful when it comes to creating professional movies, using footage from your digital movie camera, or any other digital multimedia files; including image stills and audio files.
The iMovie window is your working studio. Inside this one window, you have the ability to draw together all of the elements of your movie, and then arrange them by adding titles and transitions; you can even use special effects. For example, you could create a movie of a family members birthday, using a dozen movie clips, plus background music and narration. You can also add still images, create seamless fades between photos, and movies. It’s all here inside the iMovie window.
The iDVD application comes bundled on all Macintosh computers that have a DVD burner. Using iDVD, you can create slideshows of pictures, or become a director and create your own DVD movies, using a digital camcorder. You even have iMovie to help you edit your home movies. iDVD is part of the iLife suite of application, which is sold separately from Mac OS X.
If you’ve ever wanted to test your skills at movie production, then the iDVD application is just what you’ve been waiting for all these years. There are all kinds of layout applications, such as applications for laying material out on paper (Adobe InDesign and Quark Xpress), and there are programs that layout Web pages (Adobe Dreamweaver). With that in mind, think of iDVD as a layout application for the creation of your Oscar-winning production. This gives you the ability to generate slideshows, videos, or a combination of both, along with menus, buttons (just like any other DVD), and then burn it onto a blank DVD that can be viewed by anyone that owns a DVD player.
The iDVD application is powerful, but just like any other layout program, it requires material to use for the layout. For example, when you open iDVD, you need access to video files, audio files, and graphics. The iDVD application doesn’t create the materials that make up the DVD; it only organizes them. And, not all DVD players are created equal. Some DVD disks do not work in all the players on the market; especially older DVD players. For information on compatibility issues between DVD writers and DVD players, point your browser to: http://www.dvdrhelp.com.