Once you’ve bought your Macintosh computer, installed the operating system and all your applications, it’s important to be able to keep all that software up-to-date; especially the operating system software. With the consistent updates that Apple is making to the Snow Leopard operating system, Mac OS X helps you keep all the software up-to-date with the click of a button.
In addition, loss of data can be a tragic occurrence, so Snow Leopard lets you archive or copy data from your computer to an external disk (just remember to keep your backups offsite). Snow Leopard also helps you monitor activities on your system, see who is currently using your computer, and how much processing power each program is using. This gives you the ability to fine-tune your system for maximum performance. If your system seems to be slowing down, or you’re experiencing more crashes than usual (a rare occurrence on a Mac), Snow Leopard gives you the programs to optimize and repair day-to-day problems, and keep your system in tiptop shape.
Remember that maintaining your computer requires more on your part than the launching of a couple of programs. The Macintosh computer comes with several internal fans that help keep the inner workings cool; however, those fans also pull in dust. You should open your computer and vacuum out the interior about once a year, and dust the exterior surface about once a month. In addition, make sure the computer has enough room around it for air to circulate. Finally, make sure all the cables you have strung from the computer to all your peripherals are out of harms way, and in good condition. In past years, attempting to maintain your computer system was a challenge; however, today it’s easy to keep things running smoothly.
Let’s face it, a computer without software is simply a very expensive boat anchor. On the other hand, software without a computer is useless. Once you install your software, it’s important to keep up with all the updates, patches, and fixes. The Snow Leopard operating system comes bundled with literally dozens of software packages—everything from disk repair utilities to image-capture applications. In addition, hackers are causing problems and Apple stays on top of them with updates to Snow Leopard, which you can download from the Internet. After you download a software package, you can re-use the package file (.pkg) to install it on another Mac without re-downloading.
 Click the Apple menu, and then click Software Update.
A screen appears with a status bar checking for software updates.
 Click Show Details, if necessary.
 Check the software updates you want to load (if available).
 Select an update, to read more information about that specific product.
 Click the Install Items button.
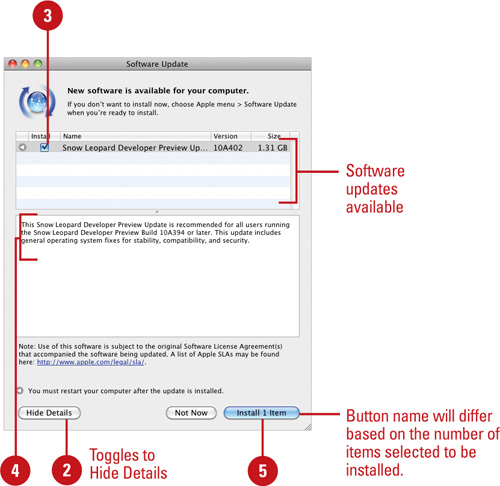
 Type your Administrator name and password.
 Click OK.
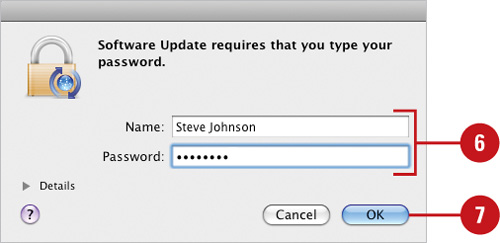
Mac OS X begins installing the software. Follow any onscreen instructions, and then close it
Trying to keep up with all your software updates use to be a hassle, but not any more. Not only does Snow Leopard let you quickly download all your operating system software updates; it lets you automate the process. When you automate software updates, you select a specific time interval between checks. For example, you could instruct Snow Leopard to check for available updates every month. Snow Leopard even lets you download important updates in the background, so it doesn’t interrupt your workflow. With the ability not only to update your software, but also to automate the entire process, there is no longer any excuse for not having up-to-date software.
- Click the System Preferences icon in the Dock, and then click the Software Update icon.
- Click the Scheduled Check tab.
- Select the Check For Updates check box.
- Click the Updates pop-up, and then select how often Snow Leopard checks for updates.
- Select the Download important updates automatically check box to download updates without interrupting your workflow.
- Click Check Now to check for any current updates.
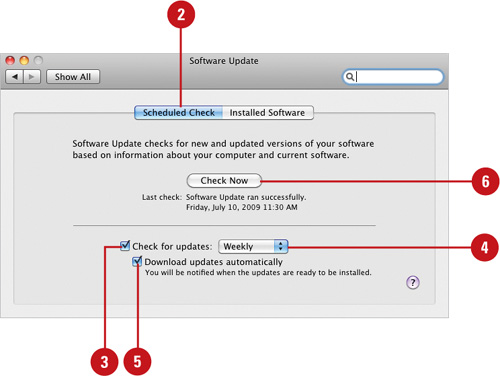
- To check all the updates you’ve currently installed, click the Installed Updates tab.
 A list of updated files appears.
You can scroll through the updates to view any changes to your system.
 Click the Close button.
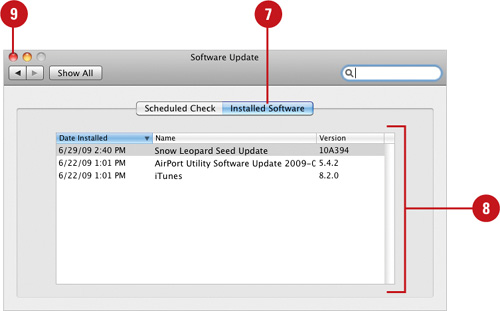
Not all compressed file formats are self-extracting. For those files you’ll need a program capable of uncompressing (extracting) the files. Stuffit Expander is a universal utility that helps you open up all those pesky compressed files that other users and companies send you. The latest version (Stuffit 2009 v13), opens almost any compressed format including: .sit, .sea, .hqx, and, .bin. In addition, Stuffit can open files compressed using WinZip (Windows compression utility), and the UNIX formats: .tar, .gzip, and .bzip. For example, you receive a WinZip file from your parents showing pictures of their trip to Hawaii or you download the latest software patch for your word-processing program, and it came in the .hqz format. With Stuffit Expander, you’re only seconds away from viewing those pictures and updating that word processor.
- Click the Applications folder in the Dock, and then click the Utilities folder or the Stuffit folder to locate the Stuffit Expander.
- Select a compressed file.
- Drag and drop the file over the Stuffit Expander icon.
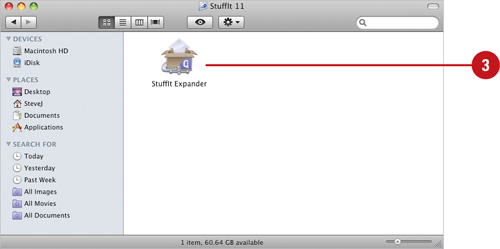
- Stuffit Expander uncompresses the file, and places it in the same location as the compressed file.
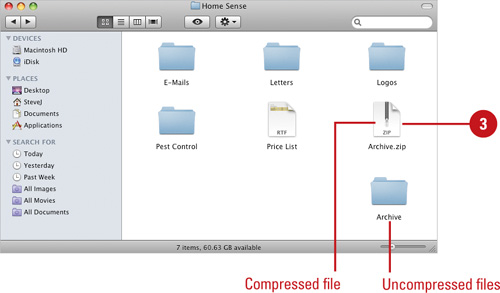
You can compress files and folder in special files that compress the contents to decrease the size of the files they contain. Compressed folders are useful for reducing the file size of one or more large files, thus freeing disk space and reducing the time it takes to transfer files to another computer over the Internet or network. A compressed file is denoted by a ZIP icon. You can compress one or more files in a compressed file by using the Compress command on the File menu. When a file is compressed, a copy is used in the compression, and the original remains intact. You can uncompress, or extract, a file from the compressed folder by double-clicking the compressed file icon. The compressed files and folder are uncompressed into a folder called Archive.
- Select a file, group of files, or a folder.

- Click the File menu, and then click Compress.
Archive creates a zipped file with the same name as the original item.
- To restore an archived zip, double-click its icon.
Important
Remember that a back up of your data is your insurance of recovery after a disk crash or other catastrophic system failure. Always keep your backups offsite, or in a protected location, such as a fireproof safe. As tragic as a fire would be, the damage would be compounded if your backups were also destroyed.
See Also
See “Opening Compressed Files” on page 434 for information on opening compressed files with Stuffit Expander.
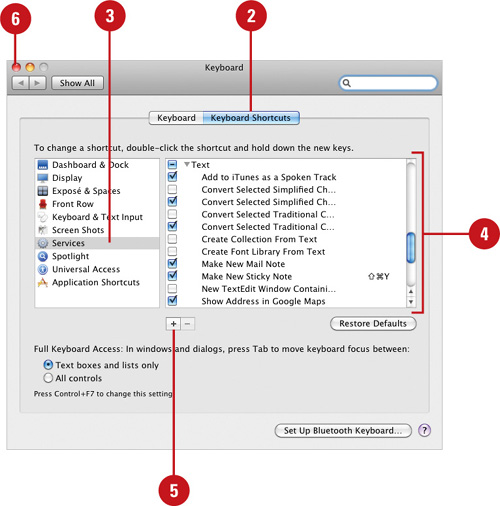
Application Services are a Mac OS X feature that lets you efficiently use content from one application to another application. Services are available on the Application menu in an application, such as TextEdit or Finder, based on the situation or in a shortcut (context) menu (New!). For example, you could use the Services option to send selected text information in an e-mail, or make a sticky note in TextEdit. In Snow Leopard, you can individually disable or enable each service in the Keyboard preferences (New!). With Automator, you can now build your own services, making a repetitive task simple to use (New!).

- Click the System Preferences icon in the Dock, and then click the Keyboard icon.
- Click the Keyboard Shortcuts tab.
- Click Services in the left column.
- Select or clear the check boxes next to the services you do or don’t want under the task type, such as Text, Internet, or Pictures.
- To add services, click the Add (+) button, select an application, type a menu title, and specify a keyboard shortcut, and then click Add.
- Click the Close button.
When you work on a computer, you’re utilizing applications that are stored on the computer’s hard drive. As you work, you’re accessing and writing files back to the hard drive. For example, you open MS Word, create a document, and then save it using the name: MyLetter.doc.
Mac OS X stores files and programs on your hard drive using a system of tracks and sectors; similar to a pie cut into equal triangular pieces. In addition, Mac OS X divides the hard drive into logical file systems, which can help you organize your files and projects.
When you open your hard drive, you’ll see that Mac OS X has created several folders to organize your creative efforts. There’s a folder for applications, and a folder for the System files—there’s even a folder that contains all the users for the particular computer, and another for your documents.
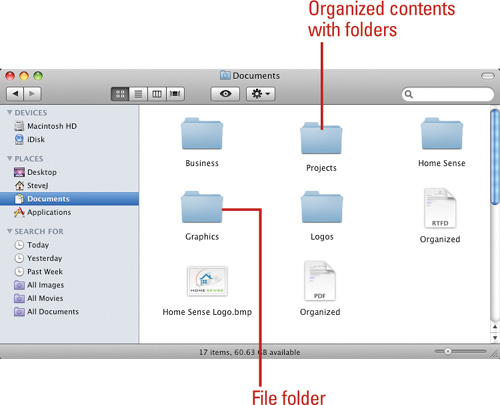
Typically, when you load an application for the first time, you’re asked to hold the application within the Applications folder. This gives Mac OS X the ability to control the program, and even helps you when it comes time to check for updates. As you use your computer, you’ll probably begin adding folders for your various projects. It’s important that you create a disk file system that’s well organized. Well organized file systems help you locate and retrieve files quicker and, if properly created, help you to move them from machine to machine. For example, you create a project folder for a major video project: everything that pertains to that project (video, audio, files, text, graphics), are all organized into folders within that one folder. When it come times to publish, move, or archive that information, all your files are conveniently organized in one location.
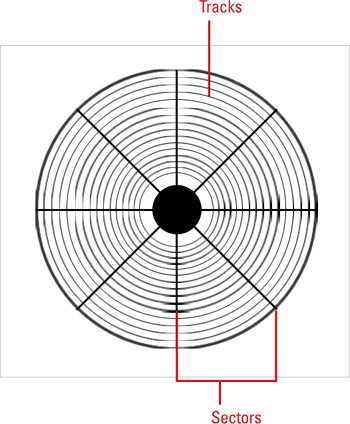
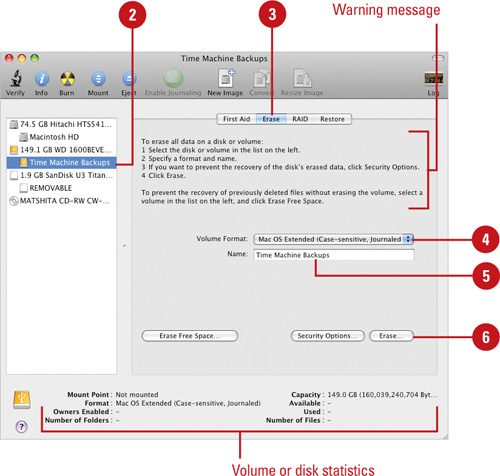
Computers are wonderful devices; however, it’s the information they hold that makes them important. Not only is that information important on your computer, it might also be something you want to send to someone else or archive. In order to send or archive, you’ll first need a disk. When you format a disk, you’re actually telling the operating system to scrub the disk of all information, and prepare it for use. Make sure you backup any important data before performing the formatting operation. When using the Disk Utility to copy, Mac OS X creates a mirror copy of the original. This differs from dragging and dropping a file onto a disk icon. When you drag and drop, the OS places the new files in whatever space is available. However, when you use Disk Utility, it places the files in exactly the same tracks and sectors as the original.
- Click the Applications folder in the Dock, click the Utilities folder, and then click the Disk Utility icon.
- Select the volume (disk) you want to format (you cannot format the startup drive).
- Click the Erase tab.
- Click the Volume Format pop-up, and then select from the following options:
Mac OS Extended (Journaled). Uses the same HFS Plus filing system as Mac OS Extended, and keeps a journal of your activities. Journaling makes for shortened startup times, and helps in the event of a crash.
Mac OS Extended. Formats the disk using HFS Plus filing system (helps to compress files and maximize file space).
UNIX File System. Formats a disk for use on a UNIX system.
MS-DOS File System. If available, formats a disk for use on a Windows (MS-DOS) system.
- Type a Name for the formatted disk.
- Click Erase.
- Click the Applications folder in the Dock, click the Utilities folder, and then click the Disk Utility icon.
- Click the Restore tab.
- Drag a disk image into the Source input box (the disk to copy).
- Drag a disk image from the Disk Volume column into the Destination input box (the disk to copy onto).
- Select the Erase Destination check box to instruct the OS to erase the Destination drive before performing the copy (recommended).
- Click Restore.

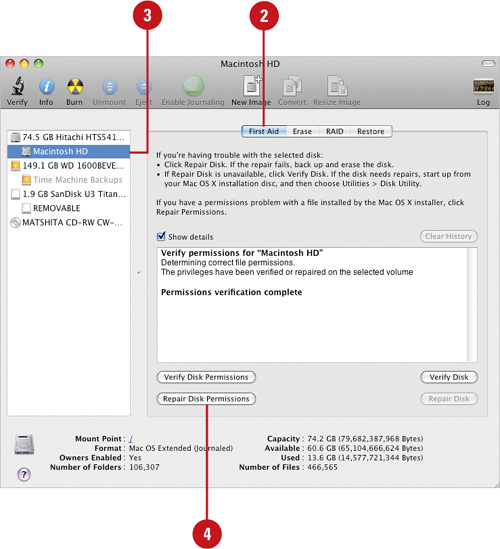
It’s not unusual for a hard drive to experience problems. When problems occur on the main hard drive, it can produce lock ups and slower performance. Apple helps to solve this problem by letting you perform disk repairs to any drives with the exception of the start up drive. For example, you could use disk repair to fix problems on a damaged JAZZ drive, or a secondary hard drive. Apple’s Disk Utility locates and fixes problems with catalog and storage files. When information in these areas is damaged, it can cause trouble opening files and slowing down performance.

Your computer uses a storage device to hold applications and data. Typically this would be the main hard drive. Not only is the storage of that information important, but timely retrieval is also an important consideration. Every computer user wants their system to run as efficiently as possible. Faster computers should perform operations such as: opening applications, saving files, and performing normal operations faster than older computers. However, you may notice that after a while your computer doesn’t seem to be operating as fast as it did previously—files that took a few seconds to open now take a minute. The problem lies in the optimization of the hard drive, and Snow Leopard gives you several ways to optimize your hard drive. Benchmark tests reveal that keeping your hard drive in tiptop shape, actually makes the drive perform eight to ten percent faster. That means programs operate faster, opening and working on graphic files is faster; everything is faster. Time spent in optimizing your hard drive is time well spent.
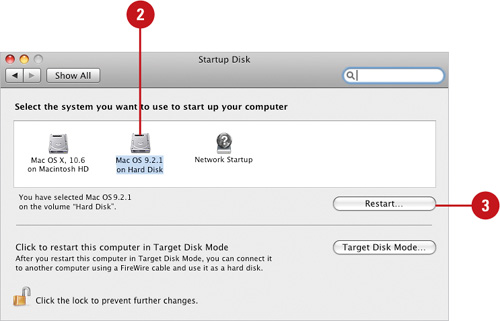
Mac OS X Snow Leopard doesn’t support the Classic environment, so if you want to use Mac OS 9, you need to install it on a different disk or partition disk. When you want to use Mac OS 9, you can use the Startup Disk pane in System Preferences to set Mac OS 9 as your startup disk. When you restart your computer, Mac OS 9 starts. In Mac OS 9, you need to use the Startup Disk control panel in the Apple menu to switch back to your Mac OS X startup disk and use Mac OS X features. If Mac OS 9 is not available in the Startup Disk preference pane, your computer only starts in Mac OS X, which happens on some newer computers. Check your documentation or Apple support for details.
- Click the System Preferences icon in the Dock, and then click the Startup Disk icon.
- Click the Mac OS 9 icon system folder you want to use as the startup disk.
An alert message appears, asking for confirmation.
- Click Restart, and then click Restart again as confirmation.
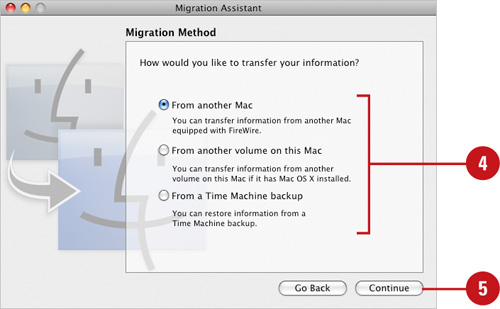
Instead of trying to re-create Macintosh settings manually from an old computer on a new Macintosh computer, you can use the Migration Assistant. With a FireWire cable connecting the two computers using Mac OS X, you can use the Migration Assistant to transfer important files and Macintosh settings from one computer to another. The Migration Assistance can transfer user accounts, applications, network and computer settings, files, and volumes. Before you can use the Migration Assistant, you need the administrator user name and password to gain access.
- Click the Applications folder in the Dock, click the Utilities folder, and then click the Migration Assistant icon.
- Read the welcome screen, and then click Continue.
- Enter the administrator name and password, and then click OK.
- Select the migration method you want to use:
From another Mac. Transfers information from another Mac using a FireWire.
From another volume on this Mac. Transfers information from another volume on this Mac.
From a Time Machine backup. Restores information from a Time Machine backup.
- Click Continue.
- Follow the on-screen instructions for your migration option, which includes selecting the information you want to transfer; steps vary depending on your migration method.
- Click Transfer.
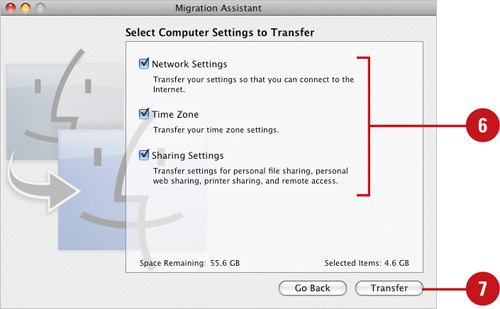
- When the process is complete, click Done.
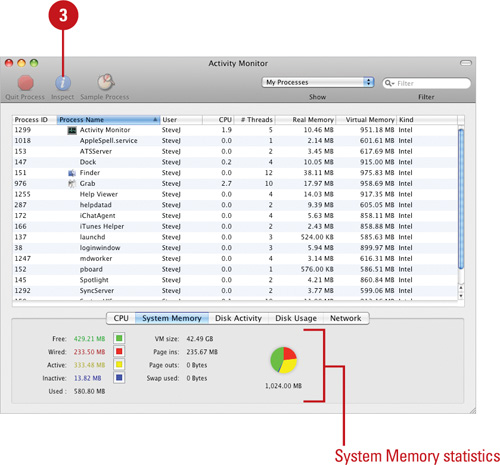
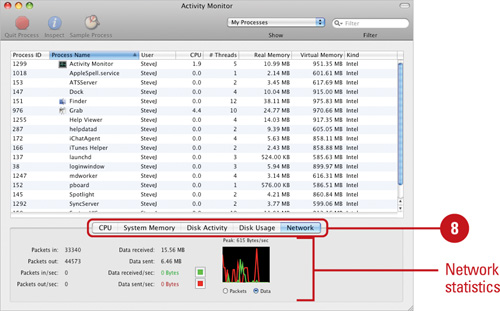
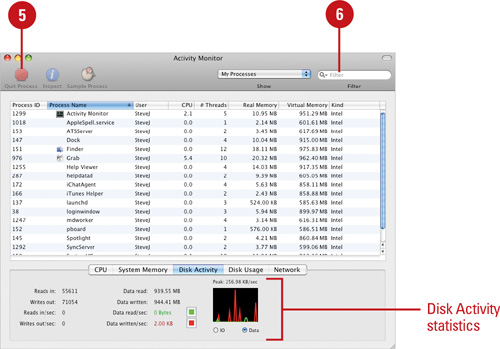
Mac OS X lets you view exactly how much processor power the various files and applications you have open are using, by utilizing the Activity Monitor. The Activity Monitor is a highly accurate tool that gives you up-to-date information on the various operations currently being used on your computer. It gives you the ability to view the process on a live graph, and even to halt various processes. In addition, if you own a multi-processor Mac, you’ll see a separate graph for each processor to let you know how well the operating system is dividing the load.
- Click the Applications folder in the Dock, click the Utilities folder, and then click the Activity Monitor icon.
- Select a process from the available options.
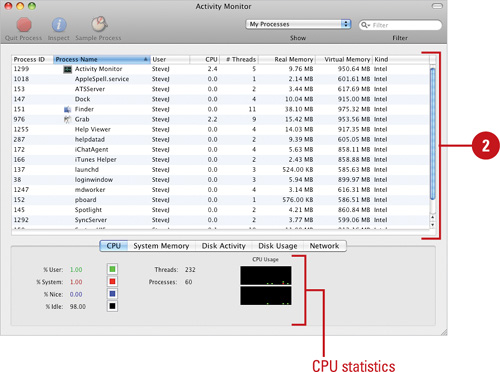
- To view more information, click the Inspect button.
- To save the current process list, click the File menu, and then click Save.
- To force a quit of the selected process, click the Quit Process button.
- To search for a specific process, enter a search string in the Filter field.
- To view selected processes, click the Process pop-up.

- Select from the following monitoring tabs:
CPU. Select to view a graph of the process currently active.
System Memory. Select to view the current distribution of system memory.
Disk Activity. Select to view information on the current disk activities.
Disk Usage. Select to view disk usage on the selected disk (click the Disk pop-up to select a disk).
Network. Select to view the current activity across the network.
- Click the Close button.
The Console utility is a viewer that displays all the text-based messages sent between the Macintosh operating system, and all open applications. While this utility may seem a bit much for the average Macintosh user, it’s of great value to programmers, or would-be programmers, because it gives you information on how the operating system communicates with OS X applications.
- Click the Applications folder in the Dock, click the Utilities folder, and then click the Console icon.
- Click Show Log Lists, and then select from the available Console logs.
- To erase the current log, click Clear Display.
- To reload the active log, click Reload.
- To add a day/date stamp to the log, click Insert Marker.
- To look for a specific function, type a search value into the Filter field.

- To add or subtract buttons from the Console toolbar, click the View menu, and then click Customize Toolbar. Select the item to add or subtract.
- To change the font used in displaying Console messages, click the Font menu, and then click Show Fonts.
- If necessary, make any changes to the Font family and size.
 Click the Close button.
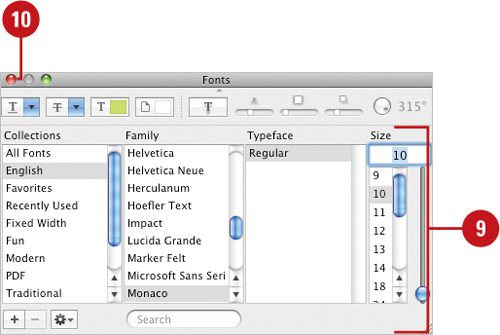
 Click Done.
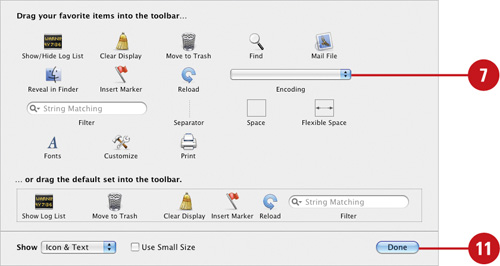
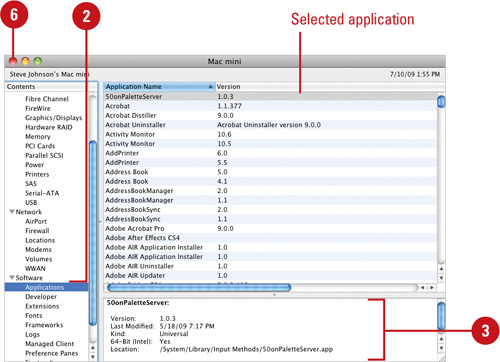
The System Profiler gives you an exact record of what applications you have installed on your computer; along with information on the installed hardware, system extensions, and current network. It’s a great place to go, if you’re curious about what you’ve got. For example, the System Profiler not only gives you information on your installed applications, it also tells what version (including patches) you’ve got, and the last time you updated it. The System Profiler also gives you detailed information on your processor; its speed, and any external devices, such as your hard drives and scanners.
- Click the Applications folder in the Dock, click the Utilities folder, and then click the System Profiler icon.
- Select an item from the Contents column.
- View information on the selected item in the Info window.
- Click the View menu, and then select from Short Report, Standard Report (default), or Extended Report.
- Click the File menu, and then click Save Print or Export the current report.
- Click the Close button.
Did You Know?
You can use System Profiler to check if you have a CD or DVD recordable drive on your computer. Launch System Profiler from the Utilities folder, click the triangle to expand the Hardware category, click the ATA (internal), USB, FireWire, or SCSI category, and then look for CD-R, DVD-R, CD-RW, or DVD-RW. Any of these means you can burn a CD or DVD. If it says simply CD or DVD, then you can’t.
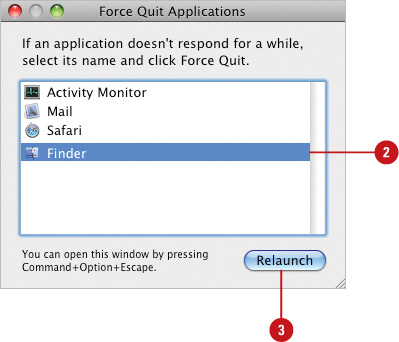
When OS X was first unveiled to the Apple community, many users sat back and waited to see how this new operating system would fit into the Mac world, and over the years, it has won over even its harshest critics. With its ability to process information ultra fast, and its UNIX base, it has become the system of choice for the discriminating Mac user. Apple OS X is the first “true” multi-processing operating system to appear in the Mac market. When you open a program, the UNIX-based operating system runs the application within a protected area of the CPU memory. When a second program is opened, it gets its own CPU working areas. What that means to you is that a program crash no longer means restarting your computer. All you have to do is force the program to quit. In the event of a system lockup, you can even instruct the operating system to force a restart.